manuals.online logo
Brands
  1. Home
  2. •
  3. Brands
  4. •
  5. Lunos
  6. •
  7. Fan
  8. •
  9. Lunos RA 15-60 User manual

Lunos RA 15-60 User manual

9
I DE Einbauanleitung
für den Radial-Rundkanallüfter
Typ RA 15-60
- Bitte an den Nutzer weiterleiten -
II EN Installation Manual
for the Radial Wall-Tube Fan
Type RA 15-60
- Please pass on to user -
10
Content:
About this manual
Safety instructions, Disposal
Technical data, Shipping units
Installation examples
Assembly: Assembly tube
Assembly: Motor unit and electrical connection
Filter replacement, Cleaning
Additional parts and replacement parts
Page:
10
10
11
12
13
14
16
16
About this manual
Safety instructions
Disposal
The packaging must be sorted before disposal. If you wish to dispose of the ventilation device, observe the
currently applicable regulations. Pursuant to the German Electrical and Electronic Equipment Act
(ElektroG) this device can be returned to your municipal collection point free of charge.
Installation manual EN
Read this manual carefully and completely before assembly! Always observe the general safety instructions and the
safety symbols with information in the text.
Hand out this manual to the user (tenants, proprietors, property management etc.) after completing assembly.
Symbols in this manual:
This sign warns you against risks of injury
This sign warns you against risks of injury from electricity
Fans must not be
installed for usage
as extractor hood.
Caution! Any assembly work to the ventilation device may only be carried out after disconnecting the
supply voltage! The ventilation device is fitted with protective insulation according to Protection Class II; a pro-
tective conductor connection is not required!
Attention! The electrical connection may only be made by authorised qualified personnel and accord-
ing to the applicable version of VDE 0100!
Attention! This device must not be operated by children and persons (filter replacement / cleaning)
who are not able to operate the device safely due to their physical, sensory or mental abilities or their inexperi-
ence or lack of knowledge.
Fans for exhaust air operation must at any time be provided with a continued flow of outside air.
11
Technical data EN
Shipping units Please check the delivery for completeness and mint condition
Electrical connection
Supply voltage: 12 VDC SELV Connected load: 28 W (start-up)
Protection class: II Power consumption:
Protection type: IP 20 Low stage (15 m³/h) 0,6 W
Middle stage (30 m³/h) 1,3 W
High stage (60 m³/h) 7,2 W
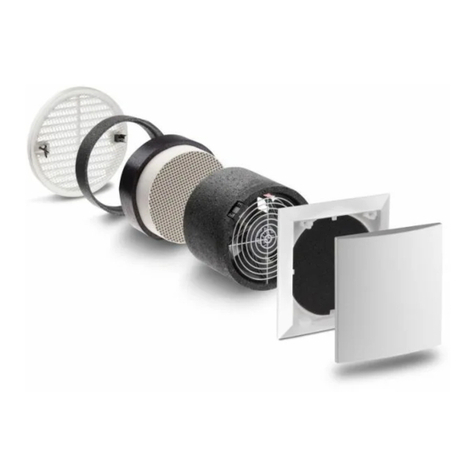
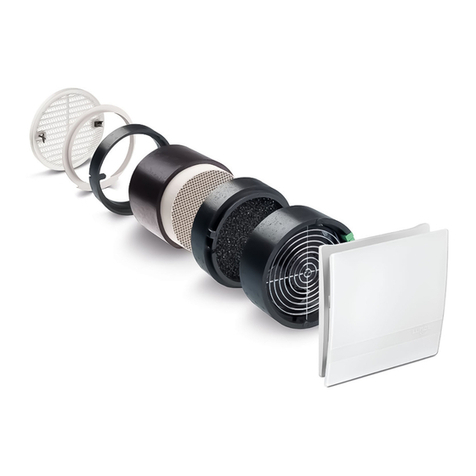
Assembly tube Outer grille
Tube DA 160 mm
Plaster protection cap
RA 15-60 Built-in device Inner screen
Type 9/IBE
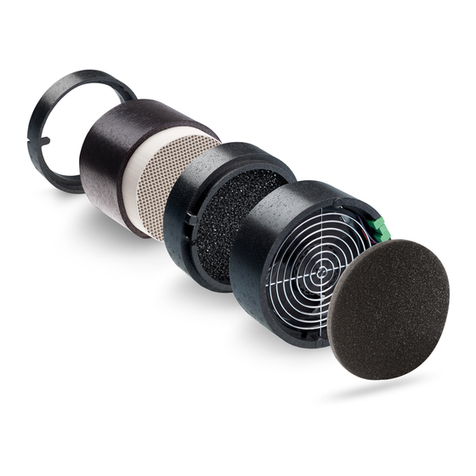
Sound insulation ring
Star-shaped sound
absorbers
Fan with cable
Sound insula-
tion mat Attention! The filter is included in
the shipping unit
RA 15-60 built-In device
Alternative inner screens see price-
list or available on request
Alternative external closures see pricelist
or available on request!
12
Installation examples EN
Dimensions in mmStandard length
500 mm
Star-shaped sound absorbers Sound insulation mat Outer grille
Inner screen 9/IBE Sound insulation ring Fan
Other installation lengths:
Please observe the
differing number of star-
shaped sound absorbers
to be inserted!
The pictured order of the
elements in the tube must
always be observed!
The sound insulation mat
must be inserted with the
thicker side towards the
outer grille! If necessary,
shorten the sound insulati-
on mat from the outside.
inside outside
13
Assembly: Assembly tube EN
Prepare wall openings for the assembly tube
(e.g. via core drilling, core bit Ø162 mm). If
necessary, shorten the tube to the installation
length required (min. 243 mm). In doing so,
ensure the necessary excess length of the
tube on both sides to bridge the plaster thick-
ness (after plastering, the tube must be flush
with the plaster or flush with the wall or insu-
lation in the case of outer grilles to be plas-
tered). Insert the tube and seal it all around
(assembly adhesive Order No. 038 733).
①
inside outside
Plaster protection cap
3 mm
Other outer grilles available on request!
Apply the internal and external plaster. In the
case of an external closure to be plastered,
first replace the plaster protective cap outside
with the external closure.
Remove the plaster protection cap outside.
Mount the outer grille using the integrated
claw fasteners (tighten the screws).
Note:
The solid plastic outer covers provided by
LUNOS ensure high resistance to driving rain
and can be used in Stress Group III pursuant
to DIN 4108-3 (2014-11). Metal or metal-
coated covers can be used in Stress Group I
pursuant to DIN 4108-3 (2014-11).
In the case of buildings exposed to wind or
the risk of strong winds and rain to the outer
covers, further measures of weather protec-
tion may be required.
②
➂
inside outside
Tighten the claw fasteners with screws
14
Assembly: Motor unit and electrical connection EN
Slit the cable duct and tube (2 cm deep).
Only slit the tube vertically or horizontally!
Insert the mains cable at an appropriate
length into the tube. Depending on the
length of the assembly tube, make sure that
the mains cable is long enough to reach the
connector plug of the motor!
Slit the tubes only
in these four sec-
tions.
vertically
horizontally
Safety Instructions:
Caution! Any assembly work to the ventilation device may only be carried out after disconnecting all poles of
the supply voltage!
Make sure that the supply voltage of all connection lines is voltage-free (dead)! (Separation from the power
supply with a minimum contact opening of 3 mm, e.g. electric fuse separating all poles).
Each electric circuit of this ventilation system must be fitted with a residual current protection (e.g. FI switch/
RCCB)!
Electrical connection only by a specialist!
Additional installations and electrical components in this ventilation system are not admissible!
Observe length!
Strip and insulate the connection cable.
The motor is operated with 12 V DC. The
setting of the airflow levels is carried out via
the control line (purple). The motor can also
be operated via several controls supplied by
LUNOS.
All controls are supplied with installation
manuals including connection diagrams!
Mount the mains cable to the plug. After
putting together the plug, fix the connection
by screwing it together.
Motor-
cable
Mains cable
red blue
purple
Screw together!
15
DE
Insert the sound insulations (if necessary,
slit for better postioning of the mains cable)
and the motor unit into the assembly tube.
Position the mains cable between the
sound absorbers and the tube wall!
Insert the internal closure with filter. Snap
the inner screen into place in open position!
Done!
open
closed
Observe the order!
Insert and push to the
outer grille. At first, mea-
sure and, if necessary,
shorten the tube length!
See also “Installation exa-
mples“!
Position the star-shaped sound-absorbers in a
staggered arrangement towards one another!
16
Filter replacement EN
LUNOS Germany
LUNOS Lüftungstechnik GmbH Phone +49 30 362 001-0
für Raumluftsysteme Fax +49 30 362 001-89
Wilhelmstr. 31 [email protected]
13593 Berlin ∙ Germany www.lunos.de
E 97/06.16
Filter replacement date Expected filter replacement Type of filter used
Please enter the filter changes you have carried out:
A dirty filter is signalled by the filter
change indicator. For information on
how this is done, please refer to the
description of the control that you use.
Remove cover, take filter out, insert new
or cleaned filter (filters can be cleaned
e.g. in a dishwasher), put cover back on.
The ventilation openings must not be
obstructed or covered.
Cleaning
If necessary, wipe the inner screen and covering frame with a dry soft cloth.
Filter replacement and cleaning must not be carried out by children or by persons who are not able to ope-
rate the device safely due to their physical, sensory or mental abilities or their inexperience or lack of
knowledge.
Additional parts and replacement parts
Filter
Inner screen compl. 9/IBE Order No.: 039 851
Replacement filters 9/FIB3R three-pack Order No.: 037 214
Outer grilles:
Type 1/WE 180 white Order No.: 039 852
Type 1/RE 180 red-brown Order No.: 039 854
Type 1/BE 180 sanded Order No.: 039 917
Outer grilles for plastering available on request

Other manuals for RA 15-60

2

Other Lunos Fan manuals

Lunos e2 Series User manual

Lunos

Lunos e2 Series User manual

Lunos RA 15-60 User manual

Lunos

Lunos RA 15-60 User manual

Lunos 3/UP-AS Manual

Lunos

Lunos 3/UP-AS Manual

Lunos AB 30/60 User manual

Lunos

Lunos AB 30/60 User manual
Lunos AB 30/60 User manual

Lunos

Lunos AB 30/60 User manual

Lunos fgo User manual

Lunos

Lunos fgo User manual

Lunos e2 60 User manual

Lunos

Lunos e2 60 User manual

Lunos AB 30/60 User manual

Lunos

Lunos AB 30/60 User manual

Lunos Silvento EC User manual

Lunos

Lunos Silvento EC User manual
Lunos Skalar Series Manual

Lunos

Lunos Skalar Series Manual

Lunos ALD Manual

Lunos

Lunos ALD Manual

Lunos Ne t Series User manual

Lunos

Lunos Ne t Series User manual

Lunos e2 mini User manual

Lunos

Lunos e2 mini User manual

Lunos EAU 100 User manual

Lunos

Lunos EAU 100 User manual
Lunos Silvento EC User manual

Lunos

Lunos Silvento EC User manual

Lunos 9/WDS User manual

Lunos

Lunos 9/WDS User manual

Lunos Silvento EC User manual

Lunos

Lunos Silvento EC User manual

Lunos 3/UP-BR Manual

Lunos

Lunos 3/UP-BR Manual

Lunos eGO User manual

Lunos

Lunos eGO User manual

Lunos e2 mini User manual

Lunos

Lunos e2 mini User manual

Lunos Silvento User manual

Lunos

Lunos Silvento User manual

Lunos e2 mini User manual

Lunos

Lunos e2 mini User manual

Lunos e2 mini User manual

Lunos

Lunos e2 mini User manual

Lunos Silvento ec User manual

Lunos

Lunos Silvento ec User manual

Popular Fan manuals by other brands

SNOWJOE SUNJOE 24V-MSTFAN-LTE-RM Operator's manual

SNOWJOE

SNOWJOE SUNJOE 24V-MSTFAN-LTE-RM Operator's manual

Craftmade Cameo CB60 Specifications

Craftmade

Craftmade Cameo CB60 Specifications

S&P OZEO E ECOWATT Series installation manual

S&P

S&P OZEO E ECOWATT Series installation manual

Air Specialties Express VE Installation, operating and maintenance instructions

Air Specialties Express

Air Specialties Express VE Installation, operating and maintenance instructions

Hunter Dublin installation manual

Hunter

Hunter Dublin installation manual

Pacific International Fans EM-E installation manual

Pacific International Fans

Pacific International Fans EM-E installation manual

Bimar FES-45 Instruction booklet

Bimar

Bimar FES-45 Instruction booklet

Fanaway EVO3 Installation instructions manual

Fanaway

Fanaway EVO3 Installation instructions manual

Broan SOLITAIRE Series installation instructions

Broan

Broan SOLITAIRE Series installation instructions

Geovent MEF Series instruction manual

Geovent

Geovent MEF Series instruction manual

Vornado Traditions 125ST owner's guide

Vornado

Vornado Traditions 125ST owner's guide

Soleus Air FT1-20-10 user guide

Soleus Air

Soleus Air FT1-20-10 user guide

Turbo TTF-M3 instruction manual

Turbo

Turbo TTF-M3 instruction manual

S&P AIRPUR-N manual

S&P

S&P AIRPUR-N manual

Juwent WD-16 instruction manual

Juwent

Juwent WD-16 instruction manual

Maico ESQ 25/4 Mounting and operating instructions

Maico

Maico ESQ 25/4 Mounting and operating instructions

Kichler Lighting Arkwet Weather+ instruction manual

Kichler Lighting

Kichler Lighting Arkwet Weather+ instruction manual

Ellington Regatto REG54BNK3 installation guide

Ellington

Ellington Regatto REG54BNK3 installation guide

manuals.online logo
manuals.online logoBrands
  • About & Mission
  • Contact us
  • Privacy Policy
  • Terms and Conditions

Copyright 2025 Manuals.Online. All Rights Reserved.