manuals.online logo
Brands
  1. Home
  2. •
  3. Brands
  4. •
  5. M-system
  6. •
  7. Transmitter
  8. •
  9. M-system Mini-M M2LCS User manual

M-system Mini-M M2LCS User manual

Other M-system Transmitter manuals

M-system W5FV User manual

M-system

M-system W5FV User manual

M-system 6R User manual

M-system

M-system 6R User manual

M-system W2XM User manual

M-system

M-system W2XM User manual

M-system M6SVF User manual

M-system

M-system M6SVF User manual

M-system M2EXS User manual

M-system

M-system M2EXS User manual

M-system 6PA User manual

M-system

M-system 6PA User manual

M-system M3LV User manual

M-system

M-system M3LV User manual

M-system Mini-M M2EXT User manual

M-system

M-system Mini-M M2EXT User manual

M-system Mini-M M2RT User manual

M-system

M-system Mini-M M2RT User manual

M-system M1EXS-2 User manual

M-system

M-system M1EXS-2 User manual

M-system M1EXV-4 User manual

M-system

M-system M1EXV-4 User manual

M-system CTH User manual

M-system

M-system CTH User manual

M-system M5CT-5AM User manual

M-system

M-system M5CT-5AM User manual

M-system W2RS1 User manual

M-system

M-system W2RS1 User manual

M-system Mini-M M2RS1 User manual

M-system

M-system Mini-M M2RS1 User manual

M-system Mini-M M2VS User manual

M-system

M-system Mini-M M2VS User manual

M-system M5 Series User manual

M-system

M-system M5 Series User manual

M-system M3SXT User manual

M-system

M-system M3SXT User manual

M-system F2SP User manual

M-system

M-system F2SP User manual

M-system M5XCRS User manual

M-system

M-system M5XCRS User manual

M-system B5VS User manual

M-system

M-system B5VS User manual

M-system W2VS User manual

M-system

M-system W2VS User manual

M-system TM User manual

M-system

M-system TM User manual

M-system 27RS User manual

M-system

M-system 27RS User manual

Popular Transmitter manuals by other brands

Seneca K120RTD installation manual

Seneca

Seneca K120RTD installation manual

Nautel GV40 installation manual

Nautel

Nautel GV40 installation manual

HumanTechnik cm-light operating instructions

HumanTechnik

HumanTechnik cm-light operating instructions

INOR APAQ C130 TC User instructions

INOR

INOR APAQ C130 TC User instructions

Linear DXS-64 operating instructions

Linear

Linear DXS-64 operating instructions

FeinTech ABT00102 instruction manual

FeinTech

FeinTech ABT00102 instruction manual

Geo Web Pack quick start guide

Geo

Geo Web Pack quick start guide

Inovonics EchoStream EN1210W installation instructions

Inovonics

Inovonics EchoStream EN1210W installation instructions

IKONNIK KA-6 quick start guide

IKONNIK

IKONNIK KA-6 quick start guide

Rohde & Schwarz SR8000 Series System manual

Rohde & Schwarz

Rohde & Schwarz SR8000 Series System manual

Audio Technica UniPak ATW-T93 Installation and operation

Audio Technica

Audio Technica UniPak ATW-T93 Installation and operation

NIVELCO EasyTREK SCA-300 Series Programming manual

NIVELCO

NIVELCO EasyTREK SCA-300 Series Programming manual

Honeywell 5816WMBR installation instructions

Honeywell

Honeywell 5816WMBR installation instructions

Kamstrup READy MTU Installation and operation guide

Kamstrup

Kamstrup READy MTU Installation and operation guide

Omega ZW Series user guide

Omega

Omega ZW Series user guide

ABB Field 264H Instructions for installation

ABB

ABB Field 264H Instructions for installation

Dejero EnGo 3x manual

Dejero

Dejero EnGo 3x manual

Rosemount 4600 Reference manual

Rosemount

Rosemount 4600 Reference manual

manuals.online logo
manuals.online logoBrands
  • About & Mission
  • Contact us
  • Privacy Policy
  • Terms and Conditions

Copyright 2025 Manuals.Online. All Rights Reserved.

5-2-55, Minamitsumori, Nishinari-ku, Osaka 557-0063 JAPAN
Phone: +81(6)6659-8201 Fax: +81(6)6659-8510 E-mail: info@m-system.co.jp
EM-5047 Rev.5 P. 1 / 3
INSTRUCTION MANUAL
Mini-M™
STRAIN GAUGE TRANSMITTER MODEL M2LCS
BEFORE USE ....
Thank you for choosing M-System. Before use, please check
contents of the package you received as outlined below.
If you have any problems or questions with the product,
please contact M-System’s Sales Office or representatives.
■PACKAGE INCLUDES:
Signal conditioner (body + base socket).............................(1)
■MODEL NO.
Confirm Model No. marking on the product to be exactly
what you ordered.
■INSTRUCTION MANUAL
This manual describes necessary points of caution when
you use this product, including installation, connection and
basic maintenance procedures.
POINTS OF CAUTION
■NONINCENDIVE APPROVAL OPTION
• This equipment is suitable for use in Class I, Div. 2,
Groups A, B, C and D or Non-Hazardous Locations only.
• WARNING! Before You Remove the Unit from Its Base
Socket or Mount It, Turn Off the Power Supply and Input
Signal for Safety.
• WARNING! – Explosion Hazard –
Substitution of Components May Impair Suitability for
Class I, Div. 2.
• WARNING! – Explosion Hazard –
Do Not Disconnect Equipment Unless Power Has Been
Switched Off or The Area is Known To Be Non-Hazardous.
• The equipment was evaluated for use in the ambient tem-
perature and relative humidity as mentioned in ‘ENVI-
RONMENT’ section.
• The input and output wiring must be in accordance with
Class I, Div. 2 wiring methods and in accordance with the
authority having jurisdiction for use in these hazardous
locations.
■CONFORMITY WITH EU DIRECTIVES OR UL
• This equipment is suitable for Pollution Degree 2 and In-
stallation Category II (transient voltage 2500V). Rein-
forced insulation (signal input or output to power input:
300V) and basic insulation (signal input to output: 300V)
are maintained. Prior to installation, check that the insu-
lation class of this unit satisfies the system requirements.
• Altitude up to 2000 meters.
• The equipment must be mounted inside a panel.
• The equipment must be installed such that appropriate
clearance and creepage distances are maintained to con-
form to CE/UL requirements. Failure to observe these
requirements may invalidate the CE/UL conformance.
• The actual installation environments such as panel con-
figurations, connected devices, connected wires, may affect
the protection level of this unit when it is integrated in
a panel system. The user may have to review the CE re-
quirements in regard to the whole system and employ ad-
ditional protective measures to ensure the CE conformity.
• Install lightning surge protectors for those wires connect-
ed to remote locations.
■POWER INPUT RATING & OPERATIONAL RANGE
• Locate the power input rating marked on the product and
confirm its operational range as indicated below:
100 – 240V AC rating: 85 – 264V (90 – 264V for UL),
47 – 66 Hz, approx. 3 – 5VA
24V DC rating: 24V ±10%, approx. 3W
11 – 27V DC rating: 11 – 27V, approx. 3W
110V DC rating: 85 – 150V (110V ±10% for UL), approx. 3W
■GENERAL PRECAUTIONS
• Before you remove the unit from its base socket or mount
it, turn off the power supply and input signal for safety.
■ENVIRONMENT
• Indoor use.
• When heavy dust or metal particles are present in the
air, install the unit inside proper housing with sufficient
ventilation.
• Do not install the unit where it is subjected to continuous
vibration. Do not subject the unit to physical impact.
• Environmental temperature must be within -5 to +55°C
(23 to 131°F) with relative humidity within 30 to 90% RH
in order to ensure adequate life span and operation.
• Be sure that the ventilation slits are not covered with ca-
bles, etc.
■WIRING
• Do not install cables close to noise sources (relay drive
cable, high frequency line, etc.).
• Do not bind these cables together with those in which
noises are present. Do not install them in the same duct.
■AND ....
• The unit is designed to function as soon as power is sup-
plied, however, a warm up for 10 minutes is required for
satisfying complete performance described in the data
sheet.
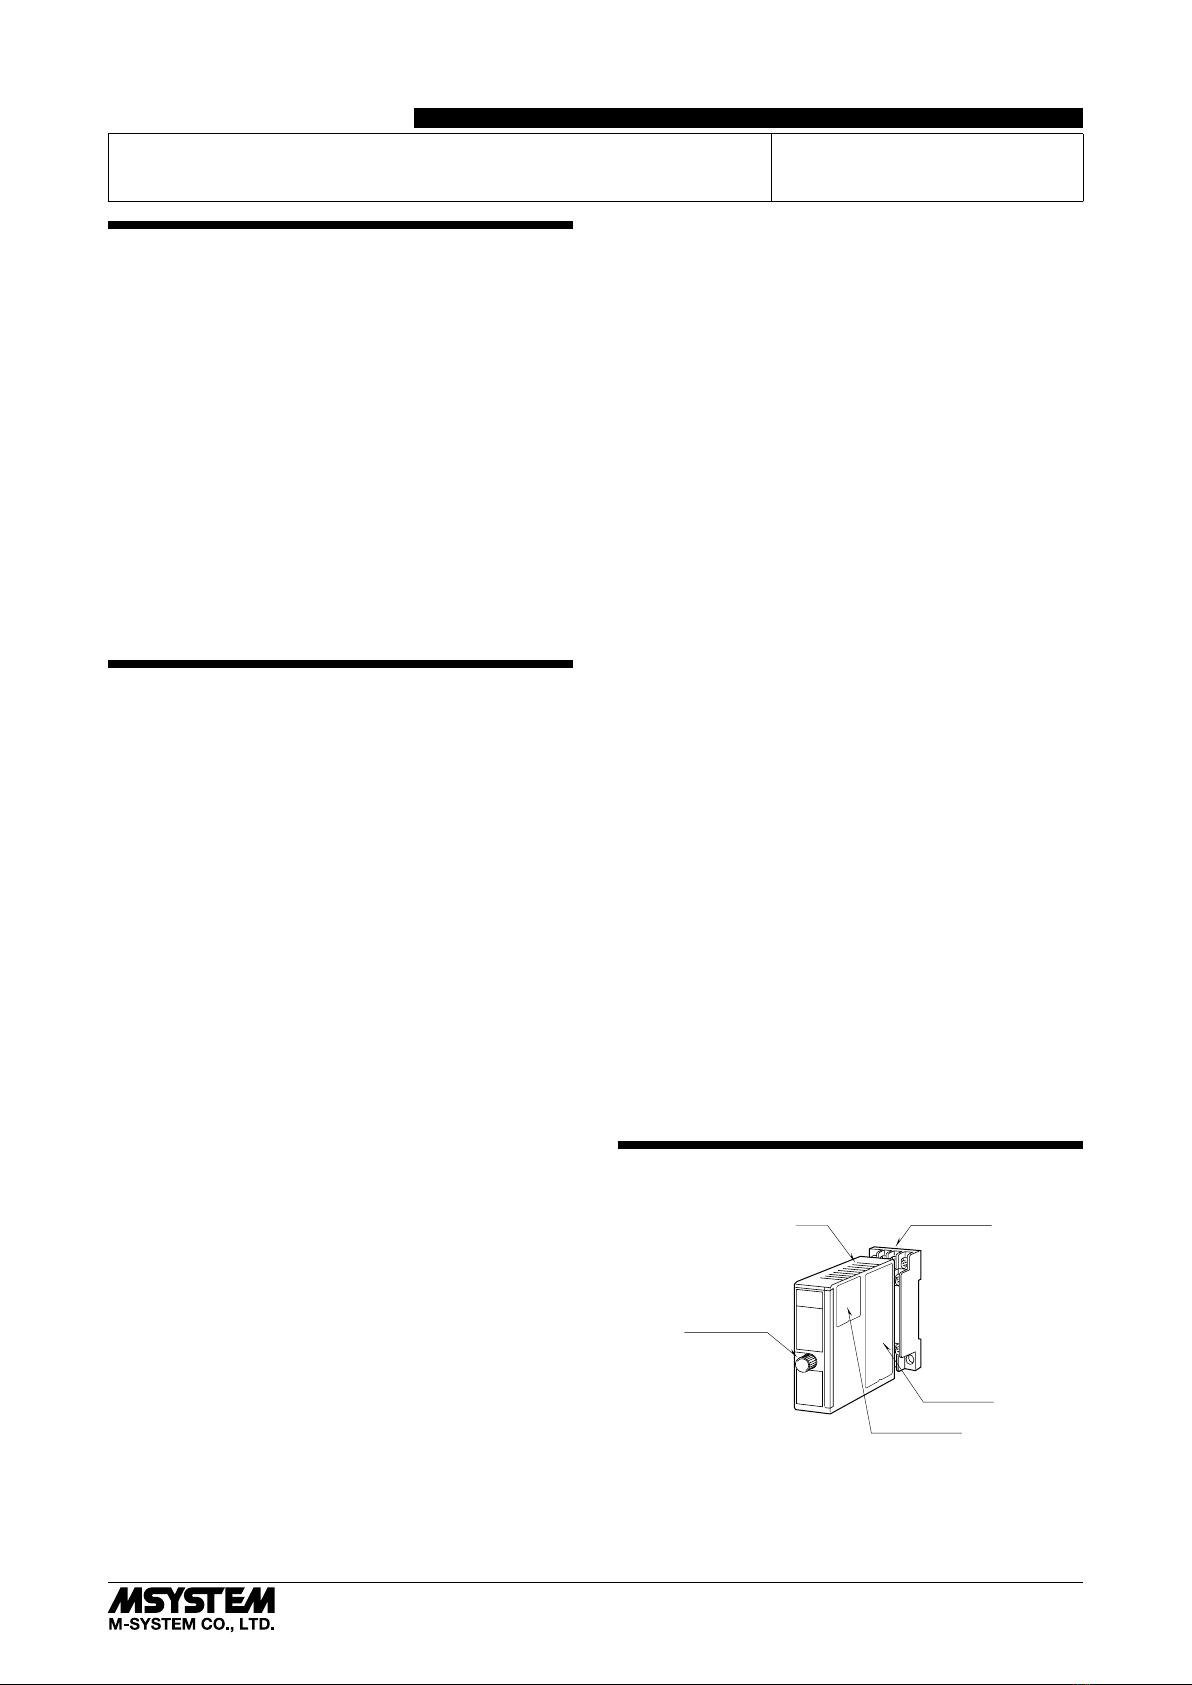
COMPONENT IDENTIFICATION
Model
Body Base Socket
Fixing Screw
Connection
Diagram
Specifications
M2LCS
5-2-55, Minamitsumori, Nishinari-ku, Osaka 557-0063 JAPAN
Phone: +81(6)6659-8201 Fax: +81(6)6659-8510 E-mail: info@m-system.co.jp
EM-5047 Rev.5 P. 2 / 3
INSTALLATION
Loosen the fixing screw at the front of the unit in order to
separate the body from the base socket.
DIN Rail
35mm wide
Spring Loaded
DIN Rail Adaptor
■DIN RAIL MOUNTING
Set the base socket so that
its DIN rail adaptor is at
the bottom. Position the
upper hook at the rear side
of base socket on the DIN
rail and push in the lower.
When removing the socket,
push down the DIN rail
adaptor utilizing a minus
screwdriver and pull.
■WALL MOUNTING
Refer to “EXTERNAL DIMENSIONS.”
TERMINAL CONNECTIONS
Connect the unit as in the diagram below or refer to the connection diagram on the side of the unit.
■EXTERNAL DIMENSIONS unit: mm (inch)
4
8 7
1011
56
123
9
21.5 (.85)
70.5 (2.78)
86.7 (3.41)7.3 (.29) 22 (.87)
6 (.23)
59 (2.32)
DIN RAIL
35mm wide
[4 (.16)]
11–M3
SCREW
72 (2.83)4 (.16)
29.5 (1.16)
2–4.2x5
(.17x.20)
MTG HOLE
6 (.24) deep
116.7 (4.59)
• When mounting, no extra space is needed between units.
■CONNECTION DIAGRAM
7
8
10
11
+
COM
–
1
4
5
2
3
+
–
STRAIN GAUGE
INPUT
EXC.
+
–
OUTPUT
U(+)
V(–)
POWER
WIRING INSTRUCTIONS
■SCREW TERMINAL
Torque: 0.8 N·m
■SOLDERLESS TERMINAL
Refer to the drawing below for recommended ring tongue
terminal size. Spade tongue type is also applicable.
Applicable wire size: 0.25 to 1.65 mm2(AWG 22 to 16)
Recommended manufacturer: Japan Solderless Terminal
MFG.Co.Ltd, Nichifu Co.,ltd
6 (.24) max
3.3 (.13) max
mm (inch)
M2LCS
5-2-55, Minamitsumori, Nishinari-ku, Osaka 557-0063 JAPAN
Phone: +81(6)6659-8201 Fax: +81(6)6659-8510 E-mail: info@m-system.co.jp
EM-5047 Rev.5 P. 3 / 3
CHECKING
1) Terminal wiring: Check that all cables are correctly con-
nected according to the connection diagram.
2) Power input voltage: Check voltage across the terminal
10 – 11 with a multimeter.
3) Strain gauge: Check the bridge resistance. The maxi-
mum current supplied to the strain gauge is 35mA.
4) Input: When applying maximum load, check voltage
across the terminal 1 (+) – 2 (–) equals Exc. × Strain
Gauge Sensitivity.
5) Output: Check that the load resistance meets the de-
scribed specifications.
ADJUSTMENT PROCEDURE
Fine Zero Adj.
Excitation Adj.
16-position
Coarse Zero Adj.
16-position
Coarse Span Adj.
Fine Span Adj.
Auxiliary
Coarse Zero Adj.
1) Excitation Adj.: The excitation voltage is calibrated at
the factory, therefore will not usually require adjustment,
except when used in combination with a strain gauge of
sensitivity other than described on the specifications.
In that case, adjust to the value calculated by the follow-
ing equation:
Excitation [V] = 5 [V] × a [mV/V]
b [mV/V]
where a:
Factory set sensitivity value marked on the product
b: User’s sensitivity value
Adjustable range is within 2V to 10V with bridge resist-
ance of 350Ω. When the calculated value exceeds 10V,
adjust it to 10V.
2) Coarse Zero Adj.: Tare adjustment. Approx. 5% of input
span adjusted with each increment. Max. 80% with 16
positions.
Without any load, adjust the output to 0%.
3) Fine Zero Adj.: Used for fine tare adjustment.
4) Coarse Span Adj.: Gain adjustment. 100 – 20% of input
span adjusted with 16 positions.
With 100% load, adjust the output to 100%.
5) Fine Span Adj.: Used for fine gain adjustment.
6) Coarse Zero Adj. (auxiliary): Used when the zero can-
not be adjusted with only the coarse and fine zero adjust-
ments.
After coarse adjustment, turn the fine zero adj. to the
middle position and adjust the output to zero.
When not in use, the trimmer should be turned fully
clockwise.
MAINTENANCE
Regular calibration procedure is explained below:
■CALIBRATION
Warm up the unit for at least 10 minutes. Apply 0%, 25%,
50%, 75% and 100% input signal. Check that the output
signal for the respective input signal remains within accu-
racy described in the data sheet. When the output is out of
tolerance, recalibrate the unit according to the “ADJUST-
MENT PROCEDURE” explained earlier.
LIGHTNING SURGE PROTECTION
M-System offers a series of lightning surge protector for
protection against induced lightning surges. Please contact
M-System to choose appropriate models.