Mackworth M Series User manual

M-Series Mobile Hoist
(M150, M160, M175 & M180)
User Manual

M-Series Mobile Hoist User Manual Page 2of 36 Part No. 999036 / Rev.6 / Mar 2018
User Manual Index Page
Symbols used 3
1. Introduction 4
2. Contraindications 5
3. Intended use / Overview of the M-Series Hoist 5 to 6
4. Unpacking 7
5. Hoist assembly instruction 8 to 9
6. Hoist safety advice 10
7. Operating the hoist 11
8. Folding for transportation / storage 12
9. Linak® Operating systems
9a Jumbo care system 13
9b Homecare system 13
10. How to charge the hoist battery 14
11. Daily maintenance checks 15
12. Maintenance and servicing 16 to 18
13. Recommended cleaning instruction 19 to 21
13. Generic spare parts listing 22
13. Technical spec 23 to 24
15. Slings 25
16. Carry bars 26
17. Fault finding / maintenance 26
18. Standards applied 27
19. Test certificate and Guarantee 28
19.1 Guarantee 29
20. Service record history
20.1 Initial information 30
20.2 Service record history 31 to 34
21. User notes 35
22. Contact details 36

M-Series Mobile Hoist User Manual Page 3of 36 Part No. 999036 / Rev.6 / Mar 2018
Symbols in use Index
Warning – Consult instructions for use
Caution – pinch point
Manufacturer
Please observe local laws on recycling
Two-person lift may be required
Refer to user manual
Date of manufacture
Serial number

M-Series Mobile Hoist User Manual Page 4of 36 Part No. 999036 / Rev.6 / Mar 2018
CAUTION: DO NOT ATTEMPT TO USE THIS EQUIPMENT
WITHOUT FIRST UNDERSTANDING THE CONTENTS OF THIS
MANUAL.
1. Introduction
The hoist can easily be operated by one person.
Before using this equipment, and to ensure the safe operation of your
Mobile Hoist, carefully read this entire manual, especially the section on
“Cautions”.
The hoist is designed to be used in conjunction with slings and
accessories. Please refer to any user guides supplied with these
components and refer to them while reviewing this manual.
Should any questions arise from reviewing this manual contact your local
authorised representative.
Failure to comply with warnings in this manual may result in injury to
either the operator, or the individual being lifted/transferred. Damage to
the mobile hoist and/or related components may also occur.
Be sure that the contents of this manual are completely understood
prior to using this mobile hoist. Store this manual with the documents
included with the mobile hoist and sling(s).
Contents of this manual are subject to change without prior written notice.
Ensure you are aware of the hoist manufacturer's fitting instructions.
Please identify if the hoist requires a loop or clip fitting. If a clip fit sling is
required, please refer to the enclosed clip instructions for use.
Do NOT use a clip fit sling on a loop designed spreader bar.
Do NOT use a loop designed sling on a stud/clip designed spreader bar.
For all other sling information/clip & hoist size compatibility, please refer
to page 22 of the General User Safety Guide.
To view our clip fitting video please visit:
www.mackworth-healthcare.com/training.
For general guidance for how to fit a sling, please visit:
www.mackworth-healthcare/category/guides.

M-Series Mobile Hoist User Manual Page 5of 36 Part No. 999036 / Rev.6 / Mar 2018
2. Contraindications
There are no known “contraindications” associated with the usage of the
mobile hoist and its accessories, provided they are used a per
manufacturer’s recommendations and guidelines.
However, it is recommended that a client specific assessment is
completed by a trained and knowledgeable health care professional to
determine the method of transfer.
The manufacturer does not recommend a required number of caregivers
for the use of our products. This information and recommendation can
only be provided after a thorough personalized, case specific assessment,
as there are many factors that can influence these decisions.
It is however, “obligatory” that a client that is assessed as being an
independent user of our ceiling hoist technology have the ability to
receive assistance, during the transfer, in the event of a hoist malfunction
or personal concern.
This assistance can be provided in the form of; a nearby qualified
caregiver, a phone, a communication device etc.
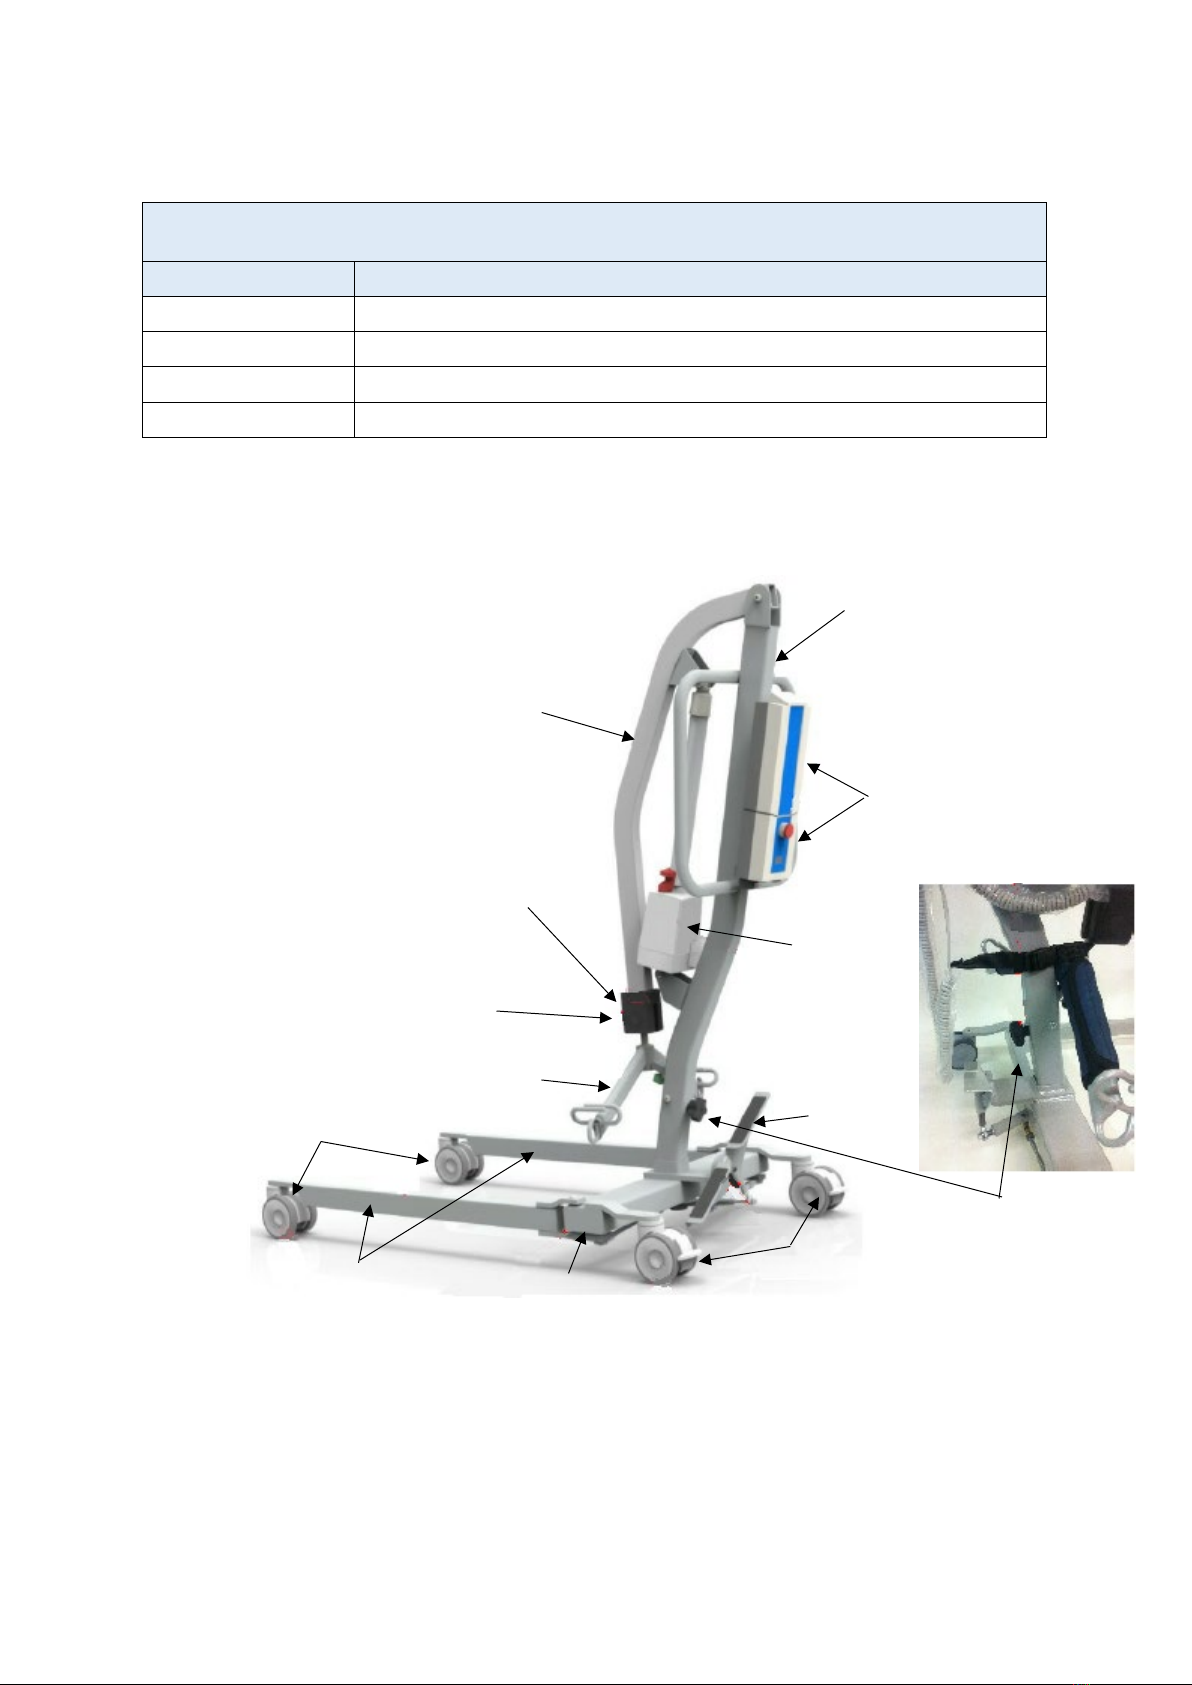
3. Intended use / Overview of the M-Series Mobile Hoists
The mobile hoist is a lifting aid used by health care professionals to
transfer / lift clients.
The mobile hoist makes it possible to move mobility impaired individuals
with minimal strain or risk to the caregiver, while providing complete
safety, dignity and comfort for the client.
The mobile hoist is one of two components that make up this
technology. The other component, the sling, is a specially designed fabric
accessory that attaches to the mobile hoist by means of a carry bar and
straps, and holds an individual while the hoist, or transfer takes place.
The sling is generally supplied with the mobile hoist at the initial time of
purchase.
Please refer to any user guides supplied with the sling and reference
them while reviewing this manual.
The mobile hoist has the ability to hoist an individual up from one
location such as bed, then move the individual to another location and
finally lower the individual into a chair for example.
The functions of lifting up or down, or opening and closing the legs on
the hoist, are accomplished by pressing buttons on the hand control. The
hand control is attached to the mobile hoist.
Due to the design of the mobile hoist system, it takes very little effort to
press a button to perform the desired motion.

M-Series Mobile Hoist User Manual Page 6of 36 Part No. 999036 / Rev.6 / Mar 2018
Please familiarise yourself with the components of the mobile hoist by
referring to the diagram below.
Model table for the M-Series of Mobile Hoists
Product code
Product description
M150 *
M150 Mobile Hoist (150kg SWL)
M160 *
M160 Mobile Hoist (160kg SWL)
M175 *
M175 Mobile Hoist (175kg SWL)
M180 *
M180 Mobile Hoist (180kg SWL)
* The numerical number in the product code relates to the SWL limits.
Illustration of key components
Boom
Mast
Control box
and battery
PU end
cover
M10 bolt & Nylon
lock nut *
Spreader bar
Front
castors
Legs
Base
Rear brake
castors
Foot
pedal
Actuator
Mast locking
hand wheel

M-Series Mobile Hoist User Manual Page 7of 36 Part No. 999036 / Rev.6 / Mar 2018
4. Unpacking
SAFETY NOTE: Some of the parts are heavy and will need to
be lifted with care. Heavier items may need two people to lift.
(Please refer to technical spec on page 20 to 21)
The hoist will arrive to you in a robust box and is folded in position,
please be careful when removing the hoist from the box. This is a two
man lifting operation or you can carefully remove the front of the box
and wheel the hoist out.
Please read the user guide in full before operating.
The hoist is fully assembled and load tested before it leaves our premises
and is supplied with a certificate of testing on page 25.
This handbook should be kept safe for future reference.
The Test Certificate is important and is valid for 6 months only, when the
certificate has expired it must be renewed, please refer to the LOLER
regulations for further advice or contact your local service provider.

M-Series Mobile Hoist User Manual Page 8of 36 Part No. 999036 / Rev.6 / Mar 2018
5. Hoist assembly instruction
The Assembled Hoist Carton Contains:
•Base fitted with 2 brake castors rear and 2 non-brake castors front
•Mast and boom assembly
•2 Point spreader bar complete with cover, and new M10 Bolt and
Nylon Lock Nut
•Mast locking hand wheel
•Hand set
•Battery Pack
•Control box
•Actuator
•Battery charging cable.
a. Carefully open the box (SAFETY NOTICE - Do not use a sharp knife /
edge) remove all loose parts / excess packaging from the carton.
b. Carefully lift the hoist out of the carton (SAFETY NOTICE - 2-person lift
recommended or remove the end of the carton and wheel the hoist out).
Place the hoist on a flat surface and ensure the rear braked castors are
locked.
c. Remove the black mast locking hand wheel from the top of the
assembly, then carefully lift the mast upright ensuring the mast drops
into position. (SAFETY NOTICE - Please ensure both hands are on the
handles when lifting the mast into position, possible risk of finger trap).
d. Ensure all cables are routed correctly and are clear of the base / mast
when lifting into position.
e. When the mast if fully engaged with the base, fit and fully tighten the
mast locking hand wheel. (SAFETY NOTICE - Ensure this is tight and
locked into position before using the hoist). Remove the strap and
buckle retaining the spreader bar, the strap should be kept safe and
should be used if the hoist is folded for transport.

M-Series Mobile Hoist User Manual Page 9of 36 Part No. 999036 / Rev.6 / Mar 2018
Hoist assembly instruction (continued…)
i. Ensure the mast is fully seated in position
before securing the mast locking hand
wheel
ii. Mast locking hand wheel must be
secure before use
f. The foot pedal will open and close the legs simply by activating one side
with your foot.
g. Ensure the emergency stop button (RED) on the
control box is in the out position.
h. Confirm all cables are located and secure,
before operation the hoist ensure the strap &
buckle is removed. Press the up button on the
handset and confirm the boom rises. Your hoist
is now ready to use.
(Fig.1)
(Fig.2)
Emergency stop button
Strap and buckle

M-Series Mobile Hoist User Manual Page 10 of 36 Part No. 999036 / Rev.6 / Mar 2018
6. Hoist safety advice
Please ensure you read the following safety advice. This will ensure
lifting operations are made easy and trouble free.
•Always carry out the risk assessment and plan your lifting operations
before commencing and moving & handling practice.
•Always carry out the daily check list before using the hoist.
•Always read the user manual and ensure you are familiar with the
operating controls and safety features of the lift before lifting a patient.
•Always check the safe working load (SWL) of the hoist is suitable for the
weight of the patient.
•Always carry out lifting in accordance with the instructions in the user
manual.
•Never disconnect or bypass a control or safety feature on the hoist.
•Never force an operating or safety control, excess force could damage
the feature.
•Always manoeuvre the hoist using the handles provided, these are
designed to aid ease of transport.
•Do not push a load at excess speed.
•Do not push the hoist over rough or uneven ground.
•Do not push the hoist down steps.
•Do not attempt to lift a patient on a slope.
•Always apply the brakes when parking the hoist.
•Never use electric hoists in a shower.
•Never charge the hoist in a damp environment, e.g. bathroom or shower
room.
•Your lift is for patient lifting. Do not use it for any other purpose.
•Ensure you follow a regular battery charging routine to prolong the life
of the battery.

M-Series Mobile Hoist User Manual Page 11 of 36 Part No. 999036 / Rev.6 / Mar 2018
7. Operating the hoist
7.1 Castors & Braking - The hoist has two braked castors at the rear of the
base. The brakes should only be applied when the lift is parked. The
brakes should always be released when a lifting operation is taking place.
7.2 Leg Opening & Closing - The hoist legs can be opened for access into and
around riser recliner chairs, wheelchairs etc. The legs should be closed
when transferring and negotiating narrow doorways and confined
spaces. You can operate the leg opening device by pressing down onto
the pedal, this will activate the opening or closing mechanism.
7.3 Emergency Stop Button - The big red emergency stop button located on
the front of the control box is activated by pressing the button in.
Note: This will cut all power to the hoist. It can easily be reset by twisting
the button clockwise to release.
7.4 Raising & Lowering The Boom - The boom can be raised and lowered by
the powerful 10,000n motor, this is activated by a hand set that has
direction arrows indicating up and down movement. The hand set is
plugged into the base of the control box. The actuator will stop at the
end of each full stroke.
7.5 Battery - The battery is protected from full discharge by a low voltage
alarm & illuminated LED (this can vary pending the model of control box
used). This will sound or illuminate when the battery need recharging.
Complete the lift and place on charge. Do not ignore this warning! See
charging a battery on page 14
User Note:
The control boxes utilised within the devices use internal relay switches
for actuator operation.
Pressing a hand controller button energises this control box relay with a
small magnetic field, causing it to close. Releasing the hand controller
button de-energises the control box relay, causing it to open.
Immediately “re-pressing” the relevant control button before the relay’s
magnetic field has had time to reset will result in no additional
activation.
This is not a fault of the system and no damage is caused by this process.
If this situation occurs, please release the control button for two seconds
and then press again. By this time the magnetic field will have dissipated
and the operation of the button will re-energise the switch enabling
further use.

M-Series Mobile Hoist User Manual Page 12 of 36 Part No. 999036 / Rev.6 / Mar 2018
8. Folding for transportation / storage (folding mast type only)
8.1 Lower the boom with the hand set until the spreader bar sits on
the steel bracket. Attach the strap & buckle around the mast and
spreader bar, this ensures the mast is secure and clear from the
floor when folded.
8.2 Apply the rear brakes.
8.3 Unscrew / remove the mast locking hand wheel.
8.4 Carefully lift the mast slightly and push / fold it forward towards
the base
8.5 Replace / tighten the mast locking hand wheel.
(fig.3) above: Lower the boom with the handset
(fig.4) above: Place spreader bar onto the bracket and secure with
the strap and buckle
(fig.5) above: secure the rear brakes. Fold the mast and replace
the hand wheel. Take care not to overtighten the hand
wheel.
(Fig.3)
(Fig.4)
(Fig.5)
Ensure the boom is
clear of the floor

M-Series Mobile Hoist User Manual Page 13 of 36 Part No. 999036 / Rev.6 / Mar 2018
9. Linak® Operating System
a. Jumbo care system – Typical Illustration
1. Linak® battery pack
2. Linak® control box
3. Linak® actuator
4. Linak® handset
b. Homecare system – Typical illustration
1
2
3
4
5. Linak
®
battery pack and control box
6. Linak®actuator
7. Home care battery charger
5
6
7
8
8.

M-Series Mobile Hoist User Manual Page 14 of 36 Part No. 999036 / Rev.6 / Mar 2018
10. How to charge the hoist battery
There are a number of batteries located in the power pack / battery
housing. They are charged through a shaver type socket in the base of
the control unit. When charging is required the 3 pin mains lead is
plugged into a wall socket and the shaver type socket goes into the base
of the control box.
a. Fit the mains power lead shaver type socket in the base of the
control box.
b. Plug the charger mains plug into a suitable mains outlet and
switch the mains supply on. (The RED Emergency Stop button has
to be out for the battery pack to charge)
c. Charging the battery is automatic and will normally take eight to
twelve hours to fully charge. (You cannot overcharge the batteries
if left for long periods of time).
d. To return the hoist to use, switch off the mains supply. Remove
the shaver type plug from the socket at the base of the control
box. The hoist is now ready for use.
Please pay attention to the following points to avoid any problems
with discharging batteries:
•Keep the batteries fully charged.
•The batteries should never be allowed to run completely flat.
•The power pack should never be stored for long periods of time
without a regular charge.
•Do not leave the power pack plugged into the charger with the
mains power off.
•Regularly check the battery charger indicator, this will be on
the control box or handset.

M-Series Mobile Hoist User Manual Page 15 of 36 Part No. 999036 / Rev.6 / Mar 2018
11. Daily maintenance checks
11.1 Visual check list
These are recommended to be carried out before the hoist is used for
any moving & handling practice.
a. CHECK that the legs open and close correctly.
b. CHECK that the hoist moves freely on its castors.
c. CHECK that the spreader bar is free to rotate and swing.
d. CHECK the spreader bar fixing/M10 bolt & nylon lock nut is
secure.
e. CHECK that the sling hooks on the spreader bar are free from
excessive wear.
f. CHECK the hand control lowers and raises the boom
satisfactorily.
g. CHECK the operation of the emergency stop button.
h. CHECK that the hoist is charged to a satisfactory level of use.
i. CHECK that the locking Mast Hand Wheel is tightened and
secured fully.
If in doubt DO NOT USE

M-Series Mobile Hoist User Manual Page 16 of 36 Part No. 999036 / Rev.6 / Mar 2018
12. Maintenance & Servicing
These recommendations are in line with the Lifting Operations and Lifting
Equipment Regulations (LOLER 1998). For further detailed information, please
visit: www.hse.gov.uk/work-equipmentmachinery/loler.html.
This maintenance must be carried out by a competent person and is a UK
regulation. The inspection must take place every 6 months. (Please check if
outside of the UK for different specific test requirements). Please see page 17
to 18 for illustrations to help with Key Safety Checks.
a. Certification: An authorised / competent service company or person
will issue a test certificate after satisfactory completion of the LOLER
inspection. The certificate will be valid for 6 months.
b. Batteries:The batteries are located in the Battery Pack and should
not require maintenance other than the regular charging as detailed
in the charging instructions.
c. Emergency down: Check the emergency down functionality. (see
illustrated image below (fig.6)
d. Actuator: The actuator should require no maintenance other than
checking for correct operation, listening for unusual noise and
checking for any damage. (see illustrated image below (fig.6)
e. Castors: Check the rear brake on the castor. Check all castor fixing
points. Check that the castor runs free and rotates easily. Remove any
build-up of hair, fluff, dust etc. Lubricate if necessary with a very light
mineral based grease.
f. Leg pivot points / Under carriage: Operate the foot pedal and ensure
a smooth opening and closing of the legs. Check the steel leg linkages
are secure. Adjust the steel linkages if necessary to align the legs.
Check all the screws in the under-carriage are secure, if loose secure
with Loctite®. (see illustrated image below (fig.7)
g. Battery pack: Check the functionality of the emergency stop button.
Inspect all male and female sockets for correct fitting. Inspect the
hand control functionality.
h. Mast: Ensure the mast fully engages into the base housing. Check the
operation of the mast locking hand wheel. Check the actuator
mounting brackets for excessive wear.
i. Boom: Check the attachment of the boom to the mast, ensure all
fixing points are secure and free from wear. Check the boom can
rotate freely and there is no excess movement of the boom in both
directions.

M-Series Mobile Hoist User Manual Page 17 of 36 Part No. 999036 / Rev.6 / Mar 2018
Maintenance & servicing (continued…)
j. Spreader bar: Check the spreader bar rotates and swings freely.
Check the central pivot M10 bolt and nylon lock nut for excessive
wear. Check the fixing point for excessive wear and inspect the sling
hooks for any damage, sharp edges and excessive wear. (see
illustrated image below (fig.8)
Illustrations for key check points as indicated above in points 1. To 11.
(fig.8) Ensure hooks are not damaged
Emergency
lowering
down
(Fig.6)
(Fig.7)
a. Centre pivot point screw secure with
thread lock x 1.
b. Track rods screws secure with thread
lock and tighten nuts x 4 positions
a.
b.
b.
b.
b.
(Fig.8)

M-Series Mobile Hoist User Manual Page 18 of 36 Part No. 999036 / Rev.6 / Mar 2018
(fig.8) Ensure the M10 bolt, nylon lock nut
and 2 washers are in position and secure
(Fig.8)
(Fig.8)

M-Series Mobile Hoist User Manual Page 19 of 36 Part No. 999036 / Rev.6 / Mar 2018
13. Recommended Cleaning Instruction
General cleaning
The exterior of the Hoist can be cleaned using a damp soapy cloth for general
cleaning duties. Please ensure the cloth is damp and not wet. Ensure the
exterior of the device is dry after cleaning, dry using a clean dry cloth.
Care should always be taken when cleaning around electrical components
Disinfecting (if necessary)
Should the Hoist require a more thorough clean, the use of the Actichlor
disinfectant product, which is widely available in tablet form and used
throughout the healthcare industry, is recommended for use to ensure a
thorough clean.
•Please follow the manufacturers safety instruction for the use of the
cleaning product before use to ensure safe use for the operator and the
patient.
•Ensure the cloth is damp before the cleaning process. DO NOT use
a wet cloth over electrical systems.
•Be careful not to let water ingress into the device as although the
device is IP rated, it is not water tight.
Application is through a clean soaked (but damp) cloth applied to
wipe the device down
Used in the following dilutions to ensure an effective clean:
•Actichlor dissolvable chlorine tablets provide a concentration of
1000 ppm of available chlorine (0.1%) per 1 tablet
•1 tablet (1.7g formed tablet (x1)) will create a virucidal solution,
diluted in 1 litre of water to provide effective means to clean a
“Dirty” device. This is also ideal for use after an outbreak of the
Norovirus / winter vomiting and can be used as a precaution
against C.Diff. It is effective against viruses, bacteria, spores,
yeasts and moulds.
•The contact time against the outer components of the device
should be for 5 minutes to prevent any virucidal infections without
a degradation to the functionality of the device. 5 minutes is a
recommended contact time. The device can withstand a longer
contact period but the 5 minute recommendation as a minimum
must be followed to provide an effective cleaning regime.
•Blood spills should be dealt with by an increased concentration of
the solution – please refer to the instructions on the
manufacturers product labelling.

M-Series Mobile Hoist User Manual Page 20 of 36 Part No. 999036 / Rev.6 / Mar 2018
(recommended cleaning instruction…continued)
Concentration limits for differing cleans will be shown on the manufacturers
Achtochlor tablet container, however, this is reflected in the table below:
Safety precautions when using this cleaning agent
Handling and Storage:
Advice on Safe Handling
Avoid contact with skin and eyes. Do not breathe dust / fumes /
gas / mist / vapours / spray. Use only with adequate ventilation
Wash hands thoroughly after handling. Mixing this product with
acid or ammonia releases chlorine gas
Hygiene Measures
Handle in accordance with good industrial hygiene and safety
practice. Remove and wash contaminated clothing before re-use.
Wash face, hands and any exposed skin thoroughly after handling.
Dilution chart
Product used as:
Device
condition
Concentration
(ppm)
Dilution
qty *
Tablets per
litre
Contact time
Bactericidal
Clean
200
5 litre
1
1 minute
Dirty
1000
1 litre
1
5 minutes
Yeasticidal
Clean
200
5 litre
1
1 minute
Dirty
1000
1 litre
1
5 minutes
Fungicidal
Clean
2000
1 litre
2
15 minutes
Dirty
5000
1 litre
5
15 minutes
Mycobactericidal
Clean
1000
1 litre
1
15 minutes
Dirty
5000
1 litre
5
15 minutes
Virucidal
Clean
500
2 litre
1
5 minutes
Dirty
1000
1 litre
1
5 minutes
Sporcidal (C.Diff)
Clean
1000
1 litre
1
10 minutes
Sporicidal
Clean
5000
1 litre
5
10 minutes
*Dilution is made within water
•When diluted in water, one tablet gives 1000 ppm of available chlorine DO
NOT dilute within any other medium
•The concentration of the solution depends upon whether the device being
cleaned is noticeably dirty or note (indicated in the table by “Device
Condition”
Other manuals for M Series
1
This manual suits for next models
4
Table of contents
Other Mackworth Mobility Aid manuals

Mackworth
Mackworth SA400 User manual

Mackworth
Mackworth 540100 User manual

Mackworth
Mackworth M400 User manual

Mackworth
Mackworth TA400 User manual

Mackworth
Mackworth 999028 User manual

Mackworth
Mackworth 999029 User manual

Mackworth
Mackworth SA180 User manual

Mackworth
Mackworth 180 Mobile Hoist User manual

Mackworth
Mackworth M180 User manual

Mackworth
Mackworth M180 User manual