2 ©2007 MadCow Rocketry™ MIM-23B Hawk Assembly
Please make sure you read all directions and understand how to assemble your model
beforeyoustartconstruction.Itisalsoagoodideatotestteachpartbeforeassembly
–somemanufacturingtolerancesmayrequirelightsandingbeforenalassembly.
Laser cut parts will exhibit varying amounts of charring on the edges depending on the
density of the plywood. The charred edges do not interfere with bonding and do not
need to be cleaned before assembly. In most cases the charring will be cleaned up
duringsandingfornishingandpainting.
Step 1 – Motor Mount Assembly
Testtthetailconeintotheaftendofthebodytube.Makesurethatthetailcone
shoulderdoesnotinterferewiththenslot.Ifitdoes,sandtheshouldertothecorrect
length(thenominallengthoftheshouldershouldbe0.5”).Next,Testtthetailcone
and centering ring over the motor mount tube and sand if necessary. The centering ring
shouldhaveasnugtbutlooseenoughtomovetheringoverthemotortubewithout
deformingit.Alsotesttthecenteringringinthebodytubeandsandifnecessary.
Spread some epoxy on the outside of one end of the motor tube and slide the tail cone
inplacesothemotortubeisushwiththeaftendofthetailcone.Makesureyouclean
the motor tube of any epoxy so
asnottointerferewiththen
tangs later.
After the tail cone is dry, make a
mark 3/8” from the other end of
the motor tube. Spread some
epoxy on the motor tube and
slide the forward ring (with the notch) until it aligns with the mark. 3/8” Exposed
Forward Ring Notch
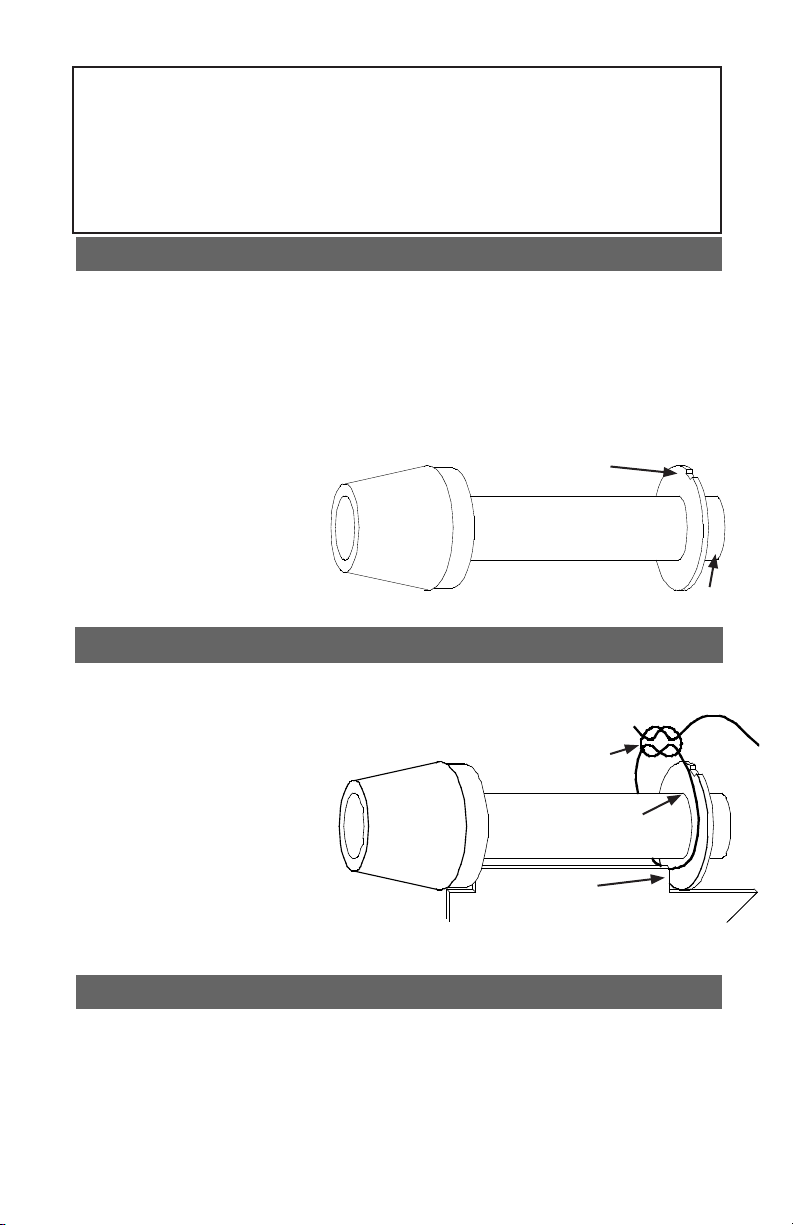
Step 2 – Shock Cord Attachment
The shock cord in this kit consists of a shorter section of Kevlar and a longer section
of nylon cording. The two sections should be tied together using a single overhand,
ringbendordoublesherman’sknot.TheKevlarsectionwillbeattachedtothemotor
mount and the nylon section will be
attached to the nose cone.
Wrap the end of the Kevlar shock
cord around the forward end of the
motor tube and tie a square knot
or bowline knot near the notch in
the forward centering ring. Apply
some epoxy to the knot to make
sure it doesn’t come loose later.
Make sure the Kevlar loop is seated
againsttheforwardcenteringringsothatitwillnotinterferewiththentangslater.You
can tack with epoxy or CA to hold in place.
Fin Tang
Apply CA or
Epoxy to knot
Push cord in corner
and tack with epoxy
Step 3 – Insert Motor Tube Assembly into Body Tube
Wrap the shock chord into a small bundle and stuff it inside the motor tube for this next
step.Makesurethecordpassesoverthenotchintheforwardcenteringring.Testtthe
motortubeassemblyintothebodytubetoensureasnugt.Sandthecenteringringsif
necessary.Whenyouaresatisedwiththet,spreadsomeepoxyontheinsideofthe
body tube and slide the forward centering ring of the motor assembly into the body tube.
Spread some more epoxy on the inside edge of the body tube before sliding the tail cone
into the body tube. Continue sliding the assembly inside the body tube until the tail cone


