Magiccos FP406 User manual

TYPE FP406
Instruction Manual & Recipes
Magiccos Aluminum Die-cast Food Processor
Version 2.0

CONTENTS
Product Introduction & Parts ----------------------------------------------------- 1
Packing Contents ----------------------------------------------------------------2
Important Safety Cautions ------------------------------------------------------- 3
Technical Specification ---------------------------------------------------------- 6
Product Features ---------------------------------------------------------------- 7
Safety Lock System ----------------------------------------------------------7
Overheating Protection ------------------------------------------------------ 7
Small, Medium & Big feed chute & Food Residues ---------------------------- 8
Premium Aluminum Die-cast Housing --------------------------------------- 10
How To Select Speeds ---------------------------------------------------------- 11
How to Use the Appliance ------------------------------------------------------ 12
Installation ----------------------------------------------------------------- 12
How to use chopper blade -------------------------------------------------- 14
How to use dough blade ---------------------------------------------------- 16
How to use 5 insert cutting blades ------------------------------------------ 18
Maintenance --------------------------------------------------------------------22
Cleaning ----------------------------------------------------------------------- 23
Warranty and Expansion -------------------------------------------------------- 26
Basic Warranty Information ------------------------------------------------- 26
Terms & Policy --------------------------------------------------------------26
Defective Products & Returns ----------------------------------------------- 27
New ! Expansion Replacement Warranty for Damaged Accessories ---------- 28
Covered Accessories for Expansion Replacement Warranty ------------------ 29
Delivery for Expansion Replacement Warranty ------------------------------ 31
Troubleshooting ---------------------------------------------------------------- 32
Appliance doesn’t work -----------------------------------------------------32
Appliance stops running suddenly ------------------------------------------ 33
Motor is running while components DO NOT run ---------------------------- 33
Difficult to install the chopper blade and drive shaft ------------------------- 34
Appliance shakes violently -------------------------------------------------- 35
Chopping performance is not good enough --------------------------------- 35
Slicing /grating performance is not good enough ----------------------------36
Unpleasant smell ----------------------------------------------------------- 36
Liquid leakage problem -----------------------------------------------------37
Missing parts or broken parts ----------------------------------------------- 37
Recipes ------------------------------------------------------------------------ 38
Contact Us --------------------------------------------------------------------- 49
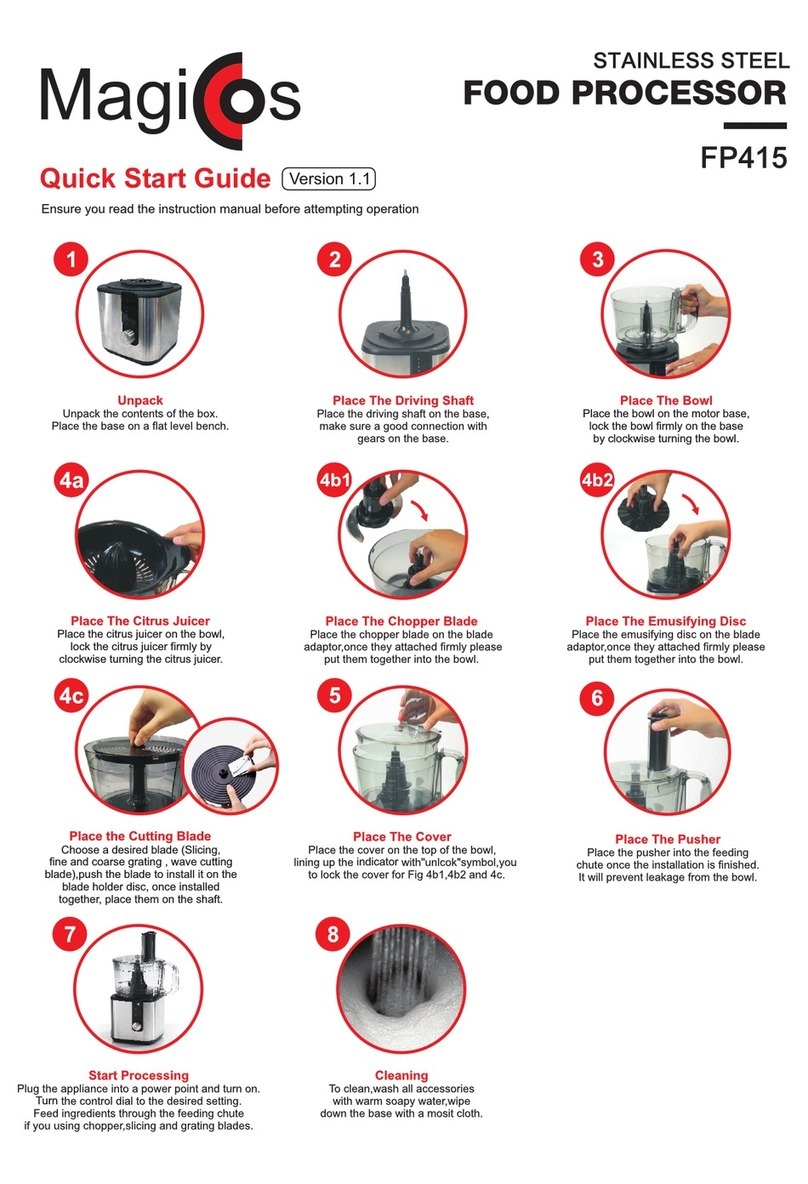
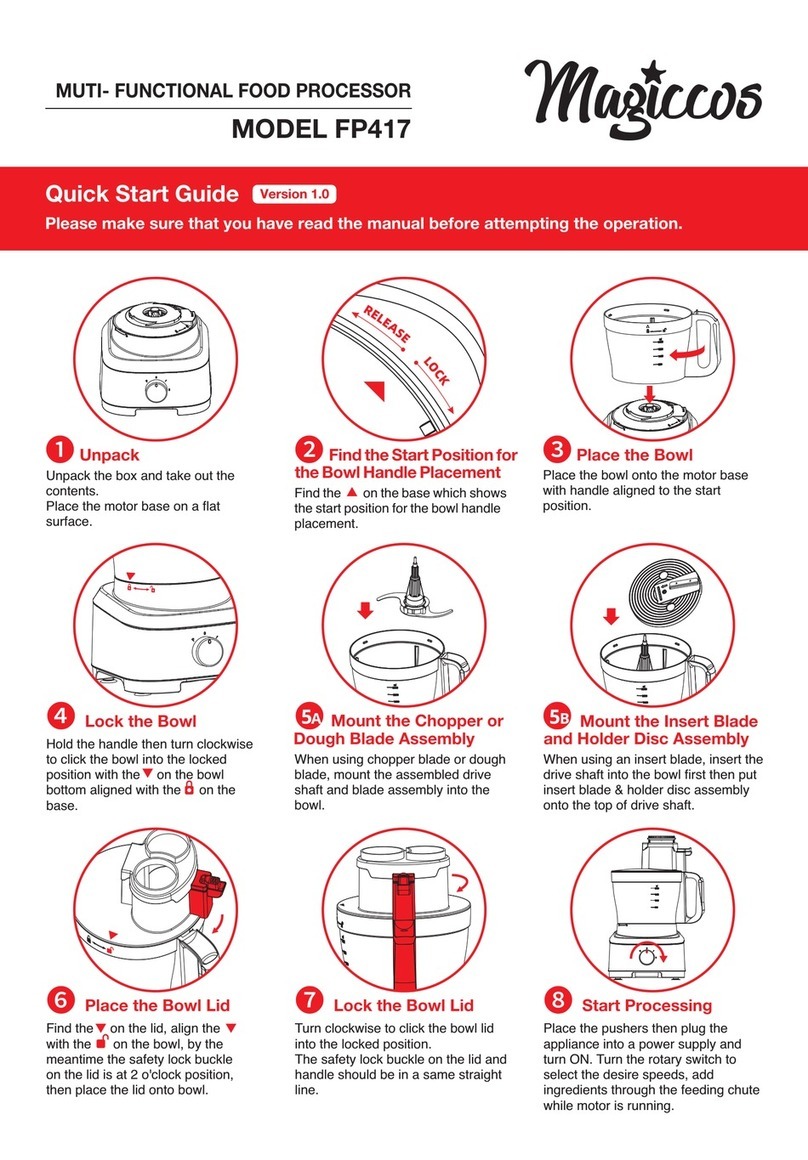
1
Product Introduction & Parts
1Rotary switch
2Motor base
3Food processor bowl
4Drive shaft
5Blade holder disc
6Bowl lid
7Safety lock buckle
8Protective cover
9Big pusher
10 Small pusher
11 Dough blade
12 Chopper blade
13 Blade protectors
14 Coarse shredding insert blade
15 Fine shredding insert blade
16 French fry insert blade
17 Coarse slicing insert blade
18 Fine slicing insert blade
19 Spatula

2
Packing Contents
Thanks for purchasing Magiccos food processor.
Please find all the packing contents and where are the packing positions inside the
packing box.
Spatula , quick start guide page, manual & recipe book are packed in a bag on the
top of the foam, please take out and read quick start guide and manual before
operation.
Notice:
There is a round label on the bowl handle, please read the contents before using,
please remove the label before cleaning in a dishwasher.
Please read the contents of warning sticker on the motor base, keep the warning
sticker and rating label on the motor base.
Please read the contents of the warning sticker on the bowl lid and save it.
Chopper blade with protectors and slicing blades with protective films, please
remove them carefully before using, you can keep the chopper blade protectors
for repeated use.

3
Important Safety Cautions
Your safety and the safety of others are very important.
Important safety messages are provided in this manual and on your appliances.
Always read and obey all safety messages.
This is the safety alert symbol.
This symbol alerts you to potential hazards that can kill or hurt you
and others. AII safety messages will follow the safety alert symbol
and either the word "DANGER"or"WARNING".
These mean:
You can be killed or seriously injured if you don't
immediately follow instructions.
You can be killed or seriously injured if you don't
follow instructions.
All safety messages will tell you what the potential hazard is, tell you how to
reduce the chance of injury, and tell you what can happen if the instructions are
not followed.
When using electrical appliances, basic safety precautions should always be
followed, including the following:
WARNING
When using electrical appliances, basic safety precaution must always be followed:
1. Carefully read all instructions before operating and save for future reference.
2. FOR HOUSEHOLD USE ONLY. DO NOT USE THIS APPLIANCE FOR OTHER THAN
ITS INTENDED USE.
3. REMOVE all packaging materials before first use.
4. Wash food contact parts before first use.
5. This appliance is not intended for use by persons (including children) with
reduced physical, sensory or mental capabilities, or lack of experience and
knowledge, unless they have been given supervision or instruction concerning
use of the appliance by a person responsible for their safety.

4
6. DO NOT allow young children to operate or use it as a toy. CLOSE SUPERVISION
IS NECESSARY WHEN USING THIS APPLIANCE NEAR CHILDREN.
7. Ensure the polarized plug fit into the polarized outlet only one way. If not, reverse
the plug or contact a qualified electrician to install the proper outlet.
8. This appliance should always be used on a stable, dry, heat-resistant surface.
9. DO NOT modify the plug in any way.
10. If the supply cord is damaged, in order to avoid a hazard, it must be replaced by
the manufacturer, service agent or similarly qualified persons before further use.
11. This appliance includes a safety system which prevents operation unless the
accessories are securely installed.
12. If operation is not finished within 5 minutes, turn off the appliance and let it cool
for 1 minute before the next round of operation. If more than 3 rounds of
operation are required, cool down the appliance for 15-60 minutes to room
temperature . This can lengthen lifespan of the appliance.
13. To protect against risk of electric shock, fire or personal injury, DO NOT immerse
power cord, plug or motor base in water or any form of liquid, neither rinse it
under tap water.
14. DO NOT process hot ingredients.
15. DO NOT push food with fingers, or other objects (like knives), always use the
enclosed pusher for feeding food.
16. Blades are very sharp, be extremely careful when handling chopper blade and
insert cutting blades, especially while assembling, disassembling and cleaning
after use.
17. DO NOT let power cord hang over the edge of a table or counter, or touch any
hot surface.
18. DO NOT place the appliance near a gas outlet, electric burner, or heated oven.
19. Ensure the capacities shown in the specifications section are not exceeded.
20. Always use a reliable earthed power supply to operate appliance.
21. Avoid contact with moving parts,keep finger away from working blades to
prevent personal injury.
22. DO NOT add liquid exceed the max liquid level, and leakage may dirty or even
burn the appliance.
23. DO NOT sharpen the blades.
24. DO NOT use the cracked bowl.

5
25. DO NOT add overmuch food into the appliance.
26. DO NOT use the appliance if the chopper blades are bent or damaged.
27. Never operate the appliance without the lid and bowl in place, always place the
pusher to avoid food or liquid leakage
28. DO NOT try to defeat the interlock mechanism.
29. Make sure the chopper blade and cutting blades are properly assembled before
operating the appliance.
30. Switch off and unplug
Before fitting or removing parts
When not in use
Before cleaning
31. Before removing the lid from the bowl
Switch off
Wait until the accessories/ blades have completely stopped
32. THERE ARE NO SERVICEABLE PARTS INSIDE THIS APPLIANCE.
33. The appliances are not intended to be operated by means of an external timer or
separate remote-control system.
34. The food processor bowl is made of plastic with metal components. They should
not be placed in a microwave oven.
35. Appliances contain valuable materials that can be recycled. Dispose of old
appliances using appropriate collection systems in accordance with federal and
local regulations.
SAVE THESE INSTRUCTIONS

6
Technical Specification
Model: FP406
Voltage: 120V~60HZ
Rating power: 800W ; Peak power: 1000W
Cord length: 35.4"
Dimension: 8.5 " x 7.5" x12.4 " (284mm* 249mm*414 mm)
Food processor bowl max capacity: 3.5L / 14 Cups
Food processor bowl rating capacity: 2.0 L / 8 Cups
(2.0L rating level for shredding,slicing and French fry functions )
Processor bowl max liquid level: 1.0 L / 4 Cups
( 1.0L max liquid level for chopping and liquid processing with chopper blade )

7
Product Features
Magiccos designed this new food processor for you, please notice below important
features, it may help you to understand and use the food processor.
Safety Lock System
NOTE: This appliance is equipped with a safety lock system, which can protect your
safety while using the appliance, there are 3 safety locks in the bowl , lid , protective
cover and safety lock buckle, the appliance cannot be turned on when any of the 3
locks are not well locked. Please refer to installation chapter to find how to lock them
correctly. Please make sure the bowl , lid , protective cover and safety lock buckle are
firmly locked to activate the safety locks.
Notice: If above parts are not locked in place, you CAN NOT turn on the appliance
and bilking LED dictators only show you have a good input power connection, the
safety system do not allow you to use the appliance to minimize the possible
damage because of incorrect assembly. Before turning on the appliance, please
make sure the the bowl , lid, protective cover and safety lock buckle are firmly locked
in place.
Overheating Protection
This appliance is equipped with a overheating protection thermostat (re-settable
fuse) inside. If the motor temperature becomes too high, the unit will turn off
automatically and resume operation after the motor has cooled down 30 minutes
sufficiently (may need 15-60 minutes according to the room environment
temperature), unplug and reinsert again could wake up the appliance.
Though equipped with a powerful and high speed motor, the overheating protection
only can be triggered only by high load and long time working, it is a very extreme
situation and very important for safety. For keeping a better motor working situation
of the appliance and to avoid overheating protection situation, we suggest to use the
appliance within 3 minutes continually per time, no more than 5 minutes continually
per time, if overheating protection is already triggered, please cool down the
appliance to room environment temperature (15-60 minutes), unplug and reinsert
again to wake up the appliance.

8
Small, Medium & Big feed chute & Food Residues
The food processor have three kinds of feed chute. Small, medium and large feed
chute available for different shapes of food.
If the food is small or medium size, you can lock the protective cover and choose to
use big pusher alone or small pusher & big pusher assembly together, please find
below size of chute hole, you can place smaller food into the 1.6’’* 2.4’’ (42mm*62mm)
hole or 2.5’’ (65mm)dimension round hole. Kindly notice the 1.6’’* 2.4’’(42mm*62mm)
hole is not a regular shape because of related safety requirements.
Note: Small pusher & big pusher could be assembled together for convenient use.

9
If the food is a larger size, such as big tomato or bigger size frozen cheese please cut
them into suitable size, put it into the chute then lock the protective cover and lock
the safety lock buckle, please use small pusher & big pusher assembly together to
push food gently.
Kindly notice the chute hole is 2.6’’* 4.8’’(67mm*122mm) and is not a regular shape
because of related safety requirements.
Note: for different food, please search Magiccos demo video for your reference, any

10
About Food Residues: Because of safety requirements, there is an enough safety
distance between the cutting disc (blade holder disc) and bowl lid, this prevents
moving and shaking cutting disc to contact the bowl lid.
The distance is also enough to protect your finger during operation, because of this
safety reason then some food residues would left on the disc, it is a normal situation.
To reduce food residues please select suitable size food chute, put the food as
straight as it could be, If the food is tilted during the pushing it may lead to bad
performance or more residues.
Please follow the instruction and select suitable speed, but because of personal
operation differences, you can adjust to a higher speed or bigger pressure to avoid
food residues.
Please ensure proper installation so that the appliance will start up and be in good
working condition. Any abnormalities please stop using the appliance and check
with Magiccos after-sales support team.
Premium Aluminum Die-cast Housing
The housing with very nice Aluminum Die-cast material, only a few leading brands
use this kind of material. Because of the high cost of Aluminum die-casting, it is only
to be used for premium designed products such as premium laptop, Magiccos
die-cast food processors have a sturdy and heavier housing to ensure a more
durable appliance and a more stable base. However, the electrolytic silver surface is
soft, so to maintain a nice appearance, do not use abrasive cleaners on the motor
base.

11
How To Select Speeds
FP406 food processor has 2 speeds and a PULSE function. You can select different
speeds according to the accessories and food, please find recommended speeds in
the related chapters for each accessories. Turning clockwise to select from the 2
speeds and turning counter clockwise to select PULSE function.
Speed 1 is slow speed and speed 2 is faster speed. To select appropriate speed
according to the food hardness and your processing needs. Normally, soft food can
be processed by lower speeds. If the food fails to be processed or is stirred very
slowly, it means that the speed is inappropriate. Then you need to replace it by
higher speeds, below basic table for your reference.
Accessory
Food
Speed
Working Time
Chopper
blade
Meat
PULSE 2-3 times, then turn to
speed 2
Max 1 minute
Dough
blade
Flour&water
Speed 1 and turn to speed 2
gradually
Max 1 minute
French Fry
blade
Potato
Speed 2
Max 1 minute
PULSE function
PULSE gear on the rotary switch for the max speed, release your finger to turn off
the appliance, you DO NOT need to hold a long time, PULSE 2-3 times could let the
ingredients to be roughly chopped and mixed, after that you could select related
speeds accordingly.
Note : some strength is required for the best performance not matter which speed
you selected if pushing food through feed chute. Running speed is slow while food is
very tough even working with speed 2, please DO NOT push too violently.

12
How to Use the Appliance
Installation
Please follow below reference installation steps, below part numbers have been
listed on page 1.
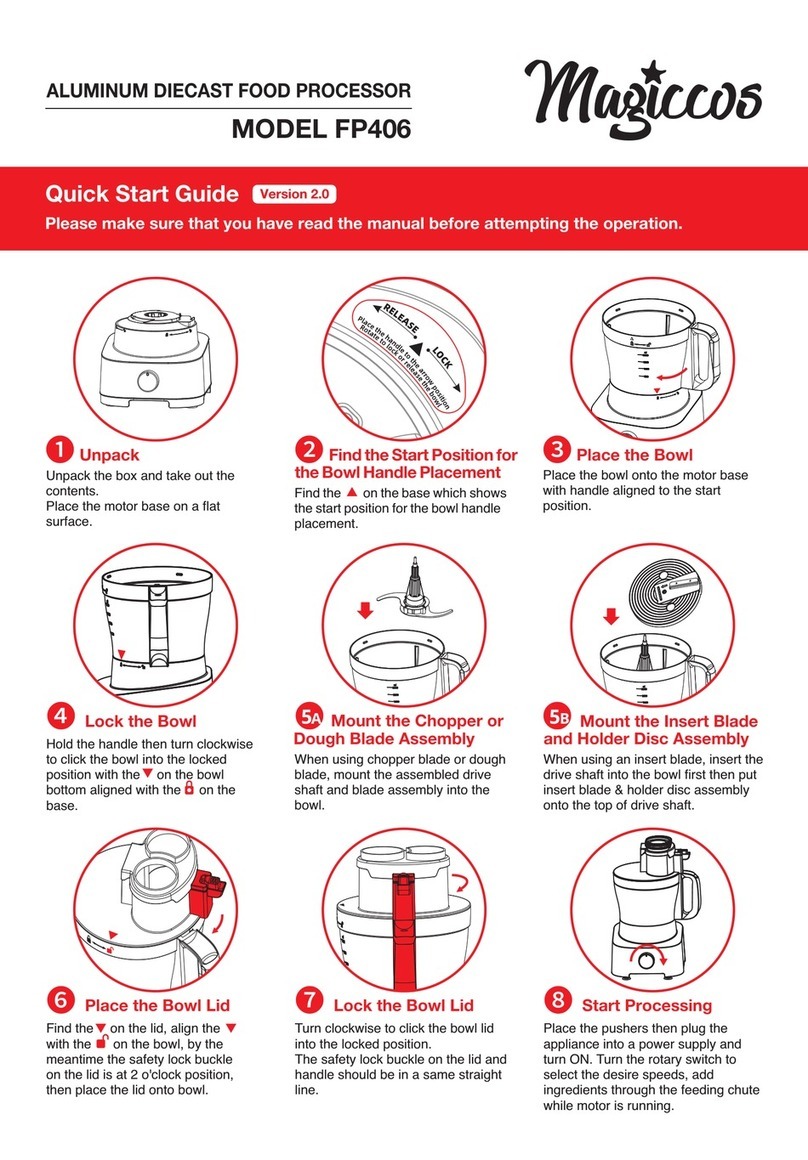
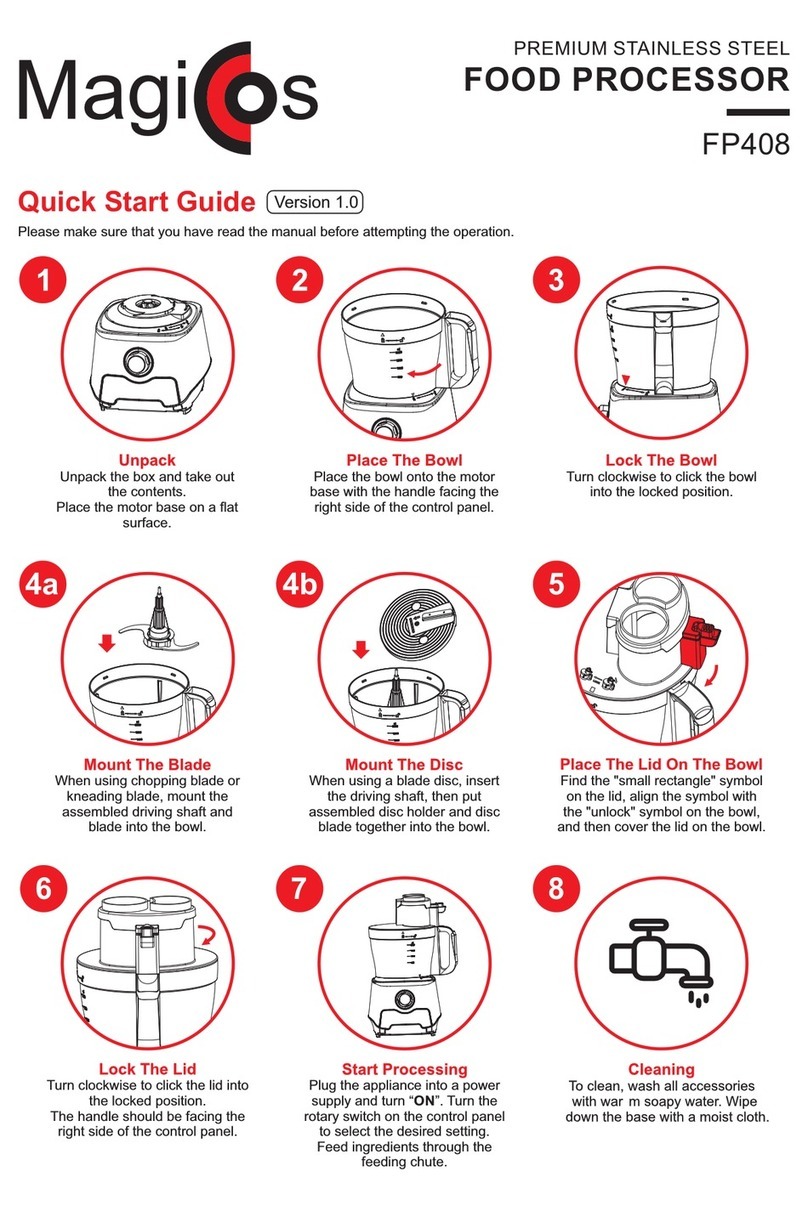
1. Position the motor base②on the flat and dry place.
2. Position the food processor bowl ③onto motor base②, place the bowl handle to
the arrow marking position on the base , turn
clockwise to lock the bowl onto the base.
3. Take out the blade and follow below steps to put them into the bowl.
When using the chopper blade⑫or dough blade⑪, just seat it onto drive
shaft④,assemble the drive shaft④and blade⑪⑫together, then put them as
an assembly together onto the food processor bowl③.
Assemble the chopper blade⑫to the drive shaft④according to the
following steps (similar steps for assembling the dough blade ⑪and
drive shaft④).
1. Find the UP side of the chopper blade
2. Find the 4 crossed notches near the 4 rivets

13
3. There are 2 big ribs on the drive shaft, let the drive shaft ribs
completely go through 2 of the 4 crossed notches.
4. Push the chopper blade down to the end,holding the drive shaft
and turn clockwise to lock the chopper blade &
drive shaft as the LOCK direction markings
shown on the chopper blade plastic part.
When using slicing, shredding or french fry cutting blades, put the drive
shaft ④onto the food processor bowl③, take out one blade then insert it into
blade holder disc⑤, seat the blade (⑭⑮⑯⑰⑱) and blade holder disc⑤
together onto the drive shaft④, make sure the blade holder disc is firmly and
evenly on the top of the drive shaft④before further operation.
4. Put food into the food processor bowl③then lock bowl lid⑥, protective cover⑧
and safety lock buckle⑦while using the chopper blade⑫or dough blade⑪. When
using slicing, shredding or French Fry blade⑭⑮⑯⑰⑱, lock bowl lid⑥, protective
cover ⑧and safety lock buckle⑦first, ingredients should be filled through feed
chute once the appliance is running.
Attention:
Only one of the 7 blades can be used each time.
Always lock food processor bowl ③,bowl lid⑥,protective cover⑧and safety
lock buckle⑦before turning on the appliance.
The rotary switch should in the OFF position before plugging into the socket, use
PULSE function to confirm whether the appliance is well assembled. If there is
anything abnormal, unplug the appliance and re-assemble the appliance as
above steps.
Please check how to install our appliance from Magiccos Amazon page.

14
How to use chopper blade
Chopper blade ⑫& drive shaft④assembly and usage
Place the motor base evenly on your countertop, with a good power outlet, follow
above Fig and below steps to use the chopper blade assembly.
1. Place the food processor bowl handle position as the guiding symbols and
words on base, lock the bowl firmly onto the base.
2. Find the UP side of the chopper blade (The laser markings on the blade show the
upward side), find the 4 crossed notches on the chopper blade plastic part, there
are 2 ribs on the drive shaft, let the ribs go through 2 of the 4 crossed notches ,
push the chopper blade to the end, holding the plastic part of the chopper blade
and twist the drive shaft clockwise as the LOCK directional marking to lock the
chopper blade firmly.

15
3. Place the chopper blade & drive shaft assembly on the bowl center shaft.
4. Add ingredients into the bowl, if the food is big please cut them into smaller
pieces and put evenly.
5. Lock the the bowl lid, lock the protective cover and safety lock buckle.
6. Place the small & big pusher together to avoid food leakage from the chute.
After finishing the above steps, please plug in and make sure it is in OFF gear, then
you can turn on the appliance.
The volume per batch refer to the following table :
Ingredi e n t
Vo lu m e
Sp e e d
Wo r k i n g Tim e
Ch o c o l ate
≤20 0 g
1- 2 fo r mix
Max 1 minute
So f t Ch e e se
≤35 0 g
1-1 for mi x
Max 1 minute
Me a t
≤80 0 g
P / 2
30-60 seconds
Veget a b l e
250 g
P / 2
30-60 seconds
On ion
≤80 0 g
P / 2
30-60 seconds
WARNING and TIPS
Please always follow above steps to install chopper blade and drive shaft
together firmly or else you may can not chop food or even damage the bowl.
Please cut food into smaller pieces for better performance, such as cutting meat
into 2.5 cm pieces, PULSE 2- 3 times then turn to speed 2
Do not use chopper blade to cut bone or ice, the chopper blade is not designed
for cutting such hard objects.
The chopper blade is very sharp, please keep it away from children.
Please be careful and always keep the blade protectors to avoid being cut.
If you always use the chopper function, after clean and dry you can keep the
assembled drive shaft and chopper blade together in the bowl, but keep them
away from children.

16
How to use dough blade
Dough blade ⑪& drive shaft④assembly and usage
Place the motor base evenly on your countertop, with a good power outlet, follow
above Fig and below steps to to use the dough blade assembly.
1. Place the food processor bowl handle position as the guiding symbols and
words on base, lock the bowl firmly onto the base.
2. Find the UP side of the dough blade (please find the UP marking on the round
cycle of the dough blade), find the 4 crossed notches on the blade plastic part,
there are 2 big ribs on the drive shaft, let the ribs go through 2 of the 4 crossed
notches of the dough blade , push to the end, holding the dough blade and twist
the drive shaft clockwise to lock the dough blade firmly.
3. Place the dough blade assembly on the bowl center shaft.

17
4. Add ingredient into the bowl.
5. Lock the the bowl lid,lock the protective cover and safety lock buckle.
6. Place the small & big pusher together to avoid food leakage from the chute.
After finishing the above steps, please plug in and make sure it is in OFF gear, then
you can turn on the appliance.
The volume per batch refer to the following table :
In g re d i e nt
Volum e
Sp e e d
Wo r k i n g Tim e
Fl o u r &Wa ter
≤6 00 g /3 60 g
2
30-60 seconds
Egg
≤10 p c s
2
20-30 seconds
Fl o ur & s of t c he e s e
Tot all y ≤600g
2
30-60 seconds
WARNING and TIPS
Add flour first then add water onto the flour, the ratio of flour to water for a nice
dough is 1: 0.6, which means 100g flour need 60g water (you can adjust ratio
according to different types of flours).
The standard processing time is 30-60 seconds, flour will become sticky if working
time lasts too long, it will make the appliance shake more violently or work
abnormally.If you can not have a nice dough within 60 seconds, you may need to
adjust the ratio by adding flour or water slowly, step by step, from the feed chute.
About shaking : food running inside unbalanced with a higher speed so the
appliance could shake violently, almost all food processors have a similar situation. It
will shake more obviously if it is more than 400g flour, the 4 sucker feet could help
to grasp the table, but if the shaking is too violently you can press down the
appliance a bit till the dough is finished and try lesser flour next time.

18
How to use 5 insert cutting blades
5 insert cutting blades⑭⑮⑯⑰⑱ and blade holder disc⑤assembly and usage
Place the motor base evenly on your countertop, with a good power outlet, follow
above Fig and below steps to to use the insert cutting blade assembly.
1. Place the food processor bowl handle position as the guiding symbols and
words on base, lock the bowl firmly onto the base.
2. Place the drive shaft on the bowl center shaft.
3. Select required cutting blade and insert the blade into the blade holder disc.
Other manuals for FP406
3
Table of contents
Other Magiccos Food Processor manuals

Magiccos
Magiccos FP406 User manual

Magiccos
Magiccos FP408 User manual

Magiccos
Magiccos FP415 User manual

Magiccos
Magiccos FP416A User manual

Magiccos
Magiccos FP406 User manual

Magiccos
Magiccos FP415 User manual

Magiccos
Magiccos FP408 User manual

Magiccos
Magiccos FP406 User manual

Magiccos
Magiccos FP416A User manual

Magiccos
Magiccos FP417 User manual