Majestic Archangel User manual

Archangel Installation Guide
These instructions are for left and right-handedunits.
The
diagrams show a lek handed unit.
VMAR.21
DO NOT ASSEMBLE WITHOUT FOLLOWING THESE INSTRUCTIONS

Archangel Installation Guide
Page2of17
Thank you for purchasing the Archangel.
Please study these instructions carefully before assembly and installation and check all supplied parts immediately upon receipt.
Installation Tips:
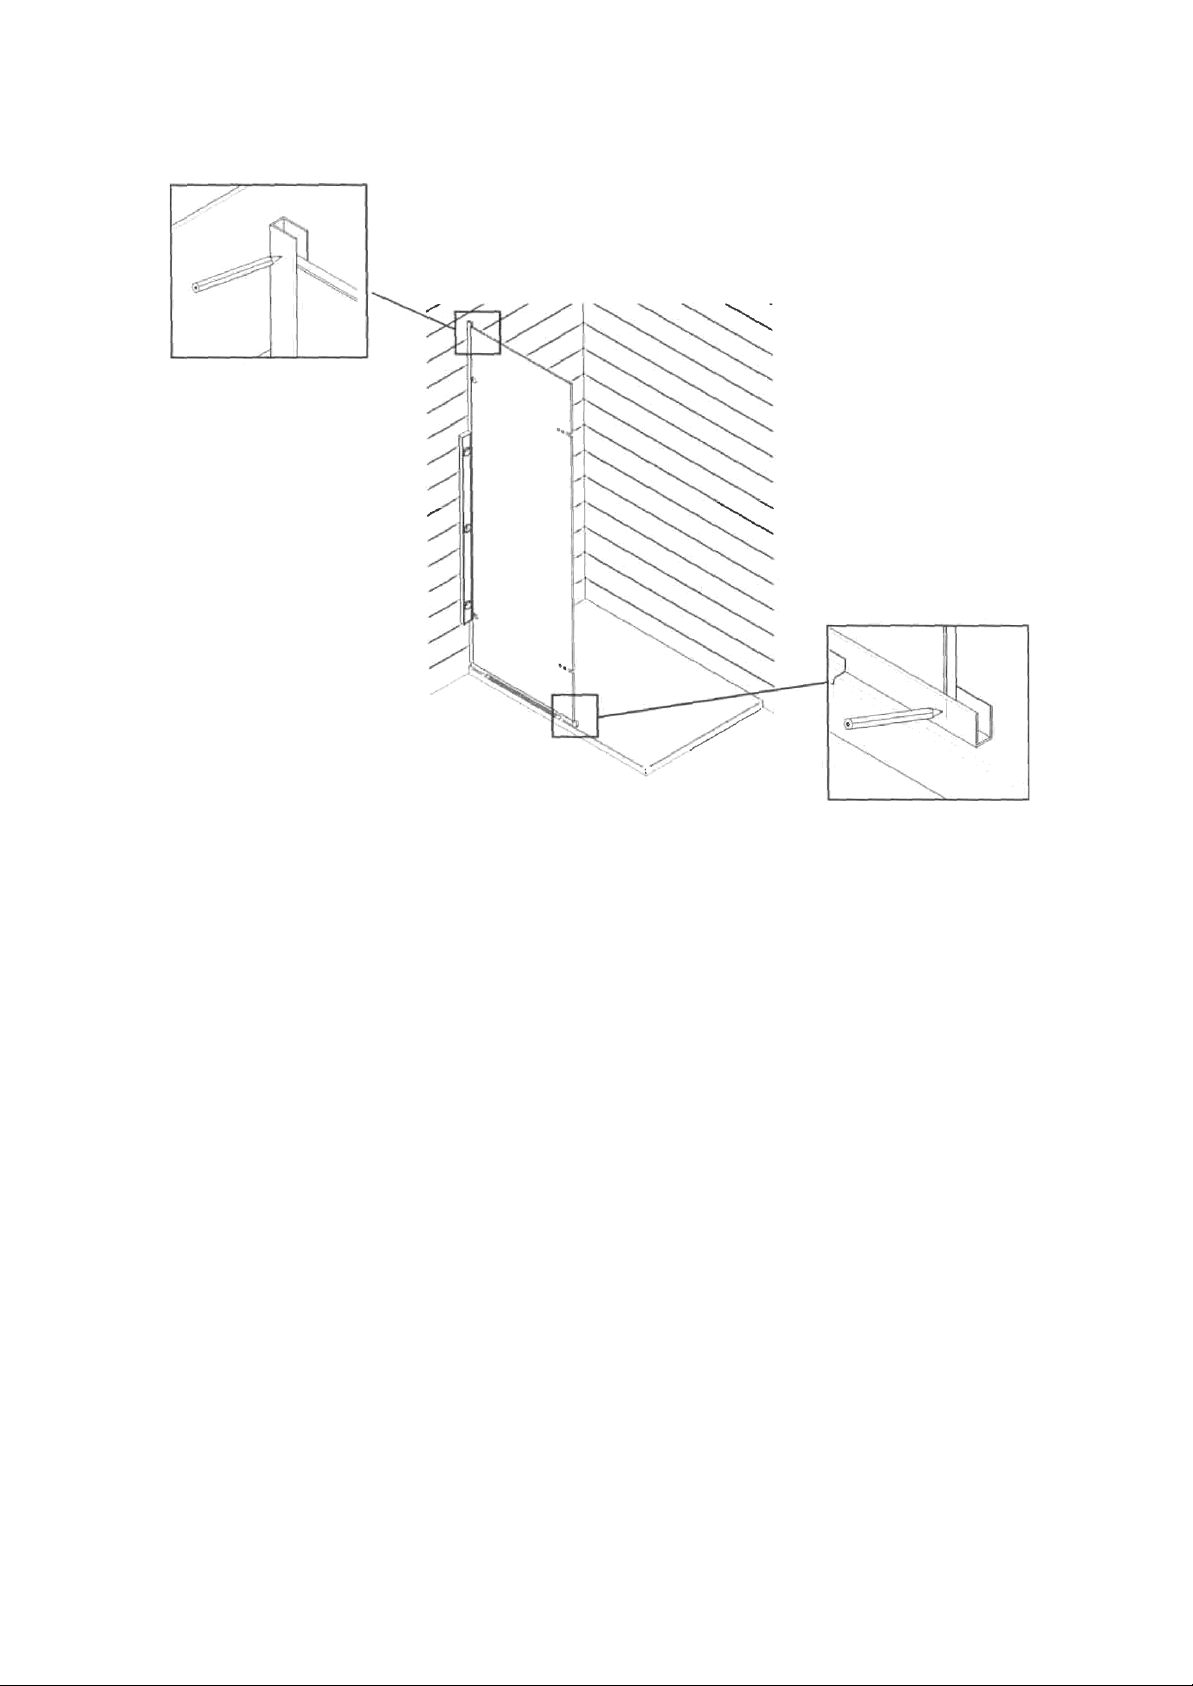
The general principle of assembly is to assemble parts in the steps shown-first a dry assembly to check
fits or mark cutting or drilling positions and then a final assembly with silicone.
If a shower tray is used, ensure that it is level in all directions before installation.
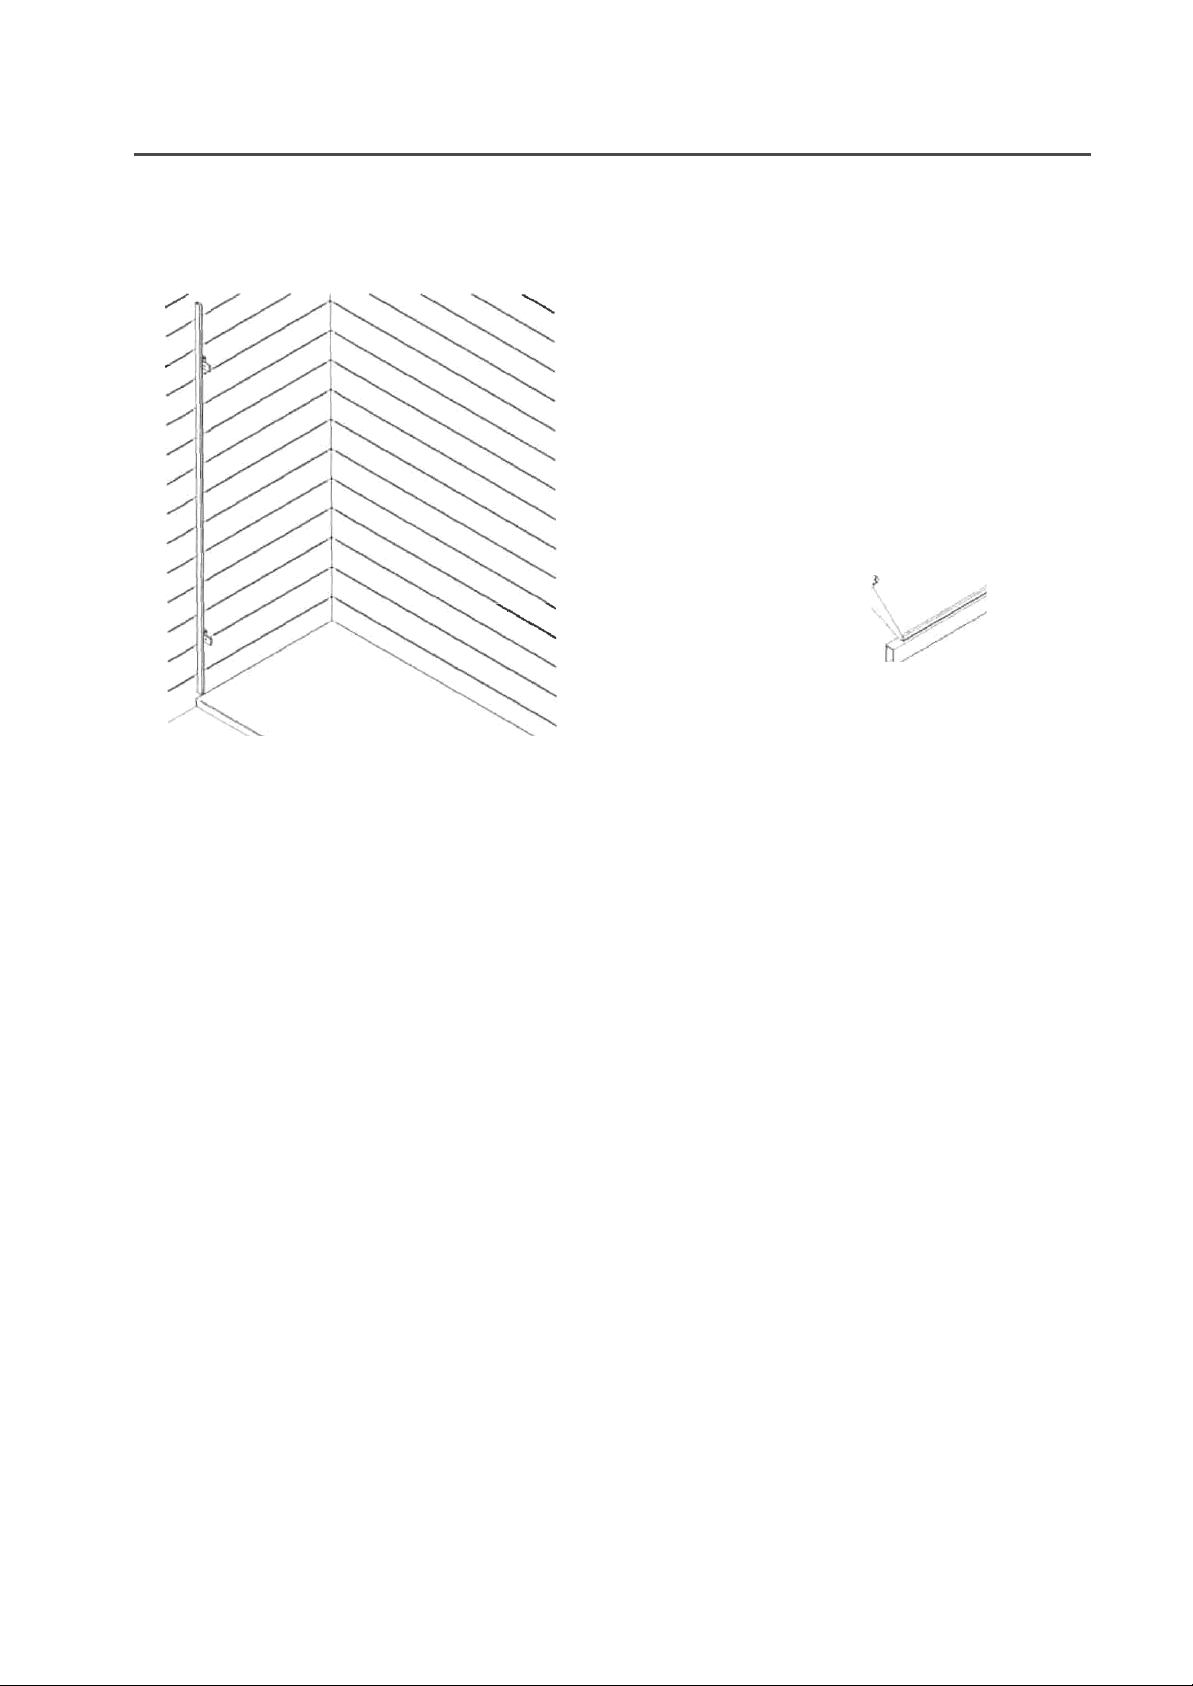
Use a good quality, full length spirit level to ensure that the wall channel is perfectly upright.
Whenhandlingglass,useglassliftersandtakecaretoensurethatcornersoredgesarenotknocked.
Whencuttingaluminumextrusion,wraptheprofilewithmaskingtapefirstandcutthroughthetaped
area-thiswillhelpprotectthesurroundingsurface.Useafinefiletosmoothcutedges.
Parts Supplied:
The parts supplied are illustrated on the following pages.
Please check them and contact Majestic Showers in the event of missing or damaged parts.
These instructions are for left and right-handed units. The diagram shows left-handed unit.
NB: NOT All parts are reversible.

Archangel Installation Guide
Page 3 of17
Part List:
1
xFixedPanel-Glass
1xLeafPanel-Glass
2 x 24 mm Channel &Fixings
2
x Hinge Assembly
Fixed Glass Seal
2xWallBracketAssembly Rubber SpacerTape
LeafGlassSeal 10 mm SpacerBlock

Archangel Installation Guide
Page4of17
Part List:
1xFloorEndcap 1x WallEndcap

Archangel Installation Guide
Page5of17
1
Ifashowertrayisused,preferablypositionthefloor
channelaminimum of10mminboardoftheedge.
Insertthe10mmspacer blockintothefloor
channelanduseittoaligntheverticalwall
channel.
Useaspiritleveltoensurethatthewallchannelis
vertical.
Markthescrewholesfortheverticalchannelon
the wall.
Removethewallchannel,drill6mm holesinto
thewallandinsert thewallplugs.

Archangel Installation Guide
3
Page 6 of 17
Repositiontheverticalwall channeland insertthe topandbottomscrewsto holditin
place.
Insert therubber spacer strip intothefloor channel and cuttolength.
Using suction glass lifters, lift the fixed glass panel into the
channels.
Make sure that the panel is plumb vertical.
Ifnecessary,use additionalshort piecesofrubberstripinthefloorchannelto adjustthe heightand
level ofthe glass.Takenoteoftheirpositions.Donotusemorethan3thicknesses ofrubberstripin
anyone
position.
The glass panel can be moved backwards or forwards in the floor channel but the glass must
be inside
thevertical wall channel by at least 3mm alongits entire height.
Usingametalscriber,markthefloorchannelattheendoftheglassandmarkthewallchannelatthe
top of the glass.


Archangel Installation Guide
Page 7 of 17
4 Disassembletheglass-to-wallbrackets,beingcarefulnottodamagethefaceplates.
Ensure the clear plastic gaskets are inserted and wall screw plates facing inward (to the
wet side
of theshower).
Alignthebracketscentrallyto the slotsintheglasspanel,holdthemin placeand markthescrew
positions for the bracket onto thewall.
Put the brackets to one side and use the suction lifters to remove the glass panel.
Remove the floor channel, having marked its position, and unscrew and remove the wall channel.
Drill 7 mm holes into the wall where the brackets will be mounted and insert wall plugs.
Cut the floor and wall channels were marked earlier and file smooth.
Viewfromwetside.

Archangel Installation Guide
Page8of17
Runabeado1siliconealongthebackfaceofthewallchannel
and screw it tightly in place on the wall.
Loosely screw the glass-to-wall brackets to the wall.
Run a bead of silicone along the base of the floor channel and position it on the tray where marked.
5

Archangel Installation Guide
Page9of17
Usethe10mmspacerblocktoensurethatthe floorchannelisalignedwiththewallchannel,pushthe
ends together and tape inposition.
Removethe10mmspacerand applya generousamountof siliconeintothe cornerjointformedby
the
two channels.
Reinsert the noted rubber strips into the floor channel.
As shown,run a bead of siliconealong the insidewallsofthefloorandwall channels.
Usingthesuctionlifters,replacetheglasspanelintothesiliconelinedchannels.
To prevent leakage around the wall brackets, fill the glass slot at the lower bracket with silicone.
Looselyfixthe faceplates of the glass-to-wallbracketsthrough the holes in the glass,ensuring
that the
clear plastic gaskets are inserted to both sides of the glass.
Fully tighten the bracket wall screws.
Ensurethat the glasspanelisverticalin thecorrectposition,then tighten thewallbracketface
plates.

Archangel Installation Guide
Page 10of17
7
Loosen the hinge cover screws andremove the
hinge covers.
Unscrew and remove the clamp plates and one
clamp gasket from each side of the
hinge.(see
below).
Keep all disassembled parts safe for later use.
Hinge Cover Screw

ArchangelInstallationGuide
Page11of17
Offerthehinges uptothewet sideof thefixedpanel.
Ensure that all gaskets are in place ensuring that each
face of
theglassisseparatedfromthehingesbyaclamp
gasket.
Onlyonesideofthehingewillfitin the cutoutsofthe fixed
panel.
Refittheclampgasketandclampplatetothedrysideofthe
glass andattach using 2 xM6screws.
Checkthattheclampplateisfittedwiththewidearea
nearest theedge of thefixedglass.
Check that the hinge is aligned with the glass edge, is
central
and properly aligned.
Tighten the hinge clamp screws

Archangel Installation Guide
Page12of17
9
IMPORTANTNOTE:
Thefixedglass seal is to be cut into3sectionsto fit to thefixedglass panel
above,
between and below thehinges.
Forgoodsealing,itisimportantthattheindividualsectionsarefittedascloseto
the hinges aspossible.
Cutalengthofthefixedglasssealtoalignwiththeupperedgeofthefixedglassand theuppersideof
the upperhinge.
Cuttwofurther lengthstofitbetween thehinges andbetween thelowerhingeandthebottom ofthe
fixed glass.

Archangel Installation Guide
Page13of17
Whenfittingtheglassleaf,ensurethatitisthe
rightwayupso that its hinge holes align
with thoseofthepanelwhen its topedgeis
level withthetopedge of thePanel.
The distance between the top of the upper
cutoutandtheedgeofthe glassis282mm,
whereasthe distancebetweenthe lower
cutout
andtheglassedgeis276mm.
Fitthe glassleafseal to thebottomedgeofthe glassleaf
and
trim tosize.

Archangel Installation Guide
Page14of17
12
Offer the glass leaf up to the hinges.
Ensure that all gaskets are inplace ensuringthat
eachfaceoftheglassisseparatedfromthe
hinges by agasket.
Refitthe clampgasketandclampplateto thedry
sideoftheglassleafandattachusing2xM6
screws.
Checkthattheclampplateisfittedwiththewide
areanearest theedgeoftheleafglass.
Check that the hinge is aligned with the glass
edge, is central and properly aligned.
Tighten the hinge screws.

Archangel Installation Guide
Page15of17
13
Fitthe coversto thehingeplatesbyhooking
themoveronesideofthehingeplatesand
tighteningthe grubscrewsatthe otherside.
Usingasmearofsilicone,fitthechromium
screwcoversprovidedto thewallbracket
screws and the coverplatesto the wall
screw
sections.

Archangel Installation Guide
Page16of17
14
NOTE: The wall and floor channel endcaps are subtly different, see images below.
Identifythewall channelendcapandusingasmearofsilicone,mountitinplaceontopofthewall
channel.
Similarly fit the floor channel endcap to the floor channel.
Endcap
Endcap

Archangel Installation Guide
Page17of17
Other Majestic Bathroom Fixture manuals