Majestic Como vJUN19 User manual

Como Corner Installation Guide - vJUN19
1
The Majestic Shower Company Limited
17 Flitch Industrial Estate, Chelmsford Road, Dunmow,CM6 1XJ
Telephone +44 (0) 8448 001 500
Thank you for purchasing this Como shower enclosure. Please study these instructions
carefully before assembly and installation.
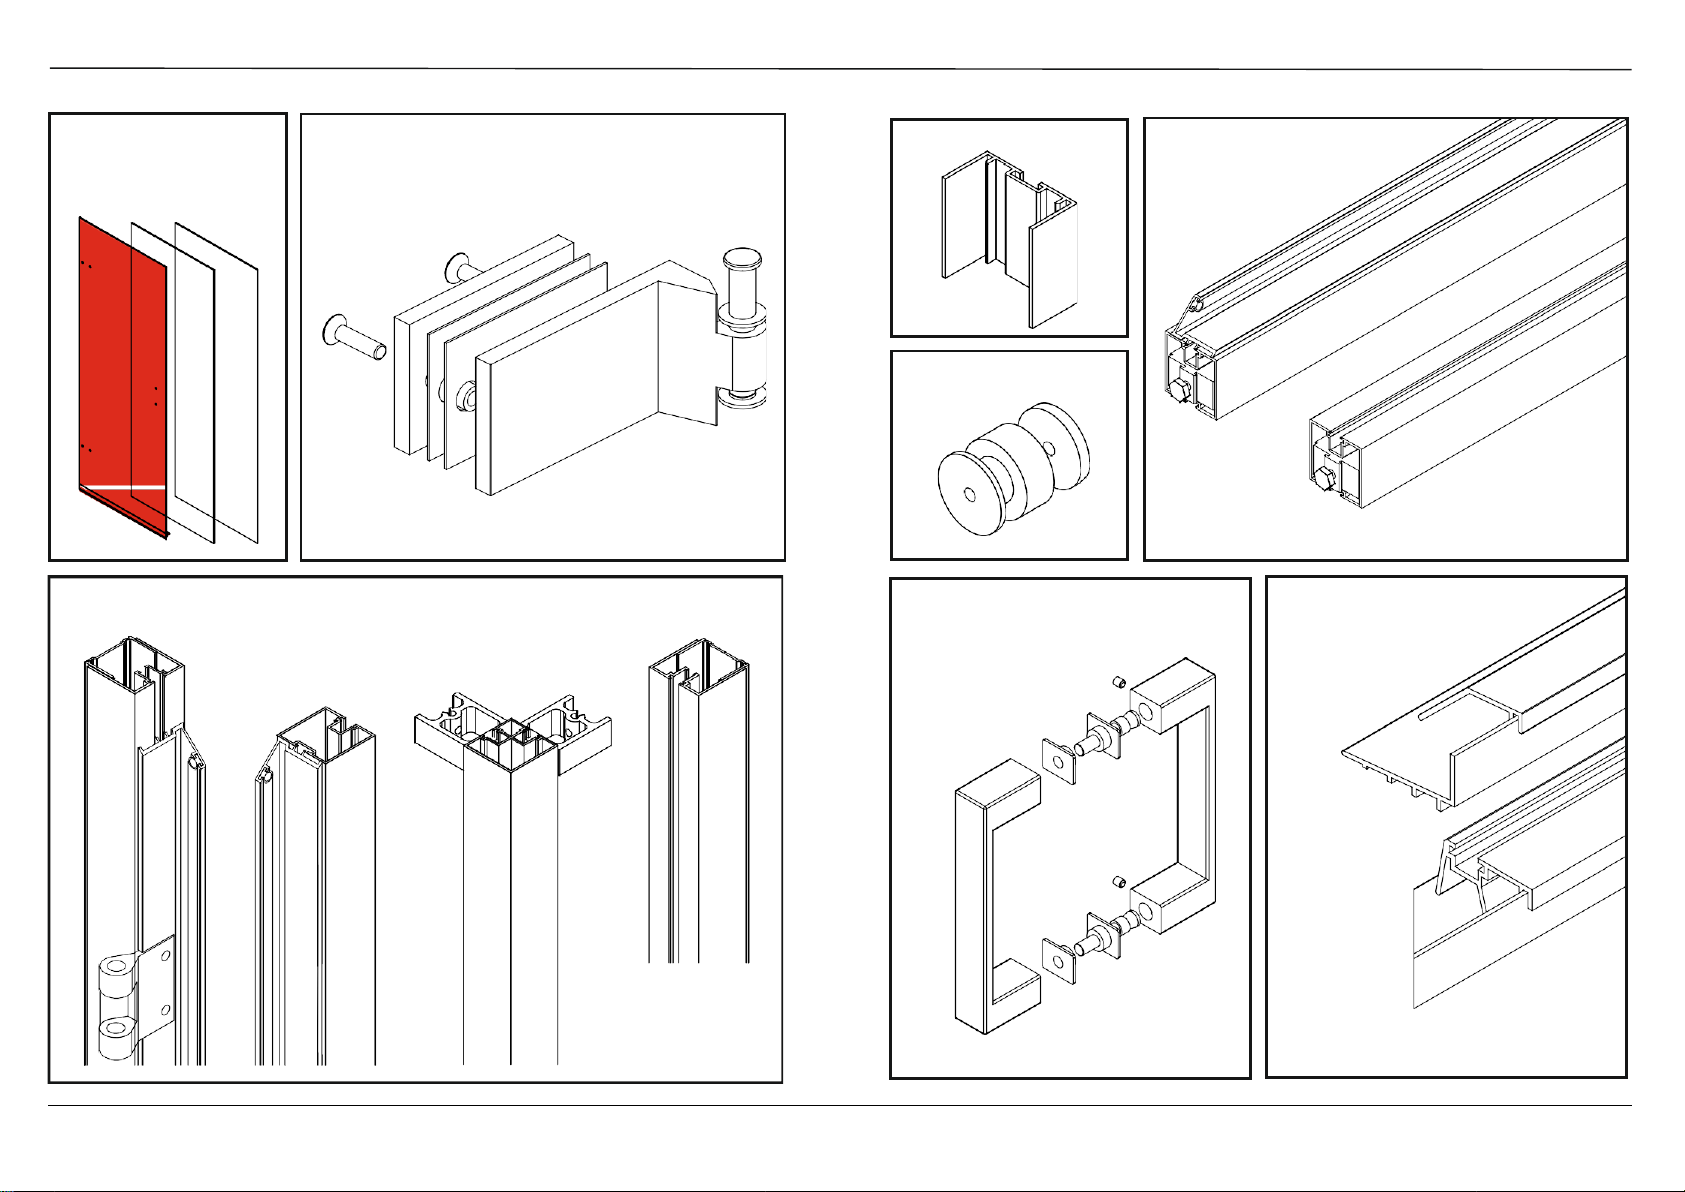
Checking of Parts
Parts are listed at the beginning of this guide. Please check all supplied parts immediately
upon receipt and contact the Majestic Shower Company in the event of any missing or
damaged parts.
Handling of Parts
When handling glass, take care to ensure that corners or edges are not knocked. Do not
place glass on hard surfaces - place cushioning material underneath to prevent the glass
from shattering.
Unwrap all metal parts carefully to prevent damaging the plated surfaces.
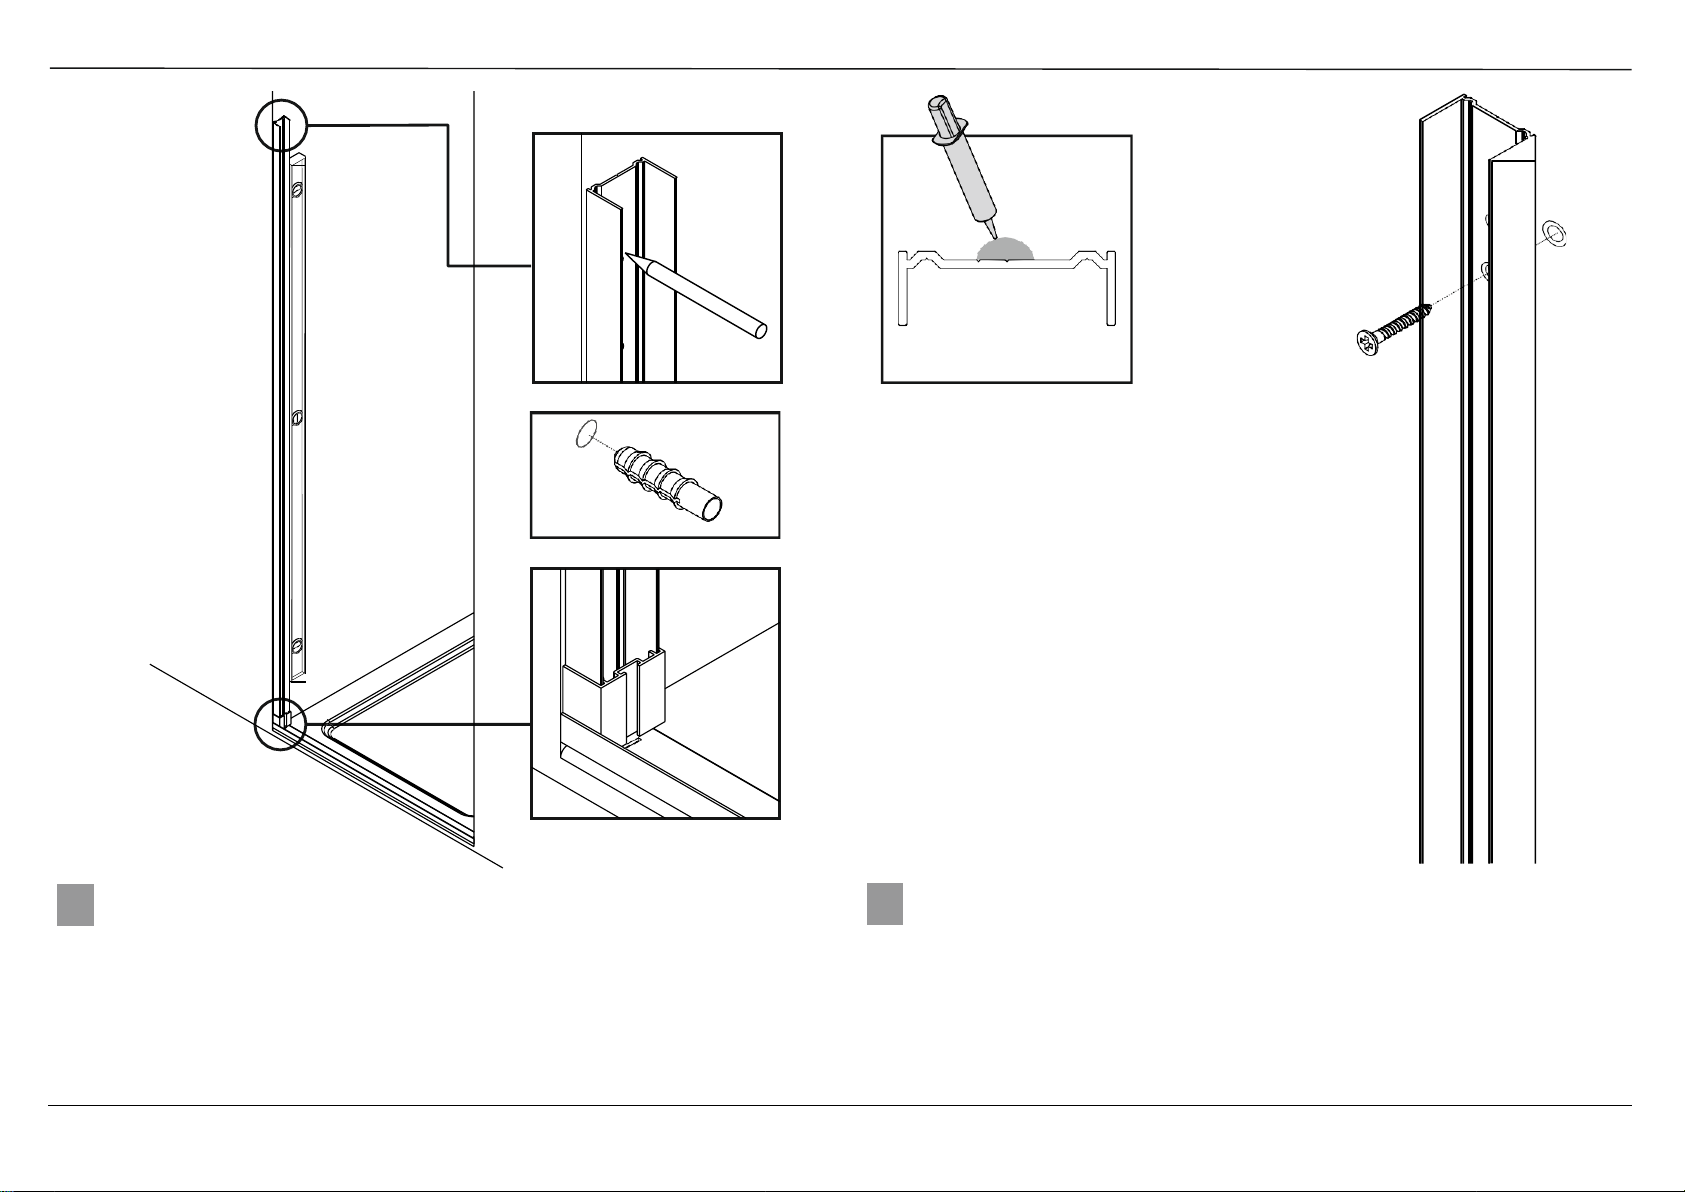
Pre Installation Checks
Prior to undertaking installation, check the accuracy of the following against specifications
for the particular installation location:
-
Verticality and flatness of the wall. A maximum of 15 mm lean in or lean out of thewall
relative to the floor or tray can be accommodated by the wall profiles.
-
Levelness and flatness of the floor or rim of the shower tray.
DO NOT ASSEMBLE WITHOUT FULLY READING THESEINSTRUCTIONS

Como Corner Installation Guide
2
The Majestic Shower Company Limited
17 Flitch Industrial Estate, Chelmsford Road, Dunmow, CM6 1XJ
Telephone +44 (0) 8448 001 500
1 x Wall Frame assembly
- hinge side of door
1 x Centre Post
assembly
1 x Wall Frame assembly
- Return Panel side
1 x Corner Post
assembly
Wall fixing screws
and wall plugs
also supplied.
2 x Hinge assemblies
including screws
and gaskets
Door Handle or Towel Rail
assembly as ordered
1 x Template
12 x Adjustable spacers
1 x Glass Door with
bottom rail and seal
1 x Glass Return Panel
1 x Glass InLine Panel
1 x Top Frame assembly
for Door side
1 x Top Frame assembly
for Return Panel side
Underframe and 2 x Underframe
Covers for Door and
InLine panel
Underframe and Underframe Cover
for Return Panel

Como Corner Installation Guide
3
The Majestic Shower Company Limited
17 Flitch Industrial Estate, Chelmsford Road, Dunmow, CM6 1XJ
Telephone +44 (0) 8448 001 500
< 15 mm
5-10mm
The Underframe is supplied over length to be trimmed to size on site.
You can trim up to a maximum of 15 mm from the wall end of each section. An ideal
position for the underframe would be 5-10mm back from the front edge of the tray.
No NOT cut the Underframe Covers - these are supplied at the correct length for your
door and panel.
Apply a generous amount of silicone to the recesses on the underside of the
Underframe sections and place them in position on the shower base. Hold them
in position with masking tape.
Apply fillets of silicone at each end of the Underframe to seal it against the walls
and ensure a sealed mitre at the corner.
5-10mm
1
2

Como Corner Installation Guide
4
The Majestic Shower Company Limited
17 Flitch Industrial Estate, Chelmsford Road, Dunmow, CM6 1XJ
Telephone +44 (0) 8448 001 500
Unscrew and separate the covers from the Wall Frame assemblies. You will also need to
separate the Cover from the Wall Frames used on the hinge side of the Door, as shown
above.
Lay the glass Door horizontally on cushioned trestles or similar and assemble the
hinges to the glass Door as shown. Ensure that the clear plastic sleeves are fitted
inside the holes in the glass and that gaskets are placed either side of the glass.
Use the Wall Frame cover with hinge parts attached to check the spacing between
the hinges and use a set square to ensure that the hinges are correctly aligned.
Fully tighten the hinges. Leave for 10 minutes and then re-tighten to compensate
for compression of the gaskets.
Cover
Inner wall profile
Outer wall profile
CHECK
CHECK
3
4

Como Corner Installation Guide
5
The Majestic Shower Company Limited
17 Flitch Industrial Estate, Chelmsford Road, Dunmow, CM6 1XJ
Telephone +44 (0) 8448 001 500
Place the outer Wall Frames in position. Use the template provided to position the
bottom of each outer Frame and ensure that there is enough space between it and the
Underframe for the inner Wall Frames to be fitted later. Use a spirit level to ensure that
the profiles are plumb vertical.
Mark all screw hole positions on the wall, and drill and fit the wall plugs provided.
Run a bead of silicone down the back of the outer Wall Frames as shown to ensure a
waterproof seal against the wall.
Using 3 of the short (30 mm) screws supplied for each outer profile, screw the frames
to the wall at top, bottom and middle, using the countersunk holes in the frames.
5
6

Como Corner Installation Guide
6
The Majestic Shower Company Limited
17 Flitch Industrial Estate, Chelmsford Road, Dunmow, CM6 1XJ
Telephone +44 (0) 8448 001 500
Assemble the inner Wall Frames to the outer profiles using the longer screws
provided in the remaining holes. Note that inner frame supporting the door has a
small metal tag protruding at the bottom which is to locate in the pierced slot at the
end of the Underframe.
Before screwing the frames together, use the self adhesive pads to position the
adjustable spacers over the wall fixing holes and adjust as required to compensate
for any lean in or lean out of the walls and to ensure that the faces of the inner
frames are plumb vertical. Once you are satisfied that they are, fully tighten the
screws.
Once you are satisfied that the faces of the inner wall frames are at 90 degrees to the
shower base, fully tighten the wall screws and replace the cover plate on the hinge side
of the door as shown.
7
8

Como Corner Installation Guide
7
The Majestic Shower Company Limited
17 Flitch Industrial Estate, Chelmsford Road, Dunmow, CM6 1XJ
Telephone +44 (0) 8448 001 500
Fit the Return Panel side Underframe Cover to the underframe pushing it up
against the Inner Wall Frame. Apply a thin bead of silicone to the groove on the
underside of the cover to retain it.
Using suction glass lifters, place the Return glass panel into the channel of the Wall
Frame assembly and the channel of the Underframe.
9
10

Como Corner Installation Guide
8
The Majestic Shower Company Limited
17 Flitch Industrial Estate, Chelmsford Road, Dunmow, CM6 1XJ
Telephone +44 (0) 8448 001 500
Place the Corner Post in position and then fit the TopFrame. Slide the TopFrame
onto the lug projecting from the Corner Post and secure it using an Allen key through
the hole in the top of the TopFrame. The wall end of the TopFrame comes fitted with
a lug and projecting bolt head that slides into the channel at the top of the Wall Frame.
Use the spanner provided to tighten the bolt head so that the TopFrame is locked in
position.
Fit the InLine Panel Underframe Cover to the underframe pushing it up against the
Corner Post. Apply a thin bead of silicone to the groove on the underside of the cover
to retain it.
Using suction glass lifters, place the InLine glass panel into the channel of the Corner Post
and the channel of the Underframe.
1
12

Como Corner Installation Guide
9
The Majestic Shower Company Limited
17 Flitch Industrial Estate, Chelmsford Road, Dunmow, CM6 1XJ
Telephone +44 (0) 8448 001 500
Place the Centre Post in position and then fit the Top Frame. Slide the Top Frame onto the
lug projecting from the Corner Post and secure it using an Allen key through the hole in the
top of the Top Frame. The wall end of the Top Frame comes fitted with a lug and projecting
bolt head that slides into the channel at the top of the Wall Frame. Use the spanner provided
to tighten the bolt head so that the Top Frame is locked in position.
A lug projecting from the underside of the Top Frame is to fit into the top of the Centre Post.
You will need to drill through the top of the Centre Post into the lug from inside the shower
and secure with the self tapping screws provided.
Fit the Door Underframe Cover to the underframe. This part is intended to be
removable to facilitate cleaning.
13
14

Como Corner Installation Guide
10
The Majestic Shower Company Limited
17 Flitch Industrial Estate, Chelmsford Road, Dunmow, CM6 1XJ
Telephone +44 (0) 8448 001 500
Offer up the assembled Door. Place the plastic washers in between the moving parts of the
hinge as shown and drop the retaining pins into place from above.
Apply a light smear of grease to the hinge pins before inserting them.
If you have chosen a back-to-back handle, fit this to the door as shown,
ensuring the black plastic washers are located in the holes on both sides of the
glass.
Tighten the grub screws on the inside handle to secure.
Alternatively, if you have chosen a towel rail handle, follow the instructions
supplied with that handle
Grub screw
INSIDE OF
SHOWER
Plastic washer
OUTSIDE OF
SHOWER
15
16

Como Corner Installation Guide
11
The Majestic Shower Company Limited
17 Flitch Industrial Estate, Chelmsford Road, Dunmow, CM6 1XJ
Telephone +44 (0) 8448 001 500
Seal around the glass panels on the inside of the shower only as shown above. Push or peg
the glass away from you so that you have sufficient space between the glass and the frame
and apply a thin bead of silicone.
INSIDE
INSIDE
17
Other Majestic Bathroom Fixture manuals
Popular Bathroom Fixture manuals by other brands

Hans Grohe
Hans Grohe Focus 190 31608 Series Instructions for use/assembly instructions

GREENS
GREENS OXI installation instructions

Armitage Shanks
Armitage Shanks SANDRINGHAM SELF CLOSING TAP S7029AA Installation and servicing instruction

Franke
Franke RH320 Installation and operating instructions

Luxier
Luxier SP03-AL installation guide

April
April Identiti Matrix Wetroom Panel installation instructions