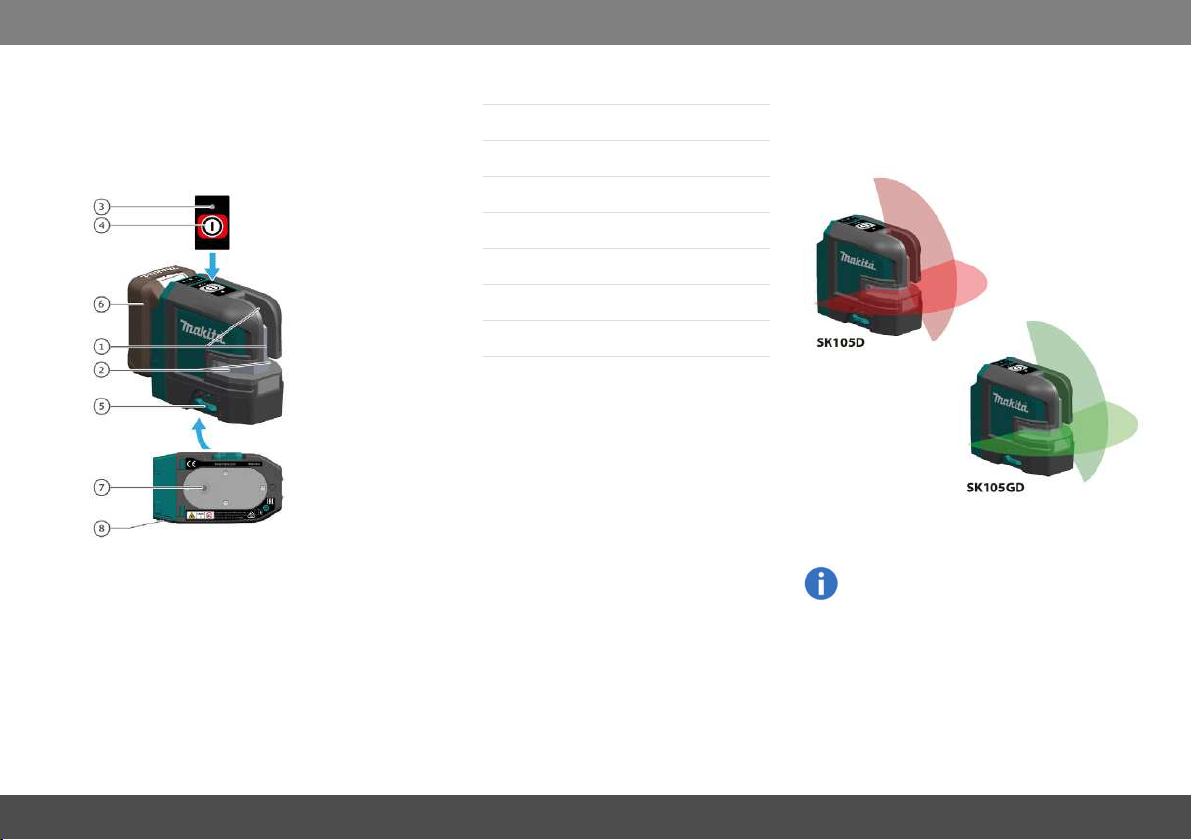
Makita SK105GD User manual

Overview 2
Technical data 3
Instrument Set-up 5
Operations 8
How to use the adapters and wall mount 11
Message Codes 13
Accuracy Check 14
Care 16
Safety instructions 17
Optional accessories 22
Makita SK105D/SK105GD 1

Overview
Ove rview
The Makita SK105D/SK105GD isa self-levelling
cross-line laser. It is a reliable precision laser for
any kind of tasks like levelling, plumbing, trans-
fering and setting out right angles.
It supports you on job side with two crossing ver-
tical and horizontal lines.
1Window of vertical line
2Window of horizontal line
3Status LED
4ON / Set key
5Levelling lock/ Transportation lock
6Battery (optional)
7Tripod thread 1/4"
8DC jack
There are 2 different types available:
lSK105D (red laser)
lSK105GD (green laser)
On all images in this document only the
SK105D is shown.
Makita SK105D/SK105GD 2

Technical data
Te c h n ica lda ta
Makita SK105D/SK105GD 3
Description SK105D SK105GD
Beam direction/fan angle Vertical/ >160°, Horizontal / >180°
Range* 25 m (82 ft) 35 m (115 ft)
Range* with receiver 80 m (262 ft)
Levelling accuracy ±0.3 mm/m = ±3.0 mm @ 10m (±0.004 in/ft = ±0.12 in @ 33ft)
Horizontal/Vertical line accuracy ±0.3 mm/m (±0.004 in/ft)
Self-levelling range ± 4 °
Self-levelling time < 3 s
Out-of-level warning Yes - blink lines every 5 s
Levelling system Automatic pendulum lockable
Laser type 635 ± 5 nm, Class 2 (acc. IEC 60825-1) 525 ± 5 nm, Class 2 (acc. IEC 60825-1)
Battery cartridge BL1015 / BL1016 / BL1020B / BL1021B / BL1040B / BL1041B
Operating time with Li-Ion battery
(2 beam)
15 h (BL1015/BL1016)
20 h (BL1020B/BL1021B)
40 h (BL1040B/BL1041B)
7 h (BL1015/BL1016)
10 h (BL1020B/BL1021B)
20 h (BL1040B/BL1041B)
Net weight 0.46 kg
Weight with Li-Ion battery 0.67 kg – 0.84 kg
Power supply Makita battery cartridge / USB adapter
Rated voltage D.C. 10.8 V - 12 Vmax, D.C. in 5 V
Dimensions (L x W x H) 112 x 61 x 102 mm (4.41 x 2.40 x 4.01 in)
Operating temperature (instrument) -10…+50 °C (+14…+122 °F)
Storage temperature (instrument) -25…+70 °C (-13…+158 °F)
Laser line width at 5m distance < 2 mm (<0.08 in)
Tripod thread 1/4’’ (+ 5/8’’ with adapter)
Pulse power for receiver Yes, auto
* depending on lighting conditions

Technical data
Please note the following:
lDue to our continuing program of
research and development, the spe-
cifications herein are subject to change
without notice.
lSpecifications may differ from country
to country.
lThe weight may differ depending on
the attachment(s), including the bat-
tery cartridge. The lightest and heav-
iest combination, according to EPTA-
Procedure 01/2014, are shown in the
table.
lSome of the battery cartridges listed
above may not be available depending
on your region of residence.
WARNING
Only use the battery cartridges listed above. Use
of any other battery cartridges may cause injury
and/or fire.
4
Makita SK105D/SK105GD

Instrument Set-up
Ins tru me n tSet-u p
Introduction
The safety instructions (see Safety Instruc-
tions) and the user manual should be read
through carefully before the product is used
for the first time.
The person responsible for the product must
ensure that allusers understand these dir-
ections and adhere to them.
The symbolsused have the following meanings:
WARNING
Indicates a potentially hazardous situation or an
unintended use which, if not avoided, will result in
death or serious injury.
CAUTION
Indicates a potentially hazardous situation or an
unintended use which, if not avoided, may result in
minor injury and/or appreciable material, financial
and environmental damage.
Important paragraphs which must be
adhered to in practice as they enable the
product to be used in a technically correct
and efficient manner.
Levelling lock
Levelling unlocked
In the unlocked position the instrument auto-
matically levels itself within the specified inclin-
ation range. (See Technical data)
Levelling locked
Turn the levelling lock in order to transport or tilt
the instrument beyond the self-levelling range.
When locked, the pendulum is fixed and the self-
levelling function is deactivated. In thiscase the
laser blinks every 5sec.
Makita SK105D/SK105GD 5

Instrument Set-up
Laser receiver
To be able to detect the laser lines over long dis-
tances or in unfavourable lighting conditions, a
laser receiver can be used.
We recommend the Makita LDX1 laser
receiver.
Li-Ion battery
Installing or removing battery cartridge
CAUTION
Always switch off the tool before installing or
removing of the battery cartridge.
CAUTION
Hold the tool and the battery cartridge firmly when
installing or removing battery cartridge. Failure to
hold the tool and the battery cartridge firmly may
cause them to slip off your hands and result in dam-
age to the tool and battery cartridge and a per-
sonal injury.
To remove the batterycartridge, slide it from the
tool while sliding the button (1) on the front of the
cartridge.
To install the batterycartridge, align the tongue on
the battery cartridge with the groove in the hous-
ing and slip it into place. Insert it all the way until it
locks in place with a little click. If you can see the
red indicator (2) on the upper side of the button, it
is not locked completely.
CAUTION
Always install the battery cartridge fully until the
red indicator cannot be seen. If not, it may acci-
dentally fall out of the tool, causing injury to you or
someone around you.
CAUTION
Do not install the batterycartridge forcibly. If the
cartridge does not slide in easily, it is not being
inserted correctly.
CAUTION
Connecting the wrong adapter may cause serious
damage to the instrument. Any damage caused
by misuse is not covered by warranty. Use only
Makita approved batteries USB adapters and
cables. Unapproved can damage the instrument.
Makita SK105D/SK105GD 6

Instrument Set-up
Using the USB adapter (optional) Makita CXT batteries
Indicating the remaining battery capacity
Only for battery cartridges with the indicator
Pressthe check button (2) on the battery cartridge
to indicate the remaining battery capacity. The
indicator lamps (1) light up for a few seconds and
show the remaining capacity:
Depending on the conditions of use and the
ambient temperature, the indication may dif-
fer slightly from the actual capacity.
Makita SK105D/SK105GD 7

Operations
Ope ratio n s
Switching ON/Set key
If the instrument is locked press laser key 3
times to switch off:
Brightness reduction
Makita SK105D/SK105GD 8

Operations
Functions with unlocked levelling
Vertical lines and horizontal lines Horizontal line Vertical line
Makita SK105D/SK105GD 9

Operations
Functions with locked levelling
Horizontal line Vertical line Horizontal line tilted
Makita SK105D/SK105GD 10

How to use the adapters and wall mount
How tous e the a d a p ters a n d wa llmou n t
L-adapter
Put the instrument on L-adapter and fix it by
thread.
L-adapter can not be used when battery cart-
ridge BL1040B or BL1041B isinserted.
Alignment of vertical laser lines
Turn the instrument 360° to adjust the vertical line.
PRO L-adapter
(optional accessory)
Put the instrument on PRO L-adapter and fix it by
thread.
Turn the instrument 360° to adjust the vertical line.
PRO L-Adapter can not be used when bat-
tery cartridge BL1040B or BL1041B is inser-
ted.
Makita SK105D/SK105GD 11

How to use the adapters and wall mount
Wall mount
(optional accessory)
Turn the adjustment knob of the wallmount to
loose and fix the slide for fine adjustment of the
horizontal line to the desired reference level.
The wallmount is a single item and will not be
delivered with the L-adapter as shown
above.
Different fixing applications
Makita SK105D/SK105GD 12

Message Codes
Mes s a g e C o d e s
Makita SK105D/SK105GD 13
Laser LED Cause Correction
ON Lights green Normal -
ON Blinks green Normal, laser set at reduced
brightness
OK - or press ON / Set key for 2
seconds to get strong laser beam
ON Lights red Instrument is at low power Change power supply
OFF Lights red 5 seconds then OFF Battery empty Change power supply
OFF Blinks red Temperature alert Cool down - or
heat up instrument
Blinks Lights red Instrument isout of self-levelling
and instrument is at low power
Change power supply
Blinks Blinks red Instrument isout of self-levelling Position the instrument almost
horizontal
Blinks every 5 seconds Lights red Levelling lock is activated and
instrument is at low power
Change power supply
Blinks every 5 seconds Lights green Normal, levelling lock is activated -
Blinks every 5 seconds Blinks green Levelling lock is activated and
laser set at reduced brightness
-

Accuracy Check
Ac c u rac y Ch e c k
Check the accuracy of your instrument reg-
ularly and particularly before important meas-
uring tasks. Check Levelling lock before
checking the accuracy.
Levelling
Checking the accuracy of the levelling
Set the instrument on a tripod half-way between
two walls (A+B) that are approx. 5 m apart. Place
the lock switch in the "Unlocked" position (see Lev-
elling lock). Direct the instrument at wallA and
switch on the instrument. Activate the horizontal
laser line or laser point and mark the position of
the line or the point on wall(A1). Rotate the instru-
ment by 180° and mark the horizontal laser line or
the laser point in exactly the same way on wall
(B1).
Then place the instrument at the same elevation
as close as possible to wallA and again mark the
horizontal laser line or the laser point on wallA
(A2). Rotate the instrument by 180° again and
mark the laser on wall B (B2). Measure the dis-
tances of the marked points A1-A2 and B1-B2.
Calculate the difference of the two meas-
urements.
|(A1 - A2) - (B1 - B2)| <=2 mm
If the difference does not exceed 2 mm, then the
instrument is within tolerance.
Should your instrument be outside of the spe-
cified tolerance, please contact a localdealer
or an authorised Makita distributor.
Makita SK105D/SK105GD 14

Accuracy Check
Vertical and horizontal line
Checking the accuracy of the horizontal line
Place the lockswitch in the "Unlocked" position
(see Levelling lock). Position the instrument
approx. 5 m away from the wall. Direct the instru-
ment at the wall and switch on. Activate the laser
line and mark the intersection point of laser
crosshairs on the wall. Swivel the instrument to the
right and then to the left. Observe the vertical devi-
ation of the horizontal line from the marking. If the
difference does not exceed 3 mm, then the instru-
ment is within tolerance.
Checking the accuracy of the vertical line
Place the lockswitch in the "Unlocked" position
(see Levelling lock). As a reference, use a plumb-
bob and attach it as close as possible to an approx.
3 m high wall. Position the instrument at a distance
of approx. 1.5 m from the wallat an elevation of
approx. 1.5 m. Direct the instrument at the wall
and switch on. Rotate the instrument and align it
with the bottom of the plumb line. Now read off the
maximum deviation of the laser line from the top of
the plumb line. If the difference does not exceed 2
mm, then the instrument is within tolerance.
Should your instrument be outside of the spe-
cified tolerance, please contact a localdealer
or an authorised Makita distributor.
Makita SK105D/SK105GD 15

Care
Care
Never immerse the instrument in water. Wipe off
dirt with a damp soft cloth. Never use aggressive
cleaning agents or solvents. Treat the instrument
with the same care that you would apply to bin-
ocularsor a camera. Dropping or violent shaking
of the instrument may damage it. Checkthe instru-
ment for any damage before using it. Checkthe
levelling accuracy of the instrument regularly.
To warranty the best precision and visibility please
clean the optics of your instrument regularly.
Therefore blow off the dust from the glasses
without touching the optics with your fingers. If
necessary use a damp soft cloth and a little bit of
pure alcohol.
To avoid wrong measurements also clean your
adapters regularly. This could be done also by the
proposed recommendation. Especially the inter-
face between the adapter and instrument should
alwaysbe clean to enable easy rotation. To clean
the magneticsurface you could use compressed
air or modelling clay.
If the equipment get wet always dryit (max.
70°C/158°F) before repacking it into the case.
Makita SK105D/SK105GD 16

Safety instructions
Sa fety ins tru c tio n s
The person responsible for the instrument
must ensure that allusers understand these
directions and adhere to them.
Areas of responsibility
Responsibilities of the manufacturer of the ori-
ginal equipment:
Makita Corporation Anjo, 3-11-8, Sumiyoshi-cho,
Aichi 446-8502, Japan
Makita, Jan-Baptist Vinkstraat 2, 3070, Belgium
Internet: www.makita.com
The company above is responsible for supplying
the product, including the User Manual in a com-
pletely safe condition.
The company above is not responsible for third
party accessories.
Responsibilities of the person in charge of the
instrument:
1. To understand the safety instructions on
the product and the instructions in the
User Manual.
2. To be familiar with localsafety regulations
relating to accident prevention.
3. Always prevent access to the product by
unauthorised personnel.
Permitted use
1. Projection of horizontal and vertical laser
lines
Prohibited use
1. Using the product without instruction
2. Using outside the stated limits
3. Deactivation of safety systems and
removalof explanatory and hazard labels
4. Opening of the equipment by using tools
(screwdrivers, etc.)
5. Carrying out modification or conversion
of the product
6. Deliberate dazzling of third parties; also in
the dark
7. Inadequate safeguards at the surveying
site (e.g. when measuring on roads, con-
struction sites, etc.)
Hazards in use
WARNING
Watch out for erroneous measurements if the
instrument isdefective or if it has been dropped or
has been misused or modified. Carry out periodic
test measurements. Particularly after the instru-
ment has been subject to abnormaluse, and
before, during and after important meas-
urements.
CAUTION
Never attempt to repair the product yourself. In
case of damage, contact a localdealer.
WARNING
Changes or modifications not expressively
approved by Makita/manufacturer for compliance
could void the user´s authority to operate the
equipment.
CAUTION
Laser light is bright and blinding. Do not shine at
aircraft or vehicles at any distances.
WARNING
Makita Line Laser and L-adapter / PRO L-adapter
should not be used in the vicinityof pacemaker
because of integrated magnets which can affect
the function of the pacemaker.
Makita SK105D/SK105GD 17

Safety instructions
Battery tool use and care
1. Recharge onlywith the charger specified
by the manufacturer. A charger that is
suitable for one type of batterypackmay
create a riskof fire when used with
another battery pack.
2. Use power tools only with specifically des-
ignated batterypacks. Use of any other
battery packs may create a risk of injury
and fire.
3. When battery pack is not in use, keep it
away from other metal objects, like paper
clips, coins, keys, nails, screws or other
small metal objects, that can make a con-
nection from one terminal to another.
Shorting the battery terminals together
may cause burns or a fire.
4. Under abusive conditions, liquid may be
ejected from the battery; avoid contact. If
contact accidentally occurs, flush with
water. If liquid contacts eyes, additionally
seekmedicalhelp. Liquid ejected from
the battery may cause irritation or burns.
5. Do not use a batterypackor tool that is
damaged or modified. Damaged or mod-
ified batteries may exhibit unpredictable
behaviour resulting in fire, explosion or
risk of injury.
6. Do not expose a battery pack or tool to
fire or excessive temperature. Exposure
to fire or temperature above 130 °C may
cause explosion.
7. Follow allcharging instructions and do
not charge the battery pack or tool
outside the temperature range specified
in the instructions. Charging improperly
or at temperatures outside the specified
range may damage the batteryand
increase the risk of fire.
Important safety instructions for battery cart-
ridge
1. Before using batterycartridge, read all
instructions and cautionary markings on
(1) battery charger, (2) battery, and (3)
product using battery.
2. Do not disassemble battery cartridge.
3. If operating time has become excessively
shorter, stop operating immediately. It
may result in a risk of overheating, pos-
sible burnsand even an explosion.
4. If electrolyte gets into your eyes, rinse
them out with clear water and seek med-
icalattention right away. It may result in
loss of your eyesight.
5. Do not short the battery cartridge:
(1) Do not touch the terminals with any
conductive material.
(2) Avoid storing battery cartridge in a
container with other metal objects such
as nails, coins, etc.
(3) Do not expose battery cartridge to
water or rain. A batteryshort can cause a
large current flow, overheating, possible
burns and even a breakdown.
6. Do not store the battery cartridge in loc-
ations where the temperature may reach
or exceed 50 °C (122 °F).
7. Do not incinerate the batterycartridge
even if it is severelydamaged or is com-
pletely worn out. The battery cartridge
can explode in a fire.
8. Be careful not to drop or strike battery.
9. Do not use a damaged battery.
10. The contained lithium-ion batteries are
subject to the Dangerous Goods Legis-
lation requirements.
For commercial transports e.g. by third
parties, forwarding agents, special
requirement on packaging and labeling
must be observed.For preparation of the
item being shipped, consulting an expert
for hazardous material is required.
Please also observe possibly more
detailed national regulations.
Tape or mask off open contactsand pack
up the battery in such a manner that it can-
not move around in the packaging.
11. Follow your local regulations relating to
disposal of battery.
12. Use the batteries only with the products
specified by Makita. Installing the bat-
teries to non-compliant products may res-
ult in a fire, excessive heat, explosion, or
leak of electrolyte.
SAVE THESE INSTRUCTIONS.
Makita SK105D/SK105GD 18

Safety instructions
CAUTION
Only use genuine Makita batteries. Use of non-
genuine Makita batteries, or batteries that have
been altered, may result in the battery bursting
causing fires, personal injuryand damage. It will
also void the Makita warranty for the Makita tool
and charger.
Tips for maintaining maximum battery life:
1. Charge the battery cartridge before com-
pletely discharged. Always stop tool oper-
ation and charge the battery cartridge
when you notice lesstool power.
2. Never recharge a fully charged battery
cartridge. Overcharging shortens the bat-
tery service life.
3. Charge the battery cartridge with room
temperature at 10 °C - 40 °C (50 °F - 104
°F). Let a hot batterycartridge cool down
before charging it.
Limits of use
Refer to section Technical data. The instru-
ment isdesigned for use in areas per-
manently habitable for humans. Do not use
the product in explosion hazardous areas or
in aggressive environments.
Disposal
CAUTION
Flat batteries must not be disposed of with house-
hold waste. Care for the environment and take
them to the collection points provided in accord-
ance with national or local regulations.
The product must not be disposed with
household waste. Dispose of the product
appropriately in accordance with the national
regulations in force in your country. Adhere
to the national and country specific reg-
ulations.
Transport
Transport of instrument
Always set the instrument in "Locked" position by
turning the lockswitch when transporting the
instrument (see Levelling lock). Please use the ori-
ginal case or an equivalent packaging for trans-
porting and shipping your measuring instrument.
Makita SK105D/SK105GD 19

Safety instructions
Electromagnetic Compatibility
(EMC)
WARNING
The instrument conforms to the most stringent
requirements of the relevant standards and reg-
ulations. However, the possibility of causing inter-
ference in other instruments cannot be totally
excluded.
FCC statement (applicable in U.S.)
Thisequipment has been tested and found to com-
ply with the limits for a Class B digital instrument,
pursuant to part 15 of the FCC rules. These limits
are designed to provide reasonable protection
against harmful interference in a residential install-
ation. This equipment generates, uses and can
radiate radio frequency energy and, if not installed
and used in accordance with the instructions, may
cause harmful interference to radio com-
munications.
However, there isno guarantee that interference
will not occur in a particular installation. If this equip-
ment does cause harmful interference to radio or
television reception, which can be determined by
turning the equipment off and on, the user is
encouraged to try to correct the interference by
one or more of the following measures:
1. Reorient or relocate the receiving
antenna
2. Increase the separation between the
equipment and the receiver
3. Connect the equipment into an outlet on
a circuit different from that to which the
receiver is connected
4. Consult the dealer or an experienced radi-
o/TV technician for help
Thisinstrument complies with part 15 of the FCC
rules. Operation is subjected to the following two
conditions:
1. This instrument may not cause harmful
interference, and
2. this instrument must accept any inter-
ference received, including interference
that may cause undesired operation.
ISED statement (applicable in Canada)
This instrument complies with Industry Canada
license-exempt RSS standard(s). Operation is
subjected to the following two conditions:
1. This instrument may not cause harmful
interference, and
2. this instrument must accept any inter-
ference received, including interference
that may cause undesired operation.
Makita SK105D/SK105GD 20
This manual suits for next models
2
Table of contents
Languages:
Other Makita Laser Level manuals

Makita
Makita SK20GD User manual

Makita
Makita SKR300 User manual

Makita
Makita SKR200 User manual

Makita
Makita SK102 User manual

Makita
Makita SK104Z User manual

Makita
Makita SK105D Operating instructions

Makita
Makita SK104 User manual

Makita
Makita SK10 User manual

Makita
Makita SK20 User manual

Makita
Makita SK40GD User manual