Makita HM001G User manual

HM001G
EN Cordless Demolition Hammer INSTRUCTION MANUAL 7
PL Akumulatorowy Młot
Udarowy INSTRUKCJA OBSŁUGI 17
HU Akkumulátoros
bontókalapács HASZNÁLATI KÉZIKÖNYV 28
SK Akumulátorové búracie
kladivo NÁVOD NA OBSLUHU 38
CS Akumulátorové bourací
kladivo NÁVOD K OBSLUZE 48
UK Акумуляторний відбійний
молоток ІНСТРУКЦІЯ З
ЕКСПЛУАТАЦІЇ 58
RO Ciocan demolator fără cablu MANUAL DE INSTRUCŢIUNI 70
DE Akku-Stemmhammer BETRIEBSANLEITUNG 81

1
2
3
Fig.1
1
2
Fig.2
1
2
AB
Fig.3
1
Fig.4
1
Fig.5
1
Fig.6
1
2
Fig.7
1
Fig.8
2

1
2
Fig.9
1
Fig.10
2
1
Fig.11
1
Fig.12
1
2
3
Fig.13
1
2
3
Fig.14
1
2
Fig.15
3

3
21 4
Fig.16
(1)
Fig.17
Fig.18
Fig.19
Fig.20
1
Fig.21
1
2
34
Fig.22
4

1
2
3
Fig.23
1
Fig.24
1 2
12
Fig.25
Fig.26
1
Fig.27
5

12
Fig.28
1
Fig.29
1
Fig.30
1 2
12
Fig.31
6

7ENGLISH
ENGLISH (Original instructions)
SPECIFICATIONS
Model: HM001G
Blows per minute 0 - 2,650 min-1
Rated voltage D.C. 36 V - 40 V max
Overall length with BL4025 481 mm
with BL4040 496 mm
Net weight 6.3 - 7.1 kg
• Duetoourcontinuingprogramofresearchanddevelopment,thespecicationshereinaresubjecttochange
without notice.
• Specicationsmaydierfromcountrytocountry.
• Theweightmaydierdependingontheattachment(s),includingthebatterycartridge.Thelightestandheavi-
estcombination,accordingtoEPTA-Procedure01/2014,areshowninthetable.
Applicable battery cartridge and charger
Batterycartridge BL4020/BL4025/BL4040*/BL4050F*
*:Recommendedbattery
Charger DC40RA/DC40RB/DC40RC
• Someofthebatterycartridgesandchargerslistedabovemaynotbeavailabledependingonyourregionof
residence.
WARNING: Only use the battery cartridges and chargers listed above.Useofanyotherbatterycartridges
andchargersmaycauseinjuryand/orre.
Intended use
The tool is intended for chiselling work in concrete,
brick,stoneandasphaltaswellasfordrivingandcom-
pacting with appropriate accessories.
Noise
ThetypicalA-weightednoiseleveldeterminedaccord-
ingtoEN60745-2-6:
Soundpressurelevel(LpA):89dB(A)
Soundpowerlevel(LWA):100dB(A)
Uncertainty(K):3dB(A)
NOTE:
Thedeclarednoiseemissionvalue(s)hasbeen
measured in accordance with a standard test method
andmaybeusedforcomparingonetoolwithanother.
NOTE:
Thedeclarednoiseemissionvalue(s)may
alsobeusedinapreliminaryassessmentofexposure.
WARNING: Wear ear protection.
WARNING: The noise emission during actual
use of the power tool can dier from the declared
value(s) depending on the ways in which the
tool is used especially what kind of workpiece is
processed.
WARNING: Be sure to identify safety mea-
sures to protect the operator that are based on an
estimation of exposure in the actual conditions of
use (taking account of all parts of the operating
cycle such as the times when the tool is switched
o and when it is running idle in addition to the
trigger time).
Vibration
Thevibrationtotalvalue(tri-axialvectorsum)deter-
minedaccordingtoEN60745-2-6:
Workmode:chisellingfunctionwithsidegrip
Vibrationemission(ah, Cheq):5.5m/s2
Uncertainty(K):1.5m/s2
Workmode:chisellingfunctionwithsidehandle
Vibrationemission(ah, Cheq):6.0m/s2
Uncertainty(K):1.5m/s2
NOTE:Thedeclaredvibrationtotalvalue(s)hasbeen
measured in accordance with a standard test method
andmaybeusedforcomparingonetoolwithanother.
NOTE:Thedeclaredvibrationtotalvalue(s)mayalso
beusedinapreliminaryassessmentofexposure.
WARNING:
The vibration emission during actual
use of the power tool can dier from the declared val-
ue(s) depending on the ways in which the tool is used
especially what kind of workpiece is processed.
WARNING:
Be sure to identify safety measures
to protect the operator that are based on an estima-
tion of exposure in the actual conditions of use (tak-
ing account of all parts of the operating cycle such
as the times when the tool is switched o and when
it is running idle in addition to the trigger time).
EC Declaration of Conformity
For European countries only
TheECdeclarationofconformityisincludedasAnnexA
to this instruction manual.

8ENGLISH
SAFETY WARNINGS
General power tool safety warnings
WARNING: Read all safety warnings, instruc-
tions, illustrations and specications provided
with this power tool.Failuretofollowallinstructions
listedbelowmayresultinelectricshock,reand/or
seriousinjury.
Save all warnings and instruc-
tions for future reference.
Theterm"powertool"inthewarningsreferstoyour
mains-operated(corded)powertoolorbattery-operated
(cordless)powertool.
Cordless Demolition Hammer safety
warnings
1. Wear ear protectors.Exposuretonoisecan
cause hearing loss.
2. Use auxiliary handle(s), if supplied with the
tool.Lossofcontrolcancausepersonalinjury.
3. Hold power tool by insulated gripping sur-
faces, when performing an operation where
the cutting accessory may contact hidden
wiring.Cuttingaccessorycontactinga"live"
wiremaymakeexposedmetalpartsofthepower
tool "live" and could give the operator an electric
shock.
4. Wear a hard hat (safety helmet), safety glasses
and/or face shield. Ordinary eye or sun glasses
are NOT safety glasses. It is also highly recom-
mended that you wear a dust mask and thickly
padded gloves.
5. Be sure the bit is secured in place before
operation.
6. Under normal operation, the tool is designed
to produce vibration. The screws can come
loose easily, causing a breakdown or accident.
Check tightness of screws carefully before
operation.
7. In cold weather or when the tool has not been
used for a long time, let the tool warm up for
a while by operating it under no load. This
will loosen up the lubrication. Without proper
warm-up, hammering operation is dicult.
8. Always be sure you have a rm footing. Be
sure no one is below when using the tool in
high locations.
9. Hold the tool rmly with both hands.
10. Keep hands away from moving parts.
11. Do not leave the tool running. Operate the tool
only when hand-held.
12. Do not point the tool at any one in the area
when operating. The bit could y out and
injure someone seriously.
13. Do not touch the bit, parts close to the bit, or
workpiece immediately after operation; they
may be extremely hot and could burn your
skin.
14. Some material contains chemicals which may
be toxic. Take caution to prevent dust inhala-
tion and skin contact. Follow material supplier
safety data.
15. Always be sure that the tool is switched
o and the battery cartridge and the bit are
removed before handing the tool to other
person.
16. Before operation, make sure that there is no
buried object such as electric pipe, water pipe
or gas pipe in the working area. Otherwise, the
drillbit/chiselmaytouchthem,resultinganelectric
shock, electrical leakage or gas leak.
17. Do not operate the tool at no-load
unnecessarily.
SAVE THESE INSTRUCTIONS.
WARNING: DO NOT let comfort or familiarity
with product (gained from repeated use) replace
strict adherence to safety rules for the subject
product. MISUSE or failure to follow the safety
rules stated in this instruction manual may cause
serious personal injury.
Important safety instructions for
battery cartridge
1. Before using battery cartridge, read all instruc-
tions and cautionary markings on (1) battery
charger, (2) battery, and (3) product using
battery.
2. Do not disassemble or tamper the battery
cartridge.Itmayresultinare,excessiveheat,
or explosion.
3. If operating time has become excessively
shorter, stop operating immediately. It may
result in a risk of overheating, possible burns
and even an explosion.
4. If electrolyte gets into your eyes, rinse them
out with clear water and seek medical atten-
tion right away. It may result in loss of your
eyesight.
5. Do not short the battery cartridge:
(1) Do not touch the terminals with any con-
ductive material.
(2) Avoid storing battery cartridge in a con-
tainer with other metal objects such as
nails, coins, etc.
(3) Do not expose battery cartridge to water
or rain.
A battery short can cause a large current
ow, overheating, possible burns and even a
breakdown.
6. Do not store and use the tool and battery car-
tridge in locations where the temperature may
reach or exceed 50 °C (122 °F).
7. Do not incinerate the battery cartridge even if
it is severely damaged or is completely worn
out. The battery cartridge can explode in a re.
8. Do not nail, cut, crush, throw, drop the battery
cartridge, or hit against a hard object to the
battery cartridge.Suchconductmayresultina
re,excessiveheat,orexplosion.
9. Do not use a damaged battery.

9ENGLISH
10. The contained lithium-ion batteries are subject
to the Dangerous Goods Legislation require-
ments.
Forcommercialtransportse.g.bythirdparties,
forwarding agents, special requirement on pack-
agingandlabelingmustbeobserved.
Forpreparationoftheitembeingshipped,consult-
ing an expert for hazardous material is required.
Pleasealsoobservepossiblymoredetailed
national regulations.
Tapeormaskoopencontactsandpackupthe
batteryinsuchamannerthatitcannotmove
around in the packaging.
11. When disposing the battery cartridge, remove
it from the tool and dispose of it in a safe
place. Follow your local regulations relating to
disposal of battery.
12. Use the batteries only with the products
specied by Makita.Installingthebatteriesto
non-compliantproductsmayresultinare,exces-
siveheat,explosion,orleakofelectrolyte.
13. If the tool is not used for a long period of time,
the battery must be removed from the tool.
14. During and after use, the battery cartridge may
take on heat which can cause burns or low
temperature burns. Pay attention to the han-
dling of hot battery cartridges.
15. Do not touch the terminal of the tool imme-
diately after use as it may get hot enough to
cause burns.
16. Do not allow chips, dust, or soil stuck into the
terminals, holes, and grooves of the battery
cartridge.Itmayresultinpoorperformanceor
breakdownofthetoolorbatterycartridge.
17. Unless the tool supports the use near
high-voltage electrical power lines, do not use
the battery cartridge near a high-voltage elec-
trical power lines.Itmayresultinamalfunction
orbreakdownofthetoolorbatterycartridge.
18. Keep the battery away from children.
SAVE THESE INSTRUCTIONS.
CAUTION: Only use genuine Makita batteries.
Useofnon-genuineMakitabatteries,orbatteriesthat
havebeenaltered,mayresultinthebatterybursting
causingres,personalinjuryanddamage.Itwill
alsovoidtheMakitawarrantyfortheMakitatooland
charger.
Tips for maintaining maximum
battery life
1. Charge the battery cartridge before completely
discharged. Always stop tool operation and
charge the battery cartridge when you notice
less tool power.
2.
Never recharge a fully charged battery cartridge.
Overcharging shortens the battery service life.
3.
Charge the battery cartridge with room tempera-
ture at 10 °C - 40 °C (50 °F - 104 °F). Let a hot
battery cartridge cool down before charging it.
4. When not using the battery cartridge, remove
it from the tool or the charger.
5. Charge the battery cartridge if you do not use
it for a long period (more than six months).
Important safety instructions for wireless unit
1.
Do not disassemble or tamper with the wireless unit.
2. Keep the wireless unit away from young chil-
dren. If accidentally swallowed, seek medical
attention immediately.
3. Use the wireless unit only with Makita tools.
4.
Do not expose the wireless unit to rain or wet conditions.
5. Do not use the wireless unit in places where
the temperature exceeds 50°C (122°F).
6.
Do not operate the wireless unit in places where medi-
cal instruments, such as heart pace makers are nearby.
7.
Do not operate the wireless unit in places where
automated devices are nearby. If operated, auto-
mateddevicesmaydevelopmalfunctionorerror.
8.
Do not operate the wireless unit in places under
high temperature or places where static electric-
ity or electrical noise could be generated.
9.
The wireless unit can produce electromagnetic
elds (EMF) but they are not harmful to the user.
10. The wireless unit is an accurate instrument. Be
careful not to drop or strike the wireless unit.
11. Avoid touching the terminal of the wireless
unit with bare hands or metallic materials.
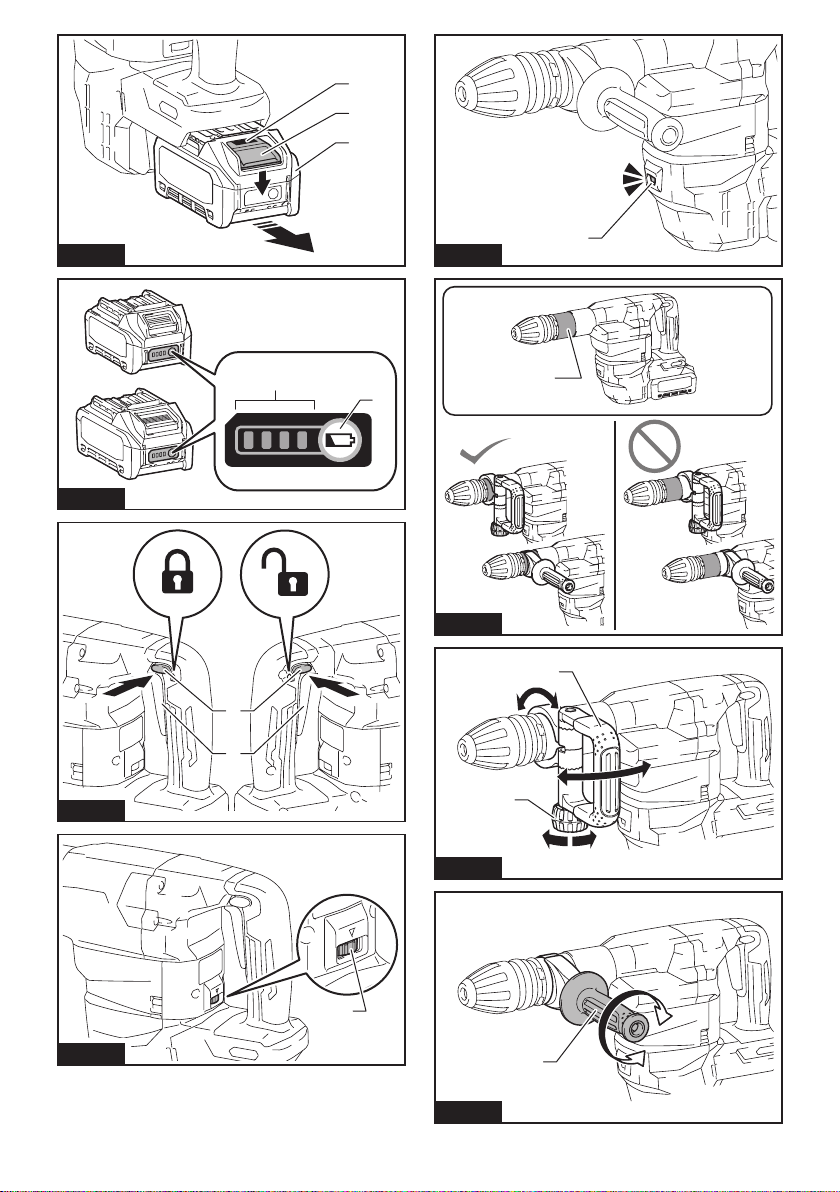
12. Always remove the battery on the product
when installing the wireless unit into it.
13. When opening the lid of the slot, avoid the
place where dust and water may come into the
slot. Always keep the inlet of the slot clean.
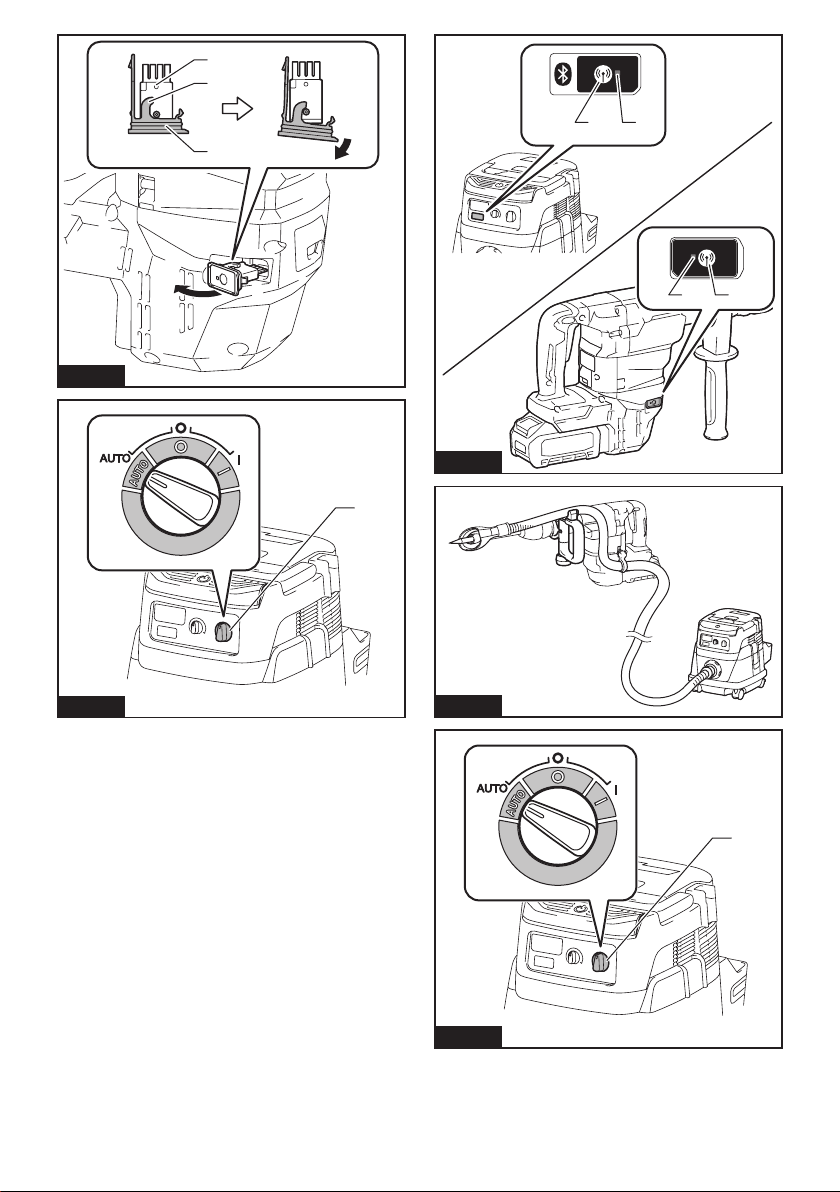
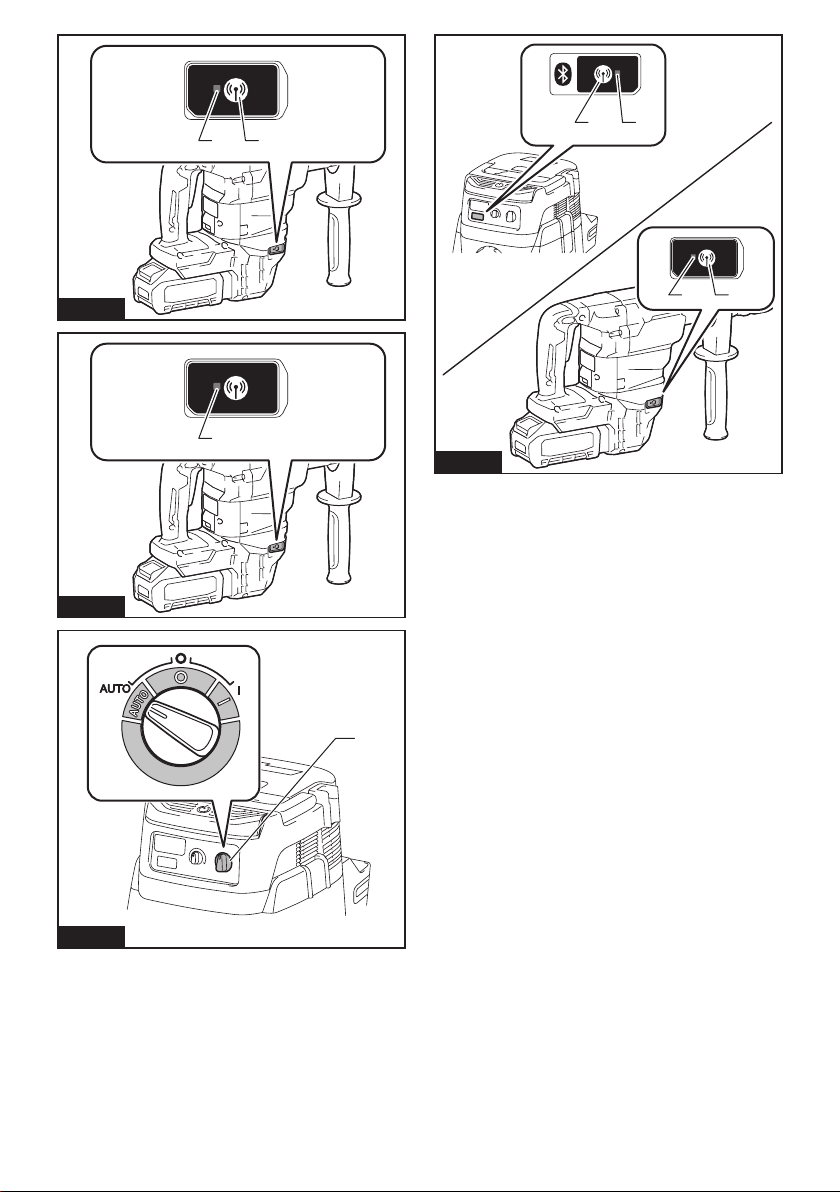
14.
Always insert the wireless unit in the correct direction.
15. Do not press the wireless activation button
on the wireless unit too hard and/or press the
button with an object with a sharp edge.
16.
Always close the lid of the slot when operating.
17.
Do not remove the wireless unit from the slot while
the power is being supplied to the tool. Doing so
maycauseamalfunctionofthewirelessunit.
18. Do not remove the sticker on the wireless unit.
19. Do not put any sticker on the wireless unit.
20.
Do not leave the wireless unit in a place where static
electricity or electrical noise could be generated.
21.
Do not leave the wireless unit in a place subject
to high heat, such as a car sitting in the sun.
22.
Do not leave the wireless unit in a dusty or powdery
place or in a place corrosive gas could be generated.
23. Sudden change of the temperature may bedew
the wireless unit. Do not use the wireless unit
until the dew is completely dried.
24. When cleaning the wireless unit, gently wipe
with a dry soft cloth. Do not use benzine, thin-
ner, conductive grease or the like.
25. When storing the wireless unit, keep it in the
supplied case or a static-free container.
26. Do not insert any devices other than Makita
wireless unit into the slot on the tool.
27.
Do not use the tool with the lid of the slot damaged. Water,
dust,anddirtcomeintotheslotmaycausemalfunction.
28.
Do not pull and/or twist the lid of the slot more than
necessary.Restorethelidifitcomesofromthetool.
29.
Replace the lid of the slot if it is lost or damaged.
SAVE THESE INSTRUCTIONS.

10 ENGLISH
FUNCTIONAL DESCRIPTION
CAUTION: Always be sure that the tool is
switched o and the battery cartridge is removed
before adjusting or checking function on the tool.
Installing or removing battery cartridge
CAUTION: Always switch o the tool before
installing or removing of the battery cartridge.
CAUTION: Hold the tool and the battery car-
tridge rmly when installing or removing battery
cartridge.Failuretoholdthetoolandthebattery
cartridgermlymaycausethemtoslipoyourhands
andresultindamagetothetoolandbatterycartridge
andapersonalinjury.
►Fig.1: 1. Red indicator 2. Button 3.Batterycartridge
Toremovethebatterycartridge,slideitfromthetool
whileslidingthebuttononthefrontofthecartridge.
Toinstallthebatterycartridge,alignthetongueonthe
batterycartridgewiththegrooveinthehousingandslip
itintoplace.Insertitallthewayuntilitlocksinplace
withalittleclick.Ifyoucanseetheredindicatoronthe
uppersideofthebutton,itisnotlockedcompletely.
CAUTION: Always install the battery cartridge
fully until the red indicator cannot be seen. If not,
itmayaccidentallyfalloutofthetool,causinginjuryto
youorsomeonearoundyou.
CAUTION: Do not install the battery cartridge
forcibly.Ifthecartridgedoesnotslideineasily,itis
notbeinginsertedcorrectly.
Indicating the remaining battery capacity
Pressthecheckbuttononthebatterycartridgetoindi-
catetheremainingbatterycapacity.Theindicatorlamps
light up for a few seconds.
►Fig.2: 1. Indicator lamps 2.Checkbutton
Indicator lamps Remaining
capacity
Lighted O Blinking
75% to 100%
50% to 75%
25% to 50%
0% to 25%
Charge the
battery.
Thebattery
mayhave
malfunctioned.
NOTE: Depending on the conditions of use and the
ambienttemperature,theindicationmaydierslightly
fromtheactualcapacity.
NOTE:Therst(farleft)indicatorlampwillblinkwhen
thebatteryprotectionsystemworks.
Tool / battery protection system
Thetoolisequippedwithatool/batteryprotectionsys-
tem.Thissystemautomaticallycutsopowertothe
motortoextendtoolandbatterylife.Thetoolwillauto-
maticallystopduringoperationifthetoolorbatteryis
placedunderoneofthefollowingconditions:
Overload protection
Whenthetoolorbatteryisoperatedinamannerthat
causesittodrawanabnormallyhighcurrent,thetool
automaticallystopswithoutanyindication.Inthissit-
uation,turnthetooloandstoptheapplicationthat
causedthetooltobecomeoverloaded.Thenturnthe
tool on to restart.
Overheat protection
Whenthetoolorbatteryisoverheated,thetoolstops
automatically.Inthiscase,letthetoolandbatterycool
beforeturningthetoolonagain.
NOTE:Whenthetoolisoverheated,thelampblinks.
Overdischarge protection
Whenthebatterycapacityisnotenough,thetoolstops
automatically.Inthiscase,removethebatteryfromthe
toolandchargethebattery.
Switch action
WARNING: Before installing the battery car-
tridge into the tool, always check to see that the
switch trigger actuates properly and returns to
the "OFF" position when released.
CAUTION: When not operating the tool,
depress the trigger-lock button from side to
lock the switch trigger in the OFF position.
Topreventtheswitchtriggerfromaccidentallypulled,
thetrigger-lockbuttonisprovided.Tostartthetool,
depressthetrigger-lockbuttonfromA( )sideandpull
theswitchtrigger.Toolspeedisincreasedbyincreas-
ing pressure on the switch trigger. Release the switch
triggertostop.Afteruse,depressthetrigger-lockbutton
fromB( )side.
►Fig.3: 1.Trigger-lockbutton2. Switch trigger
Using the trigger-lock button for
continuous operation
Forcontinuousoperation,depressthetrigger-lockbut-
tonfromB( )sidewhilepullingtheswitchtrigger,and
then release the switch trigger. To stop the tool, depress
thetrigger-lockbuttonfromA( )side.

11 ENGLISH
Speed change
►Fig.4: 1.Speedadjustingdial
Theblowsperminutecanbeadjustedbyturningthe
adjustingdial.
Thedialismarked1(lowestspeed)to5(fullspeed).
Refertothetablefortherelationshipbetweenthenum-
bersettingsonthedialandtheblowsperminute.
Number Blows per minute
52,650 min-1
42,500 min-1
32,000 min-1
21,500 min-1
11,300 min-1
CAUTION: Do not turn the adjusting dial when
the tool is running. Failure to do so may result in
the loss of control of the tool and cause an injury.
NOTICE: The speed adjusting dial can be turned
only as far as 5 and back to 1. Do not force it past
5 or 1, or the speed adjusting function may no
longer work.
NOTE: Soft no-load rotation function
Blowsatnoloadperminutebecomessmallerthan
thoseonloadinordertoreducevibrationunderno
load,butthisdoesnotshowtrouble.
Onceoperationstartswithabitagainstconcrete,
blowsperminuteincreaseandreachthenumbersas
showninthetable.
Whentemperatureislow,thetoolmaynothavethis
function even with the motor rotating.
Lighting up the front lamp
►Fig.5: 1. Lamp
CAUTION: Do not look in the light or see the
source of light directly.
Pulltheswitchtriggertolightupthelamp.Thelamp
keepsonlightingwhiletheswitchtriggerisbeingpulled.
Thelampgoesoutapproximately10secondsafter
releasing the switch trigger.
NOTE:Useadryclothtowipethedirtothelensof
the lamp. Be careful not to scratch the lens of lamp, or
itmaylowertheillumination.
Electronic function
The tool is equipped with the electronic functions for
easyoperation.
• Constant speed control
The speed control function provides the constant
rotation speed regardless of load conditions.
• Soft start
The soft-start function minimizes start-up shock,
andmakesthemachinestartsmoothly.
ASSEMBLY
CAUTION: Always be sure that the tool is
switched o and the battery cartridge is removed
before carrying out any work on the tool.
Installing side handle / side grip
CAUTION: Always use the side handle / side
grip to ensure safe operation.
CAUTION: After installing or adjusting the
side handle / side grip, make sure that the side
handle / side grip is rmly secured.
NOTICE: Do not install the side handle / side grip
to any other area than the designated mounting
area.
►Fig.6: 1. Mounting area
Side handle
►Fig.7: 1. Side handle 2. Clamp nut
Thesidehandlecanbeswunginaverticaldirectionand
securedatanydesiredposition.Itcanalsobeadjusted
ateightstepsbackandforthinahorizontaldirection.
Loosen the clamp nut to swing the side handle to a
desiredposition,andthentightentheclampnutsecurely.
Side grip (auxiliary handle)
Thesidegripcanbeswung,allowingeasyhandlingofthetoolinany
position.Loosenthesidegripbyturningitcounterclockwise,swingit
tothedesiredpositionandthentightenitbyturningclockwise.
►Fig.8: 1. Side grip
Installing or removing bit
Grease
Cleantheshankendofthebitandapplygreasebefore
installingthebit.
Coattheshankendofthebitbeforehandwithasmall
amountofgrease(about0.5-1g).Thischucklubrica-
tion assures smooth action and longer service life.
►Fig.9: 1. Shank end 2. Grease
Insertthebitintothetool.Turnthebitandpushitinuntil
itengages.Afterinstallingthebit,alwaysmakesurethat
thebitissecurelyheldinplacebytryingtopullitout.
►Fig.10: 1. Bit
Toremovethebit,pullthechuckcoverdownalltheway
andpullthebitout.
►Fig.11: 1. Bit 2. Chuck cover
Bit angle
Thebitcanbesecuredat12dierentangles.Tochangethebit
angle, slide the change ring forward, then turn the change ring to
changethebitangle.Atthedesiredangle,slidethechangering
backtotheoriginalposition.Thebitwillbesecuredinplace.
Afterchangingthebitangle,makesuretheangleis
xedbytryingtorotatethebit.
►Fig.12: 1. Change ring

12 ENGLISH
Dust extractor attachment
Optional accessory
1. Installthehoseholder(A/B).
When the side handle is installed to tool, loosen the
clampnut,andthenremovethehexbolt.Installthe
hoseholder(A)betweenthehexboltandtheclampnut
bytighteningtheclampnutrmly.
►Fig.13: 1.Hexbolt2.Hoseholder(A)3. Clamp nut
When the side grip is installed to the tool, loosen the
sidegrip,mountthehoseholder(B)totheshaft,and
thentightenthesidegriprmly.
►Fig.14: 1.Hoseholder(B)2. Shaft 3. Side grip
2. Attachtheholderjointtothetool,andthenattach
thehoseholder(C)totheholderjoint.
►Fig.15: 1.Holderjoint2.Hoseholder(C)
NOTE:Thehosejointcanbeattachedtoeitherside
of the tool.
WARNING: Use the mounting part of the tool
only for attaching the holder joint.
Usingthemountingpartforanyotherpurposemay
cause an unexpected accident.
3. Attachthedustcoverandthehosetothetool,and
thenxthehosetothehoseholders.
►Fig.16: 1. Dust cover 2. Hose 3.Hoseholder(A/B)
4.Hoseholder(C)
4. Connect the hose to the hose of the vacuum
cleanerwiththehosejoint.
NOTE: If the hose is not included, attach the dust
covertothecleaner'sjointorattachittoMakita's
hose ø28.
5. Adjustthedistancebetweenthedustcoverand
thetipofthechiselorbullpoint.Therecommended
distance is 30 mm to 100 mm.
►Fig.17: (1) 30 mm to 100 mm
OPERATION
CAUTION:
Always use the side handle / side grip
(auxiliary handle) and rmly hold the tool by both side
handle / side grip and switch handle during operations.
CAUTION:
Always make sure that the workpiece
is secured before operation. Failuretoproperlysecurethe
workpiecemaycausetheworkpiecetomoveresultingininjury.
CAUTION:
Do not pull the tool out forcibly even
the bit gets stuck. Loss of control may cause injury.
CAUTION: Do not leave the tool stabbed in
the workpiece. Otherwisethetoolmaystartsunin-
tentionallyandcauseaninjury.
NOTE:Ifthebatterycartridgeisinlowtemperature,
thetool’scapabilitymaynotbefullyobtained.Inthis
case,warmupthebatterycartridgebyusingthe
toolwithnoloadforawhiletofullyobtainthetool’s
capability.
Chipping/Scaling/Demolition
Holdthetoolrmlywithbothhands.Turnthetoolon
andapplyslightpressureonthetoolsothatthetoolwill
notbouncearound,uncontrolled.Pressingveryhardon
thetoolwillnotincreasetheeciency.
►Fig.18
►Fig.19
WIRELESS ACTIVATION
FUNCTION
Optional accessory
What you can do with the wireless
activation function
Thewirelessactivationfunctionenablescleanandcom-
fortableoperation.Byconnectingasupportedvacuum
cleanertothetool,youcanrunthevacuumcleaner
automaticallyalongwiththeswitchoperationofthetool.
►Fig.20
To use the wireless activation function, prepare follow-
ingitems:
• Awirelessunit(optionalaccessory)
• Avacuumcleanerwhichsupportsthewireless
activation function
The overview of the wireless activation function
setting is as follows. Refer to each section for detail
procedures.
1. Installing the wireless unit
2. Tool registration for the vacuum cleaner
3. Starting the wireless activation function
Installing the wireless unit
Optional accessory
CAUTION: Place the tool on a at and stable
surface when installing the wireless unit.
NOTICE: Clean the dust and dirt on the tool
before installing the wireless unit. Dust or dirt
maycausemalfunctionifitcomesintotheslotofthe
wireless unit.
NOTICE: To prevent the malfunction caused by
static, touch a static discharging material, such
as a metal part of the tool, before picking up the
wireless unit.
NOTICE: When installing the wireless unit,
always be sure that the wireless unit is inserted
in the correct direction and the lid is completely
closed.

13 ENGLISH
1. Openthelidonthetoolasshowninthegure.
►Fig.21: 1. Lid
2. Insert the wireless unit to the slot and then close
the lid.
Wheninsertingthewirelessunit,aligntheprojections
with the recessed portions on the slot.
►Fig.22: 1. Wireless unit 2.Projection3. Lid
4. Recessed portion
Whenremovingthewirelessunit,openthelidslowly.
Thehooksonthebackofthelidwillliftthewirelessunit
asyoupullupthelid.
►Fig.23: 1. Wireless unit 2. Hook 3. Lid
Afterremovingthewirelessunit,keepitinthesupplied
case or a static-free container.
NOTICE: Always use the hooks on the back of
the lid when removing the wireless unit. If the
hooks do not catch the wireless unit, close the lid
completelyandopenitslowlyagain.
Tool registration for the vacuum
cleaner
NOTE:AMakitavacuumcleanersupportingthe
wireless activation function is required for the tool
registration.
NOTE:Finishinstallingthewirelessunittothetool
beforestartingthetoolregistration.
NOTE: During the tool registration, do not pull the
switch trigger or turn on the power switch on the
vacuum cleaner.
NOTE: Refer to the instruction manual of the vacuum
cleaner, too.
Ifyouwishtoactivatethevacuumcleaneralongwith
theswitchoperationofthetool,nishthetoolregistra-
tionbeforehand.
1. Installthebatteriestothevacuumcleanerandthe
tool.
2. Setthestand-byswitchonthevacuumcleanerto
"AUTO".
►Fig.24: 1.Stand-byswitch
3. Pressthewirelessactivationbuttononthevac-
uum cleaner for 3 seconds until the wireless activation
lampblinksingreen.Andthenpressthewirelessacti-
vationbuttononthetoolinthesameway.
►Fig.25: 1.Wirelessactivationbutton2. Wireless
activation lamp
If the vacuum cleaner and the tool are linked success-
fully,thewirelessactivationlampswilllightupingreen
for2secondsandstartblinkinginblue.
NOTE:Thewirelessactivationlampsnishblinking
ingreenafter20secondselapsed.Pressthewireless
activationbuttononthetoolwhilethewirelessacti-
vationlamponthecleanerisblinking.Ifthewireless
activationlampdoesnotblinkingreen,pushthewire-
lessactivationbuttonbrieyandholditdownagain.
NOTE: When performing two or more tool registra-
tionsforonevacuumcleaner,nishthetoolregistra-
tiononebyone.
Starting the wireless activation
function
NOTE:Finishthetoolregistrationforthevacuum
cleaner prior to the wireless activation.
NOTE: Refer to the instruction manual of the vacuum
cleaner, too.
Afterregisteringatooltothevacuumcleaner,the
vacuumcleanerwillautomaticallyrunsalongwiththe
switch operation of the tool.
1. Install the wireless unit to the tool.
2. Connect the hose of the vacuum cleaner with the
tool.
►Fig.26
3. Setthestand-byswitchonthevacuumcleanerto
"AUTO".
►Fig.27: 1.Stand-byswitch
4. Pushthewirelessactivationbuttononthetool
briey.Thewirelessactivationlampwillblinkinblue.
►Fig.28: 1.Wirelessactivationbutton2. Wireless
activation lamp
5. Pulltheswitchtriggerofthetool.Checkifthe
vacuumcleanerrunswhiletheswitchtriggerisbeing
pulled.
To stop the wireless activation of the vacuum cleaner,
pushthewirelessactivationbuttononthetool.
NOTE: The wireless activation lamp on the tool will
stopblinkinginbluewhenthereisnooperationfor
2hours.Inthiscase,setthestand-byswitchonthe
vacuumcleanerto"AUTO"andpushthewireless
activationbuttononthetoolagain.
NOTE:Thevacuumcleanerstarts/stopswithadelay.
There is a time lag when the vacuum cleaner detects
a switch operation of the tool.
NOTE: The transmission distance of the wireless unit
mayvarydependingonthelocationandsurrounding
circumstances.
NOTE: When two or more tools are registered to one
vacuumcleaner,thevacuumcleanermaystartrun-
ningevenifyoudonotpulltheswitchtriggerbecause
another user is using the wireless activation function.

14 ENGLISH
Description of the wireless activation lamp status
►Fig.29: 1. Wireless activation lamp
Thewirelessactivationlampshowsthestatusofthewirelessactivationfunction.Refertothetablebelowforthe
meaning of the lamp status.
Status Wireless activation lamp Description
Color
On
Blinking
Duration
Standby Blue 2 hours Thewirelessactivationofthevacuumcleanerisavailable.The
lampwillautomaticallyturnowhennooperationisperformed
for 2 hours.
When
the tool is
running.
Thewirelessactivationofthevacuumcleanerisavailableandthe
tool is running.
Tool
registration
Green 20 seconds Readyforthetoolregistration.Waitingfortheregistrationbythe
vacuum cleaner.
2 seconds Thetoolregistrationhasbeennished.Thewirelessactivation
lampwillstartblinkinginblue.
Cancelling
tool
registration
Red 20 seconds Readyforthecancellationofthetoolregistration.Waitingforthe
cancellationbythevacuumcleaner.
2 seconds Thecancellationofthetoolregistrationhasbeennished.The
wirelessactivationlampwillstartblinkinginblue.
Others Red 3 seconds The power is supplied to the wireless unit and the wireless activa-
tion function is starting up.
O - - The wireless activation of the vacuum cleaner is stopped.
Cancelling tool registration for the
vacuum cleaner
Performthefollowingprocedurewhencancellingthe
tool registration for the vacuum cleaner.
1. Installthebatteriestothevacuumcleanerandthe
tool.
2. Setthestand-byswitchonthevacuumcleanerto
"AUTO".
►Fig.30: 1.Stand-byswitch
3. Pressthewirelessactivationbuttononthevac-
uum cleaner for 6 seconds. The wireless activation
lampblinksingreenandthenbecomered.Afterthat,
pressthewirelessactivationbuttononthetoolinthe
sameway.
►Fig.31: 1.Wirelessactivationbutton2. Wireless
activation lamp
Ifthecancellationisperformedsuccessfully,thewire-
less activation lamps will light up in red for 2 seconds
andstartblinkinginblue.
NOTE:Thewirelessactivationlampsnishblinkingin
redafter20secondselapsed.Pressthewirelessacti-
vationbuttononthetoolwhilethewirelessactivation
lamponthecleanerisblinking.Ifthewirelessacti-
vationlampdoesnotblinkinred,pushthewireless
activationbuttonbrieyandholditdownagain.

15 ENGLISH
Troubleshooting for wireless activation function
Beforeaskingforrepairs,conductyourowninspectionrst.Ifyoundaproblemthatisnotexplainedinthemanual,
donotattempttodismantlethetool.Instead,askMakitaAuthorizedServiceCenters,alwaysusingMakitareplace-
ment parts for repairs.
State of abnormality Probable cause (malfunction) Remedy
The wireless activation lamp does
notlight/blink.
The wireless unit is not installed into the tool.
Thewirelessunitisimproperlyinstalled
into the tool.
Installthewirelessunitcorrectly.
Theterminalofthewirelessunitand/or
theslotisdirty.
Gentlywipeodustanddirtontheterminalofthe
wireless unit and clean the slot.
Thewirelessactivationbuttononthe
toolhasnotbeenpushed.
Pushthewirelessactivationbuttononthetool
briey.
Thestand-byswitchonthevacuum
cleanerisnotsetto"AUTO".
Setthestand-byswitchonthevacuumcleanerto
"AUTO".
Nopowersupply
Supplythepowertothetoolandthevacuumcleaner.
Cannotnishtoolregistration/can-
cellingtoolregistrationsuccessfully.
The wireless unit is not installed into the tool.
Thewirelessunitisimproperlyinstalled
into the tool.
Installthewirelessunitcorrectly.
Theterminalofthewirelessunitand/or
theslotisdirty.
Gentlywipeodustanddirtontheterminalofthe
wireless unit and clean the slot.
Thestand-byswitchonthevacuum
cleanerisnotsetto"AUTO".
Setthestand-byswitchonthevacuumcleanerto
"AUTO".
Nopowersupply
Supplythepowertothetoolandthevacuumcleaner.
Incorrect operation
Pushthewirelessactivationbuttonbrieyandperform
thetoolregistration/cancellationproceduresagain.
Thetoolandvacuumcleanerareaway
fromeachother(outofthetransmission
range).
Get the tool and vacuum cleaner closer to each other.
Themaximumtransmissiondistanceisapproximately10
mhoweveritmayvaryaccordingtothecircumstances.
Beforenishingthetoolregistration/cancellation;
-theswitchtriggeronthetoolispulledor;
-thepowerbuttononthevacuum
cleaner is turned on.
Pushthewirelessactivationbuttonbrieyand
performthetoolregistration/cancellationprocedures
again.
The tool registration procedures for the
toolorvacuumcleanerhavenotnished.
Performthetoolregistrationproceduresforboththe
tool and the vacuum cleaner at the same timing.
Radiodisturbancebyotherappliances
whichgeneratehigh-intensityradio
waves.
Keepthetoolandvacuumcleanerawayfromthe
appliancessuchasWi-Fidevicesandmicrowave
ovens.
The vacuum cleaner does not run
along with the switch operation of
the tool.
The wireless unit is not installed into the tool.
Thewirelessunitisimproperlyinstalled
into the tool.
Installthewirelessunitcorrectly.
Theterminalofthewirelessunitand/or
theslotisdirty.
Gentlywipeodustanddirtontheterminalofthe
wireless unit and clean the slot.
Thewirelessactivationbuttononthe
toolhasnotbeenpushed.
Pushthewirelessactivationbuttonbrieyandmake
surethatthewirelessactivationlampisblinkinginblue.
Thestand-byswitchonthevacuum
cleanerisnotsetto"AUTO".
Setthestand-byswitchonthevacuumcleanerto
"AUTO".
More than 10 tools are registered to the
vacuum cleaner.
Performthetoolregistrationagain.
If more than 10 tools are registered to the vacuum cleaner,
thetoolregisteredearliestwillbecancelledautomatically.
The vacuum cleaner erased all tool
registrations.
Performthetoolregistrationagain.
Nopowersupply
Supplythepowertothetoolandthevacuumcleaner.
Thetoolandvacuumcleanerareaway
fromeachother(outofthetransmission
range).
Get the tool and vacuum cleaner closer each other.
The maximum transmission distance is approxi-
mately10mhoweveritmayvaryaccordingtothe
circumstances.
Radiodisturbancebyotherappliances
whichgeneratehigh-intensityradio
waves.
Keepthetoolandvacuumcleanerawayfromthe
appliancessuchasWi-Fidevicesandmicrowave
ovens.
The vacuum cleaner runs while the
tool's switch trigger is not pulled.
Other users are using the wireless
activation of the vacuum cleaner with
their tools.
Turnothewirelessactivationbuttonoftheother
tools or cancel the tool registration of the other
tools.

16 ENGLISH
MAINTENANCE
CAUTION: Always be sure that the tool is
switched o and the battery cartridge is removed
before attempting to perform inspection or
maintenance.
NOTICE: Never use gasoline, benzine, thinner,
alcohol or the like. Discoloration, deformation or
cracks may result.
TomaintainproductSAFETYandRELIABILITY,
repairs,anyothermaintenanceoradjustmentshould
beperformedbyMakitaAuthorizedorFactoryService
Centers,alwaysusingMakitareplacementparts.
OPTIONAL
ACCESSORIES
CAUTION: These accessories or attachments
are recommended for use with your Makita tool
specied in this manual.Theuseofanyother
accessories or attachments might present a risk of
injurytopersons.Onlyuseaccessoryorattachment
for its stated purpose.
Ifyouneedanyassistanceformoredetailsregard-
ingtheseaccessories,askyourlocalMakitaService
Center.
• SDS-MAXbullpoint
• SDS-MAXcoldchisel
• SDS-MAXscalingchisel
• SDS-MAXclayspade
• Bit grease
• Side handle
• Side grip
• Safetygoggles
• Dust extractor attachment
• Wireless unit
• Makitagenuinebatteryandcharger
NOTE:Someitemsinthelistmaybeincludedinthe
toolpackageasstandardaccessories.Theymay
dierfromcountrytocountry.

17 POLSKI
POLSKI (Instrukcja oryginalna)
DANE TECHNICZNE
Model: HM001G
Liczbaudarównaminutę 0–2 650 min-1
Napięcieznamionowe Prądstały36V–40Vmaks.
Długośćcałkowita z BL4025 481 mm
z BL4040 496 mm
Masa netto 6,3–7,1 kg
• Wzwiązkuzestaleprowadzonymprzeznasząrmęprogramembadawczo-rozwojowymniniejszedanemogą
uleczmianombezwcześniejszegopowiadomienia.
• Danetechnicznemogąróżnićsięwzależnościodkraju.
• Masamożebyćróżnawzależnościodosprzętu,wtymakumulatora.Wtabeliprzedstawionajestnajlżejszai
najcięższakonguracja,zgodniezprocedurąEPTA01/2014.
Kompatybilne akumulatory i ładowarki
Akumulator BL4020/BL4025/BL4040*/BL4050F*
*:Zalecanyakumulator
Ładowarka DC40RA/DC40RB/DC40RC
•
Pewnezwymienionychpowyżejakumulatorówiładowarekmogąbyćniedostępnewregioniezamieszkaniaużytkownika.
OSTRZEŻENIE: Należy używać wyłącznie akumulatorów i ładowarek wymienionych powyżej.
Używanieinnychakumulatorówiładowarekmożestwarzaćryzykowystąpieniaobrażeńciałalubpożaru.
Przeznaczenie
Narzędziejestprzeznaczonedopodkuwaniawbetonie,
cegle,kamieniuiasfalcieorazdowbijaniaizagęszcza-
niazużyciemodpowiednichakcesoriów.
Hałas
TypowyrównoważnypoziomdźwiękuAokreślonyw
oparciuonormęEN60745-2-6:
Poziomciśnieniaakustycznego(LpA):89dB(A)
Poziommocyakustycznej(LWA):100dB(A)
Niepewność(K):3dB(A)
WSKAZÓWKA:
Deklarowanawartośćemisjihałasu
zostałazmierzonazgodniezestandardowąmetodątestową
imożnająwykorzystaćdoporównywanianarzędzi.
WSKAZÓWKA:
Deklarowanąwartośćemisjihałasu
możnatakżewykorzystaćwewstępnejocenienarażenia.
OSTRZEŻENIE: Nosić ochronniki słuchu.
OSTRZEŻENIE:
Poziom hałasu wytwarzanego
podczas rzeczywistego użytkowania elektronarzę-
dzia może się różnić od wartości deklarowanej w
zależności od sposobu użytkowania narzędzia, a w
szczególności od rodzaju obrabianego elementu.
OSTRZEŻENIE: W oparciu o szacowane
narażenie w rzeczywistych warunkach użytkowa-
nia należy określić środki bezpieczeństwa w celu
zapewnienia ochrony operatora (uwzględniając
wszystkie elementy cyklu działania, tj. czas, kiedy
narzędzie jest wyłączone i kiedy pracuje na biegu
jałowym, a także czas, kiedy jest włączone).
Drgania
Całkowitawartośćpoziomudrgań(sumawektoróww3
osiach)określonazgodnieznormąEN60745-2-6:
Trybpracy:podkuwaniezuchwytembocznym
Emisjadrgań(ah, Cheq):5,5m/s2
Niepewność(K):1,5m/s2
Trybpracy:podkuwaniezrękojeściąboczną
Emisjadrgań(ah, Cheq):6,0m/s2
Niepewność(K):1,5m/s2
WSKAZÓWKA:
Deklarowanawartośćpoziomudrgań
zostałazmierzonazgodniezestandardowąmetodątestową
imożnająwykorzystaćdoporównywanianarzędzi.
WSKAZÓWKA:
Deklarowanąwartośćpoziomudrgań
możnatakżewykorzystaćwewstępnejocenienarażenia.
OSTRZEŻENIE:
Drgania wytwarzane podczas
rzeczywistego użytkowania elektronarzędzia mogą
się różnić od wartości deklarowanej w zależności
od sposobu użytkowania narzędzia, a w szczegól-
ności od rodzaju obrabianego elementu.
OSTRZEŻENIE:
W oparciu o szacowane narażenie
w rzeczywistych warunkach użytkowania należy określić
środki bezpieczeństwa w celu zapewnienia ochrony ope-
ratora (uwzględniając wszystkie elementy cyklu działania,
tj. czas, kiedy narzędzie jest wyłączone i kiedy pracuje na
biegu jałowym, a także czas, kiedy jest włączone).
Deklaracja zgodności WE
Dotyczy tylko krajów europejskich
DeklaracjazgodnościWEjestdołączonajakozałącznik
Adoniniejszejinstrukcjiobsługi.

18 POLSKI
OSTRZEŻENIA DOTYCZĄCE
BEZPIECZEŃSTWA
Ogólne zasady bezpiecznej
eksploatacji elektronarzędzi
OSTRZEŻENIE: Należy zapoznać się z
ostrzeżeniami dotyczącymi bezpieczeństwa,
instrukcjami, ilustracjami i danymi technicz-
nymi dołączonymi do tego elektronarzędzia.
Niezastosowaniesiędopodanychponiżejinstrukcji
możeprowadzićdoporażeniaprądem,pożarui/lub
poważnychobrażeńciała.
Wszystkie ostrzeżenia i instruk-
cje należy zachować do wykorzy-
stania w przyszłości.
Pojęcie„elektronarzędzie",występującewwymienio-
nychtuostrzeżeniach,odnosisiędoelektronarzędzia
zasilanegozsiecielektrycznej(zprzewodemzasilają-
cym)lubdoelektronarzędziaakumulatorowego(bez
przewoduzasilającego).
Ostrzeżenia dotyczące
bezpieczeństwa podczas eksploatacji
akumulatorowego młota udarowego
1. Nosić ochronniki słuchu.Hałasmożespowodo-
waćutratęsłuchu.
2. Używać narzędzia z uchwytami pomocniczymi,
jeśli zostały dostarczone wraz z nim. Utrata
kontrolimożespowodowaćobrażeniaciała.
3. Trzymać elektronarzędzie za izolowane
powierzchnie rękojeści podczas wykonywa-
nia prac, przy których osprzęt tnący mógłby
dotknąć niewidocznej instalacji elektrycznej.
Zetknięcieosprzętuzprzewodemelektrycznym
znajdującymsiępodnapięciemmożespowodo-
wać,żeodsłonięteelementymetaloweelektrona-
rzędziarównieżznajdąsiępodnapięciem,grożąc
porażeniemoperatoraprądemelektrycznym.
4.
Nosić kask (hełm ochronny), okulary ochronne
oraz/lub osłonę twarzy. Zwykłe okulary bądź oku-
lary przeciwsłoneczne NIE są okularami ochron-
nymi. Stanowczo zaleca się również noszenie
maski przeciwpyłowej oraz grubych rękawic.
5. Przed uruchomieniem narzędzia należy się
upewnić, czy wiertło jest dobrze zamocowane.
6.
W normalnych warunkach pracy narzędzie wytwa-
rza drgania. W związku z tym śruby mogą łatwo
ulec poluzowaniu, doprowadzając do awarii lub
wypadku. Przed uruchomieniem narzędzia należy
skontrolować, czy śruby są dobrze dokręcone.
7. W przypadku niskiej temperatury lub gdy
narzędzie nie było używane przez dłuższy
czas, należy najpierw je rozgrzać, uruchamia-
jąc na chwilę bez obciążenia. W ten sposób
gęstość smaru ulegnie zmniejszeniu. Bez wła-
ściwego rozgrzania narzędzia działanie funkcji
udaru jest utrudnione.
8.
Podczas pracy należy zadbać o dobre oparcie dla
nóg. W przypadku pracy na pewnej wysokości upew-
nić się, że na dole nie przebywają żadne osoby.
9. Narzędzie należy trzymać mocno oburącz.
10. Trzymać ręce z dala od części ruchomych.
11. Nie pozostawiać włączonego narzędzia.
Narzędzie można uruchomić tylko, gdy jest
trzymane w rękach.
12.
Podczas pracy nie wolno kierować narzędzia w
stronę osób znajdujących się w pobliżu. Wiertło
może wylecieć z uchwytu i poważnie kogoś zranić.
13. Nie dotykać wiertła, części w pobliżu wiertła
ani elementu obrabianego od razu po zakoń-
czeniu danej operacji; mogą one być bardzo
gorące i spowodować oparzenie skóry.
14. Niektóre materiały zawierają substancje
chemiczne, które mogą być toksyczne.
Unikać wdychania pyłu i kontaktu ze skórą.
Przestrzegać przepisów bezpieczeństwa poda-
nych przez dostawcę materiałów.
15. Przed przekazaniem narzędzia innej osobie
należy upewnić się, że jest ono wyłączone, a
akumulator i wiertło zostały z niego wyjęte.
16. Przed rozpoczęciem pracy należy się upew-
nić, czy w obszarze pracy nie ma ukrytych
obiektów, takich jak na przykład przewody
elektryczne, instalacja wodna lub gazowa. W
przeciwnymraziemożedojśćdokontaktuwiertła/
dłutaztakimiobiektami,skutkującegoporażeniem
elektrycznym,upływemprądulubwyciekiem
gazu.
17. Nie należy bez potrzeby uruchamiać narzędzia
bez obciążenia.
ZACHOWAĆ NINIEJSZE
INSTRUKCJE.
OSTRZEŻENIE: NIE WOLNO pozwolić,
aby wygoda lub rutyna (nabyta w wyniku wielo-
krotnego używania urządzenia) zastąpiły ścisłe
przestrzeganie zasad bezpieczeństwa obsługi.
NIEWŁAŚCIWE UŻYTKOWANIE narzędzia lub
niestosowanie się do zasad bezpieczeństwa
podanych w niniejszej instrukcji obsługi może
prowadzić do poważnych obrażeń ciała.
Ważne zasady bezpieczeństwa
dotyczące akumulatora
1. Przed użyciem akumulatora zapoznać się ze
wszystkimi instrukcjami i znakami ostrze-
gawczymi na (1) ładowarce, (2) akumulatorze
i (3) produkcie, w którym będzie używany
akumulator.
2. Nie rozmontowywać ani modykować akumu-
latora.Możetospowodowaćpożar,przegrzanie
lubwybuch.
3. Jeśli czas działania uległ znacznemu skróce-
niu, należy natychmiast przerwać pracę. Może
bowiem dojść do przegrzania, ewentualnych
poparzeń, a nawet eksplozji.
4. W przypadku przedostania się elektrolitu do
oczu, przemyć je czystą wodą i niezwłocznie
uzyskać pomoc lekarską. Może on bowiem
spowodować utratę wzroku.

19 POLSKI
5. Nie doprowadzać do zwarcia akumulatora:
(1) Nie dotykać styków materiałami przewo-
dzącymi prąd.
(2) Unikać przechowywania akumulatora w
pojemniku z metalowymi przedmiotami,
takimi jak gwoździe, monety itp.
(3)
Chronić akumulator przed deszczem lub wodą.
Zwarcie prowadzi do przepływu prądu elek-
trycznego o dużym natężeniu i przegrzania
akumulatora, co w konsekwencji może grozić
poparzeniami a nawet awarią urządzenia.
6. Narzędzia i akumulatora nie wolno przechowy-
wać ani używać w miejscach, w których tempe-
ratura osiąga bądź przekracza 50°C (122°F).
7. Akumulatorów nie wolno spalać, również tych
poważnie uszkodzonych lub całkowicie zuży-
tych. Akumulator może eksplodować w ogniu.
8.
Nie należy przecinać ani zgniatać akumulatora,
wbijać w niego gwoździ, rzucać nim, upuszczać, ani
uderzać akumulatorem o twarde obiekty.Takiedziała-
niemożespowodowaćpożar,przegrzanielubwybuch.
9. Nie wolno używać uszkodzonego akumulatora.
10. Stanowiące wyposażenie akumulatory lito-
wo-jonowe podlegają przepisom dotyczącym
produktów niebezpiecznych.
Napotrzebytransportukomercyjnego,np.świadczonegoprzez
rmytrzecieczyspedycyjne,należyprzestrzegaćspecjalnych
wymagańwzakresiepakowaniaioznaczaniaetykietami.
Przygotowanieproduktudowysyłkiwymagaskon-
sultowaniasięzespecjalistąds.materiałówniebez-
piecznych.Należytakżeprzestrzegaćprzepisów
krajowych,któremogąbyćbardziejszczegółowe.
Zakleićtaśmąlubzaślepićotwartestykiakumulatoraoraz
zabezpieczyćgo,abyniemógłsięprzesuwaćwopakowaniu.
11.
Jeśli zajdzie konieczność utylizacji akumulatora,
należy wyjąć go z narzędzia i przekazać w bez-
pieczne miejsce. Postępować zgodnie z przepisami
lokalnymi dotyczącymi utylizacji akumulatorów.
12.
Używać akumulatorów tylko z produktami okre-
ślonymi przez rmę Makita.Zastosowanieakumula-
torówwniezgodnychproduktachmożespowodować
pożar,przegrzanie,wybuchlubwyciekelektrolitu.
13. Jeśli narzędzie nie będzie używane przez dłuż-
szy czas, należy wyjąć z niego akumulator.
14.
Przed użyciem akumulatora i po jego użyciu akumulator
może pozostawać nagrzany, co może spowodować
poparzenia lub poparzenia w niskiej temperaturze. Z
gorącym akumulatorem należy obchodzić się ostrożnie.
15. Nie należy dotykać styku narzędzia bezpośred-
nio po jego użyciu, ponieważ może on być na
tyle gorący, że spowoduje oparzenia.
16.
Nie należy dopuszczać, aby wióry, kurz lub błoto
gromadziły się na stykach, w otworach i rowkach
akumulatora.Możetospowodowaćobniżeniewydaj-
nościlubuszkodzenienarzędzialubakumulatora.
17.
Jeśli narzędzie nie jest przeznaczone do użytku w pobliżu
linii wysokiego napięcia, nie należy korzystać z akumula-
tora w ich sąsiedztwie.Możetospowodowaćnieprawidłowo-
ściwdziałaniulubuszkodzenienarzędzialubakumulatora.
18. Przechowywać akumulator w miejscu niedo-
stępnym dla dzieci.
ZACHOWAĆ NINIEJSZE
INSTRUKCJE.
PRZESTROGA: Używać wyłącznie oryginal-
nych akumulatorów rmy Makita.Używanienie-
oryginalnychakumulatorówrminnychniżMakitalub
akumulatorów,którezostałyzmodykowane,może
spowodowaćwybuchakumulatoraipożar,obrażenia
ciałaorazzniszczeniemienia.Stanowitorównież
naruszeniewarunkówgwarancjirmyMakitadoty-
czącychnarzędziaiładowarki.
Wskazówki dotyczące zacho-
wania maksymalnej trwałości
akumulatora
1. Akumulator należy naładować zanim zostanie
do końca rozładowany. Po zauważeniu spadek
mocy narzędzia należy przerwać pracę i nała-
dować akumulator.
2. Nie wolno ładować powtórnie w pełni nałado-
wanego akumulatora. Przeładowanie akumula-
tora skraca jego trwałość.
3.
Akumulator należy ładować w temperaturze poko-
jowej w przedziale 10–40°C (50–104°F). W przy-
padku gorącego akumulatora przed przystąpie-
niem do ładowania należy poczekać, aż ostygnie.
4. Jeśli akumulator nie jest używany, należy go
wyjąć z narzędzia lub ładowarki.
5. Akumulatory niklowo-wodorkowe należy nała-
dować po okresie długiego nieużytkowania
(dłuższego niż sześć miesięcy).
Ważne zasady bezpieczeństwa
dotyczące złącza bezprzewodowego
1. Nie rozmontowywać ani modykować złącza
bezprzewodowego.
2.
Trzymać złącze bezprzewodowe z dala od małych
dzieci. W przypadku przypadkowego połknięcia
natychmiast skorzystać z pomocy medycznej.
3. Używać złącza bezprzewodowego wyłącznie z
narzędziami rmy Makita.
4. Nie narażać złącza bezprzewodowego na dzia-
łanie deszczu lub niesprzyjających warunków
atmosferycznych.
5. Nie używać złącza bezprzewodowego w miej-
scach, w których temperatura przekracza 50°C.
6.
Nie obsługiwać złącza bezprzewodowego w
miejscach, w których w pobliżu znajdują się
przyrządy medyczne, takie jak rozruszniki serca.
7.
Nie obsługiwać złącza bezprzewodowego w
miejscach, w których w pobliżu znajdują się zau-
tomatyzowane urządzenia.Wprzypadkuobsługi
złączabezprzewodowegowzautomatyzowanym
urządzeniumożewystąpićusterkalubbłąd.
8.
Nie używać złącza bezprzewodowego w miejscach,
w których panuje wysoka temperatura lub takich,
w których możliwe jest wygenerowanie ładunków
elektrostatycznych lub zakłóceń elektrycznych.
9. Złącze bezprzewodowe może wytwarzać pole
elektromagnetyczne, które nie jest szkodliwe
dla użytkownika.
10. Złącze bezprzewodowe to czuły przyrząd.
Należy chronić złącze bezprzewodowe przed
upadkiem i uderzeniami.

20 POLSKI
11. Unikać dotknięcia zacisku złącza bezprze-
wodowego gołymi rękoma lub metalowymi
materiałami.
12. W przypadku montażu złącza bezprzewodo-
wego należy zawsze wyciągać akumulator z
produktu.
13. Podczas otwierania pokrywy gniazda unikać
miejsc, w których pył i woda mogą przedo-
stać się do gniazda. Zawsze utrzymywać wlot
gniazda w czystości.
14. Zawsze wkładać złącze bezprzewodowe skie-
rowane w odpowiednią stronę.
15. Nie naciskać zbyt mocno przycisku aktywacji
bezprzewodowej na złączu bezprzewodowym
i/lub nie naciskać przycisku za pomocą przed-
miotu z ostrą krawędzią.
16.
Zawsze zamykać pokrywę gniazda podczas pracy.
17. Nie usuwać złącza bezprzewodowego z
gniazda, gdy zasilanie narzędzia jest włączone.
Wykonanietejczynnościmożespowodować
usterkęzłączabezprzewodowego.
18. Nie usuwać naklejki ze złącza
bezprzewodowego.
19. Nie umieszczać żadnej naklejki na złączu
bezprzewodowym.
20. Nie pozostawiać złącza bezprzewodowego w
miejscach, w których możliwe jest wygenero-
wanie ładunków elektrostatycznych lub szu-
mów elektrycznych.
21. Nie pozostawiać złącza bezprzewodowego w
miejscach narażonych na działanie wysokich
temperatur, na przykład w samochodzie zapar-
kowanym w słońcu.
22. Nie pozostawiać złącza bezprzewodowego w
miejscach, w których występuje kurz, pył lub
gazy wykazujące właściwości korozyjne.
23. Nagła zmiana temperatury może spowodować
pojawienie się rosy na złączu bezprzewodo-
wym. Nie używać urządzenia, aż do momentu
całkowitego osuszenia rosy.
24. W przypadku czyszczenia złącza bezprzewo-
dowego delikatnie wytrzeć je przy użyciu mięk-
kiej, suchej szmatki. Nie stosować benzyny,
rozpuszczalnika, smaru przewodzącego prąd i
innych podobnych substancji.
25. W przypadku przechowywania złącza bezprze-
wodowego umieścić je w dołączonej obudowie
lub antystatycznym pojemniku.
26. Nie wkładać żadnych urządzeń innych niż złą-
cze bezprzewodowe rmy Makita do gniazda w
narzędziu.
27. Nie wolno używać narzędzia, gdy pokrywa
gniazda jest uszkodzona.Woda,pyłizabru-
dzenia,któreprzedostanąsiędogniazda,mogą
spowodowaćusterkę.
28. Nie ciągnąć i/lub nie obracać nadmiernie
pokrywy gniazda.Umieścićpokrywęwodpo-
wiednimmiejscuwprzypadkuzsunięciasięjejz
narzędzia.
29. Wymienić pokrywę gniazda w przypadku jej
zgubienia lub uszkodzenia.
ZACHOWAĆ NINIEJSZĄ
INSTRUKCJĘ.
OPIS DZIAŁANIA
PRZESTROGA: Przed przystąpieniem do regu-
lacji lub przeglądu narzędzia upewnić się, że jest
ono wyłączone, a akumulator został wyjęty.
Wkładanie i wyjmowanie akumulatora
PRZESTROGA: Przed włożeniem lub wyjęciem
akumulatora należy zawsze wyłączyć narzędzie.
PRZESTROGA: Podczas wkładania lub wyjmo-
wania akumulatora należy mocno trzymać narzę-
dzie i akumulator.Wprzeciwnymraziemogąsięone
wyślizgnąćzrąk,powodującuszkodzenienarzędzia
lubakumulatoraiobrażeniaciała.
►Rys.1:
1.Czerwonywskaźnik2.Przycisk3.Akumulator
Abywyjąćakumulator,przesuńprzyciskznajdującysię
wprzedniejjegoczęściiwysuńakumulator.
Abywłożyćakumulator,wyrównajwystępnaakumulato-
rzezrowkiemwobudowieiwsuńgonaswojemiejsce.
Akumulatornależywsunąćdooporu,ażsięzatrzaśniena
miejscu,cojestsygnalizowanedelikatnymkliknięciem.
Jeśliwgórnejczęściprzyciskujestwidocznyczerwony
wskaźnik,akumulatorniezostałcałkowiciezatrzaśnięty.
PRZESTROGA: Akumulator należy włożyć
do końca, tak aby czerwony wskaźnik nie był
widoczny.Wprzeciwnymraziemożeprzypadkowo
wypaśćznarzędzia,powodującobrażeniaoperatora
lubosóbpostronnych.
PRZESTROGA: Nie wkładać akumulatora na
siłę.Jeśliakumulatorniedajesięswobodniewsunąć,
oznaczato,żezostałwłożonynieprawidłowo.
Wskazanie stanu naładowania akumulatora
Nacisnąćprzyciskkontrolnynaakumulatorzewcelu
wyświetleniastanunaładowaniaakumulatora.Lampki
wskaźnikazaświecąsięprzezkilkasekund.
►Rys.2: 1.Lampkiwskaźnika2.Przyciskkontrolny
Lampki wskaźnika Pozostała
energia
akumulatora
Świeci się Wyłączony Miga
75–100%
50–75%
25–50%
0–25%
Naładować
akumulator.
Akumulator
możenie
działać
poprawnie.
Other manuals for HM001G
9
Table of contents
Languages:
Other Makita Power Hammer manuals

Makita
Makita GMH01Z User manual

Makita
Makita DHR283 User manual

Makita
Makita HM001G User manual

Makita
Makita BHR261 User manual

Makita
Makita HM001G User manual

Makita
Makita HM1213C Manual

Makita
Makita HM001GM201 User manual

Makita
Makita HM1512 User manual

Makita
Makita HM002G User manual

Makita
Makita M8600B User manual

Makita
Makita HM0810 User manual

Makita
Makita HM1242C Manual

Makita
Makita GRH07 User manual

Makita
Makita HM1205C User manual

Makita
Makita HM1111C User manual

Makita
Makita HM002G User manual

Makita
Makita HM1201 User manual

Makita
Makita HM1202C User manual

Makita
Makita HM002GZ03 User manual

Makita
Makita M8600 User manual