Makita 5201NA User manual

INSTRUCTION MANUAL
Circular Saw
5201N
5201NA
ENGLISH: Original instructions
Read before use.

2ENGLISH
SPECIFICATIONS
Model 5201N / 5201NA
Blade diameter 260 mm
Max. Cutting depth at 90° 97 mm
at 45° 64 mm
No load speed (min-1)3,700
Overall length 445 mm
Net weight 8.3 kg
• Duetoourcontinuingprogrammeofresearchanddevelopment,thespecicationshereinaresubjecttochange
withoutnotice.
• Note:Specicationsmaydifferfromcountrytocountry.
Symbols
Thefollowingshowthesymbolsusedfortheequipment.
Besurethatyouunderstandtheirmeaningbeforeuse.
Readinstructionmanual.
Wearsafetyglasses.
Intended use
Thetoolisintendedforperforminglengthwaysand
crosswaysstraightcutsandmitrecutswithanglesin
woodwhileinrmcontactwiththeworkpiece.
Power supply
Thetoolshouldbeconnectedonlytoapowersupplyof
thesamevoltageasindicatedonthenameplate,and
canonlybeoperatedonsingle-phaseACsupply.This
toolshouldbegroundedwhileinusetoprotecttheoper-
atorfromelectricshock.Useonlythree-wireextension
cordswhichhavethree-pronggrounding-typeplugsand
three-polereceptacleswhichacceptthetool'splug.
SAFETY INSTRUCTIONS
WARNING! When using electric tools, basic safety
precautions, including the following, should always
be followed to reduce the risk of re, electric shock
and personal injury. Read all these instructions
before operating this product and save these
instructions.
For safe operations:
1. Keep work area clean.
Clutteredareasandbenchesinviteinjuries.
2. Consider work area environment.
Donotexposepowertoolstorain.Donotuse
powertoolsindamporwetlocations.Keepwork
areawelllit.Donotusepowertoolswherethereis
risktocausereorexplosion.
3. Guard against electric shock.
Avoidbodycontactwithearthedorgroundedsur-
faces(e.g.pipes,radiators,ranges,refrigerators).
4. Keep children away.
Donotletvisitorstouchthetoolorextensioncord.
Allvisitorsshouldbekeptawayfromworkarea.
5. Store idle tools.
Whennotinuse,toolsshouldbestoredinadry,
highorlockedupplace,outofreachofchildren.
6. Do not force the tool.
Itwilldothejobbetterandsaferattheratefor
whichitwasintended.
7. Use the right tool.
Donotforcesmalltoolsorattachmentstodo
thejobofaheavydutytool.Donotusetoolsfor
purposes not intended; for example, do not use
circularsawstocuttreelimbsorlogs.
8. Dress properly.
Donotwearlooseclothingorjewellery,theycan
becaughtinmovingparts.Rubberglovesand
non-skidfootweararerecommendedwhenwork-
ingoutdoors.Wearprotectinghaircoveringto
containlonghair.
9. Use safety glasses and hearing protection.
Alsousefaceordustmaskifthecuttingoperation
isdusty.
10. Connect dust extraction equipment.
Ifdevicesareprovidedfortheconnectionofdust
extractionandcollectionfacilitiesensuretheseare
connectedandproperlyused.
11. Do not abuse the cord.
Nevercarrythetoolbythecordoryankittodis-
connectitfromthesocket.Keepthecordaway
from heat, oil and sharp edges.
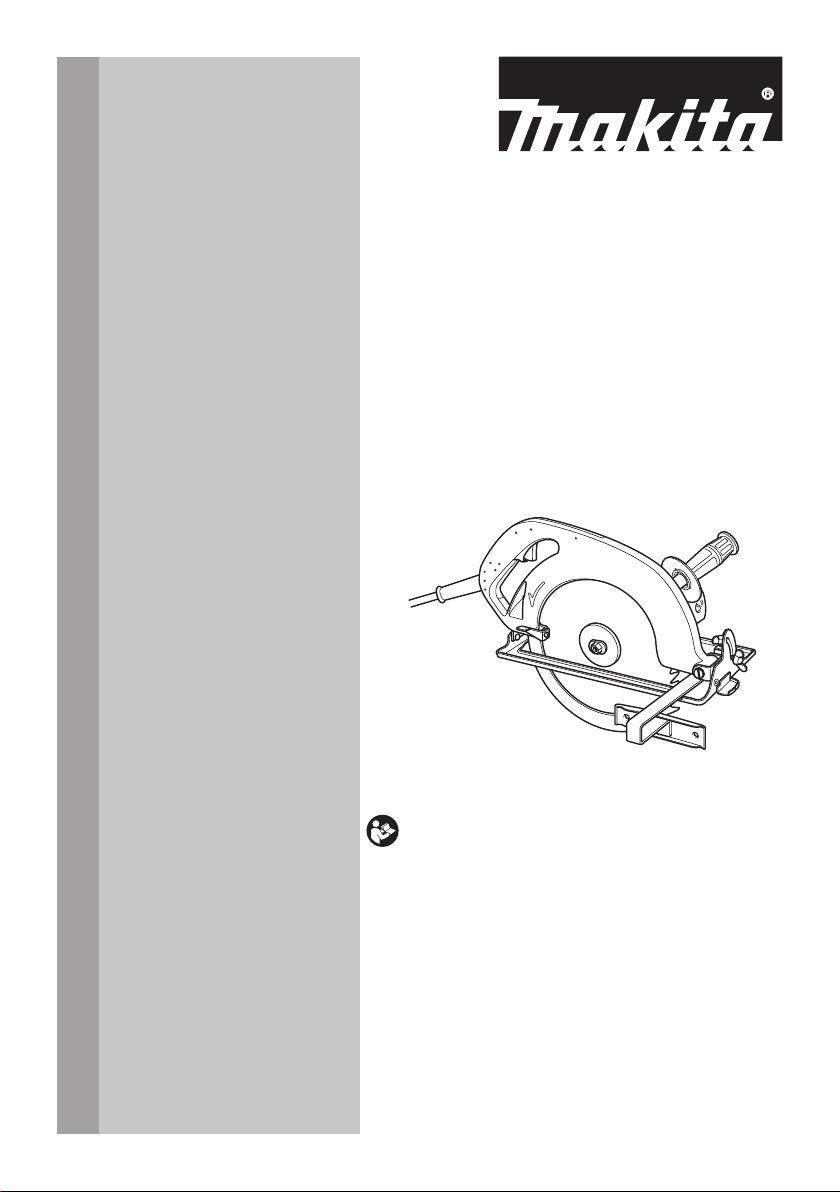
12. Secure work.
Useclampsoravicetoholdthework.Itissafer
thanusingyourhandanditfreesbothhandsto
operate the tool.
13. Do not overreach.
Keepproperfootingandbalanceatalltimes.
14. Maintain tools with care.
Keepcuttingtoolssharpandcleanforbetterand
saferperformance.Followinstructionsforlubrica-
tionandchangingaccessories.Inspecttoolcord
periodicallyandifdamagedhaveitrepairedbyan
authorizedservicefacility.Inspectextensioncords
periodicallyandreplace,ifdamaged.Keephan-
dlesdry,cleanandfreefromoilandgrease.
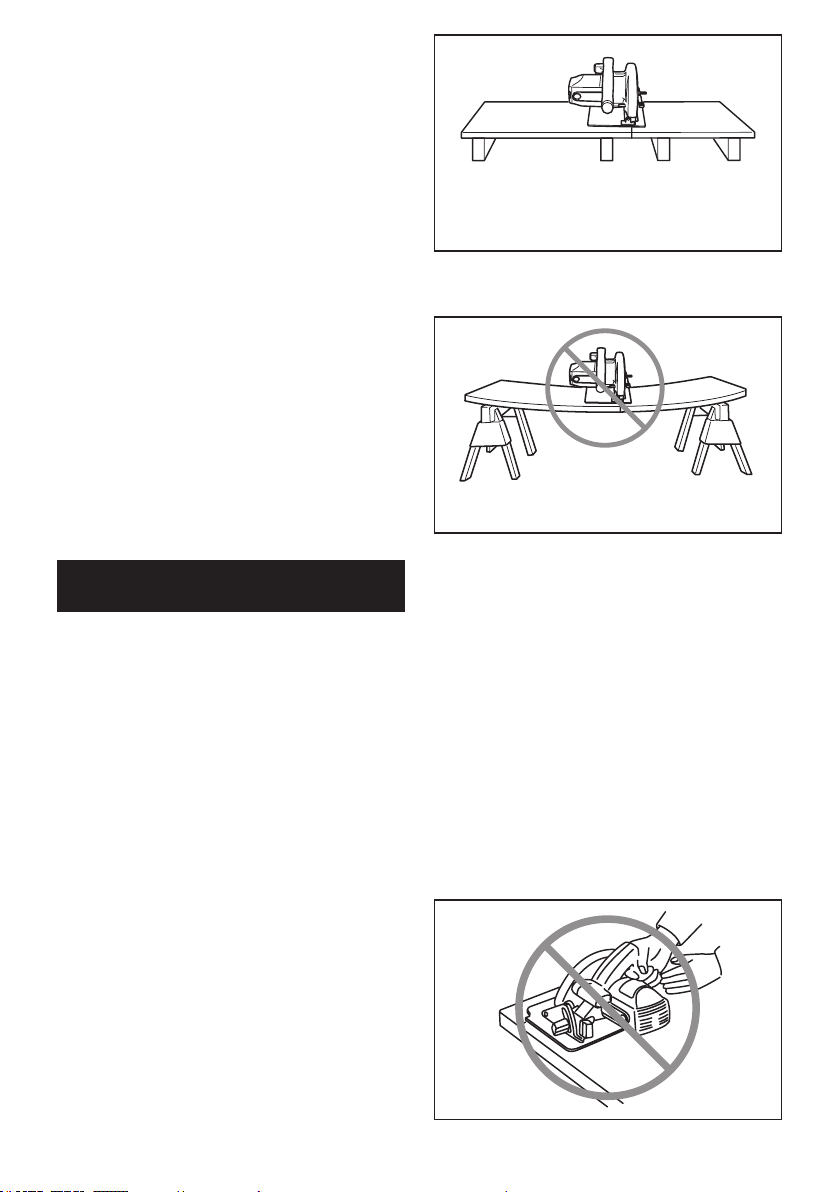
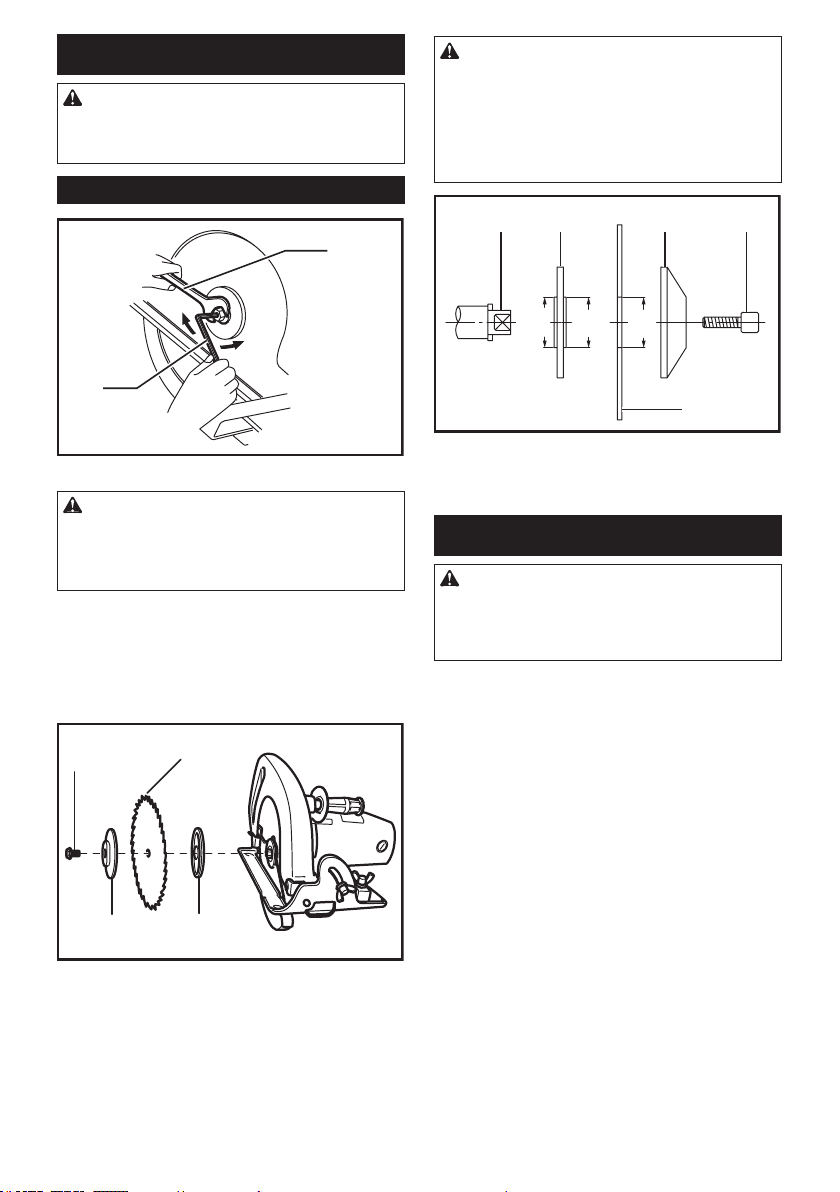
15. Disconnect tools.
Whennotinuse,beforeservicingandwhenchang-
ingaccessoriessuchasblades,bitsandcutters.
16. Remove adjusting keys and wrenches.
Formthehabitofcheckingtoseethatkeysand
adjustingwrenchesareremovedfromthetool
before turning it on.
17. Avoid unintentional starting.
Donotcarryaplugged-intoolwithangeronthe
switch.Ensureswitchisoffwhenpluggingin.

3ENGLISH
18. Use outdoor extension leads.
Whentoolisusedoutdoors,useonlyextension
cordsintendedforoutdooruse.
19. Stay alert.
Watchwhatyouaredoing.Usecommonsense.
Donotoperatetoolwhenyouaretired.
20. Check damaged parts.
Before further use of the tool, a guard or other part
thatisdamagedshouldbecarefullycheckedto
determinethatitwilloperateproperlyandperform
itsintendedfunction.Checkforalignmentofmov-
ing parts, free running of moving parts, breakage
ofparts,mountingandanyotherconditionsthat
mayaffectitsoperation.Aguardorotherpart
thatisdamagedshouldbeproperlyrepairedor
replacedbyanauthorizedservicecenterunless
otherwiseindicatedinthisinstructionmanual.
Havedefectiveswitchesreplacedbyanautho-
rizedservicefacility.Donotusethetoolifthe
switchdoesnotturnitonandoff.
21. Warning.
Theuseofanyaccessoryorattachment,other
thanthoserecommendedinthisinstructionman-
ualorthecatalog,maypresentariskofpersonal
injury.
22. Have your tool repaired by a qualied person.
Thiselectrictoolisinaccordancewiththerelevant
safetyrequirements.Repairsshouldonlybecar-
riedoutbyqualiedpersonsusingoriginalspare
parts,otherwisethismayresultinconsiderable
danger to the user.
ADDITIONAL SAFETY RULES FOR
TOOL
1. Wear hearing protection.
2. Keep Guards In Place and In Working Order.
Never wedge or tie lower guard open. Check
operation of lower guard before each use.
Don’t use if lower guard does not close briskly
over saw blade.
CAUTION: If saw is dropped, lower guard may
be bent, restricting full return.
3. Do not use blades which are deformed or
cracked.
4. Do not use blades made of high speed steel.
5. Do not stop the blades by lateral pressure on
the saw blade.
6. Keep Blades Clean and Sharp. Sharp blades
minimize stalling and kickback.
7. DANGER:
Keep Hands Away From Cutting Area.
Keep hands away from blades. Don’t reach
underneath work while blade is rotating. Don’t
attempt to remove cut material when blade is
moving.
CAUTION: Blades coast after turn off.
8. Support Large Panels (Fig. 1 & 2).
Large panels must be supported as shown in
Fig. 1 to minimize the risk of blade pinching
and kickback.
When cutting operation requires the resting
of the saw on the workpiece, the saw shall be
rested on the larger portion and the smaller
piece cut off.
Fig. 1
Toavoidkickback,dosupportboardorpanelnearthecut.
Fig. 2
Donotsupportboardorpanelawayfromthecut.
9. Use Rip Fence.
Always use a fence or straight edge guide
when ripping.
10. Guard Against Kickback. (Fig. 1 & 3)
Kickback occurs when the saw stalls rapidly
and is driven back towards the operator.
Release switch immediately if blade binds or
saw stalls.
Keep blades sharp. Support large panels as
shown in Fig. 1.
Use fence or straight edge guide when ripping.
Don’t force tool. Stay alert-exercise control.
Don’t remove saw from work during a cut while
the blade is moving.
NEVER place your hand or ngers behind the
saw. If kickback occurs, the saw could easily
jump backwards over your hand, possibly
causing severe injury.

4ENGLISH
Fig. 3
11. Lower guard should be retracted manually
only for special cuts such as “Compound
Cuts”. Raise lower guard by Retracting Lever.
As soon as blade enters the material, lower
guard must be released.Forallothersawing,
thelowerguardshouldoperateautomatically.
12. Adjustments.
Before cutting be sure depth and bevel adjust-
ments are tight.
13. Use Only Correct Blades In Mounting.
Don’t use blades with incorrect size holes.
Never use defective or incorrect blade washers
or bolts.
14. Avoid Cutting Nails.
Inspect for and remove all nails from lumber
before cutting.
15. When operating the saw, keep the cord away
from the cutting area and position it so that it
will not be caught on the workpiece during the
cutting operation. Operate with proper hand
support, proper workpiece support, and sup-
ply cord routing away from the work area.
WARNING:
It is important to support the workpiece prop-
erly and to hold the saw rmly to prevent loss
of control which could cause personal injury.
Fig. 4 illustrates typical hand support of the
saw.
Fig. 4
Atypicalillustrationofproperhandsupport,workpiece
support,andsupplycordrouting.
16. Place the wider portion of the saw base on that
part of the workpiece which is solidly sup-
ported, not on the section that will fall off when
the cut is made.
As example, Fig. 5 illustrates the RIGHT way
to cut off the end of a board, and Fig. 6 the
WRONG way. If the workpiece is short or small,
clamp it down. DON’T TRY TO HOLD SHORT
PIECES BY HAND! (Fig. 6)
Fig. 5
Fig. 6
17. Never attempt to saw with the circular saw
held upside down in a vise. This is extremely
dangerous and can lead to serious accidents.
(Fig. 7)
Fig. 7
18. Before setting the tool down after completing a
cut, be sure that the lower (telescoping) guard
has closed and the blade has come to a com-
plete stop.
19. Using manufacturer data
• Ensure that the diameter, thickness and
other characteristics of the saw blade are
suitable for the tool.
• Ensure that the saw blade is suitable for
the spindle speed of the tool.
20. Do not use any abrasive wheel.
SAVE THESE INSTRUCTIONS.

5ENGLISH
FUNCTIONAL
DESCRIPTION
CAUTION:
• Alwaysbesurethatthetoolisswitchedoffand
unpluggedbeforeadjustingorcheckingfunction
on the tool.
Adjusting depth of cut
1
►1. Lever
CAUTION:
• Afteradjustingthedepthofcut,alwaystighten
theleversecurely.
Loosen the lever on the depth guide and move the base
upordown.Atthedesireddepthofcut,securethebase
bytighteningthelever.
Forcleaner,safercuts,setcutdepthsothatnomore
thanonebladetoothprojectsbelowworkpiece.Using
propercutdepthhelpstoreducepotentialfordanger-
ousKICKBACKSwhichcancausepersonalinjury.
Bevel cutting
1
2
►1.Bevelscaleplate2.Clampingscrew
Loosentheclampingscrewonthebevelscaleplateon
thefrontofthebase.Setforthedesiredangle(0°-45°)
bytiltingaccordingly,thentightentheclampingscrew
securely.
Sighting
AB
1
►1. Base
Forstraightcuts,aligntheApositiononthefrontofthe
basewithyourcuttingline.For45°bevelcuts,alignthe
B position with it.
Switch action
1
2
►1.Lockbutton2.Switchtrigger
CAUTION:
• Beforeplugginginthetool,alwayschecktosee
thattheswitchtriggeractuatesproperlyand
returnstothe"OFF"positionwhenreleased.
For tool with lock button
Tostartthetool,simplypulltheswitchtrigger.Release
theswitchtriggertostop.
Forcontinuousoperation,pulltheswitchtriggerand
thenpushinthelockbutton.
Tostopthetoolfromthelockedposition,pulltheswitch
triggerfully,thenreleaseit.
For tool without lock button
Tostartthetool,simplypulltheswitchtrigger.Release
theswitchtriggertostop.

6ENGLISH
ASSEMBLY
CAUTION:
• Alwaysbesurethatthetoolisswitchedoffand
unpluggedbeforecarryingoutanyworkonthe
tool.
Removing or installing saw blade
1
2
►1.Wrench2.Hexwrench
CAUTION:
• Besurethebladeisinstalledwithteethpointing
up at the front of the tool.
• UseonlytheMakitawrenchtoinstallorremove
the blade.
Toremovetheblade,holdtheouterangewiththe
wrenchsothatitcannotrevolve,thenusethehex
wrenchtoloosenthehexboltcounterclockwise.Then
removethehexbolt,outerangeandblade.
Toinstalltheblade,followtheremovalprocedurein
reverse.BESURETOTIGHTENTHEHEXBOLT
CLOCKWISESECURELY.
12
34
►1. Hex bolt 2.Sawblade3.Outerange4. Inner
ange
Whenchangingblade,makesuretoalsocleanupper
andlowerbladeguardsofaccumulatedsawdust.Such
effortsdonot,however,replacetheneedtochecklower
guardoperationbeforeeachuse.
CAUTION:
• Theinnerangehasa25mmdiameteronone
side and a 25.4 mm diameter on the other. The
sidewith25.4mmdiameterismarkedby"25.4".
Usethecorrectsidefortheholediameterof
thebladeyouintendtouse.Mountingtheblade
onthewrongsidecanresultindangerous
vibration.
12
34
5
25
25
25.4
►1. Mounting shaft 2.Innerange3.Outerange
4.Hexsocketheadbolt5.Sawblade
OPERATION
CAUTION:
• Besuretomovethetoolforwardinastraight
linegently.Forcingortwistingthetoolwillresult
inoverheatingthemotoranddangerouskick-
back,possiblycausingsevereinjury.
Holdthetoolrmly.Thetoolisprovidedwithbothafront
gripandrearhandle.Usebothtobestgraspthetool.If
bothhandsareholdingsaw,theycannotbecutbythe
blade.Setthebaseontheworkpiecetobecutwithout
theblademakinganycontact.Thenturnthetoolonand
waituntilthebladeattainsfullspeed.Nowsimplymove
thetoolforwardovertheworkpiecesurface,keeping
itatandadvancingsmoothlyuntilthesawingiscom-
pleted.
Togetcleancuts,keepyoursawinglinestraightand
yourspeedofadvanceuniform.Ifthecutfailstoprop-
erlyfollowyourintendedcutline,donotattempttoturn
orforcethetoolbacktothecutline.Doingsomaybind
thebladeandleadtodangerouskickbackandpossible
seriousinjury.Releaseswitch,waitforbladetostop
andthenwithdrawtool.Realigntoolonnewcutline,
andstartcutagain.Attempttoavoidpositioningwhich
exposesoperatortochipsandwooddustbeingejected
fromsaw.Useeyeprotectiontohelpavoidinjury.

7ENGLISH
12
3
►1. Rear handle 2.Frontgrip3. Base
Rip fence (Guide rule)
1
►1.Ripfence(Guiderule)
Thehandyripfenceallowsyoutodoextra-accurate
straightcuts.Simplyslidetheripfenceupsnugly
againstthesideoftheworkpieceandsecureitin
positionwiththescrewonthefrontofthebase.Italso
makesrepeatedcutsofuniformwidthpossible.
MAINTENANCE
CAUTION:
• Alwaysbesurethatthetoolisswitchedoffand
unpluggedbeforeattemptingtoperforminspec-
tionormaintenance.
Replacing carbon brushes
1
►1. Limit mark
Removeandcheckthecarbonbrushesregularly.
Replacewhentheyweardowntothelimitmark.Keep
thecarbonbrushescleanandfreetoslipintheholders.
Bothcarbonbrushesshouldbereplacedatthesame
time.Useonlyidenticalcarbonbrushes.
Useascrewdrivertoremovethebrushholdercaps.
Takeouttheworncarbonbrushes,insertthenewones
andsecurethebrushholdercaps.
1
2
►1.Brushholdercap2.Screwdriver
TomaintainproductSAFETYandRELIABILITY,repairs,
anyothermaintenanceoradjustmentshouldbeper-
formedbyMakitaAuthorizedServiceCenters,always
usingMakitareplacementparts.
ACCESSORIES
CAUTION:
•
Theseaccessoriesorattachmentsarerecom-
mendedforusewithyourMakitatoolspeciedinthis
manual.Theuseofanyotheraccessoriesorattach-
mentsmightpresentariskofinjurytopersons.Only
useaccessoryorattachmentforitsstatedpurpose.
Ifyouneedanyassistanceformoredetailsregarding
theseaccessories,askyourlocalMakitaServiceCenter.
• Sawblades
• Ripfence(Guiderule)
• Hexwrench
• Wrench22

Makita Corporation
www.makita.com
883189D7
EN
20170119
Other manuals for 5201NA
4
This manual suits for next models
1
Table of contents
Other Makita Saw manuals

Makita
Makita DJR187 Manual

Makita
Makita DUC101 User manual

Makita
Makita 5008MG User manual

Makita
Makita LC1230 User manual

Makita
Makita LS1017 User manual

Makita
Makita 5007N User manual

Makita
Makita LS711D Manual

Makita
Makita 4100NH Quick start guide

Makita
Makita XSL03 User manual

Makita
Makita 5620DWA Quick start guide

Makita
Makita JR3060T User manual

Makita
Makita JR3061T User manual

Makita
Makita LS1017 User manual

Makita
Makita 5017RKB User manual

Makita
Makita LS1040 User manual

Makita
Makita 5057KB User manual

Makita
Makita MLS100 User manual

Makita
Makita 2704 User manual

Makita
Makita JR3000 User manual

Makita
Makita LS1040 User manual