manuals.online logo
Brands
  1. Home
  2. •
  3. Brands
  4. •
  5. Makita
  6. •
  7. Trimmer
  8. •
  9. Makita RPT250 User manual

Makita RPT250 User manual

I
English
I
French
I
German
I
Italian
I
Dutch
I
Spanish
Pole
Hedge
Trimmer
Taille
haie
a
Rallonge
Hock-Heckenschere
Tagliasiepi
Prolungato
a
Scoppio
Stok Heggenschaar
Cortasetos
Articulado
de
Altura
RPT250
Instruction Manual Manuale
di
istruzioni
I
Manuel d’instructions Handleiding
1
Bet
rie
bsan
lei
t
ung Manual deinstrucciones
i
1
Important:
Read
this
instruction
manual
thoroughly before
using
the Pole
Hedge Trimmer and follow
the
safety regulations carefully.
Be sure to keep
this
instruction
manual
for future reference.
Important:
tire entierementce manuel d’instructionsavant d’utiliserla
taille haie
a
rallonge et respecter toutes les consignes de
securite.
S’assurerde conserver ce manuel dinstructionspour toute
referenceulterieure.
Wichtig:
Lesen Sie vor lnbetriebnahmedes Hock-Heckenscheresdiese
Betriebsanleitung sorgfaltig durch,
und
befolgen Sie unbedingt
alle Sicherheitsvorschriften
fur
den Gebrauch des Gerates.
Bewahren Siediese Betriebsanleitung
fur
spateres
Nachschlagen unbedingt
auf.
Importante:
Leggere questo manuale
di
istruzioni sin0
in
fondo prima
di
usare
il
tagliasiepi prolungato a scoppio e seguire sempre
attentamentele norme
di
sicureua.
Conservarepoi questo manuale per poterne fare
di
nuovo
us0
in
futuro.
Belangrij
k:
Lees deze handleiding zorgvuldig door voor
u
de stok
heggenschaar gaat gebruik en volg de veiligheidsinstructies
nauwgezetop.
Bewaar deze handleiding zodat
u
er later nog
iets
in
op
kunt
zoeken.
Importante:
Lea completamenteeste manual
de
instrucciones antes de
utilizar el Cortasetos Articulada de Altura
y
respete
cuidadosamentelas instrucciones para
su
seguridad.
Guarde este manual de instrucciones en
un
lugar a mano para
su
referencia en cualquier momento.
Thank you very much
for
choosingthe MAKITA Pole Hedge Trimmer.We
are
pleased
to
offer you
a
product that
is
the result
of
an extensive development
program and many years of knowledge and experience.
To safely obtain the best possible results from your MAKITA Pole Hedge Trimmer,
please
read
this manual thoroughly
before
using the machine, and follow
all
instructions given herein to
assure
proper operation of the MAKITA Pole Hedge
Trimmer.
...
.
....
,
.
.,.
.
....
..
,::7,.:
:;.:%?
.:.
.:ii"n
...
i,
..
.
...
..::::
-.
Table
of
Contents
Safety
instructions
Specifications
Parts Breakdown
Connecting thetrimmer unit tothe pole
Attachingthehandle
Using the shoulderstrap
Fuelhefueling
Precautions
before
startingthe engine
Startingthe engine
Stoppingtheengine
Checking andadjusting
the
idling speed
OperatingthePole HedgeTrimmer
Maintenance
Storage
Maintenanceschedule
Troubleshooting
Symbols
Page
2
3-6
7
8
9
9
9
10
11
11
12
12
13-14
14-16
17
17
17
SYMBOLS
Please note the following symbols when reading this instructionmanual
WARNIWER
Q
Before usage, carefully read and fully
understand the instructions in this
manual
PROHIBITION
No
smoking
No naked flame
Wear protective
shoes
Wear protective gloves
Keep working
area
clear
of persons
and pets
0
C€
Wear
a
protective helmet and eye and
ear
protection
Beware
of
pinching
Beware
of
electrical lines,
risk
of
electrical
shock
Gasoline/oilmixture
Engine manual-start
Emergency stop
First
aid
Recyclable
OWART
OFFmOP
Emark
Page
2
3-6
7
8
9
9
9
10
11
11
12
12
13-14
14-16
17
17
17
cal
i
1
i
i
i
i
I
1
1
i
!
i
SAFETY INSTRUCTIONS
General Instructions
-
Before usage, carefullyread this manual and thoroughly familiarize yourself with
how
to
correctlyhandlethe
pole
hedgetrimmer.THlS EQUIPMENT
CAN
CAUSE
SERIOUS INJURY
IF
USED
IMPROPERLY!
-
Always provide detailed instructions on how tocorrectly
use
the pole hedge
trimmer when lendingtheequipment toanother person.
Make
surethat the
instruction manual
is
handed overtogether withthepole hedgetrimmer.
-
First-time users should
ask
their dealer
for
basic instructions on thecorrect
handling
of
the
pole
hedgetrimmer.
-
Storethis manual in
a
location where it
is
easily accessible
for
quick reference.
-
Do
not
allow
persons under the
age
of
18
tooperatethepole hedgetrimmer.
Individuals over
16
years old, however, may
use
thepole hedge trimmer for
training purposes
if
under theconstantsupervision
of
anadult familiar with the
operation
of
thepole hedgetrimmer.
-
Always usethe
pole
hedgetrimmer with theutmost careand attention.
-
Seriousinjury may result
if
thepole hedgetrimmer
is
used in thefollowing
circumstances.
Do
not usethepole hedgetrimmer:
When feeling tired
or
ill.
After consumption
of
alcoholand/or medication.
-
During pregnancy.
At night orin poor lighting conditions.
Intended use
-This pole hedgetrimmer
has
been designed for the
sole
purpose
of
trimming
hedges and bushes with
a
maximum branch diameter
of
6
mm.
Do
not usethe
trimmerforanyother purposes.
Personal protective equipment
-
Clothes worn should befunctional andtight-fittingwithout restricting movement.
Do
not wear clothing
or
jewelry that could get entangled in underbrush
or
in the
machine.
-
For
adequate protection againstinjuries
to
head, eyes,feet, hands,
as
well
as
hearing impairment,thefollowingprotective equipment and clothing must be
used whenworking with thepole hedge trimmer.
-
To prevent injury to the head or theeyes,always wear
a
protective helmet
(1)
with
goggles
or
a
visor
(2).
-Toavoid hearing impairment,wear adequate
ear
defenders
(3)
at
all
times.
-
Use
of
a
well-fitting work overalls
(4)
is
strongly recommended.
-
Always wear rugged, leather working gloves
(5)
when operating the pole
hedgetrimmer.
-
When using the pole hedge trimmer, always wear sturdy shoes
(6)
with
a
non-
slip
sole.
Special work shoesensure goodfooting and protect against injury.
x
3
.
.i
I
Starting the Pole Hedge Trimmer
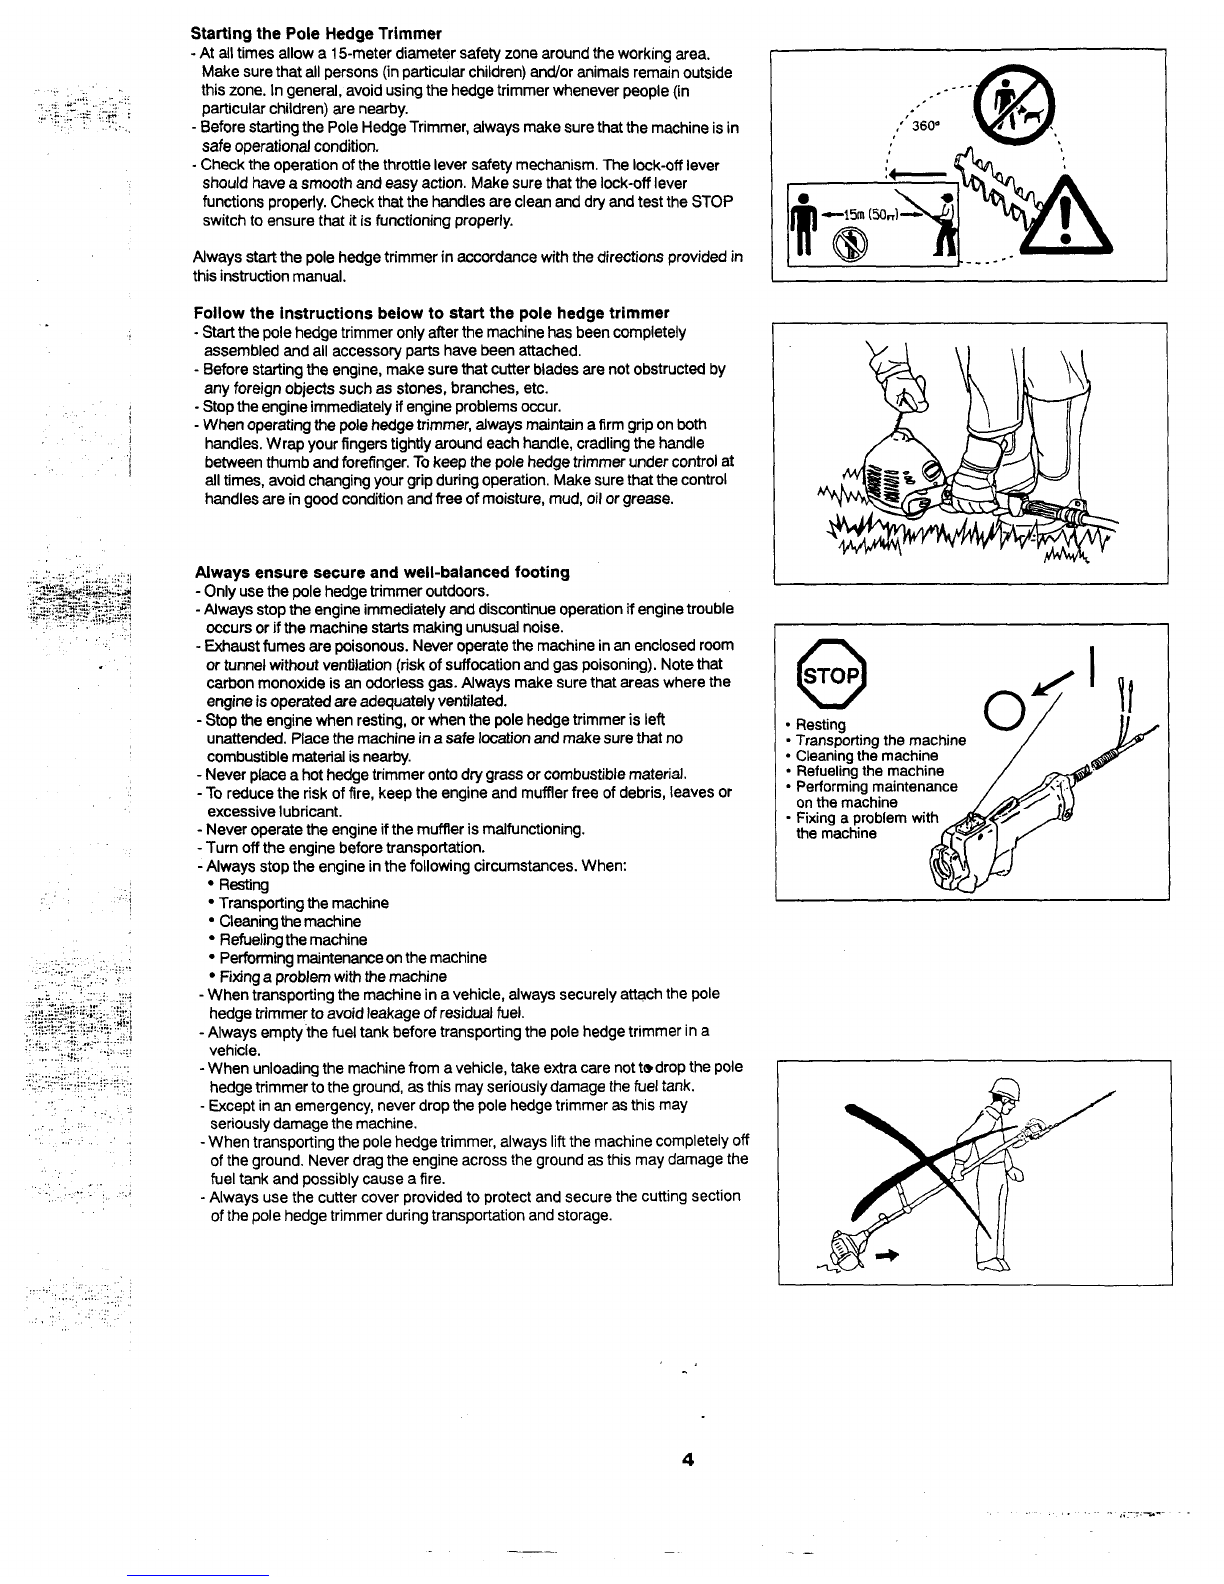
-
At all times allow
a
15-meterdiameter safely zone around the working area.
Make
sure
that
all
persons (in particular children)and/or animals remain outside
this zone. In general, avoid using the hedgetrimmer whenever people (in
particular children) are nearby.
safe
operational condition.
should have
a
smoothand easyaction.
Make
sure
that the
lock-off
lever
functions properly. Check that the handles
are
clean and dry and testthe
STOP
switch
to
ensure that it
is
functioning properly.
-
Beforestartingthe Pole Hedge Trimmer,always make
sure
that the machine
is
in
-
Check the operation
of
the throttle lever safety mechanism.
The
lack-off lever
Always start the pole hedgetrimmer in accordancewith the directions provided in
thisinstruction manual.
Follow the instructions below to start the pole hedgetrimmer
-
Start
the pole hedge trimmer onlyafter the machine hasbeen completely
assembled and
all
accessory
parts have been attached.
-
Before startingthe engine, make surethat cutter blades are not obstructed by
anyforeign
objects
such
as
stones, branches, etc.
-
Stoptheengine immediately
if
engine problems occur.
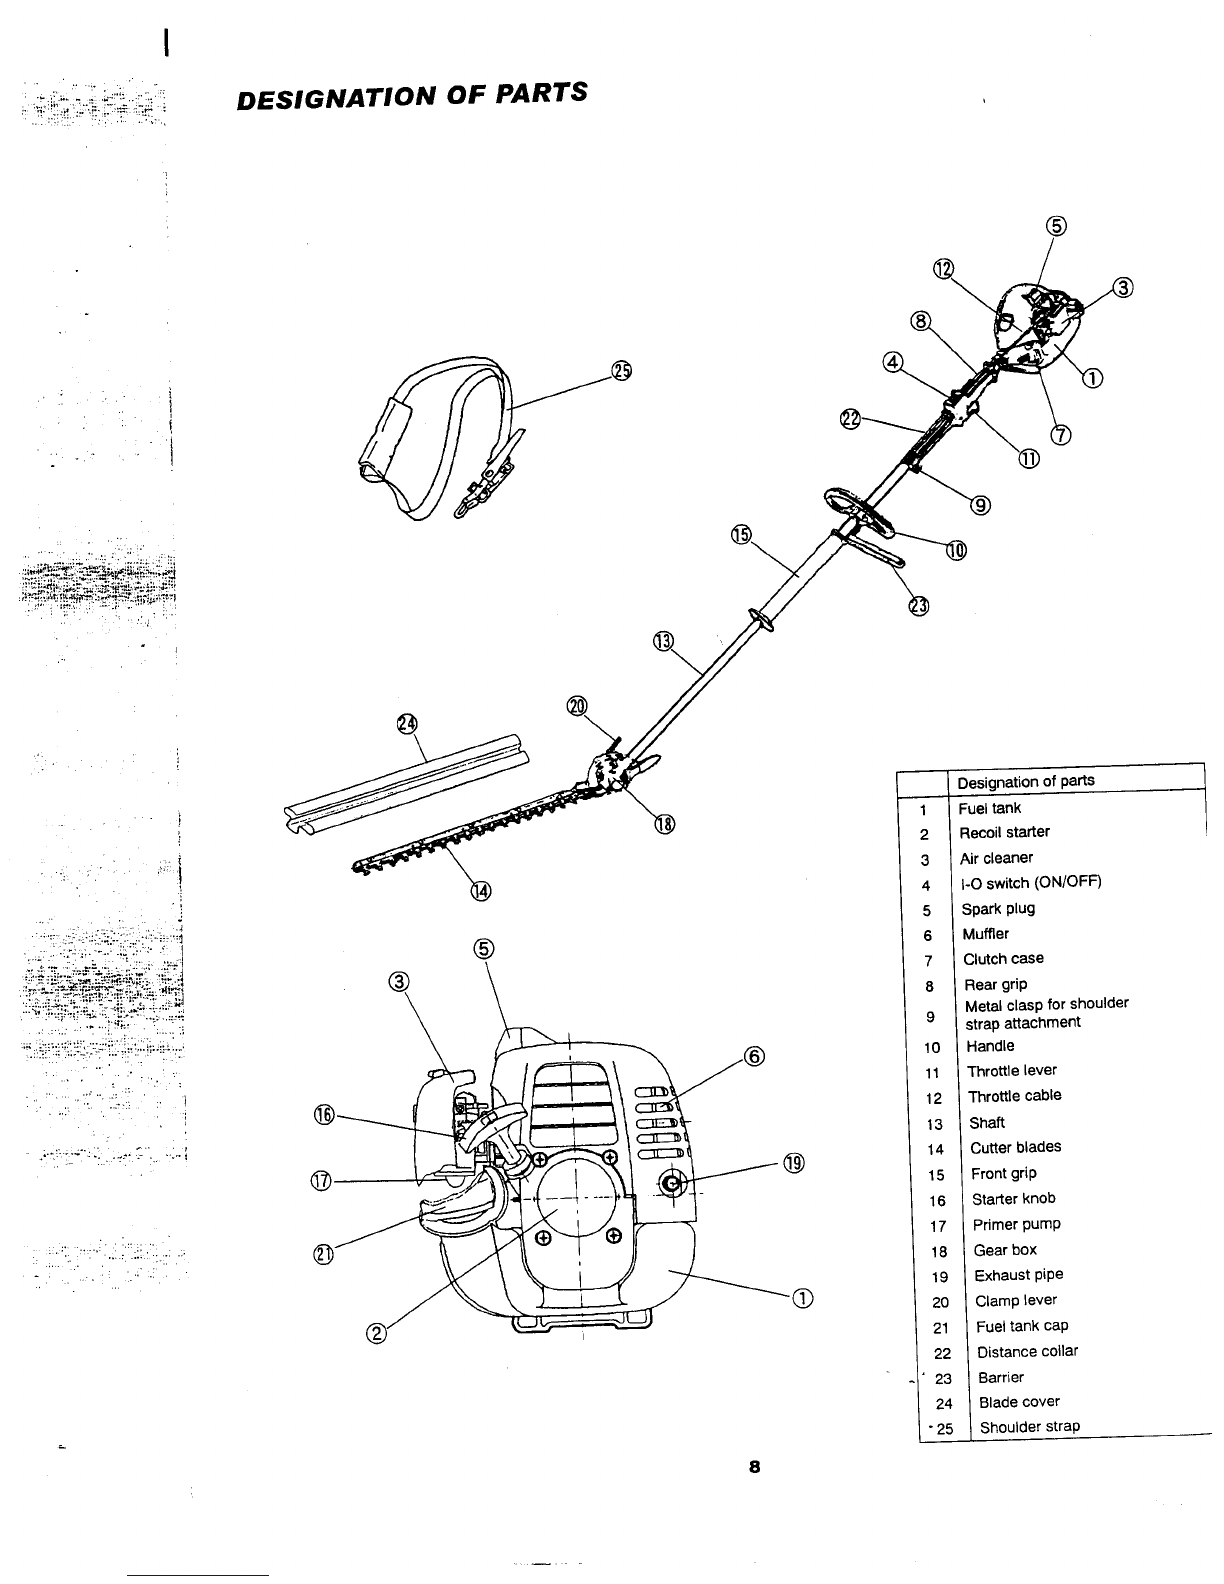
-
When operating
the
pole hedge trimmer,always maintain
a
firm grip on both
handles. Wrap your fingerstightlyaround each handle, cradling the handle
between thumb andforefinger.To keep the
pole
hedge trimmer under control at
all
times, avoid changingyour gripduring operation. Make surethatthe control
handles
are
in good condition andfree
of
moisture, mud, oil
or
grease.
Always ensure secureand well-balanced footing
-
Only
use
the pole hedgetrimmer outdoors.
-Alwaysstopthe engine immediately and discontinue operation
if
enginetrouble
occurs
or
if
the machine startsmaking unusual noise.
-
Exhaust fumesarepoisonous. Never operate the machine in an enclosed room
or
tunnel without ventilation [risk
of
suffocation and gas poisoning). Notethat
carbon monoxide
is
an
odorless
gas. Always make
sure
that areas where the
engine
is
operated
are
adequatelyventilated.
-
Stopthe engine when resting, or when the pole hedgetrimmer
is
left
unattended.
Place
the machine in
a
safe
locationand makesurethat no
combustible material
is
nearby.
-
Never place
a
hot hedgetrimmer onto
dry
grassor combustiblematerial.
-
To reduce the
risk
of
fire,
keepthe engine and muffler
free
of
debris,
leaves
or
-
Never operatethe engine
if
the muffler
is
malfunctioning.
-
Turn
off
the engine
before
transportation.
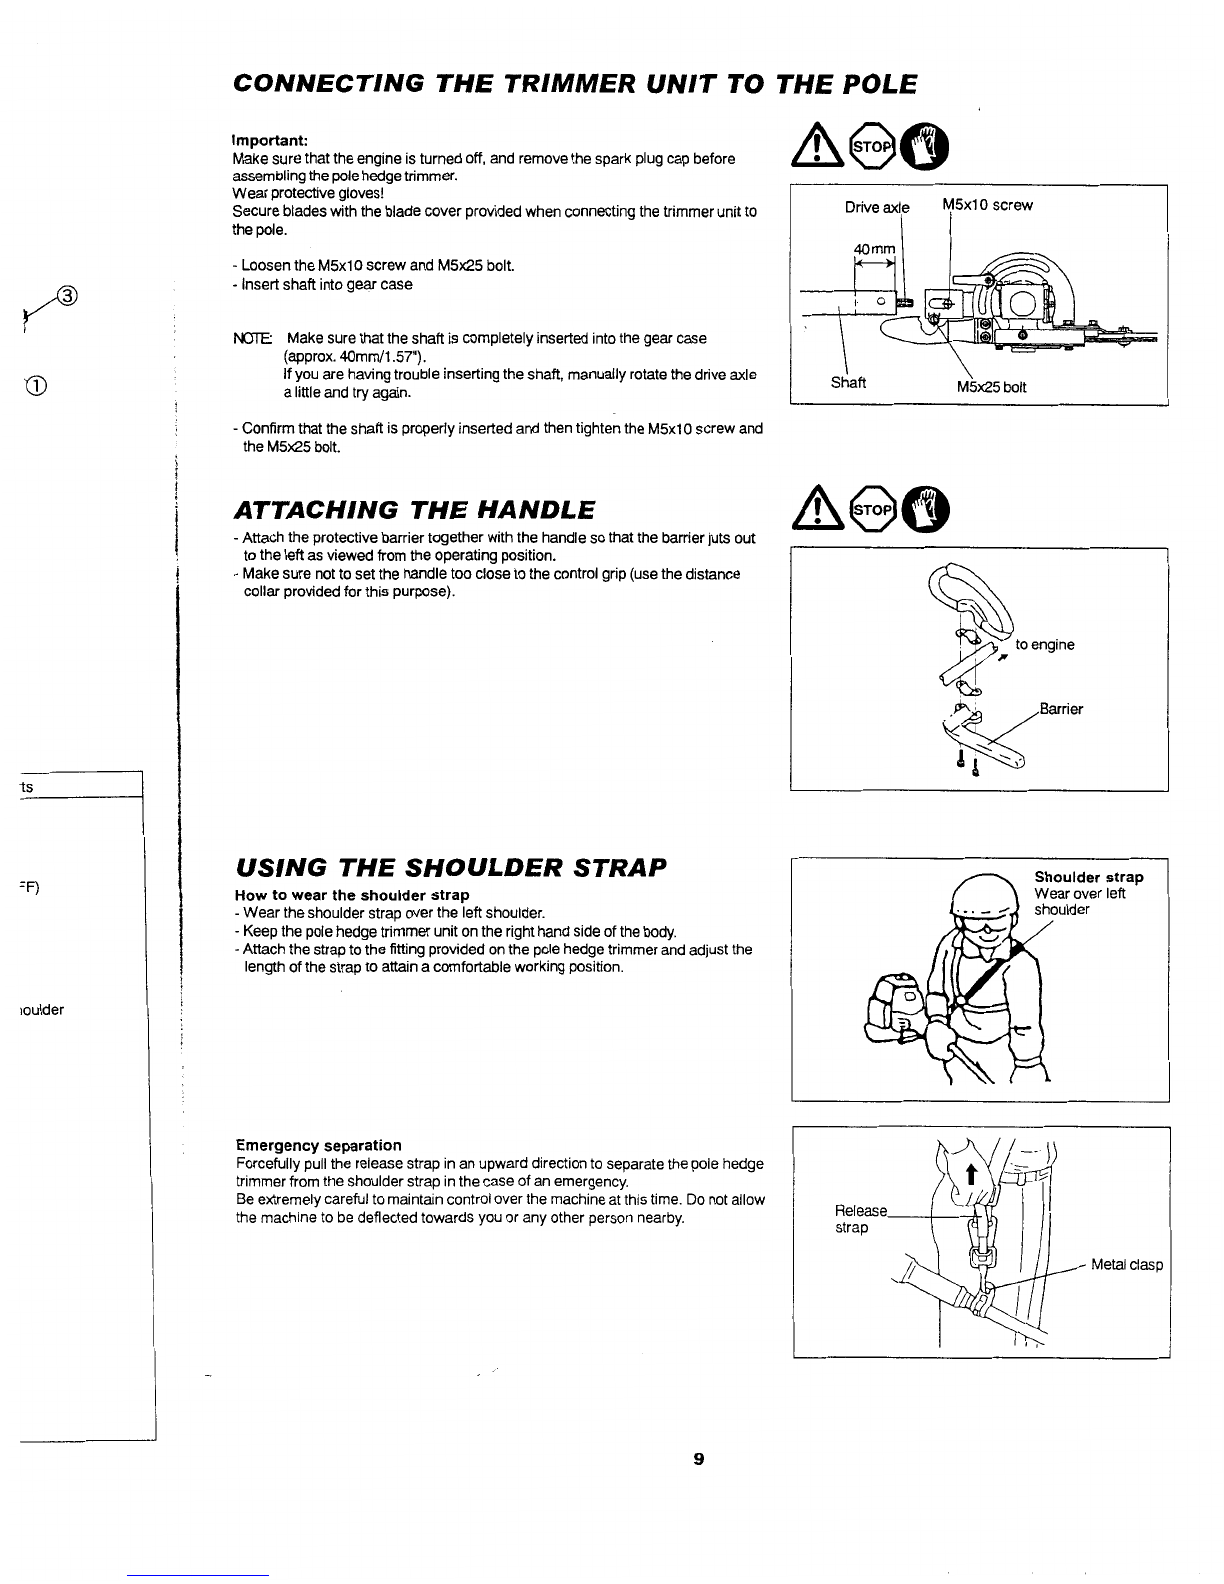
-Alwaysstopthe engine in the followingcircumstances. When:
excessivelubricant.
Resting
Transporting the machine
Cleaning
the
machine
Refuelingthe machine
Performingmaintenance onthemachine
Fixing
a
problem with the machine
-
When transporting the machine in
a
vehicle, always securely
attach
the
pole
hedge trimmer to avoid leakage
of
residual fuel.
-Alwaysempty the
fuel
tank before transporting the pole hedgetrimmer in
a
vehicle.
-When unloading the machine from
a
vehicle,
take
extra
care
not tadrop the pole
hedgetrimmer
to
the ground,
as
this may seriouslydamagethe
fuel
tank.
-
Except in
an
emergency, never dropthe pole hedgetrimmer
as
this may
seriously damagethe machine.
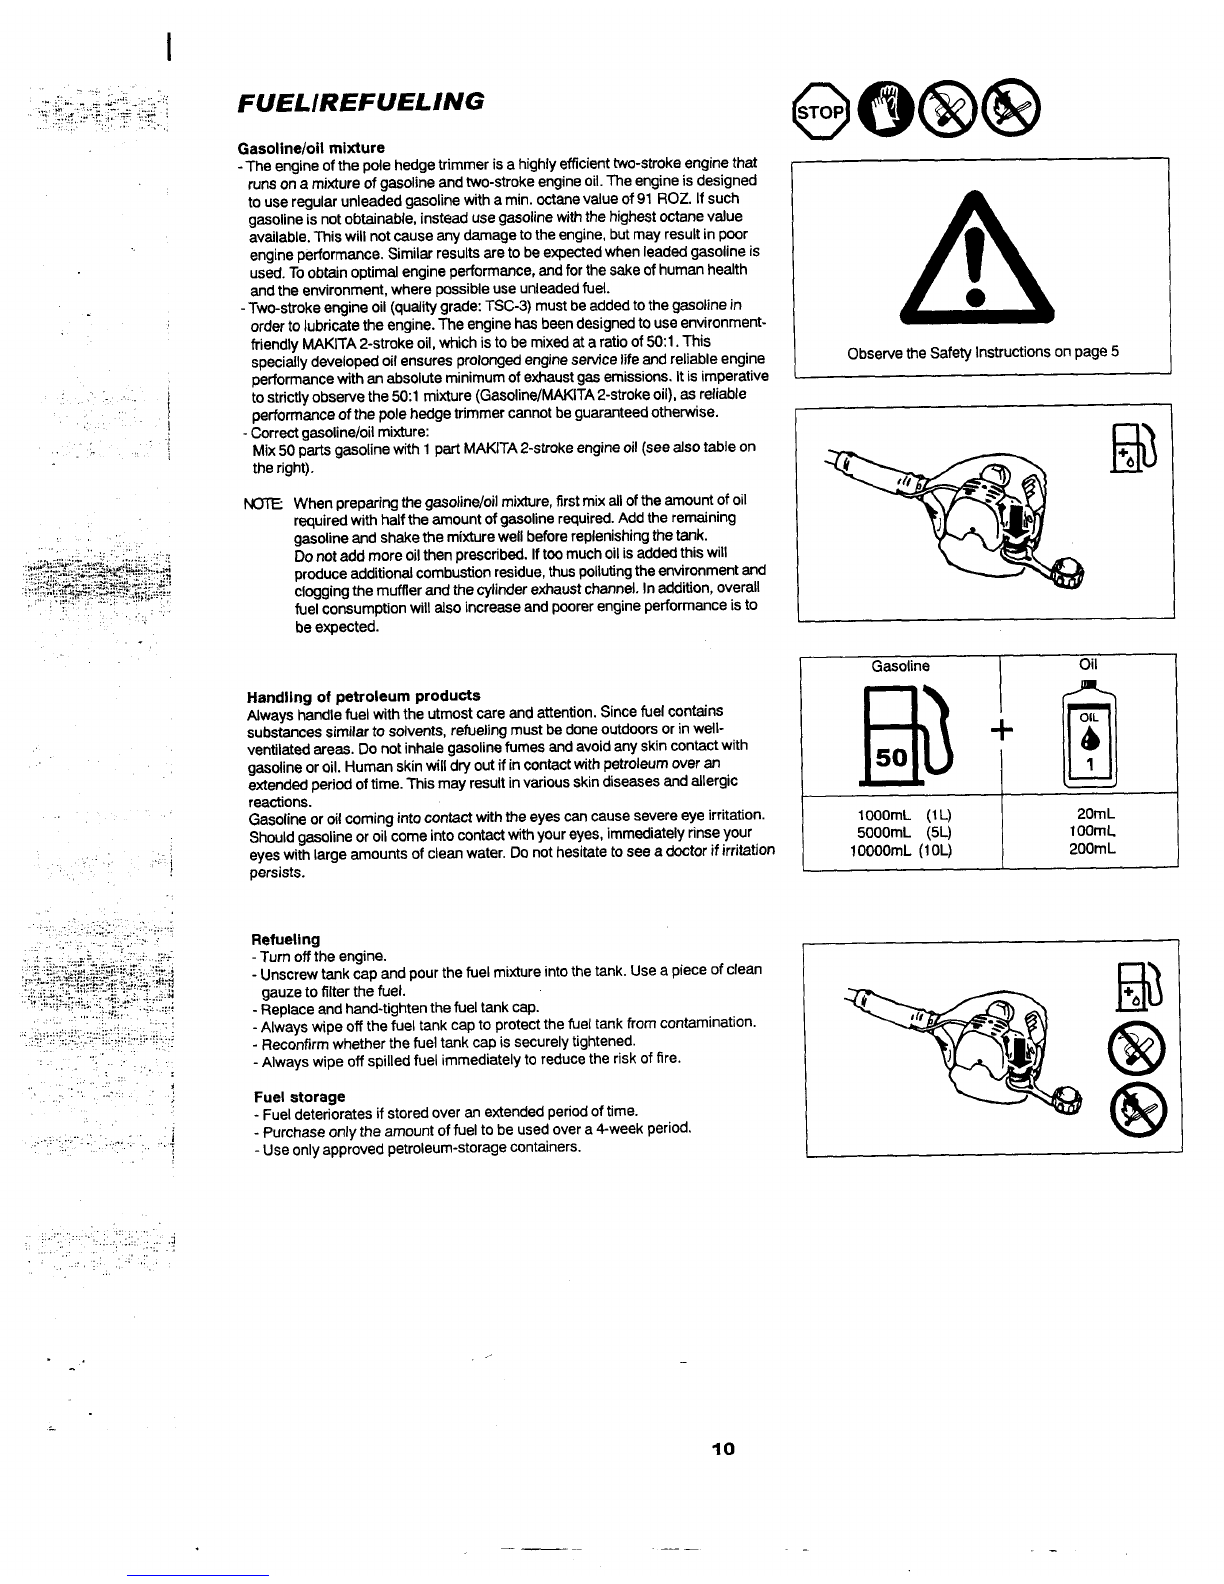
-When transporting the pole hedgetrimmer, always lift the machine completely
off
of the ground. Never drag
the
engine acrossthe ground
as
this may damage the
fuel
tank and possibly
cause
a
fire.
of
the pole hedgetrimmer during transportation and storage.
-
Always
use
the
cutter
cover provided to protect and
secure
the cutting section
Resting
Transporting the machine
Cleaningthe machine
Refueling
the
machine
Performing maintenance
on
the
machine
Fixing
a
problem with
the machine
I
n
I
4
Hetueling
-
Before refueling, stopthe engine.
-
Never
refuel
near naked flames
-
Do
not smokewhen refueling.
-
Always allow sufficient time
for
the engine to cool down before refueling.
-
Take
care
not
to
let
your
skin come into contact with petroleum products.
Do
not
inhale gasoline fumesand always wear protective gloves when refueling.
Change and clean protective wear at regular intervals.
-
Take
extra
care
to avoid spillinggasoline and oil in
order
toavoid contamination
of
the ground (environmentalprotection).
If
gasoline or oil
has
been spilled onto
the hedge trimmer, immediately wipe the surface
of
the hedge trimmer with
arag.
To
avoid spontaneous combustion, allow wet rags to
dry
sufficiently
before
discarding them into anappropriate, covered container.
-
Make
surethat no
fuel
comes in contact with
your
clothing. Change fuel-
contaminated clothing immediately
(fire
hazard).
-
Closethe
fuel
tank and tighten the
fuel
tank capsecurely.
To
restart
the engine,
transfer the pole hedge trimmer to
a
location at least
3
meters away from the
place
of
refueling.
fastened.
ground level
(risk
of
explosion).
the reach
of
children.
contains ethanol
or
methanol (typesof alcohol) when mixing gasoline with
two-
stroke engine
oil.
-
Check the
fuel
tank
cap
atregular intervals to make
sure
that the cap
is
securely
-
Never
refuel
the machinein anenclosed room. Fuel vapors accumulate at
-
Storefuel in appropriate containers only, and make
sure
that
stored
fuel
is
out of
-
To prevent damageto fuel lines and engine
parts,
avoid using gasoline that
Operation
-
During operation, hold the
pole
hedgetrimmer with both hands at
all
times.
-
Only
use
the
pole
hedge trimmer in good light and visibility conditions. Beware of
slippery and wet
areas
(ice
and snow) during the cold season (danger
of
slipping),and always ensure securefooting.
-
Never use the pole hedgetrimmer while standing on an unstable
surface
or
a
steepslope.
-
Never usethe
pole
hedgetrimmer while standing on
a
ladder.
-
Never climb
a
tree
to
use
the pole hedgetrimmer from the tree.
-
To
avoid stumbling or fallingover objects, never walk backwardswhen working
-Always stopthe engine before cleaning
or
servicing the machine.
Also,
refrain
-
Do
not
operate
the
pole hedge trimmer
if
the cutting unit
is
damaged
or
worn.
with
the
pole hedge trimmer.
from replacing parts before the engine has been stopped.
Maintenance instructions
-
Always doyour utmost to keep pollution and
noise
emissions
as
low
as
possible
when operating
the
pole hedgetrimmer. Pay special attention to correct
adjustment
of
the carburetor.
nuts and bolts
are
securely tightened.
sparks,etc.
well-ventilated locked room.
Make
sure
the
pole hedge trimmer
is
out of
children's
reach
at
all
times.
-
To
prevent further damageand/or personal injury, refrain from repairing
a
malfunctioning pole hedge trimmer
if
not qualified to
do
so.
For
repairs
always
contact your
dealer
or
an
authorized
serviceagent.
-
Clean the hedge trimmer atregular intervalsand periodicallycheck whether
all
-
Never service
or
storethe pole hedge trimmer in the vicinity of naked flames,
-
Empty thefuel tank before storage, and always storethe pole hedge trimmer in
a
Do
not attempt to modify or remodel the pole hedge trimmer
as
this
may
affect
operation safety.
A
5
.
.
Maintenance work that can
be
performed by the
user
is
limited to the activities
described in this instruction manual. Any other procedures
are
to be executed by
an authorized
service
agent.
Use
only genuinespare parts and
accessories
supplied by MAKlTA via authorized
service centers.
Use
of unauthorized
accessories
andtools may increase the
risk
of accident and
injury. MAKlTA accepts
no
liabilitywhatsoever for accidents or damageresulting
from the
use
of
unauthorized
accessories
and parts.
.,...
...
I
.i.
..
.:_
,:
.)
.-
..
_..:
,
::I
:
.,.I
!
I
.
'
*'
,,
..
,
.
....
First aid
As
a
precaution
for
the occurrence
of
anaccident, make
sure
that
a
fully stocked
first aid kit
is
ready athand.
Replace any itemstaken from the first aid kit
as
soon
as
possible.
When asking
for
help
in
the case
of
an emergency, give the following
information:
*
Place
of
accident
Whathappened
Number
of
injured people
Extent of injuries
Your name
l
Packaging
Thepole hedgetrimmer
is
delivered in
a
protective cardboard
box
to prevent
damage during shipping. Cardboard
is
a
basic raw material that can
be
reused
and recycled (waste paper recycling).
...
..
,
,8
EU
Conformity Declaration
Theundersigned, Yasuhiko Kanzaki,
as
authorized by MAKlTA
INTERNATIONAL EUROPE
LTD.,
Michigan
Drive,
Tongwell,MiltonKeynes,
Bucks MK1
WD,
U.K.,
declaresthat the MAKlTA Machine,
Type-
manufactured by Robin conforms tothe
basic
safetyand health
requirements
of
theapplicable EU guidelines,
EU Machineguideline98/37/EG
EU EMCguideline
89/336/EWG
(modifiedby91/263/EWG, 92Ml/RNGand
WWG)
The most importantstandards applied to properly meet the requirements
of
the above EU guidelines were:
EN11806,EN774,
EN11680,ClSPR12,EN50082-l,DINVDE0879Tl.
Milton Keynes, 1.1
0.00
For MAKlTA INTERNATIONAL EUROPE LTD.
~
1.
.
..
..
Yasuhiko Kanzaki
ManagingDirector
6
TECHNICAL DATA
:
RPT250
Dimensions
(L
x
W
x
H)
mm
tion
Loop handle and Grip handle
2410
x
335
x
220
!TA
Milton
Keynes,
Cutting length
mm
Engine displacement CmJ
ealth
535
24.5
J3llEWG and
Fuel consumption kglh
Specific
fuel
consumption g/kWh
requirements of
E0879T1.
0.50
667
RPT250
Model
Ignition system type
Spark plug type
Solid state ignition
NGK BMR7A
Mass
kg
I
6.4
I
Electrode gap
mm
Volume
(fuel
tank)
LI
0.6-0.7
0.65
Right handle
(reargrip)
1
Idling
m/s2
2.6
Racing
m/s2
8.1
Vibration per
IS0791
6
Maximum engine performance
I
0.75
kW at 7000
mid
I
Idling
mlsz
7.8
Left
handle
.
(handle) Racing
m/s2
12.7
8800
Engine speed min"
At recommended
max,
spindle speed
Idling
m/s2
Racing
m/s2
Left
handle
(frontgrip) 3.9
10.1
Idling speed
3000
I
Right handle
(rear
grip)
Clutch
engagement
speed
m/s2
2.9
Idling
Racing
mls2
8.7
4000
Vibration per
IS011680
WALBROWYL
Carburetor
(Diaphragm carburetor)
Idling
m/s2
93
Racing
n/s2
11 9
Left
handle
(handle)
Left
handle
(front
grip)
Idling
m/s2
4.4
Racing
mls2
9.9
Sound pressure level average IS07917 dB (A) 93.3
I
IS01
1680 dB (A) 91.6
IS010884
dB
(A)
IS011680
dB
(A)
Sound power level average
Mixture
ratio (Fuel: MAKITA 2-stroke
oil)
102.4
98.5
50:l
Gear ratio 114
7
I
DESIGNATION
0
F
PARTS
5
Spark plug
6
Muffler
7
Clutch
case
8
Rear grip
Metal clasp
for
shoulder
strapattachment
10
Handle
11
Throttle lever
12
Throttle cable
13
Shaft
14
Cutter blades
15
Front grip
16
Starter knob
17
Primer pump
18
Gear box
19
Exhaust pipe
20
Clamp lever
21
Fuel tank cap
22
Distance collar
24
Blade cover
-
'
23
Barrier
-
25
Shoulder strap
i
'!
,.
..
.
..
.
..
..
.
..
.
.
,
..
.. .
.
,
.-.
'',
._
",.
...".
:
1
.
...
.'
...
!'
...
._-
,
'
-
'
I
.
-.-t
..
,.
..
,
..
..
..
...
.
..:
...
.
.
..
.
....,
..
. .
:
....
,.
8
CONNECTING THE TRIMMER
UNIT
TO
THE
POLE
=F)
ioulder
!
tS
1
Important:
Make
surethatthe engine
is
turned
off,
and removethe spark plug capbefore
assembling
the
pole
hedge
trimmer.
Wearprotective gloves!
Secureblades with the bladecover provided when connecting thetrimmer unit
to
the
pole.
-
Loosen theM5x10 screw and
M5x25
bolt.
-
Insert shaft intogear
case
NOTE:
Make
surethattheshaft
is
completely inserted intothegear
case
(approx.40mm/l.57”).
If
you arehavingtrouble insertingthe
shaft,
manuallyrotate thedrive
axle
a
little
andtry again.
-
Confirm that theshaft
is
properly inserted andthentighten theM5x10 screwand
the
M5x25
bolt.
ATTACHING THE HANDLE
-
Attach theprotective barrier together with the handle
so
that thebarrier juts out
-
Makesurenot
to
setthehandle
too
close
tothecontrol grip (usethedistance
totheleft
as
viewed from theoperating position.
collar provided forthis purpose).
USING THE SHOULDER STRAP
How
to
wear the shoulder strap
-
Weartheshoulderstrapovertheleft shoulder.
-
Keepthepole hedgetrimmer unit ontheright handside
of
the
body.
-Attach thestrap
to
thefitting provided onthepole hedgetrimmer andadjust
the
length
of
thestraptoattain
a
comfortable working position.
Emergency separation
Forcefully pull the
release
strapin anupward direction
to
separatethe pole hedge
trimmer from
the
shoulderstrapin the
case
of
anemergency.
Be extremely
careful
to
maintain control overthe machine
at
thistime.
Do
not allow
the
machine
to
be
deflected towards you oranyother person nearby.
I
Drive
axle
M5x10 screw
I1
\
M5x25
bolt
Shaft
to
engine
Barrier
g
I
Shoulder strap
n
Wearover
left
ulder
9
I
Gasoline
1
!
Oil
..,
.'.
I
!
. ~.
I
...
.........
....
...-..
.
..._
.,
.
FUELIREFUELING
Gasoline/oilmixture
-Theengine of thepole hedgetrimmer
is
a
highly efficienttwo-stroke enginethat
runs on
a
mixture
of
gasoline andtwo-stroke engineoil.Theengine
is
designed
to useregular unleaded gasoline with
a
min. Octanevalue
of
91
ROZ.
If
such
gasoline
is
not obtainable,instead usegasolinewith the highest octane value
available. Thiswill not causeanydamagetotheengine,but may result in poor
engineperformance. Similar results areto beexpected when leaded gasoline
is
used.
To
obtain optimal engine performance, and
for
thesakeof human health
andthe environment, where possibleuse unleaded
fuel.
-
Two-stroke engine
oil
(qualitygrade: TSC-3) must be added tothegasolinein
orderto lubricate
the
engine.Theengine
has
beendesigned to useenvironment-
friendly MAKITA 2-stroke
oil,
which
is
to be mixed at
a
ratio
of
501.
This
specially developed
oil
ensuresprolonged engine
service
life
andreliable engine
performancewith an
absolute
minimum
of
exhaustgasemissions.It
is
imperative
tostrictlyobserve the
50:l
mixture (Gasoline/MAKITA2-stroke oil),
as
reliable
performance
of
the
pole
hedgetrimmer cannot beguaranteed otherwise.
Mix
50
parts gasoline with
1
part MAKITA 2-strokeengine
oil
(see
also
table on
the right).
-
Correct gasoline/oil mixture:
NOTE
When preparing thegasoline/oil mixture,firstmix all
of
theamount
of
oil
required with
half
theamount
of
gasoline required.
Add
theremaining
gasoline and shakethemixturewell before replenishing thetank.
Do
not addmore
oil
then prescribed.
If
too much
oil
is
addedthiswill
produceadditional combustion residue, thus polluting the environment and
clogging themufflerand thecylinder exhaust channel. In addition, overall
fuel
consumptionwill also increase and poorer engine performance
is
to
beexpected.
Handling
of
petroleum products
Always handle
fuel
with the utmost
care
and attention. Since
fuel
contains
substancessimilartosolvents, refueling must
be
doneoutdoors
or
in well-
ventilated areas.
Do
not inhale gasolinefumes and avoid anyskin contactwith
gasoline
or
oil.
Human skinwill dry out
if
in contactwith petroleum over an
extended period
of
time. Thismay result in various skin diseases and allergic
reactions.
Gasolineor
oil
cominginto contact with the eyes
can
causesevereeye irritation.
Should gasoline
or
oil
comeintocontactwith your eyes, immediately
rinse
your
eyeswith large amounts
of
clean water.
Do
not hesitate to
see
a
doctor
if
irritation
persists.
Refueling
-Turn
off
theengine.
-
Unscrew tank capand pour the
fuel
mixtureintothe tank.
Use
a
piece
of
clean
-
Replace and hand-tighten the
fuel
tank cap.
-
Always wipe
off
thefuel tank capto protect the
fuel
tank from contamination.
-
Reconfirm whether
the
fuel
tank cap
is
securelytightened.
-Always wipe
off
spilled fuel immediately to reduce the
risk
of
fire.
gauzetofilterthe fuel.
Fuel
storage
-
Fuel deteriorates
if
storedover an extended period
of
time.
-
Purchaseonly the amount
of
fuel to
be
used over
a
4-week period.
-
Use
onlyapproved petroleum-storage containers.
A
Observethe Safety Instructions onpage
5
1M)OmL
(IL)
5000mL
(51)
1
OOmL
1
OOOOmL
(1
OL) 200mL
...
.....
......
.....
..:.
....
..I
....
.,
,
.....
,
..
......
)il
OmL
OmL
I
OmL
A@@
PRECAUTIONS BEFORE STARTING THE ENGINE
-At
all
times allow
a
15-meter diameter safety zone around theworking area.
Make
surethat
all
persons (inparticular children)and/or animals remain outside
this zone.
operational condition. Makesurethat thecutter blades
are
not damaged,and
check thethrottle lever
for
easyaction. Confirm that the cutter blades
are
not in
motion whenthe engine
is
idling.
If
themachine
is
not operating normally,contact
your dealer
to
havethemachine adjusted.
Make
sure
that thehandles
are
clean
and dry, and test whether the
1-0
switch
is
functioning properly. Startthe engine
only in accordancewith the instructions given in this manual.
Do
not
use
any
other methods
to
start
thepole hedgetrimmer
(see
,
"Startingthe Engine").
-
Startthe engine
of
the pole hedgetrimmer only after having read and fully
understood the instructions. Never attempt
to
start
a
pole
hedge trimmer that has
not been fully assembled. Serious injury may result otherwise.
obstructed by stones,branches
or
anyother solid objects.
getcaught in thecutler blades.
work areafor the presence
of
power lines and electrical fences before starting
to
work.
-
Before using thepole hedgetrimmer, makesurethat the machine
is
in
safe
-
Before starting theengine, always makesurethat the cutter blades arenot
-
Check the working area
for
wires, cord, glass
or
other foreign objects that could
-
Electrical shock: Be aware
of
all electrical lines in thevicinity. Check the entire
STARTING THE ENGINE
If
themachine hasjust been refueled, move atleast
3
metersawayfrom the
location wherethe pole hedgetrimmer was
refueled.
Placethe
pole
hedgetrimmer
on
a
reasonably clean spoton level ground, and makesurethat the cutter blades
are
not in contact with the ground
or
anyother solid objects.
Cold
start
(cold engine
/
enginewas stopped
for
more than
5
minutes /after
refueling)
I.
Move the
1-0
switch
to
the
'1''
position
(1).
2.
Pushthe primer pump
(2)
repeatedly
(7
to
10
times) until
fuel
enters the bulb
of
3.
Move the choke lever
(3)
intothe
'"td
"
(vertical) position.
4.
With one hand
hold
theenginefirmlyon the ground
(4).
5.
Pull thestartercordfor approx.
10-1
5
cm until resistance can
be
felt.
6.
Pull firmly (repeatedly
if
necessary)onthecord until theengine
starts.
7.
Return
choke
lever
to
position
"
I
t
I
"
afterthe engine has started. Note that the
choke lever returns automatically when thethrottle lever
is
operated. Squeeze
the throttle lever together with thelock-off lever.
"P.
8.
Warm up theengine at
a
moderate speedfor approx.
1-2
minutes.
9.
After theengine
is
warm theengine runs evenly andtransition from low speed
to
high speed
is
smooth andwithout interruption.
Note: Pullingthestarterrope repeatedly with the choke in
"
N"
position results
in excessivefuel intake,which can make
it
difficult
for
the engine
to
start.
In the
case
of
excessive
fuel
intake,removethespark plug and pull the
starter rope slowly
to
remove excess fuel.
Dry
the spark plug electrode
and replace thespark plug.
Warm
start
(immediaterestart
after
engine-stop)
Do
not operate the choke
(3)
when restarting the engine immediately
after
stoppage.
If
the engine does not start,execute steps
1-8
as
described above
(cold start).
Note:
Do
not
release
the starter knob immediately
after
pulling the starter rope,
but guide the knob back
to
its original position.
II
*.-.
..-
,.
-
STOPPING THE ENGINE
.,
I
.-
I.
-
:"
1.
Releasethethrottle lever.
2.
Pushthe
1-0
switch
to
the
"0"
position
(5)
to
stop
the engine.
~
I
I
I
CHECKING
AND
ADJUSTING THE IDLING
SPEED
The
cutter blades
of
thepole hedgetrimmer should not move when thethrottle
lever
is
released.
-Thecorrect idling speed
is
3000
min'.
If
necessary, adjust theidling speed using
theidling adjustment screw (reduce revs until thecutter blades donot move
anymore).
Turn screw clockwise:
Turn screw counter-clockwise: Idling speed increases
Idling speeddecreases.
Allow anadequate difference between the idling rate and the rate atwhich the
clutch engages (reduceidling speedfurther
if
necessary). Should
the
cutter
blades still move in spite
of
accurateidling speedsettings, consult your
nearest authorized
sewce
agent.
The
clutch shouldengageat
a
minimum rate
of
4OOO
min
Checkthat the STOPswitch, the lock-off lever and thethrottle lever are
all
funchoning properly.
Idling adjustment screw
.
~.
i
...
:..
.
.
.'.I
.
,
..:
.,
,.
12
screw
A@@@
OPERATING THE POLE HEDGE TRIMMER
-
When workingwith thepole hedge trimmer,firmlygraspthe handleswith both
hands.
-
Do
not touch
the
cutter
blade
portion
of
the
pole
hedge
trimmer during operation,
orwhen the engine
is
running.
-Take extra
care
not to inhale exhaustgaseswhen working with the pole hedge
trimmer. Never operate
the
pole hedgetrimmer in an enclosed room
or
anarea
with insufficient ventilation
(risk
of
suffocation and gaspoisoning). Note that
carbon monoxide
is
anodorless
gas
that
is,
it
cannot
be
detected by thesense
of
smell.
hedgetrimmer.
-
Always wear adequate protective wear
before
starting to work with the pole
-
Stoptheengineimmediately
if
themuffler
is
not functioning properly.
-
Only usethepole hedge trimmer in good light
and
visibility conditions.
-
Do
not operate the pole hedgetrimmer in darkness
or
fog.
Beware
of
slippery
andwet areas
(ice
and snow) during the
cold
season (danger
of
slipping),and
always ensuresecurefooting.
steepslope.
-
Never usethe pole hedge trimmer while standing on an unstable surface
or
a
-
Never usethepole hedge trimmerwhile standing on
a
ladder.
-
Never climb
a
treetousethepole
hedge
trimmer from thetree.
-
Continuously
check
theworking areafor wires, cord, glass
or
other foreign
-
Confirm thatthe cutter
blades
arein rapid motion
before
starting
to
cut.
-Always grip thepole hedge trimmer with both hands and maintain
a
firm grip
-To
assureoptimal control over thepole
hedge
trimmer, always completelywrap
objects that could getcaught in thecutter blades.
when working with the machine.
your
hands
around the
handles
(useyour thumb
for
counterpressure) and
apply
a
firm grip onthehandles.
throttle lever hasbeen released.
-
Note thatthecutter
blades
will remain in motion for up to
two
secondsafterthe
-
Do
not cutwith the
pole
hedgetrimmer at low engine speed.
-
Thespeed
of
thecutter
blades
cannot
be
adjusted properly with thethrottle
-
To
trim thetop surface
of
a
hedge,
first align the cutting tool at anangle
of
lever when theengine
is
running at low speed.
15"-30"
in thecuttingdirection and keepthe
pole
hedge
trimmer in
a
horizontal
position. Thenstarttrimming
the
hedgeusing
a
swinging movement, much
like
drawing circlesegmentswith the
hedge
trimmer shaft.
-To
trim the
sides
of
a
hedge, align the
blades
parallel to thesurface to
be
cut and
starttrimming with semi-circular upward (down-up)movements.
-
Pay attention when trimming
a
hedge that hasgrown along
a
fence. Be
especially careful not to allow thecutter
blades
from coming into contact with
solid
matter such
as
a
metal fence. Cutting into
solid
matter such
as
metal, stone,
concrete
or
thick wood may damagethe
blades
and/or causeoverall breakdown
of
themachine.
-
Do
not usethe pole hedge trimmer over anextended period
of
time.
As
a
general
rule, for every
50
minutes
of
operation take
a
10-20
minutes rest.
-
If
thecutter blades comeinto contactwith stones
or
other
solid
objects, stopthe
engineimmediatelyandcheckthe
blades
for
damage. Replacethe
blades
if
-
If
the pole hedge cutter develops
a
problem during operation (strangenoises,
damaged.
vibration, etc.),immediatelystoptheengine.
Do
not usethemachine again until
theproblem has been recognized and solved.
-
Always
do
your utmost to
keep
pollution and noise emissions
as
low
as
possible
when operating the pole hedgetrimmer. Pay special attention tocorrect
carburetor adjustment and accurate gasolineioil mixture.
lay theequipment ontheground and removetheobstruction. Check the
blades
for
damagebefore using themachine again.
-
If
thick branches getjammed in thecutter
blades,
immediately stoptheengine,
13
..
Adjustment
of
cutting angle
:;,
'-:e..=,::+
:;:
:,+. ..
::"
,
,I
..
.I...'
..
1.
Stopthe
pole
hedgetrimmer engine
and
lay the machineon the ground.
2.
To
adjustthe angle
of
thecutter unit, loosen the clamp lever located atthe top
3.
Adjust the angle
of
the cutter unit and turn the clamp lever clockwise to secure.
..:.
:.
......
, ,
..
..
,>.,~
of
the cutter unit by turning it counter-clockwise.
Thecutter unit canbe adjusted anywhere between
45"
and
90".
Note:
-
Do
not adjust the
cutter
unit while the pole hedge trimmer
is
in an upright position.
-
Move the
1-0
switch tothe
"0"
position and
lay
the pole hedge trimmer flat on the
-
Always securethe blades with the blade cover provided before adjusting
ground toadjust the cutting angle.
cutting
angle.
MAINTENANCE
-
Before performing any maintenancework on the pole hedge cutter
(blade
cleaning, etc.), always stopthe engineand wait until the engine
has
cooled
down.
As
anadditional safety precaution,
also
removethe spark plug cap.
-
Do
not try to straighten
or
weld
a
bent or broken cutting
blade.
Always replace
damaged blades.
-
Stopthe engine atregular intervals to check the cutter
blades
for possible
damage (perform
a
tapping-resonance testto detect hard-to-see hairline
cracks).
Always make surethat the teeth
of
the
blades
are
sharp.
-
Cleanthe pole hedgetrimmer atregular intervals. During cleaning also
check
that
ail
screws, nuts and bolts are well tightened.
-
To
reduce the
risk
of
fire,
never
service
or
storethe pole hedge trimmer in the
vicinity
of
open
fires.
-
Always wear rugged protective gloves when handling the
cutter
blades.
-
Contact your dealer
for
replacement cutter blades.
Sharpeningthe
blade
If
the cutting
blades
have become blunt and cutting performance
is
poor, havethe
blades
sharpened
by
an authorized serviceagent.
.
..
14
Blade adjustments
Extended
use
of
the
pole
hedge
trimmer will gradually wear down
the
blades.
Readjust
the
blades
if
cutting performance deteriorates noticeably. For adjustment
of the
blades
followthe instructions below.
1.
Release
nut
0.
2.
Tighten screw
@
lightly until resistance
is
felt. Then turn the screw in the
3.
Hold screw
@
in place with
a
screwdriver and tighten nut
0.
4.
After
adjustment lubricate
the
blades
with
a
thin film of
light
oil.
5.
Start the engine and pull thethrottle lever several times to setthe blades in
motion. Continue
for
approx. oneminute.
6.
Stopthe engine andwait until the
blades
cometo
a
standstill. Cautiously touch
the
blades
with your
bare
hand. Adjustment
is
correct
if
the
blades
are
warm,
but not
too
hot
to
touch.
If
the blades
are
too hot
to
be touched,
release
screw
@for another quarter to half
a
turn and repeat steps
5-6
to confirm proper
adjustment.
opposite direction
for
a
quarter
or
half turn.
NOTE:
Always stopthe engine and remove the spark plug capbefore adjusting
the
blades!
The blades have grooves around the truss screws
0.
Always keep
these grooves clean
so
that they can
be
inspected for possible damage.
@Hexagonal U-nut
@Truss screw
@
Flat washer
@
Blunt extension
@
Blade guide
@
Upperblade
0
Lower
blade
Cleaning the air cleaner
-
Every
8
hours (daily)
-
Remove the
air
cleaner cover.
-
Remove thespongeelement. Wash the sponge element in lukewarm water and
-
Replace the cleaned and
dried
spongeelement and then replace the
air
cleaner
allowto dry completely.
cover.
Note: Clean the
air
cleaner on
a
daily
basis.
Aclogged
air
cleaner may make
it
difficult or impossible tostart and/or accelerate the engine.
Checking
the
spark plug
-
Every
8
hours (daily)
-
Only
use
the
universal wrench provided to remove and replace the
spark
plug.
-Thespark plug gap should be
0.6-0.7
mm. Adjust the spark plug gap
if
it
is
too
wide or too narrow. Clean or replace the spark plug
if
contaminated and/or
clogged with carbon
residue.
Always
replace
with the sametype of spark plug
Screw Air cleaner cover
I
Adding grease and lubricant
-The gearbox
of
the pole hedgetrimmer should
be
greased every
20
working
hours. Add approx.
1
Occ
of
lubricant (Shell Alvania
No.
3
or
equivalent)tothe
gearbox via the greasenipples. (Somegreasewill emergefrom the head
of
the
gearbox (located atthe
base
of the
blade)
when
the
pole hedgetrimmer
is
setin
motion thefirst time after greasing.
Use
this
as
a
rough indicator
for
the amount
of
greaseto supply.)
Note: Observe greasing intervals and the amount
of
greaseto
be
supplied.
Mechanical parts
of
the
pole hedge trimmer may
be
damaged
if
grease
is
not supplied atthe prescribed intervals
or
if
an insufficientamount
of
grease
is
added.
Fuel tank filter
-Theinside
of
the
fuel
tank
is
equipped with
a
filter that cleans the fuel beforeit
entersthe carburetor.
-
Wsually check thefilter at regular intervals.To
do
so,
use
a
piece
of
wire formed
into
a
hook
and
draw thefilter
out
of
the tank
(1).
Replace thefilter
if
it
is
hardened, clogged up,
or
excessively contaminated.
-
Inadequate
fuel
supply
as
a
result
of
a
deteriorated fuel filter may result in
poor
engine performance. In order
to
ensure that the required amount
of
fuel
enters
the carburetor, replace the fuel filter whenever in doubt
of
its condition.
Cleaning the muffler outlet
-
Check the condition
of
the muffleroutlet
(2)
atregular intervals.
-
Use
a
suitable
tool
to removeexcessivecarbon residue that accumulates
around the muffler outlet. Take special
care
toprevent removed carbon residue
from entering engine parts.
Cleaning the spark arrester
-Thespark arrester should becleaned every
50
working hours.
-
Havethe spark arrester cleaned at your dealership
or
by anauthorized Service
agent.
For all maintenance work not mentioned in this instruction manual, please Contact
your
dealership or anauthorized service agent.
Daily inspection and maintenance
To
ensure
a
long service
life
of
your pole hedge trimmer, perform the following
inspections and maintenance on
a
daily basis.
-
Always check
for
loose
or
missing parts before starting operation. Pay special
attention to the cutting unit and make surethat the cutter
blade
lock screws
are
well tightened.
cylinder
before
starting operation. Clean
if
necessary.
Clean the outside of the pole hedge trimmer; check
for
damageand
loose
Clean the
air
filter. Clean
the
filter several times
a
day
if
working in extremely
Check the
cutter
blades
for
damage.
Make
surethat the blades
are
securely
-
Check
for
clogging
of
the cooling
air
passages and the cooling fins of the
-
Each day
after
using
the
pole hedge trimmer perform the following.
parts.
dusty conditions.
mounted.
I
I
STORAGE
Daily
Every
20
hours
Weekly
Quarter annually
If
the pole hedgetrimmer
is
to bestored
for
anextended period
of
time, proceed
as
follows:
-
Drain
all
fuel from thetank and carburetor.
-
Remove thespark plug
and
add
a
few drops
of
two-stroke
oil
through thespark
plug hole. Gently pull outthestarter rope
to
ensure that the
oil
is
evenly
distributed inside theengine. Replaceandtighten thespark plug.
-
Clean theentire
pole
hedgetrimmer andapply
a
thin layer of
oil
to
themetallic
surfaces
of
the machine. Secureand protect the blades with the blade cover
provided. Storethe
pole
hedge trimmer in location that
is
free
of
humidity.
~~ ~
Air filter Clean
Cooling air duct Clean
Cutting tool
Idling
Gearbox Add
grease
Spark plug
Muffler
Fuel filter
Fuel tank Clean inside
Check fordamage,confirm sharp
Confirm thatthe cutter blades arenot in motion
Check, replace
if
necessary
Check, clean outlet
if
necessary
Clean or replace,
if
necessary
MAINTENANCE SCHEDULE
Before extended storage
Drain
Fuel tank Drain tank
Carburetor Keep engine running until fuel runs out
f
General Engine
Screws, nuts, bolts Check general condition and safety
Visually check
for
damage
Confirm that screws, nuts and bolts aresecure
After refueling Throttle lever
Lock-off lever
STOPswitch
Check functioning
Check functioning
Check functionina
I
I
-
TROUBLESHOOTING
Problem
Engine does not start or
difficulty starting
Warm start problems
Engine starts but stalls
immediately
Poor performance
System
Ignition
Fuel supply
Compression
Mechanical
Fuel supply
Several systems may
be affected
simultaneously
Observation
Ignition spark
is
present
No
ignition spark
Fuel available
Inside engine
Outside engine
Starter not functional
Fuel available
Ignition functioning
Fuel available
Engine idling
Cause
Problem with fuel supply
or
compression system,
mechanical defect
STOP switch
in
Of
F-position, broken wire, defective
spark plug
or
connector, defective ignition module
Wrong choke setting, defective carburetor,
fuel
filter
contaminated, broken
or
bent fuel hose
Defective cylinder gasket,damaged crankshaft
seals,
defective piston and/or cylinder rings
Loose spark plug
Defective starter spring, mechanical defect inside
engine
Carburetor contaminated (havecarburetor cleaned)
Incorrect idling adjustment. carburetor
or
fuel
filter
contaminated
Defective fuel tank vent, broken
fuel
hose, defective
STOP switch
(loose
contact, etc.)
Contaminated
air
filter, carburetor contaminated,
clogged muffler, clogged cylinder exhaust duct
17

Other Makita Trimmer manuals

Makita UH004G User manual

Makita

Makita UH004G User manual

Makita BUH48 User manual

Makita

Makita BUH48 User manual

Makita DUH607 User manual

Makita

Makita DUH607 User manual

Makita UR012G User manual

Makita

Makita UR012G User manual

Makita EM4351UH User guide

Makita

Makita EM4351UH User guide

Makita RT0702C User manual

Makita

Makita RT0702C User manual

Makita UH007GD201 User manual

Makita

Makita UH007GD201 User manual

Makita UH5580 User manual

Makita

Makita UH5580 User manual

Makita EH7500S User manual

Makita

Makita EH7500S User manual

Makita DUH551 User manual

Makita

Makita DUH551 User manual

Makita DUH754SZ User manual

Makita

Makita DUH754SZ User manual

Makita DUR190U User manual

Makita

Makita DUR190U User manual

Makita UR013G User manual

Makita

Makita UR013G User manual

Makita DUR192L User manual

Makita

Makita DUR192L User manual

Makita DUN461W User manual

Makita

Makita DUN461W User manual

Makita DUH483 User manual

Makita

Makita DUH483 User manual

Makita DUR36UZ User manual

Makita

Makita DUR36UZ User manual

Makita DUM604 User manual

Makita

Makita DUM604 User manual

Makita UH200D User manual

Makita

Makita UH200D User manual

Makita BBC231U User manual

Makita

Makita BBC231U User manual

Makita DUR366L User manual

Makita

Makita DUR366L User manual

Makita RT001G User manual

Makita

Makita RT001G User manual

Makita M3700 User manual

Makita

Makita M3700 User manual

Makita DUH506 User manual

Makita

Makita DUH506 User manual

Popular Trimmer manuals by other brands

Craftsman Quickwind CMCST920 instruction manual

Craftsman

Craftsman Quickwind CMCST920 instruction manual

Craftsman 917.773761 owner's manual

Craftsman

Craftsman 917.773761 owner's manual

Stihl HSA 56 instruction manual

Stihl

Stihl HSA 56 instruction manual

Texas HSA 18 operating instructions

Texas

Texas HSA 18 operating instructions

sunjoe TRJ600C Operator's manual

sunjoe

sunjoe TRJ600C Operator's manual

Philips QG3340 instructions

Philips

Philips QG3340 instructions

Jonsered GT2124CGT2124C Spare parts

Jonsered

Jonsered GT2124CGT2124C Spare parts

Webb WEV20LT Original instructions

Webb

Webb WEV20LT Original instructions

ATIKA BF 31-4T Original instructions

ATIKA

ATIKA BF 31-4T Original instructions

Texas Equipment PCX2000 user manual

Texas Equipment

Texas Equipment PCX2000 user manual

Core GasLess CGT 400 Service guide

Core

Core GasLess CGT 400 Service guide

Echo GT_225 - 11-09 Operator's manual

Echo

Echo GT_225 - 11-09 Operator's manual

Dolmar AT-3623 AT-3630 instruction manual

Dolmar

Dolmar AT-3623 AT-3630 instruction manual

Panasonic ER-GB62 operating instructions

Panasonic

Panasonic ER-GB62 operating instructions

Echo SRM-210 - PARTS CATALOG SERIAL NUMBERS... parts catalog

Echo

Echo SRM-210 - PARTS CATALOG SERIAL NUMBERS... parts catalog

Ele GSP210 operating instructions

Ele

Ele GSP210 operating instructions

Stihl KM 85 R instruction manual

Stihl

Stihl KM 85 R instruction manual

Black & Decker Strimmer GL651 instruction manual

Black & Decker

Black & Decker Strimmer GL651 instruction manual

manuals.online logo
manuals.online logoBrands
  • About & Mission
  • Contact us
  • Privacy Policy
  • Terms and Conditions

Copyright 2025 Manuals.Online. All Rights Reserved.