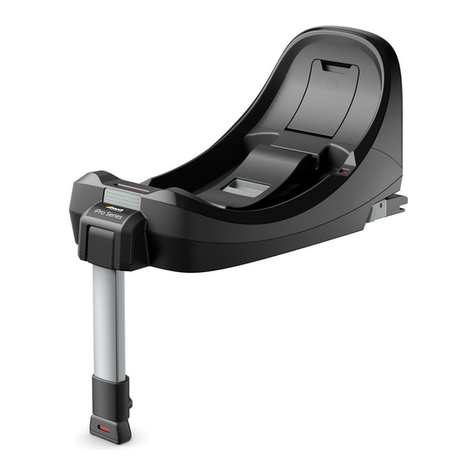
Mamas & Papas isofix base User manual

INSERIRE LOGO RUSSO
isofix base 0+1 K
Instructions for use
PVIB_0236_0313_V1

click
A
BB
click
click
1 2
3 4
5 6

B
A
OK
A
B
A
B
D
A
D
E
B
C
7 8
9
10

OK
C
B
A
click
A
B
B
A
OK
11
12
13

A
B
14
EN_English
Thank you for choosing a
Mamas & Papas product.
Product compatibility
• "IsofixBase0+1K"maybeusedexclusively
withanymodelsofthecarseats"Primo
ViaggioIP","PrimoViaggioSL"and"VITO".
• DonotusetheIsofixBase0+1Kwiththe
carseats"PrimoViaggio"or"PrimoViaggio
SIP".
Product characteristics
• “IsofixBase0+1K”mustbefittedon
vehicleseatsfacinginthenormaldirection
oftravel.Donotfit“IsofixBase0+1K”on
seatswithairbagsoronseatsthatface
awayorsidewayswithrespecttothe
normaldirectionoftravelofthevehicle.
•The use of “Isofix Base 0+1 K”ensures
greater safety and ease of mounting for
Peg Perego child car seats.
•Ensure that the vehicle is fitted with an
Isofix system. Check the list of car models
provided with the product.
WARNING
• Readtheinstructionscarefullybeforeuse
andkeepthemintheholderprovidedfor
futurereference.Failuretocloselyfollow
theinstallationinstructionsforthecar
safetyseatwillputyourchildatrisk.
•The assembly and installation operations
must be conducted by adults.
•Avoid inserting fingers into the
mechanisms.
•Death or serious injury can result if this
safety seat base is installed on seats with
airbags.
•Eliminate danger by disabling airbags
surrounding the position of the car safety
seat.
•When travelling take special care to make
sure that luggage or other objects do not
injure the child in the safety seat in the case
of accidents.
•Do not use installation methods different
from those indicated. This would result in
the risk of detachment from the seat.
•Child car seat base, group 0+, “Semi-
Universal” category, class E for use with
any models of the car seats "Primo Viaggio
IP", "Primo Viaggio SL" .Approved under
European standard ECE R44/04 for
children weighing from 0 to 13 kg (0 to
12/14 months). Only for use in vehicles
fitted with Isofix approved points (for
details see the list of car models fitted with
Isofix attachment systems).
•Child car seat base, group 1, “Semi-
Universal” category, class A for use with
VITO and all its models. Approved under
European standard ECE R44/04 for
children weighing from 9 to 18 kg (from
9 months to 4 years approx). It can only
be used in vehicles with approved Isofix
points.
•Check the vehicle's use and maintenance
manual to see whether it is compatible with
Isofix child restraint systems.
•If you are unsure of anything, contact the
manufacturer or the retailer of this child car
seat.

6
•Do not remove the stickers; this could
mean that the product no longer conforms
with standards.
•Do not use this base if it is broken or has
missing parts, if it is second-hand or of
uncertain origin, or if it has undergone
violent strain in an accident, as it may have
suffered extremely dangerous structural
damage.
•Do not modify the product.
•For any repairs, replacement parts or
information on the product, contact the
post-sales assistance service. The relevant
information is provided on the last page of
this manual.
•Do not use this base after a period of
five years has passed from the date of
production indicated on the bottom.
The natural ageing of the materials may
mean that it is no longer compliant with
standards.
Instructions for use in car
1•Find the Isofix attachment points on the car
seats.
2•Lengthen the Isofix attachments on the
base by pressing the lever as shown in the
figure, to facilitate fastening.
3•Extract the support leg from under the
base and fold it outwards until it clicks into
position. Position the base on the car seat
as shown in the figure, aligned with the
Isofix attachments.
4•Engage the attachments on the base to the
seat buckles (check that there is nothing
interfering with the seat buckles that could
stop them from functioning properly).
•IMPORTANT: The two signals on the
sides of the handle go from red to green to
indicate that it is properly attached.
•IMPORTANT: Once the procedure is
complete, move the base to check that
both Isofix points are actually attached.
5•Adjust the height of the support leg by
pressing down the inner catch until it
touches the car floor (it is important for the
leg to be well supported on the car floor
even if this causes the base to be slightly
raised from the vehicle seat).
•Once the above steps are complete, “Isofix
Base 0+1 K” can remain in the car ready for
use.
•If your car has storage compartments on
the floor of the vehicle, in the area where the
support leg is to rest, you should open the
compartment and rest the leg on the bottom
of it.
Connecting Primo Viaggio IP /
Primo Viaggio SL
6•Place the child in the car seat safety seat,
remembering to secure him/her with the
harness. Lift the chair with the handle
(facing the opposite direction to normal
vehicle movement) and engage to the base
by pressing down with both hands on the
chair until it clicks into place.
•IMPORTANT: The two signals behind the
base go from red to green to indicate that
the child car seat is properly attached.
•IMPORTANT: Once the procedure is
complete, move the child car seat to check
that it is actually attached.
7•Inside the car, the handle must be fully
lowered towards the backrest of the vehicle
seat, as shown in the figure. Press the
round buttons on the handle and at the
same time rotate the handle as shown in
the figure until it clicks into position.
8•Pull the handle on the base and push the
base with the child car seat against the
vehicle seat until they can go no further.
•IMPORTANT: It is possible to check that
the base is correctly positioned by looking
at the signals on the handle. OK (green)
indicates that the position is correct, NO
(red) indicates that the procedure has
been carried out incorrectly and must be
repeated until the handle only shows the
term “OK”.
9•To release the child car seat from the base:
raise the handle to its transport position,
push the lever on the backrest upwards
and at the same time lift the seat.
10•To release the base from the vehicle seat:
release the Isofix connectors from the fixing
points in the car by lifting the handle on the
base (Arrow A) and pulling the base in the

7
normal direction of travel (Arrow B). Pull the
handle (Arrow C) and push the connectors
back inside the base (Arrow D). Rotate the
support leg and place it in its housing (Arrow
E).
Connecting VITO and all
its models
IMPORTANT:thecarseatmustbe
attachedwithoutthechildinit.
•Before connecting the car seat on the Isofix
base, ensure that the child car seat’s Isofix
connectors are fully extended (Arrow A).
•If you have any difficulty fitting car seat in
your car, lift up or remove the vehicle’s
headrests.
11•Remove the plastic casing attached to
the child car seat with the special release
switches (Arrows B and C).
12•Position the child car seat on the Isofix
Base 0+1 K and insert the rear connectors
of the child car seat in the fixing points of
the base nearest to the vehicle seat (Arrow
A).
•Press the front part of the child car seat
until it clicks into place (Arrow B).
IMPORTANT: The two signals behind the
base go from red to green to indicate that
the child car seat is properly attached to
the base.
13•Pull the handle on the base (indicated by
Arrow A) and push the base with the child
car seat against the vehicle seat until they
can go no further (indicated by Arrow B).
IMPORTANT: It is possible to check that
the base is correctly positioned by looking
at the signals on the handle. OK (green)
indicates that the position is correct, NO
(red) indicates that the procedure has
been carried out incorrectly and must be
repeated until the handle only shows the
term “OK”.
IMPORTANT:Once the procedure is
complete, move the base to check that
both Isofix points are actually attached.
Serial numbers
14•On the underside of the Isofix Base 0+1
K, near the isofix connectors, the following
information is provided: product name,
date of manufacture and serial number of
the product itself (Fig. a).
The approval label is located on the Isofix
Base 0+1 K behind the compartment
holding the instruction sheet (Fig. b).
This information is required for any
complaints.
Cleaning and maintenance
•This product requires a small amount of
maintenance. Cleaning and maintenance
must only be carried out by adults.
•Clean the plastic parts periodically with a
damp cloth. Do not use solvents or other
similar products.
•Protect the product from atmospheric
agents: humidity, rain or snow. Extended
exposure to sunshine can cause colour
changes in many materials.
•Store the product in a dry environment.
How to read the approval label
This paragraph explains how to read the
approval label (the orange label located in
the instruction sheet compartment).
•The terms SEMI-UNIVERSAL class E and
class A indicate the compatibility of the

child car seat with vehicles fitted with Isofix
attachment systems.
•The top of the label displays the trademark
of the manufacturing company and the
name of the product.
•The letter E in a circle indicates the
European approval mark and the number
indicates the country that issued the
approval (1: Germany, 2: France, 3: Italy, 4:
The Netherlands, 11: Great Britain, and 24:
Ireland).
•Approval number: if it starts with 04 this
indicates the fourth amendment (the one
currently in force) of Regulation R44.
•Reference standard: ECE R44/04.
•Production serial number: on issue of
approval each safety seat is personalized
with its own number.

FI001201I182 — 10/04/2013
HD5 0RH, UK
mamasandpapas.com
mamasandpapas.ca
mamaspapas.kr
+44 (0)845 268 2000
1-800-490-0331
1-800-667-4111
1300 663 034
T: +44 (0)845 268 2000
T: 1-800-490-0331
T: 1-800-667-4111
T: 1300-663-034
/mamasandpapasuk
/mamasandpapasusa
/mamasandpapasmaltaregion
/mamasandpapasmagyarorszag
/mamasandpapas
mamasandpapasblog.com
/user/mamasandpapasglobal
@mamasandpapas
Table of contents
Other Mamas & Papas Car Seat manuals

Mamas & Papas
Mamas & Papas Viaggio Quick guide

Mamas & Papas
Mamas & Papas Vito Quick guide

Mamas & Papas
Mamas & Papas Vito TT Quick guide

Mamas & Papas
Mamas & Papas Lusofix User manual

Mamas & Papas
Mamas & Papas Vito User manual

Mamas & Papas
Mamas & Papas Moto G123 User manual

Mamas & Papas
Mamas & Papas Vito TT Quick guide

Mamas & Papas
Mamas & Papas Moto G123 User manual

Mamas & Papas
Mamas & Papas Armadillo HD5 0RH User manual

Mamas & Papas
Mamas & Papas Venture User manual