manuals.online logo
Brands
  1. Home
  2. •
  3. Brands
  4. •
  5. Manfrotto
  6. •
  7. Camera Accessories
  8. •
  9. Manfrotto 627 User manual

Manfrotto 627 User manual

Cod. 627,01 - 01/08 Copyright © 2004 Manfrotto Bassano Italy
627
INSTRUCTIONS
I
INTRODUZIONE
Adattatore per fotografia panoramica di base, abbinabile a teste fotografiche.
PREPARAZIONE
Montare l’adattatore sulla testa o treppiede tramite la vite femmina da 3/8” “A”.
MONTAGGIO DELLA FOTOCAMERA SULLA TESTA E
É previsto un attacco doppio coassiale da 1/4” e 3/8” per montare qualunque
fotocamera tramite la vite di fissaggio a molla “J”. Portare l’attacco filettato
femmina della fotocamera sulla vite di fissaggio della testa.
Reggendo saldamente la fotocamera con una mano (fig. 2), ruotare in senso
antiorario la ghiera dentellata “N” mentre si applica una leggera pressione
verso il basso alla fotocamera. Se necessario, la vite di fissaggio “J” si adatta
automaticamente all’attacco femmina da 1/4”, abbassando il manicotto filettato
esterno da 3/8”.
Prima di usare la fotocamera, accertarsi che sia bloccata saldamente alla
piastra (fig. 3).
USO
L’adattatore dispone di una scala a 360° per guidare l’impostazione della
fotocamera a differenti angolazioni per riprese panoramiche di base:
- allentare la ghiera dentellata “N” per sbloccare la fotocamera
- ruotare la fotocamera sull’angolazione desiderata “Z” (usando un punto di
riferimento a piacere sul corpo della fotocamera che consenta di allinearla in
modo ragionevolmente accurato rispetto alla scala graduata dell’adattatore).
- bloccare saldamente la fotocamera sulla nuova angolazione “Z” stringendo la
ghiera dentellata “N”
1
2
3
4
INTRODUCTION
Basic panoramic adapter that can be mounted on top of a head.
SET UP
Assemble the head on the head / tripod using 3/8” female thread “A”.
MOUNTING THE CAMERA ON THE HEAD ET
A dual 1/4” and 3/8” coaxial attachment is provided to mount any camera by
spring-loaded screw fixing “J”. Place the female threaded fixing socket on the
camera over the head screw fixing. Holding the camera securely in one hand
(fig. 2), rotate anti-clockwise the geared “N” whilst applying a gentle downward
pressure on the camera. The head screw fixing “J” will automatically adjust
to a 1/4” female fixing as appropriate, by pressing down the outer 3/8” spring
loaded thread.
Please ensure you have securely locked the camera on to the plate before
use (fig. 3)
USE
The adapter has a 360° scale to help set the camera at different angles for
basic panoramic shooting:
- loosen the geared knob “N” to unblock the camera
- turn the camera to the desired angle “Z” (using a reference point of your
choice on the camera body that allows you align the camera reasonably
accurately with the adapter’s degree scale)
- lock the camera firmly at the new angle “Z” by tightening the geared locking
knob “N”
1
2
3
4
O
45
90
E
INTRODUCCIÓN
El adaptador panorámico básico se puede montar en la parte superior de la
rótula.
CONFIGURACIÓN
Monte la rótula sobre la rótula/ usando la rosca “A” del trípode hembra 3/8”.
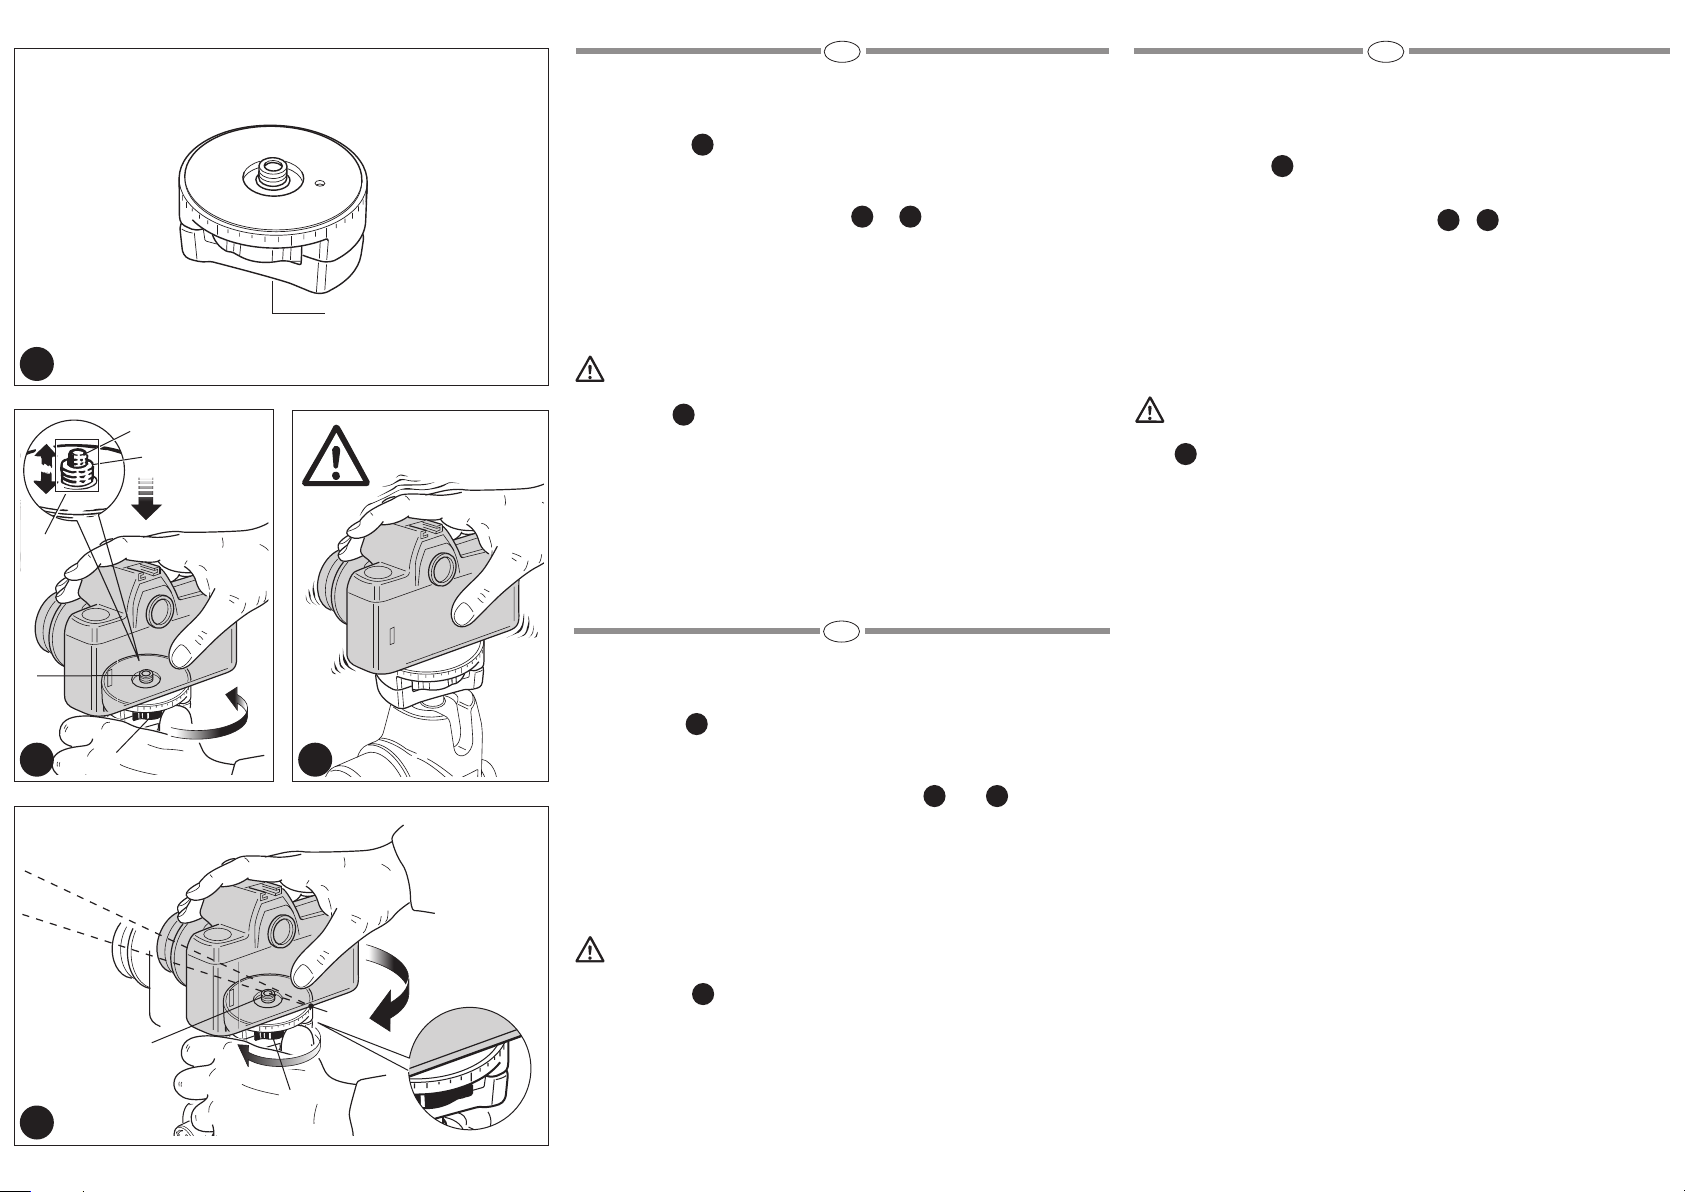
MONTE LA CÁMARA SOBRE LA RÓTULA Y
Se proporciona un acoplamiento coaxial dual de 1/4” y 3/8” para montar
cualquier cámara mediante la fijación del tornillo de carga del muelle “J”.
Coloque la rosca hembra fijando la ranura sobre la cámara sobre la fijación de
rosca de la rótula.
Manteniendo la cámara con seguridad en una mano (fig. 2), rote en el sentido
contrario a las agujas del reloj el mecanismo “N” mientras se aplica una
ligera presión hacia abajo sobre la cámara. La rosca de fijación de la cámara
“J” ajustará automáticamente a la rosca hembra 1/4” apropriadamente,
presionando hacia abajo la rosca exterior de carga del muelle 3/8”.
Por favor, asegúrese de que ha bloqueado con seguridad la cámara sobre
el plato antes de usarla (fig. 3).
USO
El adaptador tiene una escala de 360° para ayudar a configurar la cámara a
diferentes ángulos para tomas panorámicas básicas:
- afloje el pomo “N” para desbloquear la cámara
- coloque la cámara en el ángulo deseado “Z” (usando un punto de
referencia de su elección sobre el cuerpo de la cámara que le permite alinear
razonablemente la cámara con la escala graduada del adaptador.
- Bloquee la cámara firmemente en el nuevo ángulo “Z” mediante el bloqueo
del pomo “N”
1
2
3
4
INTRODUCTION
Cette base panoramique simple se monte sur une rotule.
INSTALLATION
Fixez la rotule au trépied en insérant la vis 3/8” du trépied dans l’orifice fileté
“A” de la rotule.
FIXATION DE L’APPAREIL A LA BASE ET
Le système de fixation à double filetage escamotable “J” de 1/4” et 3/8” permet
de fixer tout type de boîtier à ce plateau panoramique. Placez simplement
l’orifice fileté de l’appareil au-dessus de la vis.
En tenant l’appareil fermement d’une main (fig. 2), faites tourner la molette “N”
dans le sens inverse des aiguilles d’une montre tout en exerçant une légère
pression sur le boîtier. Cela fera se rétracter l’adaptateur de 3/8” et la vis de
1/4” pourra être insérée dans l’orifice fileté.
Assurez-vous que l’appareil est solidement fixé à la base avant de l’utiliser
(fig. 3).
UTILISATION
Cette base est équipée d’une échelle graduée de 360° pour vous aider à placer
l’appareil photo à différents angles pour des prises de vues panoramiques :
- desserrez le bouton “N” pour libérer l’appareil photo
- tournez l’appareil photo pour le placer sur l’angle souhaité “Z” (à l’aide d’un
point de référence de votre choix sur le boîtier de l’appareil qui vous
permettra d’aligner le boîtier avec précision avec l’angle choisi sur l’échelle).
- bloquez l’appareil photo à l’angle “Z” choisi en serrant le bouton de blocage
“N”.
1
2
3
4
EINLEITUNG
Panorama-Adapter zur Anbringung auf einem Stativkopf.
ANBRINGUNG
Setzen Sie den Adapter mit seiner 3/8”-Gewindebuchse “A” an den Stativkopf
bzw. das Stativ an.
AUFSETZEN DER KAMERA AUF DEN ADAPTER UND
Eine angefederte Koaxialschraube 1/4” und 3/8” gestattet die Verwendung
mit jeder Kamera. Setzen Sie die Kamera mit ihrer Stativbuchse auf den
Adapter auf. Nehmen Sie die Kamera fest in eine Hand (Abb. 2), und drehen
Sie das Rändelrad “N” unter leichtem Druck auf die Kamera entgegen den
Uhrzeigersinn. Bei einer Kamera mit 1/4”-Buchse wird der angefederte äußere
Gewindering 3/8” automatisch nach unten gedrückt.
Bitte vergewissern Sie sich vor der Benutzung des Adapters, dass die
Kamera sicher befestigt ist (Abb. 3).
VERWENDUNG
Der Adapter hat eine 360°-Skala, die bei Panorama-Aufnahmen die Einstellung
der Kamera auf unterschiedliche Winkel erleichtert.
- Lösen Sie das Rändelrad “N” zur Freigabe der Kamera.
- Drehen Sie die Kamera auf den gewünschten Winkel “Z” (unter Zuhilfenahme
eines beliebigen Bezugspunktes an der Kamera, der eine ausreichend genaue
Ausrichtung der Kamera mit Hilfe der Gradskala des Adapters gestattet).
- Sichern Sie die Kamera in der neuen Winkeleinstellung durch Anziehen des
Rändelrades “N”.
1
2
3
4
F
D
O
45
90
A
45
90
45
90
45
90
45
90
1
2
1
J
J
N
Z
1/4”
J
N
3/8”
2
1
2
4
3

Other Manfrotto Camera Accessories manuals

Manfrotto MHXPRO-BHQ2 User manual

Manfrotto

Manfrotto MHXPRO-BHQ2 User manual

Manfrotto MVM500A User manual

Manfrotto

Manfrotto MVM500A User manual

Manfrotto 745XB User manual

Manfrotto

Manfrotto 745XB User manual

Manfrotto 482LCD User manual

Manfrotto

Manfrotto 482LCD User manual

Manfrotto MVH500A User manual

Manfrotto

Manfrotto MVH500A User manual

Manfrotto MVH612AH User manual

Manfrotto

Manfrotto MVH612AH User manual

Manfrotto 515MV User manual

Manfrotto

Manfrotto 515MV User manual

Manfrotto 701RC2 User manual

Manfrotto

Manfrotto 701RC2 User manual

Manfrotto 684B User manual

Manfrotto

Manfrotto 684B User manual

Manfrotto MVG460 User manual

Manfrotto

Manfrotto MVG460 User manual

Manfrotto 143 User manual

Manfrotto

Manfrotto 143 User manual

Manfrotto 545B User manual

Manfrotto

Manfrotto 545B User manual

Manfrotto MKCOMPACTACN-BK User manual

Manfrotto

Manfrotto MKCOMPACTACN-BK User manual

Manfrotto 115 User manual

Manfrotto

Manfrotto 115 User manual

Manfrotto 190XPROB User manual

Manfrotto

Manfrotto 190XPROB User manual

Manfrotto MVR901ECEX User manual

Manfrotto

Manfrotto MVR901ECEX User manual

Manfrotto MVHN12AH User manual

Manfrotto

Manfrotto MVHN12AH User manual

Manfrotto 484 User manual

Manfrotto

Manfrotto 484 User manual

Manfrotto MVM250A User manual

Manfrotto

Manfrotto MVM250A User manual

Manfrotto Imagine More MKC3-H01 User manual

Manfrotto

Manfrotto Imagine More MKC3-H01 User manual

Manfrotto 524AX User manual

Manfrotto

Manfrotto 524AX User manual

Manfrotto 458B User manual

Manfrotto

Manfrotto 458B User manual

Manfrotto 560B User manual

Manfrotto

Manfrotto 560B User manual

Manfrotto MVG460 User manual

Manfrotto

Manfrotto MVG460 User manual

Popular Camera Accessories manuals by other brands

Contax VARTA BLOCK V Installation

Contax

Contax VARTA BLOCK V Installation

CamRanger PT Hub quick start guide

CamRanger

CamRanger PT Hub quick start guide

Chimera 2785M instructions

Chimera

Chimera 2785M instructions

Pentax Adapter 645 for 67 Lens operating manual

Pentax

Pentax Adapter 645 for 67 Lens operating manual

Sony VAD-PHA operating instructions

Sony

Sony VAD-PHA operating instructions

Graphite 58G001 instruction manual

Graphite

Graphite 58G001 instruction manual

Ikelite AF35 AutoFlash quick start guide

Ikelite

Ikelite AF35 AutoFlash quick start guide

STARFIELD 2 inches Herschel Solar Wedge instruction manual

STARFIELD

STARFIELD 2 inches Herschel Solar Wedge instruction manual

FLIR TA04-KIT user manual

FLIR

FLIR TA04-KIT user manual

Oben AC-2300 series user manual

Oben

Oben AC-2300 series user manual

Vinten FE-165 Light user guide

Vinten

Vinten FE-165 Light user guide

Steelsring EF GFX user guide

Steelsring

Steelsring EF GFX user guide

TQ Remote V01 user manual

TQ

TQ Remote V01 user manual

Sanyo KR-1100AEL Cadnica Specifications

Sanyo

Sanyo KR-1100AEL Cadnica Specifications

Hitachi FDS 12DV manual

Hitachi

Hitachi FDS 12DV manual

Olympus E-P2 - PEN 12.3 MP Micro Four Thirds Interchangeable Lens Digital... instructions

Olympus

Olympus E-P2 - PEN 12.3 MP Micro Four Thirds Interchangeable Lens Digital... instructions

CHINT R6 user manual

CHINT

CHINT R6 user manual

Sony BVF-C10W Operation manual

Sony

Sony BVF-C10W Operation manual

manuals.online logo
manuals.online logoBrands
  • About & Mission
  • Contact us
  • Privacy Policy
  • Terms and Conditions

Copyright 2025 Manuals.Online. All Rights Reserved.