Manhattan RS-1933 User manual

RS-1933 High Definition Set Top Box
User Manual
Version 1.2
For up-to-date product information visit us at www.manhattan-digital.net

I RS-1933 User Manual
DANGEROUS
VOLTAGE
IMPORTANT OPERATING
INSTRUCTIONS
WARNING:
To reduce the risk of electrical shock, do not open the cabinet.
Do not place where contact with water or immersion is possible. Avoid
exposure to moisture.
Do not place near fire or open flames. Avoid exposure to excessive heat.
Slots and openings in the cabinet are provided for ventilation. Do not
block these openings.
The unit should be connected only to the required power supply, as
described in instructions or as marked on the unit. If not sure, contact
your local dealer or power company.
Contact your local dealer for technical service if opening is required.
NOTE:
To ensure proper use, read this manual carefully and retain for further
reference.
Power off the unit when cleaning. You may clean the cabinet, panel, and
remote control with a soft cloth lightly moistened with mild detergent
solution. Allow to dry before powering on.

RS-1933 User Manual II
Technical Specifications
Hardware
Audio
MPEG-1 Layers 1,11,11
MPEG-2 Layer 2
MPEG-2 AAC LC and LC and AAC+
MPEG-4 AAC L@ 2-Channels / 5.1 Channel MPEG-4
AAC+SBR 2-Channel
Mono, dual Mono, Stereo, Joint Stereo
Dolby digital ACS-3 through SPDIF Coaxial output
Video
MPEG-1 (SD)
MPEG-2 MP@ML (SD) and MP@HL (HD)
MPEG-4p 10 (H.264) MP@L3 (SD) and [email protected]
Video Format 4.3, 16.9, with Pan Scan Letterbox
Up-scaling of SD video on HD output
Down-scaled HD video on SD output
Supported Resolutions: 1080i /720p /480p /576p
/480i /576i
Front Panel
8 Button Keys
4 digit Seven Segment Display
Rear Panel
IF in loop through
1 x HDMI with HDCP
1 x Coaxial SPIDF
1 x USB 2.0 port
1 x PCMCIA Interface Slot
Power on/off switch
100-240v 50/60Hz @25w
Accessories
Handset with batteries
TV Reception
DVBS2 Tuner, Single HDTV Decoder with CI
System Resources
ALi 3602 Chipset
2 MByte Flash Memory
64 MByte RAM Memory
5000 C/Ku channel format
NTSC composite output
64 satellites and 8 favorite groups settings
Recall last channel
16 Day EPG
8 event timers. Count-down timer
Update firmware through USB port
Language support: English, French, German,
Russian, Arabic, Portuguese, Turkish, Spanish,
Polish, and Italian
Dolby ASC-3 through Co-axial SPDIF port
Teletext up to 800 pages
OSD Transparency, 10-40%
Video resolution switch on remote
User can change Background graphics
Wake-up Channel Default by user
DiSEqC 1.0 –off, 1/2-2/2, ¼-4/4
DiSEqC 1.2, Positioner. Satellite selectable with
limits
DiSEqC 1.3 Support USAL for dish satellite
programming
Polarization H/V Auto
DVB-S Auto Scan @ 50 TP/S
Signal strength and quality level support
IF loop-through for multiple receivers
DVR Function;
Through USB port
Up to 2.0 TB hard disk capability. Will separate files
after 1 TB
Identifies program, music, and JPEG files
independently
Identifies free space, record time and size
Time record. Can record in a set time
Can set FF & RW times in 30s, 1m, 5m, 10m
Play, pause, and stop function with jump selection
User can lock, delete, or rename recorded files
Browse records and preview files
User can sort by date and time
Hard Drive not included
Software
Specifications

III RS-1933 User Manual
1. Getting Started
1. Front panel
2. Remote Controller
3. Connecting
2. Basic Operations
1. Turning on
2. Power
3. Channel Up/Down
4. Volume Up/Down
5. Number Keys
6. Mute
7. Pause
8. Recall
9. Favorite
10. Audio
11. Information
12. EPG
13. TV/Radio
14. Channel List
15. Sleep
16. Page Up/Down
17. Text
18. Subtitle
19. Resolution
20. Menu
21. Size
22. Exit
3. Menu Operations
1. Menu
2. Edit Channel
2.1 TV Channel List
2.2 -Favorite
2.3 -Lock
2.4 -Skip
2.5 -Move
2.6 -Edit
3. Radio Channel List
4. Delete All
4. Installation
1. Installation
2. Antenna Connection
3. Satellite List
4. Antenna Setup
5. Satellite Search
6. Multi-Satellite Search
7. TP List
Contents
1
1
1
2
Contents
4
4
4
4
4
4
4
4
4
4
4
5
5
6
6
6
6
6
6
6
6
6
6
7
7
7
7
7
7
8
8
8
9
9
7
10
10
10
10
11
12
12
13
5. System Setup
1. System Setup
2. Language
3. TV System
4. Local Time Setting
5. Timer Setting
6. Parental Lock
7. OSD Setting
8. Favorite
9. Other
6. Tools
1. Tools
2. Information
3. Factory Setting
4. Upgrade By USB
5. Common Interface
6. USB
7. REC
1. REC
2. Record Manager
3. Storage Information
4. HDD Format
5. DVR Configuration
6. Jump
8. Tips
9. Warranty
14
14
14
14
15
15
16
16
17
17
18
18
18
18
18
18
19
22
22
22
22
22
23
23
24
26

RS-1933 User Manual 1
Power
Mute
Resolution
EPG
Satellite
Favorite
Audio
TV/Radio
Recall
Page Down
Page Up
Menu
Exit
Text
Up/Channel Up
Right/Volume Up
Number Keys
Multi Picture
Skip Forward
Pause
Skip Back
Down/Channel Down
Record
Information
DVR
Left/ Volume Down
Fast Forward
Stop
Play
Rewind
Color Keys
Power
OK/Select
Exit
Menu
1. Front Panel
2. Remote Control
Up/Channel Up
Left/Volume Down
Down/Channel Down
Right/Volume Up
OK/Select
Getting Started
Text
Subtitle

2 RS-1933 User Manual
3. Connecting
If your TV is standard definition and
does not have component input,
please use a 3 lines cable (red, white,
yellow) to connect to your STB’s CVBS,
left and right analog audio port, as well
as to your TV’s corresponding ports.
If your TV is standard or high definition
and has component input ports, you
can connect your STB to your TV with a
5 lines cable (red, green, blue/ red,
white)
If your TV is high definition and has a
HDMI input port, connect your STB to
your TV with an HDMI cable. This
allows for maximum resolution to be
displayed on your television.
Connect your satellite antenna cable
to your STB’s ‘SAT IN’ port. Then, turn
on your TV and select the appropriate
input on your television.
Turn on your STB power, select a satellite in the “Satellite List”menu, and then enter the antenna setup to
configure exact parameters of this antenna. Select “Single Satellite Search”, then “Auto Scan”to search programs.
Getting Started

RS-1933 User Manual 3
Getting Started
The Manhattan RS-1933 receiver has a capacity for up to 100 satellites in memory. Standard factory settings include
over 90 satellites on both C and Ku-band, from 128 East to 1 West longitude. This allows North American users on both
the Pacific (Alaska and Hawaii) and Atlantic (Canada’s Maritimes) coasts to use the same memory configuration. This
standard setup lists satellites from West to East, Ku-band followed by C-band. A few selected transponders are included
with each satellite to allow you to get started. A few channels from popular satellites are also included, but you must do
a scan to create full channel lists once you connect your system. Go into the receiver Menus and check the satellites
that you will be using on your system, and uncheck anything that may be checked but not used. While there may be over
90 satellites in the receiver memory, only those satellites that have been selected and actually have at least one channel
scanned or inputted into the memory in advance will appear when you press the LIST button.
Those using an IRD receiver such as a 4DTV may prefer to have satellites listed in order, but with C and Ku-band from
an orbital location listed next to each other. You can go to the Manhattan-Digital website at www.manhattan-digital.net
and visit our SUPPORT section to obtain a factory download file in the MIX format, which alternates C and Ku listings in
this manner. Such a download can be transferred to a USB memory stick to update your receiver.
Whichever method that you use, once it is installed, you have several choices on how to scan for active satellite
channels. One can do an AUTO SCAN, which searches all frequencies on each polarity, then creates a channel list. Auto
Scan can be quite time consuming and sometimes less than accurate unless a system is perfectly aligned. Alternatives
include the manual entry of additional Transponder information from references on the Internet such as www.global-
cm.net or www.lyngsat.com and others. You can then use the Preset Scan mode to more quickly scan for signals. An
Auto Scan attempted AFTER first doing a Preset Scan should be faster, since the Preset Scan has already found a number
of transponders. All of this scanning does take time, and if you would like another alternative to reduce the effort
needed to create a channel list, there is the availability of Preloaded Memory Updates, sold by select Manhattan-Digital
dealers. Such an update would normally include a consecutive listing of ALL known transponders containing FTA
channels, allowing you to immediately do a Preset Scan on each polarity after loading this update into the receiver. Such
updates are done on a frequent basis to keep the database up-to-date. Please contact Manhattan-Digital by Email at the
contacts listed on the website if you would like the name of a dealer that can provide this service.
3. Connecting Cont.

4 RS-1933 User Manual
Basic Operations
1. Turning On
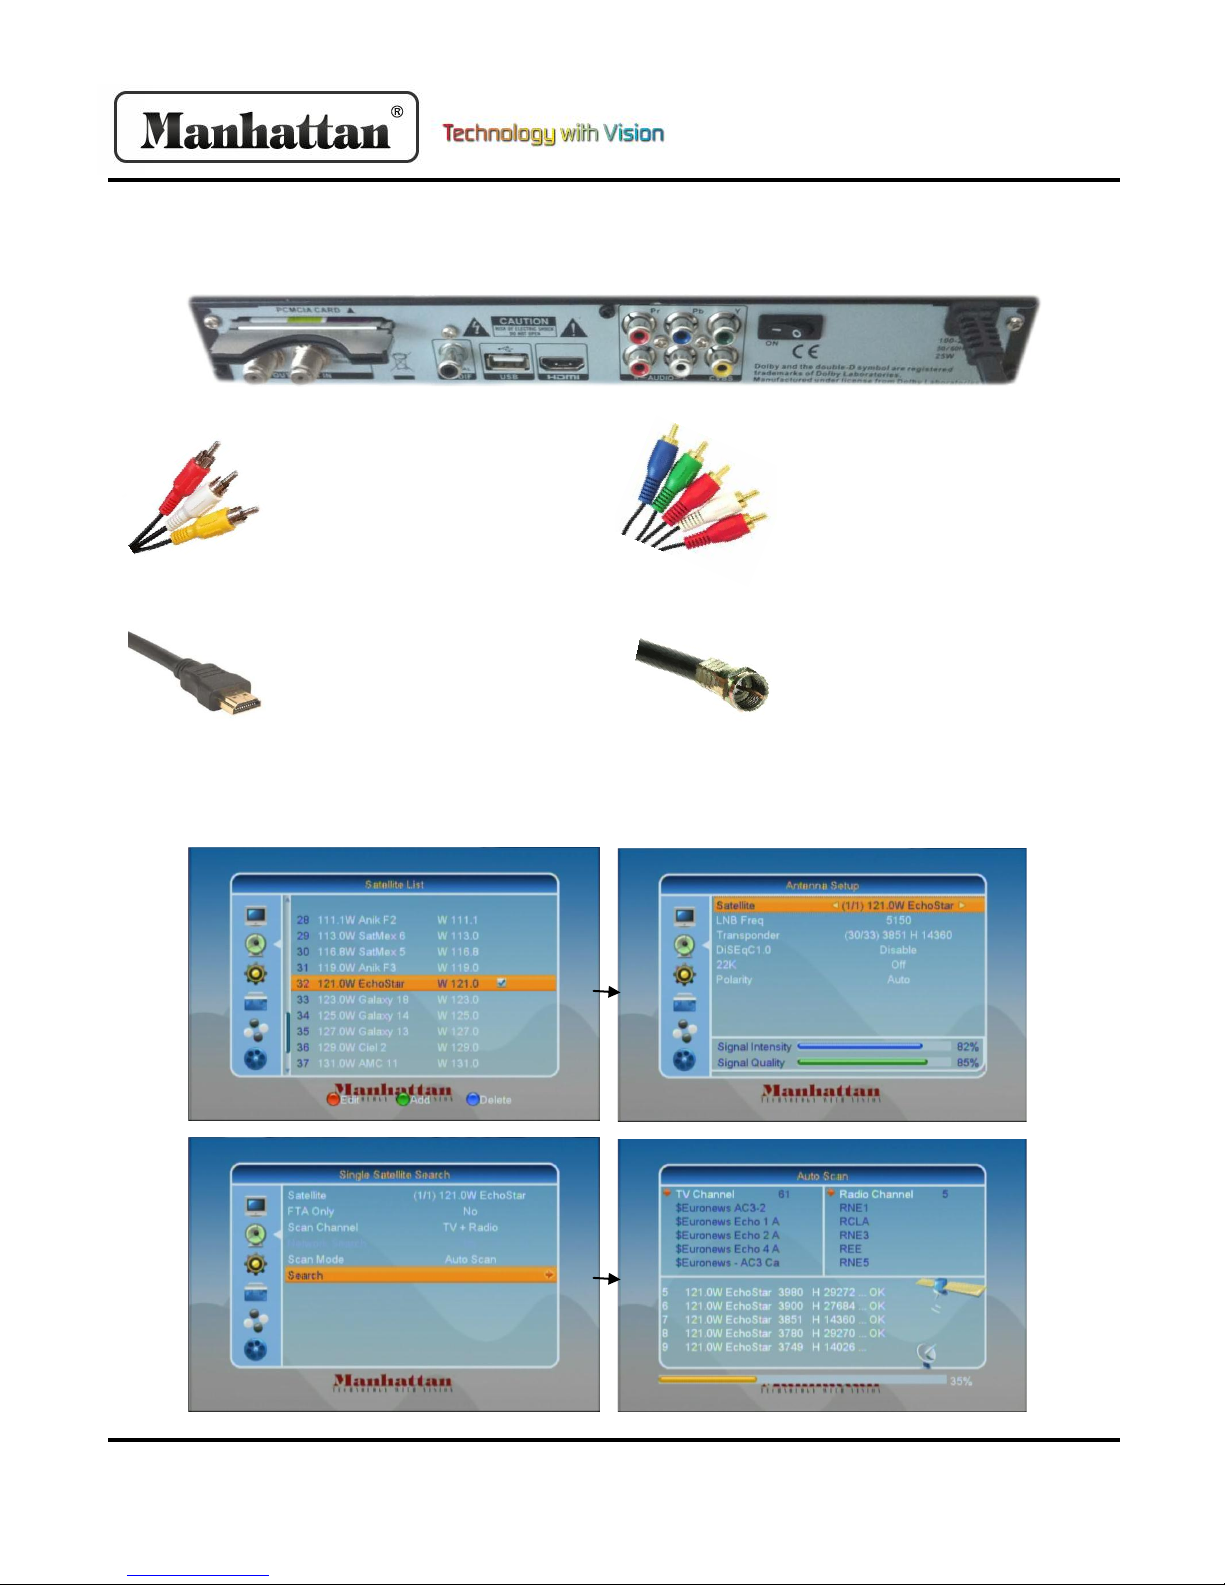
First, turn on the main power by flipping the switch
on the back of the device to the ‘on’position. When
the device is first used, it will either display no
channels, or the first channel from the default
channel list. If the STB has been set up previously, it
will display the last channel before turning off.
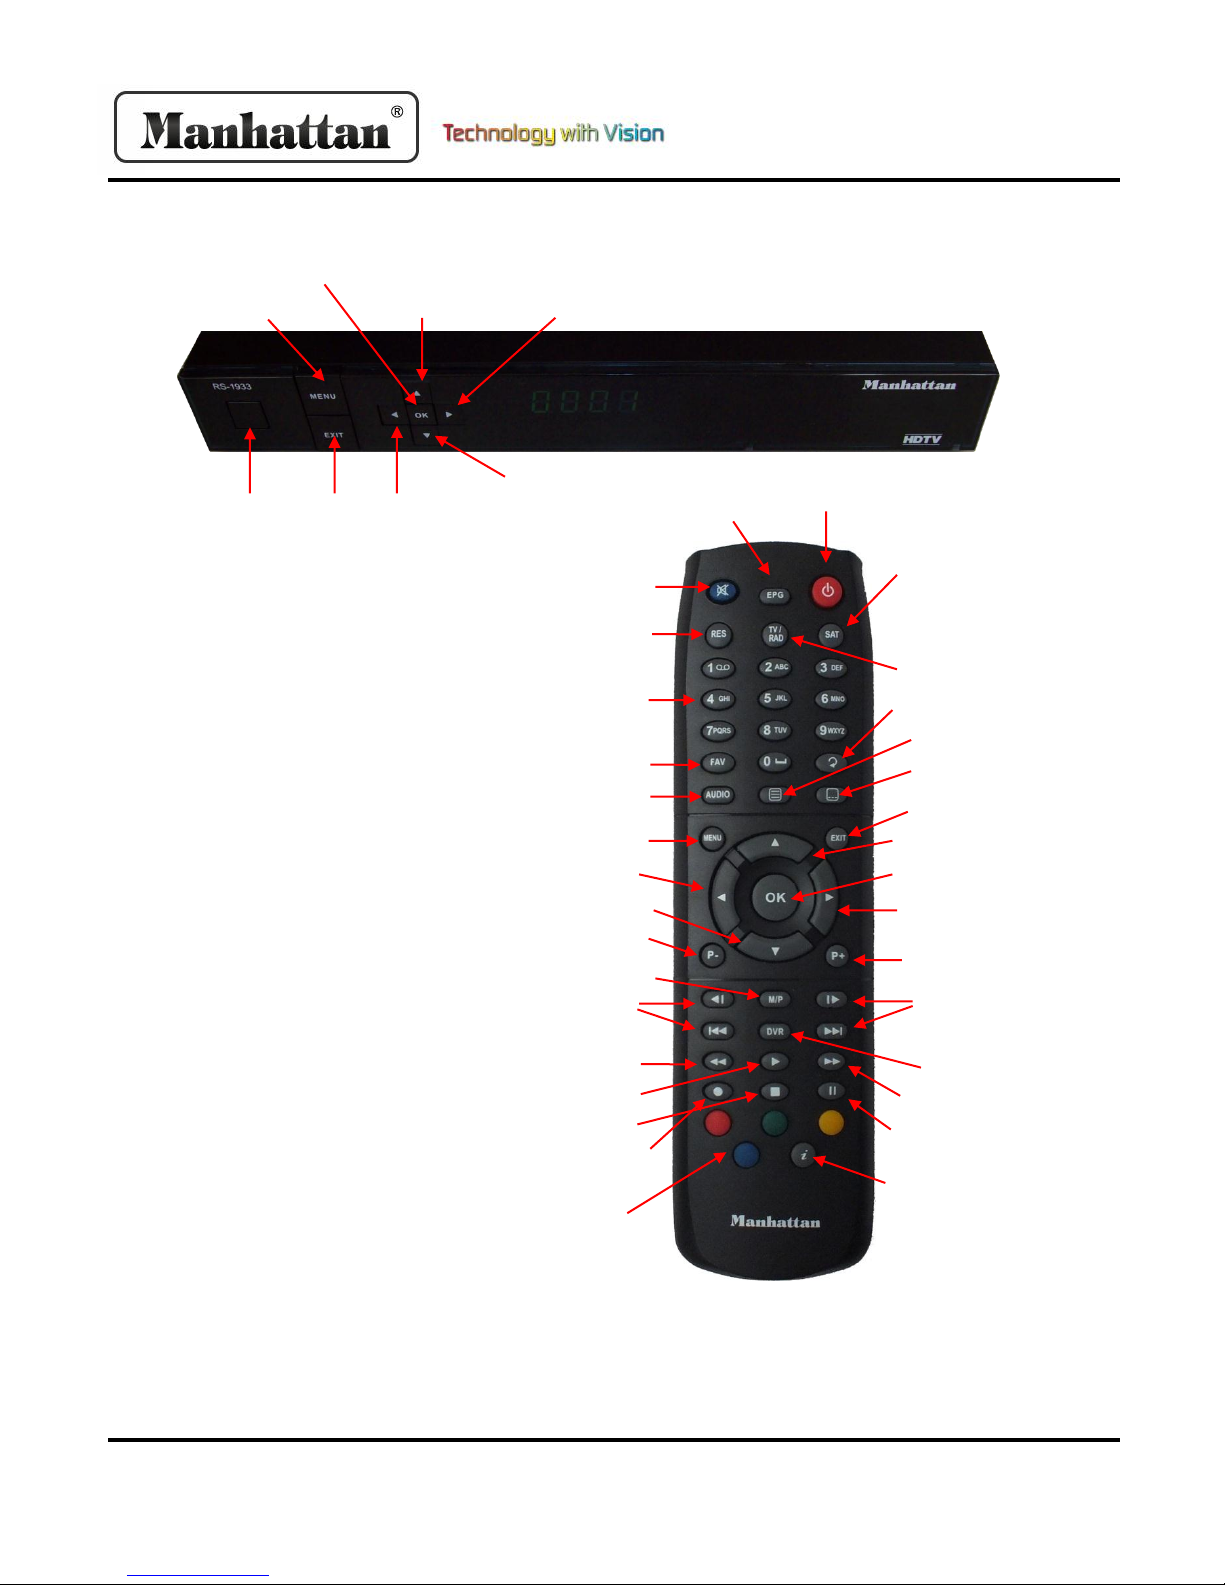
2. Power
When the power is switched ‘on’ on the back of the
STB, pressing the power buttons on the front panel
and remote control will enter standby mode. In
standby, pressing the power button will call back the
unit and play the previous channel. Disconnecting
the unit will end the standby state.
3. Channel Up/Down
In full screen, press the [Up/Down] buttons to switch
between channels.
4. Volume Up/Down
In full screen, press the [Left/Right] buttons to adjust
the volume. This controls the volume output of the
STB.
5. Number Keys
In full screen, use the [Number] keys on your remote
control to input channel number and press the [OK]
button to switch.
6. Mute
Press the [Mute] button to mute the sound on it will
show up on screen. Press the button again to restore
the sound.
7. Pause
In full screen, press the [Pause] button, and the
picture will be paused. The sound on the channel will
continue. Pressing the [Pause] button again will
resume to the current playing picture.
8. Recall
Pressing the [Recall] button will switch to the
previous channel you played.
9. Favorite
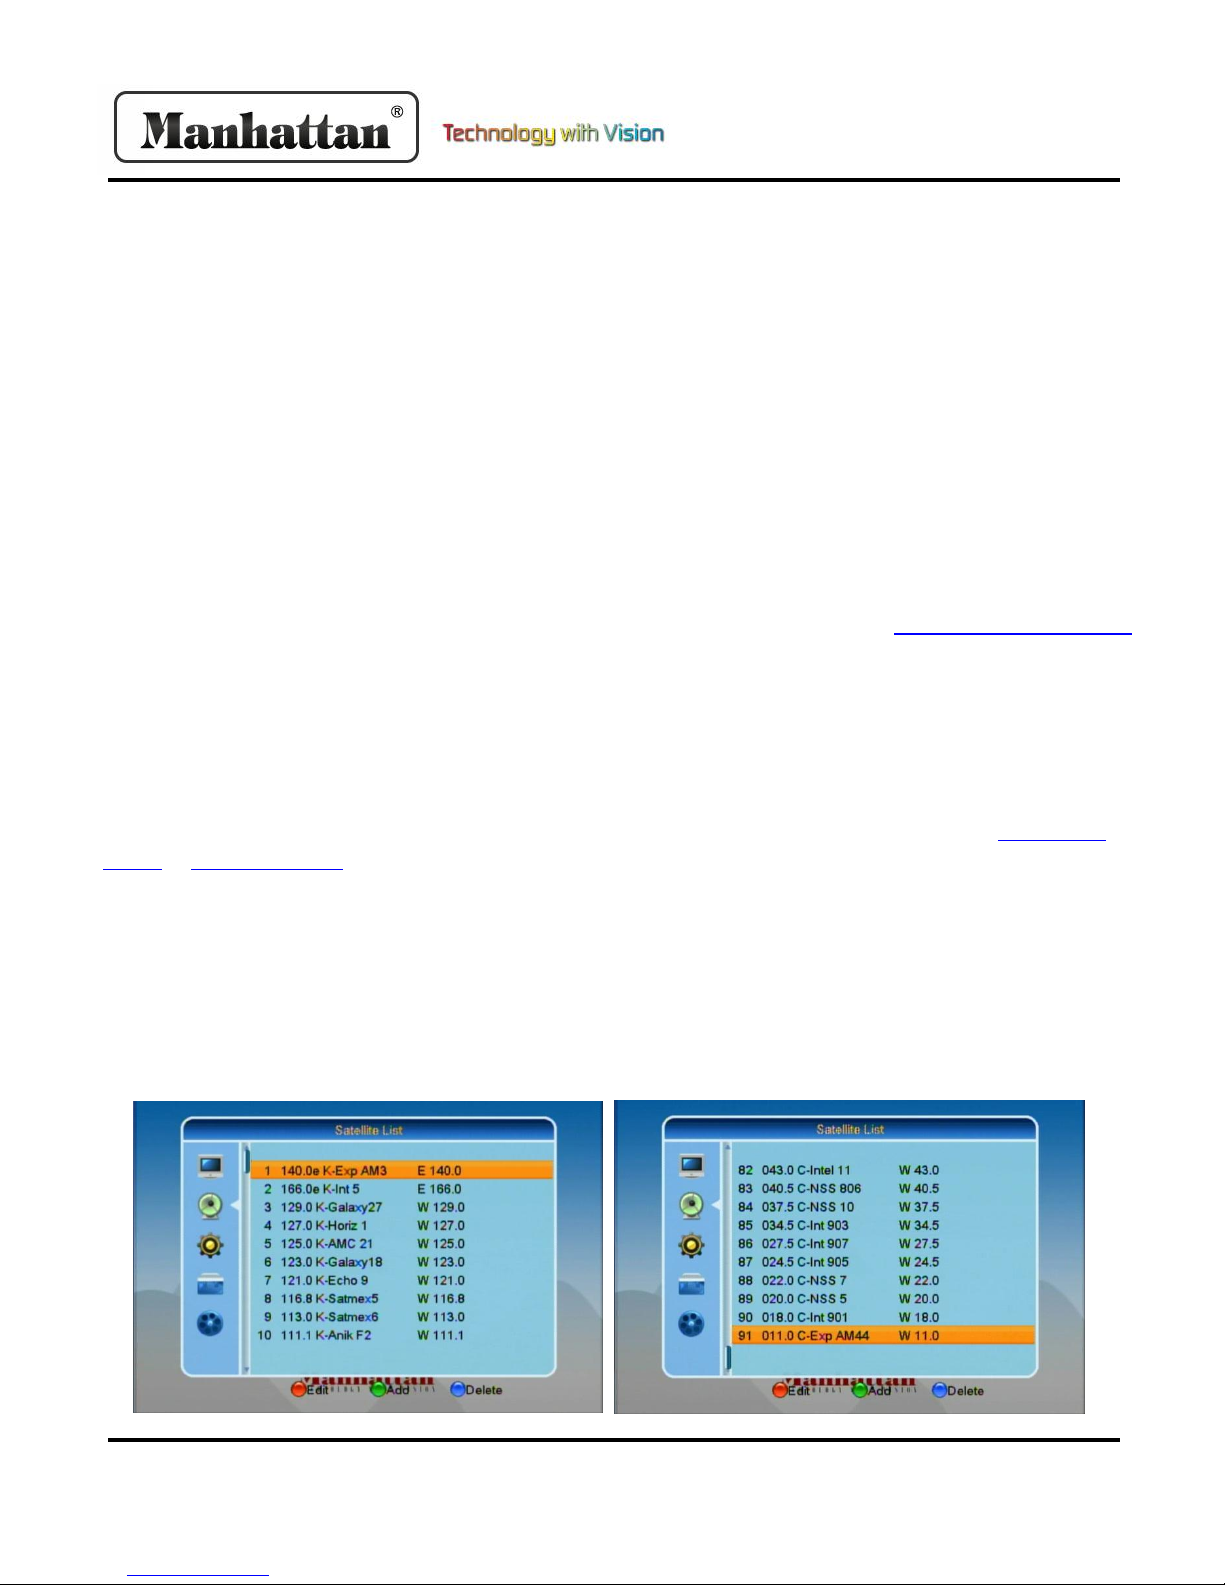
In full screen, pressing the [Favorite] key will display
a favorite window on the left side of your screen. If
you have not set any favorite channels, your screen
will display no favorite channels.
In the favorite window, you can move up and down
and select a group by using [Up/Down] keys and
pressing the [OK] button. Once you select a group,
you can scroll through the favorite channels in that
group. Press [Left] to select a different group. Hit the
[Exit] button to return to full screen. Setting up
favorite channels is discussed further.
10. Audio
In full screen, pressing the [Audio] button will open
the audio menu. You can modify the audio track by
pressing [Up/Down] and the audio mode by pressing
[Left/Right]
Mode: Left, Right, Stereo, Mono

RS-1933 User Manual 5
Basic Operations
11. Information
In full screen, pressing the [Info] key will open the
information window. The window displays
parameters of current channel.
12. EPG
The EPG (Electronic Program guide) helps you
navigate channels through all the possible viewing
options. It supplies information such as channel
listings and starting and ending times for all available
channels. Press the [EPG] key to display [EPG]
screen.
Pressing the [OK] button in each item will display
more detailed information. Press the red button to
cancel.
12. EPG Cont.
Pressing the [Red] button in the EPG menu will
display the “Time Bar Menu”. You can press
[Left/Right] to select back/current time/last program
or -0:30/next program or +0:30/2:00/+2:00/last
day/next day. Press [Up/Down] to change channel.
Pressing the [Green] key in EPG menu will open
timer menu. User can set time as desired.
In EPG Menu, press [Exit] to close screen.
Note: EPG will function only when the programmer
of the channel that you are viewing provides and
supports the guide with information. EPG use is very
common outside of North America, but is limited to
just a few channels here, including RUSSIA TODAY on
Ku-band satellite Galaxy 19 at 97 West.

6 RS-1933 User Manual
Basic Operations
13. TV/Radio
In TV mode, pressing the [TV/Radio] button will
switch to radio. In radio mode, pressing the button
again will bring you back to TV mode.
14. Channel List
In full screen, pressing the [OK] button will bring up
the channel list. Press the [Left/Right] keys to change
satellite. Press [Up/Down] keys to highlight and
select channel by pressing the [OK] button.
15. Sleep
This function can set sleep timer. When you set a
sleep timer and the time arrives, the system will
enter standby automatically. You can set the sleep
timer between off and 10/30/60/90/120 minutes.
16. Page Up/ Down
In “Channel List”, the [Page Up] and [Page Down]
keys will skip pages in the list. In full screen, it will
change the satellite directly.
17. Text
Press the [Text] key to open the teletext page on a
channel. If the channel has no teletext information, it
will display no teletext data on the screen.
18. Subtitle
Press the [Subtitle] key in full screen to switch
subtitles on/off.
19. Resolution
Press the [Res] key in full screen to show the current
video output resolution. Press this key again to
switch between video output resolution by the
sequence 576i > 480i > 576p > 480p > 720p_50 >
720p_60 > 1080i_25 > 1080i_30
20. Menu
Pressing the [Menu] key will open the menu, exit the
current menu to last menu, or close the window.
21. Satellite
Press the [Sat] key to select the Satellite
22. Exit
Press the [Exit] key to return to the previous menu
or close window.

RS-1933 User Manual 7
Menu Operations
1. Menu
When you press the [Menu] key, it will enter the
menu screen like shown below.
Use the [Up/Down] keys to switch between the
menu pages “Edit Channel, Installation, System
Setup, Tools, and Game, and Record”. Press [OK] or
[Right] to enter “Edit Channel”. If menu lock is on, it
will display a dialogue for the user to key in
password. The default password is “0000”.
2. Edit Channel
Press the [Up/Down] keys to select menu items
among: “TV Channel, Radio Channel, and Delete All”.
Press [Left] or [Exit] key to go back to main menu.
2.1. TV Channel List
When you enter the “Channel List” menu, it will
display like below.
You can move the highlight using [Up/Down] and
[OK] to preview current program in side preview
window.
2.1. Cont.
You can press [Page Up/Down] to implement the
page up and down function. Use [Left/Right] keys to
switch “Program Group” You can press [Menu] or
[Exit] to go back to “Channel Edit”menu. Color Keys
implement corresponding functions in Channel List.
2.2. Favorite
Pressing the [Favorite] key, then [OK] will open up
the favorite menu like shown below.
You can highlight between 8 favorite groups by
pressing [Up/Down] and [OK] to make a favorite
mark on the left side of selected Favorite group.
Pressing [OK] again on a marked Favorite group will
remove the mark. After marking, press [Exit] to
return to Channel List and a favorite mark will show
beside the channel.
2.3. Lock
Pressing the [Red] key will enter lock mode.

8 RS-1933 User Manual
Menu Operations
2.3. Cont.
Use [Up/Down] to move the highlight, and select
channel with [OK]. A dialogue will display to enter
password. The default password is “0000”. If you
input the correct password a lock will appear beside
the channel. After you save and exit the menu, you
will be requested to input password when watching
a locked channel.
2.4. Skip
Pressing the [Green] key will enter “Skip”mode.
You can move the highlight using [Up/Down] and
[OK] to make a skip mark on the right side of the
channel. After you save and exit the menu, the
channel will be skipped when change channels in full
screen.
2.5. Move
Pressing the [Yellow] key will enter “Move”mode.
Use [Up/Down] to move the highlight and [OK] to
select a channel and make a moving mark.
2.5. Cont.
This will allow you to move selected channel to
desired position. Press [OK] key to confirm your
decision.
2.6. Edit
Pressing the [Blue] key will open “Edit”menu.
Pressing [Exit] will exit the “Edit Channel”menu.
Sort:
Pressing the [Red] key will open the sort window
like above. There are 4 different ways to sort;
Name(A-Z): Alphabetical order, Name(Z-A): Reverse
alphabetical order, Free/Scramble: Free channels will
appear in the front or sequence and scrambled at
the rear, and Lock: Accumulated locked channels in
the last of TV Channel List.
Edit:
In the “Edit Channel”menu, press the [Green] key,
then use [Up/Down] to move highlight and press
[OK] to open rename window. It shows like below.

RS-1933 User Manual 9
Menu Operations
2.6. Cont.
Pressing the [Red] key will switch capitals on. The
[Green] key can delete the character on the cursor.
The [Yellow] key will save the operation, and the
[Blue] key will cancel the operation.
Delete:
Press the [Blue] key, move the highlight with the
[Up/Down] keys, and select with [OK] to make a
delete mark on the side of selected channel. After
you save and exit the “Edit Channel”menu, the
marked channel will be deleted.
3. Radio Channel List
The operation of the “Radio Channel List”is basically
the same as the “TV Channel List”, with one point
different; Radio has no video information, so it will
always display the logo on the upper right preview
window.
4. Delete All
Press the [OK] key, and it will show a warning
message like shown below.
4. Cont.
The warning message will inquire you to delete all
channels or not. If you select “Yes”, all channels will
be deleted. If you select “No”, or press the [Exit] key,
you can exit the function without saving.

10 RS-1933 User Manual
Installation
1. Installation
Use [Up/Down] keys from the menu and select
“Installation”with the [OK] or [Right] key. If menu
lock is on, it will display a dialogue for the user to
enter password. The default password is “0000”.
Use [Up/Down] to select menu items and the left or
exit key to return to the main menu.
2. Antenna Connection
When you enter the Antenna Connection menu, it
will display like the screen below:
Press [Left/Right] to select LNB option between
“Fixed Antenna”and “Motor Antenna.”
3. Satellite List
When you enter the “Satellite List”menu, it will
display like the screen below:
3. Cont.
Press the [Red] key and you will enter the “Edit
Satellite”menu. You can edit the satellite name and
longitude.
Press the [Green] key and you will enter the “Add
Satellite”menu like shown below:
Press the [Yellow] key, and you will be asked “Are
you sure to delete?” Select “Yes”to delete the
satellite and “No”to cancel the operation.

R
R
S‐1933U
s
4.An
t
FixedAnte
Ifyouselect
Connection
”
Satellite:In
t
switchsatel
l
youtoselec
t
LNBFreq:In
selectpara
m
9750/1000
0
11250/113
0
(9750‐1060
0
DiSEqC1.0:
Y
optionsbet
w
22K:Youca
n
andoff.Wh
e
receiveTVa
switchedof
f
0kport.
MotorAnt
e
Ifyouselec
t
Connection
”
s
erManua
l
t
ennaSet
u
nna:
“FixedAnte
n
”
menu,itwil
t
hisitem,pr
e
l
itesand[OK
]
t
directly.
thisitem,pr
m
eter.Optio
n
0
/10050/104
5
0
0/5150‐575
0
0
)
Y
oucanuse[
L
w
eendisable
/
n
usethe[Lef
t
e
nthisitemi
ndradioinp
u
f
,receiverwi
l
e
nna:
t
“MotorAnt
e
”
menu,itwil
l
u
p
n
na”in“Ant
e
ldisplaylike
e
ss[Left/Righ
t
]
willenters
a
essing[Left/
R
n
sare:5150/
5
5
0/10600/10
7
0
/5750‐5150
/
L
eft/Right]k
e
/
LNB1/LNB2
/
t
/Right]keys
s
switchedo
n
u
tfrom22K
p
l
lreceiveinf
o
e
nna”in“An
t
ldisplaylike
nna
b
elow:
t
]keyswill
a
tellitelistfo
r
R
ight]keysw
i
5
750/5950/
7
00/10750/
/
Universal
e
ystoswitch
/
LNB3/LNB4.
toswitchon
n
,receiverwi
p
ort.Ifitemi
s
o
rmationfro
m
t
enna
b
elow:
r
i
ll
ll
s
m
4.
LNBT
y
10450
/
5750/
5
Motor
LocalL
thisop
keyst
o
Delete
positio
Ifyou
s
youwi
l
availa
b
Motor
longit
u
liketh
e
Use[L
e
orres
p
Positio
[Num
b
Goto
X
X”or“
g
Aftery
youca
n
andus
e
savet
h
“Recal
c
Setth
e
move
d
“Moto
r
screen
MotorAnt
e
y
pe:5150/57
5
/
10600/1070
0
5
750‐5150/U
n
Type:DiSEq
C
ongitude/Lo
c
tionisavaila
b
o
input.
All:Thisopti
o
ns.Itwilldis
p
s
elect“Yes”,
i
llcancelthe
o
b
lein“DiSEq
C
Setting:Ifyo
u
de/Latitude
i
e
screenbelo
e
ft/Right]ke
y
p
onder.
nNo.&Save:
b
er]keystos
e
X
:Press[OK]
t
g
otorefere
n
y
ouselect“Sa
n
movetheh
e
[Left/Right
]
h
eposition.
M
c
ulation”an
d
e
satellite’slo
d
ishautomat
rSetting”an
d
likeonthef
o
In
s
e
nnaCont.
5
0/5950/975
0/10750/11
2
n
iversal(975
0
C
1.2/USALS
c
alLatitude:I
b
le.Press[O
K
onwilldelet
e
p
layan“Are
y
i
twilldelete
a
o
peration.T
h
C
1.2”mode.
uselect“DiS
E
i
snotavaila
b
w.
y
sand[OK]k
e
Youcanuse
e
lectinputp
o
t
oopenlist.
Y
n
ce”.
a
tellite”and
“
h
ighlightto
W
]
tomovedis
h
M
ovethehig
h
d
press[OK]t
o
o
callongitud
e
ically.Move
t
d
press[OK]
k
o
llowingpag
e
s
tallat
i
0/10000/10
0
2
50/11300/5
1
0
‐10600)
fyouselect
U
K
]anduse[N
e
allsatellite
y
ousure...”
d
a
llpositions.
h
isitemisonl
EqC1.2”,Loc
b
le.Itwillsho
w
e
ytochange
[Left/Right]
o
o
sitionnumb
e
Y
oucanselec
t
“
PositionNo.
&
W
est/Save/Ea
s
handpress[
O
h
lightto
o
recalculate
e
/latitude.US
t
hehighlight
k
ey,itwillsh
o
e
:
11
i
on
0
50/
1
50‐
U
SALS,
umber]
d
ialogue.
If“No”,
y
c
al
w
up
satellite
o
r
e
r.
t
“goto
&
Save”,
s
tline
O
K]to
.
ALScan
to
o
wthe

12 RS-1933 User Manual
Installation
4. Motor Antenna Cont.
Switching satellite can move the dish to the right
place.
Limit Setup:
When you set “Limit Setup” to “West Limit/East
Limit”, you can move the highlight to “Limit Setup”
Line and move the dish to east or west by pressing
[Left/Right] keys manually. When you are moving
the target place, press [OK] key to save the point.
5. Single Satellite Search
When you enter “Single Search” menu, it will display
like the screen below:
Satellite: In this item, press [Left/Right] keys to select
satellite to scan.
5. Single Satellite Search Cont.
Press the [OK] key otherwise to select directly.
FTA Only: Press [Left/Right] key to scan all channels
or scan free channels. If you select “Yes”, it will scan
free channels only.
Scan Channel: Press [Left/Right] keys to select scan
TV + radio channels, or only TV/radio channels.
Network Search: Press [Left/Right] keys to select
network search or not. You can only do network scan
when you select “Preset Scan”.
Scan Mode: You can select “Auto Scan” to blind scan
or select “Preset Scan” to scan all preset TPs.
Search: Move highlight to “Search” and press [OK] to
start scanning. The next screen will display the
process and the current scanning channel.
In the “Single Search” menu, press [Exit] key to draw
back from scanning and meanwhile saving the
current value.
6. Multi Satellite Search
When you enter the “Multi Search” menu, it will
display like the screen below:
Satellite: In this item, press [OK] key to see the
selected satellite. The system will use DiSEqC1.0/
DiSEqC1.2/USALS function to search satellite and
scan channels. It will scan all the satellites displaying
in the bottom box.
FTA Only: Press [Left/Right] keys to select “scan all
channels”or “scan free channels”. If you select “Yes”,
it will scan free channels only.
Scan Channel: Press [Left/Right] keys to select scan
TV + Radio Channels, or just TV/Radio channels.
Network Search: Press [Left/Right] to select network
search or not.

RS-1933 User Manual 13
Installation
6. Multi Satellite Search Cont.
Scan Mode: You can select “Auto Scan” to blind scan
or select “Preset Scan” to scan all preset TPs.
Search: Move highlight to “Search” on press [OK] to
start scanning.
In “Multi Search” menu, press [Exit] key to draw back
from scanning while saving the current value.
7. TP List
When you enter to “TP List” menu, it will display like
the screen below:
Use the [Left/Right] keys to switch satellite. Press the
[Red] key to open “Edit TP” menu. User can edit TP
info. Frequency:”3000~13450 MHz”, Symbol Rate:
“1000~45000Ks/s”.
Press the [Green] key to open “Add TP” menu. User
can add a new TP.
7. TP List Cont.
Pressing the [Yellow] key will open a dialogue asking
you to confirm whether to delete current TP. Select
“Yes”and you will delete the highlighted channel.
Select “No”to cancel the operation.
Pressing the [Blue] key will display a dialogue box.
You can select “FTA Only, Scan Channel, Network
Search” items, then move highlight to “Yes” button
and press [OK] to begin search.

14 RS-1933 User Manual
System Setup
1. System Setup
When you enter “System Setup”menu, the screen
will display like below:
Use the [Up/Down] keys to select pages among:
“Edit Channel, Installation, System, Tools, and
Record”. Press [OK] or [Right] key to enter “System
Setup”. If menu lock is on, it will display a dialogue
for the user to enter password. The default
password is “0000” Use [Up/Down] keys to select
menu items among: “TV Channel, Radio Channel and
Delete All.”Use [Left] or [Exit] key to go back to main
menu.
2. Language
When you enter the “Language” menu, it will display
like the screen below:
Language: Use [Left/Right] keys to select menu
languages. The selection on languages include:
English, Polish, German, Russian, Arabic, Portuguese,
Turkish, Spanish, Polish, and Italian.
2. Language Cont.
First Audio: Some channels have more than one
audio language for choosing. By this function you can
set the audio for this channel. If the playing channel
has the same audio as the “First Audio” you set,
system will play this audio language by default. If the
channel does not have the suited audio language, the
system will compare automatically with second audio
language.
Second Audio: If the channel has no corresponding
audio with “First Audio”, but has it for “Second
Audio” system will play the second audio language as
default. If no audio language corresponds with the
“Second Audio”, then the default language of the
current channel will be played automatically.
Teletext: You can set teletext language. If the
streams have this language you will see the teletext
in the language you set.
Pressing the [Exit] key will draw back from
“Language” menu.
3. TV System
When you enter the “TV System” menu, you will see
the screen like below:
Video Resolution: This option is for switching the
outputting video resolution. Highlight and use the
Left/Right keys to switch video resolution By Source/
By Native/576i/ 576P/720P_50/720P_60/1080i_25/
1080i_30. This effect is equal to pressing the [Res]
key in full screen. By source means system will set
the resolution according to the program it is playing.
By Native means the system will be set according to
the TV’s maximum supported resolution.

RS-1933 User Manual 15
System Setup
3. TV System Cont.
Aspect Mode: This option is for switching the screen
aspect ratio mode. The following options are provided:
4:3 PS/4:3 LB/16:9/Auto. You can press the [Left/Right]
keys to select each mode. “16:9”will provide a pillar
box mode, which means the user uses a 16:9 display
but sees a full 4:3 picture. The system will force press
wide screen picture to be narrow with black bands on
the left and right side. “Auto”will not do any system
aspect translation. 4:3 and 16:9 aspects work best on
the appropriate displays.
Video Out: This is for setting the HDMI video output
mode. It has the following options: RGB- Normal, RGB-
Expand, YCbCr4:4:4 and YCbYr4:2:2. You can press
[Left/Right] keys to select each mode circularly.
Digital Audio Out: This is for setting both the SPDIF and
HDMI’s digital output mode. It has the options LPCM
and BS Out, and Auto. You can use the [Left/Right] keys
to select each mode. “LPCM Out”means system will
decode no matter AC3 or PCM audio track data to be
LPCM, digital audio decoder or HDMI TV will get LPCM
digital audio data. “BS Out”means system won’t do
AC3 decode just output AC3 RAW data to SPDIF and
HDMI. “Auto”means system will detect which the
connected HDMI TV can decode and then output that
data. If HDMI TV can decode SC3, system will just
output RAW data, if HDMI TV can decode LPCM only,
the system will just decode AC3 or LPCM to be LPCM
and then output. Press [Exit] to draw back from TV
System Menu.
4. Local Time Setting
4. Local Time Setting Cont.
SETTING THE CLOCK TO LOCAL TIME:
Using the Remote, press [Menu] once, then use [Down]
until you get to “System Setup”. Press the [Right] key to
highlight, and the [Down] key to reach “Local Time
Setting]. Press [OK]. Use the [Down] key to highlight “GMT
Usage”. Move left or right until ‘GMT Usage” is “User
Define”. Move down to “GMT Offset’ and press [Left] to
reach your Time Zone. (Eastern is UTC-5:00, Central is
UTC-6:00, Mountain is UTC-7:00, Pacific is UTC-8:00)
If you are observing “Summer Time”, move down so that it
is switched to ON. Press [Exit] until you get out of all
menus. Turn power OFF to test clock setting.
Region: Use the [Left/Right] keys to set your region.
GMT Usage: This item is used for opening the usage of
GMT. You can press the [Left/Right] keys to switch on
and off.
GMT Offset: This item is only valid when the setting of
“GMT Usage” is on. You can press [Left/Right] keys to
switch “GMT Offset” value, with the range -12:00 ~ +
12:00 increase each half hour progressively.
Summer Time: This item only valid when the setting of
“GMT Usage” on. When “Summer Time: is on, it will
add one hour to the time.
Date/Time: These items are valid only when the setting
of GMT Usage is off. You can press the [Left/Right] keys
moving the highlight and use the number keys to input
directly. If the current channel provides the correct
time information, you will see the current time when
you enter the “Time” menu. If the channel does not
provide time information, you have to input it
manually.
Use the [Exit] key to draw back from time menu.
5. Timer Setting
Select “Timer Setting item and press [OK] key to enter
“Timer List” menu.

16 RS-1933 User Manual
System Setup
5. Timer Setting Cont.
You can press [Up/Down] keys to select a timer, then
the [Enter] key to open timer menu.
Current time information will display on the first
column. If the current time is incorrect, please
modify the time information in the “Time” item.
Timer Mode: The modes to set the timer include
“Off, Once, and Daily.”
Wakeup Channel: Press [OK] key to enter channel list
and select channel that you want to set.
Wakeup Date: Use the [Number] keys to input your
wakeup date.
On Time: Use [Number] keys to input your wakeup
time. Once the time is up, no matter what state the
system is in, it will automatically switch to the
channel you want and start to play.
Duration: After you set a time for “Duration” item,
once the time is up, the system will automatically
switch to standby mode. If you do not want to work
this function, set the duration to 00:00.
Move the highlight to “Save” button and press [OK]
key to save timer. Select “Cancel” or press [Exit] key
to cancel the operation.
6. Parental Lock
In the “Parental Lock” line, press the [OK] key and a
dialogue will ask you to input the password. Default
password is “0000”. When you input the correct
password, you will see a screen like shown:
6. Parental Lock Cont.
Menu Lock: This is for determining that when users
wish to enter “Edit Channel/Installation/Tools”
menu, whether you have to enter a password or not.
If the setting of “Menu Lock” is set “Yes”, the user
will have to key in the password. If set “No”, it will
unlock.
Channel Lock: Determines whether the user wishes
to play the locked channels by inputting password or
not. If the setting is set to “Yes”, channels with the
lock mark will display a dialogue on the screen and
ask for password. If this setting is set to “No”, the
lock function will be disabled.
New Password: This is used for revising password.
You can input the new password in this item by using
the [Number] keys. After you fill the 4 digital
numbers, the highlight will auto skip to “Confirm
Password” and ask you to input the password again.
If the password is correct, the screen will display a
message of “Saving Data, Please Wait…” After you
finish saving and draw back to “System Setup” menu,
the revising is complete.
Use the [Exit] key to draw back “Parental Lock”
menu.
7. OSD Setting
When you enter “OSD Setting” menu, you will see a
screen like on the following page.
Table of contents
Other Manhattan Set-top Box manuals

Manhattan
Manhattan DJ-1997 User manual

Manhattan
Manhattan SX User manual

Manhattan
Manhattan Manhattan T3 Operating manual

Manhattan
Manhattan Plaza HDT-700 User manual

Manhattan
Manhattan RC-1978 User manual

Manhattan
Manhattan Plaza HDT-700 User manual

Manhattan
Manhattan T1 Freeview Specification sheet

Manhattan
Manhattan T1 Freeview Installation guide