Mapal KS How to use

Kurzanleitung / Short manual
KS Spannpatrone / KS clamping cartridge
MAPAL Dr. Kress KG
Postfach / P.O.Box 1520
D-73405 Aalen
Tel. / Phone +49 (0) 7361 585-0
Fax +49 (0) 7361 585-150
www.mapal.com

2
Kurzanleitung / Short manual
MAPAL KS Spannpatrone / KS clamping cartridge
Inhaltsverzeichnis / Table of contents
Deutsch ..........................................................................................................................................3
1Ziel der Bedienungsanleitung ...........................................................................................3
2Sicherheit............................................................................................................................3
2.1 Bestimmungsgemäße Verwendung.......................................................................................3
2.2 Zielgruppe.............................................................................................................................3
2.3 Allgemeine Warn- und Sicherheitshinweise...........................................................................3
3Einbau der KS-Spannpatrone in eine Maschinenspindel oder Adapter.........................3
3.1 Benötigte Werkzeuge, Hilfs- und Betriebsstoffe ....................................................................3
3.2 Darstellung verschiedener Ausführungen der KS-Spannpatronen.........................................4
3.2.1 Benennung der einzelnen Komponenten der KS-Montagezange...................................................... 5
3.3 Einbau in Maschinenspindel, Spannfutter oder Adapter........................................................6
4Spannen des Werkzeuges.................................................................................................7
English ...........................................................................................................................................9
1Objective of the operating instructions............................................................................9
2Safety..................................................................................................................................9
2.1 Correct use ...........................................................................................................................9
2.2 Target group .........................................................................................................................9
2.3 General warnings and safety instructions..............................................................................9
3Mounting the KS clamping cartridge into a machine spindle or an adapter..................9
3.1 Tools and materials required.................................................................................................9
3.2 Illustration of various KS clamping cartridge designs...........................................................10
3.2.1 Designation of the individual components of the KS assembly pliers.............................................. 11
3.3 Mounting into the machine spindle, chuck or adapter..........................................................12
4Clamping the tool.............................................................................................................13

Kurzanleitung / Short manual
MAPAL KS Spannpatrone / KS clamping cartridge
3
Deutsch
1 Ziel der Bedienungsanleitung
Die vorliegende Anleitung beschreibt den direkten Einbau der KS-Spannpatrone in den Ausführung Standard, MMS und
Hochdruck, nachfolgend nur KS-Spannpatrone genannt, in eine Maschinenspindel oder Adapter und das Spannen eines
Werkzeuges mit der KS-Spannpatrone.
Nachfolgend erhalten Sie im Kapitel 3 eine detaillierte Beschreibung der einzelnen Handlungsschritte, die zum erfolgreichen
Einbau der KS-Spannpatrone notwendig sind. Zusätzlich finden Sie in Kapitel 4 Informationen darüber, wie Sie Werkzeuge
richtig spannen.
2 Sicherheit
2.1 Bestimmungsgemäße Verwendung
Die MAPAL KS-Spannpatrone dient ausschließlich zum Spannen von Werkzeugen mit einer HSK-Schnittstelle auf Maschinen.
Die KS-Spannpatrone wurde speziell zum Spannen von Werkzeugen mit einer HSK-Schnittstelle konzipiert.
2.2 Zielgruppe
Der Einbau und die Bedienung dürfen nur durch ausgebildetes, autorisiertes und zuverlässiges Fachpersonal erfolgen. Das
Fachpersonal muss Gefahren erkennen und vermeiden können.
Die Unfallverhütungsvorschriften, Sicherheitsbestimmungen und -vorschriften des Maschinenherstellers sind dem Fachperso-
nal bekannt und vom Fachpersonal bei der Montage der KS-Spannpatrone zu beachten und einzuhalten.
2.3 Allgemeine Warn- und Sicherheitshinweise
Warnung
Schutzvorrichtungen der Maschine können außer Betrieb oder nicht funktionsfähig sein.
Bei Arbeiten an und in der Maschine können Sie schwer verletzt werden.
Achten Sie bei Arbeiten an der Maschine darauf, dass alle Schutzeinrichtungen der Maschine
einwandfrei funktionieren und in Betrieb sind.
3 Einbau der KS-Spannpatrone in eine Maschinenspindel oder Adapter
3.1 Benötigte Werkzeuge, Hilfs- und Betriebsstoffe
Nachfolgende Werkzeuge, Hilfs- und Betriebsstoffe werden zum Einbau der KS-Spannpatrone benötigt:
KS-Montagezangen für Standard- und Hochdruckausführung
Nenngröße KS-Spannpatrone
Bestellnummer KS-Montagezange
HSK 32
30326009
HSK 40
30326010
HSK 50
30326011
HSK 63
30326012
HSK 80
30326013
HSK 100
30326014
KS-Montagezangen für Standard- und Hochdruckausführung
Tabelle 1:
KS-Montagezangen für MMS-Ausführung
Nenngröße KS-Spannpatrone
Bestellnummer KS-Montagezange
HSK 40
30326015
HSK 50
30326016
HSK 63
30326017
HSK 80
30326018
HSK 100
30326019
KS-Montagezangen für MMS-Ausführung
Tabelle 2:
4
Kurzanleitung / Short manual
MAPAL KS Spannpatrone / KS clamping cartridge
Kegelwischer für HSK-Aufnahmen
Nenngröße KS-Spannpatrone
Bestellnummer Kegelwischer
HSK 32
30325980
HSK 40
30325981
HSK 50
30325982
HSK 63
30325983
HSK 80
30325984
HSK 100
30325985
Bestellnummern Kegelwischer
Tabelle 3:
Innensechskant-Schlüssel bzw. -Bit für Drehmomentschlüssel zum Spannen des Werkzeugs
Nenngröße KS-Spannpatrone
Größe Innensechskant-Schlüssel [mm]
HSK 32
3
HSK 40
3
HSK 50
4
HSK 63
5
HSK 80
6
HSK 100
8
Größen für Innensechskant-Schlüssel bzw. Innensechskant-Bit –Werkzeug spannen
Tabelle 4:
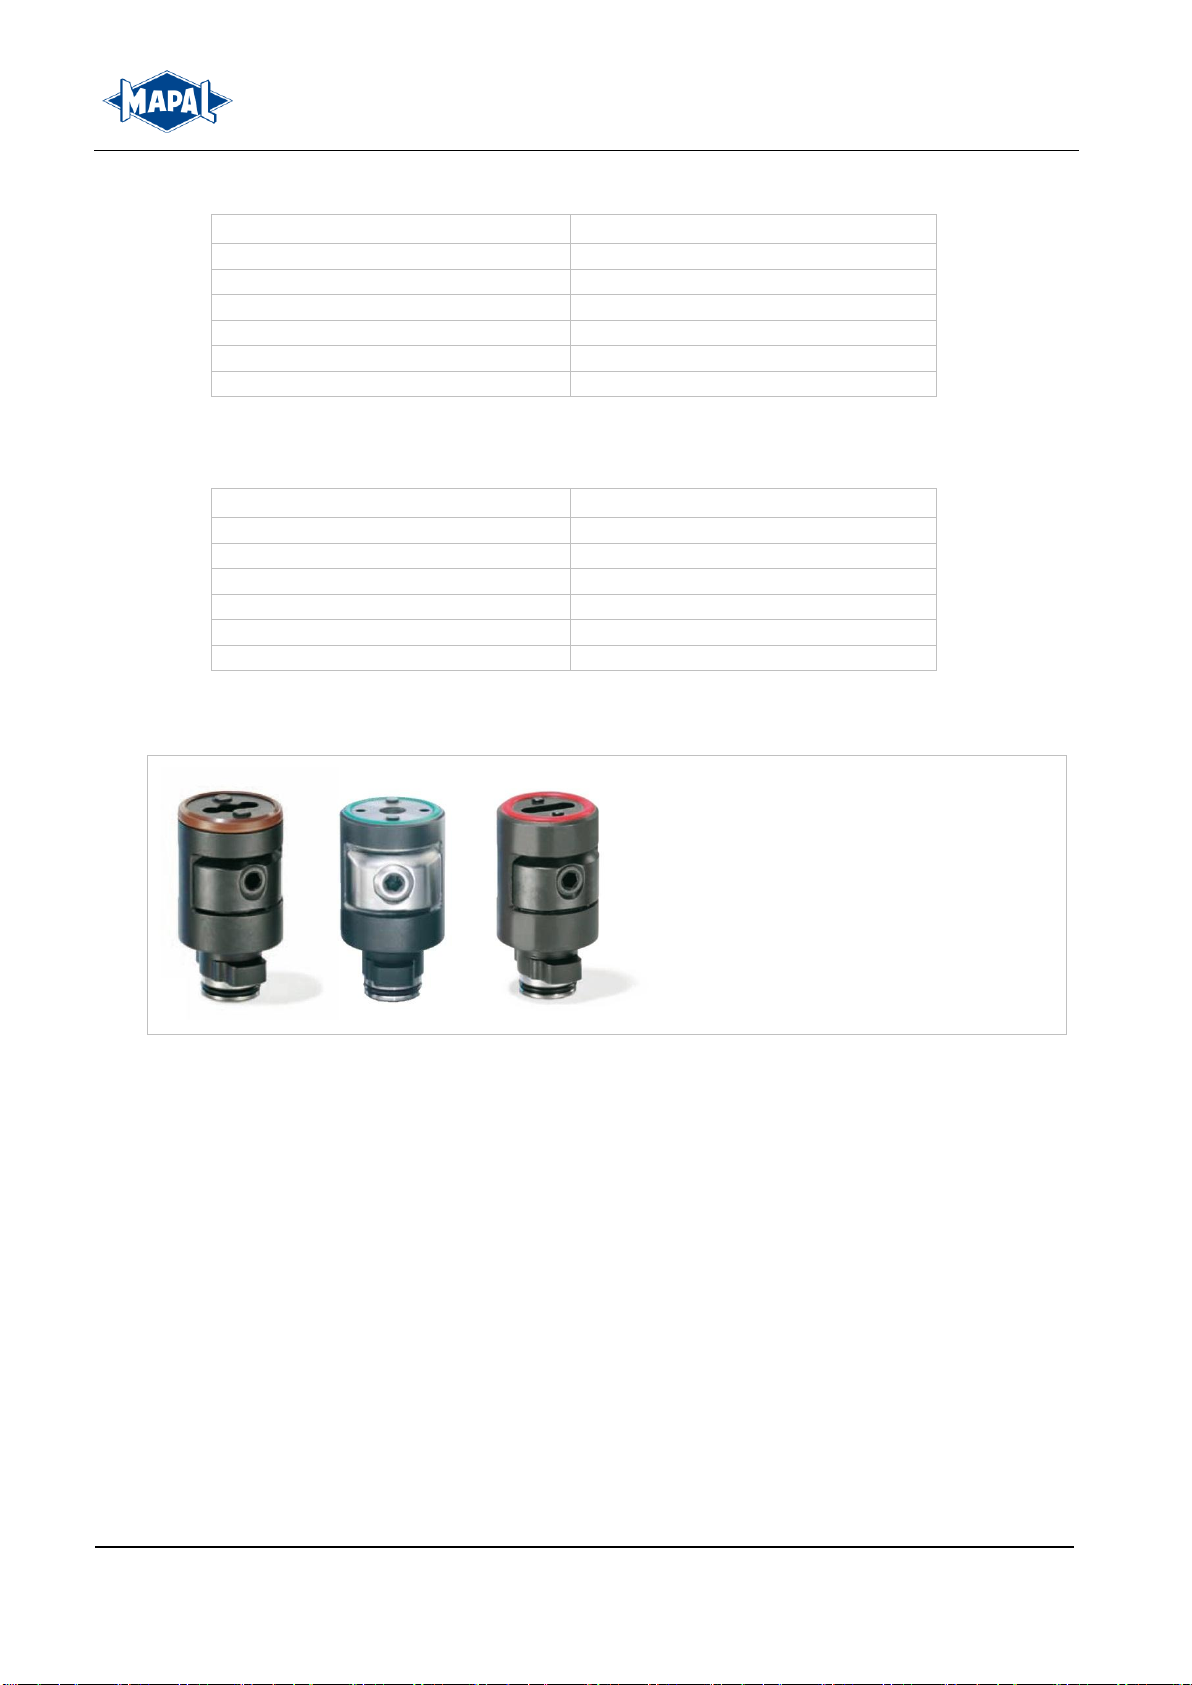
3.2 Darstellung verschiedener Ausführungen der KS-Spannpatronen
Abbildung 1: Übersichtsdarstellung KS-Spannpatronen in Ausführung Standard, MMS und Hochdruck (v.l.n.r.)
Kurzanleitung / Short manual
MAPAL KS Spannpatrone / KS clamping cartridge
5
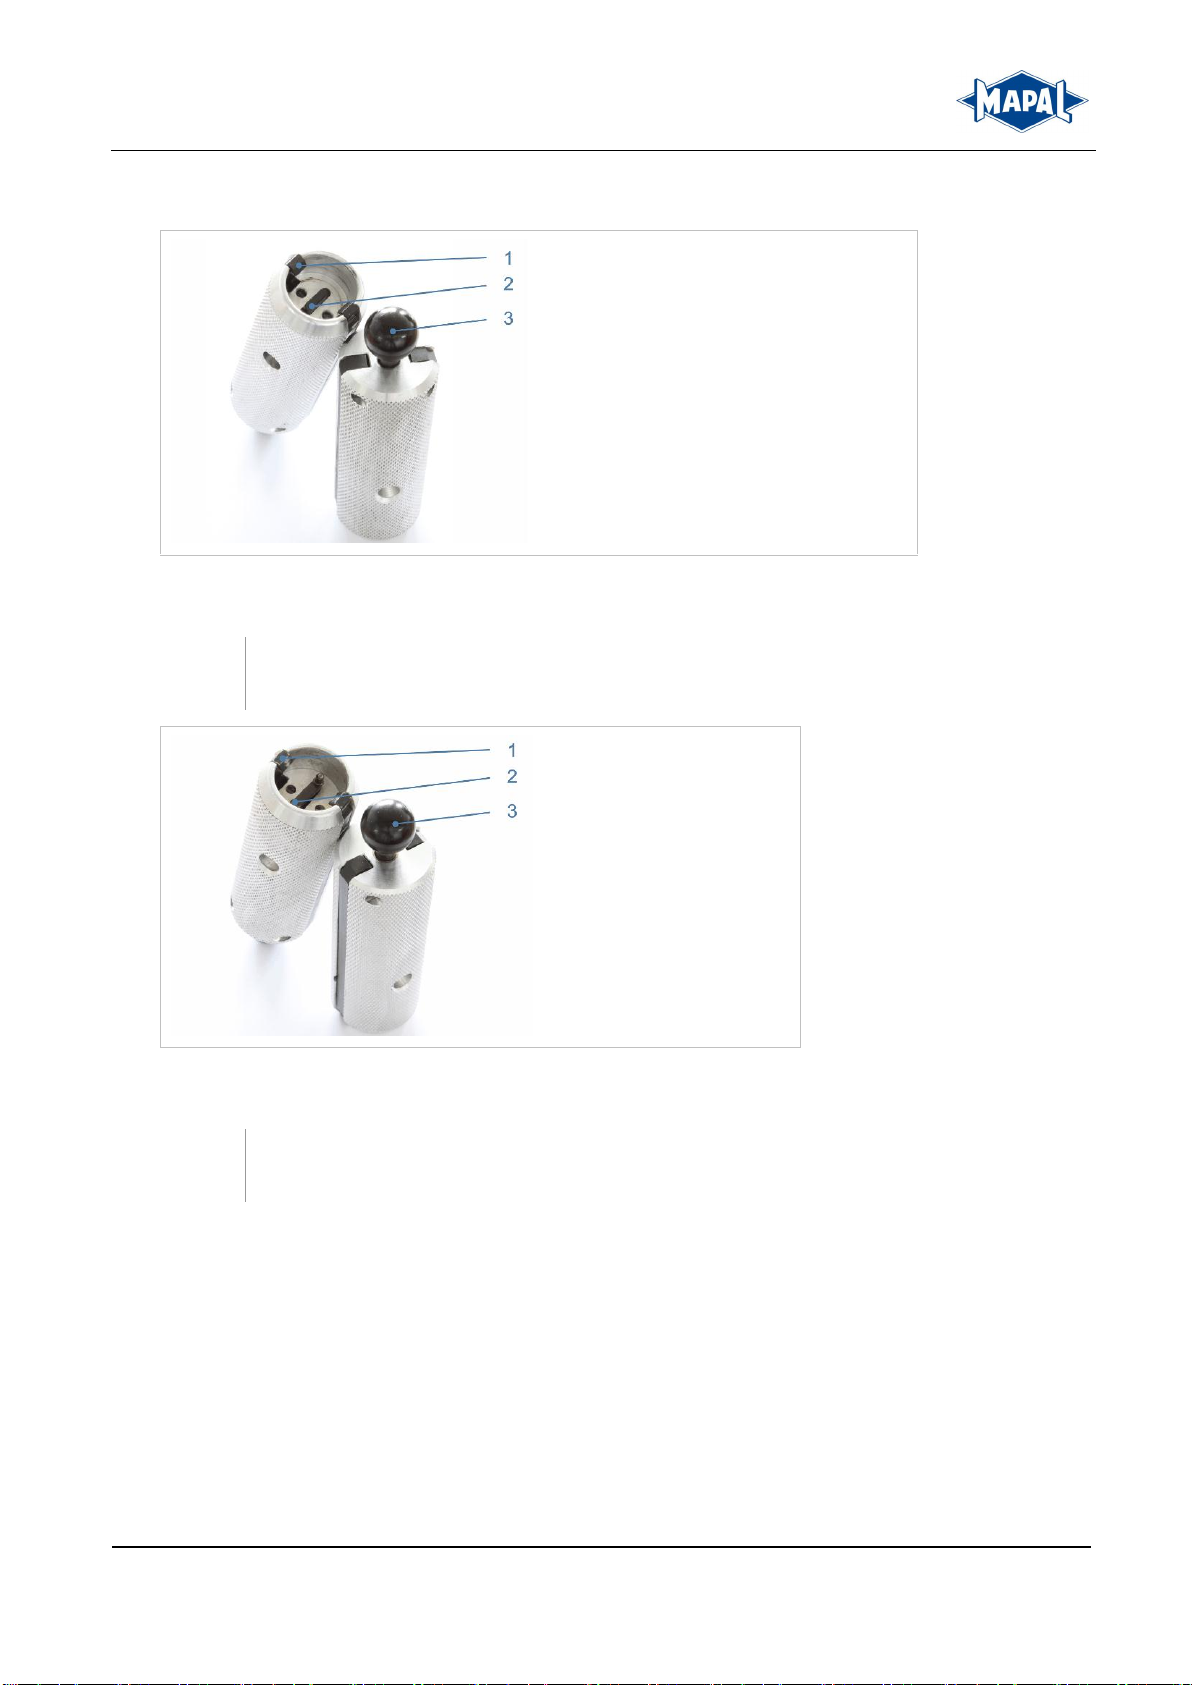
3.2.1 Benennung der einzelnen Komponenten der KS-Montagezange
Abbildung 2: Einzelne Komponenten der KS- Montagezange für Standard- und Hochdruckausführung
Legende
1
Greifbacken
2
Schwert
3
Kugelkopf
Abbildung 3: Einzelne Komponenten der KS- Montagezange für MMS-Ausführung
Legende
1
Greifbacken
2
Pins
3
Kugelkopf

6
Kurzanleitung / Short manual
MAPAL KS Spannpatrone / KS clamping cartridge
3.3 Einbau in Maschinenspindel, Spannfutter oder Adapter
1. Öffnen Sie die Greifbacken der KS-Montagezange indem
Sie den Kugelkopf nach unten drücken.
2. Halten Sie den Kugelkopf gedrückt.
HINWEIS
Verwenden Sie für die KS-Spannpatrone in der
Standard- und Hochdruckausführung ausschließlich
die KS-Montagezange für Standard- und Hoch-
druckausführung mit dem Schwert.
HINWEIS
Verwenden Sie für die KS-Spannpatrone in der
MMS-Ausführung ausschließlich die KS-
Montagezange für die MMS-Ausführung mit den
zwei Pins
Abbildung 4: Öffnen der KS-Montagezange
3. Setzen Sie die KS-Spannpatrone in die KS-Montagezange
ein.
4. Lassen Sie den Kugelkopf los.
HINWEIS
Achten Sie darauf, dass die Greifbacken der KS-
Montagezange geöffnet sind und dass das Schwert
der KS-Spannpatrone bei Standard- und Hochdruck-
ausführung in die Scheide passt.
HINWEIS
Achten Sie darauf, dass die Greifbacken der KS-
Montagezange geöffnet sind und dass die Pins der
KS-Montagezange bei MMS-Ausführung in die
Öffnungen der KS-Spannpatrone passen.
Abbildung 5: Einsetzen der KS-Spannpatrone in die KS-
Montagezange
ERGEBNIS
Die KS-Spannpatrone ist mit der KS-Montagezange
verbunden.
Warnung
Schutzvorrichtungen der Maschine können außer Betrieb oder nicht funktionsfähig sein.
Bei Arbeiten an und in der Maschine können Sie schwer verletzt werden.
Achten Sie bei Arbeiten an der Maschine darauf, dass alle Schutzeinrichtungen der Maschine
einwandfrei funktionieren und in Betrieb sind.
5. Setzen Sie die KS-Spannpatrone lagerichtig in die Ma-
schinenspindel bzw. in den Adapter ein.
HINWEIS
Achten Sie darauf, dass die entsprechenden Kontu-
ren der Spannpatrone und der Maschinenspindel
bzw. des Adapters zueinander passen. Die KS-
Spannpatrone lässt sich nur in einer Position in die
Maschinenspindel bzw. in den Adapter einsetzen.
Abbildung 6: Einsetzen der KS-Spannpatrone
Kurzanleitung / Short manual
MAPAL KS Spannpatrone / KS clamping cartridge
7
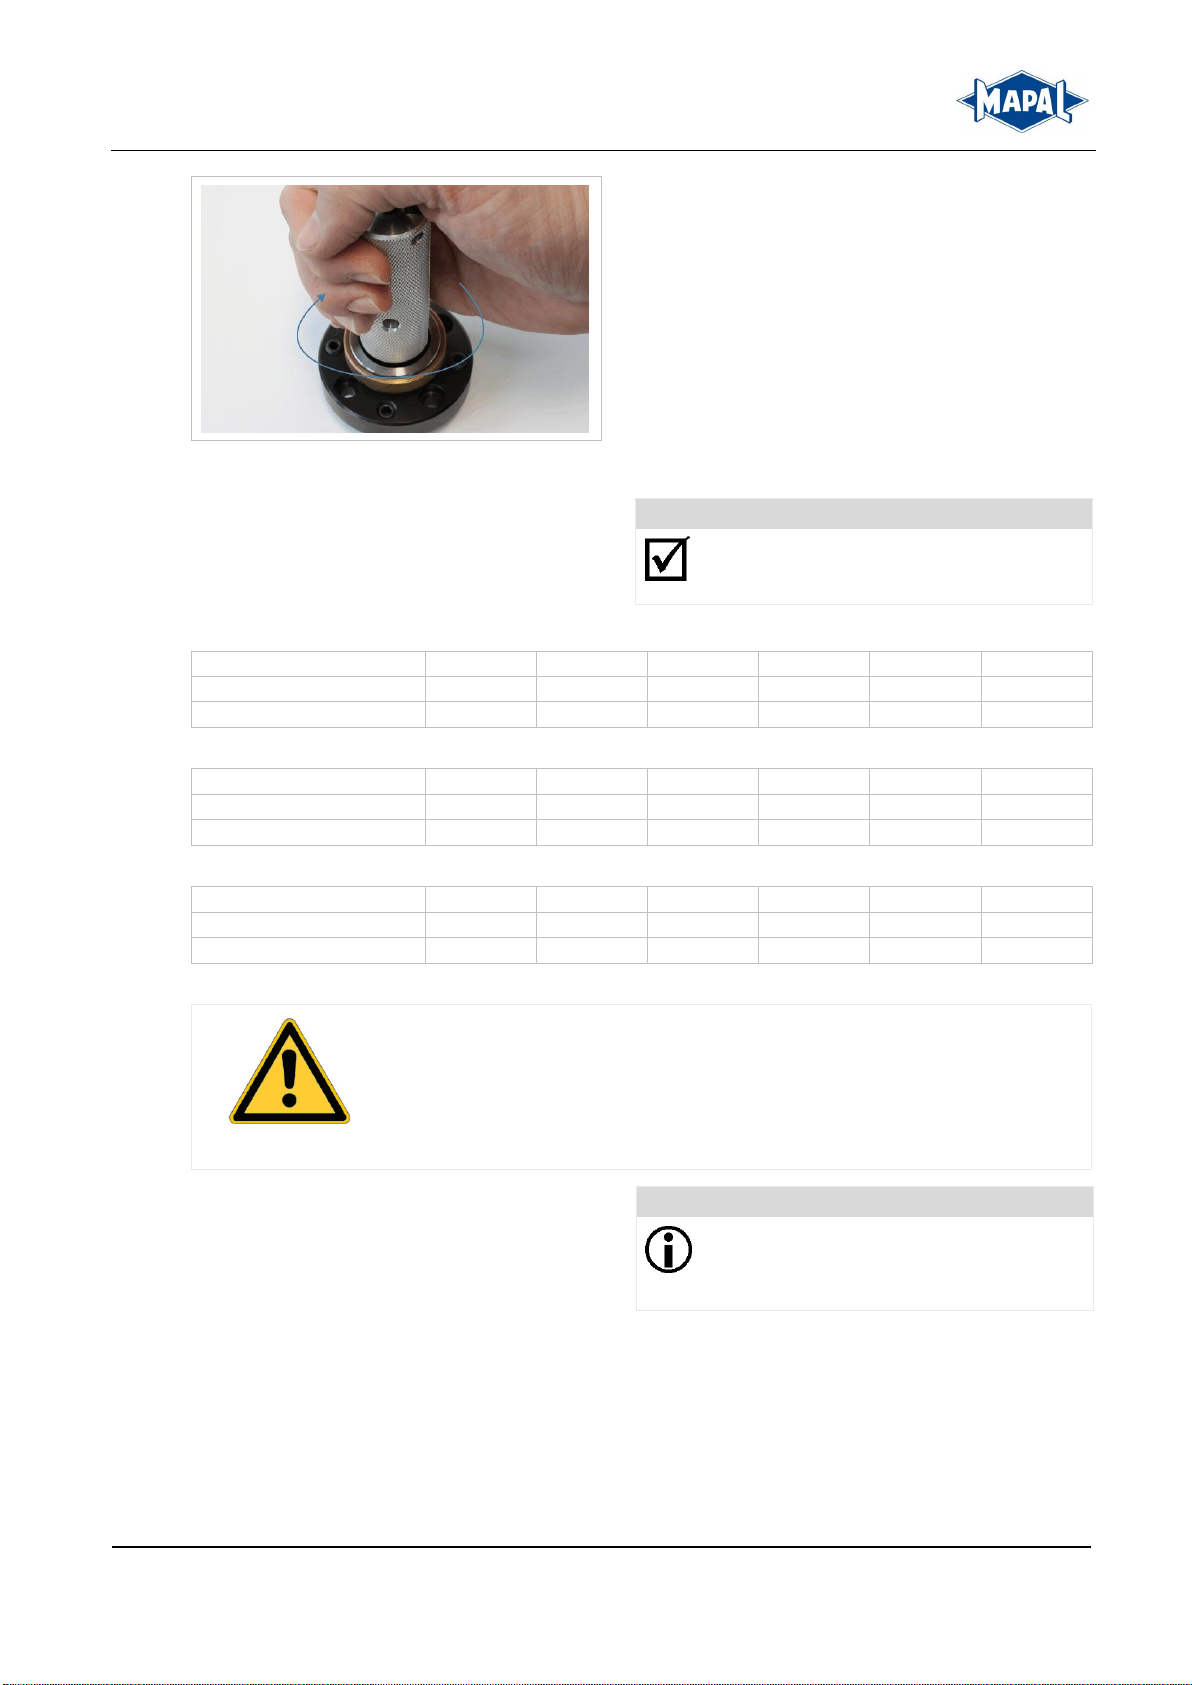
6. Drehen Sie die KS-Montagezange im Uhrzeigersinn bis
die Nase der KS-Spannpatrone spür- und hörbar einrastet.
7. Drücken Sie den Kugelkopf der KS-Montagezange nach
unten um die KS-Montagezange wieder abzuziehen.
Abbildung 7: KS-Spannpatrone arretieren
ERGEBNIS
Die KS-Spannpatrone ist in die Maschinenspindel
bzw. in den Adapter eingebaut, voll funktionsfähig
und einsatzbereit.
4 Spannen des Werkzeuges
Nenngröße
HSK 32
HSK 40
HSK 50
HSK 63
HSK 80
HSK 100
Anzugsdrehmoment [Nm]
6
7
15
20
30
50
Spannkraft [kN]
11
14
21
30
40
50
Anzugsdrehmoment und Spannkraft für die einzelnen Nenngrößen der KS-Spannpatrone Standardausführung
Tabelle 5:
Nenngröße
HSK 32
HSK 40
HSK 50
HSK 63
HSK 80
HSK 100
Anzugsdrehmoment [Nm]
6
7
15
20
30
50
Spannkraft [kN]
11
14
21
30
40
50
Anzugsdrehmoment und Spannkraft für die einzelnen Nenngrößen der KS-Spannpatrone Hochdruckausführung
Tabelle 6:
Nenngröße
HSK 32
HSK 40
HSK 50
HSK 63
HSK 80
HSK 100
Anzugsdrehmoment [Nm]
n.v.
6
15
20
30
50
Spannkraft [kN]
n.v.
11
21
30
40
50
Anzugsdrehmoment und Spannkraft für die einzelnen Nenngrößen der KS-Spannpatrone MMS-Ausführung
Tabelle 7:
Warnung
Werkzeug kann sich lösen.
Wenn sich Werkzeuge beim Bearbeiten von Werkstücken lösen, können Sie schwer verletzt
werden.
Wenn Sie Werkzeuge mit der KS-Spannpatrone spannen, müssen Sie die in Tabelle 5:,
Tabelle 6: bzw. Tabelle 7: angegebenen Werte beachten.
1. Setzen Sie den Innensechskant-Bit (Bitgröße siehe
„Tabelle 4: Größen für Innensechskant-Schlüssel bzw. In-
nensechskant-Bit –Seite 3) auf den Drehmomentschlüs-
sel.
2. Stellen Sie den Drehmomentschlüssel auf den entspre-
chenden Anzugsdrehmoment laut obiger Tabelle 5:, Ta-
belle 6: oder Tabelle 7: ein.
HINWEIS
Wenn Sie Werkzeuge auf der Maschine mit Hilfe der
KS-Spannpatrone spannen, müssen Sie mit der
Handhabung eines Drehmomentschlüssels vertraut
sein.
8
Kurzanleitung / Short manual
MAPAL KS Spannpatrone / KS clamping cartridge
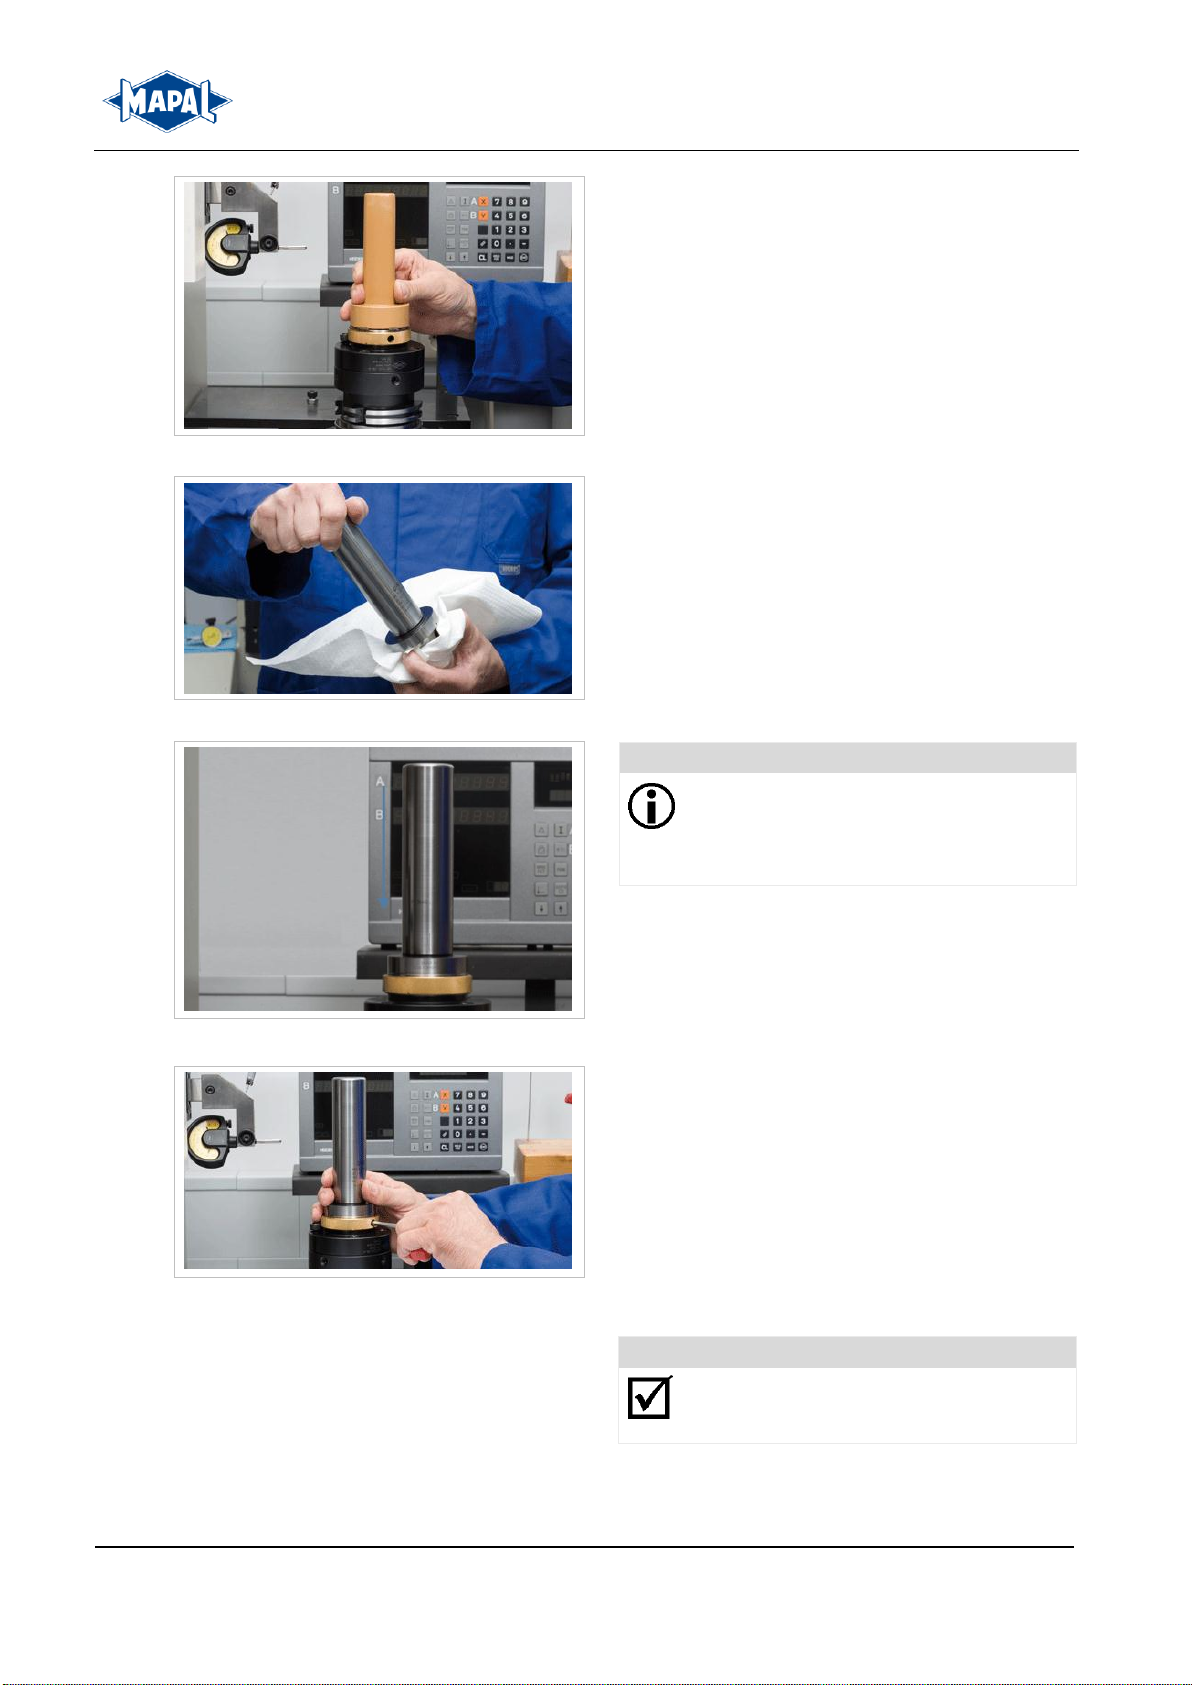
3. Reinigen Sie die HSK-Schnittstelle der Maschinenspindel
mit einem Kegelwischer (Bestellnummer siehe Tabelle 3:,
Seite 3).
Abbildung 8: HSK-Schnittstelle reinigen
4. Reinigen Sie den Werkzeugschaft mit einem sauberen
Tuch.
Abbildung 9: Werkzeugschaft reinigen
5. Setzen Sie das Werkzeug, mit der passenden Schnittstelle
in die Maschinenspindel bzw. in den Adapter.
HINWEIS
Achten Sie beim Aufsetzen des Werkzeuges darauf,
dass die Plananlagen der Maschinenspindel bzw.
des Adapters und der HSK-Schnittstelle des Werk-
zeuges eben anliegen und die Mitnehmernuten des
Werkzeuges im Eingriff sind.
Abbildung 10: Werkzeug einsetzen
6. Ziehen Sie die Gewindespindel/Spannschraube mit dem
Drehmomentschlüssel mit dem in „Tabelle 5: Anzugs-
drehmoment und Spannkraft für die einzelnen Nenngrö-
ßen der KS-Spannpatrone“ angegebenen Anzugsdreh-
moment im Uhrzeigersinn an.
Abbildung 11: Werkzeug spannen
ERGEBNIS
Das Werkzeug ist mit dem richtigen Anzugsdreh-
moment auf der Maschinenspindel bzw. dem Adap-
ter gespannt.

English
1 Objective of the operating instructions
These operating instructions describe the direct mounting of the KS clamping cartridge in the standard, MQL and high pres-
sure designs, referred to solely as KS clamping cartridges in the following, into a machine spindle or adapter and describe
clamping a tool with the KS clamping cartridge.
In section 3 in the following you will find a detailed description of the individual actions necessary to successfully mount the KS
clamping cartridge. In addition, in section 4 you can find information about how to correctly clamp the tool.
2 Safety
2.1 Correct use
The MAPAL KS clamping cartridge is used solely for clamping tools with an HSK interface to machines.
The MAPAL KS clamping cartridge was designed specifically to clamp tools with an HSK interface.
2.2 Target group
Mounting and operation are only allowed to be undertaken by trained, authorised and dependable specialist personnel. The
specialist personnel must be able to recognise and avoid hazards.
The health and safety regulations, safety stipulations and instructions from the machine manufacturer are familiar to the spe-
cialist personnel and are to be followed and observed during the fitting of the KS clamping cartridge
2.3 General warnings and safety instructions
Warning
Safety devices may be disabled or not functional.
During work on and in the machine you could be seriously injured.
During work on the machine ensure all safety devices are working correctly and in operation.
3 Mounting the KS clamping cartridge into a machine spindle or an adapter
3.1 Tools and materials required
The following tools and materials are required to mount the KS clamping cartridge:
KS assembly pliers for standard and high-pressure design
Nominal size KS clamping cartridge
Order number KS assembly pliers
HSK 32
30326009
HSK 40
30326010
HSK 50
30326011
HSK 63
30326012
HSK 80
30326013
HSK 100
30326014
KS assembly pliers for standard and high-pressure design
Table 1:
KS assembly pliers for MQL design
Nominal size KS clamping cartridge
Order number KS assembly pliers
HSK 40
30326015
HSK 50
30326016
HSK 63
30326017
HSK 80
30326018
HSK 100
30326019
KS assembly pliers for MQL design
Table 2:

10
Kurzanleitung / Short manual
MAPAL KS Spannpatrone / KS clamping cartridge
Taper wiper for HSK mountings
Nominal size KS clamping cartridge
Order number taper wiper
HSK 32
30325980
HSK 40
30325981
HSK 50
30325982
HSK 63
30325983
HSK 80
30325984
HSK 100
30325985
Order numbers taper wiper
Table 3:
Hex-wrench key or bit for torque wrench to tension the tool
Nominal size KS clamping cartridge
Size of hex-wrench [mm]
HSK 32
3
HSK 40
3
HSK 50
4
HSK 63
5
HSK 80
6
HSK 100
8
Sizes for hex-wrench key or hex-wrench bit –tool-clamping
Table 4:
3.2 Illustration of various KS clamping cartridge designs
Figure 1: General view of KS clamping cartridges in the standard, MQL designs and high-pressure (f.l.t.r.)

Kurzanleitung / Short manual
MAPAL KS Spannpatrone / KS clamping cartridge
11
3.2.1 Designation of the individual components of the KS assembly pliers
Figure 2: Individual components of the KS assembly pliers for standard and high-pressure design
Key
1
Gripper jaws
2
Flute
3
Ball head
Figure 3: Individual components of the KS assembly pliers for MQL design
Key
1
Gripper jaws
2
Pins
3
Ball head

12
Kurzanleitung / Short manual
MAPAL KS Spannpatrone / KS clamping cartridge
3.3 Mounting into the machine spindle, chuck or adapter
7. Open the KS assembly pliers gripper jaws by pushing
down the ball head.
8. Keep the ball head pressed down.
NOTE
For the KS clamping cartridge in standard and high-
pressure design, use solely the KS assembly pliers
for standard and high-pressure design with the flute.
NOTE
For the KS clamping cartridge in MQL design, use
solely the KS assembly pliers for MQL design with
two pins.
Figure 4: Open the KS assembly pliers
9. Insert the KS clamping cartridge into the KS assembly
pliers.
10. Release the ball head.
NOTE
Make sure the KS assembly pliers gripper jaws are
open and that the flute of the KS clamping cartridge
fits into the sheath in the standard and high pressure
designs.
NOTE
Make sure the KS assembly pliers jaws are open
and that the pins of the KS assembly pliers fit into
the opening of the KS clamping cartridge in the MQL
design.
Figure 5: Inserting the KS clamping cartridge into the KS
assembly pliers.
RESULT
The KS clamping cartridge connected to the KS
assembly pliers.
Warning
Safety devices may be disabled or not functional.
During work on and in the machine you could be seriously injured.
During work on the machine ensure all safety devices are working correctly and in operation.
11. Insert the KS clamping cartridge into the machine spindle
or the adapter in the correct position.
NOTE
Make sure that the corresponding contours of the
clamping cartridge and the machine spindle or the
adapter match each other. The KS clamping car-
tridge can only be inserted into the machine spindle
or into the adapter in one position.
Figure 6: Inserting the KS clamping cartridge

Kurzanleitung / Short manual
MAPAL KS Spannpatrone / KS clamping cartridge
13
12. Rotate the KS assembly pliers counter-clockwise until the
lug of the KS clamping cartridge audibly and noticeably
snaps in.
13. Press the ball head of the KS assembly pliers down to pull
the KS assembly pliers back off.
Figure 7: Arresting the KS clamping cartridge
RESULT
The KS clamping cartridge is built-into the machine
spindle or into the adapter, is fully functional and
operational.
4 Clamping the tool
Nominal size
HSK 32
HSK 40
HSK 50
HSK 63
HSK 80
HSK 100
Tightening torque [Nm]
6
7
15
20
30
50
Clamping force [kN]
11
14
21
30
40
50
Tightening torque and clamping force for the individual nominal sizes of the KS clamping cartridge, standard design
Table 5:
Nominal size
HSK 32
HSK 40
HSK 50
HSK 63
HSK 80
HSK 100
Tightening torque [Nm]
6
7
15
20
30
50
Clamping force [kN]
11
14
21
30
40
50
Tightening torque and clamping force for the individual nominal sizes of the KS clamping cartridge, high-pressure design
Table 6:
Nominal size
HSK 32
HSK 40
HSK 50
HSK 63
HSK 80
HSK 100
Tightening torque [Nm]
n.a.
6
15
20
30
50
Clamping force [kN]
n.a.
11
21
30
40
50
Tightening torque and clamping force for the individual nominal sizes of the KS clamping cartridge, MQL design
Table 7:
Warning
Tool may come loose.
If tools detach while processing workpieces, you could be severely injured.
When you clamp the tool with the KS clamping cartridge, you must comply with the values
stated in Table 5:, Table 6:and Table 7:.
1. Put the hex-wrench bit (bit size, see Table 4:Sizes for hex-
wrench key or hex-wrench bit –tool-clamping Page 3) on-
to the torque wrench.
2. Adjust the torque wrench to the corresponding tightening
torque in accordance with the above Table 5:, Table 6: or
Table 7:.
NOTE
When you clamp tools on the machine using the KS
clamping cartridge, you must be familiar with how to
handle a torque wrench.

14
Kurzanleitung / Short manual
MAPAL KS Spannpatrone / KS clamping cartridge
3. Clean the HSK interface of the machine spindle with a
taper wiper (order number, see Table 3:, Page 3).
Figure 8: Cleaning the HSK interface
4. Clean the tool shank with a clean cloth.
Figure 9: Cleaning the tool shank
5. Insert the tool together with the appropriate interface into
the machine spindle or adapter.
NOTE
When putting on the tool, make sure that the face
connection of the machine spindle or the adapters
and the HSK interface of the tool lie plane and that
the tool keyways are meshed.
Figure 10: Inserting the tool
6. Tighten the threaded spindle/clamping screw with the
torque wrench using the tightening torque stated in "Table
5:Tightening torque and clamping force for the individual
nominal sizes of the KS clamping cartridge, standard de-
sign" in the clockwise direction.
Figure 11: Clamping tool
RESULT
The tool is clamped onto the machine spindle or
adapter with the correct tightening torque.

Kurzanleitung / Short manual
MAPAL KS Spannpatrone / KS clamping cartridge
15

KAL-KS-D/E-01-0111
Bestellnummer / Order number. 10121806
Kurzanleitung MAPAL KS Spannpatrone / Short manual MAPAL KS clamping cartridge
MAPAL Dr. Kress KG, Aalen
Gültig für: / Applies for:
1. Auflage Januar 2011/ issue 1 January 2011
© MAPAL Präzisionswerkzeuge Dr. Kress KG
Kein Teil dieser Anleitung darf in irgendeiner Form (Druck, Fotokopie, Mikrofilm oder einem anderen Verfahren) ohne schriftliche Zu-
stimmung der Firma MAPAL Präzisionswerkzeuge Dr. Kress KG, Aalen, reproduziert oder unter Verwendung elektronischer Systeme
verarbeitet werden. /
No part of this manual is allowed to be copied or processed using electronic systems, in any form (print, photocopy, microfilm or any
other method) without the written approval of MAPAL Präzisionswerkzeuge Dr. Kress KG, Aalen, Germany.
Alle in diesem Handbuch genannten Bezeichnungen von Erzeugnissen sind Warenzeichen der jeweiligen Firmen. /
All the product names stated in this manual are trademarks of the related organisations.
Technische Änderungen vorbehalten. /
We reserve the right to make technical changes without notice.
Gedruckt auf Papier aus chlor- und säurefrei gebleichtem Zellstoff. /
Printed on chlorine and acid-free bleached pulp.
Other manuals for KS
1
Table of contents
Languages:
Other Mapal Power Tools Accessories manuals


