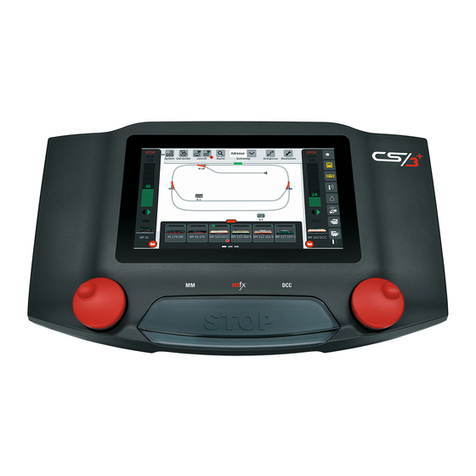
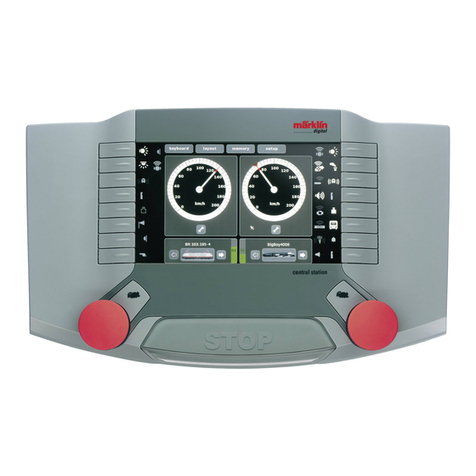
marklin Central Station 3 60216 Instruction Manual

Aufbauanleitung und Hinweise zum Betrieb der Central Station
60216 / 60226

(60226)
B 0
B
0
B 0 B 0
Rot
red
Rouge
rood
Rojo
Rosso
Röd
Rød
Rot
red
Rouge
rood
Rojo
Rosso
Röd
Rød
Braun
brown
Brun
bruin
Marrón
Marrone
Brun
Brun
Braun
brown
Brun
bruin
Marrón
Marrone
Brun
Brun
60041 (Märklin)
60101 (Märklin)
51095 (LGB)
Betrieb
Operation
Exploitation
Bedrijf
Empleo
Ampliamento
Handhavande
Drift

(60226)
60653
60657
66950 (Trix)
66955 (Trix)
60653
60657
66950 (Trix)
66955 (Trix)
SD
~~~~~ ~~
~~~~~ ~~
~~~~~ ~~
~~~~~ ~~
~~~~~ ~~
~~~~~ ~~
~~~~~ ~~~~~~~ ~~ ~~~~~ ~~
~~~~~ ~~
~~~~~ ~~
~~~~~ ~~
~~~~~ ~~
~~~~~ ~~
~~~~~ ~~~~~~~ ~~
60135 60135
Erweiterung
Expansion
Extension
Uitbreiding
Ampliación
dell’esercizio
Utbyggnad
Udvidelse

Sicherheitshinweise
• Nur für den Betrieb in trockenen Räumen.
• Verbaute LED`s entsprechen der Laserklasse 1 nach
Norm EN 60825-1.
• Dieses Gerät kann von Kindern ab einem Alter von
8 Jahren und von Personen mit eingeschränkten
physischen, sensorischen oder geistigen Fähigkeiten
oder einem Mangel an Erfahrung und/oder Wissen
verwendet werden, wenn sie beaufsichtigt werden
oder bezüglich des sicheren Gebrauchs des Geräts
unterwiesen wurden und die daraus resultierenden
Gefahren verstanden haben. Kinder dürfen nicht mit
dem Gerät spielen. Reinigung und Benutzerwartung
dürfen nicht durch Kinder ohne Beaufsichtigung
durchgeführt werden.
• Spannungsversorgung: Nur zu verwenden mit den
Schaltnetzteilen Märklin 60 Watt (60041, H0), Märklin 100
Watt (60101 Spur 1) oder LGB 100 Watt (51095).
•
Das Gerät ist nur mit SELV (Schaltnetzteil) entsprechend
der Kennzeichnung auf dem Typenschild zu versorgen.
• Beachten Sie die Hinweise in der Anleitung zum ver-
wendeten Schaltnetzteil.
• Für die Reinigung des Gerätes verwenden Sie ein
feuchtes Tuch. Benützen Sie keine Lösungs- oder
Reinigungsmittel. Das Gerät muss zur Reinigung span-
nungsfrei sein.
• Anleitung aufbewahren.
• Betriebshöhe nicht über 2.000 Meter.
Hinweis
Da die CS3 ständig weiterentwickelt wird, wäre eine
ausführliche Bedienungsanleitung in der Verpackung
nach relativ kurzer Zeit schon wieder veraltet. Wir haben
uns daher entschieden, die Bedienungsanleitung online
zur Verfügung zu stellen, wo wir sie einfacher aktualisie-
ren können. Schauen Sie bitte in der Produktdatenbank
auf www.maerklin.de unter den Artikelnummern
60216 / 60226. Dort steht sie auch in weiteren Sprachen
zur Verfügung. Dieses Vorgehen ist zudem umwelt-
freundlicher, da viel Papier für die Sprachversionen
eingespart werden kann.
Auch in unserem YouTube Märklin Kanal können Sie
verschiedene Erklärvideos zu unseren Produkten und zur
Central Station 3 finden.
Technische Hinweise
• Das vorliegende Gerät ist ein digitales Steuergerät
zum Betrieb herkömmlicher Modelleisenbahnen mit
Märklin Digital, Märklin mfx, MM oder DCC.
• Zur Erweiterung des internen Speichers kann eine
SD-Speicherkarte bis 32 GB eingesetzt werden.
• An den zwei USB-Buchsen können Maus, Tastatur
oder ein Speicherstick wahlweise direkt oder über
einen USB-Hub eingesteckt werden.
• Die USB-Ladebuchse ist nur zum Anschluss eines
Gerätes zum Aufladen des Akkus (Belastung bis max.
1 A) vorgesehen.
Hinweis: Durch einen langen Druck auf die STOP-Taste
(bis zu 10 Sek.) können Sie das Abschalten der Central
Station erzwingen. Ein weiterer Druck auf die STOP-
Taste führt dann wieder zum Start der Central Station.
Einschränkungen der Central Station 60226
Da die Central Station 60226 über keinen Geräte-Bus
Eingang verfügt, kann sie im Haupt-/Erweiterungsgerät-
Betrieb nur als Hauptgerät eingesetzt werden. Anstelle
des Geräte-Bus Eingangs besitzt diese einen zweiten
Märklin-Bus Anschluss.
Darüber hinaus kann nur das Rückmeldemodul 60883 an-
geschlossen werden, der S88 Anschluss auf der Geräte
Unterseite entfällt.

Anschlüsse
Schaltnetzteil
Gleisanschluss (max. 5 A)
Programmiergleis-Anschluss (max. 1,5 A); An-
schlussschema wie beim Fahrgleis
Geräte-Bus Eingang, 60123 (nur bei 60216)
Geräte-Bus Ausgang, 60125, 60126
Märklin-Bus, Link S88; Connect 6021; Booster
USB, Maus, Tastatur, Speicher, Hub, ...
USB, nur zum Laden
LAN, Direkte Verbindung zu einem Router
Line Out, Anschluss eines aktiven
Lautsprechers
S88 Anschluss auf der Geräteunterseite für
Decoder S88 60881/60882, (nur bei 60216)

Die Central Station 3 ist ein digitales Steuergerät für
digitale Modellbahnen. Sie ermöglicht es, mehrere
Lokomotiven gleichzeitig zu fahren, Weichen und Signale
zu schalten und vieles mehr. Aufgrund der vielen Mög-
lichkeiten ist es nicht immer leicht, den Überblick zu
bewahren. Insbesondere Einsteiger sind oft von den
angebotenen Möglichkeiten überfordert. Deshalb gibt
es die vereinfachte Benutzeroberfläche. Hier sind die
Möglichkeiten eingeschränkt und so können sich auch
Anfänger oder Einsteiger leicht in die Bedienung der
Central Station einfinden.
Inbetriebnahme
Für die erste Inbetriebnahme reicht es, die Gleise und
das Schaltnetzteil an die Central Station anzuschließen
(siehe Seite 2).
1. Fahrgleis und Programmiergleis an die Central Station
anschließen.
2. Central Station mit dem Schaltnetzteil verbinden.
3. Schaltnetzteil mit dem örtlichen Stromnetz verbinden.
Wir empfehlen die Verwendung einer schaltbaren
Steckdosenleiste an der alle Netzteile der Modell-
bahnanlage angeschlossen werden.
4. Die Central Station startet automatisch.
5. Beim ersten Start können Sie die Spracheinstellun-
gen vornehmen. Danach können Sie die vereinfachte
Benutzeroberfläche starten. Dieser Modus ist selbst-
erklärend gestaltet und ermöglicht einen einfachen
Einstieg in das Bedienkonzept der Central Station 3.
Hinweise zur vereinfachten Benutzeroberfläche
• Beim ersten Start in die vereinfachte Benutzeroberflä-
che können Sie automatisch eine Lokomotive anlegen.
Sie können dabei wahlweise
– eine mfx-Lok suchen und anlegen lassen
tippen Sie hierzu auf „Mfx-Lok Suchen“ und bestä-
tigen sie auf der folgenden Seite die entsprechen-
den Punkte, je nach Situation.
– eine nicht-mfx-Lok manuell anlegen.
hier werden die wichtigsten Punkte abgefragt und
danach die Lok entsprechend angelegt.
• Über die Taste „keyboard“ links oben am Bildschirm
wechseln Sie in das keyboard um Weichen oder an-
dere Magnetartikel anzulegen oder zu schalten.
• Im Keybord ist zunächst für die ersten 32 Adressen je
ein Tastenpaar um den zugehörigen Artikel zu schal-
ten. Ein angeschlossener Artikel kann unter seiner
Adresse sofort geschaltet werden.
• Mit einem Tipp auf die Taste kann in die Konfigura-
tion der Magnetartikel gewechselt werden.
Hinweis für Magnetartikel (Weichen, Signale etc.) unter
DCC
Das Keyboard ist auf digitale Artikel unter MM oder mfx
voreingestellt. Um Artikel unter DCC schalten zu können,
müssen diese im Keyboard zunächst auf DCC umgestellt
werden. Gehen Sie dazu wie folgt vor:
1. Keyboard aufrufen
2. mit der Taste in die Konfiguration wechseln.
3. Den entsprechenden Artikel / die entsprechende
Adresse durch einen Tip darauf markieren
4. Am unteren Bildschirmrand das Protokoll umstellen
auf DCC.
Natürlich können hier auch noch weitere Einstellungen
zu dem Artikel vorgenommen werden, z.B. kann ein
Name vergeben werden, aber das ist für das Funktionie-
ren der Artikel nicht erforderlich.
Umschalten zu der Standard-Benutzeroberfläche
Starten Sie dazu das Setup. In der linken Fensterhälfte
unter „Benutzeroberfläche“ den Eintrag „Standard“ aus.
Das Gerät startet danach neu.
Um zur vereinfachten Benutzeroberfläche zurück zu
kommen wählen Sie die Taste und danach wechseln
Sie mit der Taste in die Einstellungen CS3. Hier
können Sie die Benutzeroberfläche wieder auf „verein-
facht“ umstellen.
Vereinfachte Benutzeroberfläche
linke Hälfte: Darstellung einer mfx-Lok
rechte Hälfte: Darstellung einer über die Adresse ange-
meldeten Lok.
a Darstellung der angemeldeten Lokomotive (dazu
muss bei der Anmeldung ein Bild zugewiesen wer-
den).
Durch einen Tipp auf das Bild kann eine andere
schon angelegte Lok ausgewählt werden.
b Fahrtrichtung „vorwärts“
c Fahrtrichtung „rückwärts“
d Tacho: Geschwindigkeit der Lokomotive ablesen oder
ändern
e Funktionen der Lokomotive
f Einstellungen zu der Lokomotive (erscheint nur, wenn
in der jeweiligen Fensterhälfte eine Lok angemeldet
ist)
g Adresseinstellungen der Lokomotive (nur für nicht-
mfx-Lokomotiven)
h neue Lok anlegen / anmelden
i Wechsel in das „Keyboard“ um z.B. Weichen oder
andere Magnetartikel zu schalten.
k Wechsel in das „Setup“ für Geräteeinstellungen.

a bc
i kdgde
fh h a bc
e

Safety Notes
• Only for operation in dry spaces.
• LEDs installed correspond to Laser Class 1 according
to the EN 60825-1 Standard.
• Children ages 8 and above and individuals with limited
physical, sensory, or intellectual abilities or with a
lack of experience and/or knowledge can use this
device, if they are supervised or if they have been ins-
tructed about the safe used of this device, and if they
have understood dangers resulting from it. Children
must not be allowed to play with this device. Children
must not be allowed to clean or carry out user mainte-
nance without supervision.
• Voltage supply: This device may only be used with
these Märklin switched mode power packs for 60 watts
(60041/60065, H0), 100 watts (60101, 1 Gauge), or the
LGB switched mode power pack for 100 watts (51095).
• This device is to be powered only with SELV (Safety
Extra Low Voltage) corresponding to the identification
markings on the specification label.
• Pay attention to the notes in the instructions for the
switched mode power pack used with this device.
• Use a moist cloth to clean this device. Do not use
solvent or cleaning agents. This device must have no
voltage present when cleaning it.
• Save the instructions for this device.
• Do not operate at an altitude over 2,000 meters / 6,500
feet.
Note
Since the CS3 is being developed further constantly,
an extensive operating manual in the package with the
unit would soon be obsolete after a short time. We have
therefore decided to make the operating instructions
available online, where we can update them more easily.
Look in the product database at www.maerklin.de under
item numbers 60216 / 60226. There you will find them
available in other languages. This method is also more
environmentally friendly since a lot of paper can be
saved for the language versions.
In our YouTube Märklin channel, you can also find vari-
ous how-to videos for our products and for the Central
Station 3.
Technical Notes
• This device before you is a digital controller for opera-
tion on traditional model railroads with Märklin Digital,
Märklin mfx, MM, or DCC.
• An SD memory card up to 32 GB can be used to ex-
pand the internal memory.
• A mouse, keyboard, or a memory stick can be plugged
in directly at the two USB sockets or by means of a
USB hub.
• The USB recharging socket is intended only for
connecting a device with a rechargeable battery to be
charged (maximum load up to 1 amp).
Note: You can force the Central Station to turn off by
pressing the STOP button for a long time (up to 10
seconds). Pressing the STOP button again leads back to
starting the Central Station again.
Limitations of the 60226 Central Station
Since the 60226 Central Station does not have access
to a device bus, it can only be used as a main device in
main/expansion unit operation. This device has a second
Märklin bus connection in place of the device bus input.
In addition, only the 60883 feedback module can be
connected to this device. The S88 connection on the
underside of the device is omitted.

Connections
Switched mode power pack
Track connection (max. 5 amps)
Programming track connection (max. 1.5 amps);
connection diagram the same as for the layout
track
Device bus input, 60123 (only on 60216)
Device bus output, 60125, 60126
Märklin bus, Link S88; Connect 6021; Booster
USB, mouse, keyboard, memory, hub, ...
USB, only for recharging
LAN, direct connection to a router
Line Out, connection for an active speaker
S88 Connections on the underside of the device for
S88 60881/60882 decoder, (only on 60216)

The Central Station 3 is a digital controller for digital mo-
del railroads. It enables you to run several locomotives
at the same time, control turnouts and signals, and much
more. Due to the many options and possibilities, it is not
always easy to maintain an overview. Beginners in parti-
cular are often overwhelmed by the options and possi-
bilities that are offered. Therefore, there is a simplified
user interface. Here the possibilities are limited and even
beginners can easily find their way around the operation
of the Central Station.
Operating for the First Time
When operating the Central Station for the first time, it
is enough to connect the track and the switched mode
power pack to it (see page 2).
1. Connect the running track and programming track to
the Central Station.
2. Connect Central Station to the switched mode power
pack.
3. Connect the switched mode power pack to your
household current.
We recommend using a switchable power strip and
connecting all switched mode power packs from the
model railroad layout to it.
4. The Central Station starts automatically.
5. When starting the Central Station for the first time, you
can do language settings. After that, you can start the
simplified user interface. This mode is designed to be
self- explanatory and enables an easy entry into the
operating concept of the Central Station 3.
Notes for the Simplified User Interface
• When starting the Central Station for the first time in
the simplified user interface, you can set up a loco-
motive automatically. You can do this alternatively as
follows:
– Do an mfx locomotive search and setup.
To do this, click on „Mfx Locomotive Search“ and
confirm the appropriate points on the following
page, depending on the situation.
– Set up a non-mfx locomotive manually.
The most important points will be queried here and
after that, the locomotive will be set up accordingly.
• Using the button „Keyboard“ in the upper left on the
screen, switch to the Keyboard to set up or switch
turnouts or other solenoid items.
• In the Keyboard, there is at first a pair of buttons for
each of the first 32 addresses to allow switching the
item assigned to each pair. An item connected to
the system can be switched immediately under its
address.
• You can change to the configuration for solenoid
items by clicking on the button .
Note for Solenoid Items (Turnouts, Signals, etc.) under
DCC
The Keyboard is preset for digital items under MM or
mfx. In order to be able to switch items under DCC, they
must first be changed to DCC in the Keyboard. To do this,
proceed as follows:
1. Call up the Keyboard.
2. Change to the configuration by using the button .
3. Mark the appropriate items / the appropriate address
by clicking on them.
4. Switch the protocol to DCC at the lower edge of the
screen.
Naturally, other settings for an item can also be done
here, such as assigning a name, but this is not necessary
for the functioning of the items.
Switching to the Standard User Interface
To do this, start the setup. Select the entry „Standard“ in
the left half of the window under „User Interface“. After
that, the Central Station starts again.
Select the button and after that use the button to
change to CS3 Settings in order to get back to the
simplified user interface. Here you can switch the user
interface back to „simplified“.
Simplified User Interface
Left half: representation of an mfx locomotive
Right half: representation of a locomotive registered
using the address.
a Representation of the registered locomotive (in addi-
tion, an image must be assigned during registration).
Another locomotive already set up can be selected
by clicking on the image.
b „Forward“ direction of travel
c „Reverse“ direction of travel
d Read or change the speed of the locomotive.
e Functions for the locomotive
f Settings for the locomotive (appears only when a
locomotive is registered in the respective half of the
window)
g Address settings for the locomotive (only for non-mfx
locomotives)
h Set up / register a new locomotive.
i Change to the „Keyboard“ to switch thing such as
turnouts or other solenoid items.
k Change to „Setup“ for device settings.
a bc
i kdgde
fh h a bc
e

Consignes de sécurité
• Exclusivement pour l’exploitation dans des pièces
exemptes d’humidité
• Les LED intégrées correspondent à la classe de laser
1 selon norme EN 60825-1.
• Cet appareil peut être utilisé par des enfants de
plus de 8 ans et par des personnes à capacité phy-
sique, sensorielle ou psychique réduite ou manquant
d‘expérience ou de connaissances, sous surveillance
ou bien après avoir été instruits sur l‘utilisation en
toute sécurité et sur les dangers pouvant en résulter.
Les enfants ne doivent pas jouer avec l‘appareil. Les
enfants ne doivent pas faire le nettoyage et la mainte-
nance utilisateur sans surveillance.
•
Alimentation électrique : Utiliser uniquement avec
l‘alimentation de coupure Märklin 60 Watt (60041, H0),
Märklin 100 Watt (60101, Voie 1) ou LGB 100 Watt (51095).
•
L’appareil doit impérativement être alimenté par un
SELV (circuit à tension de sécurité extra-basse), confor-
mément à ce qui est marqué sur la plaque signalétique.
• Respectez les indications figurant sur la notice du
convertisseur utilisé.
• Pour le nettoyage de l’appareil, utilisez un chiffon
humide. N’utilisez ni dissolvants ni détergents. Pour le
nettoyage, l’appareil doit être hors tension.
• Conservez la notice.
• Ne pas utiliser à plus de 2 000 mètres d‘altitude.
Remarque
La CS3 étant en évolution permanente, une notice
détaillée fournie avec l’appareil deviendrait rapidement
obsolète. Nous avons donc décidé de mettre la notice en
ligne, ce qui facilite sa mise à jour. Veuillez consulter la
base de données des produits www.maerklin.de sous les
réf. 60216 / 60226. La notice y est également disponible
dans d’autres langues. En outre, ce procédé est écolo-
gique puisqu’il permet d’économiser de grandes quanti-
tés de papier pour les traductions.
Notre chaîne Märklin YouTube propose différentes vidéos
explicatives sur nos produits et sur la Central Station 3.
Informations techniques
•
Cet appareil est un appareil de commande numérique
pour l’exploitation de trains miniatures traditionnels avec
Märklin Digital, Märklin mfx, MM ou DCC.
•
Pour l’extension de la mémoire interne, vous pouvez
utiliser une carte mémoire SD de 32 GB maximum.
• Les deux ports USB peuvent servir à raccorder souris,
clavier ou clé USB, au choix directement ou via un
hub USB.
•
La prise de charge USB sert uniquement à raccorder un
appareil pour en recharger l’ accu (charge max. 1 A).
Remarque : Une longue pression sur la touche STOP
(jusqu’à 10 sec.) vous permet de forcer l’arrêt de la Cen-
tral Station. Une seconde pression sur la touche STOP
lance le redémarrage de la Central Station.
Limites de la Central Station 60226
La Central Station 60226 ne disposant d’aucune entrée
pour bus d‘appareil, elle ne peut être utilisée qu’en tant
qu‘appareil principal dans une exploitation d‘appareil
principal/ auxiliaire. A la place de l’entrée pour bus
d’appareil, elle dispose d’une seconde connexion pour
bus Märklin.
En outre, seul le module de rétrosignalisation réf. 60883
peut être raccordé, la connexion S88 sur la face inférieu-
re de l‘appareil est supprimée.

Connexions
Convertisseur
Connexion à la voie (max. 5 A)
Connexion de la voie de programmation
(max. 1,5 A) ; schéma de connexions comme
pour la voie de roulement
Entrée bus appareils, 60123
(uniquement pour 60216)
Sortie bus appareils, 60125, 60126
Märklin bus, Link S88; Connect 6021; Booster
USB, souris, clavier, mémoire, Hub, ...
USB, uniquement pour chargement
LAN, connexion directe à un routeur
Line Out, connexion d’un haut-parleur actif
S88 Connexion sur le dessous de l’appareil pour
décodeurs S88 60881/60882, (uniquement pour
60216)

La Central Station 3 est un appareil de commande nu-
mérique pour trains miniatures numériques. Elle permet
d’exploiter plusieurs locomotives en même temps, de
commuter aiguilles et signaux et bien d‘autres choses
encore. Compte tenu du nombre de possibilités, il n’est
pas toujours simple de garder une vue d’ensemble. Les
débutants, surtout, sont souvent dépassés par les pos-
sibilités offertes. D‘où l’existence de l’interface utilisa-
teur simplifiée. Celle-ci offre des possibilités limitées et
permet donc aussi aux débutants de se familiariser avec
la Central Station.
Mise en service
Pour la première mise en service, il suffit de raccorder la
voie et le convertisseur à la Central Station (voir page 2).
1. Raccorder la voie de circulation et la voie de pro-
grammation à la Central Station.
2. Relier la Central Station au convertisseur.
3. Raccordez le convertisseur au réseau électrique local.
Nous recommandons l‘utilisation d‘un bloc multipri-
se commutable auquel sont raccordées toutes les
alimentations du réseau miniature.
4. La Central Station démarre automatiquement.
5. La langue d‘utilisation peut être paramétrée lors de
la première utilisation. Vous pouvez ensuite lancer
l’interface utilisateur simplifiée. Ce mode est conçu
de manière intuitive et vous permet d‘aborder simple-
ment le concept d‘utilisation de la Central Station 3.
Indications relatives à l’interface utilisateur simplifiée
• Lors de la première mise en service de l’interface uti-
lisateur simplifiée, vous pouvez créer une locomotive
automatiquement. Vous pouvez alors au choix
– Rechercher une locomotive mfx et la créer auto-
matiquement.
A cet effet, appuyez sur « Rechercher loco mfx » et,
sur la page suivante, confirmez les points corres-
pondants en fonction de la situation.
– Créer manuellement une locomotive non mfx
Sont ici renseignés les points les plus importants,
la loco est alors créée conformément aux informa-
tions données.
• Via la touche « keyboard » située en haut à gauche
de l’écran, passez sur le keyboard afin de créer ou
commuter des aiguilles ou autres articles électromag-
nétiques.
• Dans le Keyboard, il existe d‘abord une paire de tou-
ches pour chacune des 32 premières adresses afin de
commuter l’article correspondant. Un article raccordé
peut être immédiatement commuté sous son adresse.
• En appuyant sur la touche , vous pouvez accéder à
la configuration des articles électromagnétiques.
Indication pour articles électromagnétiques (aiguilles,
signaux, etc.) sous DCC
Le Keyboard est préconfiguré pour des articles nu-
mériques sous MM ou mfx. Afin de pouvoir commuter
des articles sous DCC, ceux-ci doivent d‘abord être
convertis en DCC dans le Keyboard. A cet effet, procé-
dez comme suit :
1. Sélectionnez le Keyboard
2. Accédez à la configuration via la touche corres-
pondante.
3. Marquez les articles correspondant/l‘adresse corres-
pondante en appuyant dessus.
4. Sur le bord inférieur de l’écran, convertir le protocole
en DCC.
Naturellement, vous pouvez ici procéder à d‘autres para-
métrages de l’article, comme lui donner un nom, mais
cela n’est pas nécessaire au fonctionnement de l’article.
Accéder à l‘interface utilisateur standard
A cet effet, lancez le Setup. Dans la partie gauche de
l’écran, sous « Interface utilisateur », sélectionnez
l’entrée « Standard ». L‘appareil redémarre alors.
Pour revenir à l’interface utilisateur simplifiée, sélection-
nez la touche correspondante, puis, via la touche ,
accédez aux paramètres CS3. Vous pouvez ici à nouveau
accéder à l‘interface utilisateur « simplifiée ».
Interface utilisateur simplifiée
Partie gauche : Représentation d‘une locomotive mfx
Partie droite : Représentation d‘une loco connectée via
son adresse.
a Représentation de la locomotive connectée (pour
cela, une image doit être affectée lors de la connexi-
on).
Une autre locomotive déjà créée peut être sélection-
née en appuyant sur l’image correspondante.
b Sens de marche « avant »
c Sens de marche « arrière »
d Tachymètre / Lire ou modifier la vitesse de la locomo-
tive
e Fonctions de la locomotive
f Paramètres de la locomotive (apparaissent unique-
ment si une loco a été annoncée dans la moitié de
fenêtre correspondante).
g Paramètres adresse de la locomotive (uniquement
pour locomotives non mfx)
h Créer / Connecter une nouvelle loco
i Accéder au « Keyboard » afin de commuter par
exemple des aiguilles ou autres articles électromag-
nétiques.
k Accéder au « Setup » pour configurer l’appareil.

a bc
i kdgde
fh h a bc
e

Veiligheidsaanwijzingen
• Alleen voor het bedrijf in droge ruimtes.
• Gebruikte LED’s voldoen aan de laserklasse 1 volgens
NEN 60825-1.
• Dit apparaat kan door kinderen vanaf 8 jaar en door
personen met beperkte fysieke, motorieke of geeste-
lijke gesteldheid of gebrek aan ervaring en/of kun-
digheid gebruikt worden, als deze begeleid worden
of aangaande het veilige gebruik van het apparaat
onderwezen zijn en de daaruit resulterende geva-
ren hebben begrepen. Kinderen mogen niet met het
apparaat spelen. Het reinigen en het gebruikersonder-
houd mag niet zonder toezicht door kinderen worden
uitgevoerd.
• Stroomvoorziening: Alleen gebruiken met de netad-
apters Märklin 60 Watt (60041, H0), Märklin 100 Watt
(60101, Spoor1) of LGB 100 Watt (51095).
• Het apparaat mag alleen gevoed worden met een
SELV overeenkomstig het kenmerk op het typeplaatje.
• Let op de aanwijzingen in de gebruiksaanwijzing van
de toegepaste netadapter.
• Voor het reinigen van het apparaat gebruikt u een
vochtige doek. Gebruik geen oplos- of reinigingsmid-
delen. Het apparaat moet tijdens het reinigen span-
ningsvrij zijn.
• Gebruiksaanwijzing bewaren.
• Gebruikshoogte niet boven 2.000 meter.
Opmerking
Aangezien het CS3 voortdurend verder ontwikkeld wordt,
is de uitvoerige gebruiksaanwijzing uit de verpakking na
relatief korte tijd al weer verouderd. We hebben daarom
besloten de gebruiksaanwijzing online beschikbaar te
stellen, zodat we deze eenvoudig kunnen actualiseren.
Kijk daarvoor in de productendatabank op www.maer-
klin.de onder het artikelnummer 60216 / 60226. Daar is de
gebruiksaanwijzing beschikbaar, ook in meerdere talen.
Deze werkwijze is ook veel milieuvriendelijker aangezien
er veel papier kan worden bespaard voor de verschillen-
de taalversies.
Op het Märklin-kanaal op YouTube vindt u ook verschil-
lende video‘s met uitleg over onze producten en Central
Station 3.
Technische aanwijzingen
• Het apparaat is een digitaal besturingsapparaat voor
het besturen van gangbare modelspoortreinen met
Märklin digitaal, Märklin mfx, MM of DCC.
• Voor het uitbreiden van het geheugen kan een SD-
geheugenkaart tot 32 GB toegepast worden.
• Op de twee USB-bussen kan een muis, keyboard of
USB-stick direct of via een USB-hub aangesloten
worden.
• De USB-laadbus is alleen geschikt voor het aansluiten
van een apparaat om de accu op te laden (belasting
max. 1 A).
Opmerking: door lang op de STOP-toets te drukken
(ca 10 sec) kunt u het uitschakelen van het Central
Station afdwingen. Nogmaals op de STOP-toets drukken
zorgt er dan voor dat het Central Station weer opstart.
Beperkingen van het Central Station 60226
De Central Station 60226 heeft geen busingang. Hij kan
daarom in client-server-bedrijf alleen worden gebruikt
als server. In plaats van de apparatenbus ingang beschi-
kt deze echter over een tweede Märklin-bus aansluiting.
Daarnaast kan alleen de terugmeldmodule 60883 aan-
gesloten worden, de S88 aansluiting aan de onderzijde
van het apparaat vervalt.

Aansluitingen
Netadapter
Railaansluiting hoofdspoor ( max. 5 A)
Programmeerrail aansluiting (max. 1,5 A); aanslu-
iting als bij het hoofdspoor
Apparatenbus ingang, 60123
(alleen bij 60216)
Apparatenbus uitgang, 60125, 60126
Märklinbus, Link S88; connect 6021; booster
USB, muis, keyboard, geheugen, hub, …
USB, alleen voor laden
LAN, directe verbinding naar een router
Line Out, aansluiting voor actieve luidspreker
S88 Aansluiting aan de onderzijde van het apparaat
voor de decoders S88 60881/60882, (alleen bij
60216)

De Central Station 3 is een digitale besturing voor
digitale modelbanen. Hiermee kunt u meerdere locs
tegelijkertijd laten rijden, wissels en seinen schakelen en
nog veel meer. Omdat er veel mogelijkheden zijn, is goed
overzicht houden niet zo eenvoudig. Vooral als u net
begint zijn al die mogelijkheden best lastig. Daarom is
er een vereenvoudigde gebruikersomgeving. Hier zijn de
mogelijkheden beperkt, zodat ook beginners de Central
Station makkelijk kunnen bedienen.
Inbedrijfname
Voor de eerste inbedrijfname is het voldoende de rails
en de schakelende voeding aan te sluiten op de Central
Station (zie pagina 2).
1. Sluit rijspoor en programmeerspoor aan op de
Central Station.
2. Sluit de schakelende voeding aan op de Central Station.
3. Sluit de schakelende voeding aan op het net.
Wij adviseren een schakelbare stekkerdoos te gebru-
iken waar alle voedingen van de modelspoorbaan op
aangesloten worden.
4. De Central Station start automatisch.
5. Bij de start kunt u de taal instellen. Daarna kunt u de
vereenvoudigde gebruikersomgeving starten. De
bediening spreekt voor zich en maakt beginnen met
de Central Station eenvoudig.
Informatie over de vereenvoudigde gebruikersomgeving
• Als u voor het eerst begint in de vereenvoudigde ge-
bruikersomgeving kunt u automatisch een locomotief
aanmaken. U kunt
– eine mfx-Lok suchen und anlegen lassen
tippen Sie hierzu auf „Mfx-Lok Suchen“ und bestä-
tigen sie auf der folgenden Seite die entsprechen-
den Punkte, je nach Situation.
– eine nicht-mfx-Lok manuell anlegen.
hier werden die wichtigsten Punkte abgefragt und
danach die Lok entsprechend angelegt.
• Via de Keyboard-toets linksboven in het scherm komt
u naar de keyboard, waar u wissels en andere magne-
tische artikel aanmaakt of schakelt.
• In de keybord is er voor de eerste 32 adressen telkens
een toetsenpaar om de artikelen te schakelen. Een
aangesloten artikel kan meteen worden geschakeld
onder zijn adres.
• Via de toets komt u naar de configuratie van de
magnetische artikelen.
Magnetische artikelen (o.a. wissels en seinen) onder DCC
De keyboard staat ingesteld op digitale artikelen onder
MM of mfx. Om artikelen te schakelen in DCC moeten
deze in de keyboard eerst worden omgesteld op DCC.
Dat gaat als volgt:
1. Roep de keyboard op;
2. Ga via de toets naar de configuratie;
3. Markeer het artikel/adres door aantikken;
4. Zet onderin het scherm het protocol om op DCC
Natuurlijk kunnen hier nog andere dingen worden inge-
steld., bijv. een naam, maar dat hoeft niet. De artikelen
werken ook zo.
Omschakelen naar standaard gebruikersomgeving
Start setup. Kies links in het venster bij Gebruikersomge-
ving de optie “standaard”. Het apparaat start nu opnieuw.
Wilt u terug naar de vereenvoudigde gebruikersomge-
ving, kies dan toets en ga via toets naar Instellin-
gen CS3. Hier kunt u de gebruikersomgeving weer op
“vereenvoudigd” zetten.
Vereenvoudigde gebruikersomgeving
Linkerkant: weergave van een mfx-loc
Rechterkant: weergave van een via het adres aangemel-
de loc
a Weergave van de aangemelde locomotief (hiervoor
moet bij het aanmelden een afbeelding worden ge-
koppeld aan de loc).
Als u de afbeelding aantikt kunt u een andere, al
aangemaakte loc kiezen.
b Rijrichting vooruit
c Rijrichting achteruit
d Snelheidsmeter/snelheid van de locomotief aflezen of
veranderen
e Functies van de locomotief
f Instellingen van de locomotief (alleen te zien als aan
de linkerkant een loc is aangemeld)
g Adresinstellingen van de locomotief (alleen voor locs
die geen mfx zijn)
h Nieuwe loc aanmaken/aanmelden
i Naar Keyboard voor schakelen van wissels of andere
magnetische artikelen.
k Naar Setup om zaken in te stellen.

a bc
i kdgde
fh h a bc
e

Advertencias de seguridad
• Solo para su uso en recintos secos.
• Los LEDs integrados cumplen la clase láser 1 según la
norma EN 60825-1.
• Este dispositivo puede ser utilizado por niños a partir
de una edad de 8 años y por personas con facult-
ades físicas, sensoriales o intelectuales mermadas
o con falta de experiencia y/o conocimientos, si son
supervisados durante el uso o si han sido instruidos
en el uso seguro del aparato y han comprendido los
peligros que supone el uso del mismo. No está permi-
tido a los niños jugar con el aparato. La limpieza y el
mantenimiento por el usuario no deben ser realizados
por niños sin supervisión alguna.
• Alimentación eléctrica: se pueden utilizar únicamen-
te en combinación con las fuentes de alimentación
conmutadas Märklin 60 vatios (60041, H0), Märklin 100
vatios (60101, vía 1) o LGB 100 vatios (51095).
• El dispositivo se alimenta únicamente con una tensión
extra-baja de seguridad (SELV) conforme al marcado
de valores de tensión en la placa de características.
•
Tenga presentes las indicaciones y consejos relativos
a la fuente de alimentación conmutada utilizada que se
incluyen en las instrucciones de empleo.
• Para limpiar el dispositivo, utilice un paño húmedo.
No utilice disolventes ni productos de limpiezA. Para
su limpieza, asegurarse de que el dispositivo no esté
conectado a la tensión.
• Conservar las instrucciones de empleo.
• Altitud de empleo no superior a 2.000 metros.
Nota
Dado que la CS3 experimenta un perfeccionamiento
continuo, un manual de instrucciones de empleo detalla-
do incluido en el embalaje quedaría anticuado ya al cabo
de poco tiempo. Por ete motivo, nos hemos decidido
poner a disposición de nuestros clientes el manual de
instrucciones de empleo a través de nuestro sitio web,
donde lo podemos actualizar con mucha mayor facilidad.
Por favor, consulte la base de datos de productos en
www.maerklin.de en los números de artículo
60216 / 60226. Allí lo encontrará también en otros idio-
mas. Además, este procedimiento es más respetuoso
con el medio ambiente, ya que se puede ahorrar mucho
papel para las versiones en los distintos idiomas.
Encontrará distintos vídeos explicativos sobre nuestros
productos y sobre la Central Station 3 también en el
canal de Märklin en YouTube.
Indicaciones técnicas
• El presente dispositivo es una unidad de control digi-
tal para el funcionamiento de maquetas de trenes con
Märklin Digital, Märklin mfx, MM o DCC.
• Para ampliar la memoria interna se puede utilizar una
tarjeta de memoria SD de hasta 32 GB.
•
En los dos puertos USB se pueden enchufar un ratón,
un teclado o una memoria USB opcionalmente por vía
directa o a través de un concentrador USB.
Nota: Pulsando de manera prolongada la tecla STOP
(hasta 10 s) puede forzar el apagado de la Central Sta-
tion. Si pulsa de nuevo la tecla STOP, la Central Station
vuelve a arrancar.
• La hembrilla de carga USB se ha previsto exclusiva-
mente para conectar un dispositivo para recarga de
la pila recargable (carga máxima acoplada 1 A).
Limitaciones de la Central Station 60226
Dado que la Central Station 60226 no dispone de una ent-
rada para bus de dispositivos, en el funcionamiento con
dispositivo principal/extensión solo se puede emplear
como dispositivo principal. En lugar de la entrada de bus
de dispositivos, ésta posee un segundo puerto de bus
Märklin.
A ello se ha de añadir que se puede conectar única-
mente el módulo de realimentación 60883, habiéndose
eliminado la conexión S88 en el lado inferior del disposi-
tivo.
This manual suits for next models
1
Table of contents
Languages:
Other marklin Controllers manuals

marklin
marklin 72760 User manual

marklin
marklin Central Station Series User manual

marklin
marklin Central Station 3 User manual

marklin
marklin Central Station 3 User manual

marklin
marklin Central Station User manual

marklin
marklin 67014 User manual

marklin
marklin zu 29410 User manual

marklin
marklin 66191 User manual

marklin
marklin Central Station Series User manual

marklin
marklin 72752 User manual