Master Arco User manual

Gentile cliente, la ringraziamo per aver acquistato un
prodotto MASTER S.p.A. In questa guida rapida sono
contenute informazioni riguardanti le modalità d'uso del
prodotto. Leggere attentamente le istruzioni e conservarle
per eventuali successive consultazioni.
Il trasmettitore ARCO è appositamente progettato per il
controllo di tende da sole, tende da interno, tapparelle,
veneziane o simili. Ogni altro uso al di fuori dal campo
definito da MASTER è vietato e comporta, così come il
mancato rispetto delle istruzioni riportate nella presente
guida, l'annullamento della responsabilità e della garanzia
MASTER. Acqua, umidità, fonti di calore, cadute
accidentali possono danneggiare il dispositivo. Non
utilizzare prodotti abrasivi né solventi per la pulizia del
prodotto.
È consigliabile non utilizzare sistemi radio in ambienti con forti interferenze (ad esempio in vicinanza di stazioni di polizia,
aeroporti, banche, ospedali). È comunque opportuno un sopralluogo tecnico prima di installare un qualsiasi sistema
radio al fine di individuare possibili fonti di interferenza. I sistemi radio possono essere utilizzati laddove eventuali disturbi
o malfunzionamenti del trasmettitore o del ricevitore non presentino fattore di rischio, o se tale fattore è annullato da
opportuni sistemi di sicurezza. La presenza di dispositivi radio operanti alla stessa frequenza di trasmissione (433.42
MHz) possono interferire con il ricevitore radio riducendo la portata del sistema e limitando la funzionalità dell'impianto.
R
www.mastermotion.eu
433,42 MHz
Manuale d’uso per :
ARCO
ARCO 2
ARCO 5
ARCO 10
ARCO 20
rev03_22.06.17
ARCO5 - ARCO10 - ARCO20
Contenuto della confezione
- 1 trasmettitore
- 1 batteria litio CR2032
- 1 supporto
- 2 tasselli
- 1 questo manuale
Caratteristiche tecniche
- Alimentazione: n° 1 batteria litio CR2032
- Temperatura di esercizio: 0° C / +55°C
- Frequenza radio: 433.42 Mhz
- Banda di funzionamento: 433,050 – 434,790 Mhz
- Potenza massima trasmessa, e.r.p. : <10 mW
- Canali radio ARCO: 1
- Canali radio ARCO2: 2 + sequenziatore
- Canali radio ARCO5: 5 + sequenziatore
- Canali radio ARCO10: 10 + sequenziatore
- Canali radio ARCO20: 20 + 4 gruppi programmabili
Note sui sistemi radio
Al termine del ciclo di vita del prodotto, smaltirlo secondo quanto previsto dai regolamenti
locali. Questo prodotto potrebbe contenere sostanze inquinanti per l'ambiente e
pericolose per la salute, è vietato smaltire il prodotto gettandolo nei rifiuti domestici.
Inserimento/sostituzione della batteria
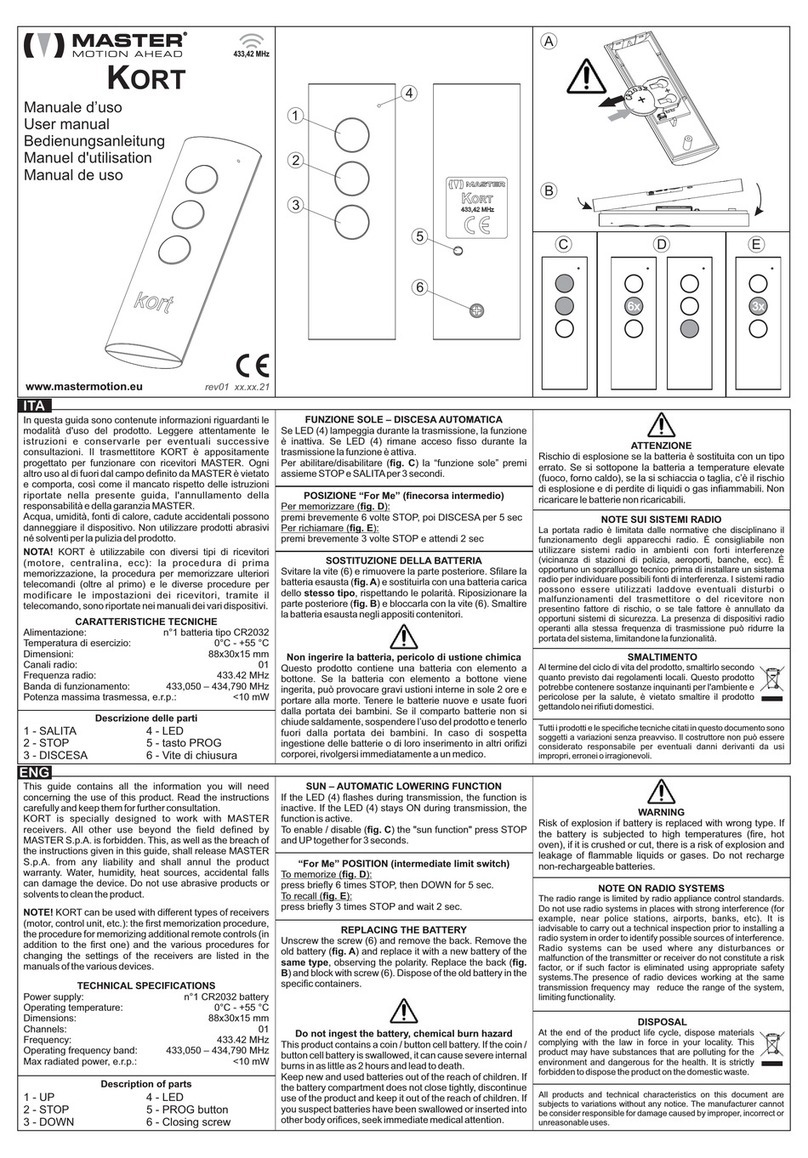
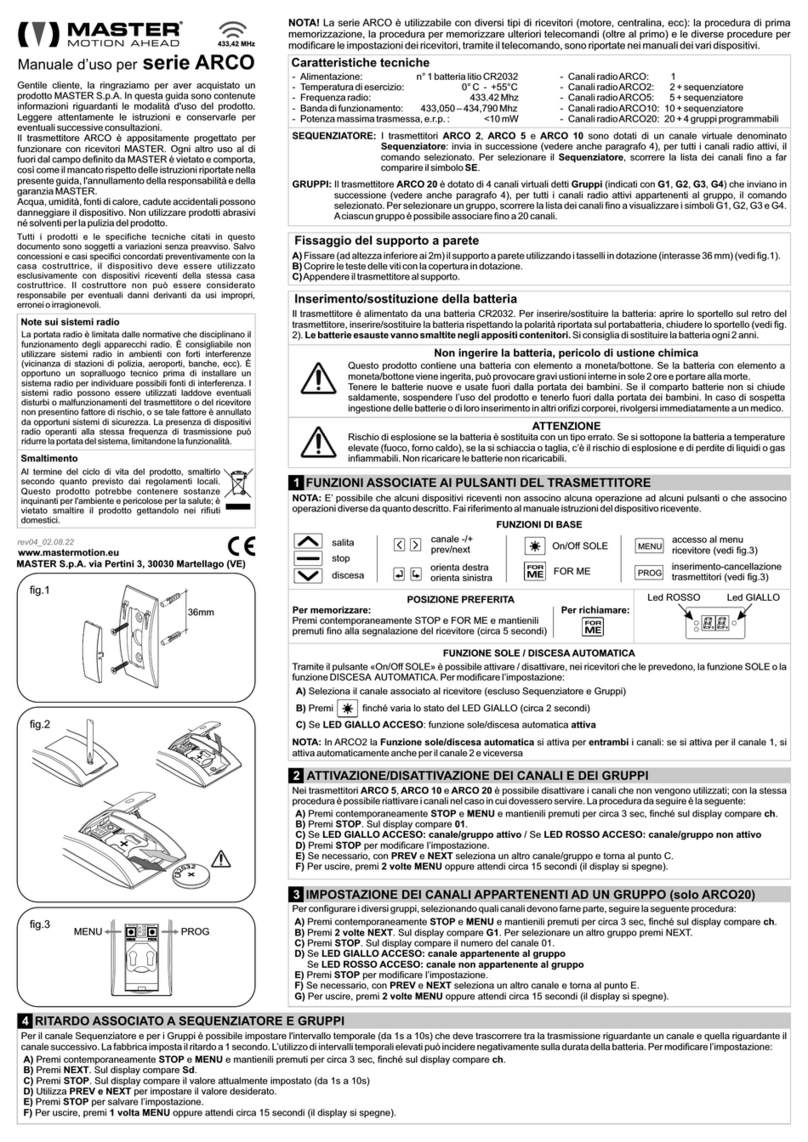
Il trasmettitore è alimentato da una batteria CR2032. Per
inserire la batteria, togliere lo sportello batteria sul retro del
trasmettitore, inserire la batteria rispettando la polarità
riportata sul portabatteria, chiudere lo sportello. L’utilizzo di
batterie diverse da quanto previsto può generare
pericolo di esplosione. Le batterie esauste vanno
smaltite negli appositi contenitori. Si consiglia di sostituire
la batteria ogni 2 anni.
Fissaggio del supporto a parete
A) Fissare a muro il supporto utilizzando i tasselli in dotazione (distanza tra i fori 36 mm).
B) Coprire le teste delle viti con la copertura in dotazione.
C) Appendere il trasmettitore al supporto.
Smaltimento
1. FUNZIONI ASSOCIATE AI PULSANTI DEL TRASMETTITORE
Funzioni di base
salita
stop
discesa
canale -/+
prev/next On/Off SOLE
FOR ME
orienta destra
orienta sinistra
Per memorizzare:
Per richiamare:
accesso al menu
ricevitore
inserimento-cancellazione
trasmettitori
MENU
PROG
Posizione preferita
Funzione sole/discesa automatica
2. ATTIVAZIONE/DISATTIVAZIONE DEI CANALI E DEI GRUPPI
NOTE: In ARCO2 la Funzione sole/discesa automatica si attiva per entrambi i canali: se si attiva per il canale 1, si attiva automaticamente anche per il canale 2 e viceversa E’ possibile
che alcuni dispositivi riceventi non associno alcuna operazione ad alcuni pulsanti o che associno operazioni diverse da quanto descritto. Fai riferimento al manuale istruzioni del dispositivo
ricevente.
3. RITARDO ASSOCIATO A SEQUENZIATORE E GRUPPI
I trasmettitori ARCO 2, ARCO 5 e ARCO 10 sono dotati di un canale virtuale denominato Sequenziatore, che invia in successione per tutti i canali radio attivi il comando selezionato. Per
selezionare il Sequenziatore, scorrere la lista dei canali fino a far comparire il simbolo SE. Il trasmettitore ARCO 20 è dotato di 4 canali virtuali (detti Gruppi, indicati con G1, G2, G3, G4) che
inviano in successione per tutti i canali radio attivi appartenenti al gruppo il comando selezionato. Per selezionare un gruppo, scorrere la lista dei canali fino a far comparire i simboli G1, G2,
G3 e G4. È possibile impostare l'intervallo temporale (da 1 a 10 sec) che deve trascorrere tra la trasmissione riguardante un canale e quella riguardante il canale successivo. La fabbrica
imposta il ritardo a 1 secondo. L’utilizzo di intervalli temporali elevati può incidere negativamente sulla durata della batteria.
Per modificare l’impostazione:
4. IMPOSTAZIONE DEI CANALI APPARTENENTI AD UN GRUPPO (solo ARCO20)
Il trasmettitore ARCO 20 è dotato di 4 canali virtuali (Gruppi, indicati con G1, G2, G3, G4) che inviano in successione per tutti i canali radio attivi appartenenti al gruppo il comando
selezionato. A ciascun gruppo è possibile associare fino a 20 canali.
Per impostare i diversi gruppi, seguire la seguente procedura:
Nei trasmettitori ARCO 5, ARCO 10 e ARCO 20 è possibile disattivare i canali che non vengono utilizzati; in questo modo si facilita l’uso del trasmettitore poiché quando si scorre la lista dei
canali si trovano solo quelli effettivamente utilizzati. E’ possibile, sempre con la stessa procedura, riattivare i canali qualora dovessero servire
La procedura da seguire è la seguente:
Tramite il pulsante «On/Off SOLE» è possibile attivare / disattivare , nei ricevitori che le prevedono, la funzione SOLE o la funzione DISCESA AUTOMATICA. Per modificare l’impostazione:
C) Se LED GIALLO ACCESO: funzione sole/discesa automatica attiva
B) Premi finché varia lo stato del LED GIALLO (circa 2 secondi)
A) Seleziona il canale associato al ricevitore (escluso Sequenziatore e Gruppi)
Tutti i prodotti e le specifiche tecniche citati in questo documento
sono soggetti a variazioni senza preavviso. Salvo concessioni e
casi specifici concordati preventivamente con la casa costruttrice, il
dispositivo deve essere utilizzato esclusivamente con dispositivi
riceventi della stessa casa costruttrice. Il costruttore non può essere
considerato responsabile per eventuali danni derivanti da usi
impropri, erronei o irragionevoli.
Premi STOP e poi FOR ME e mantieni i pulsanti premuti
fino alla segnalazione del motore (circa 5 secondi)
MENU PROG
A) Premi STOP e MENU e mantieni i pulsanti premuti per circa 3 secondi, finché sul display compare ch.
B) Premi STOP. Sul display compare 01.
C) Se LED GIALLO ACCESO: canale/gruppo attivo / Se LED ROSSO ACCESO: canale/gruppo non attivo
D) Premi STOP per modificare l’impostazione.
E) Se necessario, con PREV e NEXT seleziona un altro canale/gruppo e torna al punto C.
F) Per uscire, premi 2 volte MENU oppure attendi circa 15 secondi (il display si spegne).
A) Premi STOP e MENU e mantieni i pulsanti premuti per circa 3 secondi, finché sul display compare ch.
B) Premi NEXT. Sul display compare Sd.
C) Premi STOP. Sul display compare il valore attualmente impostato (da 1 a 10s)
D) Utilizza PREV e NEXT per impostare il valore desiderato.
E) Premi STOP per salvare l’impostazione.
F) Per uscire, premi 1 volta MENU oppure attendi circa 15 secondi (il display si spegne).
A) Premi STOP e MENU e mantieni i pulsanti premuti per circa 3 secondi, finché sul display compare ch.
B) Premi 2 volte NEXT. Sul display compare G1. Per selezionare un altro gruppo premi NEXT.
C) Premi STOP. Sul display compare il numero del canale 01.
D) Se LED GIALLO ACCESO: canale appartenente al gruppo / Se LED ROSSO ACCESO: canale non appartenente al gruppo
E) Premi STOP per modificare l’impostazione.
F) Se necessario, con PREV e NEXT seleziona un altro canale e torna al punto E.
G) Per uscire, premi 2 volte MENU oppure attendi circa 15 secondi (il display si spegne).

Do not use radio systems in places with strong interference (for example, near police stations, airports, banks, hospitals).
It is in any case advisable to carry out a technical inspection prior to installing any radio system in order to identify possible
sources of interference.Radio systems can be used where any disturbances or malfunction of the transmitter or receiver
do not constitute a risk factor, or if such factor is eliminated using appropriate safety systems.The presence of radio
devices working at the same transmission frequency (433.42 MHz) may interfere with the radio receiver and reduce the
range of the system, limiting functionality.
R
www.mastermotion.eu
433,42 MHz
User manual:
ARCO
ARCO 2
ARCO 5
ARCO 10
ARCO 20
rev03_22.06.17
ARCO5 - ARCO10 - ARCO20
Dear Customer, thank you for purchasing a MASTER
S.p.A. product. This guide contains all the information you
will need concerning the use of this product. Read the
instructions carefully and keep them for further
consultation.
ARCO is designed specifically to control sun awnings,
blinds, roller shutters, screens or similar items. All other
use beyond the field defined by MASTER S.p.A. is
forbidden. This, as well as the breach of the instructions
given in this guide, shall release MASTER S.p.A. from any
liability and shall annul the product warranty. Water,
humidity, heat sources, accidental falls can damage the
device. Do not use abrasive products or solvents to clean
the product.
Package contents
- 1 transmitter
- 1 CR2032 lithium battery
- 1 wall bracket
- 2 dowels
- 1 this manual
Technical specifications
- Power supply: n° 1 CR2032 lithium battery
- Operating temperature: 0° C / +55°C
- Operating frequency: 433.42 Mhz
- Operating frequency band: 433,050 – 434,790 Mhz
- Max radiated power, e.r.p. : <10 mW
- N° of channel ARCO: 1
- N° of channels ARCO2: 2 + sequencer channel
- N° of channels ARCO5: 5 + sequencer channel
- N° of channels ARCO10: 10 + sequencer channel
- N° of channels ARCO20: 20 + 4 groups
Notes on radio systems
At the end of the product life cycle, dispose of the device in compliance with local
regulations. This product could contain substances that are harmful to human health and
the environment: do not dispose of the product in domestic waste.
Battery insertion/replacement
The transmitter is powered by a battery C R2032. To insert the
battery, remove the battery cover on the back of the
transmitter, insert the battery respecting the polarity, close the
cover. Use of batteries different than those referred can
cause an explosion hazard. Used batteries must be
discarded in appropriate containers. It it recommended to
replace the battery every 2 years.
Fixing the wall bracket
A) Fix the bracket to the wall using the supplied plugs (distance between holes 36 mm).
B) Cover the screw heads with the coverage provided.
C) Hang the transmitter to the support.
Disposal
1. FUNCTIONS ASSOCIATED WITH THE TRANSMITTER BUTTONS
Basic functions
up
stop
down
channel -/+
prev/next SUN On/Off
FOR ME
right orientation
left orientation
To memorize:
To recall:
access to the
receiver menu
transmitters
insertion-deletion
MENU
PROG
Favorite position
Sun/automatic lowering function
2. ENABLING/DISABLING GROUPS AND CHANNELS
NOTE: In ARCO2 the «Sun/Automatic lowering» function is active for both channels: if you enable it for channel 1, it is automatically activated for channel 2 and viceversa It is possible
that some receiving devices do not associate any operations to some transmitter buttons or that associate to the transmitter buttons some operations different from what it is described. In
this case consider the instruction manual of the receiving device.
3. DELAY OF TRANSMISSION ON GROUPS AND SEQUENCER CHANNEL
ARCO 2, ARCO 5 and ARCO 10 transmitters have a virtual channel called Sequencer, which sends the selected command in succession for all active radio channels. To select the
Sequencer, scroll the list of channels until SE symbol appears. The ARCO 20 transmitter is equipped with 4 virtual channels (called Groups, indicated with G1, G2, G3, G4) which send the
selected command in succession for all the active radio channels belonging to the group. To select a group, scroll the list of channels until the symbols G1, G2, G3 and G4 appear.
It is possible to set the interval (from 1 to 10 sec) of time which must pass between the transmission on one channel and the next. The factory sets the delay at 1 second. The use of high
intervals of time can negatively effect on the battery life.
To modify the setting:
4. SETTING THE CHANNELS BELONGING TO A GROUP (only ARCO20)
The ARCO 20 transmitter is equipped with 4 virtual channels (Groups, indicated by G1, G2, G3, G4) which send the selected command in succession for all the active radio channels
belonging to the group. It is possible to associate up to 20 channels to each group.
To set different groups, follow the procedure:
C) If YELLOW LED IS ON: sun/automatic lowering function active
B) Press until the state of the yellow LED varies (about 2seconds)
A) Select the channel (excluded sequencer channel and groups)
All products and technical specifications given in this document are
subject to variation without notice. Unless previously and
specifically authorised by the manufacturer, the device must be
used exclusively with receivers produced by the same
manufacturer. The manufacturer shall not be liable for damage
resulting from improper, incorrect or unreasonable use.
Press STOP and then FOR ME and hold
the buttons until the motor signalation (about 5 seconds)
MENU PROG
A) Press STOP and then MENU and hold the buttons for about 3 seconds, until the ch symbol is displayed.
B) Press STOP. 01 will appear.
C) If YELLOW LED IS ON:channel/group enabled / If RED LED IS ON:channel/group enabled
D) Press STOP to modify the setting.
E) If necessary,press PREV and NEXT to select another channel/group and return to point C.
F) To exit, press twice MENU or wait about 15 seconds (the display switches off).
A) Press STOP and then MENU and hold the buttons for about 3 seconds, until the ch symbol is displayed.
B) Press NEXT. The Sd symbol appears on the display.
C) Press STOP. The currently set value appears on the display (from 01 to 10 sec).
D) Use PREV and NEXT to set the required value.
E) Press STOP to save the setting.
F) To exit, press 1 time MENU or wait about 15 seconds (the display switches off).
A) Press STOP and then MENU and hold the buttons for about 3 seconds, until the ch symbol is displayed.
B) Press twice NEXT. G1 symbol appears on the display. To select another group press NEXT.
C) Press STOP. Channel 01 appears.
D) If YELLOW LED IS ON: channel belongs to the group / If RED LED IS ON: channel not belongs to the group
E) Press STOP to modify the setting.
F) If necessary, press PREV and NEXT to select another channel and return to point E.
G) To exit, press twice MENU or wait about 15 seconds (the display switches off).
With transmitters ARCO 5, ARCO 10 and ARCO 20 you can turn off the channels that are not used; this will facilitate the use of the transmitter because when you scroll through the list of
channels, you find only those actually used. It's possible, with the same procedure, reactivate the channels.
The procedure is as follows:
By the «SUN On / Off " button you can activate / deactivate the SUN function or the AUTOMATIC LOWERING function, in the receivers equipped with these functions. To modify the setting:

Sehr geehrter Kunde, wir danken Ihnen für den Kauf eines
Produkts von MASTER S.p.A. In dieser Schnellanleitung sind
Informationen bezüglich des Gebrauchs des Produkts
enthalten. Lesen Sie diese Anleitungen bitte aufmerksam und
bewahren Sie sie für ein eventuelles späteres Nachschlagen
auf.
Der Funk-Handsender ARCO wurde speziell für die Steuerung
von Markisen, Vorhängen, Jalousien, Raffstores usw.
entwickelt. Jeder von dem von MASTER bestimmten
Einsatzbereich abweichender Gebrauch ist verboten und
führt, wie auch das Nichtbeachten der in dieser Anleitung
enthaltenen Anweisungen zum Verfall der Garantie und
entbindet MASTER von jeder Haftung. Wasser, Feuchtigkeit,
Wärmequellen und Herunterfallen können das Gerät
beschädigen. Keine scheuernden Produkte und keine
Lösemittel zum Reinigen des Produkts verwenden.
Es ist ratsam, die Funksysteme nicht in Umgebungen mit starken Interferenzen (zum Beispiel in der Nähe von Polizeistationen, Flughäfen,
Banken, Krankenhäusern) zu verwenden. Vor der Installation eines jeglichen Funksystems ist auf jeden Fall ein technischer
Lokalaugenschein empfehlenswert, um eventuelle Störquellen zu bestimmen. Funksysteme dürfen nur dort verwendet werden, wo
eventuelle Störwellen oder Betriebsstörungen des Senders oder Empfängers keinen Risikofaktor darstellen, oder wenn dieser Risikofaktor
durch geeignete Sicherheitssysteme eliminiert wird. Die Anwesenheit von auf der gleichen Sendefrequenz (433.42 MHz) arbeitenden
Funkvorrichtungen kann mit dem Funkempfänger interferieren und die Reichweite des Systems sowie die Funktionalität der Anlage
einschränken.
R
www.mastermotion.eu
433,42 MHz
Bedienungsanleitung für:
ARCO
ARCO 2
ARCO 5
ARCO 10
ARCO 20
rev03_22.06.17
ARCO5 - ARCO10 - ARCO20
Inhalt der Packung
- 1 Hand-Funksender
- 1 Lithiumbatterie CR2032
- 1 Halter
- 2 Dübel
- 1 dieses Handbuch
Technische Eigenschaften
- Stromversorgung: 1 Lithiumbatterie CR2032
- Betriebstemperatur: 0° C / +55°C
- Funkfrequenz: 433.42 Mhz
- Betriebsband 433,050 – 434,790 Mhz
- Übertragene Höchstleistung, E.R.P. : <10 mW
- Funkkanäle ARCO: 1
- Funkkanäle ARCO2: 2 + Folgesteuerung
- Funkkanäle ARCO5: 5 + Folgesteuerung
- Funkkanäle ARCO10: 10 + Folgesteuerung
- Funkkanäle ARCO20: 20 + 4 programmierbare Gruppen
Anmerkungen zu den Funksystemen
Am Ende seines Lebenszyklus ist das Produkts gemäß den örtlichen Gesetzen und
Vorschriften zu entsorgen. Dieses Produkt kann umwelt- und gesundheitsschädliche
Stoffe enthalten und darf daher nicht mit dem Haushaltsmüll entsorgt werden.
Einsetzen/Wechseln der Batterie
Der Sender wird durch eine Batterie CR2032 mit Strom versorgt.
Zum Einsetzen der Batterie die Batterieklappe an der
Senderrückseite entfernen, die Batterie unter Berücksichtigung
der im Batteriefach angegebenen Polarität einsetzen, die Klappe
wiede r s chlie ß en. De r G ebrau ch and erer a ls der
vorgesehenen Batterien kann zu Explosionsgefahr führen.
Leere Batterien sind in den speziellen Sammelbehältnissen
zu entsorgen. Es wird empfohlen, die Batterie mindestens alle 2
Jahre zu wechseln.
Befestigung des Halters an der Wand
A)- Den Halter mit den mitgelieferten Dübeln an der Wand befestigen (Abstand der Bohrlöcher 36 mm).
B) Die Schraubenköpfe mit den mitgelieferten Kappen bedecken.
C) Den Sender am Halter aufhängen.
Entsorgung
1. DEN TASTEN DES SENDERS ZUGEORDNETE FUNKTIONEN
Basisfunktionen
Aufwärts
Stop
Abwärts
Kanal -/+
prev/next On/Off SONNE
FOR ME
Ausrichtung nach rechts
Ausrichtung nach links
Zum Speichern:
Zum Aufrufen:
Zugang zum Menü
Empfänger
Eingabe Löschung
Sender
MENU
PROG
Bevorzugte Position
Funktion Sonne/Abwärts automatisch
2. AKTIVIERUNG/DEAKTIVIERUNG DER KANÄLE UND GRUPPEN
HINWEISE: Bei ARCO2 wird die Funktion Sonne/Abwärts für beide Kanäle aktiviert: wenn sie für Kanal 1 aktiviert ist, wird sie automatisch auch für Kanal 2 aktiviert und umgekehrt.
Es ist möglich, dass einige Empfangsgeräte einigen Tasten keine Vorgänge oder andere als die beschriebenen Vorgänge zuweisen. Bitte beachten Sie die Bedienungsanleitung des
Empfangsgerätes.
3. DER FOLGESTEUERUNG UND DEN GRUPPEN ZUGEWIESENE VERZÖGERUNG
Die Sender ARCO 2, ARCO 5 und ARCO 10 sind mit einem virtuellen Kanal namens Folgesteuerung ausgestattet, der den gewählten Steuerbefehl nacheinander für alle aktiven Funkkanäle sendet. Um
die Folgesteuerung auszuwählen, die Kanalliste durchblättern, bis das Symbol SE erscheint. Der Sender ARCO 20 ist mit 4 virtuellen Kanälen (Gruppen genannt, gekennzeichnet mit G1, G2, G3, G4)
ausgestattet, die nacheinander für alle aktiven Funkkanäle, die zu der Gruppe gehören, den gewählten Befehl senden. Um eine Gruppe auszuwählen, die Kanalliste durchblättern, bis die Symbole G1, G2,
G3 und G4 erscheinen. Es ist möglich, das Zeitintervall (von 1 bis 10 Sekunden) einzustellen, das zwischen der einen Kanal betreffenden Übertragung und der den nächsten Kanal betreffenden
Übertragung vergehen muss. Werkseitig ist die Verzögerung auf 1 Sekunde eingestellt. Die Verwendung hoher Zeitintervalle kann sich negativ auf die Lebensdauer der Batterie auswirken.
Ändern dieser Einstellung:
4. EINSTELLUNG DER EINER GRUPPE ANGEHÖRENDEN KANÄLE (nur ARCO20)
Der Sender ARCO 20 verfügt über 4 virtuelle Kanäle (Gruppen mit der Bezeichnung G1, G2, G3, G4), die nacheinander für alle der Gruppe angehörenden aktiven Funkkanäle den
ausgewählten Steuerbefehl übersenden. Jeder Gruppe können bis zu 20 Kanäle zugewiesen werden.
Zum Einstellen der verschiedenen Gruppen ist wie folgt vorzugehen:
Bei den Sendern ARCO 5, ARCO 10 und ARCO 20 können die nicht verwendeten Kanäle deaktiviert werden. Dadurch wird der Gebrauch des Senders erleichtert, da beim Durchblättern der
Kanäle nur die effektiv verwendeten Kanäle angezeigt werden. Mit dem gleichen Verfahren besteht auch die Möglichkeit, die Kanäle wieder zu aktivieren, wenn sie benötigt werden sollten.
Es ist folgendermaßen vorzugehen:
Mit derT aste « On/Off SONNE» k ann bei den E mpfängern, d ie über diese F unktionen v erfügen, die F unktion S ONNE o der die F unktion A BWÄRTS A UTOMATISCH a ktiviert/deaktiviert w erden. Ä ndern dieser Einstellung:
C) Wenn ROTE LED EINGESCHALTET: Funktion Sonne/Abwärts automatisch aktiviert
B) drücken, bis sich der Zustand der GELBEN LED ändert (ca. 2 Sekunden)
A) Den dem Empfänger zugeordneten Kanal auswählen (Folgesteuerung und Gruppen ausgeschlossen)
Alle Produkte und die in dieser Unterlage angegebenen
technischen Spezifikationen können ohne Vorankündigung
abgeänd ert werden. Abgese hen von entsprec h enden
Vereinbarungen und zuvor mit dem Hersteller besprochenen
spezifischen Fällen darf diese Vorrichtung einzig und allein mit
Empfängern des gleichen Herstellers verwendet werden. Der
Hersteller haftet nicht für eventuelle Schäden, die auf einen
unsachgemäßen, falschen oder unvernünftigen Gebrauch
zurückzuführen sind.
STOP und dann FOR ME drücken und die Tasten so lange
gedrückt halten, bis der Motor angezeigt wird (zirka 5 Sekunden)
MENU PROG
A) STOP und MENU drücken und diese beiden Tasten zirka 3 Sekunden gedrückt halten, bis auf dem Display ch angezeigt wird.
B) STOP drücken. Auf dem Display wird 01 angezeigt.
C) Wenn GELBE LED EINGESCHALTET: Kanal/Gruppe aktiviert / Wenn ROTE LED EINGESCHALTET: Kanal/Gruppe nicht aktiviert
D) STOP drücken, um die Einstellung zu ändern.
E) Wenn notwendig kann mit PREV und NEXT ein anderer Kanal bzw. eine andere Gruppe ausgewählt und auf Punkt C zurückgekehrt werden.
F) Zum Beenden 2 Mal MENÜ drücken oder zirka 15 Sekunden warten (das Display schaltet sich aus).
A) STOP und MENU drücken und diese beiden Tasten zirka 3 Sekunden gedrückt halten, bis auf dem Display ch angezeigt wird.
B) NEXT drücken. Auf dem Display wird Sd angezeigt.
C) STOP drücken. Auf dem Display wird der aktuell eingestellte Wert angezeigt (von 1 bis 10s)
D) PREV und NEXT verwenden, um den gewünschten Wert einzugeben.
E) STOP drücken, um die Einstellung zu speichern.
F) Zum Beenden 1 Mal MENÜ drücken oder zirka 15 Sekunden warten (das Display schaltet sich aus).
A) STOP und MENÜ drücken und diese beiden Tasten zirka 3 Sekunden gedrückt halten, bis auf dem Display ch angezeigt wird.
B) 2 Mal NEXT drücken. Auf dem Display wird G1 angezeigt. Zum Auswählen einer anderen Gruppe NEXT drücken.
C) STOP drücken. Auf dem Display wird die Kanalnummer 01 angezeigt.
D) Wenn GELBE LED EINGESCHALTET: Der Gruppe angehörender Kanal / Wenn ROTE LED EINGESCHALTET: Nicht der Gruppe angehörender Kanal
E) STOP drücken, um die Einstellung zu ändern.
F) Wenn notwendig kann mit PREV und NEXT ein anderer Kanal ausgewählt und auf Punkt E zurückgekehrt werden.
G) Zum Beenden 2 Mal MENÜ drücken oder zirka 15 Sekunden warten (das Display schaltet sich aus).

Cher client, nous vous remercions d'avoir acheté un
produit MASTER S.p.A. Ce guide rapide contient les
informations concernant les modes d'emploi du produit.
Lire attentivement les instructions et les conserver pour
d'éventuelles consultations successives.
L'émetteur ARCO est conçu expressément pour le
contrôle de bannes, stores d'intérieurs, volets, stores
vénitiens ou éléments similaires. Toute autre utilisation,
hors du champ défini par MASTER, est interdite et
comporte, tout comme le non-respect des instructions
figurant dans ce guide, l'annulation de la responsabilité et
de la garantie MASTER. L'eau, l'humidité, les sources de
chaleur et les chutes accidentelles peuvent endommager
le dispositif. Ne pas utiliser de produits abrasifs ni de
solvants pour nettoyer le produit.
Il est conseillé de ne pas utiliser de systèmes radio dans des environnements avec de fortes interférences (par exemple, près des postes de
police, des aéroports, des banques et des hôpitaux). Il convient dans tous les cas d'effectuer une visite technique des lieux avant d'installer
tout système radio pour détecter les sources d'interférence possibles. Les systèmes radio peuvent être employés dans les cas où les
éventuels brouillages ou dysfonctionnements de l'émetteur ou du récepteur ne représentent pas un facteur de risque ou si ce facteur est
annulé par des systèmes de sécurité appropriés. La présence de dispositifs radio opérant à la même fréquence de transmission (433,42
MHz) peut interférer avec le récepteur radio en réduisant ainsi la portée du système, ce qui limite la fonctionnalité de l'installation.
R
www.mastermotion.eu
433,42 MHz
Manuel d'utilisation pour :
ARCO
ARCO 2
ARCO 5
ARCO 10
ARCO 20
rev03_22.06.17
ARCO5 - ARCO10 - ARCO20
Contenu de l'emballage
- 1 émetteur
- 1 pile lithium CR2032
- 1 support
- 2 chevilles
- 1 ce manuel
Caractéristiques techniques
- Alimentation : n° 1 pile lithium CR2032
- Température de fonctionnement : 0° C / +55°C
- Fréquence radio : 433,42 Mhz
- Bande de fonctionnement : 433,050 – 434,790 Mhz
- Puissance maximum transmise, e.r.p. : <10 mW
- Canaux radio ARCO : 1
- Canaux radio ARCO2 : 2 + séquenceur
- Canaux radio ARCO5 : 5 + séquenceur
- Canaux radio ARCO10 : 10 + séquenceur
- Canaux radio ARCO20 : 20 + 4 groupes programmables
Notes sur les systèmes radio
À la fin du cycle de vie du produit, l'éliminer conformément aux règlementations locales en vigueur.
Ce produit pourrait contenir des substances polluantes pour l'environnement et dangereuses pour
la santé. Il est interdit d'éliminer ce produit en le jetant dans les déchets domestiques.
Introduction/remplacement de la pile
L'émetteur est alimenté par une pile CR2032. Pour introduire
la pile, enlever le couvercle de la pile à l'arrière de l'émetteur,
introduire la pile en respectant la polarité indiquée sur le
porte-pile, puis refermer la trappe. L'utilisation de piles
autres que celles prévues peut engendrer un risque
d'explosion. Les piles usées doivent être jetées dans les
collecteurs prévus à cet effet. Il est conseillé de remplacer
la pile tous les 2 ans.
Fixation du support à la paroi
A) Fixer au mur le support à l'aide des chevilles en dotation (distance entre les trous 36 mm).
B) Couvrir les têtes des vis avec la couverture en dotation.
C) Accrocher l'émetteur au support.
Élimination
1. FONCTIONS ASSOCIÉES AUX BOUTONS DE L'ÉMETTEUR
Fonctions de base
montée
stop
descente
canal -/+
prev/next On/Off SOLEIL
FOR ME
orienter à droite
orienter à gauche
Pour mémoriser :
Pour rappeler :
accès au menu
récepteur
saisie-effacement
émetteurs
MENU
PROG
Position préférée
Fonction soleil / descente automatique
2. ACTIVATION/DÉSACTIVATION DES CANAUX ET DES GROUPES
REMARQUES : Dans le modèle ARCO2, la Fonction soleil / descente automatique s'active pour les deux canaux : si elle s'active pour le canal 1, elle s'active également
automatiquement pour le canal 2 et vice et versa. Il est possible que certains dispositifs récepteurs n'associent aucune opération à certains boutons ou qu'ils associent des opérations
autres que celles décrites. Se référer au manuel des instructions du dispositif récepteur.
3. RETARD ASSOCIÉ AUX SÉQUENCEURS ET AUX GROUPES
Les émetteurs ARCO 2, ARCO 5 et ARCO 10 sont équipés d'un canal virtuel appelé Séquenceur qui envoie en succession pour tous les canaux radio activés la commande sélectionnée. Pour
sélectionner le Séquenceur, faire défiler la liste des canaux jusqu'à ce que le symbole SE apparaisse. L'émetteur ARCO 20 est équipé de 4 canaux virtuels (dénommés Groupes, indiqués
par G1, G2, G3 et G4) qui envoient en succession pour tous les canaux radio actifs appartenant au groupe la commande sélectionnée. Pour sélectionner un groupe, faire défiler la liste des
canaux jusqu'à ce que les symboles G1, G2, G3 et G4 apparaisse. Il est possible de programmer l'intervalle de temps (de 1 à 10 secondes) qui doit s'écouler entre la transmission concernant
un canal et celle concernant le canal suivant. L'usine programme le retard à 1 seconde. L'utilisation d'intervalles de temps élevés peut avoir une incidence négative sur la durée de la pile.
Pour modifier le réglage :
4. RÉGLAGE DES CANAUX APPARTENANT À UN GROUPE (uniquement ARCO20)
L'émetteur ARCO 20 est équipé de 4 canaux virtuels (Groupes, indiqués par G1, G2, G3 et G4) qui envoient en succession pour tous les canaux radio actifs appartenant au groupe la
commande sélectionnée. À chaque groupe il est possible d'associer jusqu'à 20 canaux.
Pour programmer les différents groupes, suivre la procédure suivante :
Dans les émetteurs ARCO 5, ARCO 10 et ARCO 20, il est possible de désactiver les canaux qui ne sont pas utilisés ; on facilite ainsi l'utilisation de l'émetteur car lorsqu'on fait défiler la liste
des canaux, on ne trouve que ceux qui sont effectivement utilisés. Toujours selon la même procédure, il est possible de réactiver les canaux si cela s'avère nécessaire
La procédure à suivre est la suivante :
À l'aide du bouton « On/Off SOLEIL », il est possible d'activer / désactiver, dans les récepteurs le prévoyant, la fonction SOLEIL ou la fonction DESCENTE AUTOMATIQUE. Pour modifier le réglage :
C) Si la LED JAUNE EST ALLUMÉE : fonction soleil / descente automatique active
B) Appuyer sur jusqu'à ce que le l'état de la LED JAUNE varie (environ 2 secondes)
A) Sélectionner le canal associé au récepteur (Séquenceur et Groupes exclus)
Tous les produits et les spécifications techniques cités dans ce
document sont sujets à variations sans aucun préavis. Sauf dans le
cas d'autorisations et de cas spécifiques convenus préalablement
par le constructeur, ce dispositif doit être employé exclusivement
avec des dispositifs récepteurs du même constructeur. Le
constructeur ne peut pas être considéré responsable des
dommages causés par une utilisation impropre, erronée ou
irrationnelle.
Appuyer sur STOP et ensuite sur FOR ME et garder les boutons enfoncés
jusqu'au signal du moteur (environ 5 secondes)
MENU PROG
A) Appuyer sur STOP et sur MENU et garder les boutons enfoncés pendant environ 3 secondes, jusqu'à ce que l'écran affiche ch.
B) Appuyer sur STOP. L'écran affiche 01.
C) Si la LED JAUNE EST ALLUMÉE : canal/groupe activé / Si la LED ROUGE EST ALLUMÉE : canal/groupe pas activé
D) Appuyer sur STOP pour modifier le réglage.
E) Au besoin, avec PREV et NEXT sélectionner un autre canal/groupe et revenir au point C.
F) Pour quitter, appuyer 2 fois sur MENU ou bien attendre environ 15 secondes (l'écran s'éteint).
A) Appuyer sur STOP et sur MENU et garder les boutons enfoncés pendant environ 3 secondes, jusqu'à ce que l'écran affiche ch.
B) Appuyer sur NEXT. L'écran affiche Sd.
C) Appuyer sur STOP. L'écran affiche la valeur programmée actuellement programmée (de 1 à 10 s)
D) Utiliser PREV et NEXT pour programmer la valeur souhaitée.
E) Appuyer sur STOP pour enregistrer le réglage.
F) Pour quitter, appuyer 1 fois sur MENU ou bien attendre environ 15 secondes (l'écran s'éteint).
A) Appuyer sur STOP et sur MENU et garder les boutons enfoncés pendant environ 3 secondes, jusqu'à ce que l'écran affiche ch.
B) Appuyer 2 fois sur NEXT. L'écran affiche G1. Pour sélectionner un autre groupe, appuyer sur NEXT.
C) Appuyer sur STOP. L'écran affiche le numéro du canal 01.
D) Si la LED JAUNE EST ALLUMÉE : canal appartenant au groupe / Si la LED ROUGE EST ALLUMÉE : canal n'appartenant pas au groupe
E) Appuyer sur STOP pour modifier le réglage.
F) Au besoin, avec PREV et NEXT sélectionner un autre canal et revenir au point E.
G) Pour quitter, appuyer 2 fois sur MENU ou bien attendre environ 15 secondes (l'écran s'éteint).

Distinguido cliente: Gracias por comprar un producto
MASTER S.p.A. Esta guía rápida contiene información
sobre los modos de uso del producto. Lea cuidadosamente
las instrucciones y guárdelas para consultas futuras.
El transmisor ARCO ha sido especialmente diseñado para
controlar toldos, cortinas de interiores, persianas
enrollables, persianas venecianas o productos similares.
Cualquier uso distinto al previsto por MASTER está
prohibido y conlleva, al igual que la inobservancia de las
instrucciones contenidas en este guía, la anulación de las
responsabilidades y la garantía de MASTER. El agua, la
humedad, las fuentes de calor y las caídas accidentales
pueden dañar el dispositivo. No utilice productos abrasivos
ni disolventes para limpiar el producto.
Se recomienda no utilizar sistemas de radio en ambientes con interferencias fuertes (por ejemplo, cerca de cuarteles de policía,
aeropuertos, bancos y hospitales). Es aconsejable realizar una inspección técnica antes de instalar cualquier sistema de radio para
identificar posibles fuentes de interferencias. Los sistemas de radio pueden emplearse en lugares donde las interferencias o los
problemas de funcionamiento del transmisor o receptor no presenten un factor de riesgo, o bien si dicho factor puede ser eliminado
mediante sistemas de seguridad adecuados. La presencia de radiodispositivos a la misma frecuencia de transmisión (433,42 MHz)
puede interferir con el receptor de radio, reduciendo la capacidad del sistema y limitando el funcionamiento del equipo.
R
www.mastermotion.eu
433,42 MHz
Manual de uso para:
ARCO
ARCO 2
ARCO 5
ARCO 10
ARCO 20
rev03_22.06.17
ARCO5 - ARCO10 - ARCO20
Contenido del paquete
- 1 transmisor
- 1 batería de litio CR2032
- 1 soporte
- 2 tornillos de expansión
- 1 manual (este)
Características técnicas
- Alimentación: n.º 1 batería de litio CR2032
- Temperatura de funcionamiento: 0° C / +55°C
- Radiofrecuencia: 433,42 MHz
- Banda de funcionamiento: 433,050 – 434,790 MHz
- Potencia máxima transmitida, e.r.p. : <10 mW
- Canales de radio ARCO: 1
- Canales de radio ARCO2: 2 + secuenciador
- Canales de radio ARCO5: 5 + secuenciador
- Canales de radio ARCO10: 10 + secuenciador
- Canales de radio ARCO20: 20 + 4 grupos programables
Notas sobre los sistemas de radio
Al final de la vida útil del producto, elimine el mismo en conformidad con los reglamentos
locales. Este producto podría contener sustancias contaminantes para el medio ambiente
y peligrosas para la salud, así que está prohibido eliminarlo como residuo doméstico.
Instalación/Sustitución de la batería
El transmisor se alimenta con una batería CR2032. Para
instalar la batería, saque la tapa ubicada en la parte
posterior del transmisor, introduzca la batería respetando la
polaridad indicada y cierre la tapa. El uso de baterías
distintas a las previstas puede generar riesgos de
explosión. Las baterías agotadas deben eliminarse en
contenedores adecuados. Se recomienda sustituir la
batería cada 2 años.
Fijación del soporte de pared
A) Fije el soporte en la pared utilizando los tornillos de expansión provistos (distancia entre agujeros: 36 mm).
B) Cubra las cabezas de los tornillos con los tapones provistos.
C) Cuelgue el transmisor del soporte.
Eliminación
1. FUNCIONES ASOCIADAS A LOS BOTONES DEL TRANSMISOR
Funciones básicas
subida
parada
bajada
canal -/+
anterior/siguiente On/Off SOL
FOR ME
orientar hacia la derecha
orientar hacia la izquierda
Para memorizar:
Para recuperar:
acceso al menú
del receptor
introducción-cancelación
de transmisores
MENU
PROG
Posición favorita
Función Sol / Bajada Automática
2. ACTIVACIÓN/DESACTIVACIÓN DE LOS CANALES DE LOS GRUPOS
NOTAS: En ARCO 2, la función “Sol/Bajada Automática” se activa para ambos canales: si se activa para el canal 1, también se activa automáticamente para el canal 2 y viceversa.
Es posible que algunos receptores no asocien ninguna operación a ciertos botones, o bien que asocien operaciones distintas a las descritas. Consulte el manual de instrucciones de
su receptor.
3. RETRASO ASOCIADO AL SECUENCIADOR Y A LOS GRUPOS
Los transmisores ARCO 2, ARCO 5 y ARCO 10 están provistos de un canal virtual llamado Secuenciador, que envía en sucesión el mando seleccionado a todos los canales de
radio. Para seleccionar el Secuenciador, recorra la lista de canales hasta que aparezca el símbolo SE. El transmisor ARCO 20 está provisto de 4 canales virtuales (llamados Grupos
e indicados con G1, G2, G3, G4) que envían en sucesión el mando seleccionado a todos los canales de radio activos que pertenecen al grupo. Para seleccionar un grupo, recorra la
lista de los canales hasta que aparezcan los símbolos G1, G2, G3 y G4. Es posible configurar el intervalo temporal (de 1 a 10 s) que debe transcurrir entre la transmisión de un canal y
la del canal siguiente. La fábrica configura el retraso en 1 segundo. El uso de intervalos temporales altos puede afectar negativamente la duración de la batería.
Para modificar la configuración:
4. CONFIGURACIÓN DE LOS CANALES PERTENECIENTES A UN GRUPO (solo ARCO20)
El transmisor ARCO 20 está provisto de 4 canales virtuales (Grupos, indicados con G1, G2, G3, G4) que envían en sucesión el mando seleccionado a todos los canales de radio activos que
pertenecen al grupo. Es posible asociar hasta 20 canales a cada grupo.
Para configurar los diferentes grupos, siga este procedimiento:
En los transmisores ARCO 5, ARCO 10 y ARCO 20 es posible desactivar los canales no utilizados; así se facilita el uso del transmisor, ya que, al recorrer la lista de canales, solo se
ven los que realmente se utilizan. Con el mismo procedimiento, también es posible reactivar los canales que hagan falta.
El procedimiento es el siguiente:
Con el botón «On/Off SOL» es posible activar / desactivar, en los receptores que lo prevén, la función SOL o la función BAJADA AUTOMÁTICA. Para modificar la configuración:
C) Con LED AMARILLO ENCENDIDO: función sol/bajada automática activa.
B) Presione hasta que cambie el estado del LED AMARILLO (unos 2 segundos).
A) Seleccione el canal asociado al receptor (Secuenciador y Grupos excluidos).
Todos los productos y especificaciones técnicas citados en este
documento están sujetos a cambios sin aviso previo. Salvo en caso
de concesiones y situaciones específicas previamente acordadas
con el fabricante, el dispositivo debe utilizarse exclusivamente con
receptores del mismo fabricante. El fabricante no se hará
responsable por ningún daño que derive de usos inadecuados,
incorrectos o irrazonables.
Presione PARADA y luego FOR ME, manteniendo los botones presionados
hasta recibir la indicación del motor (unos 5 segundos).
MENU PROG
A) Presione PARADA y MENÚ manteniendo los botones presionados por unos 3 segundos, hasta que en la pantalla aparezca ch.
B) Presione PARADA. En la pantalla aparecerá 01.
C) Con LED AMARILLO ENCENDIDO: canal/grupo activo / Con LED ROJO ENCENDIDO: canal/grupo inactivo.
D) Presione PARADA para modificar la configuración.
E) Si es necesario, seleccione otro canal/grupo con ANTERIOR y SIGUIENTE y regrese al punto C.
F) Para salir, presione 2 veces MENÚ o espere unos 15 segundos (la pantalla se apaga).
A) Presione PARADA y MENÚ manteniendo los botones presionados por unos 3 segundos, hasta que en la pantalla aparezca ch.
B) Presione SIGUIENTE. En la pantalla aparecerá Sd.
C) Presione PARADA. En la pantalla aparecerá el valor actualmente configurado (de 1 a 10 s).
D) Utilice ANTERIOR y SIGUIENTE para configurar el valor deseado.
E) Presione PARADA para guardar la configuración.
F) Para salir, presione 1 vez MENÚ o espere unos 15 segundos (la pantalla se apaga).
A) Presione PARADA y MENÚ manteniendo los botones presionados por unos 3 segundos, hasta que en la pantalla aparezca ch.
B) Presione 2 veces SIGUIENTE. En la pantalla aparecerá G1. Para seleccionar otro grupo, presione SIGUIENTE.
C) Presione PARADA. En la pantalla aparecerá el número del canal 01.
D) Con LED AMARILLO ENCENDIDO: canal perteneciente al grupo / Con LED ROJO ENCENDIDO: canal no perteneciente al grupo.
E) Presione PARADA para modificar la configuración.
E) Si es necesario, seleccione otro canal con ANTERIOR y SIGUIENTE y regrese al punto E.
G) Para salir, presione 2 veces MENÚ o espere unos 15 segundos (la pantalla se apaga).
This manual suits for next models
4
Table of contents
Languages:
Other Master Transmitter manuals