Mastrad meat it User manual

1
USER GUIDE

29
II. English
Introduction
The meat°it and meat°it + probes consist of a wireless probe (A) and (B), a docking station (C), a key (D) to remove
the probe and a power cable.
This wireless thermometer is compatible with all hobs, including induction hobs. It can also be used on barbecues,
whether open or closed, and in ovens.
It is suitable for fast or slow cooking, from 5 minutes to 24 hours continuous wireless use.
The thermometer can be used on thinner pieces of meat at least 0.6″ (20 mm) thick (burgers, chicken fillets, ribeye
steak, etc.) or thicker cuts (shoulder, brisket, whole chicken, etc.).
The thermometer transmits each change in degree to the connected app almost instantaneously.
The thermometer is accessed and controlled from a phone or tablet via a Bluetooth connection.
The thermometer can detect two temperature levels:
3. The cooking speed, thanks to a sensor located in the ceramic section (A)
4. The internal temperature, via a sensor located in the metal section (B)
More than one thermometer can be controlled at the same time (up to 4 probes) using the meat°it app.
The docking station (C) is used to store, protect and activate the wireless probe. It also recharges the battery in the
probe. An LED light indicates the battery level. The key to remove the probe (D) is located under the docking station
A
B
Meat it
Meat it +
D
C

30
Contents
II. English ................................................................................................................................................ 29
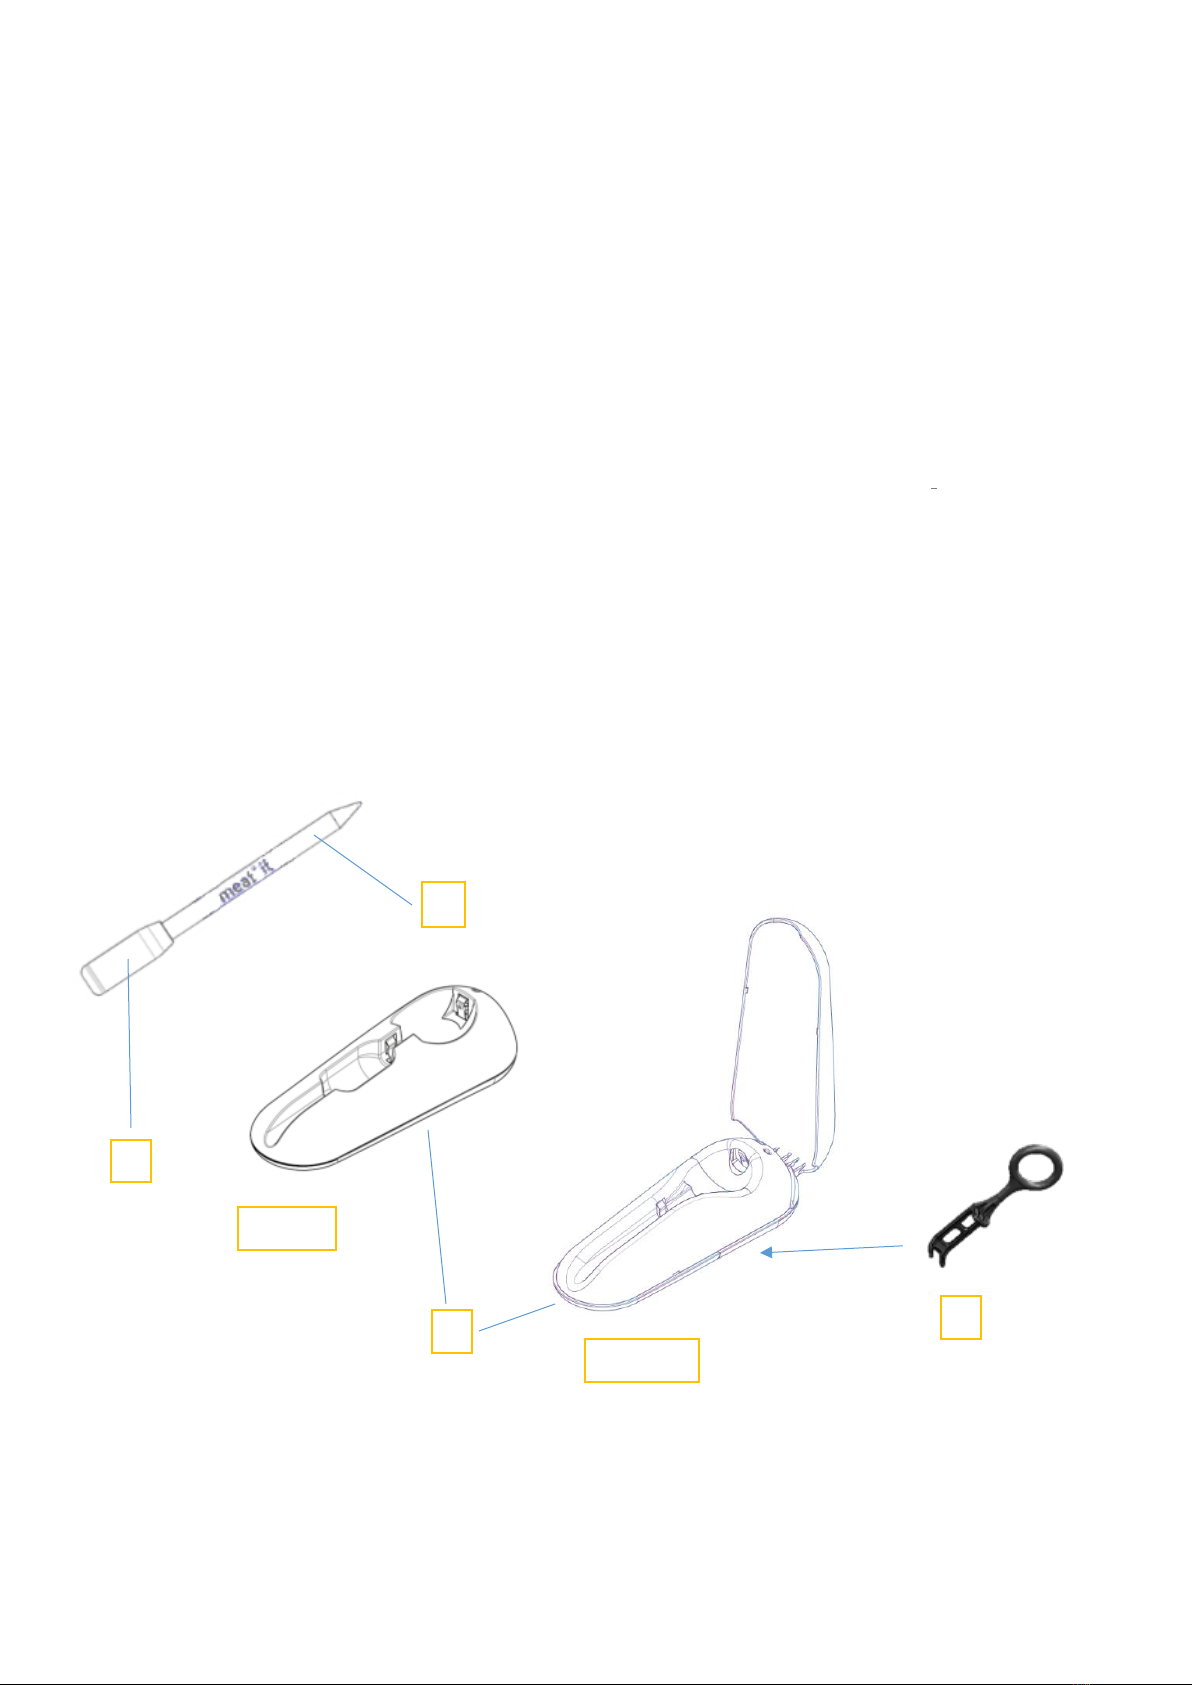
1. Before starting ........................................................................................................................................... 31
1.1. Activate Bluetooth .................................................................................................................................. 31
1.2. Install the meat°it app............................................................................................................................. 31
1.3. Charging the probe ................................................................................................................................. 31
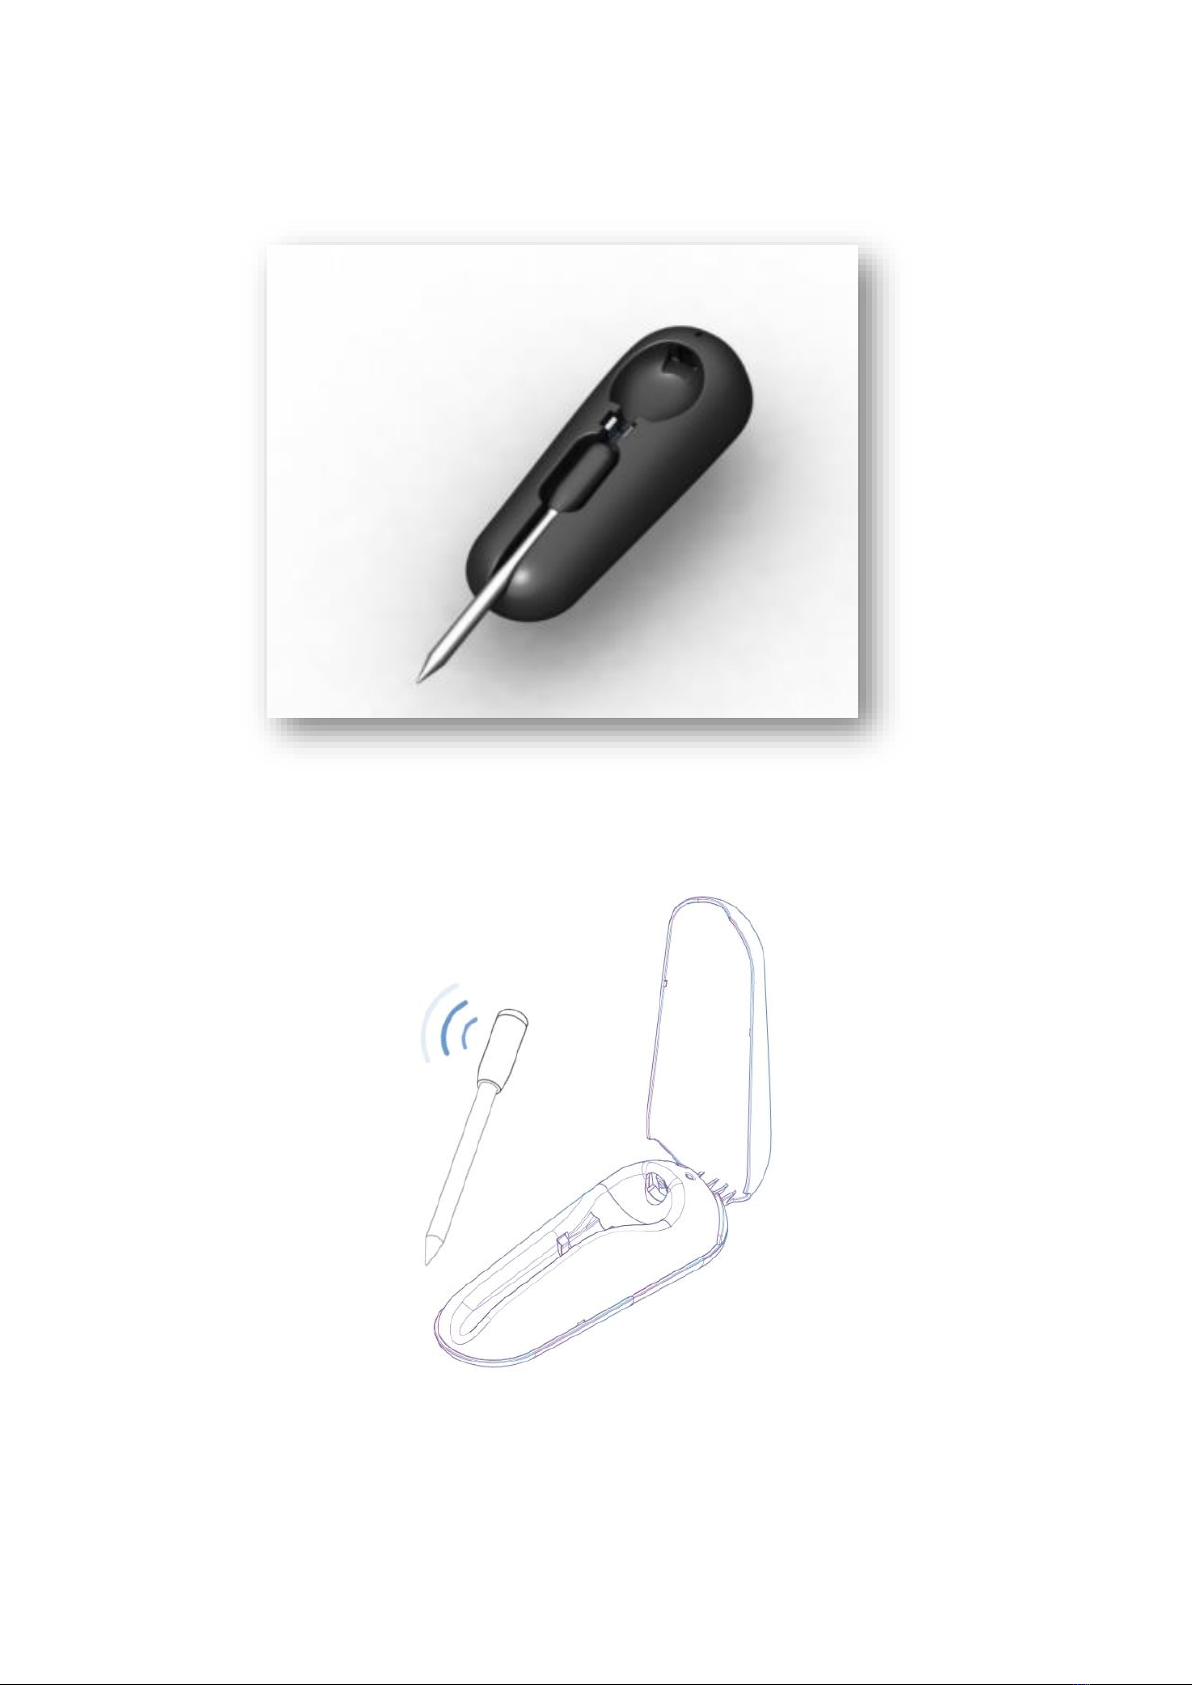
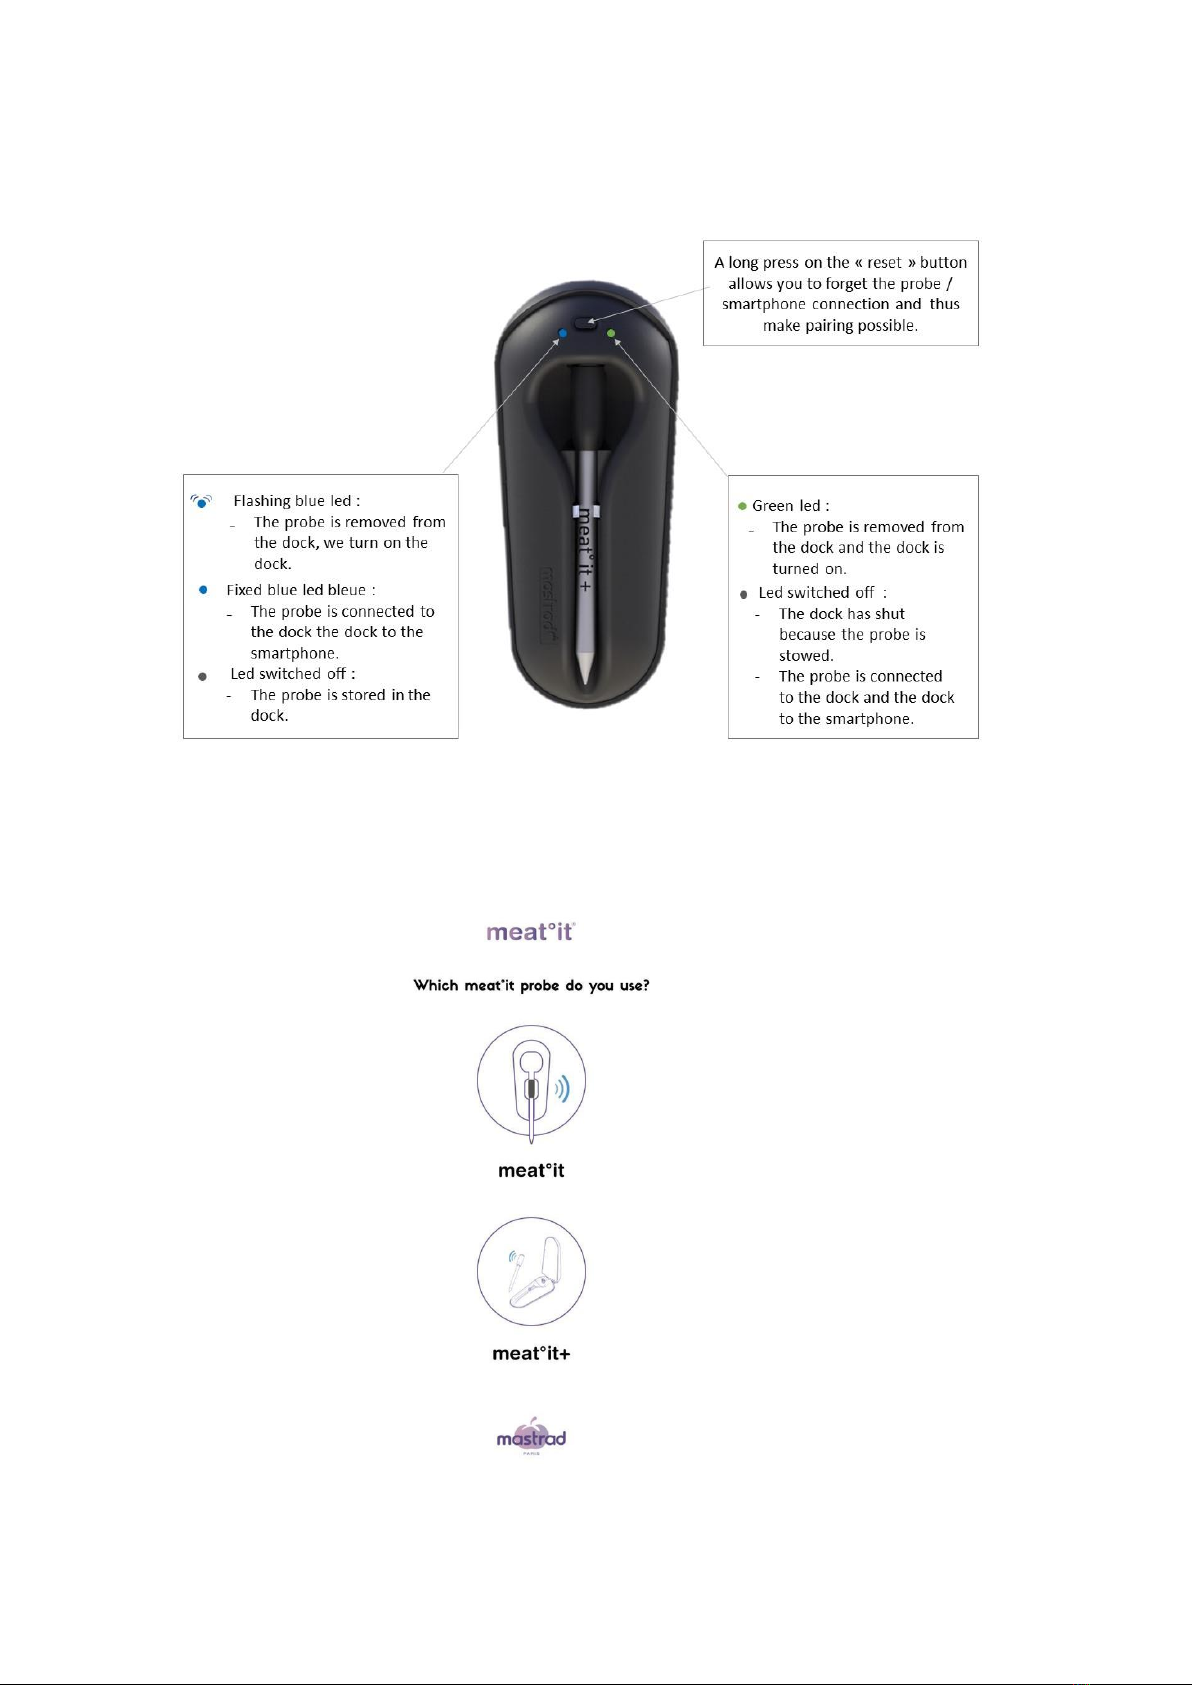
1.4. Activate the probe .................................................................................................................................. 32
2. Using the meat°it app................................................................................................................................. 33
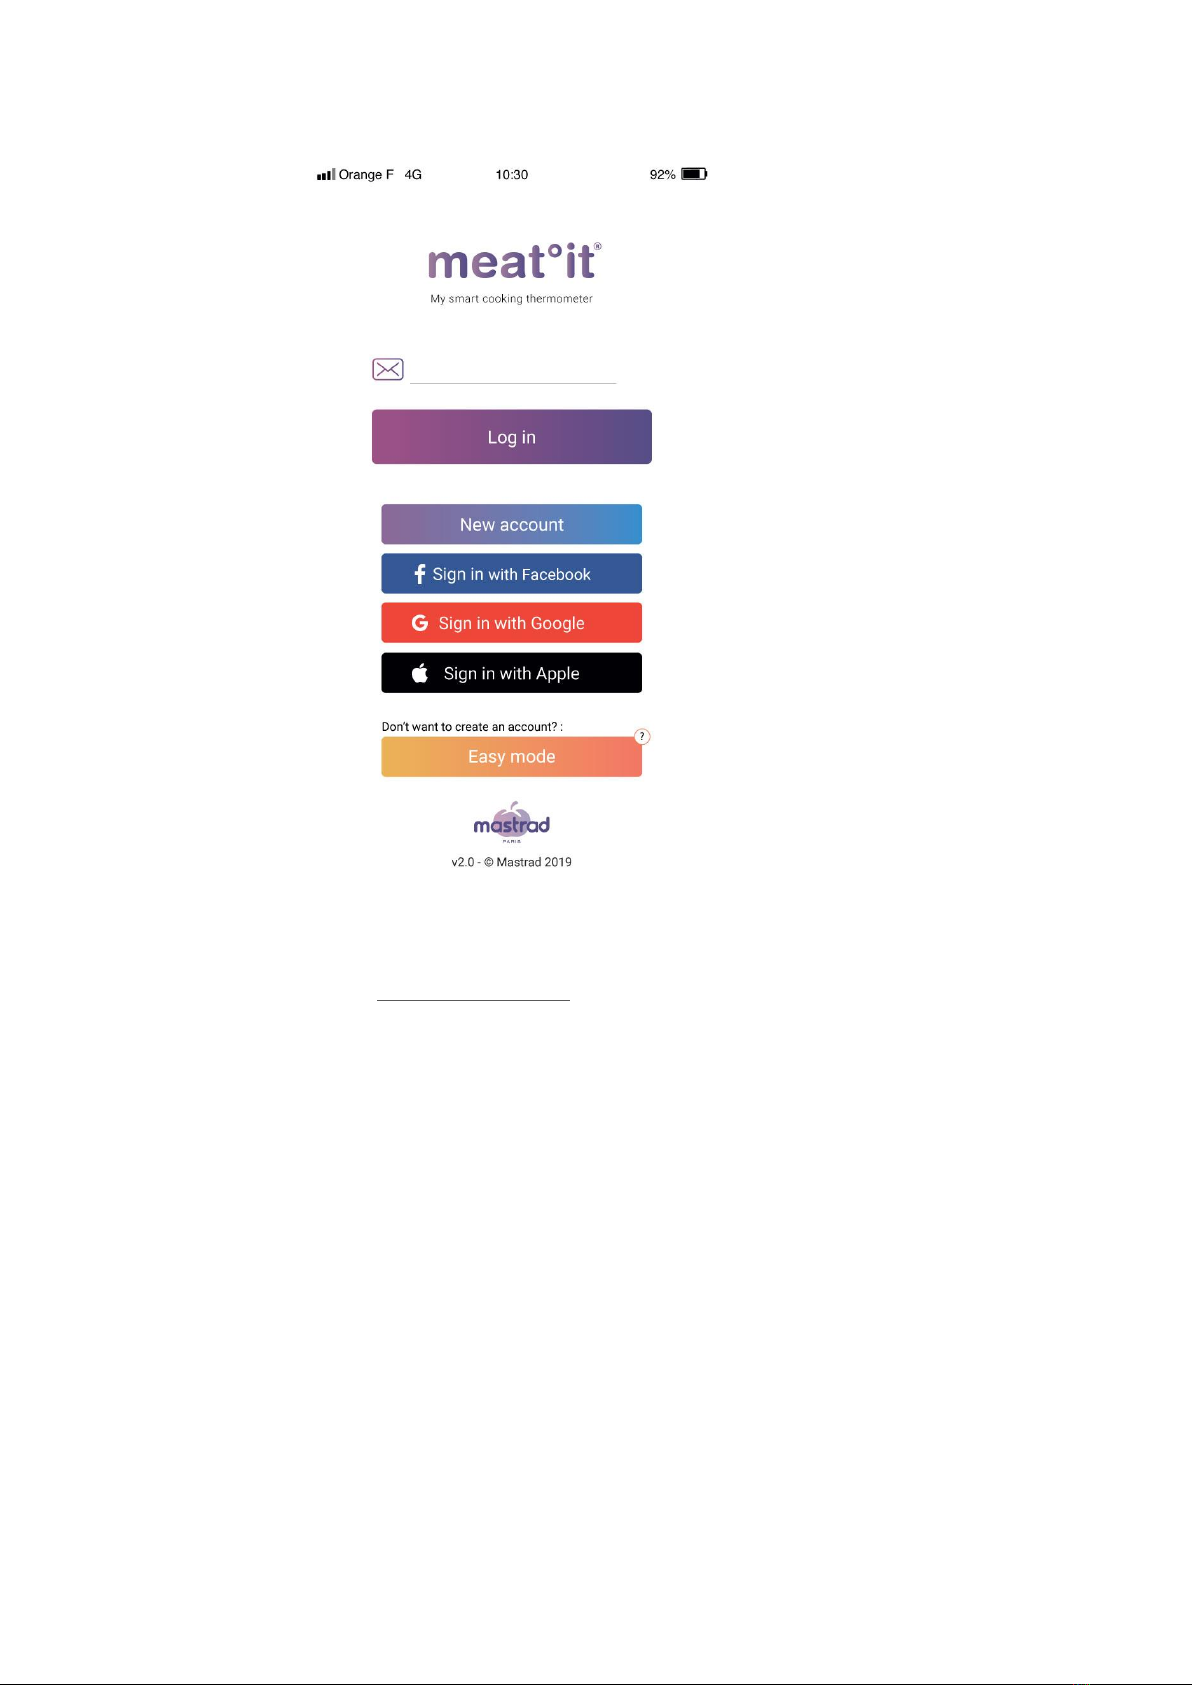
2.1. Registration and connection.................................................................................................................... 34
2.2. Connecting to the thermometer............................................................................................................... 35
2.3. Setting a “standard” cooking program..................................................................................................... 35
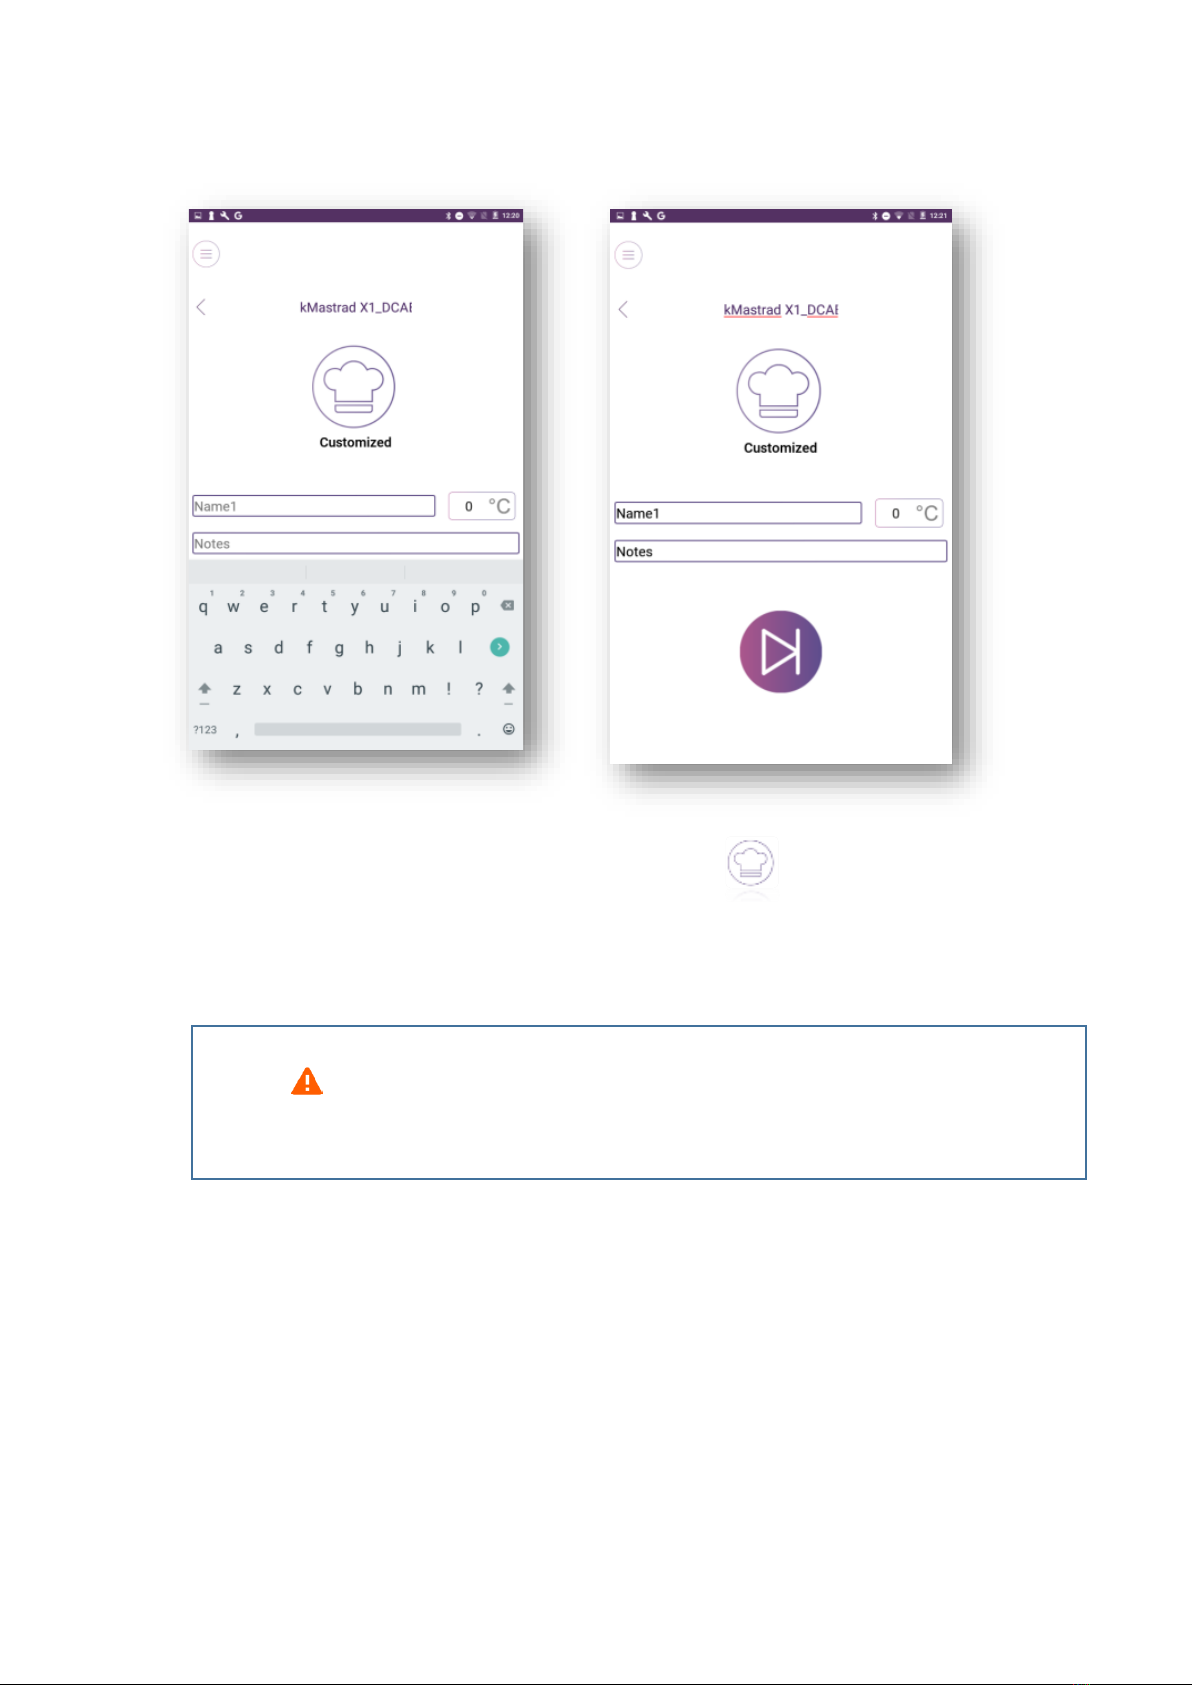
2.4. Setting a personalized cooking program .................................................................................................. 37
2.5. Wi-Fi repeater......................................................................................................................................... 37
2.6. Cooking program control screen.............................................................................................................. 40
2.7. Program an alarm................................................................................................................................... 42
2.8. Change the cooking mode ....................................................................................................................... 43
2.9. Check the graph of the evolution of the temperature ............................................................................... 44
2.10. End of cooking program ...................................................................................................................... 45
2.11. Share result......................................................................................................................................... 47
2.12. Main menu ......................................................................................................................................... 47
2.13. Cooking list ......................................................................................................................................... 48
2.14. Setting a timer/stopwatch................................................................................................................... 49
2.15. Settings/About.................................................................................................................................... 50
2.16. Help.................................................................................................................................................... 51
3. Cleaning the probe ..................................................................................................................................... 51
4. System update (firmware)........................................................................................................................... 51

31
1. Before starting
1. 1 Activate Bluetooth
1. Make sure your phone/tablet and the thermometer are sufficiently charged to proceed with the pairing
process
2
. They do not need to be fully charged but both devices must have sufficient charge not to run out of
power during the process.
2. Activate Bluetooth on your phone, if it is not already switched on.
Go to Settings> Wireless & networks > Bluetooth settings > Activate or Settings > Connections >
Activate menu and clicking on the Bluetooth icon.
To connect from an iPhone, go to Settings > Bluetooth.
With meat°it, the probe needs to be within 65 ft. (20 m) of the phone or table in order to connect.
With meat°it +, a Bluetooth relay is built into the docking station, offering a maximum range of
100 ft. (30 m) between the probe and the docking station, and also 100 ft. (30 m) between the
phone/tablet and the docking station to provide the connection.
1. 2 Install the meat°it app
Download the meat°it app from the App Store (Apple) or Google Play (Android).
Compatible versions: iOS version 9.1 or above - Android 5.0 or above. The app display is not optimized for
models older than the iPhone 5.
1.3 Charging the probe
To charge the meat°it probe, connect it to the supplied USB cable and wait for the charging indicator on the
docking station to turn from red to green.
To charge the meat°it + probe, unscrew the cover under the docking station and insert the supplied batteries.
Wait 1 hour for the probe to charge fully (and 30 mins for an 80% charge)
2
Connecting the devices that need to operate together

32
1.4 Activate the probe
To activate the probe meat°it, place it on the bottom part of the docking station.
To activate the meat°it + probe, remove it from the docking station by the tip; it is automatically activated

33
1. 5 The meat°it + docking station
2.Using the meat°it app
When starting the application, you must choose which probe you would like to connect.
When the app starts up, a “Quick start” guide will show you how to install and use the app and the thermometer.

34
2. 1 Registration and connection
When you use it for the first time, you will need to create an account so that you can log in. If you already have
an account with the website www.mastrad-paris.fr, you can enter the email address linked to your account in
order to log in. Please read and accept the terms and conditions of use.
You can also log in using your Facebook account.
You can also save time by signing up via social networks.
If you do not wish to create an account, you can enter the application with the “Easy mode” button, which
offers limited access to certain application functions.
You will be unable to use the following functions: cooking history, favorites, timer, stopwatch, recipes, photo
sharing, customer service, personalized alerts, Wi-Fi extension.

35
2.2 Connecting to the thermometer
Once you are logged in, the app automatically searches for probes within range.
Make sure Bluetooth is activated on your phone and proceed to the activation of the probe (see 1.3).
When your probe is detected, click on it to program a cooking level.
If no probe is detected, you will be asked to refresh the page.
If the Bluetooth stops when the application is working :
→IOS: reconnect your probe and take back the control of your probe. The programming is saved.
→Android: A pop up window inform you if the Bluetooth signal is lost. You will need to reconnect your
Bluetooth and reprogram your probe.
2.3 Setting a “standard” cooking program
Once you are connected to your probe, you need to select the cooking device, type of food you, the cut and the
cooking level desired. To select the type of food, scroll through the different options from left to right.
Depending on the type of food selected, you may then choose from the following cooking levels and click on
the You can also rename your probe in the summary screen with the new name that you wish to give it. You just
need to click on the probe name (here is “Mastrad WX1_DCAE”).
Once you have made your selections, click on

36

37
2. 4 Setting a personalized cooking program
When you scroll through the different types of food, the final icon is for a personalized cooking
program. You can enter a specific “Name” for your cooking program and define a temperature to the nearest
degree (up to 212°F (100°C)).
You can also leave a note about your personalized program.
2. 5 Wi-Fi repeater
You can connect a second device to improve your probe range.
You just need to connect first device with a Bluetooth connection, then on a second device allow the Wi-Fi
access in the settings. (Both devices need to be connected on the same Wi-Fi connection).
The second device will transmit the first device cooking control screen.
If you want to modify your cooking settings, please do it on the first device.
Caution : When you start a cooking program, make sure that the probe is properly inserted
into the meat/fish, with the metal part completely covered by the flesh.

38

39

40
2. 6 Cooking program control screen
A green symbol indicates that the probe you are controlling is properly paired.
A grayed-out symbol alert warn you when your probe is no longer within range.
2
5
6

41
With your meat°it + probe:
Indicates that the probe, the docking station and the phone are correctly paired.
Warns you of a loss of connection between the probe and the docking station, or between the
docking station and your phone.
Means that the probe is not connected to the docking station.
Via this icon, you can check the battery level of the probe, as well as the docking station.
This icon shows you the signal strength for your probe. The more rings around the circle,
the stronger the signal strength.

42
2. 7 Program an alarm
Click on the bell
to program an
alarm
Choose the alarm you want
Set up the timer, click on Ok
and then on the bell
The alarm are on the
cooking control screen

43
2. 8 Change the cooking mode
Click on the target
temperature
Choose the new temperature
Relaunch your cooking control
as usual

44
2. 9 Check the graph of the evolution of the temperature
Swipe to the left to see the graph
of the evolution of the
temperature.
Graph of the evolution of the
temperature. Swipe the the right
to go back to your cooking control

45
2.10 End of cooking program
Once the temperature has been reached a pop-up window warn you that the cook is done.

46
If the meat if over cooked, a red timer shows the excess cooking time. An audible alert also warns you
if the target temperature is exceeded.
To end the cooking program, click on . You can set a resting time (up to 5 minutes).
At any point, you can take a photo of your cooking by pressing . The app has to be able
to access to your camera, so make sure you give it access by clicking on “OK”. You can either take a
photo, or end your cooking program and take a photo, which generates the “Share result” screen
above.
Caution : At the end of cooking, the probe is extremely hot. To remove it, use the
extractor key located under the docking station.

47
2.11 Share result
You can share an overview of your cooking
performance containing:
- A photo of your dish
- The type of meat
- The cooking level. A performance bar shows
how much of your cooking was done too slowly,
too fast or at the correct speed
- The internal temperature
- The cooking time
- The date
2.12 Main menu
You can access the main menu at any time by clicking
on the icon at the top left of the screen.
(6) Click on “Program my probe”, to go to the set
cooking program screen (2.3)
(2) Click on “Monitor my cooking”, to go to the
cooking control screen (2.5)
(3) Click on “Cooking list”, to see your favorites/your
history (2.10)
(4) Click on “Timer”, to set a timer/stopwatch (2.9)
(5) Click on “Settings”, to access the settings (2.11)
(6) Click on “Help”, to go to the Help menu. You
can then access the quick start guide or the
instructions for use. (2.12)
(7) Click on “Store” to access the Mastrad store
Other manuals for meat it
1
This manual suits for next models
1
Table of contents
Other Mastrad Thermometer manuals
Popular Thermometer manuals by other brands

HYGIPLAS
HYGIPLAS CB891 instruction manual

PCE Health and Fitness
PCE Health and Fitness PCE-IR 425 operating instructions

Test Equipment Depot
Test Equipment Depot TRACEABLE FULL-SCALE PLUS THERMOMETER instructions

Digimate
Digimate FM35 operating instructions

ADA INSTRUMENTS
ADA INSTRUMENTS BODYTESTER instruction manual

Tegam
Tegam 911A Operation manual