MAXXMEE 09529 User manual

Fitness-Trampolin DE
1
INHALTSVERZEICHNIS
Lieferumfang 1
Symbole 2
Signalwörter 2
Bestimmungsgemäßer Gebrauch 2
Sicherheitshinweise 3
Montage 4
Vor dem Training 4
Gerät aufstellen 5
Tipps für ein gesundes Training 5
Training 6
Nach dem Training 7
Reinigung und Aufbewahrung 8
Entsorgung 8
Technische Daten 9
Teileliste 9
LIEFERUMFANG
(Bild A)
1 Hutmutter, selbstsichernd (M6) 2x
2 Innensechskantschraube
(M6 x 16mm) 2x
3 Innensechskantschraube
(M6 x 35mm) 1 x
4 Schlossschraube (M6 x 40 mm) 2x
5 Unterlegscheibe, flach 1x
6 Unterlegscheibe, gebogen 1x
7 Federring 1x
8 Sprungtuch mit Rahmen und
Sprungtuchabdeckung 1 x
9 Standbein 6 x
10 Haltestange gebeugt 1 x
11 Haltegriff 1 x
12 Haltestange gerade 1 x
13 Feststellschraube 1x
14 Innensechskantschlüssel 1 x
15 Doppelringschlüssel 1 x
• Schutzkappe 6x
• Gebrauchsanleitung 1x
Den Lieferumfang auf Vollständigkeit
und die Bestandteile auf Transport-
schäden überprüfen. Bei Schäden nicht
verwenden, sondern den Kundenservice
kontaktieren.
Eventuelle Folien, Aufkleber oder
Transportschutz vom Gerät abnehmen.
Niemals das Typenschild und eventuel-
le Warnhinweise entfernen!
09529_Inlay_DE-EN-FR-NL_A5_V1.indb 109529_Inlay_DE-EN-FR-NL_A5_V1.indb 1 04.03.2021 14:58:1504.03.2021 14:58:15

DE
2
SYMBOLE
Gefahrenzeichen: Dieses Symbol
zeigt mögliche Gefahren an. Die
dazugehörenden Sicherheits-
hinweise aufmerksam lesen und
befolgen.
Niemals auf den Rahmen treten.
Gefahr durch Umkippen.
Beim Betreten den Fuß in die
Mitte des Sprungtuches setzen.
Ergänzende Informationen
Gebrauchsanleitung vor
Benutzung lesen!
SIGNALWÖRTER
Signalwörter bezeichnen Gefährdungen
bei Nichtbeachtung der dazugehörigen
Hinweise.
WARNUNG – mittleres Risiko, kann
schwere Verletzung oder Tod zur Folge
haben
HINWEIS – kann Risiko von Sachschäden
zur Folge haben
BESTIMMUNGSGEMÄßER
GEBRAUCH
■Dieses Gerät ist als stationäres
Fitness-Trampolin zum Ganzkörper-
training bestimmt.
■Das Gerät ist für Fitness-Übungen
bestimmt. Es eignet sich nicht für
hohe Sprünge, Saltos o.Ä.
■Das Gerät ist ausschließlich für den
Innenbereich bestimmt.
■Das Gerät ist nicht für medizinische
oder therapeutische Zwecke konzipiert.
■Das Gerät ist nicht für Kinder unter
14Jahren geeignet.
■Das Gerät darf nicht von mehreren
Personen gleichzeitig verwendet
werden.
■Das Gerät ist bis maximal 100kg
belastbar.
■Dieses Gerät ist ausschließlich für
die Verwendung im Heimbereich
(Klasse H) konzipiert.
■Das Gerät ist für den privaten Ge-
brauch, nicht für eine gewerbliche
Nutzung bestimmt.
Liebe Kundin, lieber Kunde,
wir freuen uns, dass du dich für das MAXXMEE Fitness-Trampolin entschieden hast.
Du kannst deine Ausdauer fördern und diverse Muskelgruppen stärken – ohne vor
die Tür gehen zu müssen. Einfach und schnell aufgebaut, bietet das Trampolin mit
Gummiseil-Federung eine gelenkschonende Alternative zum Joggen. Die höhenver-
stellbare Haltestange, die sich auf 108, 118 oder 128 cm ausziehen lässt, bietet zu-
sätzlichen Halt beim Training. Solltest du Fragen zum Trainigsgerät sowie zu Ersatz- /
Zubehörteilen haben, kontaktiere den Kundenservice über unsere Website:
www.dspro.de/kundenservice
Wir wünschen dir viel Freude an deinem MAXXMEE Fitness-Trampolin.
Informationen zur Gebrauchsanleitung
Lies vor dem ersten Gebrauch des Gerätes diese Gebrauchsanleitung sorgfältig
durch und bewahre sie für spätere Fragen und weitere Nutzer auf. Sie ist ein Be-
standteil des Gerätes. Hersteller und Importeur übernehmen keine Haftung, wenn
die Angaben in dieser Gebrauchsanleitung nicht beachtet werden.
09529_Inlay_DE-EN-FR-NL_A5_V1.indb 209529_Inlay_DE-EN-FR-NL_A5_V1.indb 2 04.03.2021 14:58:4404.03.2021 14:58:44

Fitness-Trampolin DE
3
■Das Gerät nur für den angegebenen
Zweck und nur wie in der Gebrauchs-
anleitung beschrieben nutzen. Jede
weitere Verwendung gilt als bestim-
mungswidrig.
■Von der Gewährleistung ausge-
schlossen sind alle Mängel, die
durch unsachgemäße Behandlung,
Beschädigung oder Reparaturversu-
che entstehen. Dies gilt auch für den
normalen Verschleiß.
SICHERHEITSHINWEISE
■Das Sicherheitsniveau des Gerätes
kann nur dann gehalten werden, wenn
es regelmäßig auf Schäden kontrol-
liert wird. Daher das Gerät vor jeder
Benutzung auf Beschädigungen (lo-
ckere Schrauben, verschlissene Teile,
etc.) überprüfen. Sollten während der
Benutzung ungewöhnliche Geräusche
des Gerätes wahrgenommen werden,
das Training sofort abbrechen. Defek-
te Teile sofort austauschen lassen und
das Gerät bis zur Instandsetzung nicht
benutzen! In Schadensfällen den Kun-
denservice oder eine Fachwerkstatt
kontaktieren. Selbst keine Verände-
rungen am Gerät vornehmen.
WARNUNG – Verletzungs-
gefahr
■Dieses Gerät kann von Kindern ab
14 Jahren sowie von Personen mit
eingeschränkten sensorischen oder
geistigen Fähigkeiten oder mangels
Erfahrung und / oder mangels Wissen
benutzt werden, wenn sie beauf-
sichtigt oder bezüglich des sicheren
Gebrauchs des Gerätes unterwiesen
wurden und die daraus resultieren-
den Gefahren verstanden haben.
■Das Gerät ist kein Spielzeug! Eltern
und andere Aufsichtspersonen soll-
ten sich ihrer Verantwortung bewusst
sein, dass aufgrund des natürlichen
Spieltriebes und der Experimentier-
freudigkeit der Kinder mit Situationen
und Verhaltensweisen zu rechnen ist,
für die das Gerät nicht gebaut ist.
■Das Gerät in der Gegenwart von Kin-
dern und Tieren nicht unbeaufsichtigt
lassen.
■Bei Unsicherheiten bezüglich der Ge-
sundheit (Risikogruppe) sowie langen
Perioden ohne sportliche Betätigung,
vor der Benutzung des Gerätes einen
Arzt konsultieren. Gegebenenfalls
das Trainingsprogramm mit ihm
abstimmen.
■Schwangere oder Frauen kurz nach
Entbindung sollten das Gerät nicht
bzw. nur nach Rücksprache mit ihrem
Arzt benutzen.
■Das Befestigungs- und Verpackungs-
material von Kindern und Tieren fern-
halten. Es besteht Erstickungsgefahr.
■Niemals auf den Rahmen treten oder
springen. Es besteht Kippgefahr!
HINWEIS – Risiko von Material- und
Sachschäden
■Das Gerät schützen vor: extremen
Temperaturen, starken Tempera-
turschwankungen, langanhaltender
Feuchtigkeit, Nässe und direkter
Sonneneinstrahlung.
■Das Gerät von scharfen und spitzen
Gegenständen fernhalten.
■Nur Original-Zubehörteile des Her-
stellers verwenden, um die Funkti-
onsweise des Gerätes nicht zu beein-
trächtigen und eventuelle Schäden zu
verhindern.
09529_Inlay_DE-EN-FR-NL_A5_V1.indb 309529_Inlay_DE-EN-FR-NL_A5_V1.indb 3 04.03.2021 14:58:4504.03.2021 14:58:45

DE
4
MONTAGE
Dieser Montageanleitung Schritt für
Schritt folgen, um Fehler beim Auf-
bau und der späteren Anwendung zu
vermeiden. Beim Zusammenschrauben
grundsätzlich mit dem Doppelringschlüs-
sel(15) die Hutmuttern fixieren und den
Innensechskantschlüssel(14) für die
Schrauben verwenden.
1. Alle Teile vorsichtig auf den Boden
legen. Vorsichtshalber eine Schutzfo-
lie oder Decke unterlegen, um evtl.
Beschädigungen von empfindlichen
Bodenbelägen zu vermeiden.
2. Den Rahmen mit dem Sprungtuch(8)
so hinlegen, dass die Unterseite nach
oben zeigt.
3. BildB: Die Schutzkappen von den
Gewinden abschrauben und aufbe-
wahren.
4. BildC: Die Standbeine (9) auf die
Gewinde des Rahmen setzen und
festschrauben.
5. BildD: Den Rahmen auf die Stand-
beine stellen. Die gerade Halte-
stange(12) so mit der Halterung auf
den Rahmen aufsetzen, dass die
Haltestange nach außen zeigt. An-
schließend diese mit den zwei kurzen
Innensechskantschrauben (2) am
Rahmen befestigen.
6. BildE: Die Haltestange zusätzlich mit
den zwei Schlossschrauben(4) und
Hutmuttern(1) am Standbein fixieren.
7. BildF: Die Gummibandenden der
Abdeckung hinter dem Standbein
zusammenbinden (auf der Innenseite
des Standbeines).
8. BildG: Den Haltegriff (11) in die
Aufnahme der gebogenen Halte-
stange(10) einsetzen. Die gebogene
Unterlegscheibe (6) auf den Haltegriff
auflegen und diesen mit der entspre-
chendenInnensechskantschraube (3)
festschrauben.
9. BildH: Die flache Unterlegscheibe(5)
und den Federring (7) auf das Gewin-
de der Feststellschraube (13) fädeln.
Nun die gebogene Haltestange in die
gerade Haltestange stecken und von
außen mit der Feststellschraube auf
einer der drei vorgegebenen Höhe
fixieren.
Beachten: Die gebogene Haltestange
nur in den vorgegebenen Löchern
fixieren und maximal bis zur MIN-
Markierung herausziehen.
Das Auseinandernehmen des Gerätes
erfolgt in umgekehrter Reihenfolge.
VOR DEM TRAINING
Aufwärmen sollte grundsätzlich zu jeder
sportlichen Tätigkeit gehören. Dadurch
werden alle physischen und psychischen
Komponenten der Leistungsfähigkeit an-
geregt und verbessert. Außerdem wird
das Verletzungsrisiko minimiert.
Mit den folgenden Übungen werden
große Muskelgruppen durch Bewegung
erwärmt.
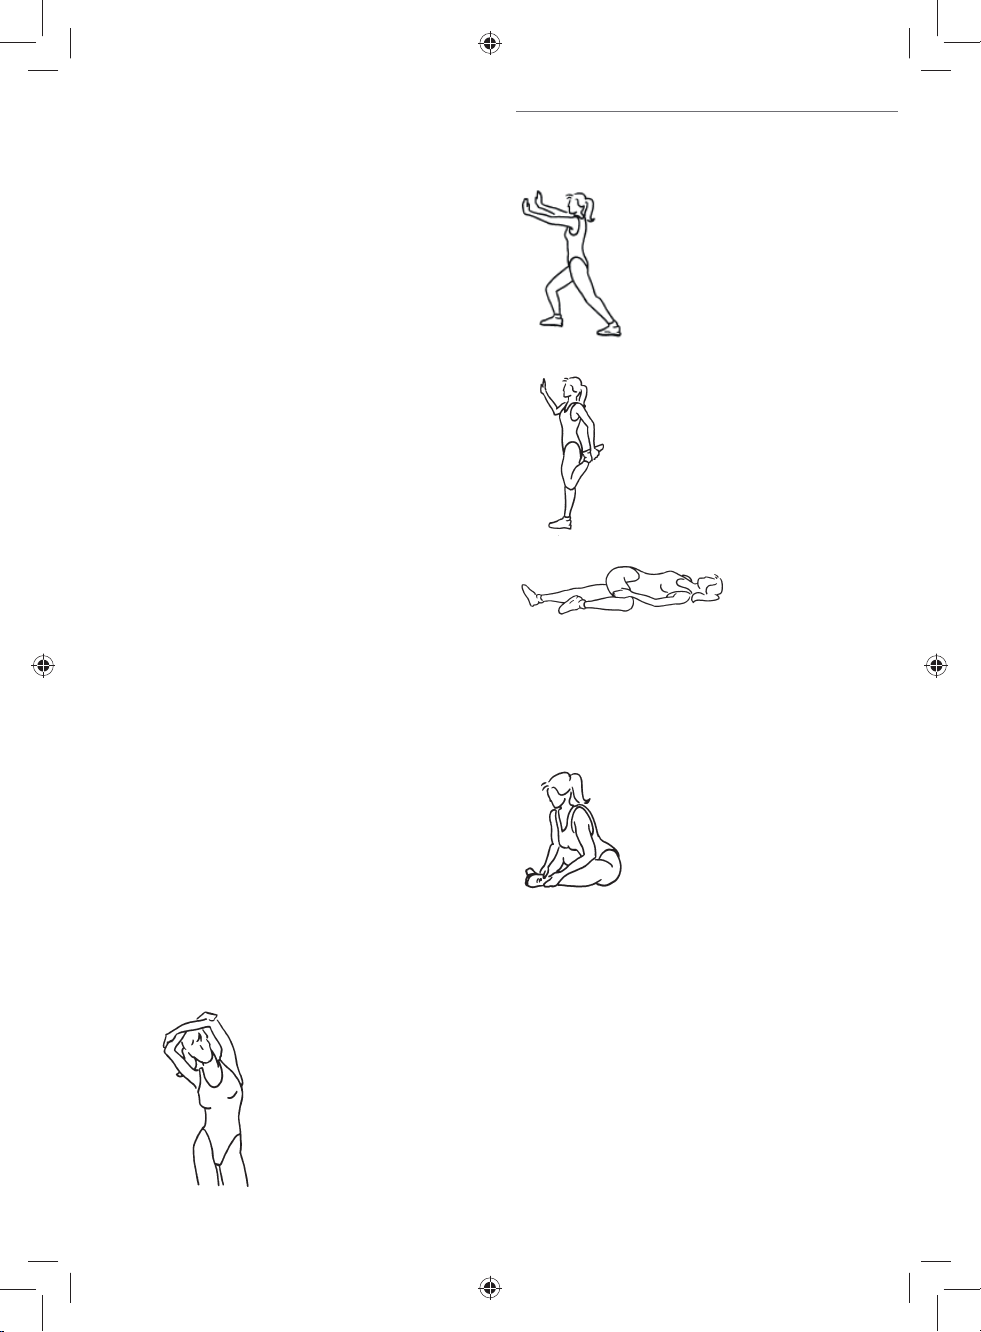
• Joggen: Einige Minuten locker am
Platz oder durch den Raum laufen.
• Kniebeugen: Schulterbreit hinstellen,
Oberkörper gerade halten und die
Knie beugen und wieder strecken.
Ca. 5 – 10 Wiederholungen.
• Oberkörper-Twist: Schulterbreit
hinstellen, Oberkörper gerade halten,
Arme seitlich auf Schulterhöhe anhe-
ben und beugen, so dass die Hände
vor der Brust sind. Den Oberkörper so
weit wie möglich nach rechts und links
drehen. Ca. 10Wiederholungen.
• Seitenbeuger: Schulterbreit hin-
stellen, Oberkörper gerade halten.
Dann den Oberkörper langsam zu
den Seiten neigen. Den Arm auf der
gestreckten Körperseite dabei über
den Kopf strecken. Ca. 10Wiederho-
lungen.
09529_Inlay_DE-EN-FR-NL_A5_V1.indb 409529_Inlay_DE-EN-FR-NL_A5_V1.indb 4 04.03.2021 14:58:4604.03.2021 14:58:46

Fitness-Trampolin DE
5
• Armkreisen: Aufrecht stehen, rech-
ten Arm strecken und nach vorne
kreisen. Nach 5 – 10 Kreiseln die
Richtung wechseln. Anschließend mit
dem linken Arm kreisen.
GERÄT AUFSTELLEN
Beachten!
■Empfindliche Oberflächen (Laminat,
Parkett etc.) ggf. mit einer rutschfes-
ten Schutzmatte vor Kratzern etc.
schützen.
(Bild I)
Das Gerät auf einem standsicheren und
waagerechten Untergrund aufstellen.
Je nach Körpergröße, genügend Platz
zu allen Seiten lassen (1 – 1,6Meter zu
allen Seiten, 2 – 3 Meter nach oben),
damit beim Training genügend Freiraum
vorhanden ist.
Der Freibereich muss den Bereich für
den Notfall-Abstieg einschließen. Sollten
Geräte zueinander in direkter Nachbar-
schaft aufgestellt sein, können sie sich
einen Freibereich teilen.
TIPPS FÜR EIN GESUNDES
TRAINING
Bei Müdigkeit und Erschöpfung
nicht trainieren.
Nie mit vollem Magen trainieren.
Etwa eine Stunde vor und nach
dem Training keine Mahlzeiten zu
sich nehmen.
Nie nach Alkohol-, Drogen- oder
Medikamentenkonsum trainieren.
Immer daran denken, dass der
Körper bei einer sportlichen Betä-
tigung viel Flüssigkeit braucht.
Immer in einem gut belüfteten
Raum trainieren.
Es geht nicht darum, auf die Schnelle ein
paar Übungen zu machen, sondern lang-
fristig und regelmäßig zu trainieren.
Es hängt von der jeweiligen physischen
Verfassung ab, wie schnell Fortschritte
erzielt werden. Man sollte langsam und
mit kürzeren Einheiten beginnen und
dem Körper Zeit geben, sich anzupas-
sen. Je dauerhafter und regelmäßiger
man trainiert, umso länger kann man die
Einheiten gestalten. Wir empfehlen eine
Trainingszeit von ca. 20 bis 30Minuten
am Gerät. Regelmäßig Pausen einlegen.
Allmählich die Intensität bis zur ge-
wünschten und noch beherrschbaren
Leistungsstufe steigern. Das Training mit
geringer Intensität ausklingen lassen.
09529_Inlay_DE-EN-FR-NL_A5_V1.indb 509529_Inlay_DE-EN-FR-NL_A5_V1.indb 5 04.03.2021 14:58:4604.03.2021 14:58:46

DE
6
TRAINING
Beachten!
■Vor dem Training sicherstellen, dass
das Gerät korrekt zusammengebaut
und die Haltestange richtig arretiert ist.
■Das Gerät nicht benutzen, wenn es
feucht oder nass ist.
■Nicht von hohen Oberflächen auf das
Gerät springen.
■Nicht vom Gerät auf den Boden oder
andere Gegenstände springen.
■Nur auf dem Sprungtuch bewegen,
niemals auf den Rahmen treten bzw.
springen.
■Nicht mit dem gesamten Körper-
gewicht auf die Haltestange stützen.
Es besteht Kippgefahr.
■Bei den Übungen gut sitzende, locke-
re, bequeme Kleidung und rutschfes-
te Sportschuhe tragen. Nicht barfuß
trainieren.
■ACHTUNG! Das Training sofort
unterbrechen, wenn Schwächegefühl,
Schwindel o. Ä. auftritt. Bei Übelkeit,
Brust- oder Gliederschmerzen, Herz-
klopfen oder anderen Symptomen
sofort an einen Arzt wenden.
■Wir weisen ausdrücklich darauf hin,
dass bei unsachgemäßem Gebrauch
des Gerätes und übermäßigem Trai-
ning Gesundheitsschäden möglich
sind.
Im Folgenden werden einige Grundtech-
niken für das Training mit dem Trampolin
beschrieben. Umfangreichere Fitness-
übungen sind im Internet zu finden.
Allgemeines
Zum Betreten des Gerätes einen Fuß in
die Mitte des Sprungtuches (8) setzen
und das andere Bein nachziehen. Für
mehr Standsicherheit am Haltegriff (11)
festhalten. Die Höhe der Haltestan-
ge(10) an die Körpergröße anpassen.
Grundposition: Aufrecht und hüftbreit
mit Blickrichtung zur Haltestange auf
dem Sprungtuch stehen. Für mehr
Standsicherheit Hände auf den Haltegriff
legen.
Zum Verlassen des Gerätes einen Schritt
über den Rand hinaus direkt auf den
Boden machen und ggf. am Haltegriff
festhalten.
Wippen
Diese Übung eignet sich ideal als Auf-
wärmübung:
1. Grundposition einnehmen.
2. Gewicht vom linken auf den rechten
Fuß und zurück sowie von der Ferse
auf den Ballen und zurück verlagern.
Arme und Schultern schwingen locker
nach vorne und nach hinten mit.
Beachten!
• Nur mit den Füßen federn.
• Zehen haben stets Kontakt zum
Sprungtuch.
• Beim Landen die Füße abrollen, um
nicht in einer ungesunden High-Heel-
Pumps-Stellung zu verbleiben.
Walken
Diese Übung eignet sich zur Verbesse-
rung der Kondition und als Aufwärm-
übung.
1. Grundposition einnehmen.
2. Gewicht von einem Bein auf das
andere verlagern.
3. Das unbelastete Bein leicht anhe-
ben und beginnen auf der Stelle zu
gehen. Die Arme schwingen gegen-
läufig mit.
Beachten!
• Für mehr Dynamik, die Knie kräftig
anheben, während die Arme vollstän-
dig durchschwingen.
• Falls die Kondition es zulässt, das
Tempo langsam steigern.
09529_Inlay_DE-EN-FR-NL_A5_V1.indb 609529_Inlay_DE-EN-FR-NL_A5_V1.indb 6 04.03.2021 14:58:4604.03.2021 14:58:46

Fitness-Trampolin DE
7
Laufen
Diese Übung eignet sich zur Verbes-
serung der Kondition und stärkt den
Gleichgewichtssinn.
1. Grundposition einnehmen.
2. Anfangen auf der Stelle zu laufen.
Die Füße werden vom Vorderfuß zur
Ferse hin abgerollt, die Knie sind
leicht gebeugt. Die Arme schwingen
gegenläufig mit.
Beachten!
Körper während der Übung stets auf-
recht halten.
Hüpfen
Diese Übung eignet sich zur Verbesse-
rung von Kraft und Kondition sowie zur
Kalorienverbrennung.
1. Grundposition einnehmen.
2. Die Bauchmuskeln anspannen.
3. Beginnen zu hüpfen, sodass die Füße
leicht vom Springtuch abheben. Die
Arme schwingen locker mit.
Beachten!
• Körper während der Übung stets
aufrecht halten.
• Entscheidend ist nicht die Sprunghö-
he, sondern die Menge der Sprünge
pro Zeiteinheit.
NACH DEM TRAINING
Nach dem Training immer Dehnübungen
durchführen, um den Kreislauf langsam
auf normales Niveau zu bringen. Im Fol-
genden ein paar Beispielübungen:
Oberkörper: Aufrecht
hinstellen, Arme über
dem Kopf verschränken
und mit der rechten Hand
den linken Ellbogen nach
rechts ziehen. Der Ober-
köper geht leicht mit.
15 – 20 Sekunden lang
halten. Seitenwechsel.
Waden: Hinstellen. Das
rechte Bein nach vor-
ne stellen und etwas
anwinkeln, während
das linke Bein gestreckt
bleibt. Die linke Ferse
auf den Boden drücken.
15 – 20Sekunden lang
halten. Seitenwechsel.
Vorderseite Ober-
schenkel: Auf einem
Bein stehen, das andere
anwinkeln und mit der
Hand den Fuß umfassen.
Zum Gesäß ziehen und
15 – 20Sekunden lang
halten. Seitenwechsel.
Rücken: Flach auf den Rücken legen.
Das rechte Bein anwinkeln und über das
ausgestreckte linke Bein legen. Hüfte
dreht sich, beide Schultern müssen auf
dem Boden bleiben. 15 – 20Sekunden
lang halten. Seitenwechsel.
Innenseite Oberschenkel:
Auf den Boden setzen,
Knie nach außen drehen,
Fußsohlen zusammen-
legen und zum Körper
ziehen. Hände um die
Fußgelenke legen und
die Knie mit den Ellbo-
gen leicht zum Boden
drücken. Den Rücken
dabei durchstrecken.
15 – 20Sekunden lang
halten.
09529_Inlay_DE-EN-FR-NL_A5_V1.indb 709529_Inlay_DE-EN-FR-NL_A5_V1.indb 7 04.03.2021 14:58:4704.03.2021 14:58:47

DE
8
Gesamtes Bein: In die Hocke gehen,
Hände neben den Füßen auf dem Boden
abstützen und ein Bein nach hinten
durchstrecken. Ober- und Unterschen-
kel des vorderen Beines bilden einen
rechten Winkel, der Fuß liegt ganz auf
dem Boden auf. 15 – 20 Sekunden lang
halten. Seitenwechsel.
Schultern/Rücken: Im
Schneidersitz mit gera-
dem Rücken auf dem
Boden sitzen. Hände fal-
ten/umfassen und Arme
über dem Kopf ausstre-
cken. Rücken strecken.
15 – 20 Sekunden lang
halten.
REINIGUNG UND
AUFBEWAHRUNG
Beachten!
■Zum Reinigen keine scharfen oder
scheuernden Reinigungsmittel oder
Reinigungspads verwenden. Diese
können die Oberflächen beschädigen.
• Das Gerät bei Bedarf mit einem
feuchten Tuch und ggf. einem milden
Reinigungsmittel abwischen.
• Das Gerät regelmäßig und vor
jedem Gebrauch auf Schäden und
Verschleißspuren prüfen.
• Zur platzsparenden Lagerung die
Haltestange (12) und die Standbei-
ne(9) abmontieren (siehe Kapitel
„Montage“). In diesem Fall die
Schutzkappen auf die Gewinde auf-
schrauben.
• Das Sicherheitsniveau des Gerätes
kann nur dann gehalten werden, wenn
es regelmäßig auf Schäden kontrol-
liert wird. Daher das Gerät vor jeder
Benutzung auf Beschädigungen (lo-
ckere Schrauben, verschlissene Teile,
etc.) überprüfen. Auf verschleißan-
fällige Teile wie die Gummiseile und
das Sprungtuch besonders achten.
Sollten während der Benutzung un-
gewöhnliche Geräusche des Gerätes
wahrgenommen werden, das Training
sofort abbrechen. Defekte Teile sofort
austauschen lassen und das Gerät bis
zur Instandsetzung nicht benutzen! In
Schadensfällen den Kundenservice
oder eine Fachwerkstatt kontaktieren.
Selbst keine Veränderungen am Gerät
vornehmen.
• Das Gerät außer Reichweite von Kin-
dern und Tieren an einem trockenen,
vor direkter Sonneneinstrahlung und
Frost geschützten Ort aufbewahren.
ENTSORGUNG
Das Verpackungsmaterial um-
weltgerecht entsorgen und der
Wertstoffsammlung zuführen. Soll
das Gerät nicht mehr verwendet
werden, auch dieses umweltge-
recht entsorgen.
09529_Inlay_DE-EN-FR-NL_A5_V1.indb 809529_Inlay_DE-EN-FR-NL_A5_V1.indb 8 04.03.2021 14:58:4704.03.2021 14:58:47

Fitness-Trampolin DE
9
TECHNISCHE DATEN
Artikelnummer: 09529
ID Gebrauchsanleitung: Z 09529 M DS V1 0321 dk
Modellnummer: JHK-15682
Klasse: H (Verwendung im Heimbereich)
Max. Belastbarkeit: 100kg
Maße: 101,6 x 127,5 x 34 cm
Gewicht: ca. 7 kg
Einstellhöhe Haltestange: ca. 108 cm / 118 cm / 128 cm
Alle Rechte vorbehalten.
TEILELISTE
(Bild J)
Teilenr. Bezeichnung Anzahl Abmessungen
1 Griffkappe 2
2Griff 2
3 Innensechskantschraube 1 M6 x 35mm
4Griffstange 1
5 Haltestange, gebogen 1
6 Sprungtuchabdeckung 1
7Federring 1
8 Unterlegscheibe, flach 1
9Feststellschraube 1
10 Rahmen 1
11 Haltestange, gerade 1
12 Sprungtuch 1
13 Innensechskantschraube 2 M6 x 16mm
14 Hutmutter, selbstsichernd 2 M6
15 Schlossschraube 2 M6 x 40mm
16 Gummiseil mit Kugel 30
17 Standbein 6
18 Gummifuß 6
09529_Inlay_DE-EN-FR-NL_A5_V1.indb 909529_Inlay_DE-EN-FR-NL_A5_V1.indb 9 04.03.2021 14:58:4804.03.2021 14:58:48

EN
10
LIST OF CONTENTS
Items Supplied 10
Symbols 11
Signal Words 11
Intended Use 11
Safety Notices 12
Assembly 12
Before Training 13
Setting Up the Device 13
Tips For Healthy Training 14
Training 14
After Training 16
Cleaning and Storage 17
Disposal 17
Technical Data 17
Parts List 18
ITEMS SUPPLIED
(Picture A)
1 Cap nut, self-locking (M6) 2x
2 Allen bolt (M6 x 16 mm) 2x
3 Allen bolt (M6 x 35mm) 1x
4 Carriage bolt (M6 x 40mm) 2x
5 Regular washer, flat 1x
6 Regular washer, curved 1x
7 Spring washer 1x
8 Jumping mat with frame and jumping
mat cover 1 x
9 Support leg 6 x
10 Holding rod, bent 1 x
11 Handle 1 x
12 Holding rod, straight 1 x
13 Locking screw 1x
14 Hex key 1 x
15 Double-ended ring spanner 1 x
• Protective cap 6x
• Operating instructions 1 x
Check the items supplied for complete-
ness and the components for transport
damage. If you find any damage, do not
use the device but contact our customer
service department.
Remove any possible films, stickers or
transport protection from the device.
Never remove the rating plate and any
possible warnings!
09529_Inlay_DE-EN-FR-NL_A5_V1.indb 1009529_Inlay_DE-EN-FR-NL_A5_V1.indb 10 04.03.2021 14:58:4804.03.2021 14:58:48

Fitness Trampoline EN
11
SYMBOLS
Danger symbol: This symbol indi-
cates possible dangers. Read the
associated safety notices carefully
and follow them.
Never step on the frame.
Danger of tipping over.
To climb onto the device, place
the foot in the middle of the
jumping mat.
Supplementary information
Read the operating instructions
before use!
SIGNAL WORDS
Signal words indicate hazards if the asso-
ciated notices are not followed.
WARNING – medium risk, may result in
serious injury or death
NOTICE – may result in risk of damage to
material
INTENDED USE
■This device is intended to be used as
a fixed fitness trampoline for training
the whole body.
■The device is designed for fitness
exercises. It is not suitable for high
jumps, saltos or similar moves.
■The device is designed exclusively for
use indoors.
■The device is not designed for medical
or therapeutic purposes.
■The device is not suitable for children
under 14 years of age.
■The device must not be used by
several people at the same time.
■The device is designed for a maximum
load of 100kg.
■This device is designed exclusively for
use in the home (Class H).
■The device is for personal use only
and is not intended for commercial
applications.
■Use the device only for the specified
purpose and as described in the
operating instructions. Any other use
is deemed to be improper.
Dear Customer,
We are delighted that you have chosen the MAXXMEE fitness trampoline. You can
boost your stamina and strengthen various muscle groups – without needing to leave
your house. Quick and easy to set up, the trampoline with elastic rope cushioning offers
an alternative to jogging that is gentle on your joints. The height-adjustable holding
rod, which can be extended to 108, 118 or 128 cm, also provides extra stability when
training.
If you have any questions about the training device and about spare parts / accessories,
contact the customer service department via our website:
www.dspro.de/kundenservice
We hope you have a lot of fun with your MAXXMEE fitness trampoline.
Information About the Operating Instructions
Before using the device for the first time, please read through these operating in-
structions carefully and keep them for future reference and other users. They form an
integral part of the device. The manufacturer and importer do not accept any liability
if the information in these operating instructions is not complied with.
09529_Inlay_DE-EN-FR-NL_A5_V1.indb 1109529_Inlay_DE-EN-FR-NL_A5_V1.indb 11 04.03.2021 14:58:4904.03.2021 14:58:49

EN
12
■The warranty does not cover faults
caused by incorrect handling, damage
or attempted repairs. The same ap-
plies to normal wear and tear.
SAFETY NOTICES
■The safety level of the device can
only be maintained if it is regularly
checked for damage. Each time
before you use the device, it should
therefore be inspected for any signs
of damage (loose screws, worn parts,
etc.). If you hear unusual noises from
the device during use, stop exercising
immediately. Have defective parts
replaced immediately and do not use
the device until it has been repaired!
In the event of any damage, please
contact the customer service depart-
ment or a specialist workshop. Do not
make any modifications to the device
yourself.
WARNING – Danger of Injury
■This device may be used by children
aged 14 and over and by people with
reduced sensory or mental abilities or
a lack of experience and / or knowl-
edge if they are supervised or have
received instruction on how to use the
device safely and have understood
the dangers resulting from failure
to comply with the relevant safety
precautions.
■The device is not a toy! Parents and
other people in supervisory capacities
should be aware of their responsibil-
ity because, due to children’s natural
instinct for play and desire to experi-
ment, it is foreseeable that situations
and behaviour will occur for which the
device is not constructed.
■Do not leave the device unattended in
the presence of children and animals.
■In the event of uncertainties regarding
health (risk group) or after long breaks
without any sporting activity, consult a
doctor before using the device.
If necessary, coordinate the training
programme with your doctor.
■Pregnant women or women who have
recently given birth should not use
the device, or should use it only after
consultation with their doctor.
■Keep the fastening and packaging
materials away from children and ani-
mals. There is a danger of suffocation.
■Never step or jump on the frame.
There is a risk of tipping over!
NOTICE – Risk of Damage to
Material and Property
■Protect the device from: extreme
temperatures, strong temperature
fluctuations, persistent moisture, wet
conditions and direct sunlight.
■Keep the device away from sharp and
pointed objects.
■Use only original accessories from the
manufacturer in order to guarantee
that there is no interference that may
prevent the device from working and
to avoid possible damage.
ASSEMBLY
Follow these assembly instructions step
by step to prevent any errors during set-
up and subsequent use. When screwing
together, generally use the double-ended
ring spanner(15) to tighten the cap nuts
and use the hex key(14) for the bolts.
1. Place all parts carefully on the floor.
To be on the safe side, place a pro-
tective film or blanket underneath
the parts to prevent any damage to
delicate floor coverings.
2. Lay down the frame with the jumping
mat (8) so that the bottom is facing
upwards.
09529_Inlay_DE-EN-FR-NL_A5_V1.indb 1209529_Inlay_DE-EN-FR-NL_A5_V1.indb 12 04.03.2021 14:58:4904.03.2021 14:58:49

Fitness Trampoline EN
13
3. Picture B: Unscrew the protective
caps from the threads and keep them
somewhere safe.
4. Picture C: Place the support legs (9)
on the threads of the frame and screw
them tight.
5. Picture D: Place the frame on the sup-
port legs. Place the straight holding
rod(12) onto the frame with the hold-
er so that the holding rod is pointing
outwards. Then fix it to the frame with
the two short allen bolts (2).
6. Picture E: Also fix the holding rod to
the support leg with the two carriage
bolts(4) and cap nuts(1).
7. Picture F: Tie together the elastic
band ends of the cover behind the
support leg (on the inside of the
support leg).
8. Picture G: Insert the handle (11) into
the mount of the bent holding rod(10).
Place the curved regular washer (6) on
the handle and screw it tight with the
appropriate allen bolt (3).
9. Picture H: Thread the flat regular
washer(5) and the spring washer(7)
onto the thread of the locking
screw(13). Then plug the bent hold-
ing rod into the straight holding rod
and fix it at one of the three prede-
fined heights with the locking screw.
Please Note: Only fix the bent hold-
ing rod in the predefined holes and
pull it out no further than the MIN
marking.
The device is taken apart in the reverse
order.
BEFORE TRAINING
A warm-up is an essential part of any
sporting activity. All physical and mental
aspects of your performance are thereby
stimulated and enhanced. It also greatly
reduces the risk of injury.
The following exercises warm up large
muscle groups through movement.
• Jogging: Jog slowly on the spot or
around the room for a few minutes.
• Knee bends: Stand with your legs the
width of your shoulders apart, keep
your upper body straight and bend
and then stretch your knees. Repeat
approx. 5 – 10 times.
• Upper body twist: Stand with your
legs the width of your shoulders apart,
keep your upper body straight, raise
your arms to shoulder height at the
sides and bend so that your hands are
in front of your chest. Twist your upper
body as far as possible to the right and
left. Repeat approx. 10 times.
• Side bends: Stand with your legs the
width of your shoulders apart, keep
your upper body straight. Then slowly
tilt your upper body to the sides.
Stretch the arm on the stretched side
of the body over your head as you do
this. Repeat approx. 10 times.
• Arm circles: Stand upright, stretch out
your right arm and swing it forwards.
Change direction after 5 – 10 swings.
Then swing with your left arm.
SETTING UP THE DEVICE
Please Note!
■Protect any delicate surfaces (laminate,
parquet floor, etc.) from scratches
etc. with a non-slip protective mat if
necessary.
(Picture I)
Place the device down on a secure and
horizontal surface.
Depending on your body size, leave
plenty of space on all sides (1 – 1.6me-
tres on all sides, 2 – 3 metres above) so
that you have enough free space during
training.
09529_Inlay_DE-EN-FR-NL_A5_V1.indb 1309529_Inlay_DE-EN-FR-NL_A5_V1.indb 13 04.03.2021 14:58:5004.03.2021 14:58:50

EN
14
The clearance space must include
the space required for an emergency
dismount. If devices are set up in the
immediate vicinity of one another, they
can share one clearance space.
TIPS FOR HEALTHY
TRAINING
Do not train if you are feeling
tired or exhausted.
Never train on a full stomach.
Do not eat anything for approx.
one hour before and after training.
Never train after consuming alco-
hol, drugs or medicine.
Always remember that the body
needs a lot of fluid during sport-
ing activity.
Always train in a well-ventilated
room.
It is not about doing a few exercises
quickly, but about training regularly over
a long period of time.
How quickly progress is made depends
on a person’s particular physical condition.
You should start slowly and start with
shorter sessions and give the body time
to adjust. The more consistently and reg-
ularly you train, the longer you can make
the sessions. We recommend a training
time of approx. 20 to 30minutes on the
device. Take regular breaks.
Increase the intensity gradually until you
reach the desired performance level that
you are still capable of maintaining. Allow
the training to fade out at a low intensity.
TRAINING
Please Note!
■Make sure before training that the
device has been assembled correctly
and the holding rod has been locked
in place correctly.
■Do not use the device if it is damp or
wet.
■Do not jump onto the device from
high surfaces.
■Do not jump off the device onto the
ground or other objects.
■Only move around on the jumping
mat, never step or jump on the frame.
■Do not support your whole body
weight on the holding rod. There is a
risk of tipping over.
■When doing the exercises, wear
well-fitting, loose, comfortable cloth-
ing and non-slip trainers. Do not train
barefoot.
■CAUTION! Stop the training immedi-
ately if you start to feel weak, dizzy or
unwell in some other way. If you feel
sick, have pain in your chest or arms,
an irregular heartbeat or other unusual
symptoms, seek medical attention
immediately.
■We explicitly point out that improper
use of the device and excessive train-
ing can be detrimental to your health.
A number of basic techniques for training
on the trampoline are described below.
More extensive fitness exercises can be
found on the internet.
General Information
To climb onto the device, place one foot
in the middle of the jumping mat (8) and
then follow with the other leg. For more
stability, firmly hold the handle (11).
Adjust the height of the holding rod(10)
to your body size.
09529_Inlay_DE-EN-FR-NL_A5_V1.indb 1409529_Inlay_DE-EN-FR-NL_A5_V1.indb 14 04.03.2021 14:58:5004.03.2021 14:58:50

Fitness Trampoline EN
15
Basic position: Stand upright on the
jumping mat with your legs apart looking
towards the holding rod. For more stabili-
ty, place your hands on the handle.
To exit the device, make one step over
the edge directly onto the floor and firmly
hold the handle if necessary.
Rocking
This exercise is an ideal warm-up exercise:
1. Assume the basic position.
2. Shift your weight back and forth from
your left to your right foot and from
your heel to the ball of your foot. Your
arms and shoulders will swing loosely
back and forth as you do this.
Please Note!
• Only bounce with your feet.
• Toes are always in contact with the
jumping mat.
• When you land, roll away your feet so
that you do not remain in an un-
healthy high-heel pumps position.
Walking
This exercise is suitable for improving
fitness and as a warm-up exercise.
1. Assume the basic position.
2. Shift your weight from one leg to the
other.
3. Slightly raise the leg with no weight
on it and start to walk on the spot.
The arms swing in the opposite direc-
tion at the same time.
Please Note!
• For more dynamic exercises, vigor-
ously lift up your knees while your
arms swing all the way through.
• If your stamina allows, slowly increase
the pace.
Running
This exercise is suitable for improving
fitness and boosts your sense of balance.
1. Assume the basic position.
2. Start running on the spot. The feet
will roll back from the front of the foot
to the heel, with the knees slightly
bent. The arms swing in the opposite
direction at the same time.
Please Note!
Keep your body upright at all times during
the exercise.
Hopping
This exercise is suitable for improving
strength and stamina and for burning
calories.
1. Assume the basic position.
2. Tense your abdominal muscles.
3. Start hopping so that the feet lift off
the jumping mat slightly. The arms
will swing loosely at the same time.
Please Note!
• Keep your body upright at all times
during the exercise.
• What matters is not how high you
jump, but the number of jumps in a
given period of time.
09529_Inlay_DE-EN-FR-NL_A5_V1.indb 1509529_Inlay_DE-EN-FR-NL_A5_V1.indb 15 04.03.2021 14:58:5104.03.2021 14:58:51

EN
16
AFTER TRAINING
After training, you should always perform
stretching exercises in order to slowly
restore your circulation to a normal level.
You will find a few example exercises
below:
Upper body: Stand up-
right, cross your arms over
your head and pull your
left elbow to the right
with your right hand. The
upper body moves gently
as you do this. Stay in this
position for 15 – 20sec-
onds. Change sides.
Calves: Stand up. Place
your right leg in front of
you and bend it slightly
while your left leg remains
stretched. Push your left
heel down onto the floor.
Stay in this position for
15 – 20 seconds. Change
sides.
Front of thighs: Stand on
one leg, bend the other
one and grab your foot
with your hand. Pull it
up to your buttocks and
hold this position for
15 – 20seconds Change
sides.
Back: Lie down flat on your back. Bend
your right leg and place it over your left
leg which is still stretched out. Your hip
twists but both shoulders must remain
on the floor. Stay in this position for
15 – 20seconds. Change sides.
Inside of thighs: Sit down
on the floor, turn your
knees to face outwards,
place the soles of your feet
together and pull towards
your body. Place your
hands around your ankles
and press your knees gen-
tly down to the floor with
your elbows. Keep your
back straight as you do
this. Stay in this position
for 15 – 20seconds.
Whole leg: Squat down, rest your hands
on the floor next to your feet and stretch
one leg out behind you. The thigh and
lower part of your front leg form a right
angle, and the foot rests fully on the floor.
Stay in this position for 15 – 20 seconds.
Change sides.
Shoulders/back:
Sit cross-legged on the
floor with a straight back.
Fold / clasp together
your hands and stretch
your arms out above your
head. Stretch your back.
Stay in this position for
15 – 20 seconds.
09529_Inlay_DE-EN-FR-NL_A5_V1.indb 1609529_Inlay_DE-EN-FR-NL_A5_V1.indb 16 04.03.2021 14:58:5104.03.2021 14:58:51

Fitness Trampoline EN
17
CLEANING AND STORAGE
Please Note!
■Do not use any sharp or abrasive
cleaning agents or cleaning pads to
clean the device. These may damage
the surfaces.
• If necessary, wipe down the device
with a damp cloth and mild cleaning
agent if required.
• Check the device for any damage and
signs of wear regularly and before
each use.
• To save space during storage, remove
the holding rod (12) and the feet(9)
(see the “Assembly” chapter). In this
case, screw the protective caps onto
the threads.
• The safety level of the device can
only be maintained if it is regularly
checked for damage. Each time
before you use the device, it should
therefore be inspected for any signs
of damage (loose screws, worn parts,
etc.). Pay special attention to parts
that are susceptible to wear, such as
the rubber cords and the jumping
mat. If you hear unusual noises from
the device during use, stop exercising
immediately. Have defective parts
replaced immediately and do not use
the device until it has been repaired!
In the event of any damage, please
contact the customer service depart-
ment or a specialist workshop. Do not
make any modifications to the device
yourself.
• Store the device in a dry place which
is protected from direct sunlight and
frost and is out of the reach of children
and animals.
DISPOSAL
Dispose of the packaging material
in an environmentally friendly man-
ner so that it can be recycled. The
device should also be disposed of
in an environmentally friendly way
if it is no longer going to be used.
TECHNICAL DATA
Article number: 09529
ID of operating instructions: Z 09529 M DS V1 0321 dk
Model number: JHK-15682
Class: H (Use at home)
Max. load capacity: 100kg
Dimensions: 101.6 x 127.5 x 34 cm
Weight: approx. 7kg
Set height of holding rod: approx. 108 cm / 118 cm / 128 cm
All rights reserved.
09529_Inlay_DE-EN-FR-NL_A5_V1.indb 1709529_Inlay_DE-EN-FR-NL_A5_V1.indb 17 04.03.2021 14:58:5304.03.2021 14:58:53

EN
18
PARTS LIST
(Picture J)
Part No. Description Number Dimensions
1 Handle cap 2
2 Handle 2
3 Allen bolt 1 M6 x 35mm
4 Handle pole 1
5 Holding rod, bent 1
6 Jumping mat cover 1
7 Spring washer 1
8 Regular washer, flat 1
9 Locking screw 1
10 Frame 1
11 Holding rod, straight 1
12 Jumping mat 1
13 Allen bolt 2 M6 x 16mm
14 Cap nut, self-locking 2
15 Carriage bolt 2 M6 x 40mm
16 Rubber cord with ball 30
17 Support leg 6
18 Rubber base 6
09529_Inlay_DE-EN-FR-NL_A5_V1.indb 1809529_Inlay_DE-EN-FR-NL_A5_V1.indb 18 04.03.2021 14:58:5304.03.2021 14:58:53

Trampoline de fitness FR
19
SOMMAIRE
Composition 19
Symboles 20
Mentions d’avertissement 20
Utilisation conforme 20
Consignes de sécurité 21
Montage 22
Avant l’entraînement 22
Mise en place de l’appareil 23
Conseils pour un entraînement sain 23
Entraînement 24
Après l’entraînement 25
Nettoyage et rangement 26
Mise au rebut 26
Caractéristiques techniques 27
Liste des pièces 27
COMPOSITION
(IllustrationA)
1 Écrou borgne, autobloquant (M6) 2x
2 Vis à six pans creux (M6 x 16mm) 2x
3 Vis à six pans creux (M6 x 35mm) 1x
4 Boulon de carrosserie (M6 x 40mm)
2x
5 Rondelle, plate 1x
6 Rondelle, bombée 1x
7 Rondelle élastique 1x
8 Toile de rebond avec châssis et bâche
de la toile de rebond 1 x
9 Pieds 6 x
10 Barre de maintien coudée 1 x
11 Poignée de maintien 1 x
12 Barre de maintien droite 1 x
13 Vis de fixation 1x
14 Clé à six pans creux 1 x
15 Double clé polygonale 1 x
• Capuchons de protection 6x
• Mode d’emploi 1x
S’assurer que l’ensemble livré est complet
et que les composants ne présentent pas
de dommages imputables au transport.
En cas de dommages, ne pas utiliser l’ap-
pareil et contacter le service après-vente.
Enlever de l’appareil les éventuels films
protecteurs, adhésifs et protections de
transport. Ne jamais ôter la plaque
signalétique de l’appareil ni les éven-
tuelles mises en garde apposées.
09529_Inlay_DE-EN-FR-NL_A5_V1.indb 1909529_Inlay_DE-EN-FR-NL_A5_V1.indb 19 04.03.2021 14:58:5304.03.2021 14:58:53

FR
20
SYMBOLES
Symbole de danger: ce symbole
signale des dangers possibles.
Lire et observer attentivement les
consignes de sécurité correspon-
dantes.
Ne jamais marcher sur le châssis.
Risque de basculement!
Pour accéder, placer le pied au
centre de la toile de rebond.
Informations complémentaires
Consulter le mode d’emploi avant
utilisation!
MENTIONS
D’AVERTISSEMENT
Les mentions d’avertissement désignent
les risques qu’implique le non respect
des consignes correspondantes.
AVERTISSEMENT– Risque moyen pou-
vant induire des blessures graves, voire
mortelles
AVIS– Risque de dégâts matériels
UTILISATION CONFORME
■Cet appareil est un trampoline de
fitness stationnaire destiné à l’entraî-
nement physique général.
■Il est destiné à la réalisation d’exer-
cices de fitness. Il n’est pas approprié
à l’exécution de sauts en hauteur, de
saltos, etc..
■L’appareil est conçu pour un usage en
intérieur exclusivement.
■Cet appareil n’est pas conçu à des
fins médicales ou thérapeutiques.
■L’appareil ne convient pas aux enfants
de moins de 14ans.
■Il ne doit pas être utilisé par plusieurs
personnes à la fois.
■L’appareil peut supporter une charge
maximale de 100kg.
Chère cliente, cher client,
Nous vous félicitons d’avoir fait l’acquisition de notre trampoline de fitness MAXXMEE.
Vous pouvez travailler votre endurance et renforcer divers groupes musculaires sans
sortir de chez vous! Monté vite et facilement, le trampoline à amortissement par corde
élastique, plus préservateur des articulations, est une alternative à la course à pied.
La barre de maintien réglable en hauteur se déploie à 108, 118 ou 128cm, et offre un
soutien supplémentaire pendant l’entraînement.
Pour toute question concernant cet appareil d’entraînement et ses pièces de rechange
et accessoires, veuillez vous adresser au service après-vente via notre site Internet:
www.dspro.de/kundenservice
Nous espérons que votre trampoline de fitness MAXXMEE vous donnera entière
satisfaction!
Informations sur le mode d’emploi
Veuillez lire attentivement le présent mode d’emploi avant la première utilisation de
l’appareil et le conserver précieusement pour toute question ultérieure ainsi que pour
les autres utilisateurs. Il fait partie intégrante de l’appareil. Le fabricant et l’importateur
déclinent toute responsabilité en cas de non-observation des instructions consignées
dans le mode d’emploi.
09529_Inlay_DE-EN-FR-NL_A5_V1.indb 2009529_Inlay_DE-EN-FR-NL_A5_V1.indb 20 04.03.2021 14:58:5304.03.2021 14:58:53
Table of contents
Languages:
Other MAXXMEE Fitness Equipment manuals

MAXXMEE
MAXXMEE 07908 User manual

MAXXMEE
MAXXMEE Mini-Trainer User manual

MAXXMEE
MAXXMEE 09733 User manual

MAXXMEE
MAXXMEE Hula Workout Hoop User manual

MAXXMEE
MAXXMEE 05854 User manual

MAXXMEE
MAXXMEE 72841A0 User manual

MAXXMEE
MAXXMEE Sit-up-Assistent User manual

MAXXMEE
MAXXMEE Crunch-Trainer User manual

MAXXMEE
MAXXMEE QSF78 User manual