McIntosh Double Bale Feeder User manual

MCINTOSH
DOUBLE BALE
FEEDER
User Manual
Phone 06 356 7056 - Fax 06 356 7055
McIntosh Brothers Engineers Ltd
PO Box 4240
PALMERSTON NORTH
NEW ZEALAND
www.mcintosh.net.nz

WARRANTY CONFIRMATION
Your bale feeder is guaranteed for a period of 12 months from date of entering service, provided that such
equipment has not been subjected to improper usage and or excessive speed over rough terrain or any other
conditions contrary to the manufactures specifications or recommendations.
The dealer has instructed me on the use of the bale feeder and maintenance requirements.
Serial # ______________
Owner’s Information
Signed _________________________ Signed _________________________
Owner _________________________ Company _________________________
Date _________________________ Sales Person _________________________
Date _________________________
Please return this completed form to;
McIntosh Brothers Engineers Ltd
PO Box 4240
PALMERSTON NORTH 4442
Please note: It is recommended that the owner and dealer both retain a copy for their records.

GENERAL OPERATION
AND
MAINTENANCE INSTRUCTIONS
Double Bale Feeder
MANUFACTURED BY
McINTOSH BROTHERS
ENGINEERS LTD
PALMERSTON NORTH
NEW ZEALAND
DISTRIBUTED BY

Safety
must have
PRIORITY
•Maintain your machine in good working condition.
•Keep all guards and shields in place.
•Disconnect hydraulic supply lines when any maintenance, greasing or adjustments are
undertaken.
•Keep hands, feet, and clothing away from power driven parts.
•Keep other people clear of machine when in use.
•Always shut down hydraulics when you leave the tractor seat.
•Do not allow people to travel on your bale feeder.
HUMAN ERROR IS THE MAJOR FACTOR IN
ACCIDENTS

MAINTENANCE
GREASING
The following is the number of greasing points on our double bale feeder.
Four bale unit grease nipples: 4 Cradles, 8 Lifting Arms, 1 Swivel, 1 Jack, 4 Hubs, 2 Walking Beams, 2 Drive
Shafts, 2 Rear Idlers
The machine should be greased daily for the first week and then weekly after that. (Detail A and B)
CHAIN
The roller chain needs no adjustment.
Periodically oil the chains and check the bolts holding the slats to the roller chain.
TYRES
Standard tyre 11.5 x 15.3, 58 PSI
Optional tyres 11.5 x 15.3 Tractor Tread, 58 PSI
400/60 x 15.3, 50 PSI
LIFTING ARMS
Greasing the lifting arms is very important to keep the machinery working correctly.
If you find the second arm does not come back fully to the loading position, put some more grease into it.
That will fix it the majority of the time.
If you find you cannot stop the bale from falling into the cradle, the most common problem is air in the
circuit. Bleed air out of the valve block and rams, then try again.
STORAGE AT END OF SEASON
Both Rams – Closed Position
Off Season Storage

•When the season is over, always clean off any feed material and wash machine.
•Fully grease.
•Apply a covering of oil to the chains prior to storage otherwise some links may seize up while not in
use
•Have both rams in the closed positions and if any of the chrome shaft is showing put grease onto that
area. If the rams are not closed, rust spots may appear on the chrome shaft which will damage the
seals. In the closed position, the smaller ram will still have 75-80mm of shaft out. When the rams are
used regularly they are lubricated by the oil in the ram. It is when they are not used is when the
damage occurs. This applies to any rams on farm machinery.
•Check tyre pressure before you use it again.
WHEN INSPECTIONS AND ADJUSTMENTS ARE BEING MADE, HYDRAULIC
POWER MUST BE DISCONNECTED
OPERATION
SET UP
The ½ inch hoses drive the cradle and the 3/8 inch hoses operate the lifting arm.
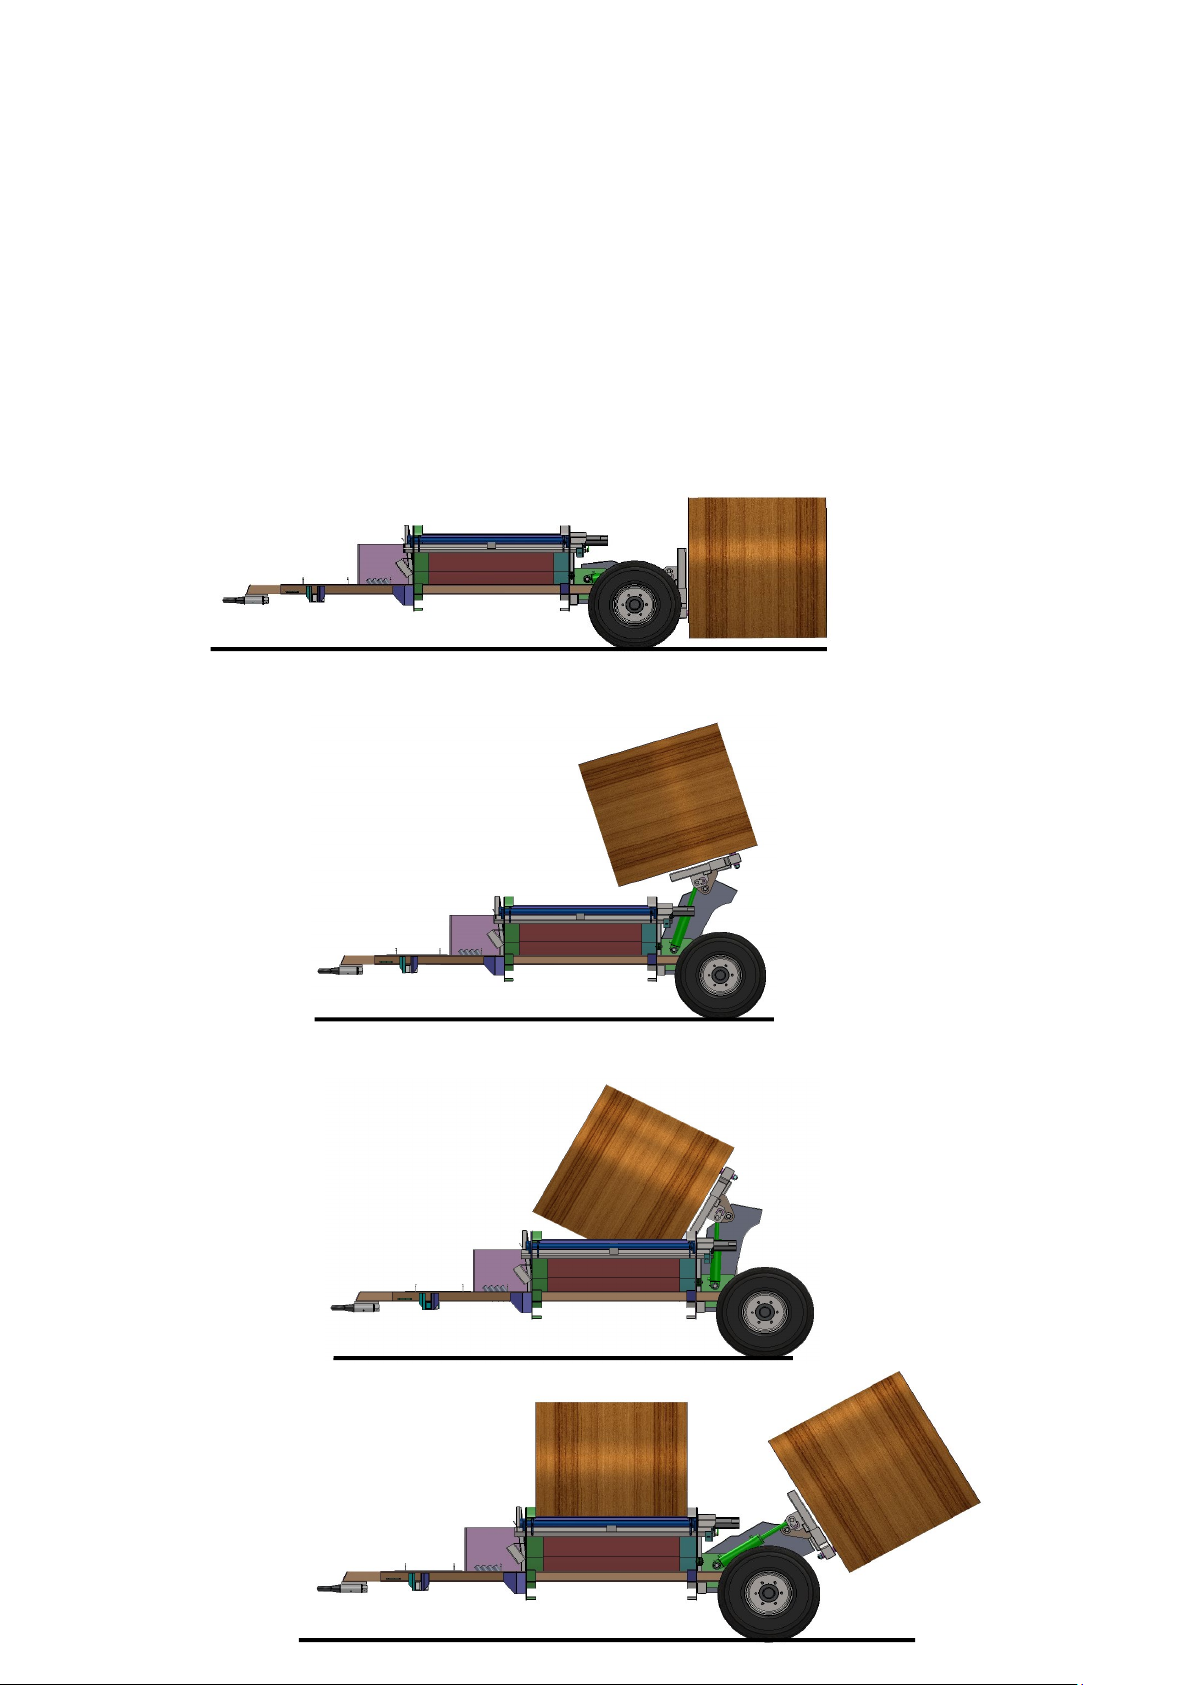
LOADING THE BALE
Lower the forks as low as they go. In this position they are set up for a standard 4 - 5 foot bale.
If feeding out 6 foot bales, lift the forks at the tyne end 100 - 150mm. Once you have loaded a few bales you
will get the right area, it does not need to be exact. If the bale is coming over and hitting the front frame, you
need to lift the forks a bit higher. If it is coming down with the back end of the bale hitting the cradle first,
then put the forks in a bit lower in the bale.
It is easier to have the two bales lined up first before loading the first bale. Once you have placed the first
bale into the cradle, you cannot see the forks when backing into the second bale so all you have to do is back
straight back into the second bale. This solves a lot of problems. Leave a gap between the bales so you can
cut the plastic off.
Before loading each bale, cut the plastic off the end of the bale, then back into it. Lift the bale over until
approximately 400mm above the cradle. This distance can vary as it depends on the bale and what height you
find it best to remove the netting. For finer chop bales you may need it higher.
You can either cut the netting underneath and pull it off or get the end of the netting and pull it off while
standing on the checker plate. Once the netting is off, you can lower the bale onto the cradle.
Another way is to cut the plastic and net off the top half of the bale, load the bale, pull out the forks, then
remove the half of the plastic and net which is the now on the top.Cut above the half way point of the bale
otherwise if may fall apart before loading on the tray.
When loading a bale, flip it right over in one movement. If you stop the bale at its full height, the second ram
may not have enough power to flip the bale over and you will have to go down and then back up. Load the
bales with the tractor idling, with a slow flow you will have more control. Once the bale is above the cradle
you will not be able to lift if up again so with the first few bales try different heights to get the net off until

you find the best position for you. The heaviest bale we have loaded weighed 1,300kg so there is heaps of
power in the ram.
To get the forks out of the bale, reverse the oil flow and the main ram will lower down while the smaller ram
will go into a float action. Once the main ram fully retracts, the smaller ram will then rotate the forks until
they are down to the load position again.
Remove the plastic and back into the second bale. Lift the bale to a good travelling height. If feeding out the
first bale on steeper country, you may want to lower the second bale or even drop it off and reload once
you’ve finished the first bale.
With rotocut bales you may need to be higher so the net doesn’t fall on the teeth.
When travelling with no bale on the forks, have them in the up position so that you do not back them into
anything or anyone trips over them.
Start Position - Loading
Loading
Loading
Travel Position

FEEDING OUT
As our Bale Feeders will operate from either side, there is no need to concern yourself which way you place
the bale in the cradle.
While feeding out, if the bale is hard to start or while it is unrolling the bale slows down, put more revs on the
tractor to speed up the bale feeder. Slow the revs down once the bale is feeding easier, aggression pins can
help.
We recommend a maximum of 50 litres of oil. If you put a bigger oil flow through the motor and swap the
direction of the feeder very quickly, you may damage the motor. At a faster flow, you will also create far
greater wear and tear on the machine. You can also split the o-rings in the valves which can cause the bale to
drop when travelling.
AGGRESSION PINS
These are supplied to assist breaking out a hay bale which is hard to get started, has a very hard centre or a
moldy wrapped bale. They are not used in normal operation. If required, insert pins in the ends of the bale
as the pin holes allow. Restart your machine and the aggression pins will break into the bale and allow it to
unwind.
Sequence Cartridges
These are set at 2 ½ turns out. The purpose of these is to have the main left ram operating first before the
smaller tip ram. If these are out too far, the second ram may operate before the main ram is fully out.
Return Relief Valve
Set all the way out, this valve is set at 50 PSI and will only go to 300 PSI when fully out. The purpose of this
valve is to let the small ram go into float when pulling the forks out of the bale. If it is screwed in too much it
will try and lift the bale when pulling out. This is just enough pressure in it to flip the forks over to load again.
Sequence Cartridge
Return relief
Valve

FAULTS WITH LOADING ARMS
Forks do not fold down parallel to ground to load bale.
•Lack of grease in pins.
Bale drops into cradle/cannot hold it up to take plastic off.
•Air in small ram. Bleed ram.
•Faulty sequence valve. Take valve out and check, replace.
•Forks creep down when travelling with a bale on. Check the valves in the aluminum block and check
the o-rings are not split. If one is split, replace o-rings. This is caused by excessive oil flow. Cut flow
back to a maximum of 50 litres.
TROUGH BALE FEEDER
•Load with the arm down.
•Travel with the arm up until you want to start feeding.
•You can lift the arm up to 45 degrees to feed with. The chains will still turn even straight up but it is
hard on the machine
•If adjusting chains, have the arm up on a 45 degree angle where the chains are at their tightest point:
DO NOT adjust when the arm is down.
•Store the machine with arm down and the ram closed otherwise grease the ram if it is out so it does
not get rust spots on it and damage the seals.
Service Information
This notice is to provide assistance and give information for issues that may occur with
some McIntosh Equipment.
Machine: Multi Bale and Double Bale Feeders
In Field valve adjustments for Rear Bale Forks
On Multi Bale Feeders, the lift rams sequencing valve is located underneath the blue cover located on
the rear right hand side. You will need to remove the cover to expose the valve assembly.
On Double Bale Feeders, the valve assembly is mounted on the rear left hand side near the wheel.
The sequencing valve assembly has 3 valves fitted to the block. There are 2 adjustable throttle valves
that control the tip over and return speed of the bale forks. The 3rd valve is an adjustable relief valve
that controls the pressure of the forks when returning to the loading position. Sometimes you will be
required to adjust these valves to suit the types of bales, oil flow of the tractor and the customers
needs. When adjusting these valves, we recommend you only adjust one valve at one time, then test
the operation again. We also recommend that when adjusting the valves, screw them in or out 1/2 a
turn at a time and retest. This can make a big difference depending on the oil flow and the weight of
the bale.
If problems occurs, we recommend that you set the valves back to the standard factory settings and re-
test the system again.

Problem: Fork assembly will not return to fully dropped (loading) position
or rear forks creep down when carrying a Bale.
Return sequencing
valve located here
Standard Factory settings 3.5 to 4 turns out
If the fork assembly is not returning to the load position during operation, screw the return valve
out a half a turn at a time until the operation works correctly. Normally this valve is set at 3.5 to 4
turns out. If this valve is screwed too far out, the main lift ram can drop when carrying a bale.
If this occurs, screw the valve in until the ram holds the bale. Always tighten the lock nut to stop the
oil from leaking.
POWER PACK INSTRUCTIONS
1. Turn main power switch on, green light will come on.
2. Turn key to on.
3. Use choke when motor is cold.
4. Press remote button 1 then start.
5. To stop press button 2.
6. Press button 5 to lower forks.
7. Press button 6 to load bale.
8. Press button 7 to feed out left side.
9. Press button 8 to feed out right side (drivers side).

Problem: Fork assembly won't tip over into feeding chamber or falls in too fast
If the fork assembly will not tip the bale into the feeding chamber, this normally
means the tip over sequencing valve is screwed too far in. Undo the lock nut and turn
the valve out a 1/4 of a turn at a time until the operation works correctly. Normally
this valve is set at 2.5 to 3 turns out. If this valve is screwed too far out, this will cause
the fork assembly to drop in too quickly and hard to hold the bale over the feeding
chamber. If this occurs, screw the valve in until you find a speed that is acceptable.
Always tighten the lock nut to stop the oil from leaking.
Problem: Bale tries to come back out when returning the fork assembly back
to the loading position.
There can be several reasons for this to happen. Firstly check the oil flow coming from the
tractor. These machines are designed to operate with oil flows of around 40—65 litres per
minute. A higher oil flow can result in a build up of back pressure and cause the forks to try
and lift the bale back out when returning. Lower the oil flow and try again before adjusting
the return relief valve. If the problem still occurs, unscrew the relief valve to lower the retract
pressure. In most cases, the valve is almost fully screwed out. If this pressure is too low, this
can cause the fork assembly to not fully return to the loading position.
On Multi Bale Feeders, this problem can also occur with tightly formed or dry bales. In
these cases we recommend you remove the middle tine and operate with only the two
outside tines fitted. We suggest you try this first before adjusting the relief valve.
Retract pressure
relief valve
located here
Tip over ram
sequencing valve
located here
Standard Factory
setting

Table of contents
Other McIntosh Farm Equipment manuals
Popular Farm Equipment manuals by other brands

Krone
Krone Fortima F 1250 Original operating instructions

SCHMOTZER
SCHMOTZER Venterra 2K KPP-LSC Translation of the original operating instructions

Hi-Way
Hi-Way E2020XT Assembly/operators/parts manual

H&S
H&S HDNR 7+4 Operator's manual / parts book

Shivvers
Shivvers Circu-Lators II installation manual

SIP
SIP STAR 430/12 T Instruction for work