Medeli AK603 User manual


2
INFORMATION FOR YOUR SAFETY!
THE FCC REGULATION WARNING (for USA)
Changes or modications not expressly approved by the
party responsible for compliance could void the user’s
authority to operate the equipment.
This device complies with Part 15 of the FCC Rules. Op-
eration is subject to the following two conditions:
(1) this device may not cause harmful interference, and
(2) this device must accept any interference received, in-
cluding interference that may cause undesired operation.
This equipment has been tested and found to comply
with the limits for a Class B digital device, pursuant to
Part 15 of the FCC Rules.
These limits are designed to provide reasonable protec-
tion against harmful interference in a residential instal-
lation. This equipment generates, uses, and can radiate
radio frequency energy and, if not installed and used in
accordance with the instructions, may cause harmful
interference to radio communications. However, there is
no guarantee that interference will not occur in a particu-
lar installation.
If this equipment does cause harmful interference to
radio or television reception, which can be determined by
turning the equipment o and on, the user is encouraged
to try to correct the interference by one or more of the
following measures:
■ Reorient or relocate the receiving antenna.
■ Increase the separation between the equipment and
receiver.
■ Connect the equipment into an outlet on a circuit dier-
ent from that to which the receiver is connected.
■ Consult the dealer or an experienced radio/TV techni-
cian for help.
Unauthorized changes or modication to this system can
void the user’s authority to operate this equipment.
PRECAUTIONS
PLEASE READ CAREFULLY BEFORE PROCEEDING
Please keep this manual in a safe place for future refer-
ence.
Power Supply
Please connect the designated DC adapter to an AC
outlet of the correct voltage.
Do not connect it to an AC outlet of voltage other than
that for which your instrument is intended.
Unplug the DC power adapter when not using the instru-
ment, or during electrical storms.
Connections
Before connecting the instrument to other devices, turn
o the power to all units. This will help prevent malfunc-
tion and / or damage to other devices.
Location
Do not expose the instrument to the following conditions
to avoid deformation, discoloration, or more serious
damage:
■ Direct sunlight
■ Extreme temperature or humidity
■ Excessive dusty or dirty location
■ Strong vibrations or shocks
■ Close to magnetic elds
Interference with other electrical devices
Radios and televisions placed nearby may experience
reception interference. Operate this unit at a suitable
distance from radios and televisions.
Cleaning
Clean only with a soft, dry cloth.
Do not use paint thinners, solvents, cleaning uids, or
chemical-impregnated wiping cloths.
Handling
Do not apply excessive force to the switches or controls.
Do not let paper, metallic, or other objects into the instru-
ment. If this happens, remove the electric plug from the
outlet. Then have the instrument inspected by qualied
service personnel.
Disconnect all cables before moving the instrument.
CAUTION
The normal function of the product may be disturbed
by Strong Electro Magnetic Interference. If so, simply
reset the product to resume normal operation by fol-
lowing the owner’s manual. In case the function could
not resume, please use the product in other location.

3
Contents
Panel & Display Description ........................................ 4
Front Panel .......................................................................... 4
Joystick .............................................................................. 5
Rear Panel ........................................................................... 6
LCD .................................................................................... 6
Setup ................................................................................. 7
Power Supply ...................................................................... 7
Music Stand ........................................................................ 7
Connecting the Headphones ................................................. 7
Connecting Pedals .............................................................. 7
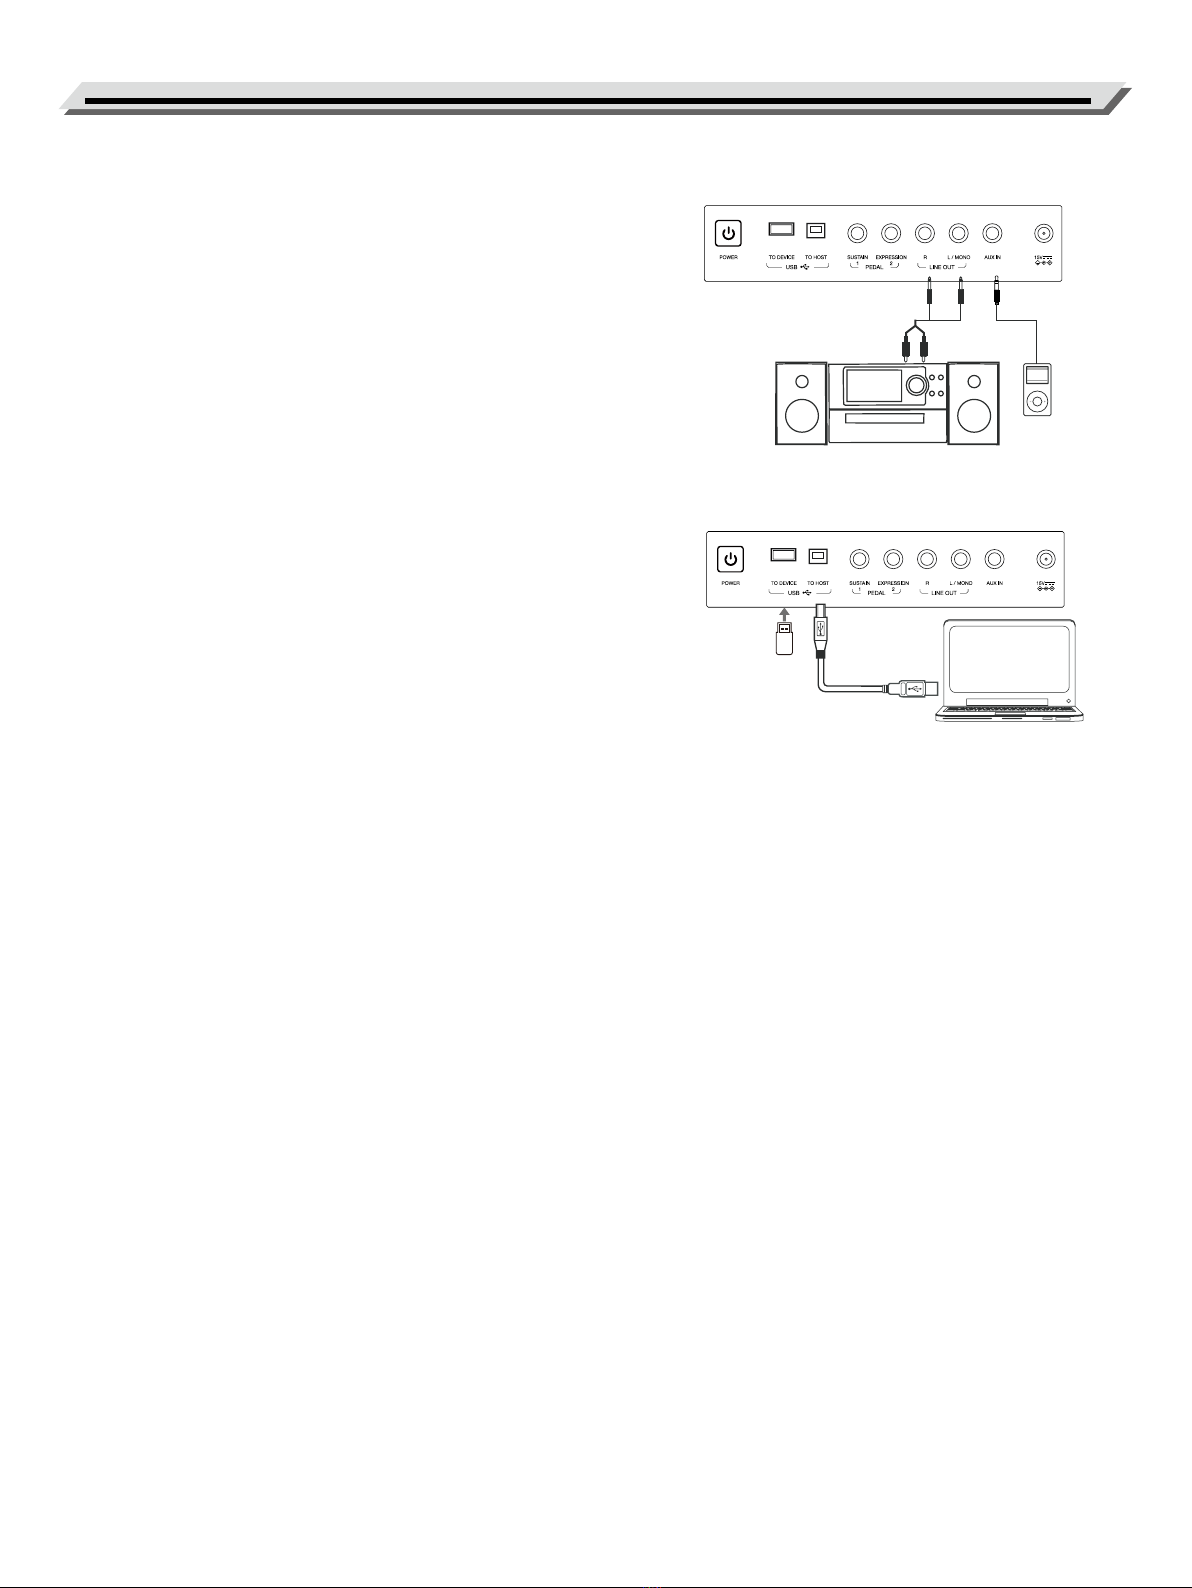
Connections .................................................................... 8
Connecting to external PA systems ........................................ 8
Connecting an MP3/CD Player............................................... 8
Connecting a Computer ........................................................ 8
Connecting a USB Flash Drive ............................................... 8
Sounds .............................................................................. 9
Playing Sounds .................................................................... 9
Setting the Keyboard Touch Sensitivity ................................... 9
Transpose & Octave ............................................................ 10
Sustain .............................................................................. 10
Synth ................................................................................ 10
Style ................................................................................. 12
Using Styles ...................................................................... 12
Style Playback ................................................................... 12
Chord Mode ...................................................................... 14
Setting Chord Detect Mode ................................................. 16
Quick Setting (Q.S.) ............................................................ 16
Songs and Audio .......................................................... 17
Playing Songs and Audio .................................................... 17
MIDI Recording .................................................................. 17
Audio Recording ................................................................ 18
Metronome ..................................................................... 19
Tempo .............................................................................. 19
Phrase Pads ................................................................... 20
Selecting a Phrase Pad Bank ............................................... 20
Playing Phrase Pads ........................................................... 20
Playing Phrase Pads with Chord Mode ................................ 21
Album .............................................................................. 21
Demo ............................................................................... 22
Mixer ................................................................................ 22
Performance Memory ................................................. 23
Using Performance Memory ................................................ 23
Locking Parameters ............................................................ 23
Eects ............................................................................. 24
Insert Eects ...................................................................... 24
Global Eects .................................................................... 24
Master EQ ......................................................................... 25
Performance Enhancement ...................................... 26
Arpeggio ...........................................................................26
Harmony ........................................................................... 26
USB Storage Devices .................................................. 26
Common Operation ............................................................ 26
Play .................................................................................. 27
Save ................................................................................. 27
Load ................................................................................. 28
Format .............................................................................. 28
Setting ............................................................................. 29
Tune ................................................................................. 29
Metronome Time Signature ................................................. 29
Fade In/Out Time ............................................................... 30
Split Point .......................................................................... 30
Harmony Type .................................................................... 30
Arpeggio Type .................................................................... 30
Arpeggio Hold .................................................................... 30
Lock ................................................................................. 30
Sustain Pedal ..................................................................... 31
Expression Pedal................................................................ 31
Joystick Down ................................................................... 31
Recorder Mode .................................................................. 31
MIDI Out Channels ............................................................. 31
Auto Power O .................................................................. 31
MIDI .................................................................................. 32
What’s MIDI? ..................................................................... 32
Troubleshooting ............................................................ 32
Specications ............................................................... 33
Appendices
Sound List ......................................................................... 35
Style List ........................................................................... 49
Song List ........................................................................... 52
Phrase Pad List .................................................................. 53
Insert Eect List ................................................................. 54
Global Eect List ................................................................ 55
Part Eect List ................................................................... 57
Chord List ......................................................................... 58
MIDI Implementation Chart .................................................. 59

USB DEVICE
MASTER VOLUME 001-010
011-022
023-029
030-090
FOLK & COUNTRY
GOLDEN & POP
JAZZ & FUSION
PIANO
SONGSOUND STYLE PART
LR1R2
SOUND
NYLON GT FNGR BASSVIOLIN STRINGS TRUMPET
SOPR SAXFLUTE PAN FLUTEDANCE LDVIBRA
BRASS
USER 1
PIANOHARPSI DREAM EP DRAW ORG CHRCH ORGMUSETTE
HONKY CLAVI60S EPPERC ORG HARMNCA
STEEL GT ACO BASS CELLO CONCRT ST TROMBONE
ALTO SAX CLARINET OBOETECH LD
HORN
ACCORD
USER 2
EXIT OCTAVE TRANSPOSE
SELECT1
PHRASE PAD
234STOP
PERFORMANCE MEMORY
STOREBANK Q.S.LOCK
123456
Q .S.1 Q .S.2 Q .S.3 Q .S.4
IFX
FX
SOUND STYLE SONGALBUM RECORD
DEMO
METRONOMETAP MIXERFUNCTIONTEMPO
CHORD
MODE
AUTO
FILL INFADE
SUNSHINE80S DISCO
COOL 8BT 8BT BLD
CHA CHA
FUS SHUFL BLGRASS LTN ROCK
WALTZ
POLKA
DSCO PTY
STYLE
213 START
SYNC
STOP
AB
MAIN
CD
BREAK START / STOP
ALBUM
SYNTH
TOUCH
ENTER
TOUCH
INTRO / ENDING
001-026
027-055
056-095
096-109
110-169
170-218
219-278
279-344
345-395
396-531
532-581
582-750
STRINGS
BRASS
SAX & WOODWIND
LEAD & PAD
PERC. & DRUMS
SFX & GM
PIANO
E.PIANO
ORGAN
ACCORDION
GUITAR
BASS
116-136
137-165
166-191
192-208
BALLROOM
SOUL & FUNK
SWING & JAZZ
COUNTRY
209-230
231-250
251-260
261-280
LATIN & LATIN DANCE
WALTZ & TRADITIONAL
WORLD
PIANIST
001-036
037-058
059-090
091-115
POP & BEAT
ROCK
BALLAD
DANCE
CELESTA
SUST HARMARP
8 POPRNR LOVE BLDHOUSE
16BEAT BLS ROCK HIP HOP
LATINCNTY POPBIG BANDFUNK
SALSA SMTH JZ
4
Panel & Display Description
1. VOLUME Knob
Adjust the master volume.
2. STYLE Selection Button
Select directly a preset Style.
3. METRONOME Button
Turn the metronome on and o.
4. TAP Button
Input tempo by tapping.
5. TEMPO <, > Buttons
Adjust the current tempo.
6. MIXER Button
Enter Mixer menu.
7. FUNCTION Button
Enter Function menu.
6&7. USB Button
Press the MIXER and FUNCTION
buttons at the same time to enter
the USB ash drive menu.
8. CHORD MODE Button
Turn on, o and set the chord mode.
9. AUTO FILL IN Button
Turn Auto Fill In on and o.
10. FADE Button
Turn Fade In or Out, on and o.
SONG MODE:
14. PAUSE Button
Pause playing a song.
15. LOOP Button
Set the song cycle mode.
Whole song loop-single song
loop.
16. REW Button
Rewind the song.
17. FF Button
Fast forward the song.
21. START/STOP Button
Start or stop playing the song.
STYLE MODE:
11. INTRO1/ENDING1 Button
Play the Intro or Ending 1.
12. INTRO2/ENDING2 Button
Play the Intro or Ending 2.
13. INTRO3/ENDING3 Button
Play the Intro or Ending 3.
14. MAIN A Button
Play the main A part of the Style.
15. MAIN B Button
Play the main B part of the Style.
16. MAIN C Button
Play the main C part of the Style.
17. MAIN D Button
Play the main D part of the Style.
18. BREAK Button
Play the break of the selected style.
19. SYNC STOP Button
Turn Sync Stop on and o.
20. SYNC START Button
Turn Sync Start on and o.
21. START/STOP Button
Start or stop the playing.
22. SOUND Button
Enter the Sound mode.
Press repeatedly to switch R1-R2-L.
23. STYLE Button
Enter the Style mode.
24. SONG Button
Enter the Song mode.
25. ALBUM Button
Turn Album function on and o.
26. RECORD Button
Enter the record mode.
27. BANK Button
Select a Performance Memory bank.
28. STORE Button
Save current panel settings to one
of the Performance Memory slots.
29. PERFORMANCE MEMORY
1 - 6 Buttons
Recall the memorised setting.
QUICK SETTING
Recall the Sound setting for the
current Style.
Front Panel
1
21
2
16 20
19
18
11 12 13 14 15 17
5678910
4
322 23 25 26
24
28
27
29

5
USB DEVICE
MASTER VOLUME 001-010
011-022
023-029
030-090
FOLK & COUNTRY
GOLDEN & POP
JAZZ & FUSION
PIANO
SONGSOUND STYLE PART
LR1R2
SOUND
NYLON GT FNGR BASSVIOLIN STRINGS TRUMPET
SOPR SAXFLUTE PAN FLUTEDANCE LDVIBRA
BRASS
USER 1
PIANOHARPSI DREAM EP DRAW ORG CHRCH ORGMUSETTE
HONKY CLAVI60S EPPERC ORG HARMNCA
STEEL GT ACO BASS CELLO CONCRT ST TROMBONE
ALTO SAX CLARINET OBOETECH LD
HORN
ACCORD
USER 2
EXIT OCTAVE TRANSPOSE
SELECT1
PHRASE PAD
234STOP
PERFORMANCE MEMORY
STOREBANK Q.S.LOCK
123456
Q .S.1 Q .S.2 Q .S.3 Q .S.4
IFX
FX
SOUND STYLE SONGALBUM RECORD
DEMO
METRONOMETAP MIXERFUNCTIONTEMPO
CHORD
MODE
AUTO
FILL INFADE
SUNSHINE80S DISCO
COOL 8BT 8BT BLD
CHA CHA
FUS SHUFL BLGRASS LTN ROCK
WALTZ
POLKA
DSCO PTY
STYLE
213 START
SYNC
STOP
AB
MAIN
CD
BREAK START / STOP
ALBUM
SYNTH
TOUCH
ENTER
TOUCH
INTRO / ENDING
001-026
027-055
056-095
096-109
110-169
170-218
219-278
279-344
345-395
396-531
532-581
582-750
STRINGS
BRASS
SAX & WOODWIND
LEAD & PAD
PERC. & DRUMS
SFX & GM
PIANO
E.PIANO
ORGAN
ACCORDION
GUITAR
BASS
116-136
137-165
166-191
192-208
BALLROOM
SOUL & FUNK
SWING & JAZZ
COUNTRY
209-230
231-250
251-260
261-280
LATIN & LATIN DANCE
WALTZ & TRADITIONAL
WORLD
PIANIST
001-036
037-058
059-090
091-115
POP & BEAT
ROCK
BALLAD
DANCE
CELESTA
SUST HARMARP
8 POPRNR LOVE BLDHOUSE
16BEAT BLS ROCK HIP HOP
LATINCNTY POPBIG BANDFUNK
SALSA SMTH JZ
Panel & Display Description
30. LOCK Button
Turn the LOCK function on or o.
31. Q.S. Button
Access Quick Setting.
32. Data Dial / ENTER Button
Increase and decrease the values, or
provide conrmation when pressed.
33. EXIT Button
Exit Menu or Cancel.
34. <, > Buttons
Decrease or increase values.
35. PHRASE PAD SELECT Button
Select a desired Phrase Pad Bank.
36. PHRASE PAD 1 – 4 Buttons
Start the percussion and melodic
phrases playback.
37. PHRASE PAD STOP Button
Stop the percussion and
melodic phrases playback.
38. PART Buttons
Turn each Sound part on and o.
39. SOUND Selection Buttons
Select directly a preset Sound.
40. Octave <, > Buttons
Adjust the octave value.
41. TRANSPOSE <, > Buttons
Adjust the transpose value.
42. SUSTAIN Button
Turn the sustain on and o.
43. ARPEGGIO Button
Turn the arpeggio on and o.
42&43. Touch Button
Press the SUSTAIN and ARPEGGIO
Button at the same time to turn
Touch mode on and o.
44. HARMONY Button
Turn the harmony eect on and o.
The instrument has a four-direction joystick. Move the Joystick up, down, left, or
right to change keyboard pitch or sound eects. After releasing it, the Joystick will
return to the neutral position.
The assigned parameters:
45. IFX Button
Turn the Insert Eect on and o.
46. LCD
Show all the important settings for
the current operation.
47. JOYSTICK
Control the pitch bend, modulation
or assign functions of the keyboard.
48. PHONES Output Jack
For connecting headphones to the
keyboard.
Joystick
X- Pitch Bend Down
X+ Pitch Bend Up
Y+ Modulation
Y- (Assignable)
39
40 41
33 34
32
38
35 36 37 45444342
30
31
47
48
46

6
Panel & Display Description
Rear Panel
LCD
1. POWER Button
Turn the power on and o.
2. USB TO DEVICE Port
For Connecting an USB ash drive device.
3. USB TO HOST Port
For connecting to a computer.
4. SUSTAIN PEDAL Jack
For connecting a sustain pedal (assignable).
1. ALBUM
2. SYNTH
3. SERIAL NUMBER
4. SOUND / STYLE / SONG / DEMO / PAD
5. INFROMATION
6. RECORD
7. TREBLE CLEF
8. BASS CLEF
9. USB
10. USB DEVICE
11. BAR / MINUTE
12. BEAT / SECOND
13. TEMPO
14. CHORD
15. MEMORY / LOCK / QUICK SETTING
16. MEMORY SETTING STORE/BANK
17. CHORD MODE
18. FADE
19. SECTION A/B/C/D
20. NUMBERED NOTATION
21. LAYER
22. SPLIT
23. HARMONY / ARPEGGIO
24. IFX
25. SUSTAIN
26. TOUCH
5. EXPRESSION PEDAL Jack
For connecting an expression pedal (assignable).
6. LINE OUTPUT Jacks
For connecting to external speakers or a PA system.
7. AUX INPUT Jack
For connecting an external audio source, such as an MP3
or CD player.
8. POWER Jack
Connect DC 15V power adaptor.
125678
4
3
1
2
35
10
6
7
8
9
4
13
21
25
23
16
26
24
22
20
19
18
17
15
14
12
11

7
Setup
This section contains information about setting up your instrument
and preparing to play. Please go through this section
carefully before turning the power on.
Power Supply
1. Before connecting to power supply, please set the master volume
to zero.
2. Connect the AC adaptor to the DC 15V jack of this keyboard.
3. Plug the AC adaptor into an AC outlet.
4. Press the [POWER] button, the LCD will be lit, which indicates the
instrument is powered on.
5. When turning the power o, set the master volume to zero.
6. Press and hold [<]/[>] buttons at the same time, and then press the
[POWER] button to turn on the piano, which will clear all user data
in the piano, including user songs, user style, user sound and user
memory.
Notes:
1. In order to save energy, the instrument will automatically shutdown
in 30 minutes if it is not used. (Please refer to Auto Power O).
2. For your safety, please unplug the instrument when it is not in use
or during a thunderstorm.
Music Stand
A music stand is supplied with the keyboard. Insert it into the slots at
the rear panel to attach it to the instrument.
Connecting the Headphones
When a pair of stereo headphones (not included) is connected to
the [PHONES] jack, the speakers will automatically switch o so that
sound will only be heard in the headphones.
Note:
To prevent hearing damage, do not use headphones at high volume or
for long periods of time.
Connecting Pedals
Connecting a Sustain Pedal
Plug in a sustain pedal or switch here to apply dampening eects
to your playing.
Connecting an Expression Pedal
An optional expression pedal can be plugged into the expression jack
for assigning an available function as desired.

8
Connections
Connecting to external PA systems
Use an audio cable to connect the LINE OUT jack of the instrument to
the audio INPUT jack of the external equipment. When L/MONO jack is
used, both L and R signals are merged and output in mono.
Note:
To avoid damaging the speakers, please set the master volume to zero
before connecting the power and other devices.
Connecting an MP3/CD Player
Connect an external audio source to the AUX IN jack on the rear panel.
The input signal is mixed with the instrument signal.
Connecting a Computer
Please connect the USB TO HOST jack of the instrument to the USB
port of a computer.
Note:
This instrument comes with both USB MIDI and USB Audio features.
Connecting a USB Flash Drive
Connect a USB ash drive to the instrument, you can save the data
such as Performance memory settings, recorded data to the USB ash
drive, or load and play back les saved in the USB ash drive
on the instrument.
Note:
To avoid error or damaging the USB ash drive, do not remove it when
reading or writing is in progress.

9
Sounds
The instrument has three parts: L, R1 and R2. You can use the [PART]
button to switch these parts ON or OFF.
Playing Sounds
Turning on the Part Switch, Selecting and Playing a Sound
1. Press the [PART R1] button to turn it on, LCD shows “SOUND R1”
and the current sound number and name.
2. There are two ways to select sounds:
Press one of the [SOUND SELECT] buttons to select the sound you
want to play, LCD shows the current sound number and name.
Press the [SOUND] button to enter the SOUND mode, then use the
data dial or [<] / [>] buttons to select the sound you want to play.
LCD shows the current sound number and name.
Playing Two Sounds Simultaneously
1. Press the [PART R2] button to turn the part on. “LAYER” light up on
display.
2. Selecting a sound for SOUND R2. Use the data dial or [<] / [>] buttons
to select the R2 sound.
3. After selecting a sound for two parts, play the keyboard and you will
hear a layered, ensemble sound combining two parts.
Playing Dierent Sounds with Both Hands
1. Press the [PART L] button to turn the part on. The keyboard is split
into the left and right areas, each with a dierent sound. “SOUND L”
and “SPLIT” light up on display. LCD shows the current sound num-
ber and name.
2. Selecting a sound for SOUND L. Use the data dial or [<] / [>] buttons-
to select the L sound.
Split Point
The key that separates sound L and sound R1/R2 is called the “split
point”. The split point is set to F#3 at the factory setting. This can be
changed to any other key in Setting.
Setting the Keyboard Touch Sensitivity
This instrument features several dierent touch sensitivity curves
programmed to simulate the touch response of various model acoustic
pianos.
1. Press the [SUST] button and [ARP] button simultaneously, to open
or close touch sensitivity setting.
2. There are ve built-in touch types, namely Soft2, Soft1, Medium,
Hard1, Hard2.
The default type is Medium.
3. If you select O, the keyboard touch is xed, the touch sign in the
upper right corner will go out.

10
Sounds
Transpose & Octave
Transpose
The transpose function allows the overall pitch of the instrument, in-
cluding Styles and Songs, to be transposed up or down by a maximum
of one octave in semitone steps.
1. Press [TRANSPOSE <] or [TRANSPOSE >] button to adjust the value
from-12 to +12 semitones.
2. Press [TRANSPOSE <] or [TRANSPOSE >] button simultaneously,
it will reset the value to default: 0.
Octave
You can also shift the pitch of a specic part or track up or down by full
octaves. Octave shift is not available for Style and Song modes.
1. Press [OCTAVE <] or [OCTAVE >] button to change the octave value
within the range of -2 to +2.
2. Press [OCTAVE <] or [OCTAVE >] button simultaneousl, it will set the
value to default: 0.
Note:
The sound octave adjusted depends on the current sound layer.
Sustain
1. Press the [SUST] button to turn the SUSTAIN eect on or o.
2. When the sustain is turned on, “SUSTAIN” lights up on display, and
all notes you play will have a longer sustain.
Synth
You can use the Synth function to create your own sound based on the
built-in sound samples.
Entering the Synth
Press [FUNCTION] button and go to Synth to access the Synth func-
tion.
Creating user sound
1. LCD will rst display “Edit Snd” and sound number. The Synth ag
will be lit. Use [<] / [>] buttons to select a desired user sound slot.

11
Sounds
2. Press [ENTER] button to enter the next menu. Then use the Data Dial
to select “Snd_Edit” or “Delete”. Press [ENTER] to go forward or press
[EXIT] to return to the previous menu.
3. If you select “Snd_Edit” and press [ENTER], the LCD will display
“PCMSound” and sample sound number. Use [<] / [>] buttons to
adjust the sound. Use Data Dial to select sound parameter, the sound
parameter will display on the LCD as follows “PCMSound”, “Cuto”,
“Resonance”, “Env Attk”, “Env Dcy”, “Env Sust”, “Env Rls”, “VibRate”,
“VibDepth”, “VibDelay”. Use [<] / [>] buttons to adjust the value, you
can play the keyboard to listen to the sound eect.
If you press [EXIT] button,LCD displays “Save?”,press [ENTER] button
to save the user sound or press [EXIT] button without saving.
If after saving, you can nd your edited user sound in the last serial
number of sound mode.
4. If you select the “Delete” menu and press [ENTER] button, LCD dis-
plays “Sure?”, press [ENTER] button to delete the current user sound,
and then return to previous menu. If you press [EXIT] button cancel the
operation, and then return to previous menu.
Parameter name Range Default Note
PCMSound 001 - n 001 n is the number of actual PCM's used in the keyboard.
Cuto 000 - 127 064 Adjust the lter cuto of the sound.
As the value is turned higher, the sound becomes brighter.
Resonanc 000 - 127 064 Adjust the lter resonance of the sound.
As the value is turned higher, the resonance eect becomes stronger.
Env Attk 000 - 127 064
Determines the time it takes for a sound to reach maximum volume after the
key is pressed and sound begins.
As the value is turned lower, the sound begins faster.
Env Dcy 000 - 127 064
Determines the time it takes for a sound to reach its sustain level volume after
the attack.
As the value is turned lower, the sound decays faster.
Env Rls 000 - 127 064 Determines the time from the key is released until the sound decays to silence.
As the value turned lower, the sound disappears faster.
VibRate 000 - 127 064 Determines how fast one vibrato eect cycle is played.
As the value is turned higher, the vibrato speed becomes faster.
VibDepth 000 - 127 064 Determines the strength of the vibrato eect.
As the value is turned higher, the eect becomes stronger.
VibDelay 000 - 127 064 Determines how quickly the vibrato eect starts after the sound begins.
As the value is turned higher, the vibrato starts later.

12
Style
Using Styles
Selecting Various Styles
Press one of the [STYLE SELECT] buttons to select the style you want to
play, LCD shows the current style number and name.
Press the [STYLE] button to enter the STYLE mode, then use the data
dial or [<] / [ >] buttons to select the style you want to play . LCD shows
the current style number and name.
Playing the Percussion Tracks of a Style
The percussion track is a signicant part of a style. You can generally
identify the style of music by listening to its percussion track.
1. In the Style mode, press the [START/STOP] button. The style will
immediately start with only the percussion track.
2. Press the [START/STOP] button again to stop the style playback.
Playing All Tracks of a Style
With auto accompaniment, you just need to play chords. The accom-
paniment will automatically follow along with the chords you play. This
simulates the experience of playing with an orchestra.
Play all the tracks of a style as follows:
1. Press the [CHORD MODE] button to turn on chord detection.
2. Press the [SYNC START] button to turn on the Sync Start function.
3. Press a chord in the chord area. It will start playing auto accompani-
ment of all tracks.
Experiment with playing dierent chords with your left hand and play-
ing the melody with your right hand.
The automatic accompaniment will enhance your performance.
Style Playback
Style Variations
There are many preprogrammed variations of automatic accompaniment.
[INTRO1/ENDING1] - [INTRO3/ENDING3]
This instrument features three built-in Intro/Ending sections.
1. Press one of the [INTRO 1] - [INTRO 3] buttons before starting style
playback. The [INTRO] button LED will light up. Press the [START/
STOP] button or play a chord on the keyboard (if [SYNC START] is
enabled) to start playing the Intro pattern.

13
Style
2. An Ending is commonly used at the end of a performance. This
instrument features three built-in Ending sections. Press one of the
[ENDING 1] - [ENDING 3] buttons to start the Ending section in the
next measure. The Style play back will stop when the Ending nishes.
[MAIN A] - [MAIN D]
Main is used for the loop part of the song. This instrument features four
built-in Main sections.
Press the [MAIN A] - [MAIN D] buttons during style playback to shift
between dierent patterns. The new Main section will start playing at
the next measure.
[BREAK]
When in Style playback, using a Break section can give even more dynam-
ics to the Main section loop.
As the Style plays, press the [BREAK] button to play a Break section in the
next measure.
After the Break plays, it will automatically return to the Main loop section.
Control Buttons
[START/STOP]
Start or stop playing back the Style. When the Style is playing, the [START/
STOP] button LED ashes according to the current tempo.
[SYNC START]
Start Style playback when playing the keyboard.
When [CHORD MODE] is turned o, turn on the [SYNC START] button,
and the percussion channels will start playing when you press any key.
When [CHORD MODE] and [SYNC START] are both turned on, the Style
playback will be triggered by playing a chord in the keyboard chord detect
area.
[SYNC STOP]
To stop the style when releasing the chord, press the [SYNC STOP] but-
ton. This only happens when [CHORD MODE] is enabled.
When [SYNC STOP] is turned on, the style stops when you release the
chord. [SYNC START] will then automatically turn on for you to easily con-
trol the Style start and stop.
[AUTO FILL IN]
Turn on [AUTO FILL IN] by pressing the button. It will automatically play a
Fill when you switch between Main Patterns. Putting Fills in your Style per-
formance gives variation to the song between Main parts. This instrument
features four built-in Fill sections. After the Fill plays, it will automatically
return to the Main loop section.

14
Style
[FADE IN]
Starting the Style with Fade In produces a smooth beginning, with the
volume increasing from low to high. Press the[FADE] button when Style
playback is stopped. The [FADE] LED will light up. When the Fade In is
complete, the [FADE] LED will go out.
[FADE OUT]
Stopping the Style with Fade Out produces a smooth ending, with the
volume tapering from high to low. Press the [FADE] button during Style
playback. The [FADE] LED will light up. When the Fade Out is complete,
the Style will automatically stop and the LED will go out. The keyboard
volume will also become lower if you are playing.
Chord Mode
Chord Basics
This section is a brief introduction to the basics of chords.
Chord Construction
1. When three or more notes are played together, they form a chord.
A chord is the basic component of harmony, and each note in the
chord is generally built according to a principle of thirds.
2. In most music, the fundamental chord is the “triad.” The notes that
make up a chord are determined according to their position: the
lowest note is called the “root”, the one a third interval above the
root is called the “third”, and the one a fth interval above the root is
called the “fth”.
3. The root note, also known as the tonic, is the most important note in
a chord. It stabilizes the sound by determining the“mode” of the
chord, xing the composition of the other notes in the chord. The
name of the chord structure depends on the interval of each note
above the root note in the chord.
• When the root pitch is a perfect fth away from the fth note and a
major or minor third from the third note, they are called “major chords”
and “minor chords”.
• When the root pitch is a major third and an augmented fth or a minor
triad and a diminished fth from the third note and fth note, they are
called the “augmented chord” and “diminished chord”.
According to the principle of third superposition, we can add a seventh
(seven intervals from the root note) and ninth(nine intervals from the root
note) on the triad to form a “seventh chord”, “ninth chord”, “eleventh
chord” and “thirteenth chord”.
Please refer to a chord chart or use a chord reference for more informa-
tion on chord types.
Major Triad Minor Triad
Augmented TriadDiminished Triad
Fifth
Root
Third

15
Style
Chord Inversion
The “inversion” of a chord is formed by turning the root note upward
and placing the third or fth note in the lowest position. The chord is
called an “inversion chord” when the root of the chord is not in the
lowest position.
This instrument supports playing chords by using inversion chord
ngering. When Bass inversion mode is turned on, the ngering of
standard chords and the ngering of inversion chords will have dier-
ent eects.
Chord Name
A chord name can tell you almost everything you need to know about
a chord, including: the root of the chord, whether the chord is a major
chord or a minor chord, an augmented chord or a diminished chord, a
seventh chord or a ninth chord, and so on.
For example, the name below clearly indicates that the root of the
chord is C, and the chord type is a minor triad, so this chord is a
minor triad with C as the root.
Please refer to a chord chart or use a chord reference for more infor-
mation on chord names.
Fingered
The default chord detect mode of this instrument is Fingered.
You can either use Single-ngered or Multi-ngered.
Note:
In Single-ngered Mode, you can play Major chords, Minor chords,
Seventh chords and Minor seventh chords by using up to three
ngers. Let’s take for example a chord with root C and introduce the
ngering for these four chords.
In Single Finger mode, you can play these four chords with a single
nger.
Multi-ngered
Multi-ngered mode only detects multi-nger chords. Let’s take
forexample a chord with root C and introduce ngering according to a
chord chart or chord reference.
Mаjor Triad
Only press the root note on the key-
board.
Minor Triad
Press the root note and the nearest
left black key simultaneously.
Seventh chord
Press the root note and the nearest
left white key simultaneously.
Minor seventh chord
Press the root note and the nearest
left white and black keys simultane-
ously .
Root Position First Inversion Second Inversion
Chord Root Chord Type
Notes: enclosed in parentheses are optional; the chords could be recognized without them.
C1+8 C1+5 Cancel
Csus2
C(b5) CM7(b5) CmM7(b5)
Cancel/C
Bass Invert
Detects inverted chords so the Bass channel can play a note other than
the root of the chord.
Smart Full Range
Detects multi-ngered chords in the full keyboard area.

16
Style
Setting Chord Detect Mode
Which ngering to use depends on the setting of the chord detect mode.
Entering Chord Mode
1. Press the [CHORD MODE] button to enter Chord mode.
2. Press the [CHORD MODE] button repeatedly to circulate between
“FINGERED-MULTI-INVENT-FULL”.
3. In FINGERED, MULTI, INVENT mode, the keyboard is divided into two
sections. The chord section is in the left hand area. In SMART FULL
RANGE mode, the entire keyboard is chord section.
Playing in Chord Mode
1. Press the [SYNC START] button to engage the sync start function.
2. Play a chord in the chord section, it will start playing auto accompani-
ment of all tracks. Or press the [START/STOP] button to start percus-
sion playback, then play a chord in the chord section to start playing
all tracks.
Quick Setting (Q.S.)
When Quick Setting is switched on, you can instantly recall all auto
accompaniment related settings including sound selection and eects
simply with a single touch of a button.
1. Press the [Q.S.] button to turns on Quick Setting for current style.
[Q.S.1] - [Q.S.4] buttons are now active.
2. Press one of the [Q.S.1] - [Q.S.4] buttons to engage the desired set-
ting.
Various panel settings (such as sound, eect, etc.) that match the
selected style can be instantly recalled. Sync start is automatically
turned on when Q.S. is engaged.
Quick Setting parameter list:
Part ON/OFF (Sound R1,R2 and L)
Sound Number (Sound R1,R2 and L)
Sound Volume (Sound R1,R2 and L)
Sound IFX Level (Sound R1,R2 and L)

17
Songs and Audio
Playing Songs and Audio
You can also play audio les (WAV / MP3) and MIDI les from a USB
device through the built-in speakers.
Selecting Songs
1. Press the [SONG] button to enter the SONG mode, then use the data
dial or [<] / [>] buttons to select the song you want to play.
LCD shows the current song number and name.
Playing Songs
1. Press the [START/STOP] button, it will stop playing. Press the button
again, it will play the current song repeatedly.
2. When the songs is stopped, pressing [STYLE] button will exit the song
mode.
Song control
REW, FF and PAUSE
When the song is playing.
Press the [ ] button to fast forward the song.
Press the [ ] button to rewind the song.
Press the [ ] button to pause the playing song, press it again to contin-
ue playing.
LOOP
Press the [ ] button for a single song loop (LED red).
The default on powering-on is all song loop (LED blue).
MIDI Recording
In MIDI recording, you can save your recording as a user song on the
instrument, or export it to a connected USB disk. The saved user songs
will not be lost when you turn o the power.
Preparing and starting Recording
1. Press the [RECORD] button to enter the user song menu. The LCD
shows the current empty user song number, such as “No File!”. Use
the data dial or [<] / [>] buttons to select a location to save your
recording. If there is a location of the recording le, “User sng” will be
displayed.
2. Press the [RECORD] button again to enter the recording preparation
state. The “REC” indicator will glimmer. Now you can select the de-
sired sound, style, tempo etc.
3. Press the [START/STOP] button or simply play the keyboard to start
recording. Alternatively, turn on the Chord Mode and SYNC START.
Recording will start when you play a chord in the chord section.

18
Songs and Audio
Stopping Recording
During recording, press the [RECORD] button. It will stop recording and
save the recorded song automatically.
If the storage become used up during recording, recording will stop and
be saved automatically.
Note:
If the selected user song has data, the previous data will be overwritten
by new recording.
Playing back Recording
1. After recording, the recorded song will be automatically selected.
Or press [SONG] button to enter the Song interface, then use data
dial or [<] / [>] buttons to select a user song.
2. Press the [START/STOP] button to start the playback.
Deleting Recording
Hold down the [RECORD] and [SONG] buttons at the same time, then
turn on the power. This operation will delete all user songs.
Audio Recording
In audio recording, you can save your recording as MP3/WAV les to a
USB ash drive.
1. Connect your USB storage device via the USB TO DEVICE jack.
The audio les you recorded will be saved to this device. Please make
sure your USB device has sucient storage.
2. Press the [RECORD] button to start recording. The LCD will temporar-
ily show “RecStart”. All the sounds that you hear from the instrument
will be recorded, such as accompaniment, keyboard sounds, song
playback, demo playback, music from Aux In etc.
3. Press the [RECORD] button to stop recording. The “REC” indicator
will turn o. The recorded song will be saved to the USB storage
device, and be named as “AudioXXX”.
4. Press the [START/STOP] button to play back this recorded song.
Alternatively, you can select to play back the recorded song from
the USB play menu. See Connecting an USB storage device.
Note:
1. Do not disconnect the USB storage device from the instrument
during recording, otherwise the le may be corrupted. Keep the
instrument power on during audio recording.
2. You cannot play audio les while recording audio.
3. Audio recording supports up to 90 minutes of recording, and will be
automatically saved when the time is up.
4. Audio recording does not support recording DEMO.

19
Metronome
Tempo
1. Press the [Metronome] button to turn on the metronome, the beat
will sound. The beat indicat or on the LCD will start counting.
2. Press the [Metronome] button again to turn o the metronome
function.
Each style of the instrument has been set with a default or standard
tempo, which can be changed by using the [TEMPO<] / [TEMPO>]
buttons.
1. Changing the tempo
Use the [TEMPO<] / [TEMPO>] button to change the tempo. Or use
the Data Dial to make a quick change when the value is ashing on
LCD.
2. To restore the default tempo setting, press the [TEMPO<] / [TEMPO>]
buttons simultaneously.
You can also use the Tap Tempo feature to change the current tempo,
which is an ecient way to get the desired tempo.
1. When the Style or Song is playing, you can press the [TAP] button
several times to change the tempo.
2. When the Style or Song stops, press the [TAP] button several times in
succession, and the Style or Song will start playing at the tempo you
tapped.

20
Phrase Pads
A Phrase Pad oers a short rhythmic sequence or sequence of phrases.
Similar types of sequences are combined to form a Phrase Pad Bank.
Selecting a Phrase Pad Bank
Press the [PHRASE PAD SELECT] button to enter the Phrase Pad selec-
tion menu, then use data dial or [<] / [>] buttons to select a phrase pads.
Playing Phrase Pads
Playing One or More Phrase Pads
Press any [PHRASE PAD] button to start playback. Now, the LED lights
of the corresponding buttons will light up and the pad will play according
to the current system tempo.
During playback, press the same Phrase Pad again and it will play again
from the start.
You can play several Phrase Pads at the same time. The new Phrase Pad
will start immediately after pressing it.
Stopping Playing Phrase Pads
Press the [PHRASE PAD STOP] button to stop all phrase Pads at the
same time. The LED lights will all go out.
If several Phrase Pads are playing at the same time, you can hold
[PHRASE PAD STOP] and press one of the Phrase Pads to stop it imme-
diately. The other Phrase Pads will keep playing.
The instrument has two types of sequences: Loop sequences and Single
sequences. The loop sequence will loop when playing. Single sequences
will stop automatically after playing one time.
Setting Phrase Pads to Standby Status
Press [PHRASE PAD SELECT] and hold it. Press one or more Phrase
Pads at the same time. The corresponding Phrase Pads can be set to
standby state, in which their LEDs keep ashing.
Now, press [PHRASE PAD SELECT] and hold it. Press one of the Phrase
Pads that is in standby state, and it will play immediately. Other Phrase
Pads will remain in standby state.
If you want to play all of the Phrase Pads that are in standby state at the
same time, just press any of them.
When [CHORD ON/OFF] is o, playing the keyboard will trigger all
Phrase Pads that are in standby state.
If you need to cancel the standby state, hold [PHRASE PAD STOP] and
press the Phrase Pad you want to cancel at the same time.
Table of contents
Other Medeli Electronic Keyboard manuals

Medeli
Medeli MC-110 User manual

Medeli
Medeli M-30 User manual

Medeli
Medeli MC-49 User manual

Medeli
Medeli M20 User manual

Medeli
Medeli M311 User manual

Medeli
Medeli mc 620 User manual

Medeli
Medeli Millenium Series Installation guide

Medeli
Medeli AW830 User manual

Medeli
Medeli M10 User manual

Medeli
Medeli A100S User manual