medi Soft OA User manual

medi GmbH & Co. KG
Medicusstraße 1
95448 Bayreuth
Germany
T +49 921 912-0
F +49 921 912-780
www.medi.de
medi Australia Pty Ltd
83 Fennell Street
North Parramatta NSW 2151
Australia
T +61-2 9890 8696
F +61-2 9890 8439
sales@mediaustralia.com.au
www.mediaustralia.com.au
medi Austria GmbH
Adamgasse 16/7
6020 Innsbruck
Austria
T +43 512 57 95 15
F +43 512 57 95 15 45
vertrieb@medi-austria.at
www.medi-austria.at
medi Belgium NV
Staatsbaan 77/0099
3945 Ham
Belgium
T: + 32-11 24 25 60
F: +32-11 24 25 64
info@medibelgium.be
www.medibelgium.be
medi Canada Inc / médi Canada Inc
104-1375 Lionel-Boulet,
Varennes, Québec,
QC Canada J3X 1P7
T +1 450-583-3317 / +1 800 361 3153
F +1 888-583-6827
www.medicanada.ca
MAXIS a.s.,
medi group company
Slezská 2127/13
120 00 Prague 2
Czech Republic
T: +420 571 633 510
F: +420 571 616 271
info@maxis-medica.com
www.maxis-medica.com
medi Danmark ApS
Vejleåvej 66
2635 Ishøj
Denmark
T +45-70 25 56 10
kundeservice@sw.dk
www.medidanmark.dk
medi Bayreuth Espana SL
C/Canigo 2-6 bajos
Hospitalet de Llobregat
08901 Barcelona
Spain
T +34-932 60 04 00
F +34-932 60 23 14
medi@mediespana.com
www.mediespana.com
medi France
Z.I. Charles de Gaulle
25, rue Henri Farman
93297 Tremblay en France Cedex
France
T +33-1 48 61 76 10
F +33-1 49 63 33 05
infos@medi-france.com
www.medi-france.com
medi Hungary Kft.
Bokor u. 21.
1037 Budapest
Hungary
T +36 1 371-0090
F +36 1 371-0091
www.medi.hu
medi Japan K.K.
5-1 Nihonbashi Kabutocho Chuoku
103-0026 Tokyo
Japan
T: +81 3 6778 2590
F: +81 3 5847 7901
info@medi-japan.jp
www.medi-japan.co.jp
medi Nederland BV
Heusing 5
4817 ZB Breda
The Netherlands
T +31-76 57 22 555
F +31-76 57 22 565
www.medi.nl
E015745 / 11.2023
Wichtige Hinweise
Das Medizinprodukt ist nur zum mehrfachen Gebrauch an einem Patienten bestimmt . Wird es für die Behandlung von mehr als ei-
nem Patienten verwendet, erlischt die Produkthaftung des Herstellers. Sollten übermäßige Schmerzen oder ein unangenehmes Gefühl wäh-
rend des Tragens auftreten, kontaktieren Sie bitte umgehend Ihren Arzt oder ihr versorgendes Fachgeschäft. Tragen Sie das Produkt nur auf
intakter oder wundversorgter Haut, nicht direkt auf verletzter oder versehrter Haut und nur unter vorheriger medizinischer Anleitung.
Important notes
This medical device is made only for multiple uses on a single patient . If it is used for treating more than one patient, the
manufacturer’s product liability will become invalid. If undue pain or an unpleasant sensation develops while you are wearing the product,
please consult your doctor or orthotist immediately. Only wear the product on unbroken skin or over injured skin that has been medically
treated, not directly on injured or damaged skin, and only after previous consultation with a medical professional.
Remarques importantes
Le dispositif médical est destiné à un usage multiple sur un patient . S´il est utilisé pour le traitement de plusieurs patients, le
fabricant décline toute responsabilité. Si des douleurs extrêmes ou une sensation de gêne devaient se manifester durant l’utilisation, veuillez
consulter immédiatement votre médecin ou votre technicien-orthopédiste. Ne portez le produit que sur la peau intacte ou dont la plaie est
soignée, et non directement sur la peau blessée ou abîmée et seulement suivant une recommandation médicale préalable.
Advertencia importante
El producto médico solo está destinado a su uso múltiple en un paciente . En el caso de que se utilice para el tratamiento de más de un
paciente, desaparece la responsabilidad del fabricante sobre el producto. De producirse dolores excesivos o una sensación de incomodidad
durante el uso del producto, sírvase solicite ayuda de su medico o técnico ortopédico inmediato. Coloque el producto solo sobre la piel intacta
o curada, no lo haga directamente sobre la piel lesionada o dañada y hágalo siempre bajo prescripción médica.
Indicações importantes
O dispositivo médico destina-se a utilização múltipla em apenas num paciente . Se for utilizado para o tratamento de mais de um
paciente, prescreve a responsabilidade do fabricante. Se surgirem dores excessivas ou uma sensação desagradável durante a utilização,
por favor consulte imediatamente o seu médico ou técnico ortopédico. Use o produto apenas com a pela intacta ou com feridas tratadas e
cobertas, mas não diretamente sobre a pele lesionada ou danificada e apenas sob orientação médica prévia.
Avvertenze importanti
Dispositivo medico riutilizzabile destinato a un singolo paziente . L’utilizzo per il trattamento di più di un paziente farà decadere
la responsabilità da parte del produttore. Nel caso in cui, durante l’uso, sopravvengano dolori o sensazione di disagio, consultare
immediatamente il medico o il negozio specializzato di fiducia che l’ha fornita. Indossare il prodotto solo su pelle integra o medicata, non
direttamente su pelle lesa o danneggiata e solo secondo le istruzioni del medico curante.
Belangrijke aanwijzingen
Het medische product is gemaakt voor herhaaldelijk gebruik door één patiënt . Indien ze voor de behandeling van meer dan één
patiënt wordt gebruikt, aanvaardt de producent geen aansprakelijkheid. Mocht u tijdens het dragen veel pijn of een onaangenaam gevoel
hebben, vraag onmiddellijk uw arts of ortopedisch instrumentenmaker om raad. Breng het product enkel aan op een intacte huid of huid met
verzorgde wonden, niet rechtstreeks op een gekwetste of beschadigde huid en enkel met voorafgaande medische begeleiding.
Vigtige oplysninger
Det medicinske produkt er kun beregnet til at blive brugt flere gange på én patient . Bruges den i behandlingen af mere end en patient,
bortfalder producentens produktansvar. Skulle der opstå store smerter eller en følelse af ubehag mens du har produktet på, skal du straks
tage produktet af og konsultere din læge eller bandagist. Påfør produktet kun på uskadt eller behandlet hud, ikke direkte på såret eller skadet
hud og kun efter forudgående medicinsk vejledning.
Viktiga råd
Den medicinska produkten är endast avsedd att användas flera gånger för en och samma patient . Om den används av flera patienter,
gäller inte tillverkarens garanti. Om starka smärtor eller obehagskänslor uppträder vid bärande av produkten, kontakta omgående din läkare
eller din återförsäljare. Använd produkten endast på intakt eller sårvårdad hud, inte direkt på skadad eller ärrad hud och endast under
medicinsk vägledning.
Důležité informace
Zdravotnický prostředek je určen pro opakované použití u pouze jednoho pacienta . Budete-li ho používat při léčbě více než jednoho
pacienta, zaniká záruka za produkt poskytovaná výrobcem. Pokud by se během nošení vyskytly nepřiměřené bolesti nebo nepříjemný pocit,
sejměte, prosím okamžitě výrobek a vyhledejte svého lékaře nebo prodejnu, kde jste výrobek zakoupili. Výrobek noste pouze na neporušené
nebo ošetřené pokožce, nikoli přímo na poraněné nebo poškozené pokožce, a jen podle předchozího lékařského návodu.
Bажные замечания
Данное медицинское изделие предназначено для многоразового использования только одним пациентом . В случае
использования изделия более чем одним пациентом гарантии производителя утрачивают силу. Если при пользовании изделием у
Вас возникли боль или неприятные ощущения,пожалуйста, немедленно снимите его и проконсультируйтесь у Вашего врача.
Носите изделие исключительно на неповрежденной коже/после обработки ран. Не следует надевать его поверх поврежденной или
пораненной кожи. Используйте изделие только после получения указаний от медперсонала.
Önemli uyarı
Bu ürün tıbbi cihaz kategorisine girer ve yalnızca hastalar üzerinde birden fazla kez kullanılmalıdır . Aynı ortezin birden fazla hastada
kullanılması durumunda tıbbi ürünlere düzenleme getiren kanunun anladığı anlamda üreticinin üründen kaynaklanan sorumluluğu sona
erer. Taşıma sırasında aşırı ağrı ve rahatsızlık duygusu görülmesi durumunda, lütfen derhal doktor veya ortopedi teknisyenini arayınız. Ürünü
yalnızca sağlıklı cilt veya gerekli tıbbi müdahalesi ve bakımı yapılmış, üstü örtülü yaralar üzerinde kullanın; doğrudan açık yara üzerinde ve
önceden gerekli tıbbi talimatları almadan kullanmayın.
medi Polska Sp. z.o.o.
ul.Łabędzka 22
44-121 Gliwice
Poland
T: +48-32 230 60 21
F: +48-32 202 87 56
www.medi-polska.pl
medi Bayreuth Unipessoal, Lda
Rua do Centro Cultural, no. 43
1700-106 Lisbon
Portugal
T +351-21 843 71 60
F +351-21 847 08 33
medi.portugal@medibayreuth.pt
www.medi.pt
medi RUS LLC
Business Center NEO GEO
Butlerova Street 17
117342 Moscow
Russia
T +7-495 374 04 56
F +7-495 374 04 56
info@medirus.ru
www.medirus.ru
medi Sweden AB
Box 6034
192 06 Sollentuna
Sweden
T +46 8 96 97 98
F +46 8 626 68 70
info@medi.se
www.medi.se
medi Trading (Shanghai) Co. Ltd.
Room 1703, T1, CES WEST BUND CENTER,
No. 277, Long Lan Road
Xuhui District
200232 Shanghai
People‘s Republic of China
T: +86-21 50582319
F: +86-21 50582319
UK Responsible Person
medi UK Ltd.
Plough Lane
Hereford HR4 OEL
Great Britain
T +44-1432 37 35 00
F +44-1432 37 35 10
enquiries@mediuk.co.uk
www.mediuk.co.uk
medi. I feel better.
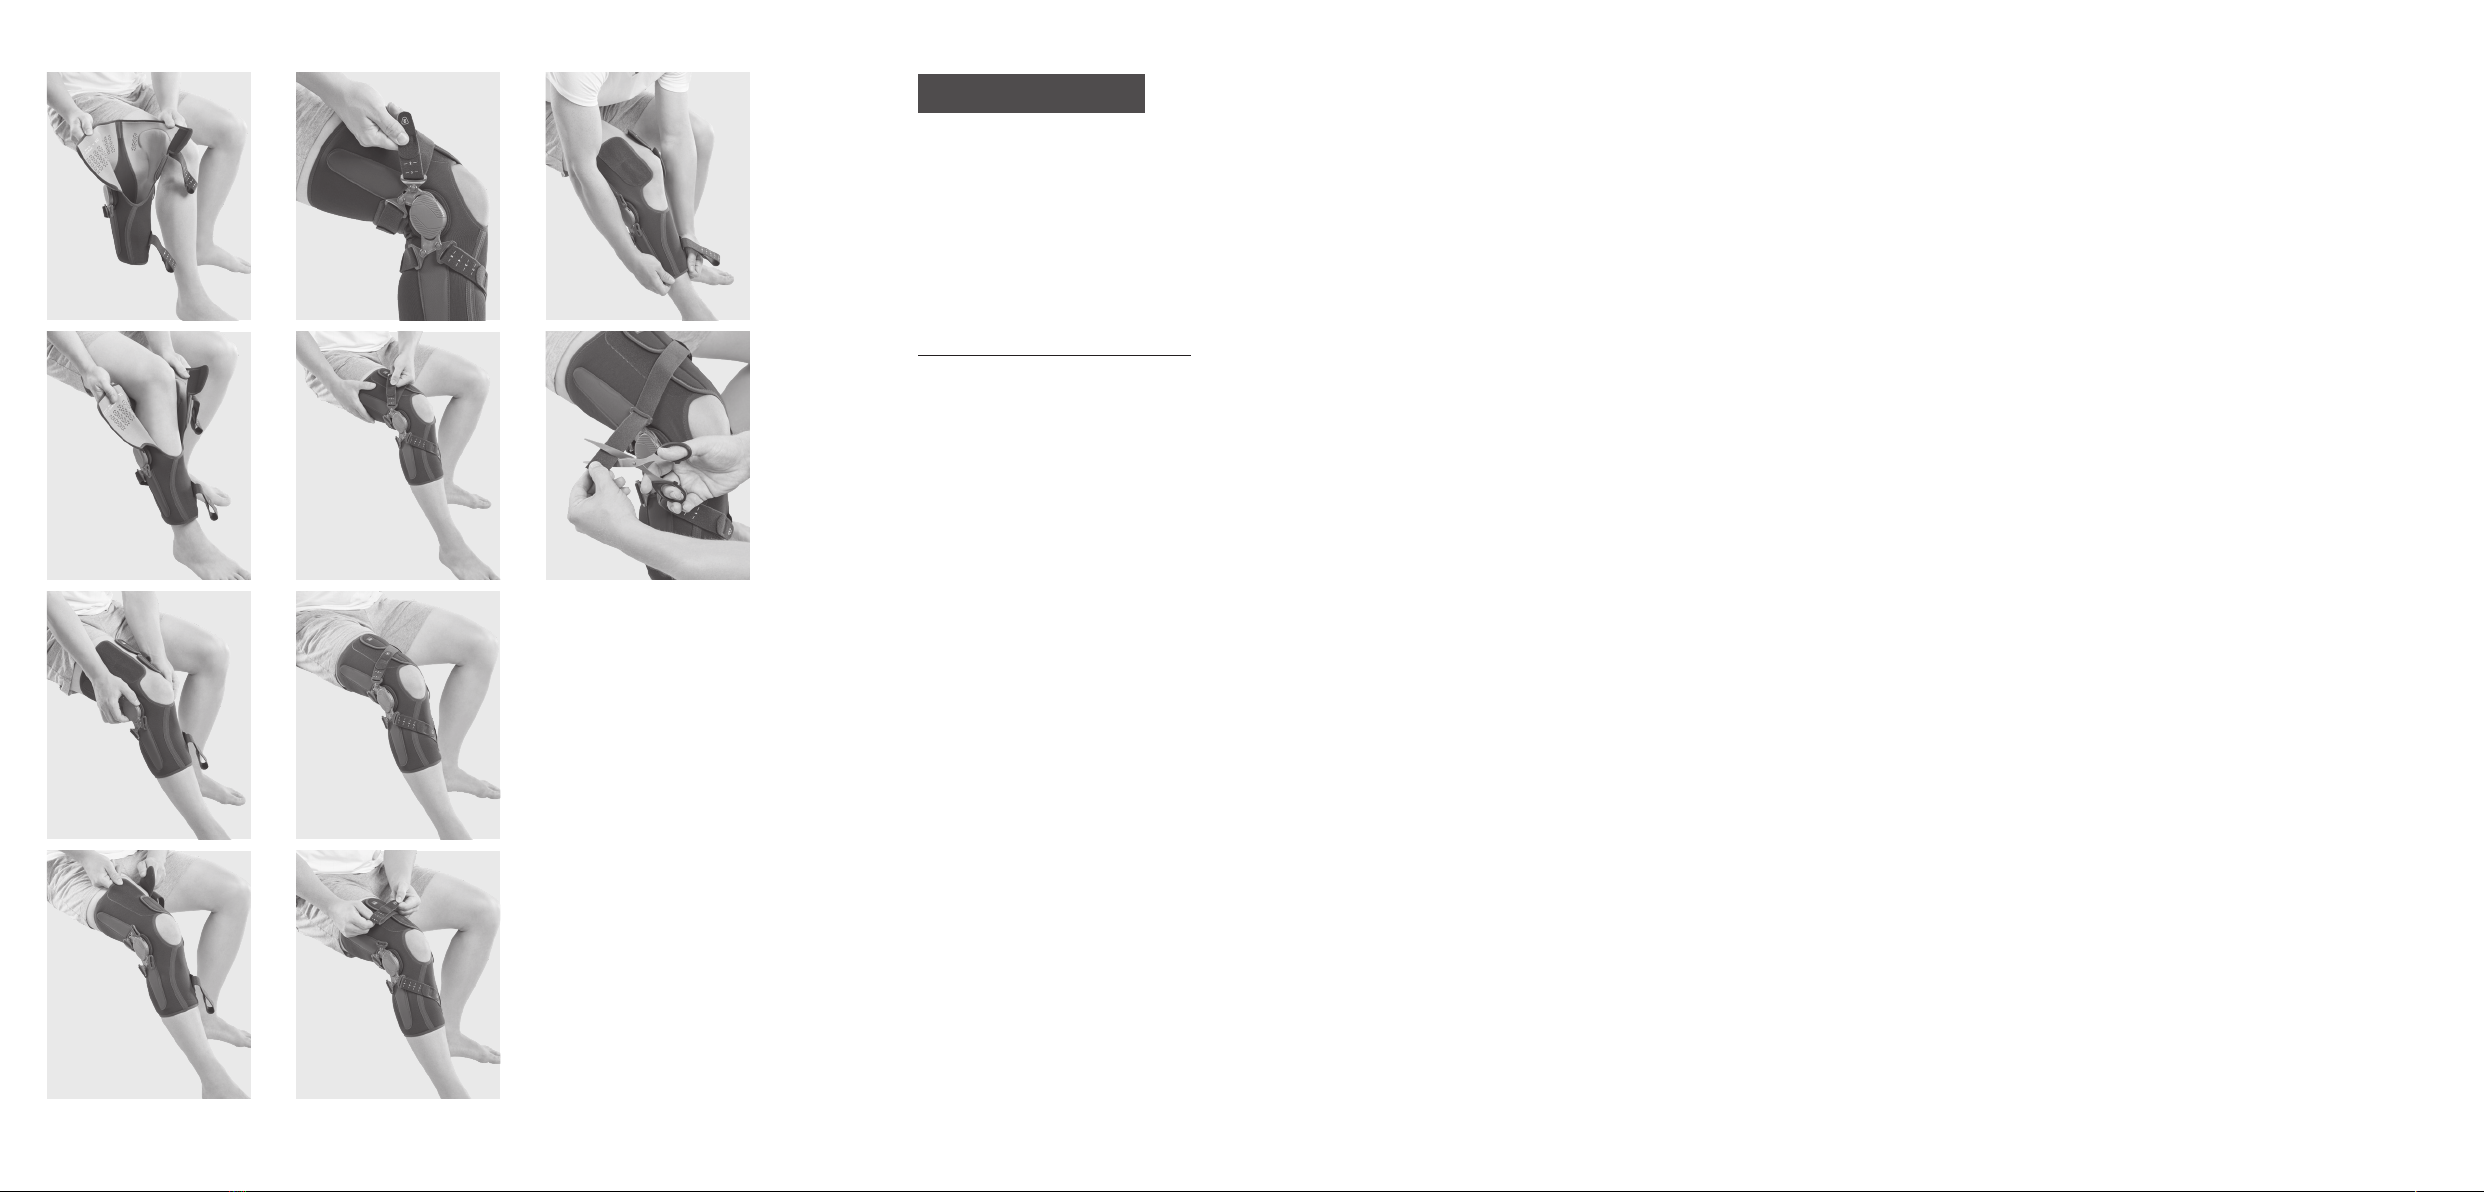
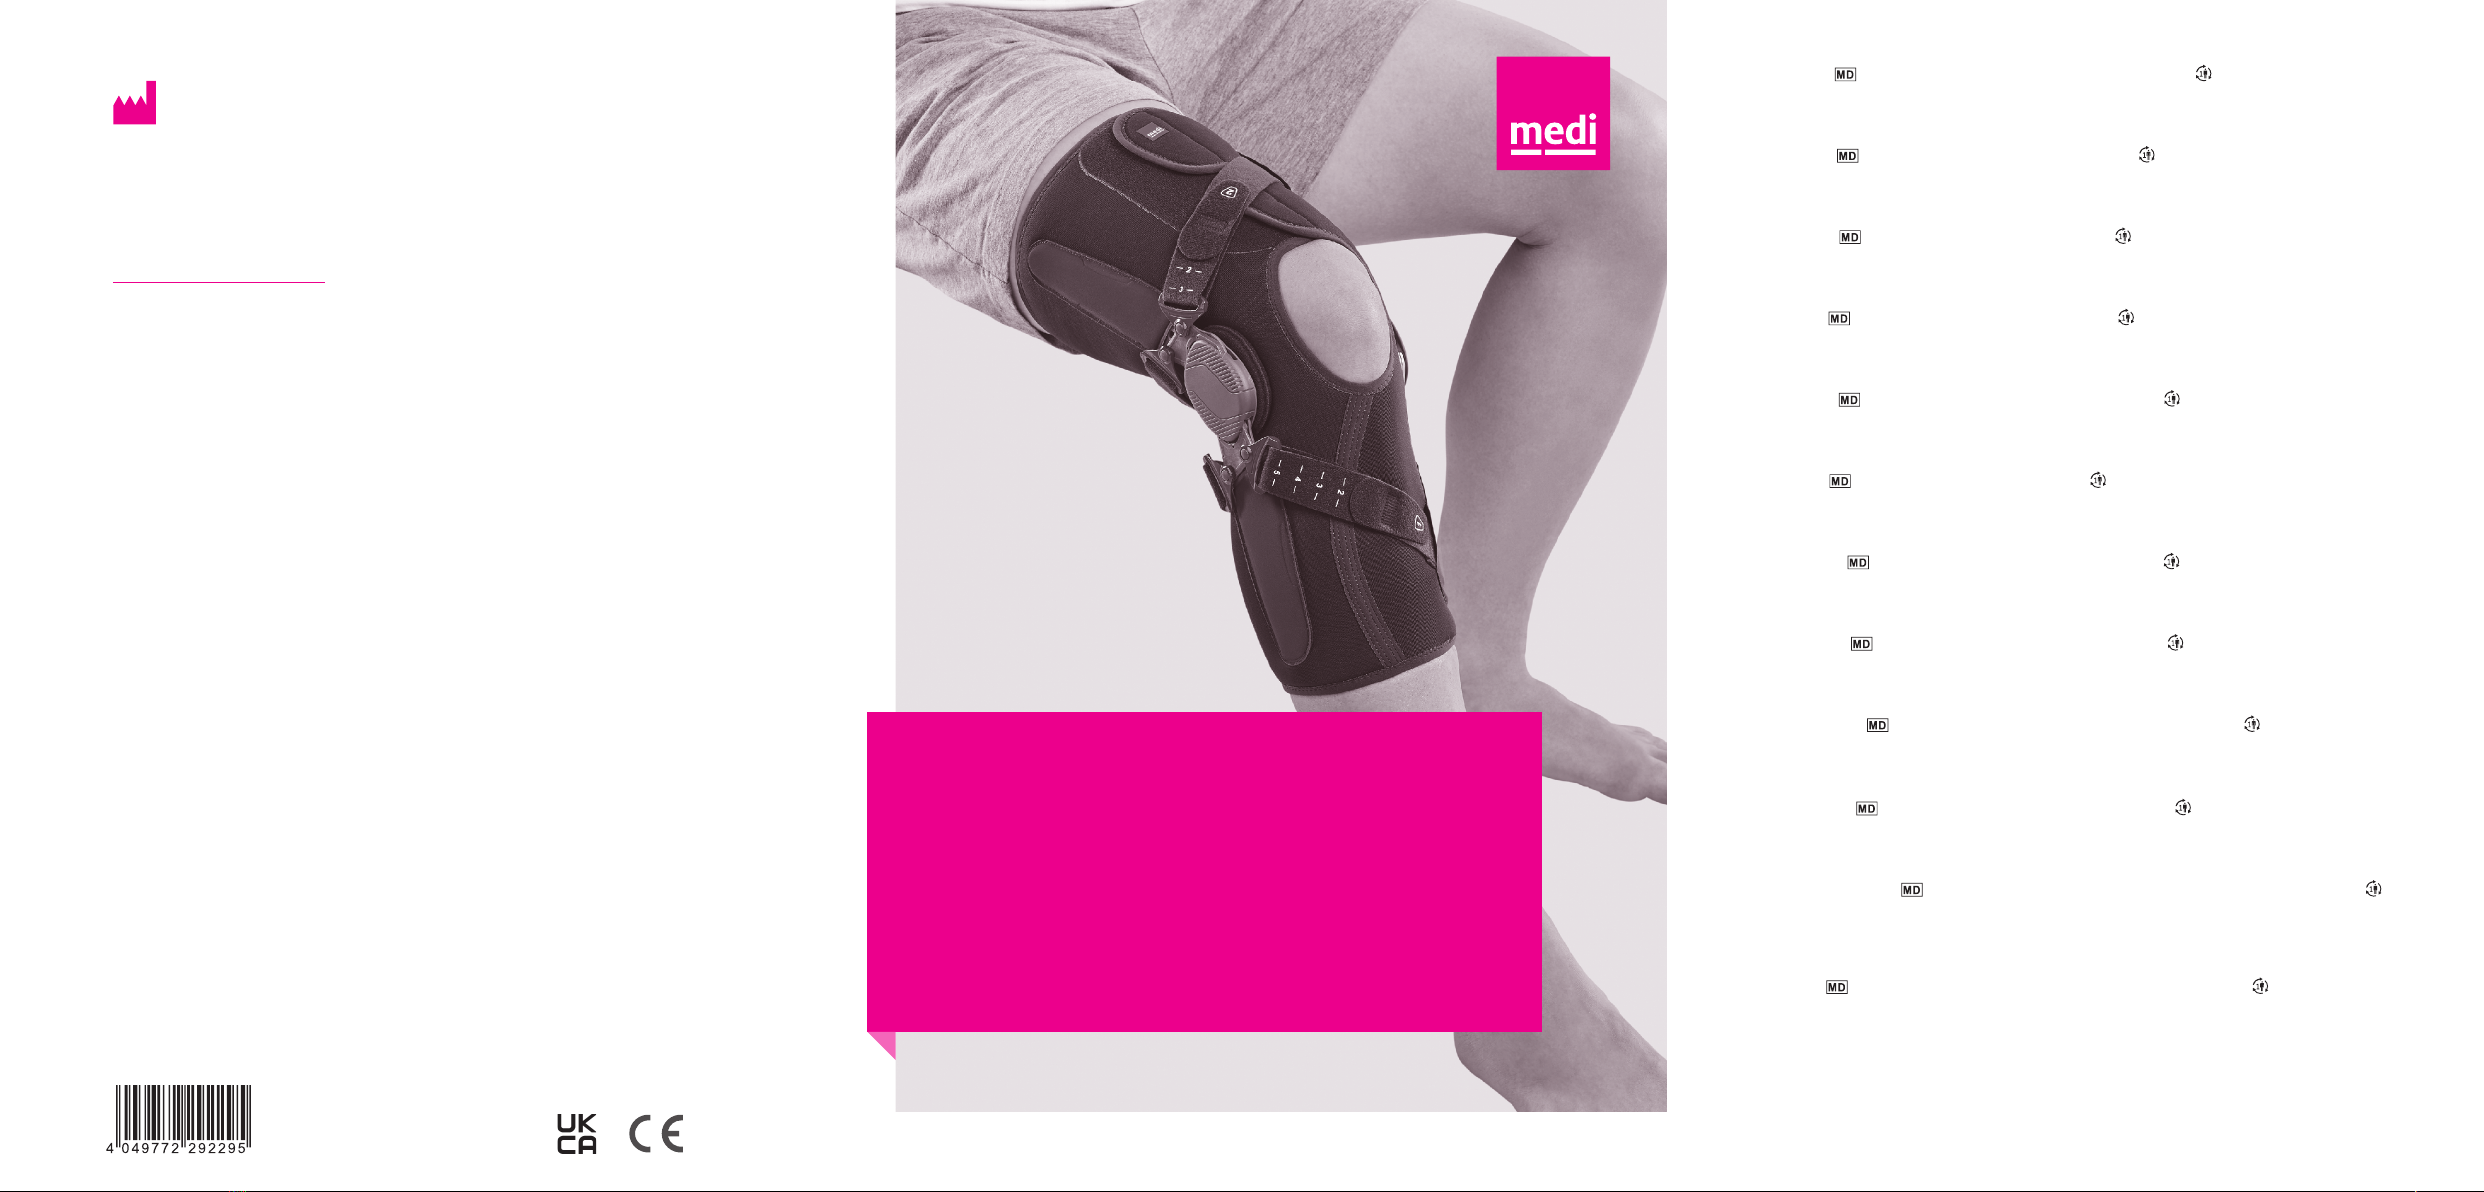
medi Soft OA light
Knie-Softorthese zur Entlastung · Soft knee orthosis for pressure
relief
Gebrauchsanweisung. Instructions for use. Mode d’emploi. Instrucciones de uso.
Instruções para aplicação. Istruzioni per l’uso. Gebruiksaanwijzing. Brugsvejledning.
Bruksanvisning. Návod k použití. Инструкция по использованию. Kullanma kılavuzu.
Instrukcja zakładania. Használati útmutató. Інструкція з використання. Navodila
za uporabo. Návod na použitie. .使用说明. Instrucțiuni de utilizare.
שומיש תוארוה. Bruksanvisning. 取扱説明書.Užsimovimo instrukcija.
E015745_AAL_soft_OA_light.indd 1 08.11.23 10:37

auf die Materialzusammensetzung
zurückzuführen sind.
Vorgesehene Anwender und
Patientenzielgruppe
Zu den vorgesehenen Anwendern zählen
Angehörige der Gesundheitsberufe und
Patienten, inklusive der in der Pflege
unterstützende Personen, nach
entsprechender Aufklärung durch
Angehörige der Gesundheitsberufe.
Patientenzielgruppe: Angehörige der
Gesundheitsberufe versorgen anhand der
zur Verfügung stehenden Maße/Größen
und der notwendigen Funktionen/
Indikationen Erwachsene und Kinder
unter Berücksichtigung der Informationen
des Herstellers nach ihrer Verantwortung.
Einstellen von Flexions- und
Extensionsbegrenzungen (Nur vom
Orthopädietechniker durchzuführen)
Extensionsbegrenzungskeile, silber
(Streckbegrenzung): -5°, 0°, 10°, 20°,
30°, 45°
Flexionsbegrenzungskeile, schwarz
(Beugebegrenzung): 0°, 10°, 20°, 30°,
45°, 60°, 75°, 90°, 120°
Ruhigstellungsmöglichkeit bei: 0°, 10°,
20°, 30°, 45°
Einstellen von Flexions- und Extensi-
onsbegrenzungen
1. In Ihrer Knieorthese sind 0° Extensi-
onskeile vorinstalliert.
2. Um die Keile auszuwechseln, trennen
Sie Das Gelenk von der Orthese.
3. Lösen Sie die Schraube auf der Innen-
seite und entnehmen Sie Schraube
und Keil.
4.
Legen Sie den entsprechenden Keil von
vorne bzw. hinten in die seitliche Öff-
nung und schrauben Sie den Keil fest.
5. Bewegen Sie das Gelenk ein paarmal
durch um sicher zu sein, dass das Ge-
lenk frei läuft und die Keile fest sitzen.
6. Befestigen Sie das Gelenk an der
Orthese.
medi Soft OA
light
Zweckbestimmung
medi Soft OA light ist eine Knieorthese
zur Entlastung.
Indikationen
Alle Indikationen, die eine Entlastung
eines Kompartiments nach 3-Punkt-
Entlastunsprinzip und zusätzliche physi-
ologische Führung des Kniegelenks
benötigen, wie z.B.
• Bei unilateraler Kniegelenkarthrose
• Nach Meniskuseingriffen
Kontraindikationen
Beidseitige Gonarthrose
Risiken / Nebenwirkungen
Es kann bei fest anliegenden Hilfsmit-
teln zu örtlichen Druckerscheinungen
oder Einengung von Blutgefäßen oder
Nerven kommen. Deshalb sollten Sie bei
folgenden Umständen vor der Anwen-
dung mit Ihrem behandelnden Arzt
Rücksprache halten:
• Erkrankungen oder Verletzungen der
Haut im Anwendungsbereich, vor
allem bei entzündlichen Anzeichen
(übermäßige Erwärmung, Schwellung
oder Rötung)
• Empfindungs- und Durchblutungsstö-
rungen (z.B. bei Diabetes, Krampfa-
dern)
• Lymphabflussstörungen – ebenso
nicht eindeutige Schwellungen von
Weichteilen abseits des Anwendungs-
bereichs
Beim Tragen von eng anliegenden
Hilfsmitteln kann es zu örtlichen
Hautreizungen bzw. Irritationen
kommen, die auf eine mechanische
Reizung der Haut (vor allem in
Verbindung mit Schweißbildung) oder
Medi Turk Ortopedi Medikal Ic ve Dis Tic. AS
Mustafa Kemal Mah. 2156 Sokak No: 16 /4-5
06510 Çankaya Ankara
Turkey
T: +90 312 435 20 26
F: +90 312 434 17 67
info@medi-turk.com
www.medi-turk.com
medi Ukraine LLC
Evhena Sverstiuka str, 11.
Kiev 02002
Ukraine
T: +380 44 591 11 63
F: +380 44 392 73 73
info@medi.ua
http://medi.ua
medi USA L.P.
6481 Franz Warner Parkway
Whitsett, N.C. 27377-3000
USA
T +1-336 4 49 44 40
F +1-888 5 70 45 54
info@mediusa.com
www.mediusa.com
1Deutsch
2
3
4
5
6
7
8
9
10
E015745_AAL_soft_OA_light.indd 2 08.11.23 10:37

Änderung der Extensions- und Fle-
xionsbegrenzungen nur auf Vorgabe
Ihres behandelnden Arztes. Um eine
Hyperextension zu vermeiden, müssen
immer Extensionskeile oder aber
0°-Keile eingesetzt sein. Die Keile geben
der Orthese den exakten Bewegungsra-
dius vor. Bei schwierigen Weichteilver-
hältnissen kann es, bedingt durch die
Weichteilkompression, notwendig sein,
einen größeren Keil einzusetzen, um die
Kniebewegung auf den gewünschten
Radius zu beschränken.
Anziehanleitung
Vor dem Anlegen
Öffnen Sie die Gurte auf der Vorderseite
und die Klettverschlüsse der Orthese.
(Bild 1)
Anlegen
• Beugen Sie das Bein auf ~70° und
ziehen Sie die Orthese auf das
verletzte Bein. (Bild 2)
• Ziehen Sie die Orthese hoch, bis das
Gestrick die Unterkante der Knieschei-
be berührt und achten Sie darauf, dass
die Kniescheibe zentriert in der
Öffnung liegt. Die Gelenkmitte der
seitlichen Gelenkschienen sitzt jetzt
ungefähr auf Höhe der oberen Kante
der Kniescheibe.
Achten Sie darauf, dass die Orthese
gerade und nicht verdreht am Bein
sitzt. (Bild 3)
• Schließen Sie nun die Klettverschlüsse
des oberen Teils der Orthese. (Bild 4)
• Vergewissern Sie sich nochmals ob des
richtigen Sitzes der Orthese.
• Ziehen Sie als erstes den unteren Gurt 1
durch die Öse des Gelenks und stellen
Ihn auf die mit dem Techniker definierte
Ersteinstellung. Schließen Sie den Klett.
Im Anschluss stellen Sie den oberen
Gurt 2 ein und schließen ihn .
• Die hinteren Gurte sind vom Techniker
voreingestellt. (Bild 5 und 6)
• Laufen Sie ein paar Schritte und
vergewissern Sie sich dass die Orthese
richtig am Bein sitzt. Ggf. korrigieren
Sie den Sitz nochmal. (Bild 7)
Ablegen
• Öffnen Sie die beiden Gurte und
kletten Sie das Gurtbandende auf das
Gurtband zurück um mögliche
Schäden an der Kleidung zu verhin-
dern. (Bild 8)
• Öffnen Sie den Klettverschluss der
Orthese und ziehen Sie die Orthese
nach unten weg. Schließen Sie die
Kletts um Beschädigungen zu
vermeiden. (Bild 9)
Hinweis für den Techniker
• Stellen Sie das Entlastungssystem
(Gurtsystem) so ein, dass der Patient
eine angenehme Schmerzlinderung
fühlt. Der Patient sollte von dieser
Basis - Einstellung noch die Möglich-
keit haben den Druck zu erhöhen oder
zu reduzieren. (Bild 10)
• Lassen Sie den Patienten die Orthese
einige Minuten tragen, um sicherzu-
stellen, dass die Gurte eine angenehme
Spannung aufweisen.
Pflegehinweise
Klettverschlüsse bitte vor dem Waschen
schließen.
Seifenrückstände, Cremes
oder Salben können Hautirritationen
und Materialverschleiß hervorrufen.
• Waschen Sie das Produkt, vorzugs-
weise mit medi clean Waschmittel, von
Hand.
• Nicht bleichen.
• Lufttrocknen.
• Nicht bügeln.
• Nicht chemisch reinigen.
Deutsch
E015745_AAL_soft_OA_light.indd 3 08.11.23 10:37

Lagerungshinweis
Bitte das Produkt trocken lagern und vor
direkter Sonneneinstrahlung schützen.
Materialzusammensetzung
Polyamid, Polyurethan, Polyester, Lycra,
Aluminium
Haftung
Die Haftung des Herstellers erlischt bei
nicht zweckmäßiger Verwendung.
Beachten Sie dazu auch die entspre-
chenden Sicherheitshinweise und
Anweisungen in dieser Gebrauchsanwei-
sung.
Entsorgung
Sie können das Produkt über den
Hausmüll entsorgen.
Ihr medi Team
wünscht Ihnen schnelle Genesung
Im Falle von Reklamationen im Zusam-
menhang mit dem Produkt, wie
beispielsweise Beschädigungen des
Gestricks oder Mängel in der Passform,
wenden Sie sich bitte direkt an Ihren
medizinischen Fachhändler. Nur
schwerwiegende Vorkommnisse, die zu
einer wesentlichen Verschlechterung des
Gesundheitszustandes oder zum Tod
führen können, sind dem Hersteller und
der zuständigen Behörde des Mitglieds-
staates zu melden. Schwerwiegende
Vorkommnisse sind im Artikel 2 Nr. 65 der
Verordnung (EU) 2017/745 (MDR) definiert
Deutsch
E015745_AAL_soft_OA_light.indd 4 08.11.23 10:37

Intended users and patient target
groups
Healthcare professionals and patients,
including persons who play a supporting
role in care, are the intended users for
this device, provided that they have
received briefing on this from healthcare
professionals.
Patient target group: Healthcare
professionals should provide care to
adults and children, applying the
available information on the
measurements/sizes and required
functions/indications, in line with the
information provided by the
manufacturer, and acting under their
own responsibility.
Setting the restrictions for flexion
and extension (can only be carried
out by an orthopaedic technician)
Extension restriction wedges, silver
(stretch restriction): -5°, 0°, 10°, 20°,
30°, 45°
Flexion restriction wedges, black (bend
restriction) 0°, 10°, 20°, 30°, 45°, 60°,
75°, 90°, 120°
Can be immobilised at: 0°, 10°, 20°, 30°,
45°
Adjusting the level of flexion and
extension restriction
1. Your knee brace comes with 0°
extension wedges pre-installed.
2. To change the wedges, remove the
brace joint from the brace.
3. Loosen the screw on the inside
section and remove the screw and
wedge.
4. Place the appropriate wedge for the
front and/or back in the side opening
and screw the wedge in tight.
5. Move the brace joint a few times to
ensure that it can move freely and the
wedges are secure.
6. Mount the brace joint on the brace.
Only change the extension and
medi Soft OA
light
Intended purpose
medi Soft OA light is a knee brace for
load relief.
Indications
All indications that require load relief of
a compartment via the 3-point pressure
relief principle and additional
physiological support of the knee joint,
such as:
• For treating unilateral osteoarthritis of
the knee
• Following surgical intervention on the
meniscus
Contra-indications
Combined lateral and medial
osteoarthitis
Risks / Side Effects
If the aids are too tight, this can cause
local pressure sores or constriction of
blood vessels or nerves. Therefore you
should consult the doctor treating you
before you use it if the following
circumstances apply to you:
• Condition or injury of the skin in the
area of application, particularly with
infectious indications (excessive heat,
swelling or reddening)
• Paraesthesia and circulatory disorders
(e.g. as seen in diabetes, varicose veins)
• Lymph drainage disorders – equally,
swelling of soft tissue adjacent to the
area of application which is not related
to a condition
When wearing snug-fitting aids, this can
result in localised skin inflammation or
irritation that is due to mechanical
irritation of the skin (particularly in
conjunction with sweating) or due to the
composition of the material.
English
E015745_AAL_soft_OA_light.indd 5 08.11.23 10:37

Taking the brace off
• Open both of the straps and stick the
end of the straps back onto their
respective straps, to prevent them
from snagging clothing. (Fig. 8)
• Open the fasteners on the brace and
pull it off your leg, moving downwards.
Close the hook and loop fastening to
prevent damage from occurring. (Fig9)
Note for technicians
• Set the load relief system (strap
system) so that the patient attains a
good level of pain relief. The base
setting should be set so that the
patient can still increase or decrease
pressure. (Fig. 10)
• Allow the patient to wear the brace for
a few minutes to ensure that the
straps are providing an appropriate
and comfortable level of tension.
Care instructions
Hook and loop fasteners should be closed
for washing. Soap residues, lotions and
ointments can cause skin irritation and
material wear.
• Wash the product by hand, preferably
using medi clean washing agent.
• Do not bleach.
• Leave to dry naturally.
• Do not iron.
• Do not dry clean.
Storage instructions
Keep the product in a dry place and do
not expose to direct sunlight.
Material composition
Polyamide, poliurethane, polyester,
lycra, aluminum
flexion restrictions under the orders
of the doctor treating you. To avoid
hyperextension, extension wedges
or 0° wedges must always be used.
The wedges set the exact radius of
movement for the brace. If soft tissue
conditions pose issues, then it may be
necessary to use a larger wedge, due to
soft tissue compression, in order to limit
movement of the knee to the desired
radius.
Fitting instructions
Open the straps on the front and the
hook and loop fastenings on the brace.
(Fig. 1)
Putting the brace on
• Bend your leg at approx. 70° and pull
the brace onto the injured leg. (Fig. 2)
• Pull the brace up your leg until the
fabric comes to below the kneecap and
ensure that the kneecap is positioned
in the centre of the opening. The centre
of the brace joint between the two
lateral joint splints is now sitting
around the same level as the upper
edge of the kneecap.
Please make sure that the brace has
been placed on the leg straight and is
not twisted. (Fig. 3)
• Now close the fasteners on the upper
part of the brace. (Fig. 4)
• Once again, ensure that the brace is
sitting correctly.
• First, pull the lower strap (1) through
the slot on the joint and set it to the
setting that was defined by the
technician. Fasten the hook and loop.
Then set the upper strap (2) and fasten
it.
• The straps at the back have already
been set by the technician. (Figs. 5 and
6)
• Take a few steps and ensure that the
brace is sitting correctly on the leg. If
necessary, correct the position of the
brace again. (Fig. 7)
English
E015745_AAL_soft_OA_light.indd 6 08.11.23 10:37

English
Liability
The manufacturer’s liability will become
void if the product is not used as
intended. Please also refer to the
corresponding safety information and
instructions in this manual.
Disposal
The product can be disposed of
in the domestic waste.
Your medi team
Wishes you a speedy recovery!
In the event of any complaints regarding
the product such as damage to the fabric
or a fault in the fit, please report to your
specialist medical retailer directly. Only
serious incidents which could lead to a
significant deterioration in health or to
death are to be reported to the
manufacturer or the relevant authorities
in the EU member state. The criteria for
serious incidents are defined in Section
2, No. 65 of the Regulation (EU) 2017/745
(MDR).
E015745_AAL_soft_OA_light.indd 7 08.11.23 10:37

Français
Utilisateurs prévus et groupe de
patients ciblé
Parmi les utilisateurs prévus comptent
les professionnels de la santé et les
patients, y compris les personnes
fournissant une assistance dans le
domaine des soins après que des
professionnels de la santé ont donné
l’information.
Groupe de patients ciblé: Les
professionnels de la santé traitent les
adultes et les enfants selon les
dimensions/tailles offertes et les
fonctions/indications requises sur la
base des informations du fabricant sous
leur propre responsabilité.
Réglage des limitations d’extension et
de flexion (à effectuer uniquement
par des techniciens orthopédistes)
Cales de limitation d’extension, argent:
-°, °, °, °, °, °
Cales de limitation de flexion, noires:
°, °, °, °, °, °, °, °, °
Possibilités d’immobilisation à:
°, °, °, °, °
Réglage des limitations d’extension et
de flexion
.
Des cales d’extension ° sont pré-
installées dans votre orthèse du genou.
. Pour remplacer les cales, détachez
l’articulation de l’orthèse.
. Desserrez la vis sur la face intérieure
et retirez la vis et la cale.
. Insérez la cale par devant ou par
derrière dans l’ouverture latérale et
vissez-la fermement.
. Faites bouger l’articulation à plusieurs
reprises pour vous assurer qu’elle
bouge sans entrave et que les cales
sont bien fixées.
. Fixez l’articulation à l’orthèse.
Modification des limitations d’extension
et de flexion uniquement sur
prescription de votre médecin traitant.
Pour éviter une hyperextension, des
medi Soft OA
light
Utilisation prévue
medi Soft OA light est une orthèse du
genou destinée à le décharger.
Indications
Toutes les indications pour lesquelles
une décharge d’un compartiment selon
le principe de décharge en 3points ainsi
qu’un guidage physiologique de
l’articulation du genou est nécessaire,
par exemple :
• En cas de gonarthrose unilatérale
• Après une opération du ménisque
Contre-indications
Gonarthrose bicondylienne
Risques / Effets secondaires
Des accessoires trop serrés peuvent
provoquer des phénomènes de
compression locale ou des
rétrécissements de vaisseaux sanguins
ou de nerfs. Par conséquent, veuillez
consulter votre médecin traitant avant
l’utilisation si vous présentez les
symptômes suivants :
• Affections ou lésions de la peau dans la
zone d’application, en particulier
signes d’infection (échauffement
excessif, gonflement ou rougeur)
• Troubles de la sensibilité et troubles
circulatoires (par ex. diabète, varices)
• Troubles du drainage lymphatique – de
même que gonflements d’origine
incertaine des parties molles situées
en dehors de la zone d’application
Porter des accessoires trop serrés
peuvent provoquer des irritations/
démangeaisons localisées dus à une
irritation mécanique de la peau (en
particulier liée à la transpiration) ou à la
composition de l’accessoire.
E015745_AAL_soft_OA_light.indd 8 08.11.23 10:37

Français
sur la jambe. Corrigez si nécessaire
encore une fois sa position. (Figure 7)
Retrait
• Ouvrez les deux sangles et rabattez
l’extrémité de la sangle sur la sangle
pour éviter d’endommager les
vêtements. (Figure 8)
• Ouvrez la fermeture agrippante de
l’orthèse et tirez-la vers le bas pour
l’enlever. Refermez les fermetures
agrippantes pour éviter des
détériorations. (Figure 9)
Remarque pour le technicien
• Réglez le système de décharge
(système de sangles) de manière à ce
que le patient ressente une agréable
atténuation de la douleur. À partir de
ce réglage de base, le patient devrait
encore avoir la possibilité d’augmenter
ou de réduire la compression. (Figure
10)
• Laissez le patient porter l’orthèse
pendant quelques minutes pour
garantir que la tension des sangles est
agréable.
Conseils d´entretien
Fermer les bandes agrippantes avant le
lavage. Les restes de savon, de crème ou
de pommades peuvent causer des
irritations cutanées et une usure
prématurée du matériau.
• Laver le produit à la main, de
préférence en utilisant le détergent
medi clean.
• Ne pas blanchir.
• Séchage à l‘air.
• Ne pas repasser.
• Ne pas nettoyer à sec.
Conseils de conservation
Conservez le produit dans un endroit sec
et évitez une exposition directe au soleil.
cales d’extension ou des cales 0°
doivent toujours être en place. Les cales
définissent l’amplitude de mouvement
exacte de l’orthèse. En cas de situation
difficile des parties molles, il peut
être nécessaire, compte tenu de la
compression des parties molles, de
recourir à une cale de plus grande taille
afin de limiter le mouvement du genou à
l’amplitude voulue.
Mode d’emploi
Avant la pose
Ouvrez les sangles sur la face avant et
les fermetures agrippantes de l’orthèse.
(Figure 1)
Pose
• Fléchissez la jambe à ~70° et enfilez
l’orthèse sur la jambe blessée.
(Figure2)
• Tirez l’orthèse vers le haut jusqu’à ce
que le tissu maillé soit au contact du
bord inférieur de la rotule et veillez à
ce que la rotule soit centrée dans
l’ouverture. Le centre de l’articulation
des rails latéraux articulés se trouve à
présent à peu près à la hauteur du bord
supérieur de la rotule.
Veillez à ce que l’orthèse soit bien
alignée sur la jambe et non pas tordue.
(Figure 3)
• Fermez maintenant les fermetures
agrippantes de la partie supérieure de
l’orthèse. (Figure 4)
• Vérifiez une fois encore la position
correcte de l’orthèse.
• Faites passer tout d’abord la sangle
inférieure 1 par l’œillet de l’articulation
et réglez-la sur le premier réglage
défini avec le technicien. Fermez la
fermeture agrippante. Réglez ensuite
la deuxième sangle et fermez-la.
• Les sangles arrière ont été réglées au
préalable par le technicien. (Figures 5
et 6)
• Faites quelques pas et assurez-vous
que l’orthèse est correctement placée
E015745_AAL_soft_OA_light.indd 9 08.11.23 10:37

Français
Composition
Polyamide, PU, polyester, lycra,
aluminium
Responsabilité
Toute utilisation non conforme annule la
responsabilité du fabricant. Veuillez à
cet effet consulter également les
consignes de sécurité et les instructions
figurant dans ce mode d’emploi.
Recyclage
Vous pouvez jeter ce produit
dans les ordures ménagères.
Votre équipe medi
Vous souhaite un prompt rétablissement !
En cas de réclamation en rapport avec le
produit, telle que par exemple un tricot
endommagé ou des défauts
d’ajustement, veuillez contacter
directement votre revendeur médical.
Seuls les incidents graves pouvant
mener à une détérioration considérable
de l’état de santé ou à la mort doivent
être signalés au fabricant ou aux
autorités compétentes de l’État
membre. Les incidents graves sont
définis à l’article 2 no 65 du Règlement
(UE) 2017/745 (MDR).
E015745_AAL_soft_OA_light.indd 10 08.11.23 10:37

Español
sudor) o a la composición del material.
Grupo de pacientes objetivo y
usuarios previstos
Los usuarios previstos son los
profesionales de la salud y los pacientes,
incluidas las personas que asisten a los
cuidados, tras haber recibido las
instrucciones debidas por parte de los
profesionales de la salud.
Grupo de pacientes objetivo: Los
profesionales de la salud, bajo su propia
responsabilidad, atenderán a los adultos
y niños teniendo en cuenta las
dimensiones/tamaños disponibles y las
funciones/indicaciones necesarias y
siguiendo la información proporcionada
por el fabricante.
Ajuste de limitación de flexión y
extensión (solo a cargo de técnicos
ortopédicos)
Cuñas de limitación de la extensión,
plata (limitación del estiramiento):
-°, °, °, °, °, °
Cuña de limitación de flexión, negro
(limitación de doblado): °, °, °, °,
°, °, °, °, °
Posibilidad de posición de reposo en:
°, °, °, °, °
Ajuste de limitaciones de flexión y
extensión
. En la órtesis de la rodilla está
preinstalada una cuña de extensión
de °.
. Para sustituir la cuña, separe la
articulación de la órtesis.
. Suelte el tornillo en el interior y retire
el tornillo y la cuña.
. Coloque la cuña correspondiente
de delante hacia atrás en el orificio
lateral y atornille la cuña.
. Mueva la articulación un par de veces
para estar seguro de que se mueve
libremente y que las cuñas están bien
alojadas.
. Fije la articulación en la órtesis.
medi Soft OA
light
Finalidad
medi Soft OA light es una órtesis de
descarga para la rodilla.
Indicaciones
Todas las indicaciones que requieran
descargar un compartimento según el
principio de descarga de 3puntos y guiar
fisiológicamente la articulación de
rodilla, p. ej.:
• En caso de artrosis unilateral de la
articulación de la rodilla
• Tras una cirugía de menisco
Contraindicaciones
Gonartrosis bilateral
Riesgos / Efectos secundarios
Los elementos de colocación fija en
casos aislados pueden provocar puntos
de presión locales o constricción de
vasos sanguíneos o nervios. Por esta
razón, si se dan las siguientes
circunstancias, deberá consultar al
médico encargado de su tratamiento
antes de utilizar el producto:
• Afecciones/lesiones cutáneas en la
zona de aplicación, especialmente
señales de inflamación (acumulación
de calor, hinchazón o enrojecimiento
excesivos)
• Trastornos circulatorios y sensoriales
(por ejemplo en caso de diabetes,
venas varicosas)
• Trastornos del drenaje linfático:
incluso hinchazones no observables de
los tejidos blandos fuera del ámbito de
aplicación
En caso de utilizar elementos ajustados,
pueden producirse irritaciones en la piel
debidas a la estimulación mecánica de la
piel (sobre todo por la generación de
E015745_AAL_soft_OA_light.indd 11 08.11.23 10:37

Español
que la pierna esté bien alojada en la
órtesis. En caso necesario, vuelva a
corregir el asiento. (imagen 7)
Retirada
• Abra ambos cinturones y fije el
extremo del cinturón en la cinta del
cinturón para evitar posibles daños en
la ropa. (imagen 8)
• Abra el cierre de gancho y bucle de la
órtesis y saque la órtesis hacia abajo.
Cierre el cierre de gancho y bucle para
evitar daños. (imagen 9)
Nota para los técnicos
• Ajuste el sistema de descarga (sistema
de cinturón) de forma que el paciente
sienta un agradable alivio del dolor.
Con este ajuste básico, el paciente
deberá poder aumentar o reducir la
presión. (imagen 10)
• Deje que los pacientes lleven puesta la
órtesis unos minutos para garantizar
una tensión agradable en los
cinturones.
Instrucciones de cuidado
Cierre los cierres de gancho y bucle
antes de proceder al lavado. Los restos
de jabón pueden causar irritaciones
cutáneas y desgaste del material.
• Lave el producto a mano,
preferiblemente con el detergente
medi clean.
• No blanquear.
• Secar al aire.
• No planchar.
• No limpiar en seco.
Instrucciones de almacenamiento
Por favor, guardar el producto en lugar
seco y protegido del sol.
Solo se pueden modificar las
limitaciones de extensión y flexión
bajo prescripción médica. Para evitar
una hiperextensión, siempre deben
emplearse cuñas de extensión o cuñas
de 0º. Las cuñas indican en la órtesis
el radio de movimiento exacto. En
condiciones difíciles del tejido blando
puede que sea necesario colocar
una cuña más grande a causa de la
compresión del tejido blando para
limitar el movimiento de la rodilla al
radio deseado.
Instrucciones de colocación
Antes de su colocación
Abra el cinturón por la parte delantera y
el cierre de velcro de la órtesis. (imagen 1)
Colocación
• Doble la pierna ~70° y coloque la
órtesis en la pierna lesionada.
(imagen2)
• Tire de la órtesis hacia arriba hasta que
el tejido del borde inferior toque la
rótula y asegúrese de que la rótula
quede centrada en el orificio. El centro
de la articulación de la férula de
articulación lateral quedará ahora más
o menos a la altura del borde superior
de la rótula.
Compruebe que la órtesis esté recta y
que no quede torcida en la pierna.
(imagen 3)
• Cierre ahora los cierres de gancho y
bucle de la parte superior de la órtesis.
(imagen 4)
• Compruebe de nuevo el asiento
correcto de la órtesis.
• Guíe el primer cinturón inferior por la
argolla de la articulación y ajústelo en
la primera posición definida con el
técnico. Cierre el cierre de gancho y
bucle. Al final, coloque el cinturón
superior 2 y ciérrelo.
• Los cinturones traseros los predefinen
los técnicos. (imágenes 5 y 6)
• Camine un par de pasos y asegúrese de
E015745_AAL_soft_OA_light.indd 12 08.11.23 10:37

Español
Composición
Poliamida, PU, poliéster, lycra, aluminio
Garantía
La garantía del fabricante se anulará en
caso de un empleo no previsto. Deberá
tener en cuenta al respecto las
indicaciones de seguridad y las
instrucciones de este manual.
Eliminación
Este producto puede eliminarse
junto con la basura doméstica.
Su equipo medi
!le desea una rapida recuperación!
En caso de reclamaciones relacionadas
con el producto, tales como daños en el
tejido de punto o defectos en el ajuste,
póngase en contacto directamente con
su distribuidor médico. Solo se
notificarán al fabricante y a la autoridad
competente del Estado miembro los
incidentes graves que puedan provocar
un deterioro significativo de la salud o la
muerte. Los incidentes graves se definen
en el artículo 2, n.º 65 del Reglamento
(UE) 2017/745 (MDR).
E015745_AAL_soft_OA_light.indd 13 08.11.23 10:37

Português
Pessoas envolvidas e grupo-alvo de
pacientes
As pessoas envolvidas são os
profissionais de saúde, incluindo pessoas
que desempenham um papel de apoio
nos cuidados médicos, e pacientes,
desde que tenham recebido os
esclarecimentos apropriados.
Grupo-alvo de pacientes: Os
profissionais de saúde devem prestar
assistência a adultos e crianças,
aplicando as informações disponíveis
sobre medidas/tamanhos e funções/
indicações necessárias, em
conformidade com as informações
fornecidas pelo fabricante, agindo sob
sua própria responsabilidade.
Ajuste de limites de flexão e extensão
(a ser realizado apenas pelo técnico
de ortopedia)
Cunhas de limitação da extensão,
douradas (limitação da extensão): -°,
°, °, °, °, °
Cunhas de limitação da flexão, pretas
(limitação da flexão) °, °, °, °,
°, °, °, °, °
Opção de posição de descanso a: °, °,
°, °, °
Ajuste de limites de flexão e extensão
. As cunhas de extensão ° já vêm
montadas na sua ortótese para o
joelho.
. Para substituí-las, separe a
articulação da ortótese.
. Solte os parafusos da parte interna e
retire os parafusos e as cunhas.
. Insira a cunha correspondente na
abertura lateral pela parte da frente
ou por trás e prenda bem a cunha.
. Movimente a articulação algumas
vezes para certificar-se de que
consegue fazê-lo livremente e de que
as cunhas estão bem colocadas.
. Fixe a articulação à ortótese.
medi Soft OA
light
Finalidade
medi Soft OA light é uma ortótese para o
joelho destinado para o alívio.
Indicações
Todas as indicações que requerem o
alívio de um compartimento de acordo
com o princípio de alívio de 3pontos e
orientação fisiológica adicional da
articulação do joelho, como, por
exemplo:
• Em caso de artrose unilateral da
articulação do joelho
• Após intervenções no menisco
Contraindicações
Gonartrose bilateral
Riscos / Efeitos secundários
No caso de os meios auxiliares ficarem
muito apertados, é possível que haja
compressão ou a constrição local de
vasos sanguíneos ou nervos. Por isto,
deve consultar o médico assistente nas
condições seguintes, antes da aplicação:
• Doenças ou lesões de pele na área de
aplicação, particularmente sinais
inflamatórios (aquecimento excessivo,
inchaço ou vermelhidão)
• Distúrbios sensoriais e circulatórios (p.
ex., em caso de diabetes, varizes)
• Distúrbios na drenagem linfática –
bem como inchaços pouco visíveis de
tecidos moles fora da área de aplicação
Ao utilizar meios auxiliares demasiado
apertados, é possível que seja
desenvolvida irritação cutânea ou
inflamação local da pele resultante do
atrito mecânico na pele (especialmente
em combinação com a transpiração) ou
da composição do material.
E015745_AAL_soft_OA_light.indd 14 08.11.23 10:37

Português
perna. Se necessário, corrija
novamente a posição. (Figura 7)
Remoção
• Abra as duas correias e prenda
novamente a extremidade da correia
na precinta para evitar possíveis danos
na roupa. (Figura 8)
• Abra o fecho de gancho e argola da
ortótese e puxe a ortótese para baixo.
Feche o velcro, para evitar danos.
(Figura 9)
Nota para o técnico
• Ajuste o sistema de alívio de pressão
(sistema de correias) para que o
paciente sinta um agradável alívio da
dor. O paciente dispõe ainda da
possibilidade de aumentar ou diminuir
a pressão deste ajuste básico. (Figura
10)
• Permita que o paciente utilize a
ortótese por alguns minutos para se
certificar que as correias estão com
uma tensão confortável.
Instruções de lavagem
Os fechos de gancho e argola têm de
estar fechados para a lavagem. Restos de
sabão podem causar irritações cutâneas
e desgaste precoce do material.
• Preferencialmente lave o produto à
mão com detergente medi clean.
• Não usar branqueadores
• Deixar secar ao ar.
• Não passar a ferro
• Não limpar a seco.
Conservação
Conserve em ambiente seco e proteja da
exposição solar direta.
Efetuar alteração das limitações de
extensão e flexão apenas por indicação
do seu médico responsável. Para
evitar uma hiperextensão, têm de ser
utilizadas sempre cunhas de extensão
ou cunhas 0 °. As cunhas determinam
a amplitude exata de movimento da
ortótese. No caso de condições difíceis
dos tecidos moles, pode ser necessária,
devido à compressão dos tecidos moles,
a utilização de uma cunha maior para
limitar o movimento do joelho até à
amplitude desejada.
Instruções de colocação
Antes da colocação
Abra as correias frontais e os fechos de
gancho e argola da ortótese. (Figura 1)
Colocação
• Dobre a perna aprox. 70° e insira a
ortótese na perna lesionada. (Figura 2)
• Puxe a ortótese até o tecido de malha
tocar na parte inferior da rótula e
certifique-se de que a rótula fica
posicionada no centro da abertura. O
centro de articulação das talas
articulares laterais fica agora
aproximadamente ao nível da parte
superior da rótula.
Certifique-se de que a ortótese se
encontra direita e não torta na perna.
(Figura 3)
• Feche agora os fechos de gancho e
argola da parte superior da ortótese.
(Figura 4)
• Certifique-se outra vez de que a
ortótese está bem colocada.
• Insira primeiro a correia 1 inferior pelo
ilhós da articulação e coloque no
ajuste inicial definido pelo técnico.
Feche o velcro. Para finalizar, coloque a
correia 2 superior e feche-a.
• As correias posteriores são pré-
ajustadas pelos técnicos. (Figuras 5 e
6).
• Dê alguns passos e certifique-se de
que a ortótese está bem fixada à
E015745_AAL_soft_OA_light.indd 15 08.11.23 10:37

Português
Composição
Poliamida, PU, poliéster, lycra, alumínio
Responsabilidade Civil
A responsabilidade civil do fabricante
extingue-se em caso de uso indevido.
Neste contexto, observe também as
respetivas instruções de segurança e
indicações existentes neste manual de
instruções.
Destruição
Para destruir coloque no lixo
doméstico.
A sua equipa medi
Deseja-lhe um bom restabelecimento!
Em caso de reclamações relativas ao
produto, como, por exemplo, danos na
malha ou imperfeições no ajuste,
contacte diretamente o seu fornecedor
especializado em produtos médicos.
Apenas os incidentes graves que podem
provocar uma deterioração significativa
do estado de saúde ou a morte devem
ser comunicados ao fabricante e às
autoridades competentes do Estado-
Membro. Os incidentes graves estão
definidos no artigo 2 n.º 65 do
Regulamento (UE) 2017/745 (MDR).
E015745_AAL_soft_OA_light.indd 16 08.11.23 10:37

Italiano
della pelle (soprattutto in correlazione
con l’aumento della sudorazione) o alla
composizione dei materiali.
Pessoas envolvidas e grupo-alvo de
pacientes
As pessoas envolvidas são os
profissionais de saúde, incluindo pessoas
que desempenham um papel de apoio
nos cuidados médicos, e pacientes,
desde que tenham recebido os
esclarecimentos apropriados.
Grupo-alvo de pacientes: Os
profissionais de saúde devem prestar
assistência a adultos e crianças,
aplicando as informações disponíveis
sobre medidas/tamanhos e funções/
indicações necessárias, em
conformidade com as informações
fornecidas pelo fabricante, agindo sob
sua própria responsabilidade.
Regolazione della limitazione della
flessione e dell’estensione (la
regolazione deve essere effettuata
esclusivamente da un tecnico
ortopedico)
Fermi per la limitazione dell’estensione,
argento (limitazione dell’estensione):
-°, °, °, °, °, °
Fermi per la limitazione della flessione,
nero (limitazione della flessione): °, °,
°, °, °, °, °, °, °
Possibili posizioni di riposo a: °, °,
°, °, °
Regolazione della limitazione della
flessione e dell’estensione
. Nell’ortesi sono preinstallati fermi di
estensione a °.
. Per sostituire i fermi staccare lo snodo
dall’ortesi.
. Svitare la vite all’interno e rimuovere
la vite e il fermo.
. Inserire il fermo corrispondente
dalla parte anteriore o posteriore
nell’apertura laterale e avvitarlo
saldamente.
medi Soft OA
light
Scopo
medi Soft OA light è un’ortesi per il
ginocchio per lo scarico degli arti
inferiori.
Indicazioni
Tutte le indicazioni che necessitano di
uno scarico di un compartimento sulla
base del principio dei 3punti e un
sostegno fisiologico supplementare
dell›articolazione del ginocchio, come p.
e.:
• In caso di artrosi unilaterale
dell’articolazione del ginocchio
• Dopo interventi al menisco
Controindicazioni
Gonartrosi bilaterale
Rischi / Effetti collaterali
Gli indumenti compressivi aderenti
possono causare la comparsa sulla cute
di segni dovuti alla pressione o
provocare una compressione dei vasi
sanguigni o dei nervi. Per questo motivo,
nelle circostanze riportate di seguito,
prima dell’utilizzo è necessario
consultare il proprio medico curante:
• Malattie o lesioni della pelle nella zona
di applicazione, soprattutto se vi sono
segni di infiammazione (riscaldamento
eccessivo, gonfiore o arrossamento)
• Disturbi della sensibilità o circolatori
(ad es. in caso di diabete, vene
varicose)
• Disturbi della circolazione linfatica -
possono verificarsi gonfiori ambigui
dei tessuti molli anche al di fuori della
zona di applicazione
Gli indumenti compressivi aderenti
possono causare infiammazioni cutanee
locali dovute all’irritazione meccanica
E015745_AAL_soft_OA_light.indd 17 08.11.23 10:37

Italiano
Chiudere il strappo asola-uncino.
Quindi inserire il cinturino superiore 2
e chiuderlo.
• I cinturini posteriori devono essere
regolati in precedenza dal tecnico
ortopedico. (figure 5 e 6)
• Fare un paio di passi ed accertarsi che
l’ortesi sia posizionata correttamente
sulla gamba. Eventualmente correggere
di nuovo la posizione. (figura 7)
Rimozione dell’ortesi
• Aprire entrambi i cinturini e allacciare le
estremità sul cinturino per evitare
possibili danni agli indumenti. (figura 8)
• Aprire la chiusura a strappo dell’ortesi
e togliere l’ortesi tirandola verso il
basso. Chiudere le chiusure a strappo
per evitare danneggiamenti. (figura 9)
Avvertenza per il tecnico ortopedico
• Regolare il sistema di scarico (sistema
dei cinturini) in modo che il paziente
percepisca una piacevole riduzione del
dolore. Il paziente non dovrebbe avere
la possibilità, partendo da questa
regolazione di base, di aumentare o
ridurre la pressione. (figura 10)
• Far indossare al paziente l’ortesi per
alcuni minuti per verificare che i
cinturini non abbiano una tensione
eccessiva.
Indicazioni per la manutenzione
Prima del lavaggio, le chiusure a strappo
asola-uncino devono essere chiuse.
Residui di sapone, creme o pomate
possono provocare irritazioni cutanee e
deteriorare il materiale.
• Lavare il prodotto preferibilmente a
mano con detersivo medi clean.
• Non usare candeggina.
• Asciugare all’aria.
• Non stirare.
• Non lavare a secco.
5. Azionare lo snodo un paio di volte per
essere certi che si muova liberamente
e che i fermi siano ben saldi.
6. Fissare lo snodo all’ortesi.
Modifiche alle limitazioni dell’estensione
e della flessione possono essere
apportate solo in base a indicazione
del medico curante. Per evitare
un’iperestensione devono essere sempre
utilizzati i fermi di estensione o i fermi
a 0°. I fermi stabiliscono l’esatto raggio
di movimento dell’ortesi. In condizioni
particolari può essere necessario, a
causa della compressione dei tessuti
molli, utilizzare un fermo più grande per
limitare il movimento del ginocchio al
raggio desiderato.
Istruzioni per l’applicazione
Prima di applicare l’ortesi
Aprire i cinturini sulla parte anteriore e
le chiusure con velcro dell’ortesi. (figura
1)
Applicazione
• Flettere la gamba a ~70° e posizionare
l’ortesi sulla gamba che ha subito la
lesione. (figura 2)
• Tirare l’ortesi verso l’alto fino a quando
il tessuto non arriva al bordo inferiore
della rotula e fare in modo che la rotula
sia al centro dell’apertura. Il centro
dello snodo delle guide laterali ora
deve essere all’altezza del bordo
superiore della rotula.
Prestare attenzione affinché l’ortesi
rimanga diritta e non ruoti attorno alla
gamba. (figura 3)
• Allacciare ora le chiusure a strappo
della parte superiore dell’ortesi.
(figura4)
• Accertarsi ancora una volta che l’ortesi
sia in posizione corretta.
• Innanzi tutto inserire il cinturino
inferiore 1 nell’occhiello dello snodo e
regolarlo secondo l’impostazione
definita con il tecnico ortopedico.
E015745_AAL_soft_OA_light.indd 18 08.11.23 10:37

Italiano
Avvertenze per la conservazione
Conservare il prodotto in luogo asciutto
e protetto dalla luce solare diretta.
Composizione
Poliammide, PU, poliestere, lycra,
aluminio
Responsabilità
La responsabilità del produttore decade
in caso di utilizzo inappropriato. A
questo proposito rispettare le
indicazioni di sicurezza e le istruzioni
contenute in questo manuale per l’uso.
Smaltimento
Il prodotto può essere smaltito con i
rifiuti domestici.
Il Suo team medi
Le augura una pronta guargione!
In caso di reclami relativi al prodotto,
come ad esempio danni al tessuto o
carenze nella conformazione, vi invitiamo
a rivolgervi direttamente al punto vendita
specializzato. Solo gli incidenti gravi, che
comportano un grave deterioramento
delle condizioni di salute o il decesso del
paziente, sono da notificare al
fabbricante e alle autorità competenti
dello Stato membro. Gli incidenti gravi
sono definiti nell‘articolo 2 n. 65 del
Regolamento (UE) 2017/745 (MDR).
E015745_AAL_soft_OA_light.indd 19 08.11.23 10:37

Gebruikersgroep en
patiëntendoelgroep
De gebruikersgroep omvat medisch
personeel en patiënten, incl. personen
die bij de verzorging helpen, na
voldoende toelichting door medisch
personeel.
Patiëntendoelgroep medisch personeel
gebruikt het product voor volwassenen
en kinderen, rekening houdend met de
beschikbare maten/groottes, de vereiste
functies/indicaties en de informatie van
de fabrikant op eigen verantwoording.
Instellen van flexie- en
extensiebeperkingen (mag enkel door
orthopedisch technicus worden
uitgevoerd)
Extensiespalk, zilver (strekbeperking):
-5°, 0°, 10°, 20°, 30°, 45°
Flexiespalk, zwart (buigbeperking):
0°, 10°, 20°, 30°, 45°, 60°, 75°, 90°, 120°
Immobilisatie bij: 0°, 10°, 20°, 30°, 45°
Instellen van flexie- en
extensiebeperkingen
1. In de knie-orthese zijn vooraf
extensiespalken van 0° geïnstalleerd.
2. Om de spalk te vervangen, maakt u
het scharnier van de orthese los.
3. Maak de schroef aan de binnenkant
los en verwijder de schroef en de
spalk.
4. Leg de gekozen spalk langs voren resp.
achteren in de opening aan de zijkant
en schroef de spalk vast.
5. Beweeg het scharnier enkele keren
om te garanderen dat het vlot
beweegt en de spalk goed vastzit.
6. Bevestig het scharnier aan de orthese.
Verander de extensie- en
flexiebeperkingen enkel op aanwijzen
van uw behandelend arts. Om
hyperextensie te vermijden, moeten
altijd extensiespalken of 0°-spalken
gebruikt worden. De spalken geven aan
de orthese de exacte bewegingsradius.
medi Soft OA
light
Beoogd doel
medi Soft OA light is een knie-orthese
voor ontlasting.
Indicaties
Alle indicaties, waarvoor een ontlasting
van een compartiment volgens het
3-punt-ontlastingsprincipe en
bijkomende fysiologische geleiding van
het kniegewricht nodig is, bijv.:
• Bij unilaterale kniegewrichtsartrose
• Na meniscusoperaties
Contra-indicaties
Tweezijdige gonartrose
Risico’s / Bijwerkingen
Bij strak aangebrachte hulpmiddelen
kunnen er plaatselijk drukverschijnselen
of beknelling van bloedvaten of
zenuwen optreden. Daarom dient u bij
de volgende omstandigheden voor de
toepassing overleg te plegen met uw
behandelend arts:
• Aandoeningen of letsels van de huid in
het toepassingsgebied, vooral bij
tekenen van ontsteking (te warm,
zwelling of roodheid)
• Waarnemings- en
doorbloedingsstoornissen (bijv. bij
diabetes, spataders)
• Stoornissen van de lymfeafvoer – ook
onduidelijke zwellingen van weke
delen weg van het toepassingsgebied.
Bij het dragen van strak aangebrachte
hulpmiddelen kunnen plaatselijk
huidirritaties voorkomen, die te wijten
zijn aan een mechanische irritatie van
de huid (vooral in combinatie met
transpiratie) of aan de samenstelling van
het materiaal.
Nederlands
E015745_AAL_soft_OA_light.indd 20 08.11.23 10:37
Other manuals for Soft OA
4
Table of contents
Languages:
Other medi Medical Equipment manuals

medi
medi Classic User manual

medi
medi M.4X-lock User manual

medi
medi protect.St pro User manual

medi
medi Rhizomed User manual

medi
medi 601 User manual

medi
medi protect.St User manual

medi
medi travel women User manual

medi
medi protect.Manu active User manual

medi
medi orthocox User manual

medi
medi SAS comfort User manual

medi
medi Spinomed User manual

medi
medi protect.Epico ROM User manual

medi
medi Stabimed User manual

medi
medi Circaid graduate arm User manual

medi
medi Manumed T User manual

medi
medi protect.Ankle air User manual

medi
medi Elbow strap User manual

medi
medi Levamed active User manual

medi
medi M.4s comfort User manual

medi
medi Epicomed E+motion User manual