MES SQA-iO User manual
Service Manual Version 187.5.1
AUGUST 3, 2021 SQA-iO Service Manual 1
Service Manual
Version: 187.5.1
Catalog#: IO-ML-01678-00
Rev: August 2021

Service Manual Version 187.5.1
AUGUST 3, 2021 SQA-iO Service Manual 2
Table of
Contents
SECTION I: Introduction
Automated Test Results 3
Technology 4
SECTION II: System Specifications and Requirements
System Components 4
Measurement Compartment 4
USB Port 5
Testing Capillary 5
Maintenance Schedule 5
Testing and Operting Requirements 6
Operating Temperature/Humidity/Altitude 6
SECTION III: Quality Control
Internal QC 6
Printing the Service Report 7
SECTION IV: Troubleshooting
Troubleshooting 7
SECTION IX: Appendixes
Cleaning the SQA-iO 8
Troubleshooting Guide 9
Filling the Testing Capillary with a Normal Volume Sample 11
Filling the Testing Capillary with a Low Volume Sample 13
Service Manual Version 187.5.1
AUGUST 3, 2021 SQA-iO Service Manual 3
SECTION I: Introduction
The SQA-iO is a high-performance PC-based analytical medical device that tests FRESH
semen samples. The device works with a computer application that contains the device,
patient, sample, test results and facility information.
After collection and preparation, a ~1 ml semen sample is withdrawn into an SQA capillary
disposable delivery system, inserted into the SQA-iO where key parameters are collected,
and sample test results are processed utilizing proprietary technology and algorithms. The
testing process takes approximately 75 seconds.
The system runs an automatic self-test and auto-calibration upon start up and checks
device stability before each sample is run.
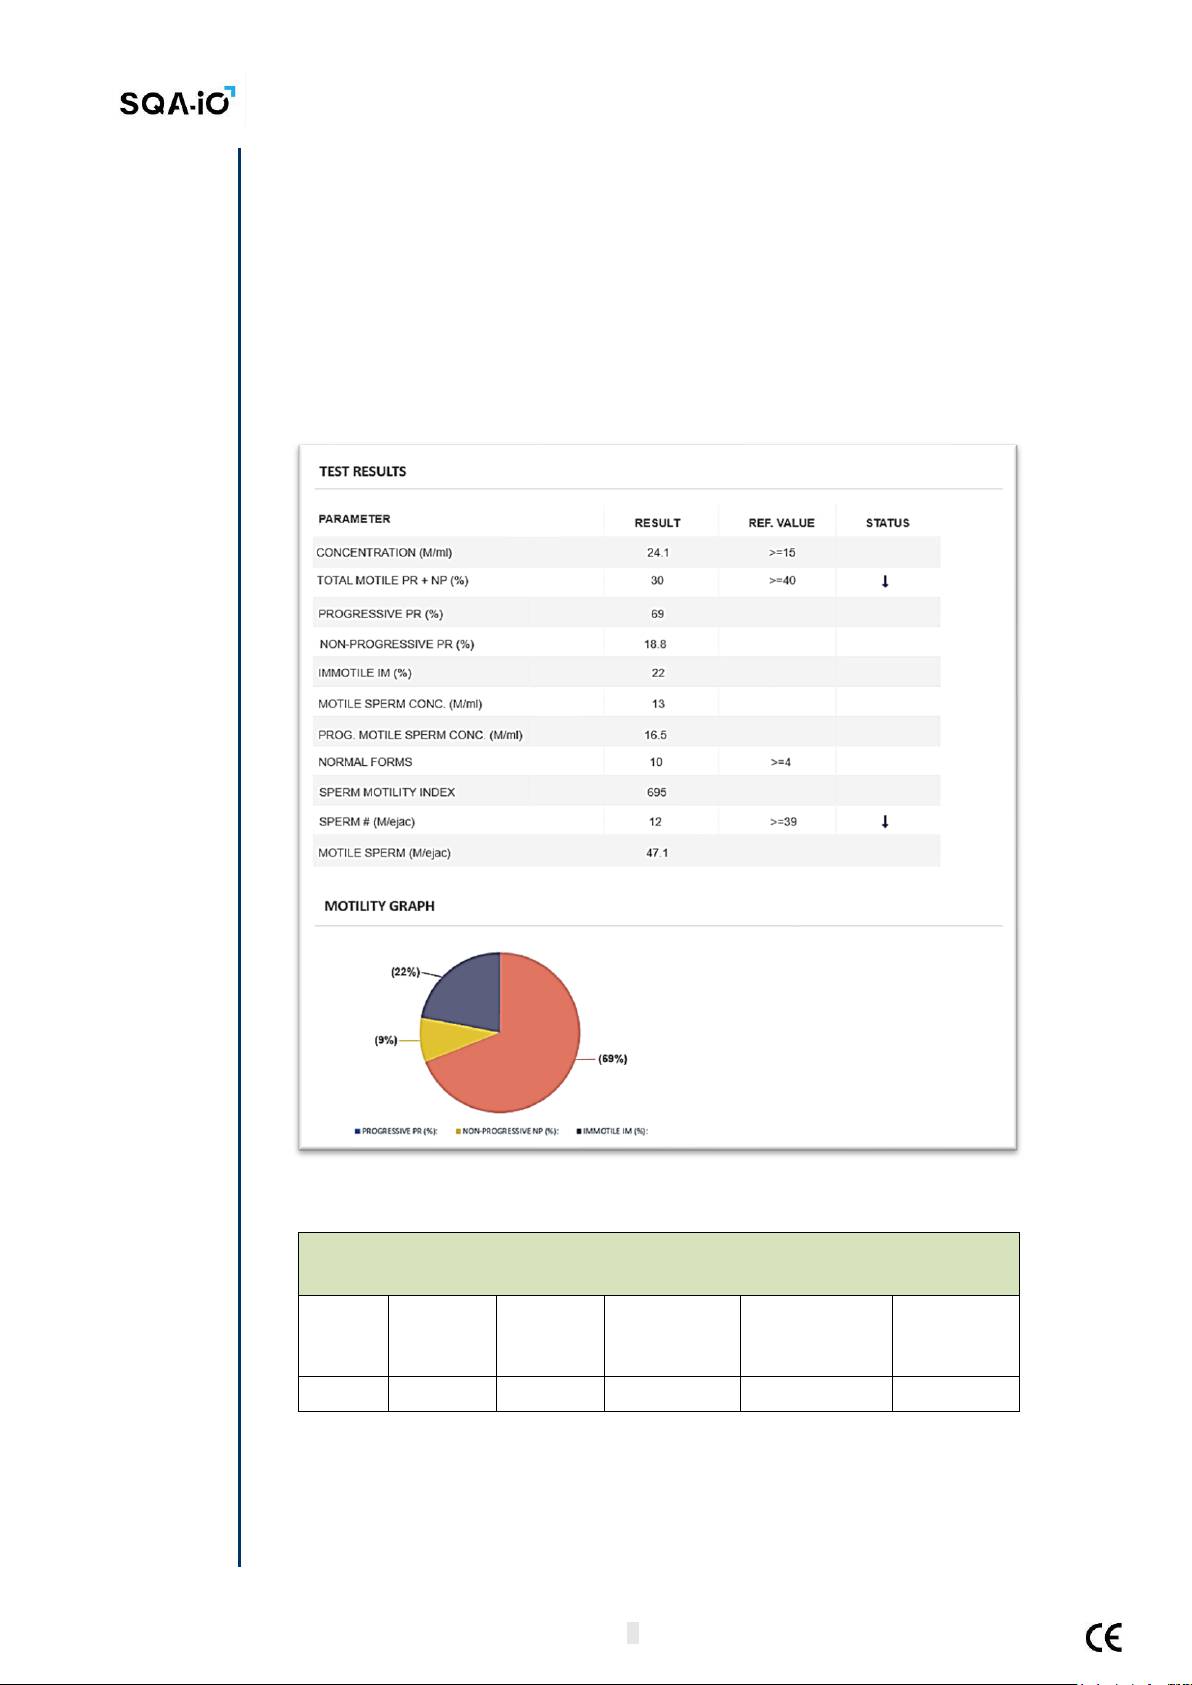
Automated
Test Results
and
Reportable
Range
SQA-iO Reportable Range
Sample
Type
Conc.
(M/ml)
Motility
(%)
PMSC
(M/ml)
Morph Norm
Forms (%)
MSC
(M/ml)
Fresh
<2 - 400
0 - 100
0 - 400
2 - 30
<0.2 - 400

Service Manual Version 187.5.1
AUGUST 3, 2021 SQA-iO Service Manual 4
Technology
Motility Channel
Light disturbances caused by moving sperm cells are converted into analog signals.
Proprietary algorithms interpret the signals and report motility.
Concentration Channel
Based on spectrophotometry analysis of the semen samples and application of
proprietary algorithms.
1. The capillary is inserted into the measurement compartment.
2. Sample concentration is evaluated in the "tall" 10 mm chamber of the capillary.
3. Motility is detected in the "thin" 0.3 mm section of the capillary.
4. This information is then digitized and routed to the microprocessor that applies
algorithms to extract the required clinical semen parameters.
Analog to
Digital
Converter
Semen
parameters
extraction
algorithms
Self-Test
and QC
KeyPad
Microcontroller
Operational
Monitor
#1 #2
#3
#4
Concentration
detector
Motility
detector
Concentration
LED
Motility
LED
SQA-iO Device
Overview and
System
Components
Measurement
Compartment
SECTION II: System Specifications and Requirements
•Dimensions: 8 X 9.5 X 10.5 cm
•Weight: 0.350 Kg
•Power supply: 5V DC (USB)
•Noise level: 0 [dBA]
•Device power consumption: 1.7 [BTU/hour] = 0.5 [Watts]
Minimum requirements:
•PC: Intel Core i5 M520 2.4GHz or equivalent
•RAM: 4GB
•Monitor Screen: Color, Wide screen –minimum resolution 1024 x 768
•Operating system compatibility: Windows 7 Professional x32 or above
•Communication Ports: one USB port
•Internet Access: 5mb per second
Front Panel: Measurement Compartment (Capillary insertion for testing)
Capillary
chamber
Service Manual Version 187.5.1
AUGUST 3, 2021 SQA-iO Service Manual 5
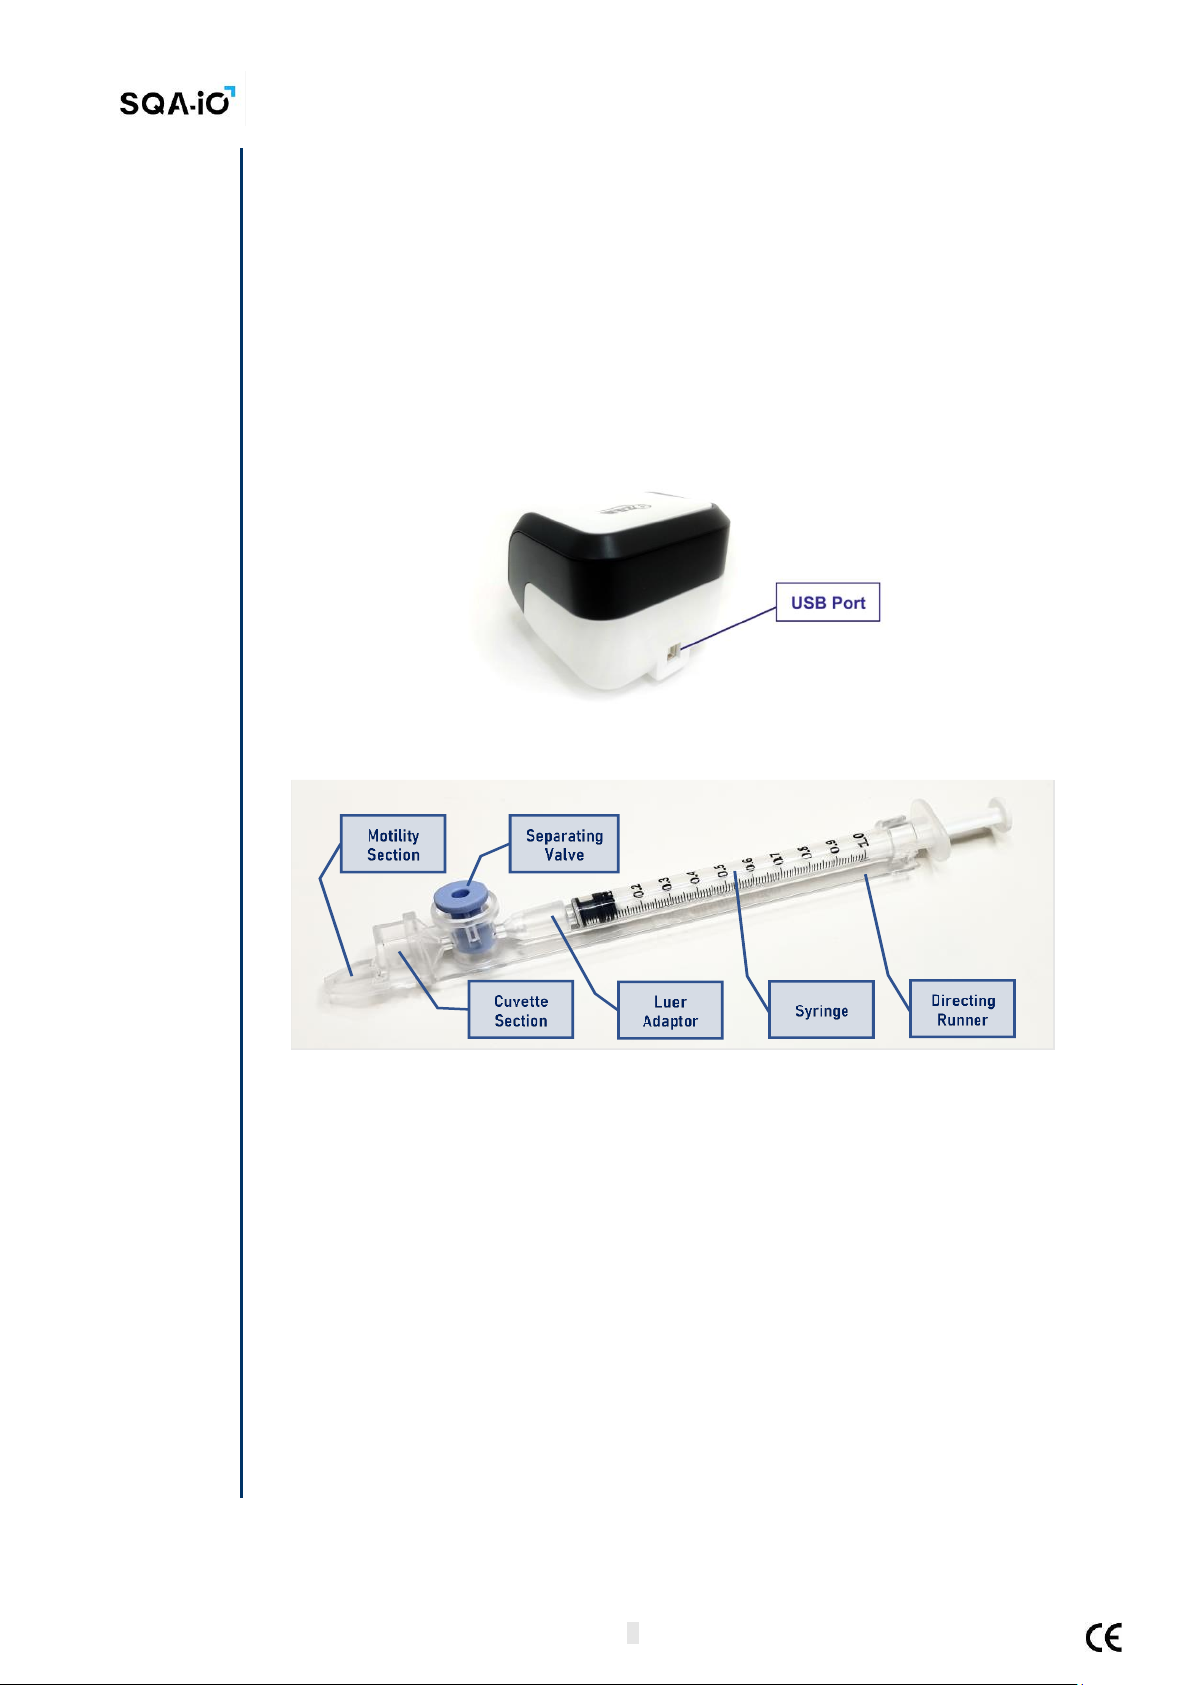
USB Port
Testing
Capillary
Maintenance
Requirements
•Sources of radiant energy: Two LEDs (motility and concentration channels)
•Detector system: Two photo detectors (Motility and Optical Density)
•Analysis Time: 75 seconds
•Software: Resides on flash memory
•Motility channel input signal: Analog, up to 5V.
•Concentration channel input signal: Modulated (kHz) analog, up to 5V
•Calibrated for testing human semen only at room temperature
Rear Panel: USB connection port
•USB PORT: 1 connector for USB 2.0B male connection cable
Testing Capillary: Sample delivery system
•Normal sample: Requires approximately 0.5cc of semen
•Short samples: Requires approximately 20µl
•Single-use design for testing semen in a biologically safe manner
•Motility parameters are measured in the 0.3 mm (thin) "capillary” section
•Concentration is measured in the 10 mm (tall) "cuvette” section
•Use only manufacturers’ certified testing capillaries for testing
•Filling and insterting the testing Capillary: Refer to the Appendix section
Maintenance Schedule
•Measurement compartment cleaning:
oDAILY: When running samples
oAFTER EVERY 10-15 tests and/or for ANY spillage
oUse only manufacturer’s cleaning kit/supplies to prevent damaging the device
oRefer to the “Cleaning the Capillary Compartment” Appendix in this manual
for detailed instructions

Service Manual Version 187.5.1
AUGUST 3, 2021 SQA-iO Service Manual 6
Testing and
Operating
Requirements
Ambient
Condition
Restrictions for
Operation
Quality
Controls
Overview
PASS/FAIL QC
Results
Controls Run at
Start-up
Manufacturer’s Recommendations
•The SQA-iO is sensitive to vibrations during the testing cycle. Operate away from
devices that cause electronic noise or vibrations such as centrifuges.
•Un-plug the device when not in use for an extended period of time.
•Ambient temperature limitations: The SQA-iO is calibrated to conduct tests at room
temperature: 20-25ºC (68-77ºF). This is the recommended range for room
temperature maintenance of semen samples prior to testing for up to 1 hour following
collection.
•Sample processing limitations: The device is calibrated to test semen samples at
room temperature. Heating samples in ANY WAY will impact results. Do not heat
samples.
•Semen is considered biologically hazardous material and is subject to
individual laboratory protocols for handling such materials. At a minimum,
it is recommended to:
oWear laboratory coat, mask and gloves when handling semen
oDispose of samples post testing in designated hazardous waste containers
oRequire that only personnel trained to work with biologically hazardous
materials test and handle semen samples.
Operating Temperature, Humidity and Altitude
•Maximum operational humidity is up to 80% for temperatures of up to 31ºC with
decreasing linearly to 50% humidity at 38ºC.
•Operates in a wide range of ambient temperatures (15-38ºC) however the system is
calibrated to measure semen samples at room temperature:
20-25ºC (68-77ºF).
•Intended for indoor use at a maximum altitude of 2000m, mains supply fluctuations
±10%, Overvoltage Category II, Pollution Degree II.
IMPORTANT NOTES:
•Humidiy exceeing the limitations above may impact test results due to condensation
on the optical detectors. Assess ambient humidity and temperature prior to device
operation.
•Ambient temperatures exceeding the limitation above may impact the accuracy of
semen motility test results because of the known effect of temperature on human
semen.
SECTION III: Quality Control
Internal Controls: A series of tests are automatically run when the SQA-iO is turned on and
prior to testing. These internal QC tests check the calibration settings and the internal
operating system.
Internal Controls are run @ SQA-iO Start-up: PASS/FAIL results are reported
on the SQA-iO home screen along with troubleshooting information
•Stabilization and autocalibration: System stability and reference parameters are
checked to ensure they are in proper range by analyzing the system sensors. Once
stable for 30 seconds the device passes stabilization and autocalibration. A warning
message is displayed on the home screen if there is a failure.
•System noise: Measures the electronic noise level of the system to insure effective
measurement of electronic signals.
•Self-test: Electronic signals simulating motility and concentration measurements
verify that the calibration settings are consistent with factory specifications.

Service Manual Version 187.5.1
AUGUST 3, 2021 SQA-iO Service Manual 7
Controls Run
Prior to
Sample
Testing
Printing the
Service
Parameter
Report
•Autocalibration verification: Reference parameters of the concentration and
motility channels are measured again (without a testing capillary).
•System noise: Measures the electronic noise level of the system to insure
effective measurement of electronic signals. The system automatically adjusts the
noise level threshold to insure accurate readings.
•Electronic spikes: Checks for measurement points that are out of range.
Instructions for printing the SQA-iO SERVICE parameters to prepare for
technical support:
If a Self-Test failure occurs, the related status icon in the SQA-iO HOME SCREEN will turn
red. Click on the RED icon to view instructions for how to resolve the problem:
SECTION IV: TROUBLESHOOTING
The SQA-iO troubleshooting guide is focused on app access and function. The
SQA-iO device cannot be opened for service so it is important to follow the cleaning
and use instructions for optimal and continued success using the device.
Please refer to the appendix section for a TROUBLESHOOTING GUIDE.
Support is available through your local distributor online. Please contact them
directly for questions concerning the device that are not outlined in this service
manual.

Service Manual Version 187.5.1
AUGUST 3, 2021 SQA-iO Service Manual 8
Appendix 1: SQA-iO Cleaning Instructions
APPENDIX 1: Cleaning the SQA-iO
When to clean: WEEKLY
•Or if SELF-TEST or any other failure occurs
•Or if System becomes contaminated with semen
Cleaning kit components:
Long cleaning brush (provided in the SQA-iO device kit)
Fibrous material cleaning paddles (single use)
Sponge-tipped drying paddles (single use)
Cleaning fluid (single drop dispenser)
CLEANING: STEP 1
•Insert the long brush supplied in your device kit (bristle side
down) into the chamber of the SQA-iO in the same way a
testing capillary would be inserted (Fig 1 and 2).
•Pull the brush out, applying downward pressure to sweep or
‘dust off’ the optics (you will feel a ‘shelf’ in the back/top
section of the chamber) –(Fig 2 and 3)
CLEANING: STEP 2
1. Use a Fibrous material cleaning paddle (Fig 4) supplied in your
TEST KIT
•Moisten with only ONE drop of cleaning fluid.
•Shake off excess fluid.
•Insert into the measurement compartment fibrous material
facing down and move the cleaning paddle in and out 5 times
(Fig 5).
•Then, insert into the measurement compartment fibrous
material facing up and move the cleaning paddle in and out 5
times (Fig 5).
2. Dry the testing chamber using a sponge-tipped drying
paddle that is supplied in your TEST KIT.
•Insert it into the testing chamber and leave it for 10 –15
seconds (Fig 6).
•Leave the drying paddle in place, DO NOT move it in and out.
Fig.1 Long Cleaning Brush
Fig. 2 Clean the chamber
Fig. 3 “Dust off”
Fig. 4 Fibrous cleaning paddle
Fig. 5 Insert cleaning paddle down and up
Fig. 6 Dry the testing chamber with sponge

Service Manual Version 187.5.1
AUGUST 3, 2021 SQA-iO Service Manual 9
APPENDIX 2: TROUBLESHOOTING GUIDE
TROUBLESHOOTING OPERATING ERRORS: This table describes what to do when a problem occurs with the SQA-iO
app access or when running a test or receiving an error message. It is important to note: If the SQA-iO case is
opened by the user, it is no longer under warranty.
ISSUE
POSSIBLE FAILURE SOURCE
SOLUTION
Computer
connectivity
1. USB connection error
indicated on the app header
/ pop-up warning.
Remove and reconnect the USB cable –follow the pop-up
warning instructions that can be activated by clicking the USB icon
found in the app header or click the ‘Disconnected’ button on the
app home screen.
2. USB connection failure after
installation
Display of Step 2 of the installation process where the user is asked
to connect the USB cable. If it fails, please report using online
support by clicking on the link to the troubleshooting page.
3. Driver error after login/sign-
up
Download and reinstall the driver by going to step 2 of the
installation process. If it fails, please report using online support.
Cannot
Sign-up
1. Missing required information
Fill in the mandator fields that are missing information. This is
indicated by red explanation text when clicking on the ‘Register’
button.
2. Did not accept Terms and
Conditions
3. User already exists
The email entered to “Register” is already in use. Select another
email or may require a password reset (see ‘Cannot Login’ below)
Cannot Login
When clicking on the ‘Login’
button a warning that user email
or password is incorrect/missing
Reset the user password: Request an email with a link to reset the
password when receiving message “Forgot email?”
Self-test
failure
A failure is indicated by a red
warning icon on the HOME page.
Click the red icon indicating a failure. Observe the normal range
value.
1. Clean the test chamber using ONLY MES cleaning kit.
2. Remove and reconnect USB cable.
3. Reboot the device.
If problem persists, refer to MES customer support:
https://www.sqa-io.com/#/contact-us/contact-us
The testing
capillary
won’t go into
the SQA-iO
The testing capillary may have
been inserted upside down or
blue piston is not fully pushed in.
Refer to the Appendix section of this guide for instructions on how to
correctly prepare and insert the capillary into the SQA-iO device.
Low Test
Credit
A red button is shown when the
test credit balance is below 10.
Click the "Tests Remaining" button on the HOME screen to enter a
new code for test credits or contact SUPPORT to order a new test kit
with a new test credit code. If the credit balance is 0 the "Test
Patient" section on the navigation bar is disabled.
Cannot start
testing / the
START TEST
button is
disabled
1. No test credits remain
•Add test credit from a new testing kit using the unique code
provided.
•Order a new test kit by going to SUPPORT
2. Information missing in
mandatory fields
Fill in all fields that are mandatory as indicated by an asterisk: *
3. The SQA-iO is not connected
Remove and reconnect the USB cable per the pop-up instructions
(and based on the red USB icon shown on the header bar).
Connection is
lost during a
test
Loss of internet connection
The USB connection indicator will turn RED and a pop-up warning
will tell the user to reconnect and navigate back to the data entry
screen. Start must be pressed again. The patient information is
saved and the system will return to the data entry screen. Test
credits will not be charged.
Test results
are not
logical
Test results appear to be out of
range.
Go to the Service page and follow the instructions:
1. Clean the test chamber using ONLY MES cleaning kit.
2. Remove and reconnect USB cable and reboot the device.
If problem persists, refer to MES customer support:
https://www.sqa-io.com/#/contact-us/contact-us
Service Manual Version 187.5.1
AUGUST 3, 2021 SQA-iO Service Manual 10
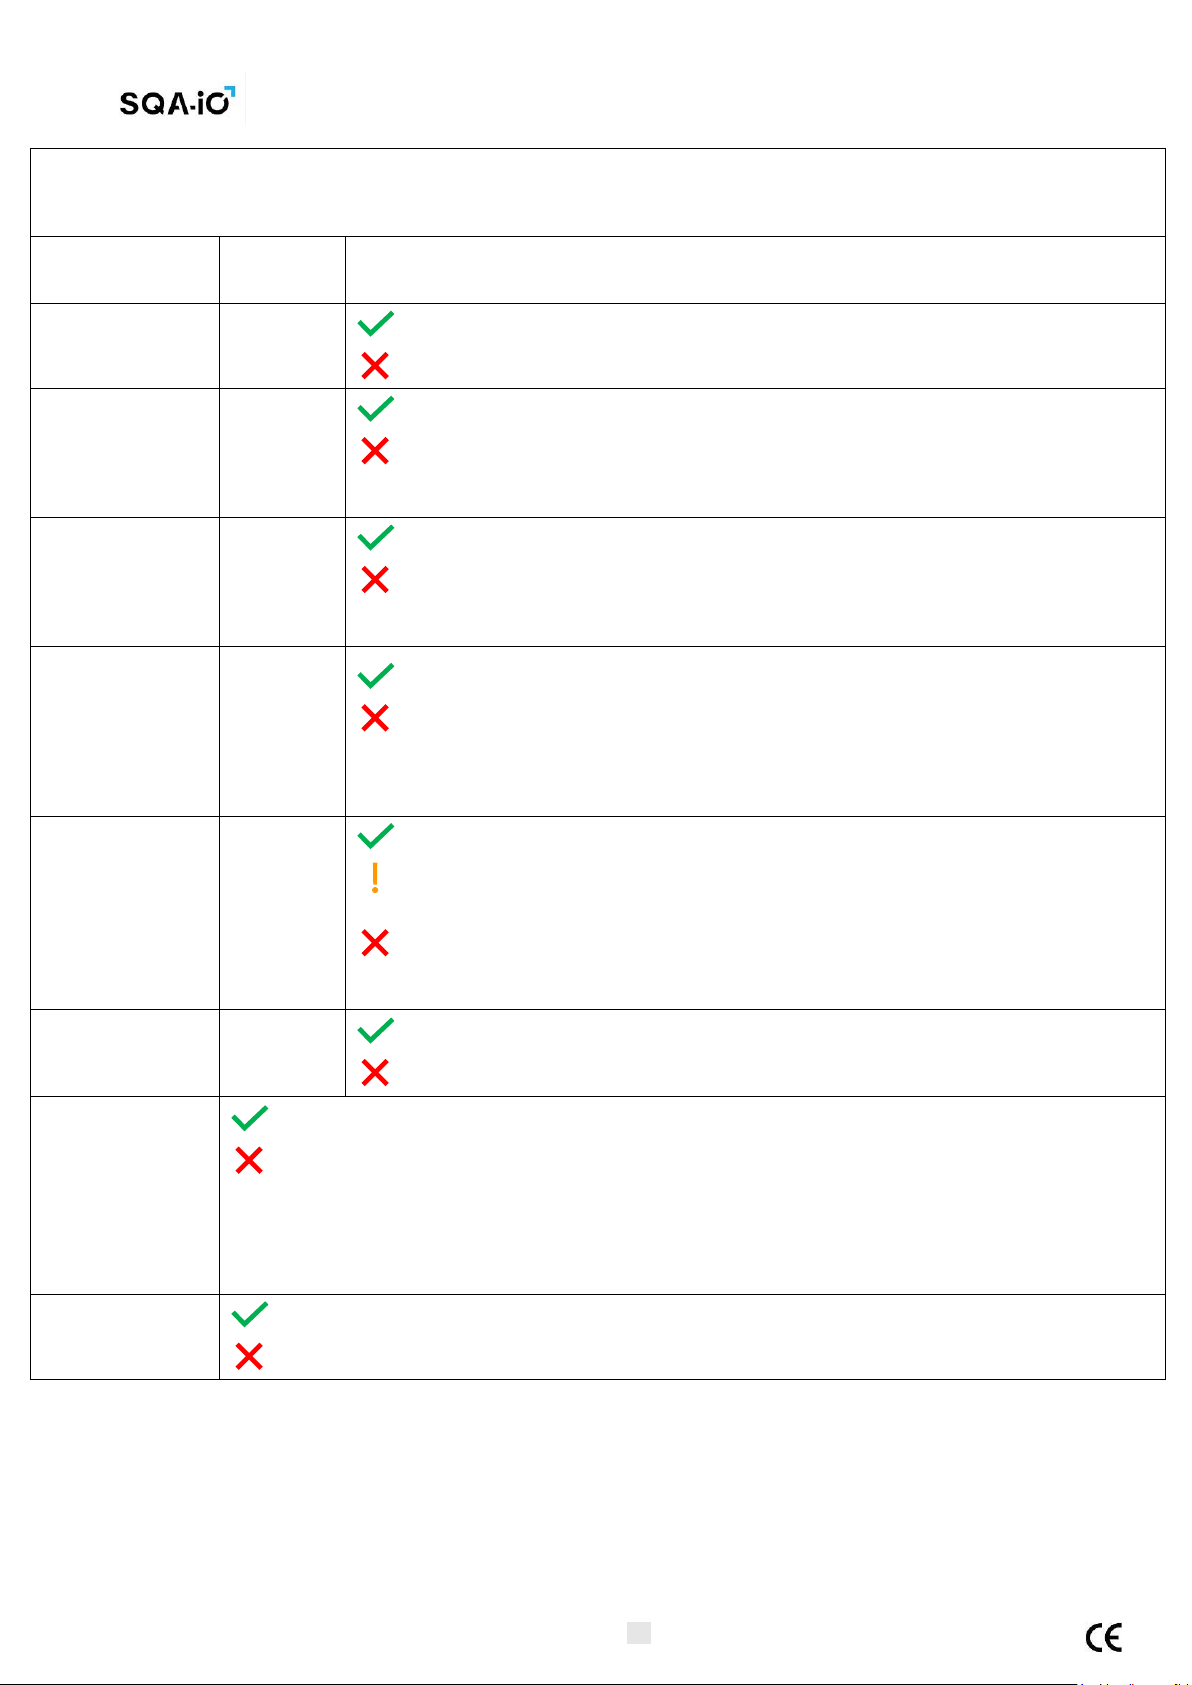
TROUBLESHOOTING PARAMETERS OUT OF RANGE: This table describes what to do when a problem occurs with the
service data key parameters. It is a detailed description of the Self-test failure that occurs on the HOME page. To solve
the issue, navigate to the SERVICE page, follow the instructions below, and rerun the Self-test. If the problem persists,
contact customer support.
PARAMETER
ACCEPTA
BLE
RANGE
DESCRIPTION/SOLUTION
REFERENCE 1
(REF 1)
150 –350
mV
Reference 1 passed the self-test
Reference 1 failed the self-test
LED CURRENT 1
(LED 1)
5 –20 mA
LED Current 1 passed the self-test
LED Current 1 failed the self-test
Suggestion: Clean the device
AMPLITUDE
50 –100
mV
Amplitude passed the self-test
Amplitude failed the self-test
Suggestion: Clean the device
ZERO LEVEL
500 –525
Zero Level passed the self-test
Zero Level failed the self-test
Suggestion: Clean the SQA-iO. Maintain ambient temperature between 20 –25°C / 68
–77°C
REFERENCE 2
(REF 2)
OPTIMAL:
2800 –
3500
PASSED:
2500 –
2800
Reference 2 passed the self-test
Reference 2 passed the self-test but is not in the optimal
range
Reference 2 failed the self-test
Suggestion: Clean the device
LED CURRENT 2
(LED 2)
10 –32
mA
Led Current 2 passed the self-test
Led Current 2 failed the self-test
AUTO-
CALIBRATION
AND
STABILIZATION
Auto-Calibration and Stabilization passed (Zero Level parameter is stable)
Auto-Calibration and Stabilization failed
Suggestion:
•Remove testing capillary from the measurement compartment
•Remove the SQA-iO from sources of vibrations (centrifuge)
•Clean the device
SELF-TEST
Self-test passed (The key system parameters are in range)
Self-test failed
Service Manual Version 187.5.1
AUGUST 3, 2021 SQA-iO Service Manual 11
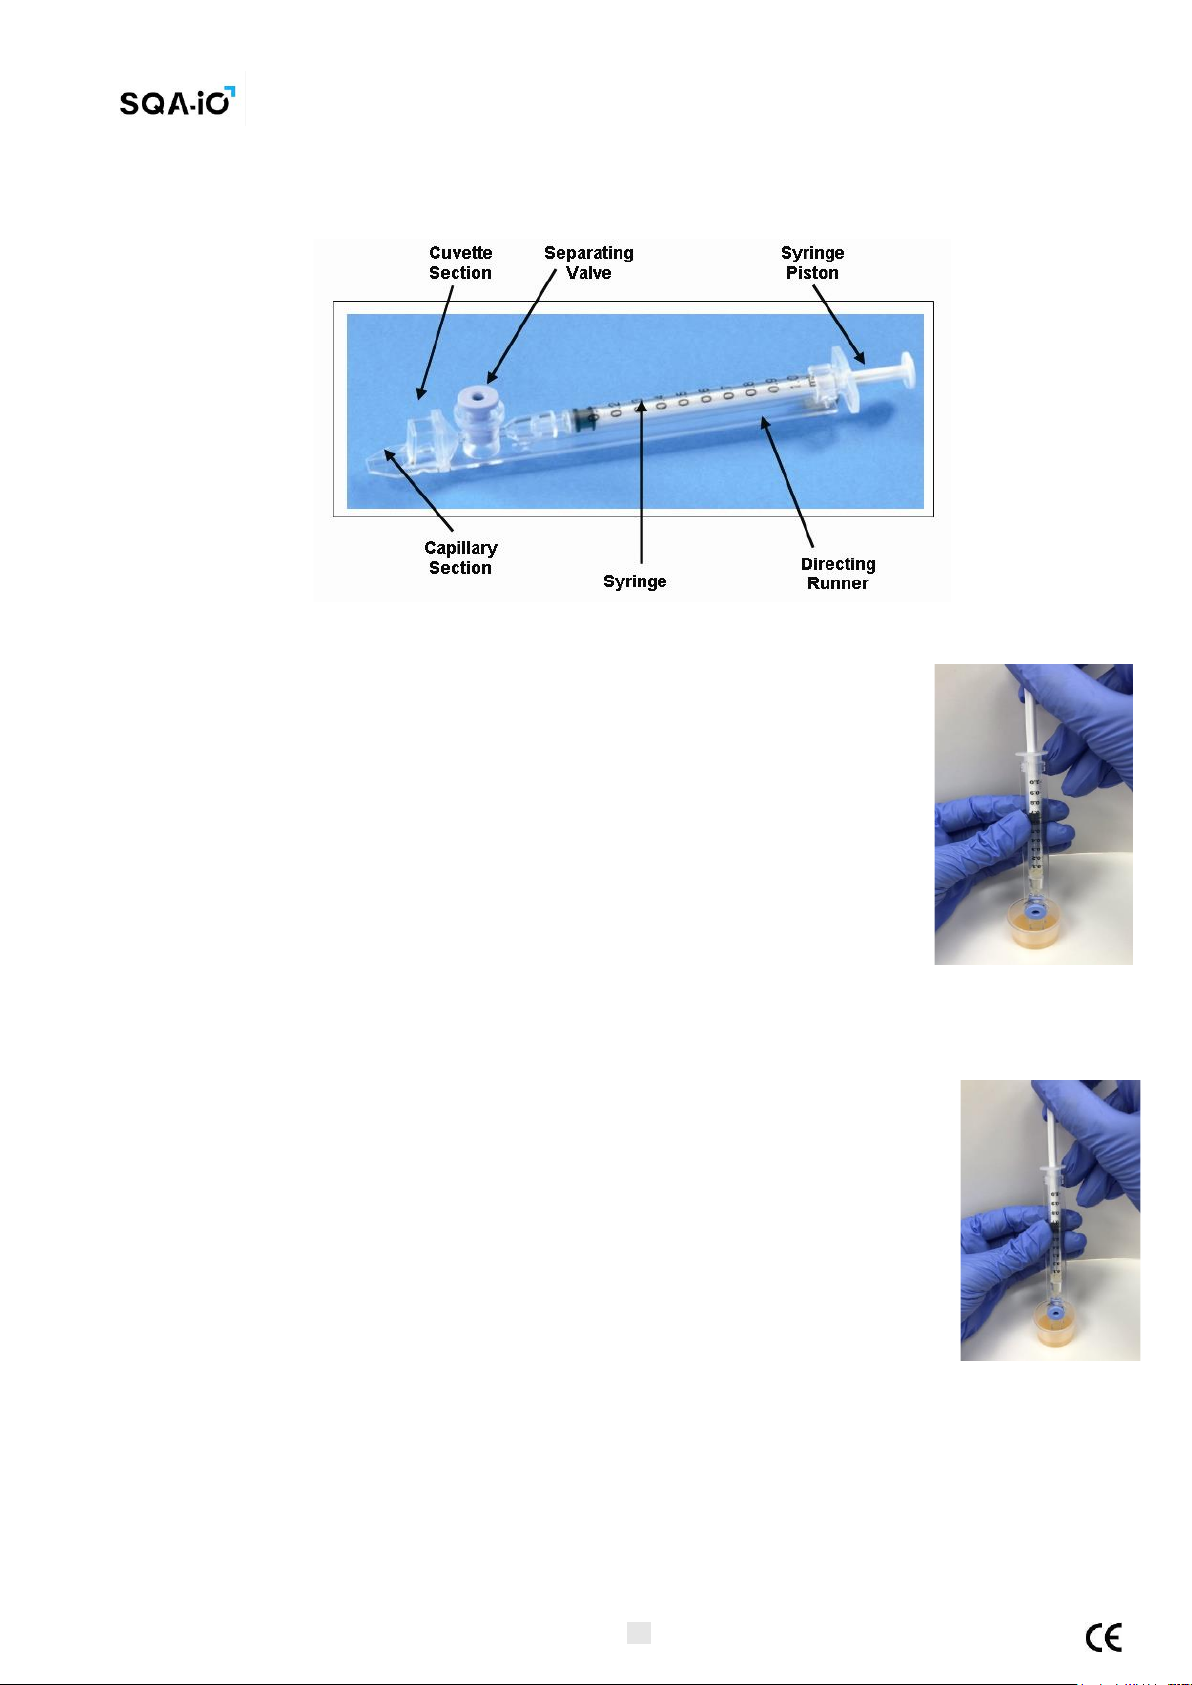
APPENDIX 3: Filling the Testing Capillary with a Normal Volume Sample
Sample size, collection and preparation instructions:
1. Sample volume should be at least .5 ml. If sample volume is less than .5 ml
the sample can be run as a short sample following the instructions in
Appendix 2.
2. The sample must be collected without partners, gels or creams and tested
within 1 hour of collection for accurate results.
3. Do not heat or refrigerate the sample, maintain an test at room temperature
4. The semen sample must be completely liquefied and well mixed prior to
aspiration: Gently mix by rotating the sample collection container.
WARNING: Do not shake or use a pipette to mix the sample otherwise air
bubbles will form and test results will be inaccurate.
Figure 1
5. Carefully check that the liquefied, fully mixed specimen is free of air bubbles (or that there is an
adequate amount of sample below the air bubbles) before immersing the capillary into the specimen.
Filling the capillary:
1. Push the syringe pump fully into the syringe. Place only thin part of the
capillary into the bottom of the sample while angling the sample container at
about 45 degrees (Figure 1).
2. Placing two fingers below the syringe pump’s head pull the syringe pump back
slowly while keeping the tip of the capillary well below the sample level
and below any surface bubbles (Figure 1). Continue to aspirate the sample
until it appears in the Luer adaptor (Figure 2).
Figure 2

Service Manual Version 187.5.1
AUGUST 3, 2021 SQA-iO Service Manual 12
3. Check the capillary after filling (Figure 3), visually confirm that the sample
has completely filled the thin section (without a meniscus) and the cuvette
section. A small level of sample should appear in the syringe. Tap on the
syringe to make sure there are no air bubbles in the sample. If, after
tapping, some air bubbles appear below the Luer adaptor, dip the capillary into
the semen sample again and aspirate a small quantity of semen to draw the air
bubbles into the syringe.
4. Quickly (to avoid wicking) wipe the outer surface of the capillary - both
top and bottom (Figure 4) with a delicate wipe (Kimwipes, etc.). It is important
to remove all semen from the exterior of the capillary in order to keep the SQA-
iO clean. Visually confirm that the capillary chambers are still full following the
cleaning process. If some of the sample has been depleted (meniscus formed in
the thin part of the capillary) fill the capillary part from the cuvette section by
slightly pushing in the piston.
Figure 4 Wipe the tip
Fig 3 Inspect for bubbles
5. Slowly and carefully push-in the blue piston until it is level with the plastic
(Figure 5).
Figure 5: Push in the blue piston
6. The capillary is now ready.
7. Insert the testing capillary into the measurement compartment with the
blue stopper down. Push it in as far as it will go to ensure that the capillary is
properly seated.
Service Manual Version 187.5.1
AUGUST 3, 2021 SQA-iO Service Manual 13
APPENDIX 4: Filling the Testing Capillary with a Low Volume Sample
Sample size and preparation:
1. A sample as small as 10 microliters can be tested for motility parameters by filling ONLY the thin section
of the testing capillary.
2. The sample must be collected without partners, gels or creams and tested
within 1 hour of collection for accurate results.
3. Do not heat or refrigerate the sample, maintain and test at room temperature
4. The semen sample must be completely liquefied and well mixed prior to
aspiration: Gently mix by rotating the sample collection container.
WARNING: Do not shake or use a pipette to mix the sample otherwise air
bubbles will form and test results will be inaccurate.
Filling the capillary:
1. Push the syringe piston in fully. Place only the thin part of the capillary
into the bottom of the sample (Figure 1).
2. Pull the piston back slowly without withdrawing the capillary from the
sample. Fill only the (thin) capillary chamber with 10 microliters of
semen (Figure 1). Aspirate the sample until it just appears in the cuvette
section while keeping the tip of the capillary well below the sample level and
well below the level of any bubbles covering the liquid.
3. Withdraw the capillary tip from the semen sample and visually inspect to
ensure that the sample has completely filled the thin section (no meniscus).
4. Quickly (to avoid wicking) wipe the outer surface of the capillary - both
top and bottom with a delicate wipe (Kimwipes, etc.). It is important to
remove all semen from the exterior of the capillary in order to keep the SQA-
iO clean.
5. Visually confirm that the thin chamber of the capillary is still full of semen
after completing the cleaning process. If some of the sample has been
depleted push-in the piston slightly until the first drop appears on the
capillary tip and then fill the capillary again from the sample container.
Figure 1
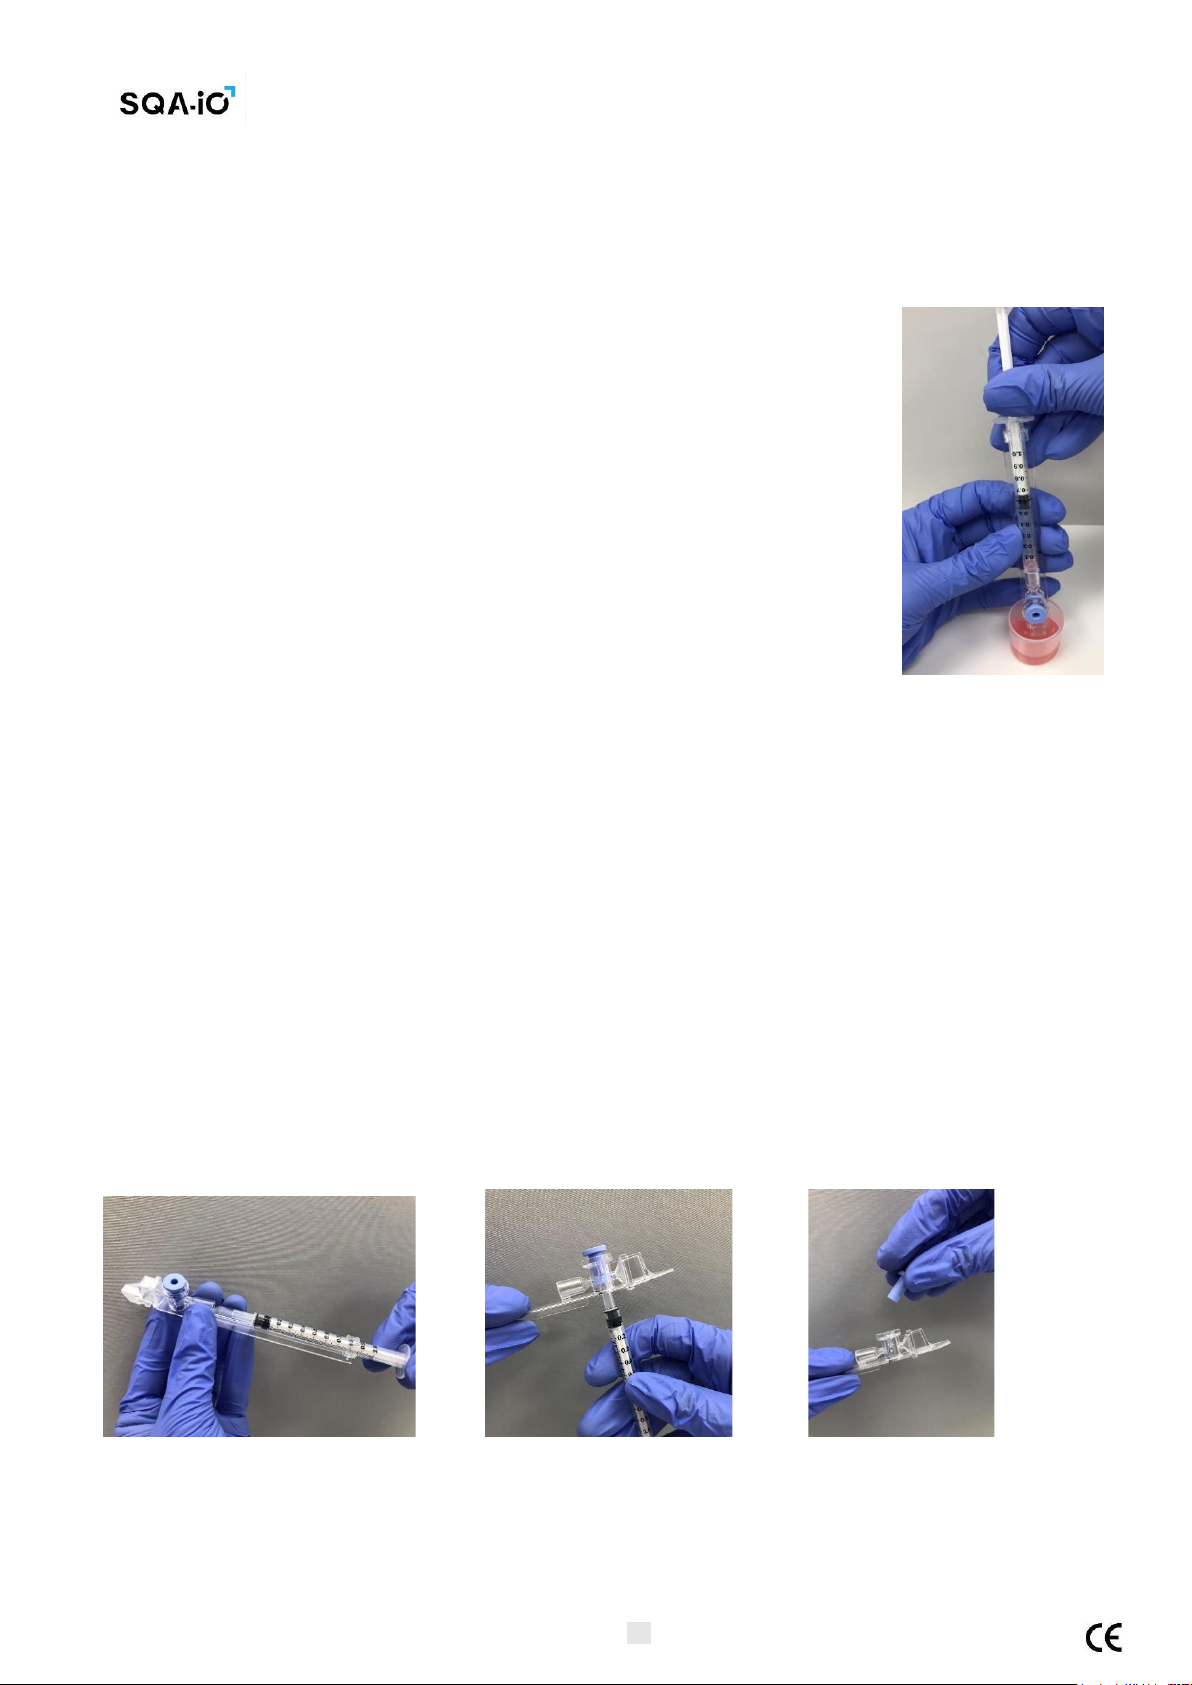
Removing the blue piston:
6. The blue piston must now be removed:
•Detach the entire syringe from the hub (Figure 2)
•Use the syringe tip to firmly push-out the separating valve from the underside of the capillary
(Figure 3).
•Completely detach the separating valve (Figure 4). The capillary is now ready to be inserted into
the SQA-iO
Figure 2: Detach the syringe Figure 3: Push the piston out Figure 4: Remove the piston
PLEASE NOTE: Test Low Volume samples as soon as the sample is aspirated into the capillary.
Table of contents
Other MES Medical Equipment manuals


