Metos LM-5/P User manual

User manual
Meat mincer
Metos LM-5/P
4221321
14.03.2011

1
MEAT GRINDER USER MANUAL
Warning!
KT-meat grinder LM-5/P is especially designed to grind liver and meat. This machine is capable
of inflicting damage to the user, unless the right safety precautions are observed. Therefore, it is
important that utmost care is taken when using this machine.
* DO NOT use this machine unless you have read and completely understood this
manual. Your attention is drawn in particular to the part which concerns
safety.
* DO NOT push your fingers into the holes of the hole plate.
* DO NOT use the machine unless all the guards are fixed firmly into place.
* DISCONNECT the power source before changing or cleaning the blades, before adjusting
anything or before you leave the machine unsupervised.
* REPORT all faults immediately.
LM-5/P
14.03.2011

2
CONTENTS
1. Introduction.................................................3
1.1 Technical specifications ........................3
2. General description.....................................3
3. Unpacking....................................................4
4. Installation ...................................................4
4.1 Location..................................................4
4.2 Electrical connection.............................5
4.2.1 Direction of rotation.......................5
4.2.2 Switch diagram...............................5
5. Operation .....................................................6
5.1 Safety......................................................6
5.1.1 Safety measures..............................6
5.1.2 Before use........................................6
5.1.3 During use.......................................7
5.1.4 After use..........................................7
5.2 Starting up .............................................7
5.3 Stopping..................................................7
5.4 Grinding.................................................7
6. Cleaning and maintenance .........................7
6.1 Recommended detergents.....................8
6.2 Dismantling the blade assembly...........8
6.3 Reassembly.............................................9
7. Maintenance.................................................10
8. Noise emission values..................................10
9. Fault finding.................................................10
APPENDIX 1. Switch diagram......................11
LM-5/P
14.03.2011

3
1. Introduction
Meat grinder LM-5/P is designed especially for the grinding of liver and small amount of fresh
meat. Read this instruction manual BEFORE using the machine and ensure also that all other
users, service mechanics and cleaners have also read and thoroughly understood this manual, and
also that they have familiarized themselves with the following:
•Dismantling, cleaning and re-assembly of the machine.
•The parts of this manual, which deal with the safety.
All users must be given the correct training in the safe use of meat grinders, and they must be
thoroughly knowledgeable in the correct safety procedures.
1.1 Technical specifications
LM-5/P
Voltage
230/50/1
Grinding motor
0,55 kW
Depth
375 mm
Height
375 mm
Width
380 mm
Grinding power
100 kg/h
Hole plate diameter
53 mm
Capacity of meat tray
3 liters
Weight
22 kg
2. General description
This manual refers to the following model:
LM-5/P
Meat grinder LM-5/P is designed to grind fresh liver and small amount of meat. Meat grinder has
been constructed following the KT product development methods. The operation of the grinder
is quiet and it is easy to dismantle for cleaning purposes.
In model LM-5/P start/stop switch is located in the front of the grinder (Picture 1: No. 1a).
LM-5/P
14.03.2011

4
Picture 1
3. Unpacking
The meat grinder may be stored in the cold store. All models must be thoroughly cleaned before
usage. See chapter 6.1 for the recommended cleaning agents.
The meat grinder is delivered with feeding equipment dismantled. The installation of the feeding
equipment is dealt in chapter 6.3. If the grinder or its package has been damaged during the
transportation, contact your retailer or the manufacturer.
The meat grinder can be lifted from the pallet or from its packaging by hand. The weight of the
grinder is mentioned in chapter 1.1. Utmost care must be taken when lifting the grinder.
4. Installation
4.1 Location
The meat grinder must be installed on a steady table, which must be large enough so the grinder
fits completely on the table.
A base for the table is provided as an optional equipment. The base is equipped with wheels. The
front two wheels may be locked, while the two back wheels are fixed. The wheels make the
moving of the machine easier. When using the optional base, the grinder must be attached to the
base with a bolt which is included in the base.
The location of the grinder must be away from corridors and doors. The location must have
adequate light. For the safety of the user, the surface of the floor must be non-slippery.
LM-5/P
14.03.2011

5
4.2 Electrical connection
Please note
1. Ensure that the voltage corresponds with the voltage marked on the rating label.
2. The machine must be CORRECTLY EARTHED.
3. Only an authorized electrician may carry out the servicing work.
4. Ensure that the electrical supply has been disconnected before any electrical connections
are made, or maintenance or adjusting work is carried out.
4.2.1 Direction of rotation
Before using the machine, check the direction of rotation with the feeding equipment
dismantled.After start-up, the machine's blade should rotate counter-clockwise when observing
it from the front (Picture 2).
Picture 2
4.2.2 Switch diagram
The switch diagram for the grinder is to be found in the appendices to this manual.
LM-5/P
14.03.2011

6
5. Operation
5.1 Safety
5.1.1 Safety measures
The importance of following safety procedures in the operation of industrial meat grinders
cannot be over-stressed. Meat grinders are capable of inflicting bodily damage to operators.
However by using common sense and being careful, as well as following all safety measures in
the operation of meat grinders, the operator will get the best possible performance out of this
versatile machine, and minimize the of accidents.
Your personal safety is more important than the quick operation of the machine.
It is recommended that only authorized persons who have received the correct training in the
operation of industrial band saws may operate them. They must also be aware of the danger
factors and safety measures.
PLEASE NOTE
All safety instructions in this manual are the manufacturer's recommended practices. Local safety
regulations and measures must always be observed.
Do not use this machine to anything else, than the purposes mentioned in this manual. The
diameter of the holes in the last plate towards the outlet shall be less than 8 mm. It is
forbidden to use hole plates with larger holes. The last plate towards the outlet is not
allowed to be ground thinner than 5 mm thickness.
5.1.2 Before use
Before starting up the meat grinder, the operator must:
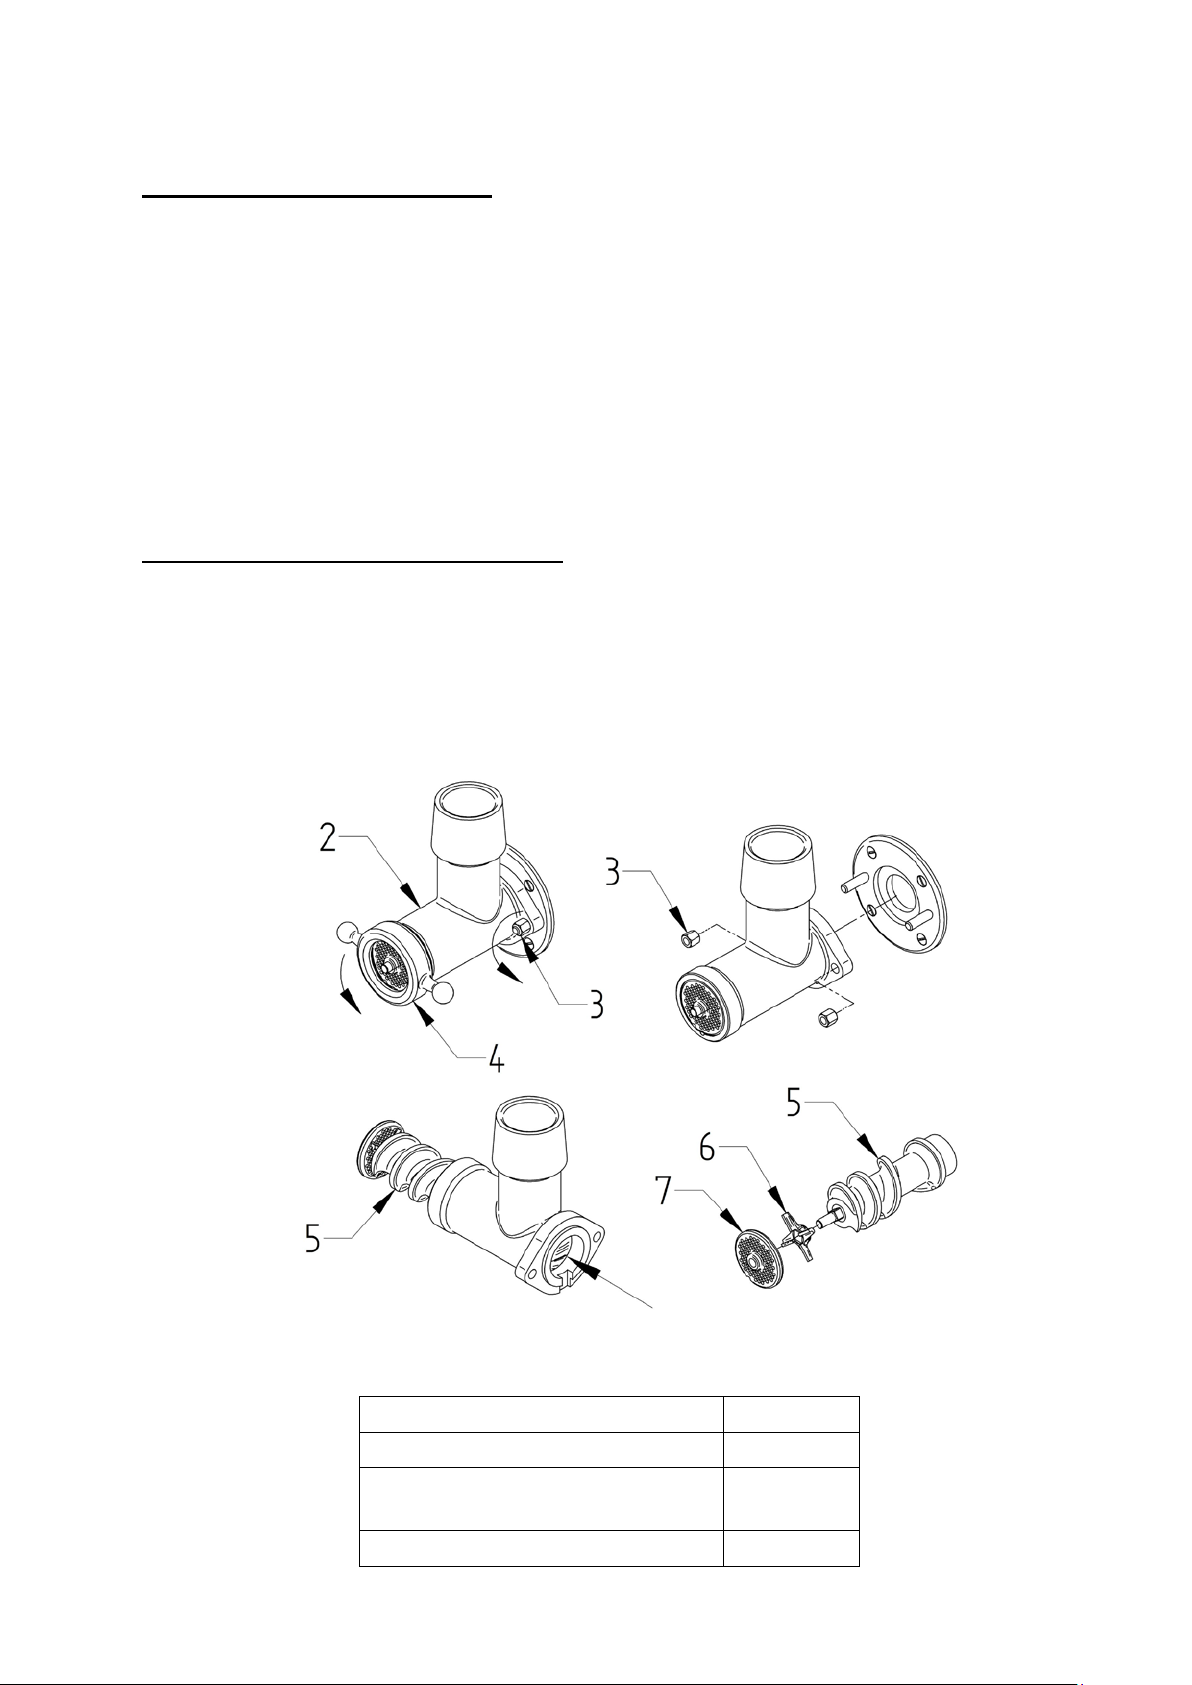
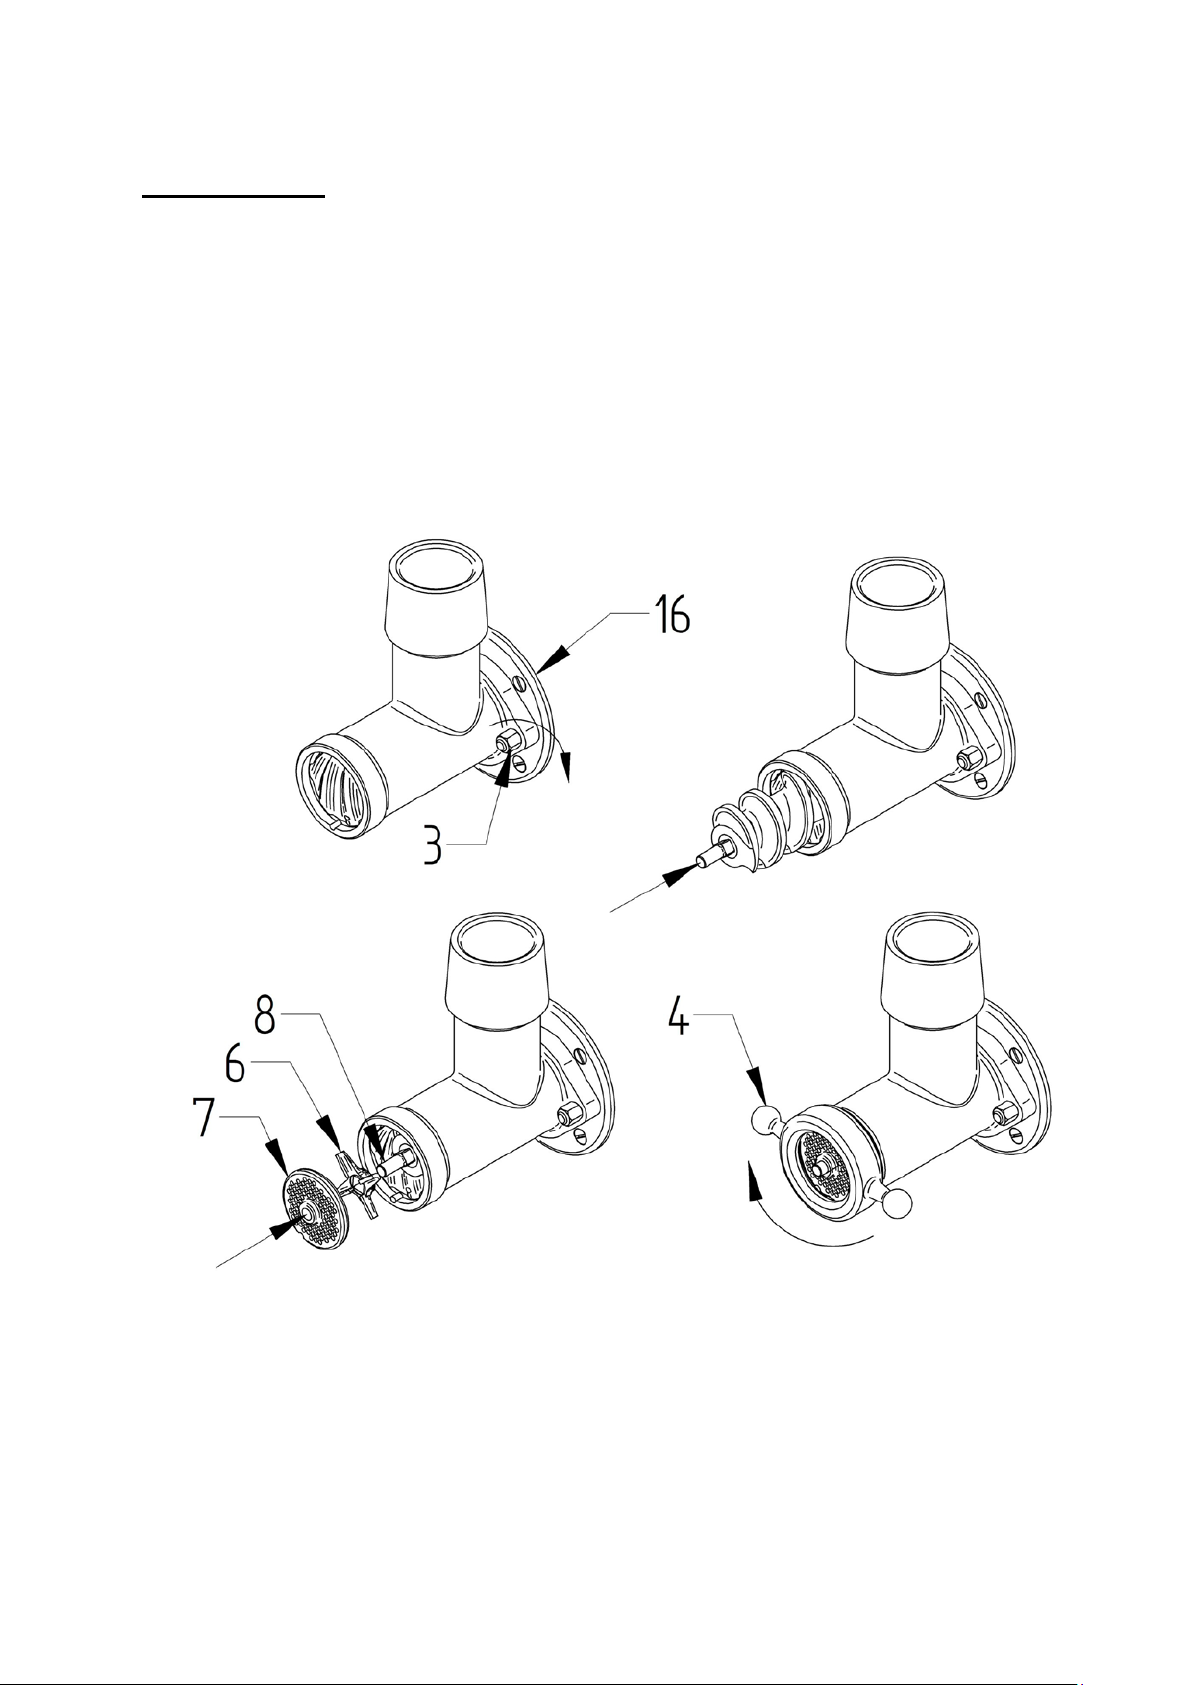
1. DISMANTLE the blades and feeding screw (Instructions for cleaning: chapter 6)
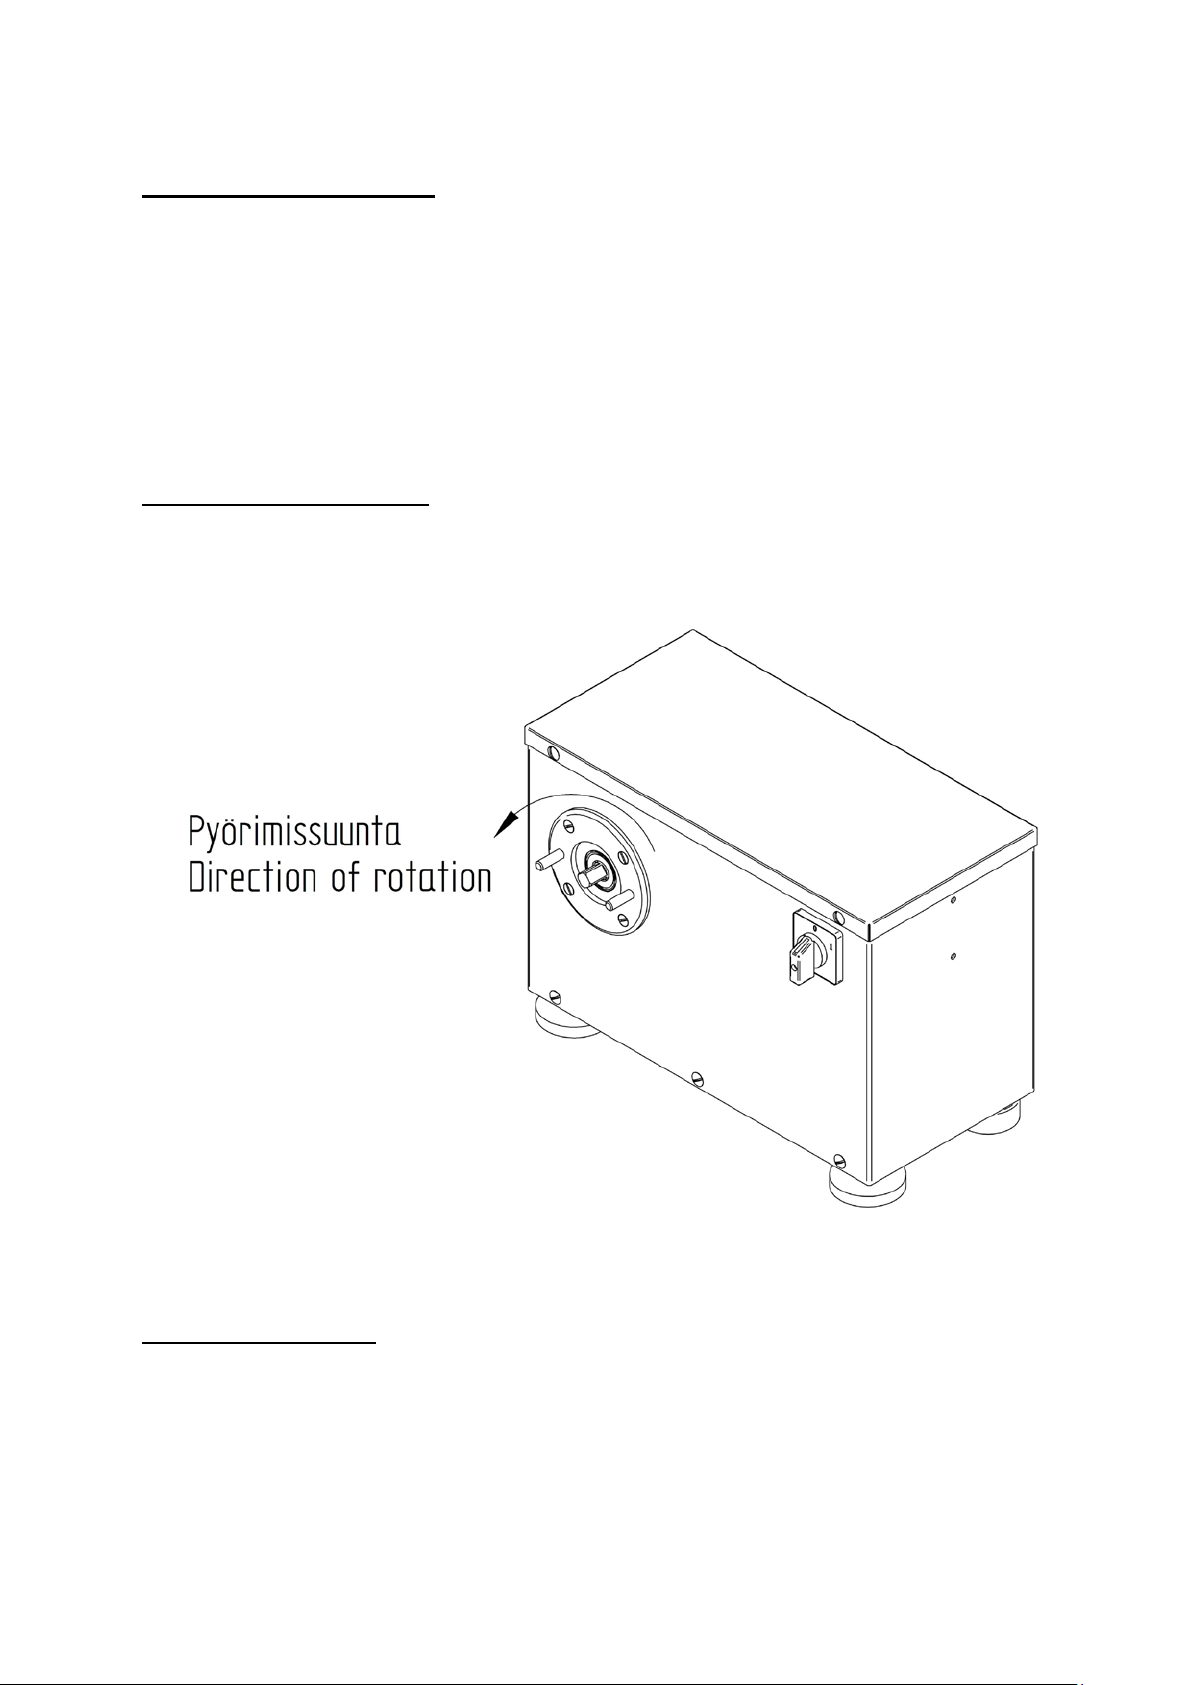
2. CHECK the direction of rotation of feed screw (counter-clockwise).
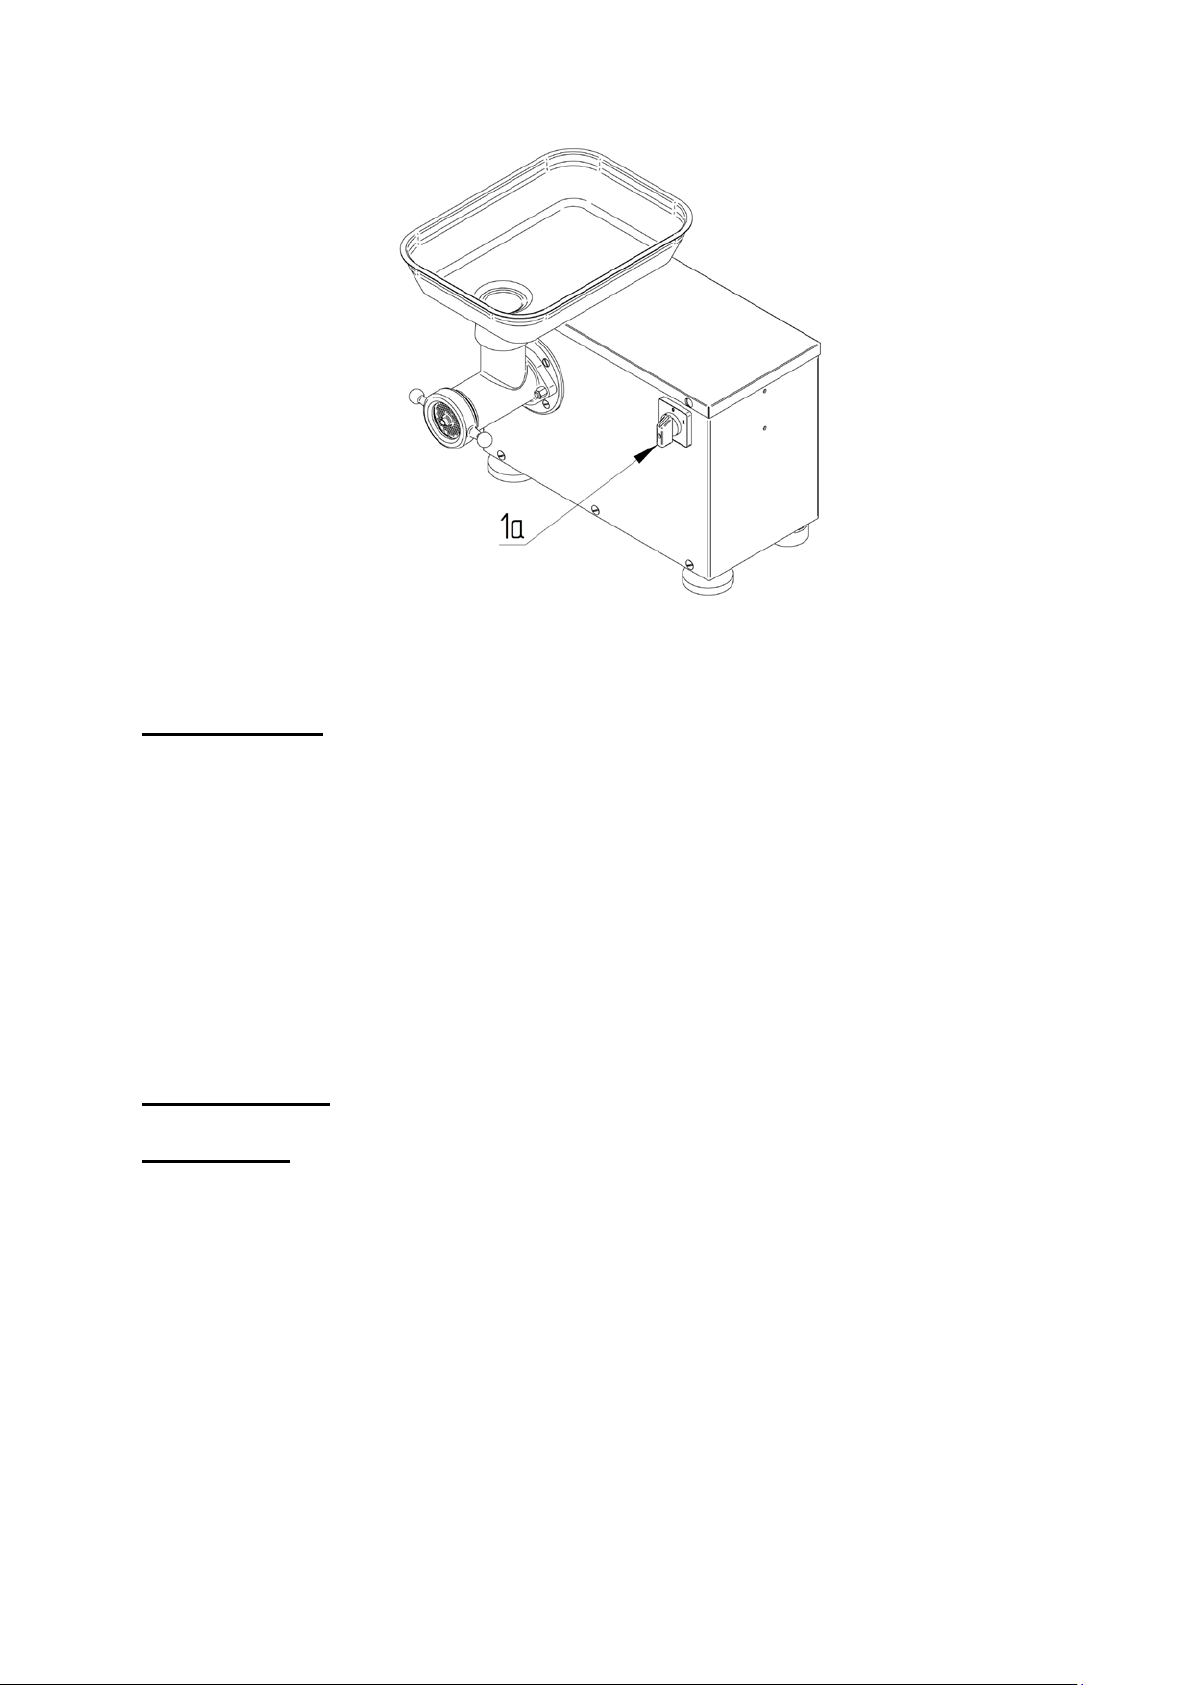
3. CHECK that the meat tray is firmly in place.
4. CHECK that the blade and hole plate to be mounted in the machine are used in pairs.
5. CHECK that the blade and hole plate are correctly mounted in the grinder housing.
6. CHECK that the edge of the hole plate remains 2-3 mm outside the housing.
7. CHECK that the entry nut is not too tight, in order to prolong the lifespan of the blade
assembly.
8. ENSURE that the diameter of the holes in the last plate towards the outlet shall be less
than 8 mm.
LM-5/P
14.03.2011

7
5.1.3 During use
Keep a check on the quality of the product. If the product does not flow out properly or if it has a
porridge-like consistency, check the blade and the hole plate. Worn components should be
replaced. See chapters 6.2 and 6.3, dismantling and reassembly of the blade assembly
5.1.4 After use
1. STOP the machine by turning the power switch to position ”0” (Picture 1, No. 1a).
2. DISCONNECT the power supply.
5.2 Starting up
Provided that all the conditions in chapters 5.1.2 are fulfilled, the grinder may be started by
turning the power switch to position ”I” (Picture 1, No. 1a).
5.3 Stopping
The meat grinder may be stopped by turning the power switch to position ”0” (Picture 1, No. 1a).
5.4 Grinding
•Feed the meat/liver to the grinding house by using the feeding hammer provided with the
machine.
•Do not push your fingers to the feed intake.
•Let the grinded product fall freely to the tray.
•Do not try to push your fingers into the holes of the hole plate.
•Do not drop foreign objects into the grinding house.
6. Cleaning and maintenance
Clean the grinder thoroughly after usage. At first, remove the plug from the wall socket. Remove
the meat tray by lifting it upwards. Remove the hole plate, blade and feeding screw from the
grinding house (see chapter 6.2. Dismantling the blade assembly).
The parts removed from the grinder should be washed using warm water, a suitable cleaning
agent and a cleaning brush provided with the machine The parts should also be disinfected. The
feed housing is dried after washing and wiped over using suitable alimentary oil. The outside of
the grinder should be wiped using a suitable cleaning agent and then dried. DO NOT USE
PRESSURIZED WATER.
LM-5/P
14.03.2011

8
6.1 Recommended detergents
For example the following detergent may be used when washing the machine:
Kärcher RM 81
Recommended disinfectants:
Kärcher RM 32, RM 35
Regardless of detergent or method used, ensure that you observe the manufacturer's instructions.
Observe the recommended concentrations and soaking times to avoid damaging your meat
grinder. If detergent, rinsing water or disinfectant remains in the grinder, it must be dried in an
appropriate manner.
6.2 Dismantling the blade assembly
Loosen the nuts (Picture 3, No. 3) of the grinding house (No. 2) with a wrench (counter-
clockwise). Remove the entry nut (No. 4) by hand, by turning it counter-clockwise (see picture).
Remove the nuts (No. 3) of the grinding house, and then remove the grinding house. Push the
feed screw (No. 5) by hand from the backside of the grinding house. Remove the blade (No. 6)
and hole plate (No. 7) from the stud.
Picture 3
LM-5/P
Weight of the entry nut
0,4 kg
Weight of the feed screw and
blade assembly
0,5 kg
Weight of the grinding house
0,7 kg
LM-5/P
14.03.2011

9
6.3 Reassembly
1. Mount the grinding house onto the grinder. When installing the grinding house, ensure
that the housing is properly inserted into the flange (Picture 4, No. 16) of the grinder.
2. Tighten the nuts (No. 3) with a wrench (clockwise).
3. Insert the feed screw into the grinding house.
4. Insert the blade (No. 6) onto the stud (No. 8).
5. Insert the hole plate (No. 7) onto the stud.
6. Insert the entry nut (No. 4) to its place (clockwise). Do not overtighten the entry nut.
7. Finally mount the meat tray to its place onto the grinding house.
Picture 4
LM-5/P
14.03.2011

10
7. Maintenance
In addition to daily cleaning the meat grinder does not require much maintenance. Worn
components must be replaced when needed (stud, blades, hole plates).
The hole plate must be over 5 mm thick. If needed, the hole plate must be replaced.
8. Noise emission values
The A-weighted emission sound pressure level at workstation does not exceed 70 dB(A).
9. Fault finding
FAULT
REASON
REMEDY
Poor quality grinding.
•Worn blade couple
Sharpen the blade and hole
plate.
•Hole plate inserts
too deep in the
grinding house.
Replace the hole plate
•
Entry nut will not screw in fully.
Clean the thread.
•The thread of the entry nut is
damaged.
Replace the entry nut.
The machine will not
start. •The power cord is not plugged in.
•The cord is cut.
•
Power switch is broken
Contact an authorized
electrician or the
manufacturer.
LM-5/P
14.03.2011

11
APPENDIX 1. Switch diagram
LM-5/P
14.03.2011


KONETEOLLISUUSOY
ECDECLARATION OFCONFORMITY
We herebydeclarethatthc fbllowing machinery
complies
with theessentialhealthandsafety
requirementsof the Machinery
Directive20061421EC.
MEAT MINCERS:LM-S/P,LM-10/P,LN{-221P,LM-82/P,LNI-321P,
LM-98/P,LM-42,LM-130
MIXER GRINDERS:
LN|-22A,LM-82A,LM-32A,
LM-98A,LM-42A,LM-130A,LM-130/280A
KT-MSI. KT-MS2.KT-MS3CLIPPERMACHINE
KT-PKMEAT
TENDERIZER
KT-SFISHSCALER
KT-ALPMEAT PRESSER
Fl95MEATSLICER
HB-4,HB-3SEALER
HB-IOBAGSEALER
KT-KB2KEBABGRILL
KT-KB3KEBABGRILL
-l'his
machineryhas
beendesigned
andmanuf'acturedinaccordance
with
the
followingharmonised
European
Standards:
EN 12100-l:2003+AI:2009,
12100-l:2003+AI:2009Safetyofmachinery
- Basic
concepts,
generalprinciplesfordesign
8N60204-I:2006+AI:2009SafetyofMachinery Electricalequipmentofmachines Specificationforgeneral
requiremenls
EN 1088:1995+A2:2008SafetyofMachinery Interlockingdevicesassociatedwith
guards.
Principles
for design
and
selection
EN ISO 13857:2008SafetyofMachinery
- Safetydistanceslo
preyent
ha:ard:onesbeing
reached
by upperand
lowerlimbs
EN 953:1997+A1:2009SafetyoJ'machinery Guards.
Generalrequirements.forthedesign
andconstruction
offixedand
movable
guards.
EN ISO I4l2l-l:2007 Safetyofmachinery Risk
assessment.
Part:. Principles.
Irurthermore,
this
machineryhasbeendesignedandmanuf'actured
inaccordance
withthefbllowingstandards
anddirectives:
SFS5107,Slaughterhouseandmeatdressingmachines.
Machinesandequipmentforcutting.
Occupational
safety.
E.M.
C.Electro-magneticcom
pat
ibiIitydirective
2001/I08/EC
Furthcrmoremeat& mixer
grinders
have
beendesignedand
manufacturedinaccordance
withthefollowingtransposed
harmonisedEuropean
Standard:
EN 12331:2003+A2:2010f'oodprocessing
machinety.Mincingmachines.Safety
andhygiene
requirements.
ManufacturedbyKONETEOLLISUUSOY
Address below
Machine
Description
andtype:
Signed
Name
TechnicalFileHeldAt KT
Address below
Serial
No 139000-150000
Date2011-01-01
Position:Management
[Y:**f*ilt''
Jlirvihaantie5,01800
Klaukkala
P.O.Box49,IrlN-01801Klaukkala
FINI,ANI)
I'el.
+358
(0)
9 8789220
Fax.
-358
(0)
I 878
92213
www.koneteol
Iisuus.fi
Y-Tunnus01
10175-l
v.A.T.
Fr0110175-l

The crossed-out wheeled bin means that within the European Union the product
must be taken to separate collection at the product end-of life.
This applies to your device but also to any enhancements marked with this sym-
bol. Do not dispose of these products as unsorted municipal waste.
This manual suits for next models
1
Table of contents
Other Metos Kitchen Appliance manuals

Metos
Metos Prima 250 User manual

Metos
Metos CFXB-180 User manual

Metos
Metos TGN 300 TN User manual

Metos
Metos MF2 User manual

Metos
Metos PROVENO E 100 l User manual

Metos
Metos MARVEL E1 User manual

Metos
Metos G250 User manual

Metos
Metos RG-200 User manual

Metos
Metos LM-32/P User manual

Metos
Metos RN20 VL2 User manual

Metos
Metos SP-30HA-F User manual

Metos
Metos VH-12 User manual

Metos
Metos RG-100 User manual

Metos
Metos MIXI MG22HD-1 User manual

Metos
Metos BETA BN 300 User manual

Metos
Metos CL-A1D User manual

Metos
Metos RG-350 User manual

Metos
Metos RG-250 Technical Document

Metos
Metos MONDIAL 300 User manual

Metos
Metos G220 User manual