Micromax A092 User manual

A092 1
CONTENTS
THE ANDROID ADVANTAGE........................................................... 3
READ ME FIRST...............................................................................3
DISCLAIMER......................................................................................3
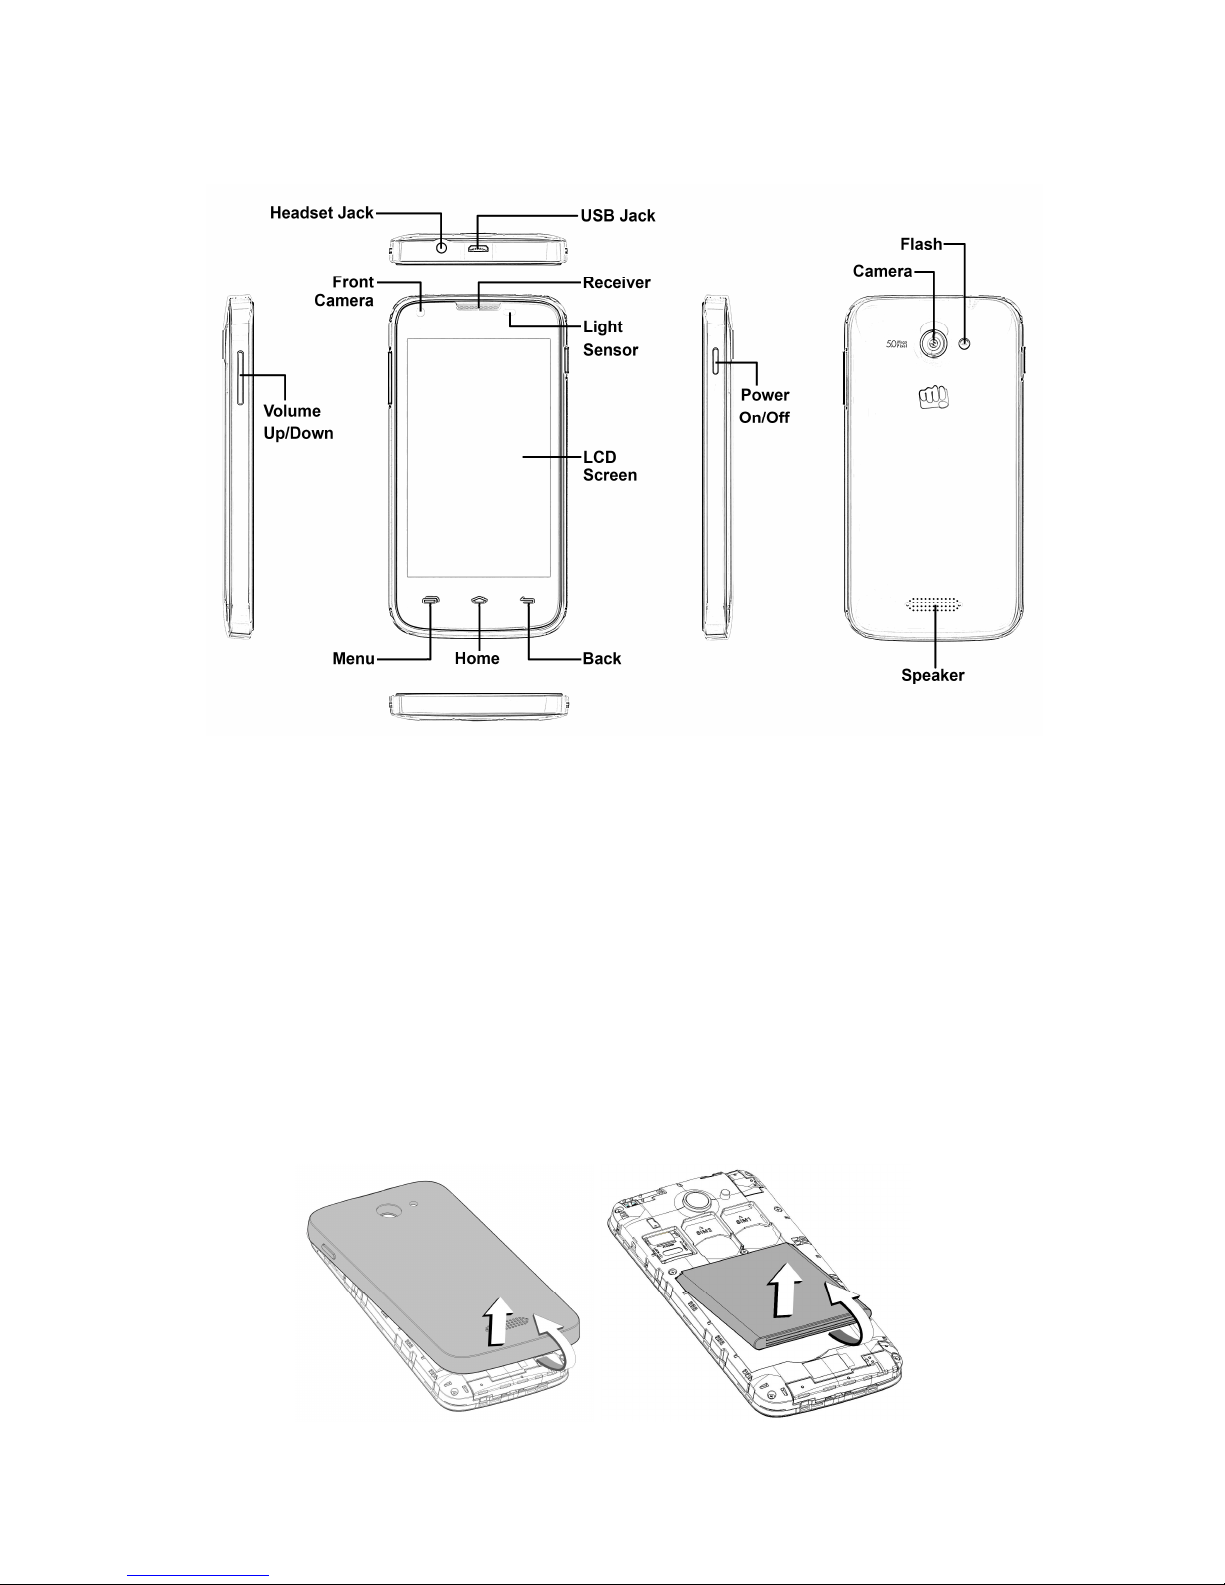
UNDERSTAND YOUR PHONE ......................................................... 5
GETTING STARTED.......................................................................... 5
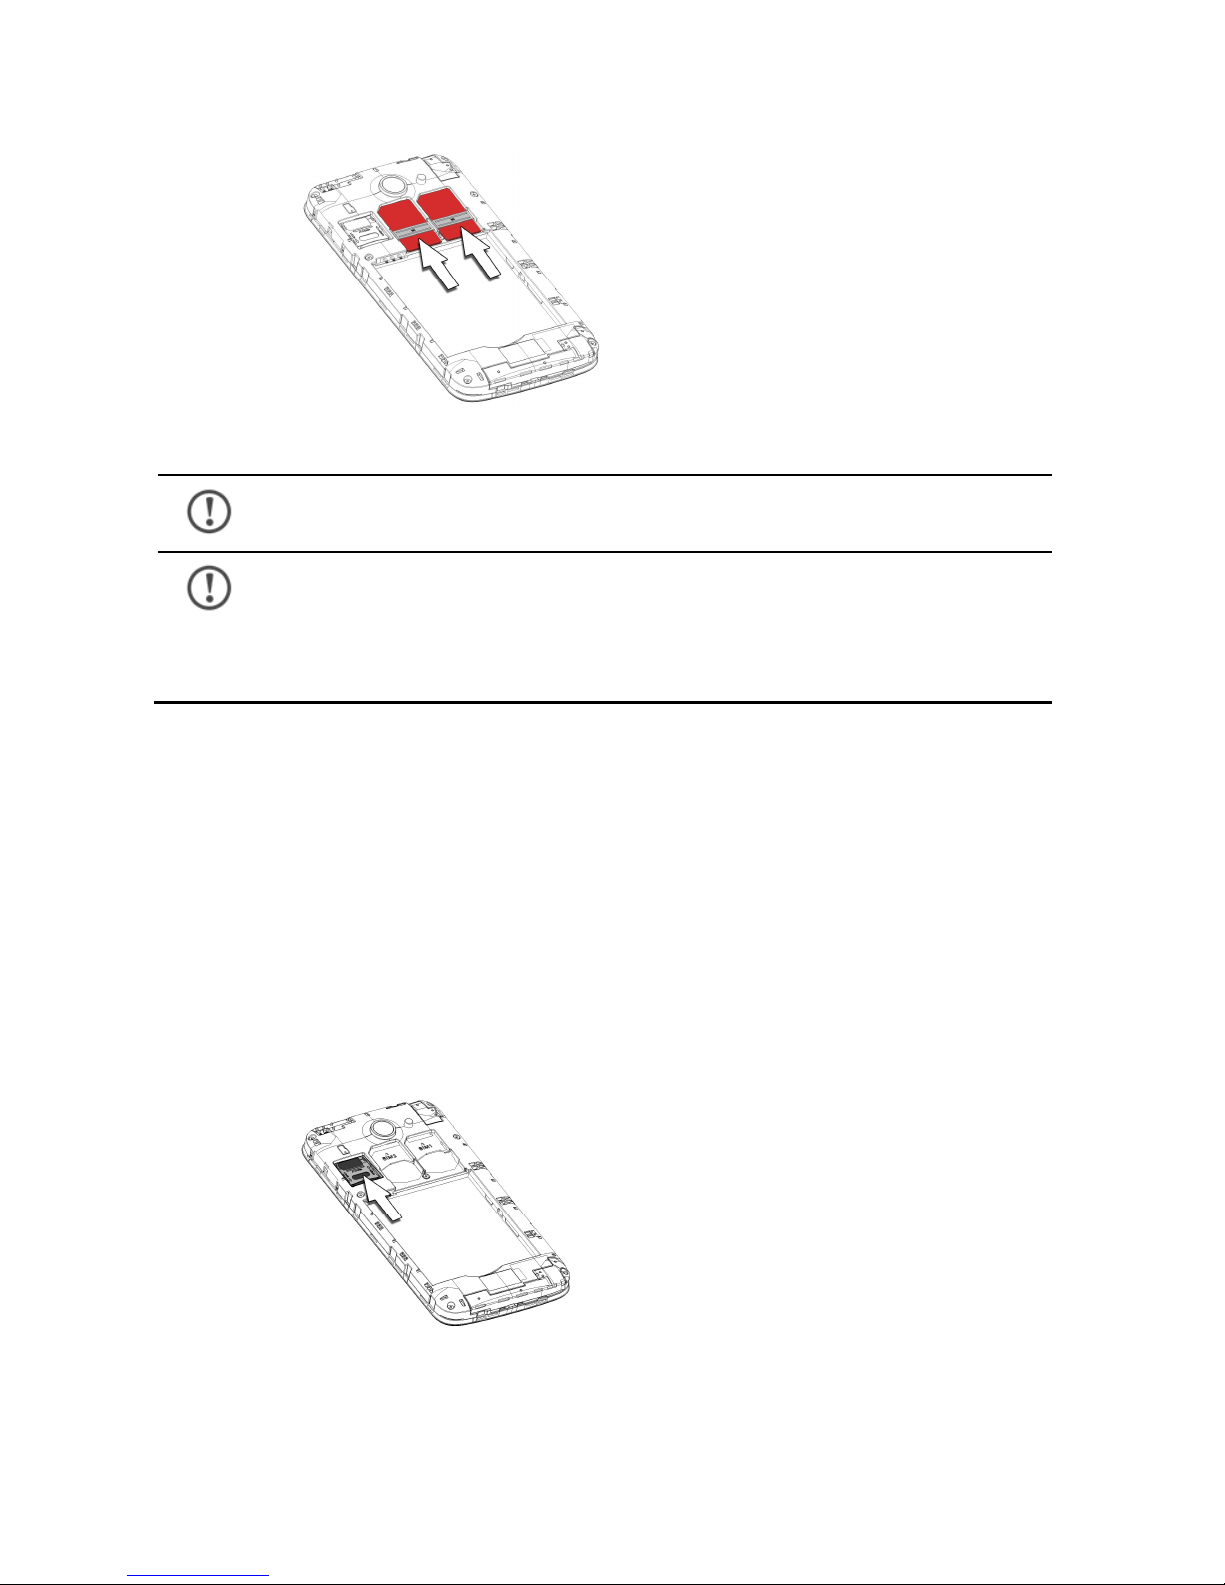
SIM CARD INSERTION................................................................................5
MEMORY CARD INSERTION.....................................................................6
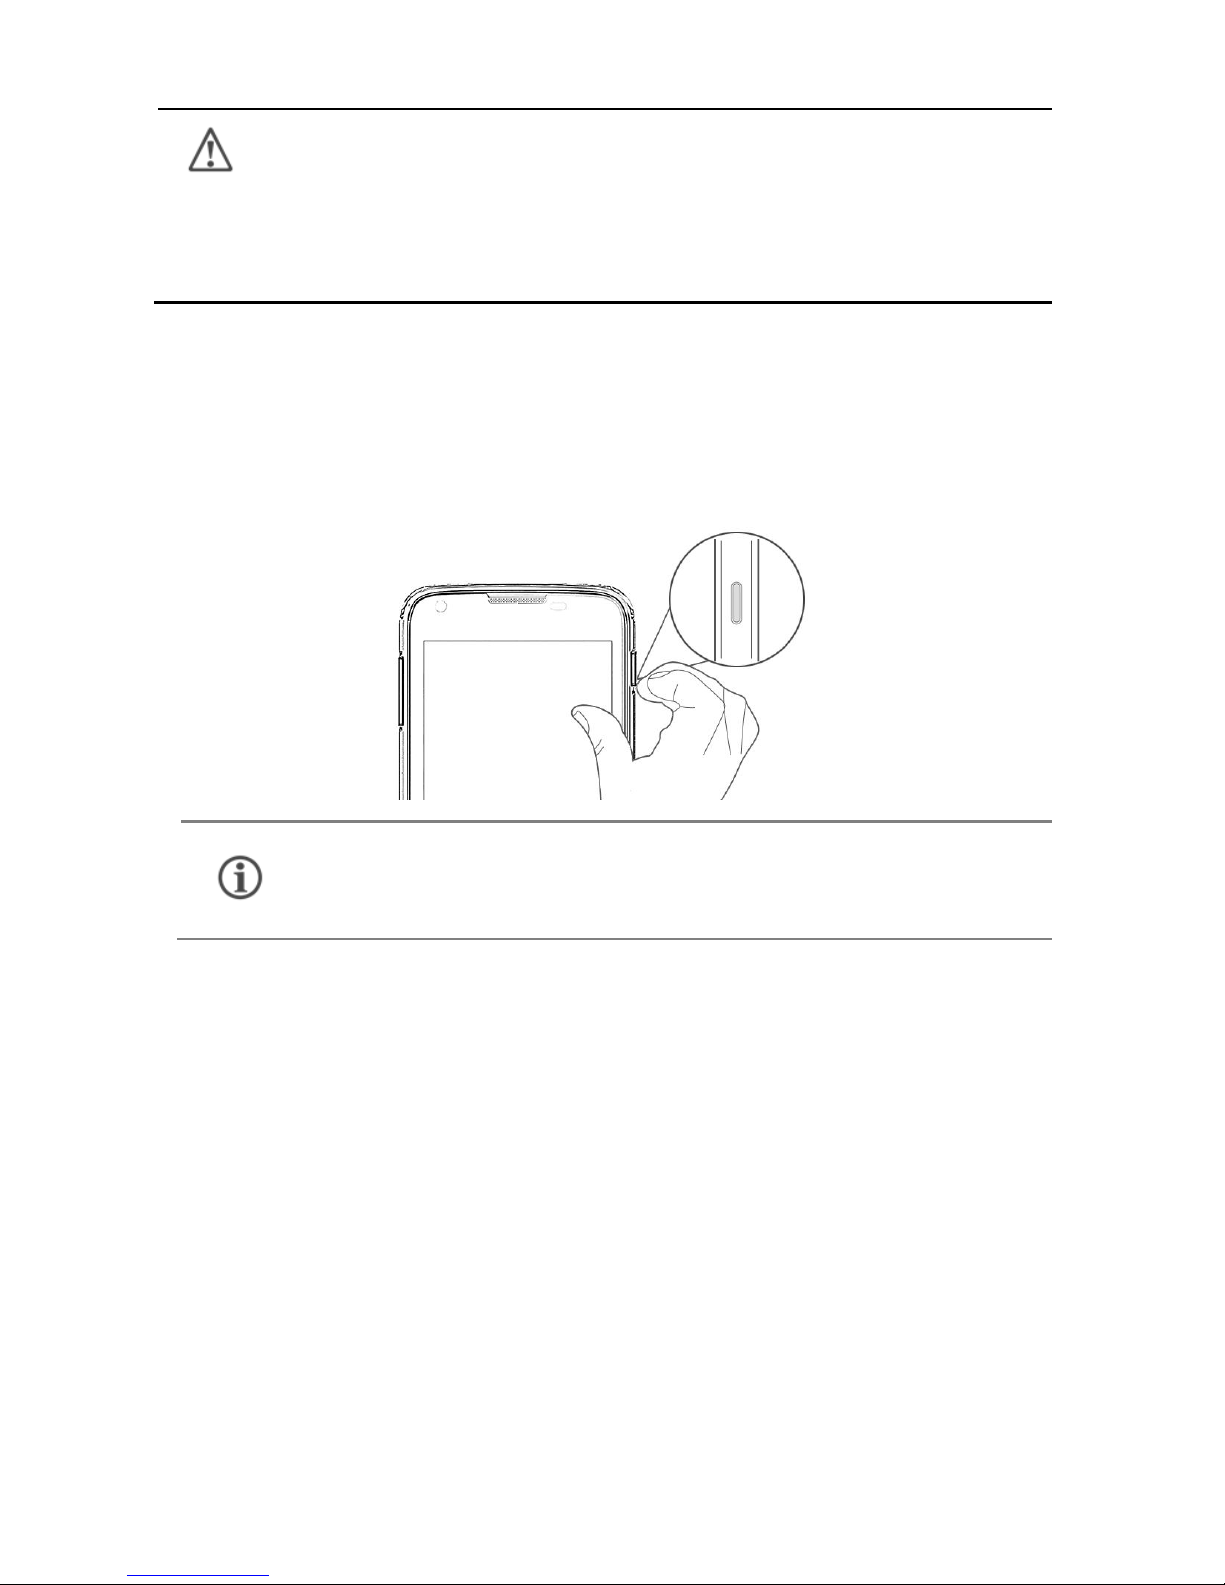
TURNING YOUR PHONE ON/OFF.........................................................7
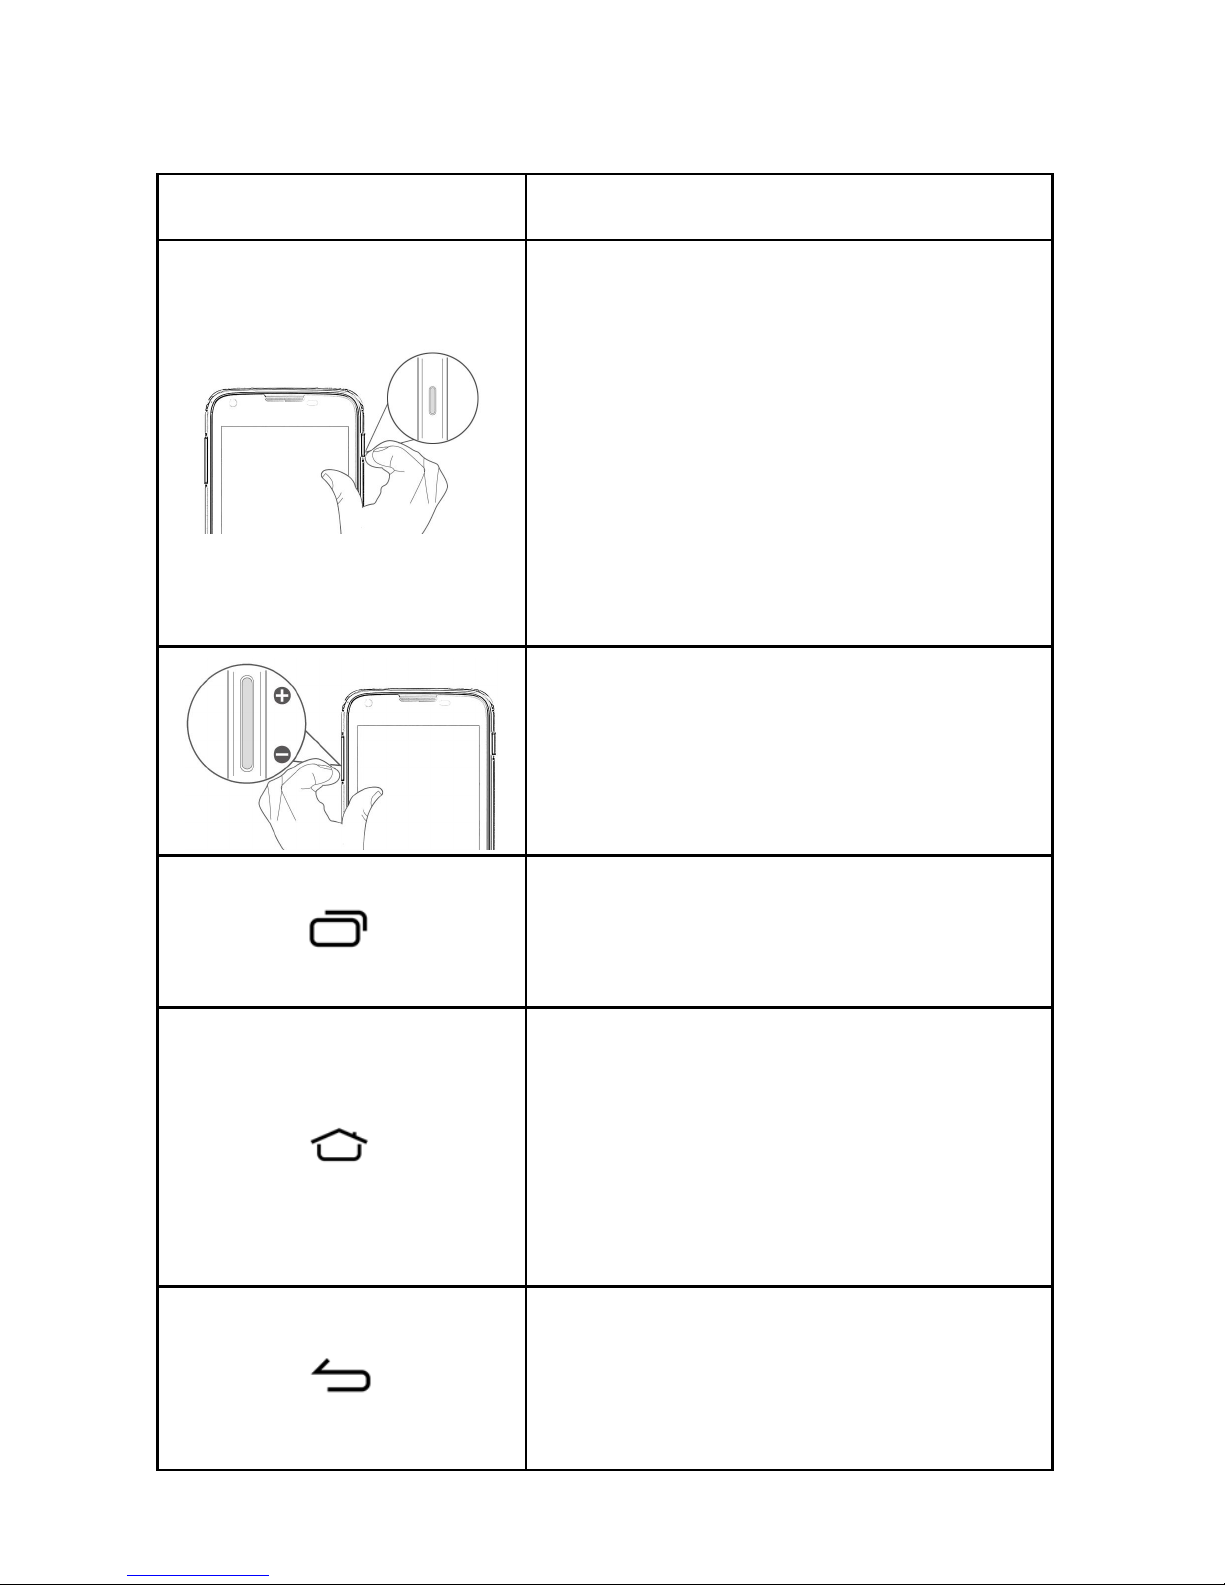
HANDSET KEYS.............................................................................................8
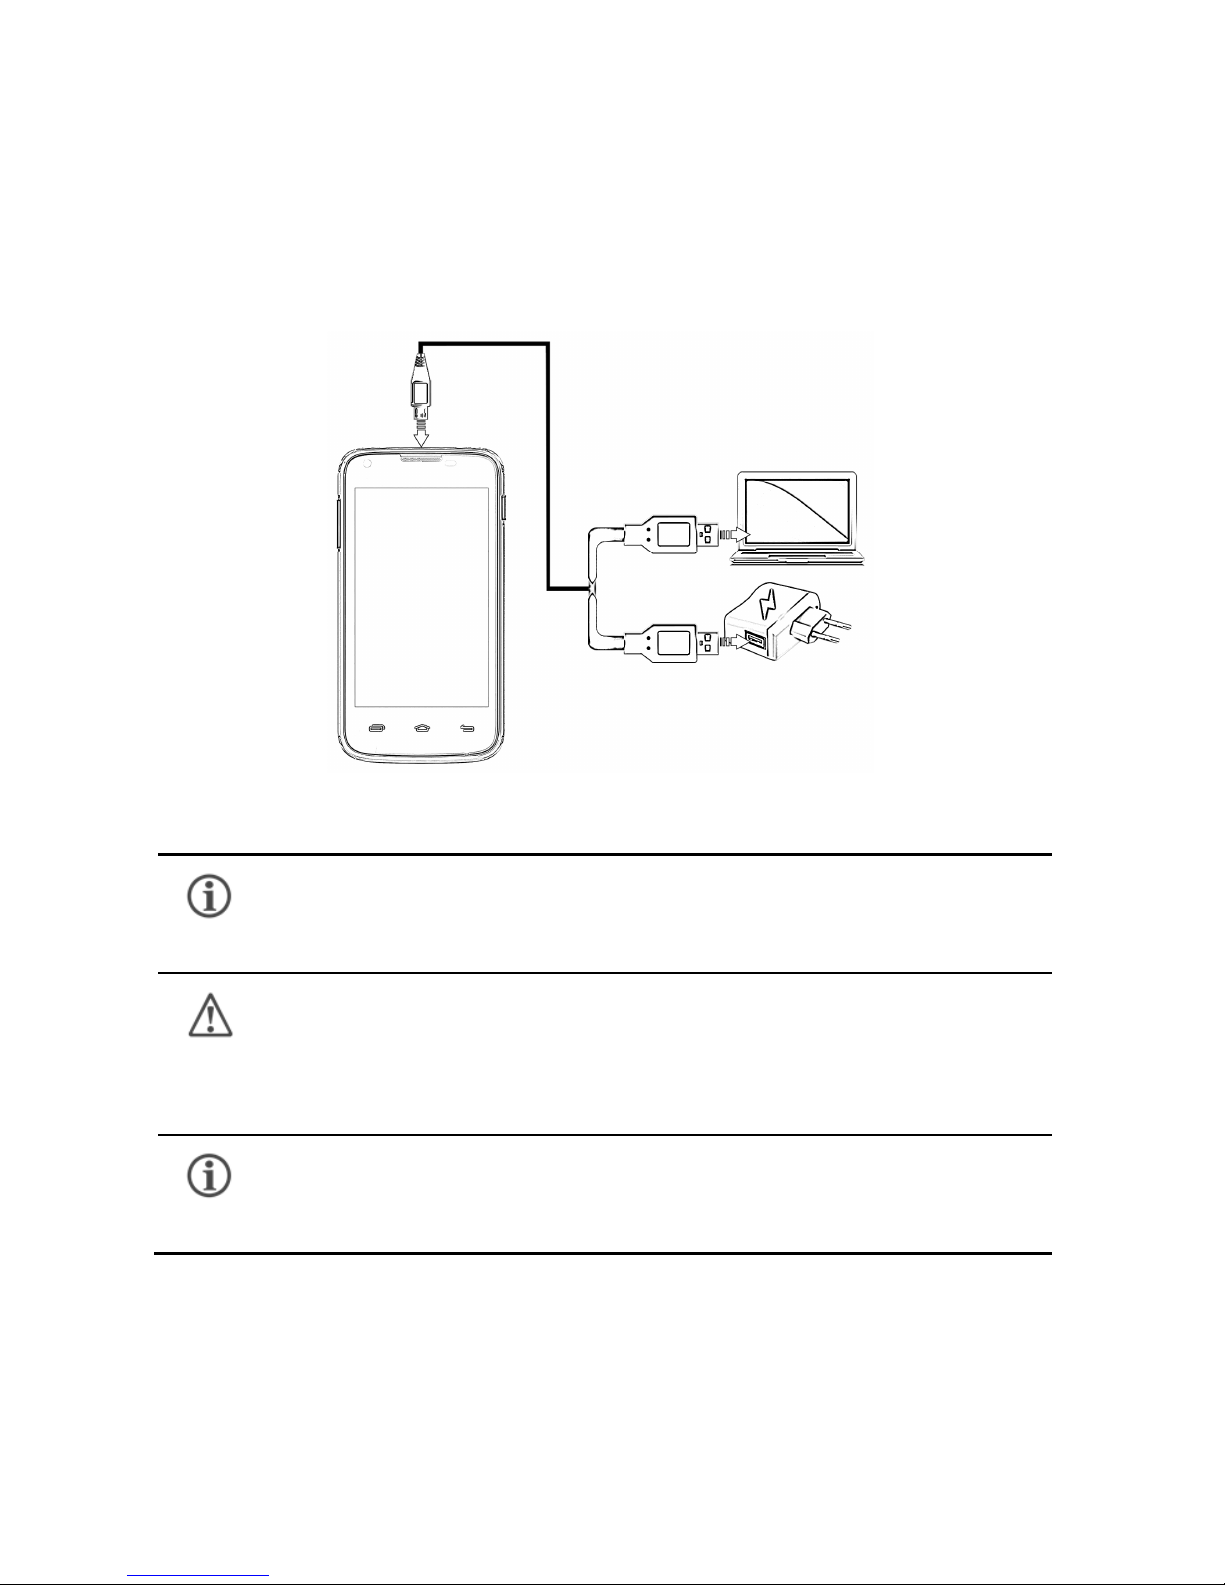
CHARGING THE BATTERY.........................................................................9
BASIC PHONE FEATURES ............................................................10
GOOGLETM ACCOUNT.............................................................................10
HOME SCREEN...........................................................................................11
APPLICATION LAUNCHER.......................................................................12
NOTIFICATIONS ..........................................................................................13
GRAVITY SENSOR.....................................................................................14
PHONE LOCKING TECHNIQUES ..........................................................15
USE GOOGLE TM SEARCH.....................................................................17
USING THE TOUCH SCREEN ........................................................18
TAP AND HOLD...........................................................................................18
DRAG AN ITEM............................................................................................18
SCROLL..........................................................................................................19
SWIPE.............................................................................................................19
USING THE PINCH ZOOM.......................................................................20
DOUBLE-TAP................................................................................................20
USING THE ONSCREEN KEYBOARD..................................................21
TASK MANAGER.........................................................................................22
CALLING AND MESSAGING ..........................................................23

A092 2
MAKE A CALL...............................................................................................23
CONTACTS....................................................................................................23
VIDEO CALL..................................................................................................24
IN CALL OPTIONS......................................................................................25
AIRPLANE MODE........................................................................................26
SEND MESSAGE.........................................................................................26
MULTIMEDIA ...................................................................................27
CAMERA.........................................................................................................27
GALLERY.......................................................................................................27
MUSIC PLAYER...........................................................................................28
FM RADIO.....................................................................................................29
SETTINGS,NETWORKS,AND APPLICATIONS............................30
CONNECT TO THE INTERNET...............................................................30
TETHERING &PORTABILITY.................................................................31
PAIR WITH BTDEVICES.........................................................................32
CONFIGURING E-MAIL............................................................................32
GOOGLETM MAPS......................................................................................33
MANAGE APPLICATIONS ........................................................................34
SAFETY PRECAUTIONS.................................................................35
TAKING CARE OF YOUR DEVICE..................................................36
BATTERY RECOMMENDATIONS ..........................................................37
RECYCLE YOUR PHONE.........................................................................37
COPYRIGHT.....................................................................................38

A092 3
The Android Advantage
Micromax A092 comes with Jelly Bean 4.3 that is capable of
performing various functions just like your personal computer and can
be personalized according to your own needs. For example, you can
add and remove applications or upgrade existing applications to
improve the functions. At the Android market, an ever growing range
of applications, games, movies, and books are available for you to
download.
Read Me First
Please read all safety precautions and this manual carefully
before using your device to ensure safe and proper use.
The descriptions in this manual are based on the default
settings of your device.
Available features and additional services may vary by
device, software, or service provider.
Applications and their functions may vary based on the
country, region, software or hardware specifications.
Micromax is not liable for performance issues caused by
third-party applications.
Disclaimer
The colors, specifications, functions and graphics
shown/mentioned in the user manual may differ from the
actual product. In such a case, the latter shall govern. Images
shown are for representation purpose only. Specifications
are subject to change without prior notice. Micromax keeps

A092 4
the right to modify the content in this user guide without
prior notice.
Upon first use of your device, your device will send
information related to your mobile, IMEI numbers, location
details and other software details through SMS*
automatically. This information may be used as further
specified in Micromax privacy policy**.
Talk and standby times are affected by network preferences,
type of SIM cards, connected accessories and individual
usage patterns. Services and some features may be
dependent on the network, service/content providers, SIM
cards, compatibility of the devices used and the content
formats supported.
Other product logos and company names mentioned herein
may be trademarks or trade names of their respective
owners.
*Operator tariff shall be applicable for SMS.
**Micromax privacy policy is available at www.micromaxinfo.com.

A092 5
Understand Your Phone
Getting Started
SIMCardInsertion
Your A092 is a dual SIM phone. Insert the SIM card in the SIM slots
correctly.
To insert the SIM card:
1. Switch off your phone and remove the rear cover and
battery, as illustrated in the following image:
2. Insert the SIM card(s) correctly in the card slot(s), as

A092 6
illustrated in the following image:
3. Place back the battery and rear cover.
Please keepthe SIM card out of the reach of children.
The card and the contacts are vulnerable to damage due
to scratching or bending. Therefore, be careful when
using, inserting or removing the cards
Memory CardInsertion
To store additional multimedia files, you must insert amemory card
into the handset.
To insert memory card:
1. Switch off the mobile phone, and then remove the rear
cover and battery.
2. Insert the memory card into the slot, as illustrated below:
3. Place back the battery and rear cover of the mobile phone.

A092 7
Use only compatible memory cards approved by Micromax
with this device. Incompatible memory cards may damage
the card or the device and corrupt the data stored in the
card.
Turning Your Phone On/Off
Press and hold the Power key for a few seconds to switch on/off the
phone.
To restart your phone, long press the Power key and
selectReboot.

A092 8
Handset Keys
Keys Functions
Long press to switch on or
switch off the phone.
Press once to turn off the screen
or to wake up the screen.
Press for 2 seconds to view quick
options to turn off the phone,
reboot the device, switch to
airplane mode, or adjust the
sound profiles.
Adjust the phone volume from
the volume keys available on the
left side of the device.
Opens a menu with items that
affect the current screen or
application.
Opens the Home screen. If you
are viewing the left or right
extended Home screen, opens
the central Home screen.
On long tap, opens the most
recently used applications.
Opens the previous screen you
were working on.
If the onscreen keyboard is open,
closes the keyboard.

A092 9
Charging the Battery
Before using the device for the first time, you must charge the battery.
You can charge the device with a travel adapter or connecting the
device to a PC with a USB cable.
You can also use a compatible USB charger to charge your
battery.
Use only Micromax approved chargers and cables.
Unapproved chargers or cables can cause battery to
explode or damage your device.
We suggest you charge the battery for 4 hours
continuously for the first time.

A092 10
Basic Phone Features
GoogleTM Account
Your GoogleTM Account lets you take full advantage of applications
and services offered by GoogleTM Android market. Configure your
GoogleTM account on this handset to get access to your GoogleTM
mails, GoogleTM Play Store, GoogleTM Maps, andmuch more.
GoogleTM account setup will be prompted when you turn on your
handset for the first time.
Network connection will be required for the GoogleTM
account setup step to appear.
However, you may configure your GoogleTM account at any later stage
from →→Add account →Google. Follow the registration
steps to successfully configure your mail account on the device.
If you do not have an existing GoogleTM account, you
may create one from the account configuring step.
You may add various other accounts, depending on
your applications.

A092 11
Home Screen
You can personalize your home screen with shortcuts, widgets,
wallpapers and other items. Swipe left or right on the home screen to
view the next extended home screen. Your A092 has five home
screens including one center home screen and four extendedhome
screens.
In the bottom pane, there will be five launcher icons for you to open
different sections in the phone. Except the application launcher in
the middle of the pane, you can rearrange and manage the other four
icons. Tap and hold to select a launcher icon and then you can
rearrange, change, or remove them with ease.

A092 12
Application Launcher
Application launcher or Application menu is available right in the
middle of the home screenbottom pane.
Tap to view all inbuilt and installed applications and widgets. In
the application menu, tap and hold any application/widget to take it to
the home screen; release the hold to place at any desired location on
the home screen.
Widgets allow placing application shortcuts on your home screen. You
can place analog clock, your recent call logs, and other such sections
of your phone on the home page and access them directly! View all
available widgets by tapping the WIDGETS tab in the Application menu
screen or just swipe through the menu icons to the widgetsscreen.

A092 13
Notifications
Notification icons inform you of new messages and events as and
when it appears in the device.
Open Notification Panel
Close Notification Panel
Open the Toolkit
Clear all Notifications

A092 14
When a notification is received, its icon appears in the status bar,
along with a brief summary. You may clear each notification
separately by swiping it towards left or right.
Toolkit provides you shortcuts to manage basic phone features, such
as Airplane Mode, Wi-Fi, Display Brightness, andmany more.
Gravity Sensor
Your phone has gravity sensor to detect gravity and display correct
orientation based on the motion.
You can enable/disable the auto-rotate feature from →→
Display →Auto-rotate screen.
Or
You can enable/disable the auto-rotate feature by dragging down the
notification panel, tapping , and then select AUTO ROTATE.

A092 15
Phone Locking Techniques
You may need to provide PIN, password, draw a pattern, take your
face in front of the phone screen, or simply slide to unlock your phone.
Slide unlock will be the default unlocking method in the phone. To
unlock the screen:
1. Press the power key to wake up the phone.
2. Hold and drag the lock icon towards the unlock icon.
Face Recognition
Look at your phone to unlock it!
Allowing you to keep
your face as screen
unlocking password. You
just need to press the
power key once and then
look at your phone to
unlock it.
PIN
Enter your PIN tounlock your phone!
You may enter a PIN and
set it as your screen
unlocking password.

A092 16
Pattern
Set and draw your desired pattern!
You can set your own
pattern by connecting
the dots to prevent your
phone from unauthorized
access.
Password
Enter your password to unlock!
You may enter any
desired password and
set it as your screen
unlocking password.
Slide
Slide from lock icon to unlock icon!
Just wake up the screen
and slide the lock icon
towards the unlock icon
to unlock your phone.
You may set any desired locking technique from →
→Security →Screen lock.

A092 17
You can disable all unlocking methods from your handset by selecting
the None option.
Use GoogleTM Search
Search anything in your phone or in the outside world from GoogleTM
Search. You can type your search keywords or can even speak it up as
your search supports voice recognition also. Use voice commands to
access various useful sections on your handset.
GoogleTM Search is available on the home screen and in the
application menu too.
To use GoogleTM voice search, tap and speak your search
keywords. The phone will return the GoogleTM search results based on
your input.
It is important to remember your screen lock
password/pattern/PIN.

A092 18
Using the Touch Screen
Tap andHold
Tap and hold an item to view the list of actions based on the selected
item and condition. Also, you can move an item from the Apps screen
to the home screen using this method, as shown in the following
image:
Drag anItem
Tap and hold an item and move your finger on the screen until you
reach the target position. The item follows your finger.

A092 19
You can generally drag items from one location to another on the
home screen. Also, you can delete items from the home screen by
holding the item and dragging it to the Remove label that becomes
available only when you hold the item on the Home screen.
Scroll
To scroll a list, slide your finger across the surface of the screen
upwards or downwards (without dragging an item).
Swipe
Place a finger on the screen and steadily slide your finger in the
desired direction.
For example, when you are viewing a picture, to view the next picture,
swipe left.

A092 20
Using the Pinch Zoom
You can open any image or web page and then use your thumb and
index finger to zoom the display through the pinch gesture as
illustrated in the following image.
Double-tap
Tap quickly twice on a webpage, map, or other screen to zoom. For
example, double-tap a section of a webpage in the browser to zoom
that section.
Other manuals for A092
1
Table of contents
Other Micromax Cell Phone manuals

Micromax
Micromax X512 User manual

Micromax
Micromax Q427+ Reference guide

Micromax
Micromax X086 User manual

Micromax
Micromax q36 User manual

Micromax
Micromax Ninja A91 User manual

Micromax
Micromax Q427+ User manual

Micromax
Micromax A190 Manual

Micromax
Micromax Bolt A075 User manual

Micromax
Micromax A96 User manual

Micromax
Micromax X245 User manual

Micromax
Micromax A66 User manual

Micromax
Micromax E471 Manual

Micromax
Micromax A73 User manual

Micromax
Micromax A99 User manual

Micromax
Micromax X771 User manual

Micromax
Micromax Canvas 2 User manual

Micromax
Micromax A065 User manual

Micromax
Micromax X235 User manual

Micromax
Micromax X249 User manual

Micromax
Micromax X377 User manual