Midland BT RIDER Manual


1
ENGLISH
Instruction guide
Thanks for purchasing the Midland BT-Rider.
In this guide you will nd all the information you may need to get the
best performances from this device.
The package contains:
• 1 Bluetooth main unit
• 1 clamp for helmet xing
• 1 wall charger 230 V AC
• mounting kit: allen wrench, velcro and extension pads.
Bluetooth Headset
The unit allows the connection with a Bluetooth mobile phone, Bluetooth
transceiver (Midland 445 BT), Bluetooth adapter BPA 100 or navigation
units like Garmin Zumo or TOM TOM Rider.
2Make sure that the main unit is fully charged prior to initial use.
Allow al least 4-5 hours for a full charge before using for the rst
time.
2The headset must be paired to another suitable Bluetooth device
before rst use. This can be a cellular phone, transceiver or
navigation system with Bluetooth inside or via Bluertooth adapter
BPA 100.(refer to chapter “Pairing process” for further information).
2 The headset function uses the AGC technology, that automatically
increases the volume according to the background noise.
2 If the unit is paired to a cellular phone, just remember that the “voice
recognition answer” to incoming call is enabled by default (refer to
chapter “Voice recognition (VR)” for further information).
Technical specication
Technology ............................................................Bluetooth® ver. 1.2
Maximum distance................................................................about 10m
Battery life in conversation ......................................................about 7h
Battery life in stand-by ................................................. about one week
Charging time ..................................................................... about 4-5h
IMPORTANT
MIDLAND BT-Rider is a water-resistant device, designed for
safe use under rainy conditions. However, the headset is not
totally waterproof and it is not recommended under heavy rain
conditions.
In any event, the silicone cover protecting the charging jack
should always be tightly closed.

2
Detailed view of the BT-Rider
Main unit
Buttons
The buttons on the communication units lets you enable Bluetooth
connection and telephone functions They can be activated in two
different modes:
• Short pressure: push the button less than one second
• Longer pressure: push the button for more than 3 seconds
Fixing plate with microphone and speaker
Charging batteries
Make sure that both units are fully charged prior to initial use. Allow at
least 4-5 hours for a full charge before using for the rst time. Normally
3-4 hours will suf ce for complete charge.
Charge the unit by inserting the wall-charger into the charging socket
(lift the rubber cover to insert the plug).
• The red LED on the BT-Rider will turn on when charging begins.
Allow the headset to charge until the red LED turns off.
• When the charge is complete, release the headset from the
charger.
Microphone back-plate of the clamp (press on
arc to release the headset unit)
Sliding-plate of the clamp Earphone
center CTRL button side Function key
for call reject, call ter-
mination and redial
Charging socket
Volume - Volume +

3
ENGLISH
Attaching and removing the BT-Rider from your
helmet
Installation
The installation is very simple:
• The clamp serves as the base for the communication unit and must
be attached to your helmet before using the device.
• Use the enclosed Allen Wrench to loosen the 2 screws of the clamp
(Picture 1). Then slide the back-plate of the clamp between the
internal padding and the external shell of the helmet (Picture 2). In
case the external shell of the helmet is too thick, use the optional
extension pad.
As a special accessory, for some helmets a special clamp with extra
long microphone boom is available.
• Before fastening the screws, make sure to adjust the clamp’s
location to an ideal position, i.e. to the spot where the attached
speaker sits opposite your ear and the microphone is located in
front of your mouth (Picture 3). You may need to re-position the
clamp repeatedly until you identify the ideal spot. The speaker can
be easily placed into position and removed by means of the supplied
velcro layer that attaches to the inner padding of you helmet.
The microphone must be placed in in front of your mouth. It can also be
slightly adjusted to suit your helmet. Make some tests to nd optimal
position.
• Once you have identied the ideal position for microphone and
speaker, use the Allen Wrench to fasten the clamp.
• Now slide the headset downwards along the sliding panel of the
clamp (Picture 4) until a sotf clicking sound indicates that the
headset is properly locked into place.
Picture 3
back-plate
Picture 1 Picture 2
Picture 4

4
Removing the communication unit from your helmet
• To remove the unit from the clamp press gently your nger against
the arched tip of the back-plate and use the other hand to slide the
headset upwards along the sliding-panel (Picture 5).
Switching on and off
To turn on the headset, hold the CTRL button down for about 6 seconds
until the blue LED ashes three times and an ascending alert tone is
heard. Then release the button.
To turn off the headset, hold the CTRL button down for about 3 seconds
until the red LED ashes three times and a descending alert tone is
heard.
Pairing process
The pairing process allows the units to identify each other.
Pairing the mobile phone
The unit can be paired to a Bluetooth mobile phone in order to make/
receive phone calls.
Follow the procedure below to pair the unit to a Bluetooth mobile
phone:
1) Turn on the phone and activate its Bluetooth function.
2) The distance between the headset and the mobile phone must be
within 10 meters.
3) With the unit turned off, press and hold the CTRL button until the
blue and red LEDs begin alternating rapidly.
4) On your phone, search for Bluetooth devices by following your
phone’s instructions. Usually this is done by selecting the Search or
Discover option in the Bluetooth or Connection menu.
5) After a few seconds of searching, your phone will list “Midland-BTR” as
a discovered device. Select it and follow your phone’s instructions
to accept pairing.
6) When prompted by your phone, enter 0000 (4 zeros) as your PIN or
passkey.
7) Your phone will conrm that pairing has succeeded.
The described pairing method is similar with navigational units. Navi-
gational units have often dual channel Bluetooth modules which can
be paired with a GSM phone and separately with a Bluetooth headset.
Midland transceivers like 445 BT and our Bluetooth Adapter BPA
know already the PIN code of BT Rider and there is no need to enter
this codes- it will pair automatically after pairing start.
2If pairing is not completed within 2 minutes, the unit will return to
stand-by mode (ashing blue every 3 seconds). To pair again, turn
off the unit by pressing the CTRL button until the red LED ashes 3
times and repeat the process as indicated above.
Picture 5

5
ENGLISH
Reconnecting the unit to a paired phone
Although you may have previously paired your unit to your phone,
each time you turn one of them off, some phones require that you
re-establish the connection. Reconnecting may also be necessary
when your headset and phone have lost the radio signal because the
distance between them has exceeded 10 meters.
After you have turned on your mobile phone, there are several methods
to re-establish the connection:
2In most cases turning on the unit reconnects it automatically to the
phone.
• With some mobile phones you need to re-establish the link to
your headset by using your phone’s menu. Please refer to your
mobile phone’s manual for operating instructions.
• Assuming your mobile phone features voice activation, tap the
CTRL button on your BT-Rider. This will activate your voice
dial function on the phone, indicating that the connection is
established.
• Do nothing. Once a call is received, answer by tapping the CTRL
control.
Handling phone calls
2 Certain advanced features of Midland BT Rider are only accessible
to phones equipped with the hands-free pro le. Check your phone’s
manual to nd out if it supports this kind of pro le.
Initiating calls from the phone’s keypad
a. Dial the phone number on the keypad of your phone.
b. Press “Talk” or “Send” on your phone to dial the number.
Voice dialling
Make sure your phone is on but no call is in progress.
Tap the CTRL button and listen for a tone. Now pronounce the name
of the party you want to call and wait for feeback from the phone. The
type of feedback depends on your phone.
2The best performances of this function will depend on the type of
helmet you use (close or open) and on the speed. Make some tests
in order to nd the optimal condition.
Answering calls
The ring tone volume for incoming calls increases gradually. When you
hear the ring tone (on the headset), there are 2 ways to answer the
call:
• Short press the CTRL button on your headset once.
• Say loudly any word of your choice (e.g.: ‘Yes’ or ‘Answer’). If you
do not utter any word within 7 seconds after hearing the rst ring-
tone, the call will be automatically rejected and the headset will stop
ringing.
Terminating calls
To end a call, just tap the Side Function knob of the unit, a beep tone
will con rm the termination. If the other party terminates the call rst,
you don’t have to do anything.
2Phones without handsfree protocol require pressing CTRL button,
to terminate the calls
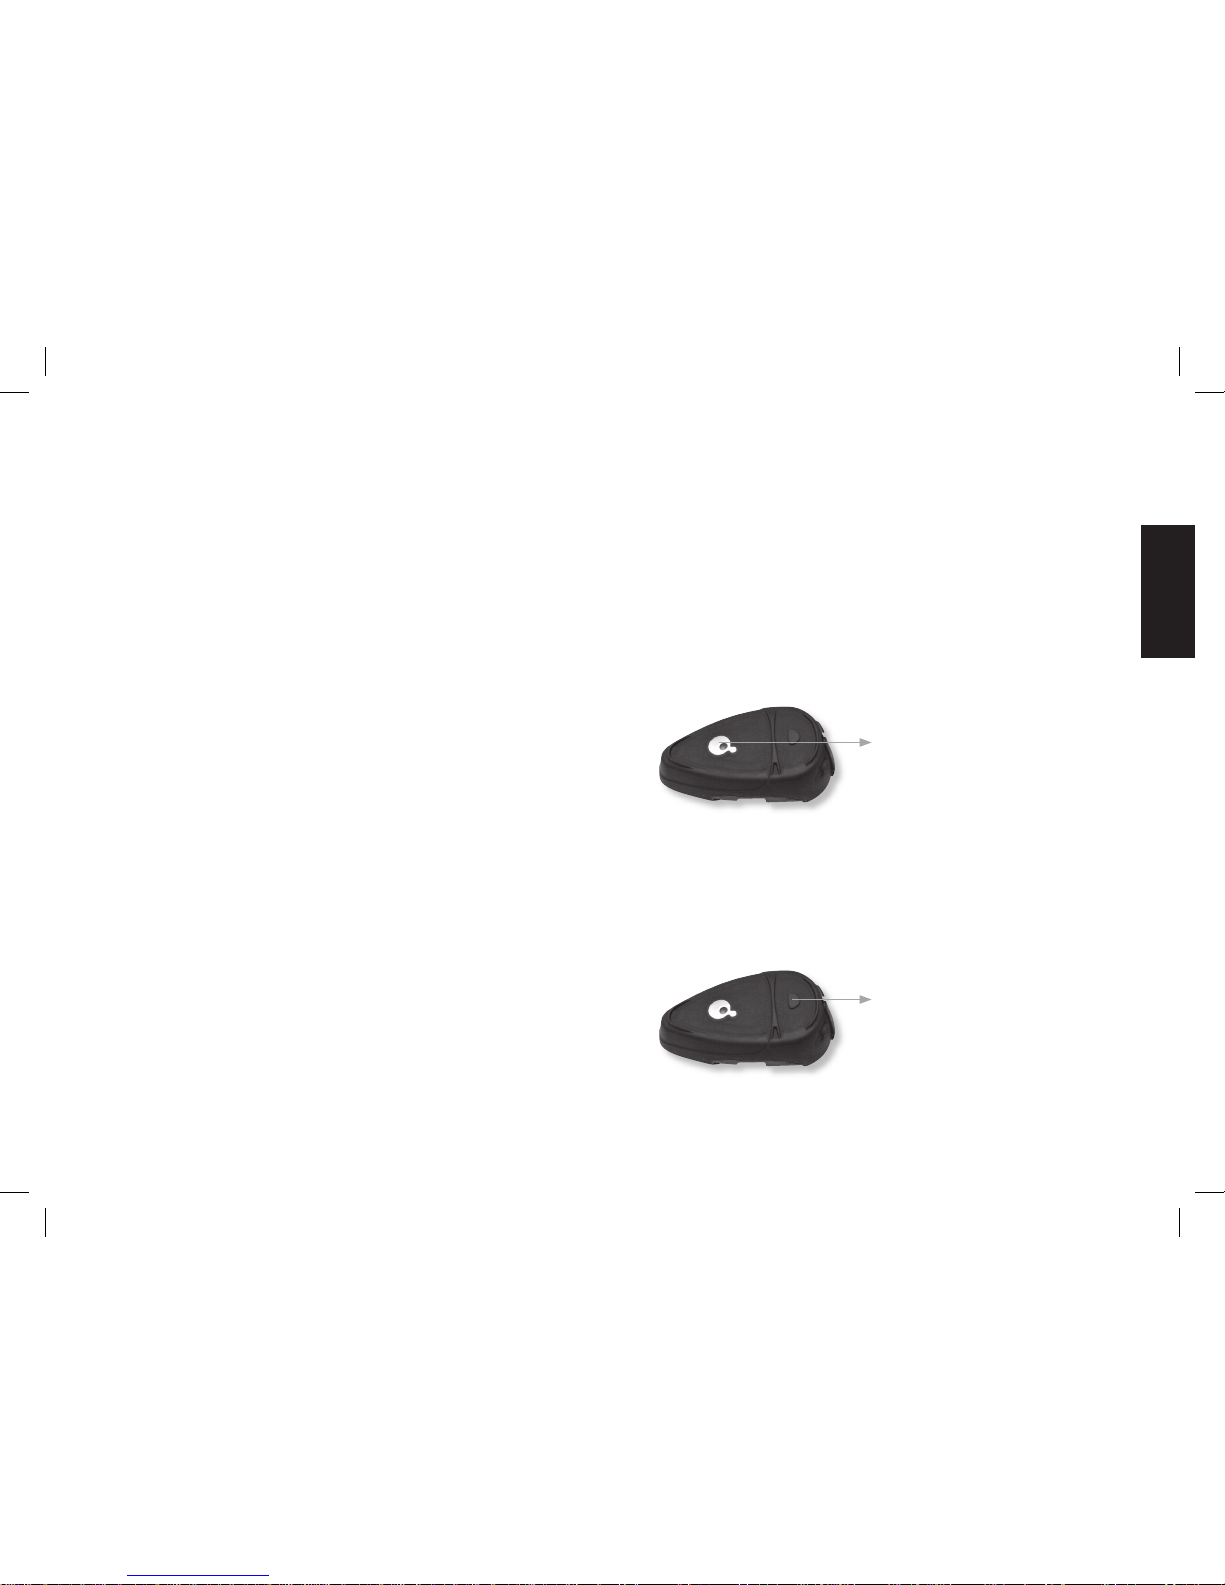
Press here to answer
the call (center control button)
Press here to terminate
the call (side function
button)

6
Call reject
While you hear the ring tone on the headset, there are two ways you
can reject the call:
• Press the Side Function knob on your headset.
• Remain silent for at least 7 seconds.
Redial
While the BT Rider is in stand-by, tap the Side Function knob on your
headset to redial the last number.
Voice recognition (VR)
The VR feature (voice recognition) allows you to answer or reject
incoming calls by voice control without having to remove your hands
from the handlebars. By default this feature is enabled.
To deactivate this function: keep pressed simultaneously the Up and
Down volume for 3 seconds. You will hear two descending beep tones
con rming the deactivation of the function. To activate it again, follow
the same procedure, you will hear the beep tones ascending.
2 The best performances of this function will depend on the type of
helmet you use (close or open) and on the speed. Make some tests
in order to nd the optimal condition.
2 With the Voice Recognition feature disabled, you can answer the
incoming call only pressing the CTRL button.
Attention! The Voice Recognition enable/disable feature effect only
the phone call answering.
Volume control
Midland BT Rider comes equipped with AGC technology to automatically
adjust the speaker volume to the optimal level based on ambient noise
and driving speed.
You may manually adjust the volume by pressing the volume buttons
one step at a time. For each volume step you adjust, you will hear a
short beep.
The AGC function for automatic volume adjustment, has the
priority over manual volume setting.
Press here to reject
the call or initiate redial
(side function button)
Volume -
press to decrease the
volume
Volume +
press to increase the
volume

7
ENGLISH
LIGHT AND SOUND SIGNALS – Headset
LED indication Status
None Headset switched off
Triple blue ash Headset being turned on
Triple red ash Headset being turned off
Single blue ash every 3 seconds Standby (not on a call)
Double blue ash every 3 seconds Active (on a call or initiating a connection)
Rapid red-blue alternating ash Pairing mode
Single red ash every 3 seconds Low battery while in stand-by
Double red ash every 3 seconds Low battery while a call in progress
Steady red Charging
Steady red turns off Battery is fully charged
Audio signals Status
Ascending tone (low-high) Headset or Voice Recognition being turned on
Descending tone (high-low) Headset or Voice Recognition being turned off
1 tone acknowledge tone for call rejected or other key entries
HEADSET FUNCTIONS
MOBILE PHONE If you want to… … do this
Turn on the unit Press the Control button for 6 seconds at least
Turn off the unit Press the Control button for 3 seconds at least
Answer a call Short press of the Control button / say a word
Reject a call Short press the side function button / remain silent for 7 seconds
Terminate a call Short press the side function button
Increase the volume Short press of the Volume Up control
Decrease the volume Short press of the Volume Down control
Voice Dial In stand by mode, press quickly the Control button and state the name
of the person to call.
Redial In stand by mode, short press the side function button

8
European CE Notice Certication and Safety
Approvals Information
This product is CE marked according to the RTTE Directive (99/5/EC).
and is free use in all the EU countries.
Users are not permitted to make any changes or modications to the
device. Modications which are not expressly approved by the producer
invalidate the warranty card.
Designed and Manufactured for Midland by:
For further information, please go to our website
www.midlandradio.eu
ALAN UK
Unit 2, Callenders, Paddington Drive,Churchward Park, Swindon, Wiltshire,
SN5 7YW United Kingdom

Table of contents
Other Midland Headset manuals

Midland
Midland BT City User manual

Midland
Midland MA46 User manual

Midland
Midland BT MINI User manual

Midland
Midland Cardo BT Rider FM Manual

Midland
Midland BT GO Manual

Midland
Midland BTNEXT PRO User manual

Midland
Midland BT Sport User manual

Midland
Midland BT GO Manual

Midland
Midland BT Sport User manual

Midland
Midland DUAL HEADSET User manual