Miele B 890 Manual

TECHNICAL INFORMATION
B 890 and B 990 Rotary Irons (US Models)
© 2011 Miele USA

Technical Information
2
B 890/B 990
Table of Contents
AWarning and Safety Instructions ............................................................5
1General...................................................................................................... 5
2Touch Current Measurement..................................................................... 6
3Risk of Injury Due to Tilting Mechanism .................................................... 6
BModification History.................................................................................6
CTechnical Data.......................................................................................... 7
DLayout of Electrical Components ...........................................................9
010Stand .......................................................................................................11
2Function................................................................................................... 12
2.1Main Electronic ............................................................................ 12
2.2Transformer ................................................................................. 13
2.3Foot Switches (2S26 and 2S27) .................................................. 13
3Fault Repair ............................................................................................. 14
3.1Foot Switch Does Not Operate the Roller.................................... 14
4Service..................................................................................................... 14
4.1Foot Switch (2S26, 2S27) Removal............................................. 14
4.2 Main Electronic (N2) Replacement .............................................. 14
4.3Transformer Removal .................................................................. 16
4.4Transformer Replacement, Base/Stand Reassembly.................. 16
4.5Bowden Cable Replacement ....................................................... 17
4.6Handle Replacement ................................................................... 19
020 Heater Plate ............................................................................................21
2Function................................................................................................... 22
2.1Heater Circuit............................................................................... 22
2.2Finger Guard Switch .................................................................... 23
3Fault Repair ............................................................................................. 23
3.1When Pressing the Foot Switch: Roller Rotates, No Heater Plate
Function ....................................................................................... 23
4Service..................................................................................................... 24
4.1Tilting the Ironing Table Horizontally ........................................... 24
4.2Opening the Heater Plate Cover.................................................. 24
4.3Insulation Matting Removal ......................................................... 25
4.4Heater Element Replacement...................................................... 25
4.5Temperature Regulator Sensor (1B2/10) Replacement .............. 25
4.6High-Temperature Cutout (2B2/10, 3B2/10) Replacement.......... 26
4.7Finger Guard Switch (F6/5) Removal .......................................... 27
030Heater Plate Motor .................................................................................28
2Function................................................................................................... 29
2.1Motor Operation........................................................................... 29
4Service..................................................................................................... 30
4.1Microswitch (S26, S27) Removal................................................. 30

Technical Information
3
B 890/B 990
4.2Heater Plate Motor (M18) Removal ............................................. 30
4.3Hinge Pressure Spring Setting/Adjustment ................................. 30
035 Lifting Arm .............................................................................................. 32
3Fault Repair ............................................................................................. 33
3.1Emergency Release Does Not Allow Laundry to Be Removed ... 33
3.2Heater Plate Cannot Be Lowered Completely ............................. 33
4Service..................................................................................................... 33
4.1Leaf Spring with Holder Replacement ......................................... 33
040 Roller.......................................................................................................35
3Fault Repair ............................................................................................. 36
3.1Laundry Not Taken In .................................................................. 36
3.2Roller Does Not Turn or Only Turns with Difficulty ...................... 36
3.3Roller Does Not Turn ................................................................... 36
3.4Roller Stops or Heater Plate Does Not Start ............................... 36
4Service..................................................................................................... 37
4.1Roller Removal ............................................................................ 37
4.2Ironing Cloth Replacement .......................................................... 38
050 Roller Motor ............................................................................................ 39
2Function................................................................................................... 40
2.1Roller Drive/Motor........................................................................ 40
2.2Control Electronic ........................................................................ 40
3Fault Repair ............................................................................................. 41
3.1Noisy Operation in the Bearing Flange........................................ 41
4Service..................................................................................................... 41
4.1Control Electronic (A1) Removal ................................................. 41
4.2Drive Shaft Removal.................................................................... 42
4.3Bearing Flange Removal ............................................................. 42
4.4DC Motor Removal ...................................................................... 42
List of Figures
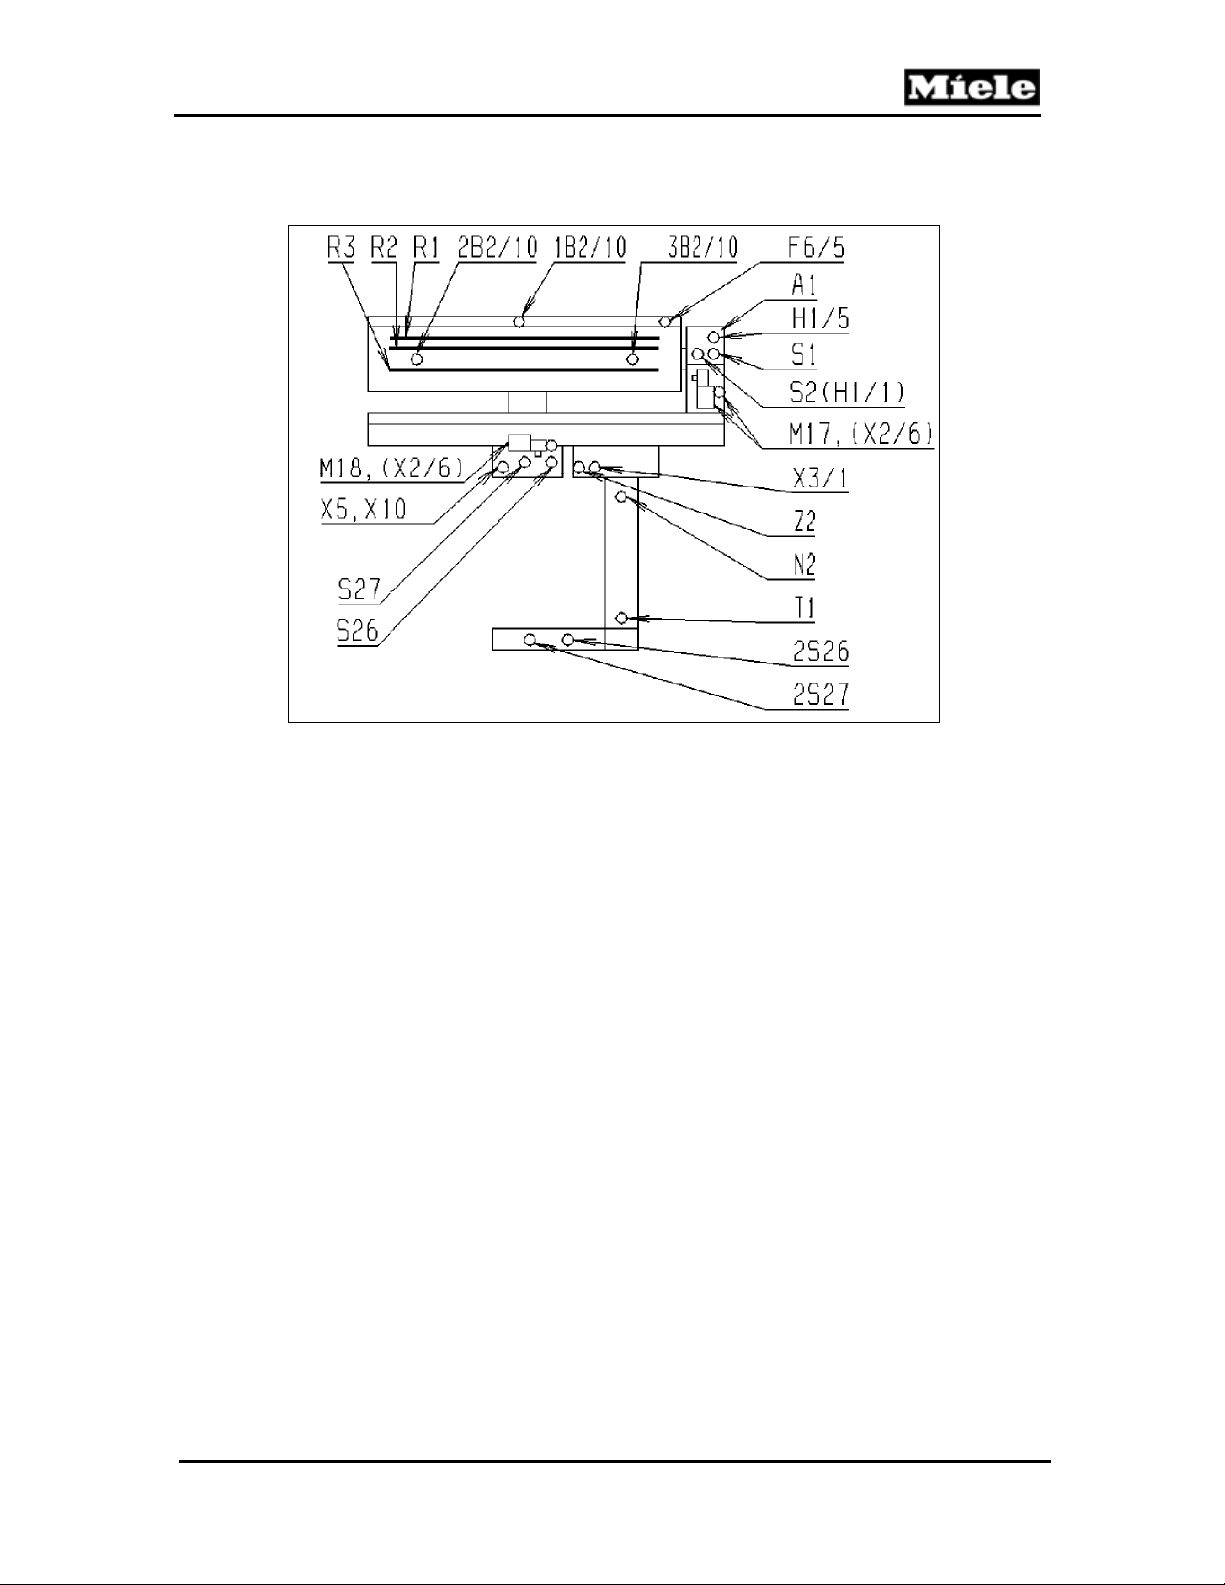
Figure D-1: Layout of Electrical Components ...................................................................9
Figure D-2: Overview of Rotary Iron ...............................................................................10
Figure D-3: Overview of (a) B 890 and (b) B 990 Controls .............................................10
Figure 010-1: Main Electronic N2, B 890 ........................................................................ 12
Figure 010-2: Main Electronic N2, B 990 ........................................................................ 13
Figure 010-3: Main Electronic Cover............................................................................... 15
Figure 010-4: Main Electronic Screw .............................................................................. 15
Figure 010-5: Bowden Cable and Plastic Hinge .............................................................18
Figure 010-6: Bowden Cable Holder and Pulley ............................................................. 18
Figure 010-7: Bowden Cable Pin .................................................................................... 19
Figure 010-8: Handle Removal ....................................................................................... 20
Figure 020-1: Heater Electrical Circuit ............................................................................ 22
Figure 020-2: Heater Temperature Control.....................................................................22
Figure 020-3: Finger Guard............................................................................................. 23
Figure 020-4: Handle (Locking Catch) ............................................................................ 24

Technical Information
4
B 890/B 990
Figure 020-5: Locking the Iron in Place .......................................................................... 24
Figure 020-6: Temperature Regulator Screws................................................................26
Figure 020-7: Finger Guard Switch ................................................................................. 27
Figure 030-1: Heater Plate..............................................................................................29
Figure 030-2: Hinge Pressure Spring Bolt and Cross Pin...............................................31
Figure 035-1: Leaf Spring and Holder.............................................................................34
Figure 040-1: Feed Board Removal................................................................................37
Figure 040-2: Roller Removal ......................................................................................... 37
Figure 050-1: Roller and Drive Components...................................................................40
Figure 050-2: Control Electronic A1................................................................................ 41
Figure 050-2: Screws Securing Roller Drive Motor to Frame .........................................43
List of Tables
Table C-1: US Technical Data ..........................................................................................7

Technical Information
5
B 890/B 990
A Warning and Safety Instructions
1 General
Service and repair work should only be carried out by suitably qualified
persons in accordance with all appropriate local and national safety
regulations.
Servicing, modification, testing and maintenance of electrical appliances
should only be carried out in accordance with all appropriate legal
requirements, accident prevention regulations and valid standards.
Do not work on the iron while it is carrying voltage. If this becomes
unavoidable, as in the process of locating faults, put extra safety measures
into place.
Before any service work is started, the machine must be disconnected from
the power supply.
Even with the machine switched off, supply voltage may be applied to some
components.
A general visual check should always be carried out.
After work has been completed, a touch current measurement should be
carried out on all accessible conductive parts that are not connected to
ground.
Danger!
There may be a risk of injury due to sharp edges. Protective gloves and
goggles should be worn and the edge protection, mat. no. 05057680,
should be used.
Danger!
Do not connect the rotary iron to an extension cord. Extension cords do not
guarantee the required safety of the appliance (e.g., danger of overheating).
Note:
If it is necessary to change the plug or power cord of the rotary iron, please
take note of the following color codes of the wires:
Green/yellow = Ground
Blue = Live 1
Brown = Live 2
Warning!
This appliance must be grounded.

Technical Information
6
B 890/B 990
2 Touch Current Measurement
Note:
Touch current measurement should be carried out on all accessible
conductive parts that are not connected to ground.
Warning!
Touch current measurement should only be carried out after the ground
connection of the appliance under test has been checked and found to be
satisfactory!
Dangerous voltages may exist on defective machines as well as on
accessible conductive parts that are not connected to ground!
Note:
No touch current measurement is necessary.
3 Risk of Injury Due to Tilting Mechanism
Warning!
When working on the appliance, the table and stand may tilt together/apart
unintentionally and this could cause injury.
The ironing table and stand are linked via a tilting mechanism. In its
transport (upright) position, the tilting mechanism is under tension; in its
working (horizontal) position, the tension in the table spring is released.
Before working on the appliance, tilt the ironing table into the working
(horizontal) setting and lock it in place.
When working under the ironing table, tilt the complete appliance
onto its back.
B Modification History
When Who What
3/8/2011 Jessica Naples Conversion for Website
11/10/2008 Liane Westerhelweg Version 4
8/19/2008 Liane Westerhelweg Version 3
11/20/2003 Olaf Meyer zu Drewer Version 2
6/29/1999 Jürgen Peller Version 1

Technical Information
7
B 890/B 990
C Technical Data
Model B 890, B 990
Type Transportable folding unit for domestic use
External dimensions, operating
position Height x width x depth: 37” x 39.4” x 16.4”
External dimensions, storage
(folded) position Height x width x depth: 41.8” x 16.4” x 16.4”
Weight Approx. 84 lbs
Max. floor load in operation 84 lbs.
Casing Extruded aluminum, powder-coated
Heater plate
Material Extruded aluminum
Surface Hard anodized
Length 32.7”
Ironing surface area 145.7 square inches
Ironing pressure 74 lbs
Temperature control Temperature regulator 86 - 392°F
Heating time to 392°F Approx. 2 min 45 sec
Roller
Length 32.7”
Diameter w/padding 6.3”
Roller base material Galvanized sheet steel
Roller padding Polyester needle felt
Roller cover Cotton nettle cloth
Roller speed 5 steps, from 6 to 15 ft/min
Drive: Roller/Heater plate
Motor (M17, M18) 24VDC, 60W motors (on rollers with geared drive)
Power ratings
Heating See data plate
Electrical connection 120VAC 60Hz (US models only)
Fuse rating 20A (US models only)
Current draw 13A (US models only)
Power cord NEMA 5-15 plug (US models only)
Total rated load See data plate
Test certificates VDE with CCA, EMV
Table C-1: US Technical Data

Technical Information
8
B 890/B 990
The appliance is supplied with a power cord and NEMA 5-15 plug, ready for
connection to an AC single-phase 120V 60Hz supply. The fuse rating is 20
amps. The actual amperage draw from the appliance is 13 amps.
All electrical work should be carried out by a qualified electrician in
accordance with local and national safety regulations.
Do not connect the rotary iron to an extension cord. Extension cords do not
guarantee the required safety of the appliance (e.g., danger of overheating).
Important!
If it is necessary to change the rotary iron’s plug or power cord, please
take note of the following color codes of the wires:
Green/Yellow = Ground
Blue = Live 1
Brown = Live 2
Warning!
This appliance must be grounded.

Technical Information
9
B 890/B 990
D Layout of Electrical Components
The layout for the B 890 and B 990 is also included in the wiring diagram.
Figure D-1: Layout of Electrical Components
A1 Control panel/electronic
B2/10 Temperature control, heater plate
F6/5 Safety switch, finger guard
H1/1 On/Off LED
H1/5 Heating LED
M17 Roller motor
M18 Motor, heater plate drive
N2 Main electronic
R1-R3 Heater elements
S1 Selector switch
S2 On/Off switch
S26, 2S26 Switch, heater plate off roller
S27, 2S27 Switch, heater plate on roller
T1 Transformer
X2/6 Plug connector, motor
X3/1 Terminal block
X5, X10 Coupling
Z2 Interference suppression capacitor

Technical Information
10
B 890/B 990
Figure D-2: Overview of Rotary Iron
(a) (b)
Figure D-3: Overview of (a) B 890 and (b) B 990 Controls

Technical Information
11
B 890/B 990
010 Stand

Technical Information
12
B 890/B 990
2 Function
2.1 Main Electronic
The B 890 and B 990 are equipped with two (2) separate electronic board
assemblies: the control electronic (A1), illustrated in Section 050-2.2, and the
main electronic (N2). The main electronic is located beneath a cover on the
top of the stand, and is responsible for providing power to components. See
Figures 010-1 and 010-2.
Figure 010-1: Main Electronic N2, B 890

Technical Information
13
B 890/B 990
Figure 010-2: Main Electronic N2, B 990
2.2 Transformer
The transformer is mounted to the base plate, and is covered by the stand.
The transformer is responsible for reducing voltage from 120VAC to 24VDC
for the electronic and several other components.
2.3 Foot Switches (2S26 and 2S27)
The foot switches are mounted below the foot plate and are actuated by the
user to engage the heater plate to the roller and to provide drive to the roller
assembly.
X1 X2
X3
X5 C1
K3
X6
K2
K1
K4
V1
C2
X4

Technical Information
14
B 890/B 990
3 Fault Repair
3.1 Foot Switch Does Not Operate the Roller
Cause:
Switch defective.
Remedy:
Replace the foot switch; see Section 010-4.1.
4 Service
4.1 Foot Switch (2S26, 2S27) Removal
1. Tilt the ironing table to its horizontal position; see Section 020-4.1.
2. Lay the iron on its back, on a mat or blanket to prevent scratching.
3. Remove the two T20 screws next to the two access holes underneath the
foot plate.
4. Remove the pedal.
5. Remove the T20 screw securing the switch holder.
6. Disconnect the wiring harness from the appropriate switch and remove
the switch.
Note:
When re-inserting the bottom screws, slide the plastic holder/spring
assemblies into the correct positions so that the guide pins engage in their
holes.
4.2 Main Electronic (N2) Replacement
1. Tilt the ironing table to its horizontal position; see Section 020-4.1.
2. Lay the iron on its back, on a mat or blanket to prevent scratching.
3. Tie a sturdy cord (such as twine) to the J-hook at the bottom of the spring.
4. Release tension from the Bowden cable by disconnecting the tension
spring. Grab the J-hook at the bottom of the spring with pliers and pull it
off of the base to disengage the spring.
Warning!
With the spring disconnected, movement of the ironing table will be
unrestricted because there is no tension holding it in place.
5. Bring the iron to its upright, stowed position (see the operating manual).
6. Remove the main electronic's cover (T20 screw) from the stand (Figure
010-3, Item 1).

Technical Information
15
B 890/B 990
Figure 010-3: Main Electronic Cover
7. Remove the T20 screw securing the main electronic to the stand (Figure
010-4, Item 1). Slide the main electronic out of the stand.
Figure 010-4: Main Electronic Screw
8. Disconnect all connections from the old electronic and connect them on
the new electronic, one at a time. This prevents incorrect connection.
9. Remove the holder from the old electronic and place it on the new
electronic.
10. Install the new electronic with holder.
11. Tilt the ironing table to its horizontal position; see Section 020-4.1.
12. Lay the iron on its back again.
13. Ensure that the Bowden cable is centered on its pulley, taping it in place if

Technical Information
16
B 890/B 990
necessary, and then feed the Bowden cable/spring assembly as far down
the stand as possible. Pull the twine or cord through the bottom of the
stand and tie or tape it down.
14. Grab the J-hook with pliers and reattach it to the base.
15. Check for smooth operation by unlocking the ironing table and moving it
to the stowed (vertical) position; if binding or unusual noises occur,
unhook the spring and check that the Bowden cable is centered on its
pulley.
16. If operation is smooth, re-install the main electronic cover and secure it
with the T20 screw.
Note:
When the cable guide (plastic “neck”) on the cover pushes against the hinge
after reassembly, the cover can break when the iron is folded.
4.3 Transformer Removal
1. Tilt the ironing table to its horizontal position; see Section 020-4.1.
2. Lay the iron on its back, on a mat or blanket to prevent scratching.
3. Tie a sturdy cord (such as twine) to the J-hook at the bottom of the spring.
4. Release tension from the Bowden cable by disconnecting the tension
spring. Grab the J-hook at the bottom of the spring with pliers and pull it
off of the base to disengage the spring.
Warning!
With the spring disconnected, movement of the ironing table will be
unrestricted because there is no tension holding it in place.
5. Bring the iron to its upright, stowed position (see the operating manual).
6. Remove the main electronic's cover (T20 screw) from the stand (Figure
010-3, Item 1).
7. Remove the T20 screw securing the main electronic to the stand (Figure
010-4, Item 1).
8. Slide the main electronic out of the stand.
9. Disconnect the transformer and foot switch wiring harnesses (all Molex)
from the main electronic.
10. Lay the iron on its back again.
11. Remove the four T30 bolts from the underside of the base.
12. Carefully remove the base.
13. Disconnect the 2 Molex plugs from the transformer.
14. Remove the 2 Phillips screws securing the transformer to its mounting
bracket.
15. Remove the transformer from its mounting bracket.
4.4 Transformer Replacement, Base/Stand Reassembly
1. Bring the iron to its upright, stowed position (see the operating manual).
2. Lay the iron on its back, on a mat or blanket to prevent scratching.
3. Secure the new transformer to the mounting bracket with the 2 Phillips
screws and reconnect the 2 Molex connections.
4. Feed the transformer and foot switch wiring harnesses back through the

Technical Information
17
B 890/B 990
stand and reconnect them to the main electronic.
5. Re-install the main electronic. Do not re-install the electronic's cover.
6. Tilt the ironing table to its horizontal position; see Section 020-4.1.
7. Lay the iron on its back again.
8. Ensure that the Bowden cable is centered on its pulley, taping it in place if
necessary, and then feed the Bowden cable/spring assembly as far down
the stand as possible. Pull the twine or cord through the bottom of the
stand and tie or tape it down.
9. Re-install the base, securing it in place with the four T30 bolts.
10. Grab the J-hook with pliers and reattach it to the base.
11. Check for smooth operation by unlocking the ironing table and moving it
to the stowed (vertical) position; if binding or unusual noises occur,
unhook the spring and check that the Bowden cable is centered on its
pulley.
12. If operation is smooth, re-install the main electronic cover and secure it
with the T20 screw.
Note:
When the cable guide (plastic “neck”) on the cover pushes against the hinge
after reassembly, the cover can break when the iron is folded.
4.5 Bowden Cable Replacement
1. Tilt the ironing table to its horizontal position; see Section 020-4.1.
2. Lay the iron on its back, on a mat or blanket to prevent scratching.
3. Tie a sturdy cord (such as twine) to the J-hook at the bottom of the spring.
4. Release tension from the Bowden cable by disconnecting the tension
spring. Grab the J-hook at the bottom of the spring with pliers and pull it
off of the base to disengage the spring.
Warning!
With the spring disconnected, movement of the ironing table will be
unrestricted because there is no tension holding it in place.
5. Bring the iron to its upright, stowed position (see the operating manual).
6. Place a block of wood or similar between the ironing table and the base to
stabilize the table.
7. Remove the T20 screw securing the Bowden cable holder (Figure 010-5,
Item 1).
8. Carefully press the Bowden cable holder into the table (Figure 010-5,
Item 2).
9. Remove the T20 screw securing the main electronic cover (Figure 010-5,
Item 3).
10. Remove the four T20 screws securing the plastic hinge (Figure 010-5,
Item 4).

Technical Information
18
B 890/B 990
Figure 010-5: Bowden Cable and Plastic Hinge
11. Carefully remove the Bowden cable holder from the table, via the
opening behind the hinge. This holder is very small and can fall inside the
table!
12. Remove the Bowden cable pin from the table (Figure 010-6, Item 1).
13. Remove the two T20 screws securing the pulley axle to the stand (Figure
010-6, Item 2).
Figure 010-6: Bowden Cable Holder and Pulley
14. Remove the pulley axle, pulley, and entire Bowden cable/spring assembly
from the stand.
15. Tie a sturdy cord (such as twine) to the J-hook at the end of the spring on
the new Bowden cable.
16. Feed the Bowden cable pin through the round opening in the table and
then through the opening behind the hinge to the outside of the table
(Figure 010-7, Item 1).

Technical Information
19
B 890/B 990
17. Install the Bowden cable pin and Bowden cable cord in the Bowden cable
holder (Figure 010-7, Item 3).
18. Feed the Bowden cable back into the table; insert through the round
opening and hold in place.
19. Secure the retaining screw in the Bowden cable holder (Figure 010-7,
Item 2).
Figure 010-7: Bowden Cable Pin
20. Re-install the hinge (Figure 010-4, Item 4).
21. Ensure that the Bowden cable is centered on its pulley, taping it in place if
necessary, and then feed the Bowden cable/spring assembly as far down
the stand as possible. Pull the twine or cord through the bottom of the
stand and tie or tape it down.
22. Grab the J-hook with pliers and reattach it to the base.
23. Check for smooth operation by unlocking the ironing table and moving it
to the stowed (vertical) position; if binding or unusual noises occur,
unhook the spring and check that the Bowden cable is centered on its
pulley.
24. If operation is smooth, re-install the main electronic cover and secure it
with the T20 screw.
Note:
When the cable guide (plastic “neck”) on the cover pushes against the hinge
after reassembly, the cover can break when the iron is folded.
4.6 Handle Replacement
1. Remove the two T20 screws securing the right end cap from the ironing
table (Figure 010-8, Item 1).
2. Tilt the ironing table to its horizontal position; see Section 020-4.1.
3. Lay the iron on its back, on a mat or blanket to prevent scratching.
4. Remove the cover from the heater plate motor (two T20 screws) (Figure
010-8, Item 2).
5. Disconnect the two ground wires (green/yellow) from the motor bracket.
6. Remove the two T20 screws securing the top of the motor bracket (Figure

Technical Information
20
B 890/B 990
010-8, Item 3).
7. Remove the two T20 screws securing the bottom of the motor bracket.
8. Lift the base of the iron slightly, so that the plate and table are pressed
together and the heater plate motor comes out of the table in one piece.
Note:
There is a wire loop at the base of the motor that holds the motor wiring
harnesses in place inside the table.
9. Remove the locks (T20 screws) (Figure 010-8, Item 5).
10. Release the handle by reaching inside the right side of the table and
pushing up and in on the handle (Figure 010-8, Item 6).
11. Remove the T20 screw securing the spring holder (next to Figure 010-8,
Item 4), remove the spring holder and pull the handle assembly out of the
right side of the table.
Figure 010-8: Handle Removal
12. Remove the T20 screw securing the handle to its mounting bar and
remove the handle.
13. After replacing the handle, re-assemble the iron by following the above
instructions in reverse order.
Warning!
Locks can be re-installed backwards!
Other manuals for B 890
7
This manual suits for next models
1
Table of contents
Other Miele Iron manuals

Miele
Miele HM 16-80 User manual

Miele
Miele HM 21-140 User manual

Miele
Miele PRI 210 User manual

Miele
Miele HM 21-140 User manual

Miele
Miele B 890 User manual

Miele
Miele HM 16-80 User manual

Miele
Miele HM 21-100 User manual

Miele
Miele HM 5316 User manual

Miele
Miele FashionMaster B 4847 User manual

Miele
Miele HM 21-140 User manual

Miele
Miele FashionMaster User manual

Miele
Miele HM 21-100 User manual

Miele
Miele B 995 D User manual

Miele
Miele HM 21-100 User manual

Miele
Miele PM 1210 User manual

Miele
Miele B 3847 FashionMaster Troubleshooting guide

Miele
Miele B 990 User manual

Miele
Miele PIB 100 User manual

Miele
Miele B 890 User manual

Miele
Miele B 890 User manual