manuals.online logo
Brands
  1. Home
  2. •
  3. Brands
  4. •
  5. Minerva
  6. •
  7. Indoor Furnishing
  8. •
  9. Minerva Augusta Styling Station 3327 User manual

Minerva Augusta Styling Station 3327 User manual

**Check inside all boxes and drawers for boxes/bags
of hardware before beginning assembly.
Using a
cam lock
Slide cam lock over head of
screw, then turn to
tighten.
Screw the cam lock screw
into the first panel.
Slide second panel over
cam lock screw.
Augusta Styling Station
Model #3327
Assembly Instructions
9 - Drawer back
10 - Drawer front
11 - Drawer left side
12 - Drawer right side
13 - Drawer bottom
14 - Left door
15 - Right door
1 - Bottom panel
2 - Bottom cover
3 - Drawer support
4 - Back panel
5 - Left side panel
6 - Right side panel
7 - Top panel
8 - Shelf
SketchPart Qty. Description
Large cam lock set
A24
23
B
Wooden dowel
Small screws
2
D
Drawer glides
34C
4E
Small cam lock set
4
Large screws
F
1
Drawer lock
G
4H
Medium screws
1I
Drawer lock catch
2
Door handles
J
K
Drawer handle
1
L
Handle screws
4
M
Door hinges
4
N
Shelf support pegs
4
Components (Label - Description)
PARTS LIST**
Phillips-head screwdriver required (not included)
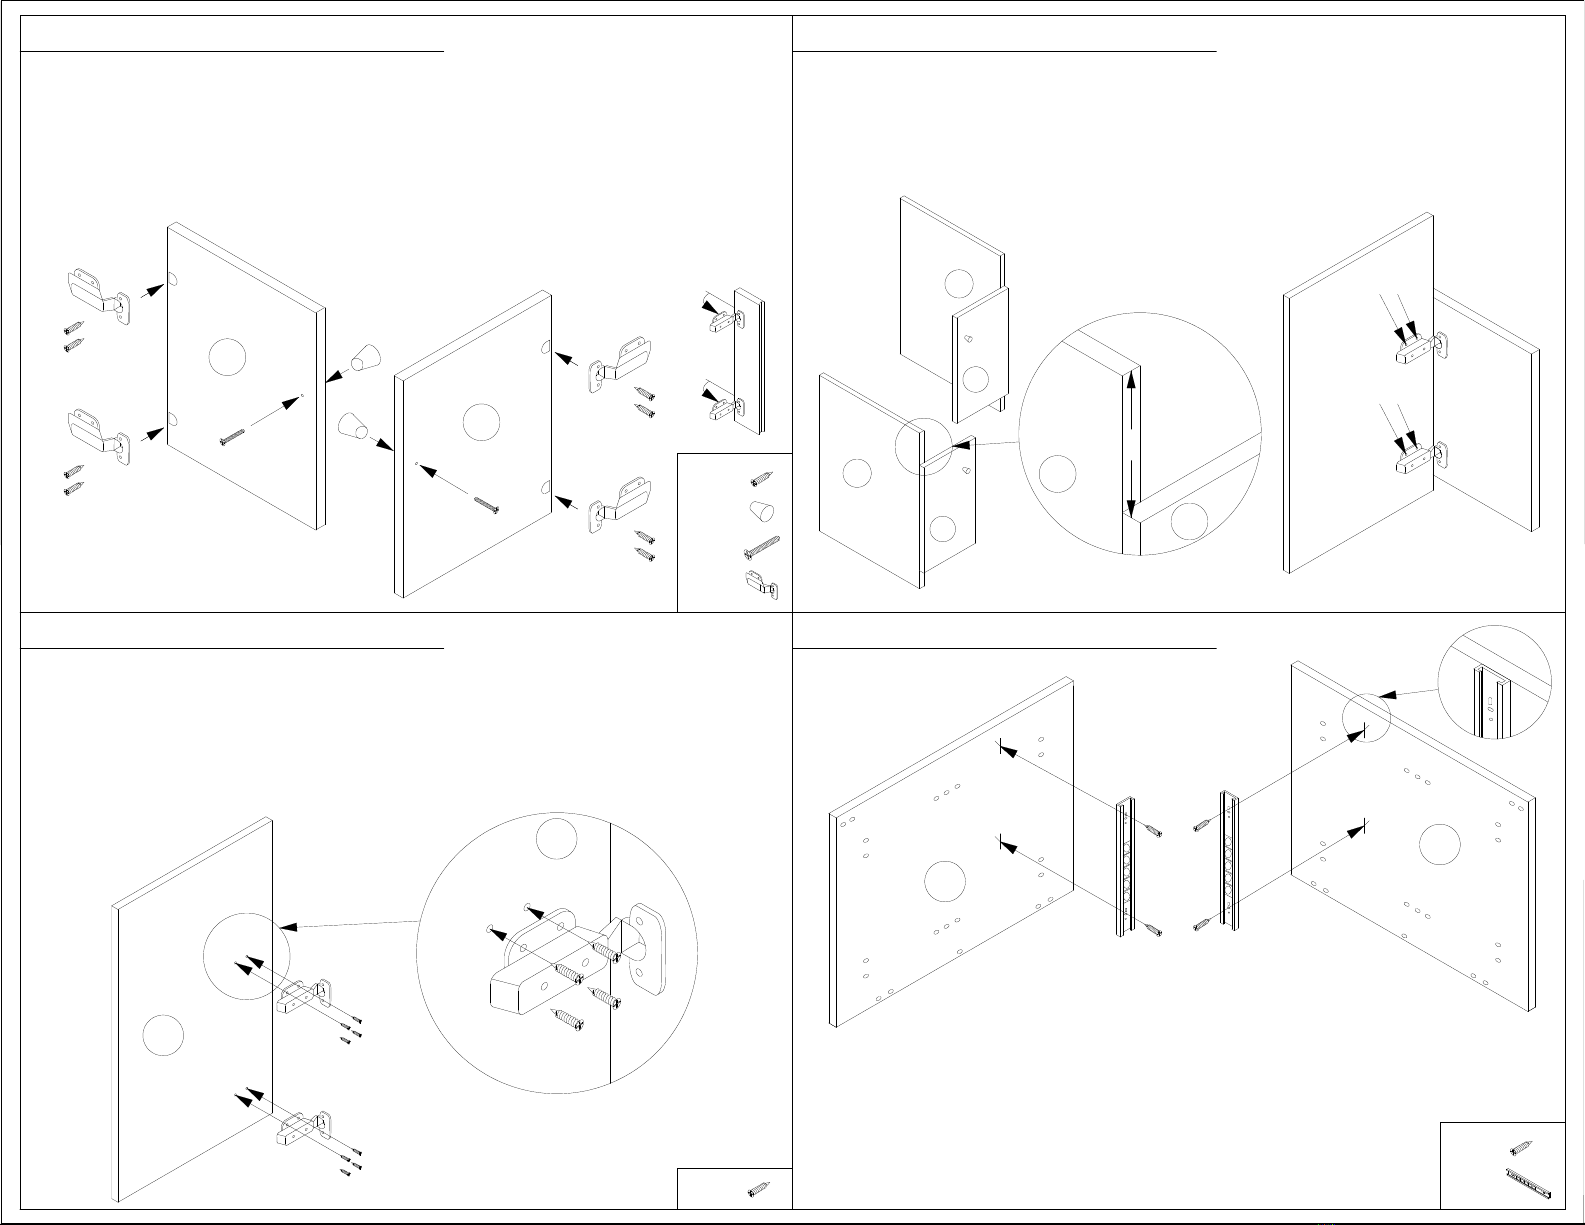
1) Place outer drawer glides (D) over small pilot hole guides.
Set front of drawer glides flush with the front edges of the side panels (5 and 6).
2) Secure each drawer glide with 2 screws (C).
*Note: The drawer glides with the rolling silver plate are the outer glides.
1) Hold the doors (14 and15) perpendicular to their respective side panel such that the hinges are
flat against the side panel.
2) Top edge of door should be 7 - 1/8" below top edge of side panel (see magnification).
3) Using a pencil or a screw, create a mark in the two upper holes of both hinges on the side panel.
1) Remove the hinges (K) from the cabinet doors (14 and 15).
The doors will be reattached after final assembly.
2) Align the top holes of the hinges (K) with the marks on the side panels from step 1.2.
3) Maintaining alignments with the marks, screw the hinges into the side panels using 4 screws (C)
per hinge (K).
1) Fit the "bowl" of the hinges (K) inside the notches cut into the doors (14 and 15),
then affix with 2 small screws (C) each.
2) Secure the 2 door handles (H) to the cabinet doors (14 and15) with 2 handle screws (J).
3) Fold the hinges in to a 90-degree angle, as if the doors were closed.
7 - 1/8"
C
1.3 - Mounting hinges (3 of 3)
H
K
K
K
K
H
C
Marks
K
6
x4
Marks
5
14
5
x2
14
1.2 - Mounting hinges (2 of 3)
K
D
C
1.1 - Mounting hinges (1 of 3)
K
K
Marks
Topedgeofdoor
C
C
C
C
C
Top edge
of side panel
D
6
2 - Mounting outer drawer glides
5
C
C
C
C
15
15
C
K
Cx4
6
D
Cx4
C
6
14
J
J
J
C
H
K
x2
x2
x4
x8
x16
1) Screw 2 cam lock screws (A) and insert 1
dowel (B) into the back panel (4) as shown.
2) Secure back panel (4) to assembly
from Step 6 with 2 cam locks (A).
1) Screw 2 cam lock screws (A) and insert 1 dowel (B) into the
underside of the bottom panel (1) as shown.
2) Slide bottom cover (2) over screws and dowel, then secure
using 2 cam locks (A).
A
B
1
A
2
7/8"
7
1) Center the drawer lock catch (I) underneath the top panel (7) such that the front
edge of the catch is exactly 7/8" in from the front edge of the top panel (7).
11
C
12
12
D
D
Notch
x1
2) Secure with 2 screws (C).
Glide
C
C
C
C
1) Locate both drawer sides (11 and 12) and the inner drawer glides (D).
2) On the outside of the drawer sides (11 and 12), align the glides (D) such
that center of the screw holes are exactly 3/4" from the bottom edge and
the glides are flush with the front edges of the sides.
3) Secure each drawer glide with 2 screws (C).
C
C
3/4" between screw
points and bottom
edge of side
I
Center
4 - Mounting inner drawer glides 5 - Mounting drawer lock catch
6 - Assembling the bottom 7 - Mounting the bottom
A
A
B
4
1
x2
x4
DI
Cx2
A x2
x1
B
A x2
x1
B
1) Lay the right side panel (6) down on the ground, and insert
7 cam lock screws (A) and 8 dowels (B) as shown.
2) Set the assembly from Step 7 onto the
right side panel (6) and secure with
5 cam locks (A).
3) Set the drawer support (3) onto the
upper row of screws, then secure
with 2 cam locks (A)
6
B
B
1
4
3
B
A
A
B
A
B
AA
B
AB
BA
B
A
16
3
4
B
A
BA
A
5
B
A
B
B
B
B
A
A
8 - Mounting the right side panel 9 - Mounting the left side panel
1) Lay the left side panel (5) down on the ground, and insert 7 cam
lock screws (A) and 8 dowels (B) as shown.
2) Set the left side panel (5) over the assembly from Step 3, inserting
the screws and dowels into the correct holes.
3) Secure left side panel (5) to the assembly with 7 cam locks (A) and
stand the assembly upright.
A x7 A
B
x7
Bx8 x8
A
4
1
7
A
A
AB
3
B
B
5
AB
B
A
x4F
H
x1
G
x4
Kx1
1) Screw lock (G) into drawer face (14) using the 4 medium
screws (H), then place the cap on from the front.
2) Screw the handle (K) on to drawer face (14) using 2 handle screws (L).
3) Screw 4 small cam lock screws (E) into back of drawer face (14).
4) Insert drawer bottom (10) into grooves on drawer sides (11 and 12),
then secure to drawer face (14) with 4 small cam locks (E).
5) Fit drawer back (13) over drawer bottom (10) and secure to
sides (11 and 12) using 4 large wood screws (F).
x2
x4
L
E
10 - Mounting the top panel 11 - Assembling the drawer
12 - Final assembly
G
E
L
K
E
E
L
F
10
H (x4)
F
13
14
11
F
F
E
12
6
N
N
N
N
x6A
x4
N
Bx5
1) Reattach cabinet doors (14 and 15) to hinges.
2) Slide drawer into the glides.
3) Set shelf (8) on shelf support pegs (N).
1) Lay the top panel (7) down on the ground, and insert 6 cam lock
screws (A) and 5 dowels (B) as shown.
2) Set the top panel (7) over the assembly from Step 4 and secure with
6 cam locks (A).
3) Screw 4 shelf support pegs (N) into holes on right and left side
panels (5 and 6) at the desired shelf height.

Other Minerva Indoor Furnishing manuals

Minerva 3398ss-m-SHL User manual

Minerva

Minerva 3398ss-m-SHL User manual

Minerva 3378 User manual

Minerva

Minerva 3378 User manual

Minerva AV-6010 User manual

Minerva

Minerva AV-6010 User manual

Minerva 3393 User manual

Minerva

Minerva 3393 User manual

Minerva Classic User manual

Minerva

Minerva Classic User manual

Minerva Yonah MR-003 User manual

Minerva

Minerva Yonah MR-003 User manual

Minerva Tavola 2015 User manual

Minerva

Minerva Tavola 2015 User manual

Minerva 3108 User manual

Minerva

Minerva 3108 User manual

Popular Indoor Furnishing manuals by other brands

Baxton Studio Everdon SA109 Assembly instructions

Baxton Studio

Baxton Studio Everdon SA109 Assembly instructions

BDI TC-223 223DHF Assembly instructions

BDI

BDI TC-223 223DHF Assembly instructions

BROSA Malamute Assembly guide

BROSA

BROSA Malamute Assembly guide

Safavieh Furniture FOX6024 quick start guide

Safavieh Furniture

Safavieh Furniture FOX6024 quick start guide

Steelcase Gesture user guide

Steelcase

Steelcase Gesture user guide

BuzziSpace BuzziJungle The Tower Low installation manual

BuzziSpace

BuzziSpace BuzziJungle The Tower Low installation manual

Nucraft Tavola Standing Height installation instructions

Nucraft

Nucraft Tavola Standing Height installation instructions

Carmelli NG2351T Assembly instructions

Carmelli

Carmelli NG2351T Assembly instructions

Coaster 603331PP Assembly instructions

Coaster

Coaster 603331PP Assembly instructions

Coaster 460472T Assembly instructions

Coaster

Coaster 460472T Assembly instructions

Ovela OVMINISBSGA user guide

Ovela

Ovela OVMINISBSGA user guide

Naomi Kids Low Loft Bed Bookcase Assembly instructions

Naomi Kids

Naomi Kids Low Loft Bed Bookcase Assembly instructions

Home Decorators HAWTHORNE 30675 Assembly instructions

Home Decorators

Home Decorators HAWTHORNE 30675 Assembly instructions

FEHN OUCH quick guide

FEHN

FEHN OUCH quick guide

Atlantic Furniture COLUMBIA Assembly instructions

Atlantic Furniture

Atlantic Furniture COLUMBIA Assembly instructions

STRUCTUBE JETT Assembly instructions

STRUCTUBE

STRUCTUBE JETT Assembly instructions

AIS C-TACKINSTALLL install guide

AIS

AIS C-TACKINSTALLL install guide

burgbad SYS30 Flex Fitting instructions

burgbad

burgbad SYS30 Flex Fitting instructions

manuals.online logo
manuals.online logoBrands
  • About & Mission
  • Contact us
  • Privacy Policy
  • Terms and Conditions

Copyright 2025 Manuals.Online. All Rights Reserved.