manuals.online logo
Brands
  1. Home
  2. •
  3. Brands
  4. •
  5. Modulift
  6. •
  7. Lifting System
  8. •
  9. Modulift CMOD 50 User manual

Modulift CMOD 50 User manual

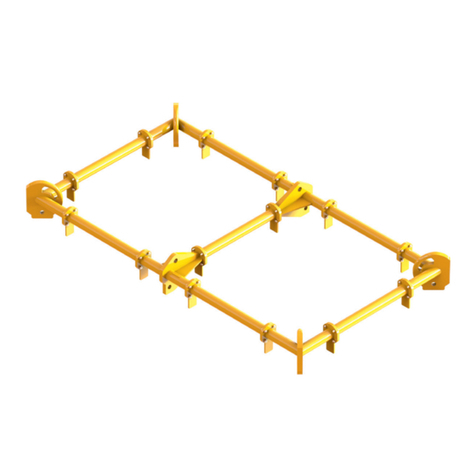
The CMOD Spreader Frame is modular in span, and every frame consists of 4 Corner Units, with intermediate Struts that
can be bolted into the assembly to achieve different spans. The CMOD 50 has an assembled span ranging from 1m by
1m to 11m by 11m and all spans inbetween.
STRUT
• Personnel using this system should be suitably trained, competent and have a clear understanding of Safe Slinging procedures
• The use of Modulift equipment must be in accordance with the procedures laid down in ‘Lifting Operations and Lifting Equipment
Regulations 1998’ (LOLER)
• NEVER EXCEED STATED SWL - ADHERE TO SWL IN TABLE 2, FOR PARTICULAR SLING ANGLE USED
• THE TOP SLING LENGTH IS CRITICAL TO THE SAFE USE OF THE SPREADER - ENSURE YOU ARE REFERRING TO
THE CORRECT TABLE
CMOD 50
Spreader Frame
TABLE 1: COMPONENT LIST
PART REF: DESCRIPTION WEIGHT / ITEM
P1 CORNER UNIT 150kg
P2 4.0m STRUT 140kg
P3 2.0m STRUT 82kg
P4 1.0m STRUT 53kg
P5 0.5m STRUT 38kg
P6 35t SHACKLE 20kg
P7 25t SHACKLE 14kg
P8 M20X65, GRADE 8.8, HT BOLTS NUTS & WASHERS
MODULIFT UK LTD
Tel: +44 (0)1202 621511 Fax: +44 (0)1202 632811 Email: [email protected] www.modulift.com
Assembled Frame:
CORNER UNIT
CMOD 50 - FRAME SPECIFICATION
• Ratedatamaximumof60tonnesSWLpleaseseetable2forSWLatspecicspans
• Sling to Vertical Angle, β, no more than 45 degrees
• Corner Units are rated at 15 tonnes each (60t combined capacity)
• Bolt tightening torque: 150Nm. Spanner size required: 30mm
• Recommended additional equipment: Torque Wrench, Podger Spanner and Ring Spanner
WARNING!
P8
P6
P2 - P5
P1
Span
β= ‘Sling to Vertical’ Angle (STV)
Fig. 1. Typical CMOD Spreader Frame Assembly
β
P7
MODULIFT UK LTD
Tel: +44 (0)1202 621511 Fax: +44 (0)1202 632811 Email: [email protected] www.modulift.com
• Max number of Struts allowed in assembly: 5
per side
• Assemble longer Struts in the centre of the
conguration
• Sling angle is crucial to safe use of frame
First pick the span required for your frame (e.g. 2m x 5m) and the Sling
Angle (we recommend 30° STV where possible), then check the SWL via the
appropriate table. Read the table by locating the lower span on the y axis
of the chart and the larger on the x. The cell which you are referred to, will
indicate the SWL for your chosen span. If your exact span is not noted in
the table, then please round up or down to the values that will give you the
lowest SWL (to ensure no overloads are applied). Please contact Modulift for
conrmationonyourSWLifrequired.SWLgivenintonnes.
The top sling must be positioned centrally
in the Shackle pin to ensure even loading.
Contact your Modulift supplier for supply of
loose spacers where required
CMOD 50: UK 2014A
DO’s & DON’TS
• Do ensure that the frame is only loaded at the
Corner Units and they are all equally loaded
• Do ensure enough clearance between frame and
the load to prevent the load hitting the frame. Any
collision could cause failure of the frame
• Do not undertake a lift without the correct use of
appropriate top slings
• Do not hang any loads from the Strut tube or
anges
• Do not exceed the stated SWL for your span
• Do not rig the lower slings more than 6°from
vertical
ASSEMBLY PROCEDURE
1. Check the ID plates on each Modulift component to ensure
the correct size is used.
2. Lay out the Struts and Corner Units in the correct
conguration
3. Checkthatallangesareclearfromdebris,sandetc.
before connection
4. Bolt the components together* using bolts, nuts & washers
provided. Tighten the bolts to torque as shown overleaf
5. Loop the top Shackles through the bows of the Corner Units
so they contact ‘bow-to-bow’. The eye of the top slings can
then be passed through the jaws of the Shackles and the
pins replaced
6. Loop the bottom Shackles through the eyes of the drop
slings and connect to the bottom of the Corner Unit with the
Shackle pin
7. Attach the lower slings to the load to be lifted
8. The assembled Spreader Frame and lifting rig must be
thoroughly checked by a competent person prior to lifting
CMOD 50
Spreader Frame
• Do not under any circumstances hang load(s)
fromthetubeoranges-theSpreaderFrameis
designed for compression - not bending
• Ensure that the top Shackle contacts the bow of the
corner plate ‘bow-to-bow’
• The CMOD system is designed in accordance with
BSEN13155:Cranes,Safety,Non-xedLoadLifting
Attachments
*The use of a Podger Spanner will aid in assembly through helping to align the bolt holes by forcing it through
11 32
10 41 31
9 50 39 29
8 50 48 37 28
7 60 50 45 35 27
6 60 60 50 43 33 26
5 60 60 60 50 40 32 25
4 60 60 60 50 49 38 31 24
3 60 60 60 60 50 47 37 30 23
2 60 60 60 60 60 50 45 36 29 23
1 60 60 60 60 60 60 50 44 35 28 22
1234567891011
11 18
10 23 17
9 28 21 16
8 28 27 20 15
7 34 28 25 19 14
6 40 34 28 24 18 14
5 40 40 34 28 23 17 13
4 50 40 40 28 28 21 17 13
3 50 50 40 40 28 26 21 16 12
2 50 50 50 40 34 28 25 20 16 12
1 50 50 50 50 40 34 28 25 20 15 12
1234567891011
30° STV SWL = tonnes
45° STV SWL = tonnes
Span/m
Span/m
Span/m
Span/m
Table 2

Other Modulift Lifting System manuals

Modulift MOD 24 User manual

Modulift

Modulift MOD 24 User manual

Modulift MOD 6 User manual

Modulift

Modulift MOD 6 User manual

Modulift TRUN MOD 600/1000 User manual

Modulift

Modulift TRUN MOD 600/1000 User manual

Modulift TRUN MOD 250 User manual

Modulift

Modulift TRUN MOD 250 User manual

Modulift CMOD 6 User manual

Modulift

Modulift CMOD 6 User manual

Modulift MOD 50 User manual

Modulift

Modulift MOD 50 User manual

Modulift MOD 12 User manual

Modulift

Modulift MOD 12 User manual

Popular Lifting System manuals by other brands

Norco 72674 Setup, operating, maintenance instructions

Norco

Norco 72674 Setup, operating, maintenance instructions

BraunAbility Century XT user manual

BraunAbility

BraunAbility Century XT user manual

VENCO VP6F Installation & owner's manual

VENCO

VENCO VP6F Installation & owner's manual

JLG 1350SJP Operation and safety manual

JLG

JLG 1350SJP Operation and safety manual

unicraft SHB 3 instruction manual

unicraft

unicraft SHB 3 instruction manual

Vetter VSL 12 manual

Vetter

Vetter VSL 12 manual

STS STE01-DRU01 operating instructions

STS

STS STE01-DRU01 operating instructions

Rotary 2000 Series installation instructions

Rotary

Rotary 2000 Series installation instructions

Sunex HD 7752C owner's manual

Sunex HD

Sunex HD 7752C owner's manual

WOOD'S POWR-GRIP FLEXR Series instructions

WOOD'S POWR-GRIP

WOOD'S POWR-GRIP FLEXR Series instructions

Ingersoll-Rand BMDL-4 instructions

Ingersoll-Rand

Ingersoll-Rand BMDL-4 instructions

Liko Golvo G7 Assembly instruction

Liko

Liko Golvo G7 Assembly instruction

morse 81-SS Operator's manual

morse

morse 81-SS Operator's manual

Braun 04 Series Service manual

Braun

Braun 04 Series Service manual

PLS AR-200 Service manual

PLS

PLS AR-200 Service manual

Nussbaum OTTO 18 operating manual

Nussbaum

Nussbaum OTTO 18 operating manual

SmarterHome Universal HD installation manual

SmarterHome

SmarterHome Universal HD installation manual

Snorkel TM12 Series Service and parts manual

Snorkel

Snorkel TM12 Series Service and parts manual

manuals.online logo
manuals.online logoBrands
  • About & Mission
  • Contact us
  • Privacy Policy
  • Terms and Conditions

Copyright 2025 Manuals.Online. All Rights Reserved.