manuals.online logo
Brands
  1. Home
  2. •
  3. Brands
  4. •
  5. modway
  6. •
  7. Indoor Furnishing
  8. •
  9. modway STASIS EEI-1181 User manual

modway STASIS EEI-1181 User manual

Customer Service 908-368-1025︱www.modwayfurniture.com Page 1 of 4
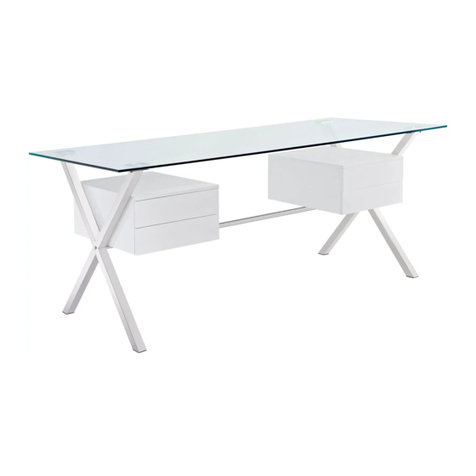
EEI -1181 STASIS OFFICE DESK
Hardware:
Component:
A Bolt M8x60mm x2
B Bolt M8x40mm x2
C Bolt M8x30mm x2
H Allen Wrench x1
1 Glass Top x1 2 Drawer Box x1
3 Right Leg x1 4 Left Leg x1
5 Central Rail x1
Flat Washer x20
D Bolt M8x10mm x16
E Washer x2
Plastic Cap x2
F
G
(with three pre-drilled holes) (with one pre-drilled hole)
Thank you for purchasing the MODWAY STASIS OFFICE DESK!
Before you start, here is some helpful advice:
1.We suggest you spend a short time reading through this leaflet and then follow the simple step by step
instructions.
2.Owing to the size and weight of the desk, we recommend that it is assembled by two adults, on a carpeted or
padded area, in the room that it is intended for. Approximate assembly time: 30 minutes.
3.Please do not use any tools other than those provided or recommended in these instructions.
4.Please do not throw away any of the packaging or instructions until you have checked all the components and
hardware and the furniture is fully assembled.
5.Assemble all components loosely until advised to tighten. Depending on use, it may be necessary to tighten the
components from time to time, so please save the tools that have been provided.
6.Please keep all pieces out of reach of small children.
Customer Service 908-368-1025︱www.modwayfurniture.com Page 2 of 4
EEI -1181 STASIS OFFICE DESK
Ax2 Ex2 Gx2
Hx1
STEP 1:
Place the Left Leg (4) to the Central Rail (5) as shown.
Please make sure that the concave surface of each Washer (E) faces to the head of each Bolt (A) when connecting.
Attach them by using Bolts (A) and Washers (E) through the pre-drilled holes on the Central Rail (5) and the Left Leg (4).
Tighten Bolts (A) with the Allen Wrench (H). Then cover the Plastic Cap (G) to the head of Bolt (A) as shown.
Repeat the same steps for assembling the Right Leg (3) to the Central Rail (5).
Hardware & Tool required
STEP 2:
Please put the Glass Top (1) upside down on a flat and smooth surface as shown .
Attach the assembled Central Rail (5),Right Leg (3) and Left Leg (4) into the bottom of Glass Top (1) by using Bolts (D)
and Flat Washers (F).
Use the Allen Wrench (H) to tighten the Bolts (4) clockwise until secure.
Notice:
Please make sure that the concave
surface of each Washer (E) faces to
the head of each Bolt (A) when connecting.
Dx16 Fx16 Hx1 Hardware & Tool required
Customer Service 908-368-1025︱www.modwayfurniture.com Page 3 of 4
EEI -1181 STASIS OFFICE DESK
In order to properly attach the Drawer Box (2) to the side of the Right Leg (3), take out the extra space before leg. It will be
necessary to remove the two drawers from the Drawer Box (2). Please follow the following steps for drawer removal.
A, Open the drawer fully.
B, Locate the black quick disconnect levers on the right and left-hand slides.
C, Simultaneously press the quick disconnect levers while pulling out the drawer. As shown, the right-hand level is pressed
down, while the left-hand lever releases by pulling up.
STEP 3:
Bx2 Cx2 Fx4
Hx1 Hardware & Tool required
STEP 4:
Carefully turn over the assembled desk.
Attach the Drawer Box (2) without drawers to the Right Leg (3) by using Bolts (C) and Flat Washers (F) through the
pre-drilled holes on the inside of the right side panel of the Drawer Box (2) and Right Leg (3).
Do not fully tighten the Bolts (C) at this time.
Attach the Drawer Box (2) to the Central Rail (5) by using Bolts (B) and Flat Washers (F).
Use the Allen Wrench (H) to tighten Bolts (B) and Bolts (C) clockwise until secure.
Right-Hand Slide:
Press lever down
Left-Hand Slide:
Pull lever up
Customer Service 908-368-1025︱www.modwayfurniture.com Page 4 of 4
EEI -1181 STASIS OFFICE DESK
Assembly is completed. The desk is ready to enjoy now!
STEP 5:
In order to return the two drawers into the Drawer Box (2).
A, Align drawer with drawer slides.
B, Move silver metal carrier fully forward in slide.
C, Gently push drawer into the drawer box.
Silver Metal Carrier Align drawer with drawer slides. Push drawer into
the Drawer Box (2) until clicking sound is heard
and slides are locked together

This manual suits for next models

1

Other modway Indoor Furnishing manuals
modway EEI-4309-WHI-CAP User manual

modway

modway EEI-4309-WHI-CAP User manual

modway EEI-2929 User manual

modway

modway EEI-2929 User manual

modway MOD-6267 User manual

modway

modway MOD-6267 User manual

modway EEI-2651 User manual

modway

modway EEI-2651 User manual

modway Chaucer MOD-7067 User manual

modway

modway Chaucer MOD-7067 User manual

modway EEI-4681 User manual

modway

modway EEI-4681 User manual

modway Envision MOD-7069 User manual

modway

modway Envision MOD-7069 User manual

modway MOD-6198 User manual

modway

modway MOD-6198 User manual

modway EEI-2230 User manual

modway

modway EEI-2230 User manual

modway EEI-6592 User manual

modway

modway EEI-6592 User manual

modway MOD-6075 User manual

modway

modway MOD-6075 User manual

modway EEI-3367 User manual

modway

modway EEI-3367 User manual

modway EEI-1179 User manual

modway

modway EEI-1179 User manual

modway EEI-2142 User manual

modway

modway EEI-2142 User manual

modway EEI-4311 User manual

modway

modway EEI-4311 User manual

modway EEI-6347 User manual

modway

modway EEI-6347 User manual

modway EEI-6353 User manual

modway

modway EEI-6353 User manual

modway MOD-6127 User manual

modway

modway MOD-6127 User manual

modway EEI-4659-GRY User manual

modway

modway EEI-4659-GRY User manual

modway EEI-3689-NAT-TAU User manual

modway

modway EEI-3689-NAT-TAU User manual
modway EEI-3939 User manual

modway

modway EEI-3939 User manual

modway EEI-5675 User manual

modway

modway EEI-5675 User manual

modway EEI-3044 User manual

modway

modway EEI-3044 User manual

modway Ripple EEI-1532 User manual

modway

modway Ripple EEI-1532 User manual

Popular Indoor Furnishing manuals by other brands

Leick Home 81263 Assembly instructions

Leick Home

Leick Home 81263 Assembly instructions

Vivo DESK-E-P48KW instruction manual

Vivo

Vivo DESK-E-P48KW instruction manual

Dorel Home Products 2115029N manual

Dorel Home Products

Dorel Home Products 2115029N manual

Hoppekids 37-0001-32-09A Assembly instruction

Hoppekids

Hoppekids 37-0001-32-09A Assembly instruction

HOME MERIDIAN PULASKI FURNITURE P053100 Assembly instructions

HOME MERIDIAN

HOME MERIDIAN PULASKI FURNITURE P053100 Assembly instructions

VONDOM Delta 66006T Assembly instructions

VONDOM

VONDOM Delta 66006T Assembly instructions

Riverside Furniture 73061 Assembly instructions

Riverside Furniture

Riverside Furniture 73061 Assembly instructions

Euro-Rite Cabinets Overjohn Cabinet Assembly instructions

Euro-Rite Cabinets

Euro-Rite Cabinets Overjohn Cabinet Assembly instructions

UNIPRODO UNI SUNBED 07 user manual

UNIPRODO

UNIPRODO UNI SUNBED 07 user manual

Winners Only DJ33872 Assembly instructions

Winners Only

Winners Only DJ33872 Assembly instructions

Next BOMBE 796754 Assembly instructions

Next

Next BOMBE 796754 Assembly instructions

Forte BLKV711L Assembling Instruction

Forte

Forte BLKV711L Assembling Instruction

KMART 42979517 Assembly instructions

KMART

KMART 42979517 Assembly instructions

Neo Chair MARVEL ETERNALS Assembly Instructions & User Guide

Neo Chair

Neo Chair MARVEL ETERNALS Assembly Instructions & User Guide

Argos Home 875/0352 Assembly instructions

Argos Home

Argos Home 875/0352 Assembly instructions

Ameriwood BASICS 7642015COM Assembly instructions

Ameriwood

Ameriwood BASICS 7642015COM Assembly instructions

Core Products CRG513 quick start guide

Core Products

Core Products CRG513 quick start guide

Ameriwood HOME 3389855COM Instruction booklet

Ameriwood HOME

Ameriwood HOME 3389855COM Instruction booklet

manuals.online logo
manuals.online logoBrands
  • About & Mission
  • Contact us
  • Privacy Policy
  • Terms and Conditions

Copyright 2025 Manuals.Online. All Rights Reserved.