manuals.online logo
Brands
  1. Home
  2. •
  3. Brands
  4. •
  5. Monacor
  6. •
  7. Security Camera
  8. •
  9. Monacor TVCCD-1702COL User manual

Monacor TVCCD-1702COL User manual

4.0~9.0mm F:1.6
T
W
N
Video
+
-
12V
4
3
5
2
1
➀➁
CCTV-Dome-Farbkamera
1 Einsatzmöglichkeiten
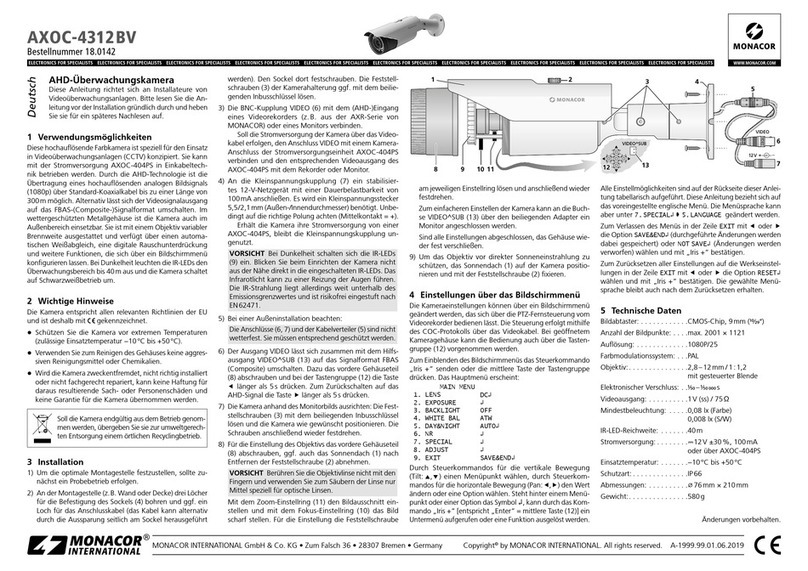
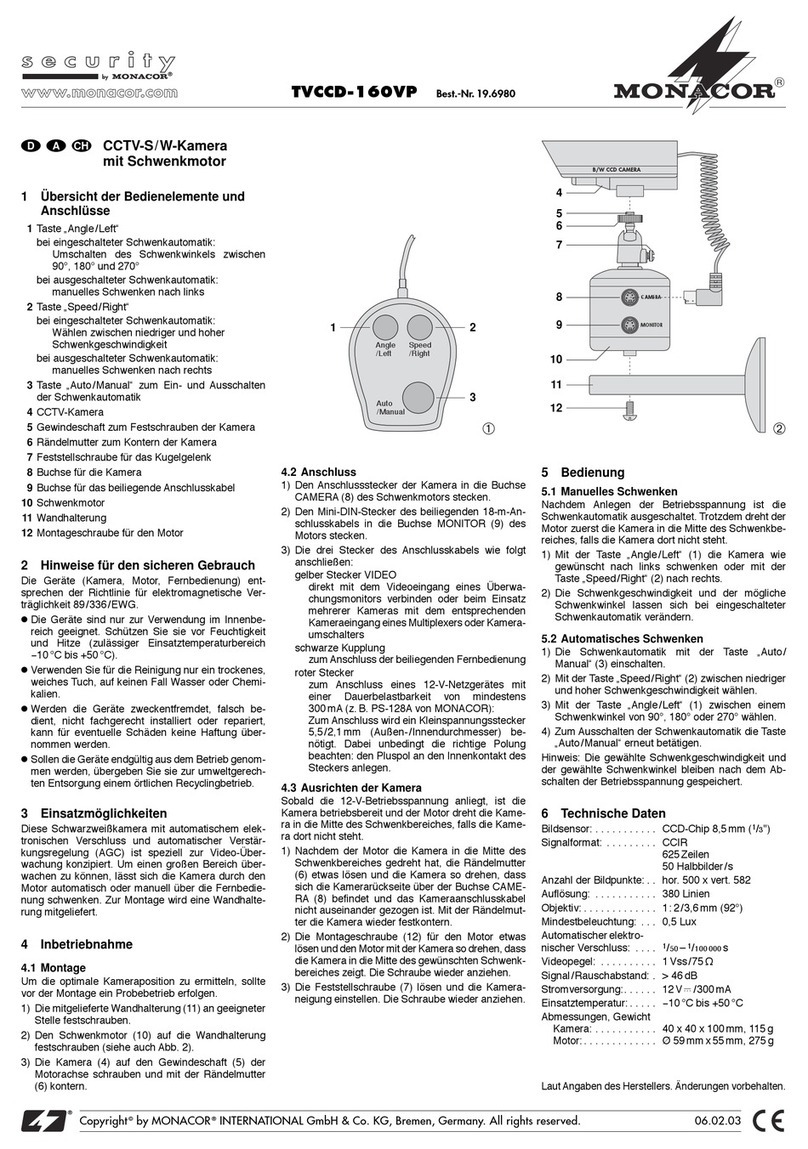
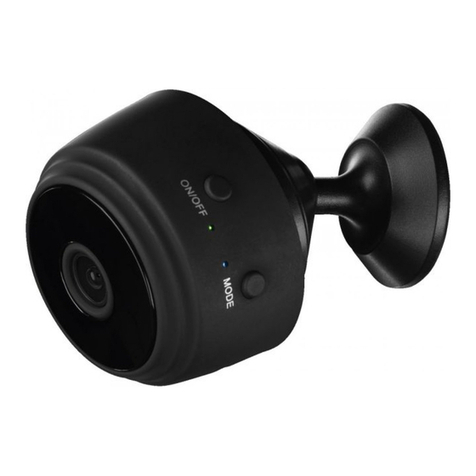
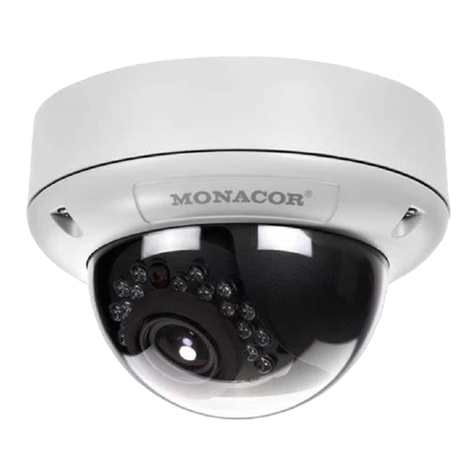
Diese Farbkamera im Kuppelgehäuse ist speziell für den
Einsatz in Video-Überwachungsanlagen konzipiert. Sie ist
mit einemAI-Objektiv („Auto Iris“) mit variabler Brennweite
ausgestattet und verfügt über einen automatischen elek-
tronischen Verschluss („Shutter“), eine Gegenlichtkom-
pensation sowie einen automatischen Weißabgleich.
2 Hinweise für den sicheren Gebrauch
DieKameraentsprichtderEU-Richtliniefürelektromagne-
tische Verträglichkeit 89/336/EWG.
●Die Kamera ist nur zur Verwendung im Innenbereich
geeignet. Schützen Sie sie vor starken Erschütterun-
gen, Feuchtigkeit und Hitze (zulässiger Einsatztempe-
raturbereich 0–40°C).
●Reinigen Sie das Gehäuse nur mit einem trockenen,
weichen Tuch, niemals mit Chemikalien oder Wasser.
●Berühren Sie die Objektivlinsen nicht mit den Fingern
und verwenden Sie für ihre Reinigung nur Mittel speziell
für optische Linsen.
●WirddieKamerazweckentfremdet,nichtrichtig montiert
bzw. angeschlossen oder nicht fachgerecht repariert,
kann keine Haftung für daraus resultierende Sach- oder
Personenschäden und keine Garantie für die Kamera
übernommen werden.
●Soll die Kamera endgültig aus dem Betrieb genommen
werden, übergeben Sie sie zur umweltfreundlichen Ent-
sorgung einem örtlichen Recyclingbetrieb.
3 Inbetriebnahme
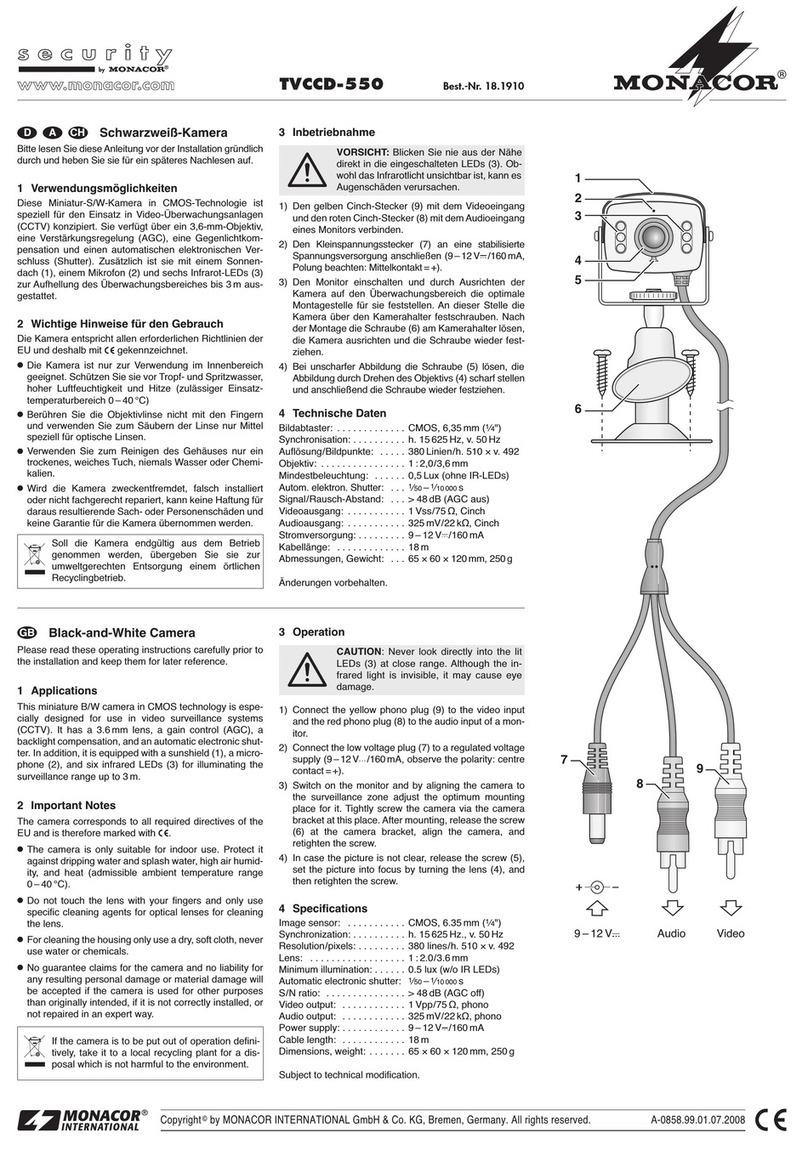
1) Zum Öffnen des Gehäuses den Haltering (1) für die
Kuppel abschrauben. Die Kuppel abnehmen.
2) Den Gehäusesockel über seine beiden Montagelöcher
an der Decke bzw. an einer Wand festschrauben.
3) Die BNC-Kupplung (2) über ein 75-Ω-Koaxialkabel mit
dem Videoeingang des Monitors verbinden. Dabei auf
den korrekten 75-Ω-Abschluss am Monitor bzw. bei
Serienschaltung am letzten Monitor achten. Bei einer
Kabellänge von mehr als 100m sollte ein Videoverstär-
kerzwischendieKamera und das lange Kabel geschal-
tet werden, um die Kabelverluste auszugleichen.
4) Ein stabilisiertes Netzgerät mit einer Ausgangsspan-
nung von 12V und einer Belastbarkeit von 190mA
(z.B. PS-12CCD oder PS-128A von MONACOR) an
die Stromversorgungskupplung (3) anschließen. Für
den Anschluss wird ein Stecker mit den Abmessungen
5,5/2,1mm (Ø außen/innen) benötigt. Am Innenkon-
takt muss sich der Pluspol befinden.
5) Nach dem Anlegen der Betriebsspannung ist die Ka-
mera betriebsbereit. Den Monitor einschalten und die
Kamera auf den Überwachungsbereich ausrichten.
Dazu die entsprechenden Schrauben der Kamera-
modulhalterung lösen und nach demAusrichten wieder
festziehen.
Achten Sie beim Ausrichten der Kamera darauf,
dasskeinSonnenlichtdirektaufdieObjektivlinsentrifft.
Anderenfalls könnte der CCD-Bildaufnehmer beschä-
digt werden!
6) Die gewünschte Brennweite mit dem Zoom-Einstellring
(4) einstellen: Die Rändelschraube des Rings lösen
und den Ring drehen. Die Brennweite kann stufenlos
zwischen Weitwinkel („W“) und Tele („T“) eingestellt
werden. Die Schraube nach der Einstellung wieder
festziehen, um den Ring gegen ein Verdrehen zu
sichern.
7) Mit dem Fokus-Einstellring (5) das Bild scharf stellen:
Die Rändelschraube des Rings lösen und den Ring
drehen, bis das Bild scharf ist. Die Schraube nach der
Einstellung wieder festziehen.
8) Die Kuppel wieder auf den Sockel setzen. Dabei dar-
auf achten, dass die Kamera durch den durchsichtigen
Teil der Kuppel blicken kann. Dann den Haltering für
die Kuppel wieder aufschrauben.
4 Technische Daten
Bildaufnehmer: . . . . . . . . CCD-Chip, 8,5mm (1/3")
Video-System: . . . . . . . . PAL, hor. 15625Hz, vert. 50Hz
Anzahl der Bildpunkte: . hor. 752 x vert. 582
Auflösung: . . . . . . . . . . . 420 Linien
Objektiv: . . . . . . . . . . . . 1 : 1,6/4–9mm
Mindestbeleuchtung: . . . 3Lux
Signal-Rausch-Abstand: > 45dB
Videoausgang: . . . . . . . 1Vss/75Ω, BNC
Autom. elektron. Shutter: 1/50 –1/100000 s
Einsatztemperatur: . . . . 0–40°C
Stromversorgung: . . . . . 12V /190mA
Abmessungen: . . . . . . . Ø 140mm x 90mm
Gewicht: . . . . . . . . . . . . 400g
Laut Angaben des Herstellers. Änderungen vorbehalten.
CCTV Colour Dome Camera
1 Applications
This colour camera in a dome housing is especially de-
signed for applications in video surveillance systems. It is
equipped with an AI lens (“Auto Iris”) with variable focal
length and has an automatic electronic shutter, a backlight
compensation, and an automatic white balance.
2 Safety Notes
The camera corresponds to the directive 89/336/EEC for
electromagnetic compatibility.
●The camera is suitable for indoor use only. Protect it
against intensive vibration, humidity, and heat (admissi-
ble ambient temperature range 0–40°C).
●For cleaning the housing only use a dry, soft cloth, by no
means chemicals or water.
●Do not touch the lenses of the lens assembly with your
fingers and use for their cleaning only special deter-
gents for optical lenses.
●If the camera is used for purposes other than originally
intended, if it is not correctly mounted or connected, or
not repaired in an expert way, no guarantee claims for
the camera or liability for any resulting personal damage
or material damage will be accepted.
●If the camera is to be put out of operation definitively,
take it to a local recycling plant for disposal which is not
harmful to the environment.
3 Setting into Operation
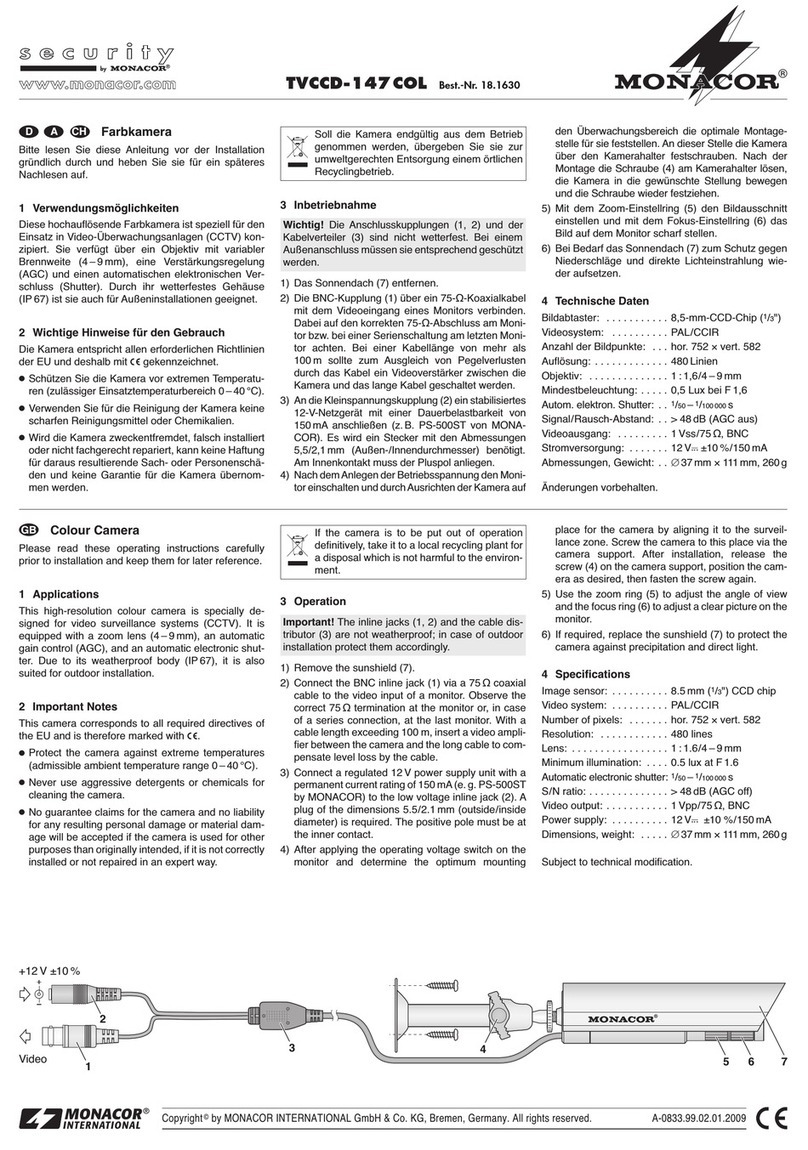
1) To open the housing, unscrew the supporting ring (1)
for the dome. Remove the dome.
2) Tightly screw the housing base via its two mounting
holes to the ceiling or to a wall.
3) Connect the BNC inline jack (2) via a 75Ωcoaxial
cable to the video input of the monitor. Attention must
be paid to the correct 75Ωtermination on the monitor
or on the last monitor in case of series connection. If
the cable length exceeds 100m, a video amplifier
should be inserted between the camera and the long
cable to compensate cable losses.
4) Connect a regulated power supply unit with an output
voltage of 12V and a current rating of 190mA (e.g.
MONACOR PS-12CCD or MONACOR PS-128A) to
the power supply inline jack (3). For the connection a
plug with the dimensions 5.5/2.1mm (Ø outside/in-
side) is required. The positive pole must be at the in-
side contact.
5) After applying the operating voltage, the camera is
ready for operation. Switch on the monitor and adjust
the camera to the area to be monitored. For this pur-
pose release the corresponding screws of the camera
module support and after adjusting retighten them.
When adjusting the camera, pay attention that no
sunlight directly hits the lenses of the lens assembly.
Otherwise the CCD image sensor could be damaged!
6) Adjust the desired focal length with the zoom adjusting
ring (4): release the knurled screw of the ring and turn
the ring. The focal length can continuously be adjusted
between wide angle (“W”) and tele (“T”). Retighten the
screw after the adjustment to secure the ring against
turning.
7) With the focus adjusting ring (5) make a clear picture:
release the knurled screw of the ring and turn the ring
until the picture is clear. After the adjustment retighten
the screw.
8) Reposition the dome on the base. Pay attention that
the camera is capable of looking through the transpar-
ent part of the dome. Then screw on the supporting ring
for the dome again.
4 Specifications
Image sensor: . . . . . . . . CCD chip, 8.5 mm (1/3")
Video system: . . . . . . . . PAL, hor. 15.625Hz, vert. 50Hz
Number of pixels: . . . . . hor. 752 x vert. 582
Resolution: . . . . . . . . . . 420 lines
Lens: . . . . . . . . . . . . . . . 1 : 1.6/4–9mm
Minimum illumination: . . 3 lux
S/N ratio: . . . . . . . . . . . > 45dB
Video output: . . . . . . . . . 1Vpp/75Ω, BNC
Automatic
electronic shutter: . . . . . 1/50 –1/100 000 s
Ambient temperature: . . 0–40°
Power supply: . . . . . . . . 12V /190mA
Dimensions: . . . . . . . . . Ø 140mm x 90mm
Weight: . . . . . . . . . . . . . 400g
According to the manufacturer.
Subject to technical modification.
®
®
Copyright©by MONACOR®INTERNATIONAL GmbH & Co. KG, Bremen, Germany. All rights reserved. A-0107.99.01.07.2003
®
D A CH
GB
TVCCD-1702COL Best.-Nr. 19.8820
4.0~9.0mm F:1.6
T
W
N
Video
+
-
12V
4
3
5
2
1
➀➁
Caméra couleur CCTV sous
forme de dôme
1 Possibilités d’utilisation
Cette caméra couleur dans un boîtier en forme de coupo-
le est spécialement conçue pour une installation dans des
centrales de surveillance vidéo. Elle est dotée d’un objec-
tif AI (“Auto Iris”) avec distance focale variable et dispose
d’une obturation électronique automatique (“shutter”),
d’une compensation du contre-jour et d’une compensation
automatique du blanc.
2 Conseils d’utilisation et de sécurité
La caméra répond à la norme européenne 89/336/CEE
relative à la compatibilité électromagnétique.
●La caméra n’est conçue que pour une utilisation en
intérieur. Protégez-la de vibrations intenses, de l’humi-
dité et de la chaleur (plage de température de fonc-
tionnement autorisée : 0°C à +40°C).
●Pour la nettoyer, utilisez un chiffon sec et doux, en
aucun cas de produits chimiques ou d’eau.
●Ne touchez pas les lentilles de l’objectif avec les doigts
et pour les nettoyer, utilisez exclusivement des produits
spécifiquement adaptés aux lentilles optiques.
●Nous déclinons toute responsabilité en cas de domma-
ges corporels ou matériels résultants si la caméra est
utilisée dans un but autre que celui pour lequel elle a été
conçue, s’elle n’est pas correctement montée, bran-
chée ou n’est pas réparée par une personne habilitée,
de même, la garantie deviendrait caduque.
●Lorsque la caméra est définitivement retirée du marché,
vous devez la déposer dans une usine de recyclage
de proximité pour contribuer à son élimination non pol-
luante.
3 Fonctionnement
1) Pour ouvrir le boîtier, dévissez l’anneau de maintien (1)
pour la coupole. Retirez la coupole.
2) Vissez le socle du boîtier via les deux trous de monta-
ge au plafond ou sur un mur.
3) Reliez la prise femelle BNC (2) via un câble coaxial
75Ωà l’entrée vidéo du moniteur. Veillez à ce que le
branchement 75Ωsur le moniteur soit correct, ou dans
le cadre d’un branchement en série, le branchement
sur le dernier moniteur. Pour une longueur de câble
supérieure à 100m, il convient d’insérer un amplifica-
teur vidéo entre la caméra et le long câble de manière
à compenser les pertes en ligne.
4) Reliez une alimentation stabilisée avec une tension de
sortie 12V et une puissance de 190mA au moins
(par exemple l’alimentation PS-12CCD ou PS-128Ade
MONACOR) à la prise d’alimentation (3) ; pour la con-
nexion, une fiche avec les dimensions 5,5/2,1mm
(diamètre extérieur/intérieur) est nécessaire. Le pôle
plus doit se trouver au contact intérieur.
5) Une fois la tension d’alimentation appliquée, la caméra
est prête à fonctionner. Allumez le moniteur et orientez
la caméra vers la zone à surveiller. Pour son orienta-
tion, desserrez les vis correspondantes sur le support
du module de caméra puis, une fois l’opération effec-
tuée, resserrez-les.
Lorsquevousorientezlacaméra,assurez-vousque
la lumière du soleil ne plonge pas directement sur les
lentilles de l’objectif. Sinon le système CCD pourrait
être endommagé.
6) Avec l’anneau de réglage zoom (4), réglez la distance
focale voulue. Desserrez la vis moletée de l’anneau et
tournez ce dernier. La distance focale peut se régler en
continu entre grand angle (“W”) et Tele (“T”). Revissez
la vis après le réglage pour que l’anneau ne puisse
plus tourner.
7) Avec l’anneau de réglage du focus (5), réglez la netteté
de l’image : desserrez la vis moletée de l’anneau, tour-
nez ce dernier jusqu’à ce que l’image soit nette. Une
fois le réglage effectué, resserrez la vis.
8) Replacez maintenant la coupole sur le socle, veillez à
ce que la caméra puisse voir à travers la partie trans-
parente de la coupole. Revissez ensuite l’anneau de
maintien pour la coupole.
4 Caractéristiques techniques
Système : . . . . . . . . . . . puce CCD, 8,5mm (1/3")
Système vidéo : . . . . . . PAL, hor. 15625Hz, vert. 50Hz
Nombre de points : . . . . hor. 752 x vert. 582
Résolution : . . . . . . . . . . 420 lignes
Objectif : . . . . . . . . . . . . 1 : 1,6/4–9mm
Luminosité minimale : . . 3 lux
Rapport signal/bruit : . . > 45dB
Sortie vidéo : . . . . . . . . . 1Vcc/75Ω, BNC
Obturation élec. autom. : 1/50 –1/100000 s
Température fonc. : . . . . 0–40°C
Alimentation : . . . . . . . . 12V /190mA
Dimensions : . . . . . . . . . Ø 140mm x 90mm
Poids : . . . . . . . . . . . . . . 400 g
D’après les données du constructeur
Tout droit de modification réservé
Telecamera CCTV a colori a cupola
1 Possibilità d’impiego
Questa telecamera a colori in un contenitore a cupola è
stata realizzata specialmente per l’impiego in impianti di
sorveglianza video. È equipaggiata con un obiettivo AI
(“Auto Iris”) con focale variabile e dispone di un otturatore
(“shutter”) elettronico automatico, di compensazione della
controluce e di compensazione automatica del bianco.
2 Avvertenze di sicurezza
La telecamera è conforme alla direttiva UE 89/366/CEE
sulla compatibilità elettromagnetica.
●Usare la telecamera solo all’interno di locali e proteg-
gerla da forti vibrazioni, dall’umidità e da temperature
estreme (temperatura d’impiego ammessa 0–40°C).
●Per la pulizia usare solo un panno asciutto e morbido;
non impiegare in nessun caso prodotti chimici o acqua.
●Non toccare le lenti con le dita e per la loro pulizia usare
solo mezzi speciali per lenti ottiche.
●Nel caso d’uso improprio, di montaggio o collegamenti
sbagliati o di riparazione non a regola d’arte non si
assume nessuna responsabilità per eventuali danni a
persone o a cose.
●Se si desidera eliminare la telecamera definitivamente,
consegnarla per lo smaltimento ad un’istituzione locale
per il riciclaggio.
3 Messa in funzione
1) Per aprire il contenitore svitare l’anello (1) che tiene la
cupola e togliere al cupola.
2) Avvitare lo zoccolo del contenitore al soffitto o alla
parete servendosi dei due fori di montaggio.
3) Con un cavo coassiale 75Ω, collegare la presa BNC
(2) con l’ingresso del monitor. Fare attenzione alla cor-
retto terminazione 75Ωsul monitor oppure, nel caso di
collegamento in serie, sull’ultimo monitor. Se il cavo è
più lungo di 100m conviene inserire un amplificatore
video fra la telecamera e il cavo lungo per compensa-
re le perdite dovute al cavo.
4) Collegare un alimentatore stabilizzato con una tensio-
ne d’uscita di 12V e con potenza di 190mA (p.es.
PS-12CCD o PS-128A della MONACOR) con la presa
d’alimentazione (3). È richiesto un connettore con le
dimensioni 5,5/2,1mm (Ø esterno/interno). Il positivo
si trova sul contatto interno.
5) Dopo aver applicato la tensione, la telecamera è pron-
ta per l’uso. Accendere il monitor ed orientare la tele-
camera verso la zona da sorvegliare. Per fare ciò allen-
tare le viti di supporto del modulo telecamera e strin-
gerle dopo aver orientato la telecamera.
Durante l’orientamento della telecamera fare atten-
zione che le lenti dell’obiettivo non vengano colpite dai
raggi diretti del sole. Altrimenti il sensore CCD potreb-
be subire dei danni!
6) Impostare la focale desiderata con l’anello di imposta-
zione dello zoom (4): allentare la vite zigrinata e gira-
re l’anello. La distanza focale può essere regolata in
modo continuo fra grandangolo (“W”) e Tele (“T”). Strin-
gere bene la vite dopo la regolazione per evitare che
l’anello possa girare.
7) Mettere a fuoco l’immagine con l’anello di regolazione
(5): allentare la vite zigrinata dell’anello e girare l’anel-
lo fino ad ottenere un’immagine a fuoco. Quindi strin-
gere di nuovo la vite di regolazione.
8) Rimettere la cupola sullo zoccolo. Controllare che l’o-
biettivo si trovi davanti la parte trasparente della cupo-
la. Quindi avvitare l’anello di supporto della cupola.
4 Dati tecnici
Sensore ottico: . . . . . . . chip CCD, 8,5mm (1/3")
Sistema video: . . . . . . . PAL, orizz. 15625Hz,
vert. 50Hz
Numero pixel: . . . . . . . . orizz. 752 x vert. 582
Risoluzione: . . . . . . . . . 420 linee
Obiettivo: . . . . . . . . . . . . 1 : 1,6/4–9mm
Illuminazione minima: . . 3 Lux
Rapporto S/R: . . . . . . . > 45dB
Uscita video: . . . . . . . . . 1Vpp/75Ω, BNC
Shutter elettronico
automatico: . . . . . . . . . . 1/50 –1/100000 s
Temperatura d’impiego: 0–40°C
Alimentazione: . . . . . . . 12V /190mA
Dimensioni: . . . . . . . . . . Ø 140mm x 90mm
Peso: . . . . . . . . . . . . . . . 400g
Dati forniti dal costruttore.
Con riserva di modifiche tecniche
®
®
Copyright©by MONACOR®INTERNATIONAL GmbH & Co. KG, Bremen, Germany. All rights reserved. A-0107.99.01.07.2003
®
I
F B CH
TVCCD-1702COL Best.-Nr. 19.8820
Cámara color CCTV en forma de
cúpula
1 Posibilidades de utilización
Esta cámara color en una caja en forma de cúpula está
especialmente fabricada para una aplicación en centrales
de vigilancia vídeo. Dispone de un objetivo AI (“Auto Iris”)
con distancia focal variable y dispone de una obturación
electrónicaautomática (“shutter”), deunacompensación de
la contraluz y de una compensación automática del blanco.
2 Consejos de utilización y de seguridad
La cámara cumple la normativa europea 89/336/CEE re-
lativa a la compatibilidad electromagnética.
●La cámara está fabricada solo para una utilización en
interior. Protéjela de las vibraciones intensas, de la
humedad y del calor (temperatura de funcionamiento
autorizada: 0°C a +40°C).
●Para limpiarla, utilice un trapo seco y suave, en ningún
caso productos químicos o agua.
●No manipule las lentes del objetivo con los dedos y para
limpiarlas, utilice exclusivamente productos específica-
mente adaptados a las lentes.
●Rechazamos toda responsabilidad en caso de daño cor-
poral o material si la cámara se utiliza en otro fin para el
cual ha sido fabricada, si no está correctamente monta-
da,conectada o reparadaporuna personahabilitada,por
estos motivos, el aparato carecería de todo tipo garantía.
●Cuando la cámara está definitivamente sacada del ser-
vicio, debe depositarla en una fábrica de reciclaje de
proximidad para contribuir a una eliminación no conta-
minante.
3 Funcionamiento
1) Para abrir la caja, desatornille la anilla de soporte (1)
para la cúpula. Saque la cúpula.
2) Atornille la bandeja de la caja vía los dos agujeros de
montaje al techo o sobre el muro.
3) Conecte la toma hembra BNC (2) vía un cable coaxial
75Ωa la entrada vídeo del monitor. Verifique que la
conexión 75Ωen el monitor sea correcta, o para una
conexión en serie, la conexión en el último monitor.
Para una longitud de cable superior a 100m, conviene
insertarunamplificadorvídeo entre la cámara y el cable
largo de manera a compensar las perdidas en línea.
4) Conecte una alimentación estabilizada con una ten-
sión de salida 12V y una capacidad de 190mA (por
ejemplo la alimentación PS-12CCD o PS-128A de
MONACOR) a la toma de alimentación (3); para la
conexión una toma con las dimensiones 5,5/2,1mm
(diámetro exterior/interior) es necesaria. El polo positi-
vo debe estar en el contacto interior.
5) Una vez la tensión de alimentación aplicada, la cáma-
ra está lista para funcionar. Conecte el monitor y orien-
te la cámara hacia la zona a vigilar. Para una orienta-
ción, desatornille los tornillos correspondientes en el
soporte del modulo de cámara y una vez la operación
efectuada, atornille de nuevo.
Cuando oriente la cámara, verifique que la luz del
sol no esté dirigida directamente en las lentes del obje-
tivo. Si no el sensor de imagen CCD podría dañarse.
6) Con la anilla de reglaje zoom (4), regule la distancia
focal deseada. Desatornille el tornillo moleteado de la
anilla y gírela. La distancia focal puede regularse en
continuo entre gran ángulo (“W”) y Tele (“T”). Atornille
el tornillo después del reglaje para que la anilla no
pueda girar.
7) Con la anilla de reglaje de la lente (5), regule la nitidez
de la imagen: desatornille el tornillo moleteado de la
anilla, gírela hasta que la imagen sea nítida. Una vez
el reglaje efectuado, atornille el tornillo.
8) Coloquedenuevo lacúpulaen subandeja,verifique que
la cámara pueda ver a través la parte transparente de la
cúpula.Atornílle la anilla de soporte para la cúpula.
4 Características técnicas
Sensor de imagen: . . . . lente CCD, 8,5mm (1/3")
Sistema vídeo: . . . . . . . PAL, hor. 15625Hz, vert. 50Hz
Cantidad de puntos: . . . hor. 752 x vert. 582
Resolución: . . . . . . . . . . 420 líneas
Objetivo: . . . . . . . . . . . . 1 : 1,6/4–9mm
Luminosidad mínima: . . 3 lux
Relación señal/ruido: . . > 45dB
Salida video: . . . . . . . . . 1Vcc/75Ω, BNC
Obturación elec. auto.: . 1/50 –1/100000 s
Temperatura func.: . . . . 0–40°C
Alimentación: . . . . . . . . 12V /190mA
Dimensiones: . . . . . . . . Ø 140mm x 90mm
Peso: . . . . . . . . . . . . . . . 400g
Según datos del fabricante.
Nos reservamos el derecho de modificación.
Kamera CCTV
1 Zastosowanie
Kolorowa kamera w okrągłej obudowie przeznaczona jest
do wizualnych systemów nadzoru. Kamera wyposażona
jest w soczewkę z automatyczną regulacją przesłony ( I)
i zmienną ogniskową, posiada automatyczną migawkę,
kompensator i automatyczny balans bieli.
2 Informacje dotyczące bezpieczeństwa
To urządzenie podlega wytycznym normy 89/336/EEC
zgodności elektromagnetycznej.
●Kamera jest przeznaczona tylko do użytku wewnątrz
pomieszczeń. Urządzenie należy chronić przed silnymi
wibracjami, wilgocią i wysoką temperaturą (dopuszcz-
alny zakres temperatury to 0 – 40 °C).
●Do czyszczenia obudowy używać suchej, miękkiej ście-
reczki. Nie stosować wody ani środków czyszczących.
●Nie dotykać soczewek palcami. Do czyszczenia so-
czewek stosować tylko odpowiednie detergenty do
szkieł optycznych.
●Producent ani dostawca nie ponosi odpowiedzialności
za wynikłe szkody materialne jeśli urządzenie było
używane niezgodnie z przeznaczeniem, zostało zain-
stalowane lub obsługiwane niepoprawnie lub podda-
wane nieautoryzowanym naprawom.
●Jeśli urządzenie nie będzie już nigdy więcej używane,
wskazane jest przekazanie go do miejsca utylizacji
odpadów aby zostało utylizowane bez szkody dla
środowiska.
3 Instalacja i pod ączenie
1) by otworzyć obudowę należy odkręcić pierścień
podtrzymujący kopułę (1). Zdjąć obudowę.
2) Przykręcić podstawę obudowy do sufitu lub ściany.
3) Podłączyć wtyczkę BNC (2) za pomocą koncentrycz-
nego kabla 75 Ωdo wejścia wideo monitora. Należy
zwrócić szczególną uwagę na odpowiednie zakończe-
nie przy monitorze lub w przypadku połączenia szere-
gowego przy ostatnim monitorze. Jeśli długość kabla
przekracza 100m, należy zainstalować wzmacniacz
wideo pomiędzy kamerą i kablem w celu skompenso-
wania strat związanych z długim okablowaniem.
4) Podłącz zasilacz o wyjściowym napięciem 12 V o
natężeniu 190 m (np. MON COR PS-12CCD lub
MON COR PS-128 ) do wtyczki zasilania (3). Do
tego połączenia wymagana jest wtyczka o wymiarach
5,5/2,1 mm (Øna zewnątrz/wewnątrz). Biegun do-
datni należy ustawić na wewnętrznym styku.
5) Po podłączeniu zasilania kamera jest gotowa do
działania. Włącz monitor i ustaw pole widzenia kamery
na monitorowany obszar. W tym celu należy poluzo-
wać odpowiednie śruby przy module podtrzymującym
kamerę, a po ustawieniu ponownie je dokręcić.
Podczas ustawiania kamery należy zwrócić uwagę
na to, aby światło słoneczne nie padało bezpośrednio
na soczewki obiektywu. W przeciwnym wypadku czuj-
nik CCD może ulec uszkodzeniu!
6) Za pomocą pierścienia zmiany ogniskowej (4) należy
ustawić odpowiednią ostrość: poluzuj moletę na
pierścieniu i ustaw pierścień. Ogniskowa może być
zmieniana nieprzerwanie pomiędzy szerokim kątem
(“W”) i tele (“T”). Po ustawieniu należy ponownie
dokręcić śrubę, tak aby pierścień się nie ruszał.
7) Za pomocą pierścienia regulującego ostrość (5)
ustaw ostry obraz: poluzuj moletę na pierścieniu i
obracając pierścieniem ustaw ostrość. Po ustawieniu
należy ponownie dokręcić śrubę.
8) Załóż kopułę na podstawę. Proszę zwrócić uwagę na
to, że kamera jest w stanie rejestrować obraz również
przez przeźroczystą część kopuły. Następnie należy
ponownie przykręcić pierścień podtrzymujący kopułę.
4 Dane techniczne
Czujnik pomiarowy
obrazu: . . . . . . . . . . . . . układ scalony CCD,
8,5 mm (1/3")
System wideo: . . . . . . . P L, w poziomie 15 625 Hz,
w pionie 50 Hz
Liczba pikseli: . . . . . . . . 752 x 582
Rozdzielczość: . . . . . . . 420 linii
Soczewka: . . . . . . . . . . . 1 : 1,6/4–9mm
Minimalne oświetlenie: . 3 luksy
Względny wskaźnik
szumów: . . . . . . . . . . . . > 45dB
Wyjście wideo: . . . . . . . 1 Vpp/75 Ω, BNC
utomatyczna migawka: 1/50 –1/100000 s
Dopuszczalna
temperatura pracy: . . . . 0–40°C
Zasilanie: . . . . . . . . . . . . 12 V /190 m
Wymiary: . . . . . . . . . . . . Ø140 mm x 90 mm
Ciężar: . . . . . . . . . . . . . . 400 g
Według specyfikacji producenta
Może ulec zmianie.
®
TVCCD-1702COL Best.-Nr. 19.8820
®
Copyright©by MONACOR®INTERNATIONAL GmbH & Co. KG, Bremen, Germany. All rights reserved. A-0107.99.01.07.2003
®
4.0~9.0mm F:1.6
T
W
N
Video
+
-
12V
4
3
5
2
1
➀➁
E
PL

This manual suits for next models

1

Other Monacor Security Camera manuals

Monacor TVCCD-312/WS User manual

Monacor

Monacor TVCCD-312/WS User manual

Monacor TVCCD-360 User manual

Monacor

Monacor TVCCD-360 User manual

Monacor INC-1500THERM User manual

Monacor

Monacor INC-1500THERM User manual

Monacor TVCCD-140IR User manual

Monacor

Monacor TVCCD-140IR User manual

Monacor INC-150WIFI User manual

Monacor

Monacor INC-150WIFI User manual

Monacor TVCCD-450 User manual

Monacor

Monacor TVCCD-450 User manual

Monacor TVCCD-350COL User manual

Monacor

Monacor TVCCD-350COL User manual

Monacor TVCCD-160 User manual

Monacor

Monacor TVCCD-160 User manual

Monacor TVCCD-280 User manual

Monacor

Monacor TVCCD-280 User manual

Monacor TVCCD-370COL User manual

Monacor

Monacor TVCCD-370COL User manual

Monacor TVCCD-160SCOL User manual

Monacor

Monacor TVCCD-160SCOL User manual

Monacor TVCCD-120R User manual

Monacor

Monacor TVCCD-120R User manual

Monacor TVCCD-436HCOL User manual

Monacor

Monacor TVCCD-436HCOL User manual

Monacor Security TVCCD-550 User manual

Monacor

Monacor Security TVCCD-550 User manual

Monacor INC-2722BCP User manual

Monacor

Monacor INC-2722BCP User manual

Monacor INC-3557PTZ User manual

Monacor

Monacor INC-3557PTZ User manual

Monacor IOC-2812BV User manual

Monacor

Monacor IOC-2812BV User manual

Monacor TVCCD-182HCOL User manual

Monacor

Monacor TVCCD-182HCOL User manual

Monacor TVCCD-700COL User manual

Monacor

Monacor TVCCD-700COL User manual

Monacor AHCAM-310DF User manual

Monacor

Monacor AHCAM-310DF User manual

Monacor INC-2036BF User manual

Monacor

Monacor INC-2036BF User manual

Monacor TVCCD-370/WS User manual

Monacor

Monacor TVCCD-370/WS User manual

Monacor TVCCD-123COL User manual

Monacor

Monacor TVCCD-123COL User manual

Monacor TVCCD-170S User manual

Monacor

Monacor TVCCD-170S User manual

Popular Security Camera manuals by other brands

Oxford Instruments ANDOR Apogee Ascent quick start guide

Oxford Instruments

Oxford Instruments ANDOR Apogee Ascent quick start guide

Vimar ELVOX 4624.036EA quick start guide

Vimar

Vimar ELVOX 4624.036EA quick start guide

Surveon CAM4 Series user manual

Surveon

Surveon CAM4 Series user manual

D-Link DCS-3110 - SECURICAM Fixed Network Camera Quick installation guide

D-Link

D-Link DCS-3110 - SECURICAM Fixed Network Camera Quick installation guide

Medion MD 9028 operating manual

Medion

Medion MD 9028 operating manual

Godrej ET-200IRHMB-M user manual

Godrej

Godrej ET-200IRHMB-M user manual

Samsung SCC-100BP Specifications

Samsung

Samsung SCC-100BP Specifications

Vivotek FD8365EHV Quick installation guide

Vivotek

Vivotek FD8365EHV Quick installation guide

Instar IN-8403 2K+ PoE user manual

Instar

Instar IN-8403 2K+ PoE user manual

Eneo IPB-75M3610M0A user manual

Eneo

Eneo IPB-75M3610M0A user manual

Okina USA EIVD36-42VF Operational manual

Okina USA

Okina USA EIVD36-42VF Operational manual

Vitek VT-IR1C/24 Operation manual

Vitek

Vitek VT-IR1C/24 Operation manual

MOB MO6395 user manual

MOB

MOB MO6395 user manual

Fastrax IV instruction manual

Fastrax

Fastrax IV instruction manual

TECOM Cloud2door user manual

TECOM

TECOM Cloud2door user manual

Kerbl 10812 Instructions for use

Kerbl

Kerbl 10812 Instructions for use

LG LND7210 owner's manual

LG

LG LND7210 owner's manual

D-Link DCS-6815 user manual

D-Link

D-Link DCS-6815 user manual

manuals.online logo
manuals.online logoBrands
  • About & Mission
  • Contact us
  • Privacy Policy
  • Terms and Conditions

Copyright 2025 Manuals.Online. All Rights Reserved.