manuals.online logo
Brands
  1. Home
  2. •
  3. Brands
  4. •
  5. Monacor
  6. •
  7. Security Camera
  8. •
  9. Monacor TVCCD-320/SW User manual

Monacor TVCCD-320/SW User manual

CCTV-Einbaukamera
1 Einsatzmöglichkeiten
Diese Schwarzweißkamera mit Nadelöhr-Objektiv eig-
net sich besonders für eine unauffällige Video-Über-
wachung. Sie ist für den Einbau in eine Decken- oder
Wandverkleidung konzipiert. Die automatische Ver-
stärkungsregelung (AGC), der automatische elektroni-
sche Verschluß, die Gegenlichtkompensation und die
hohe Lichtempfindlichkeit ermöglichen einen Einsatz
auch bei kritischen Lichtverhältnissen.
2 Hinweise für den sicheren Gebrauch
Die Kamera entspricht der EU-Richtlinie für elektro-
magnetische Verträglichkeit 89/336/EWG.
●Verwenden Sie die Kamera nur im Innenbereich.
Schützen Sie sie vor Feuchtigkeit und Hitze (zuläs-
siger Einsatztemperaturbereich 0–40°C).
●Schützen Sie die Objektivlinse vor Staub oder son-
stiger Verschmutzung.
●Verwenden Sie für die Reinigung der Kamera nur
ein weiches, trockenes Tuch, auf keinen Fall Che-
mikalien oder Wasser.
●Wird die Kamera zweckentfremdet, nicht richtig an-
geschlossen oder nicht fachgerecht repariert, kann
für eventuelle Schäden keine Haftung übernommen
werden.
●Soll die Kamera endgültig aus dem Betrieb genom-
men werden, übergeben Sie sie zur Entsorgung
einem örtlichen Recyclingbetrieb.
3 Montage
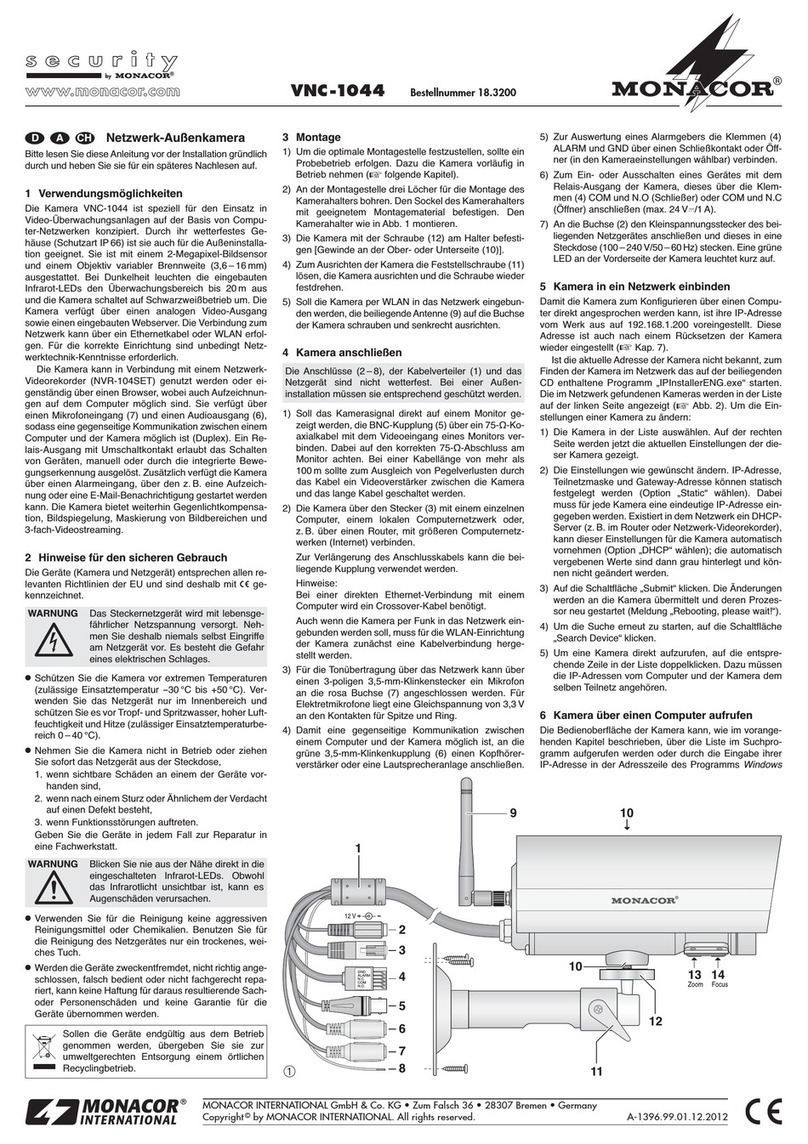
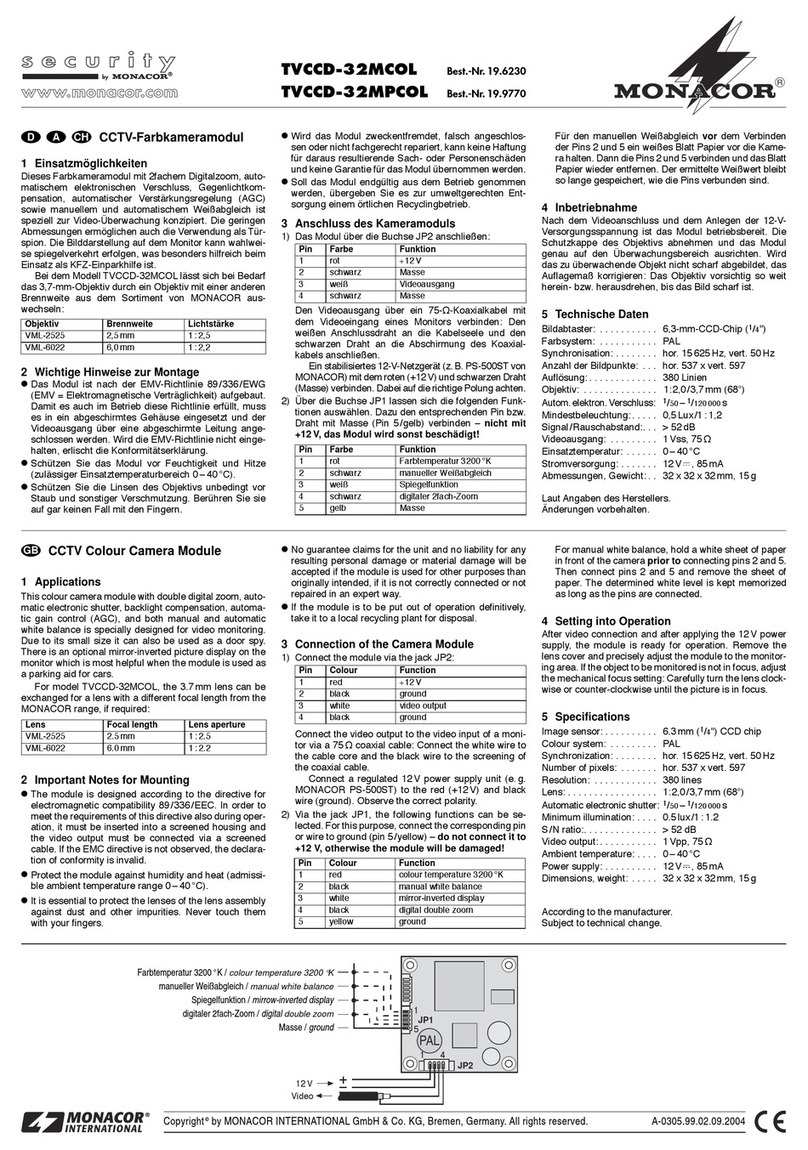
Die Kamera provisorisch in Betrieb nehmen (siehe
Kapitel 4), um die Montagestelle für eine optimale
Überwachung festzustellen. An dieser Stelle in die
Wand bzw. Decke ein Loch mit einem Durchmesser
von 47mm bohren (Einbautiefe 40mm). DieAnschlüs-
se endgültig herstellen, und die Einbaukamera fest-
schrauben.
4 Inbetriebnahme
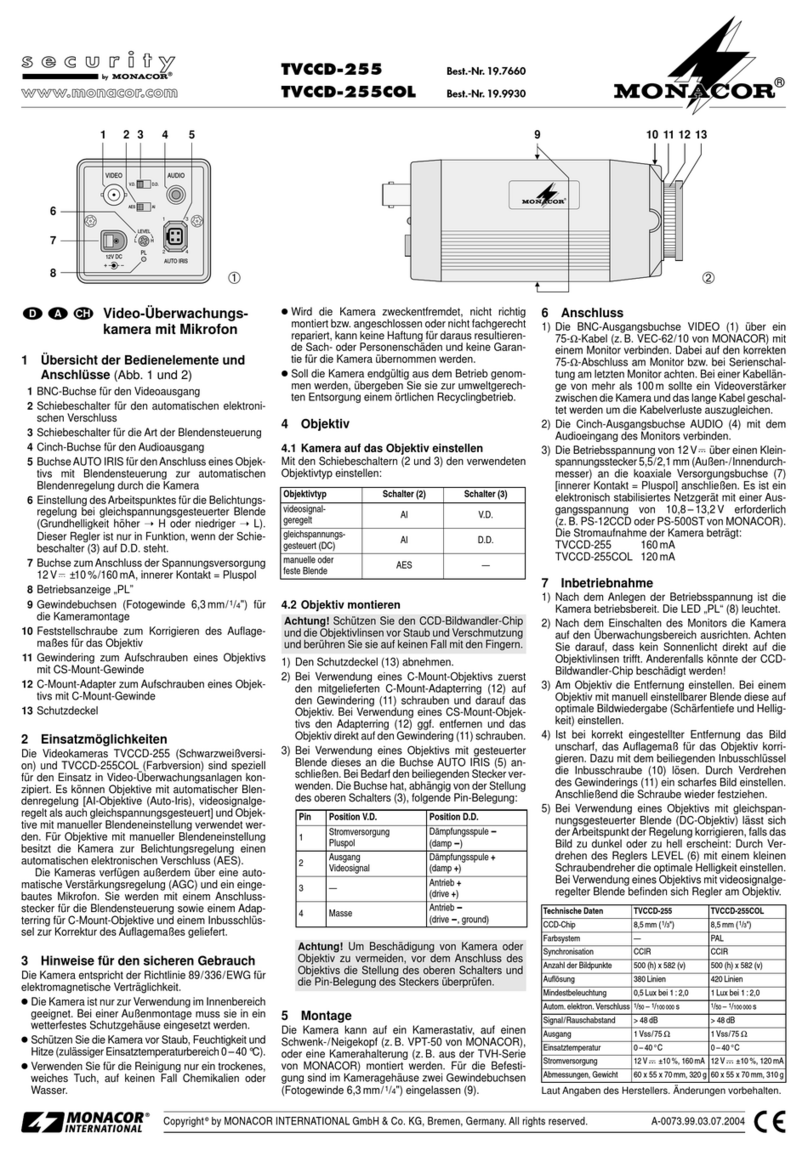
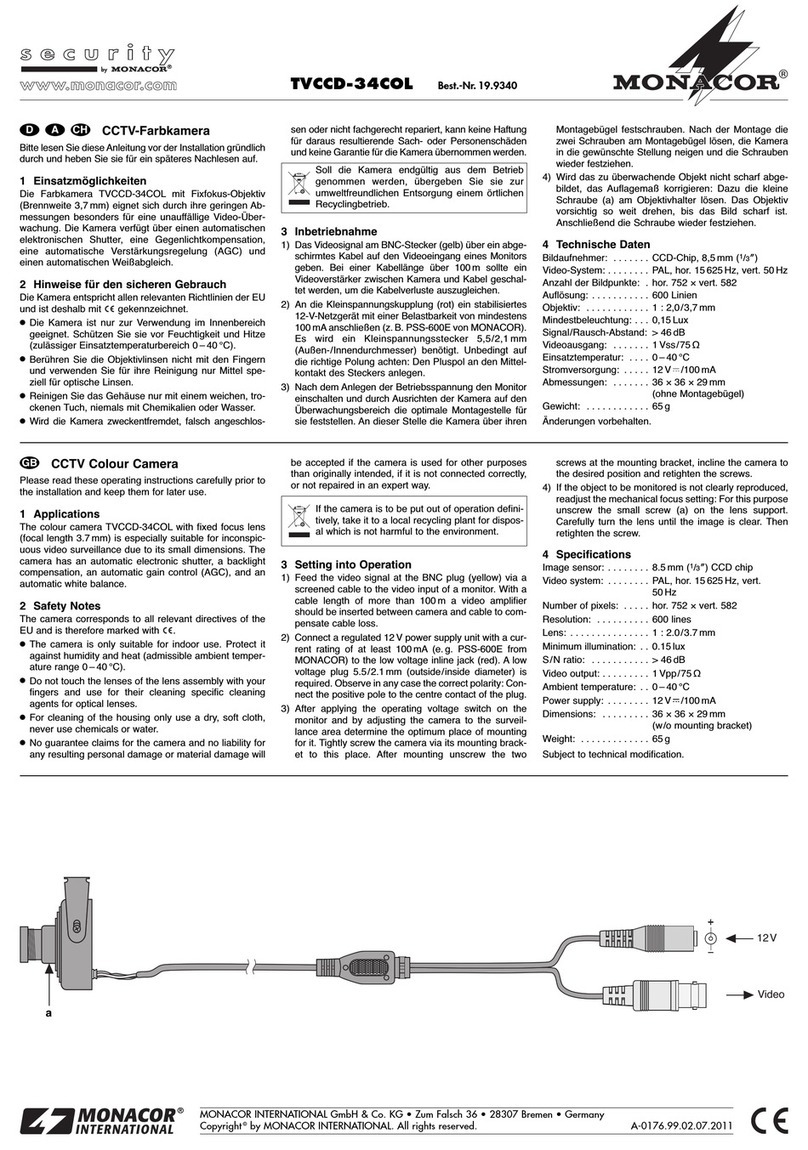
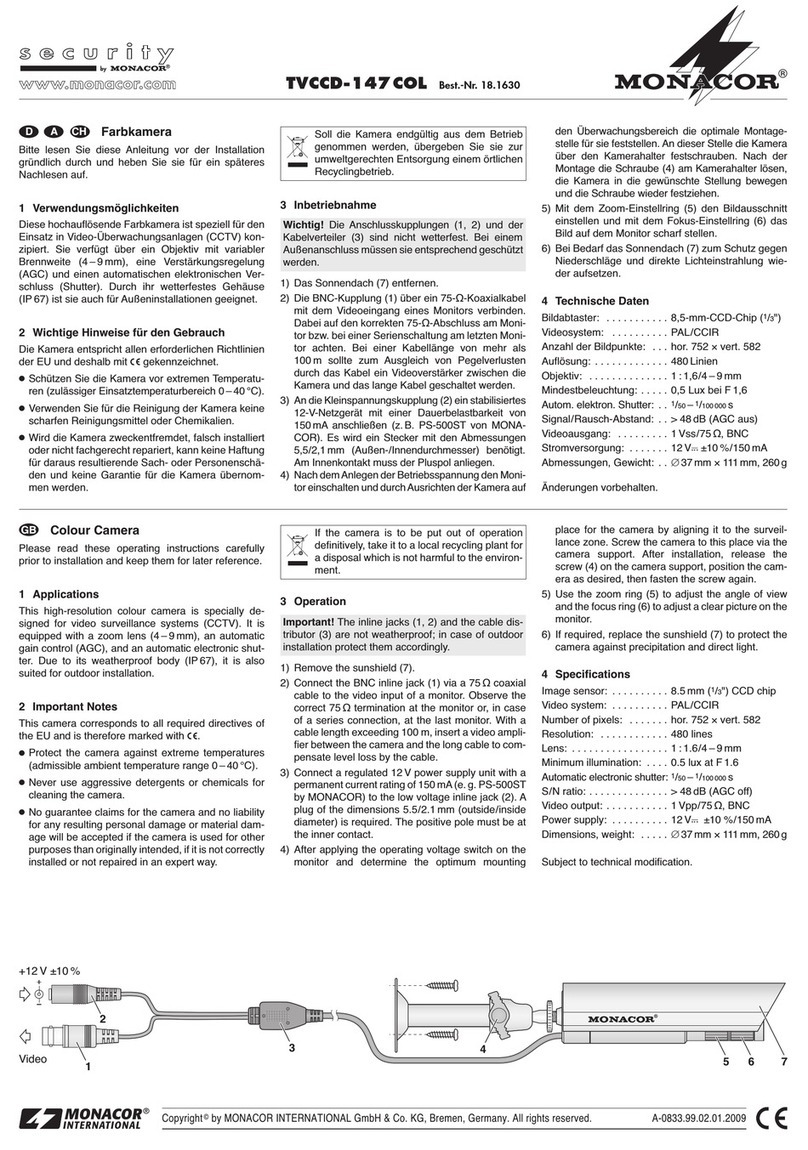
1) Die gelbe Cinch-Kupplung über ein abgeschirmtes
Anschlußkabel mit dem Videoeingang eines Moni-
tors verbinden. Bei einer Kabellänge von mehr als
100m sollte ein Videoverstärker zwischen Kamera
und Kabel geschaltet werden, um die Kabelver-
luste auszugleichen.
2) An die rote Kleinspannungskupplung ein elektro-
nisch stabilisiertes 12-V-Netzgerät mit einer Dauer-
belastbarkeit von mindestens 110mA anschließen
(z.B. PS-362ST oder PS-128A von MONACOR).
Es wird ein Kleinspannungsstecker 5,5/2,1mm
(Außen-/Innendurchmesser) benötigt. Den Pluspol
an den Mittelkontakt des Steckers anlegen.
3) Zum genauen Ausrichten der Kamera auf den
Überwachungsbereich den Monitor einschalten.
Die Kamerakugel (a) leicht in den Halter drücken,
damit sie nicht verkratzt und entsprechend drehen.
Vorsicht, durch das Anschlußkabel an der Kamera-
rückseite ist der Drehbereich begrenzt.
5 Technische Daten
Bildabtaster: . . . . . . . . . . 8,5-mm-CCD-Chip (1/3")
Synchronisation:. . . . . . . hor. 15625Hz, vert. 50Hz
Anzahl der Bildpunkte: . . hor. 500 x vert. 582
Auflösung: . . . . . . . . . . . 380 Linien
Objektiv: . . . . . . . . . . . . . 1:2,0/3,6mm (92°)
Mindestbeleuchtung: . . . 0,1 Lux
Signal/Rauschabstand: . > 46dB
Videoausgang: . . . . . . . . 1Vss, 75Ω
Einsatztemperatur:. . . . . 0–40°C
Stromversorgung:. . . . . . 12V , 110mA
Abmessungen: . . . . . . . . Ø 65mm x 45mm
Gewicht:. . . . . . . . . . . . . 160g
Laut Angaben des Herstellers.
Änderungen vorbehalten.
CCTV Camera to be built in
1 Applications
This black and white camera with pinhole lens is espe-
cially suitable for inconspicuous video monitoring. It is
designed for the installation into a ceiling or wall panel-
ling. The automatic gain control (AGC), the automatic
electronic shutter, the backlight compensation, and
the high sensitivity allow to use the camera even in
case of critical light conditions.
2 Safety Notes
The camera corresponds to the directive for electro-
magnetic compatibility 89/336/EEC.
●Only use the camera indoors. Protect it against
humidity and heat (admissible ambient temperature
range 0–40°C).
●Protect the lens against dust and other impurities.
●For cleaning only use a soft, dry cloth, by no means
chemicals or water.
●If the camera is used for purposes other than orig-
inally intended, if it is not connected properly or not
repaired in an expert way, there is no liability for any
possible damage.
●If the camera is to be put out of operation definitive-
ly, it must be disposed of in a local recycling plant.
3 Mounting
Set the camera into operation provisionally (see chap-
ter 4) to find out the mounting place for optimum moni-
toring. Drill a hole with a diameter of 47mm at this
place into the wall or ceiling (mounting depth 40mm).
Definitively make the connections, and tighten the
camera with screws.
4 Setting into Operation
1) Connect the yellow phono inline jack via a screened
cable to the video input of a monitor. In case of a
cable length of more than 100m, a video amplifier
should be inserted between camera and cable to
compensate cable loss.
2) To the red low voltage inline jack connect an elec-
tronically regulated 12V power supply unit with a
permanent current rating of at least 110mA (e.g.
PS-362ST or PS-128A by MONACOR). A low volt-
age plug 5.5/2.1mm (outside/inside diameter) is
necessary. Place the positive pole to the centre pin
of the plug.
3) For exact aligning of the camera to the monitoring
area, switch on the monitor. Slightly press the
camera ball (a) into the support so that it will not be
scratched, and turn it correspondingly. Caution, the
turning area is limited due to the connecting cable
on the rear side of the camera.
5 Specifications
Image sensor:. . . . . . . . . 8.5mm (1/3") CCD chip
Synchronization:. . . . . . . hor. 15625Hz, vert. 50Hz
Number of pixels: . . . . . . hor. 500 x vert. 582
Resolution: . . . . . . . . . . . 380 lines
Lens:. . . . . . . . . . . . . . . . 1:2.0/3.6mm (92°)
Min. illumination:. . . . . . . 0.1lux
S/N ratio: . . . . . . . . . . . . > 46dB
Video output: . . . . . . . . . 1Vpp, 75Ω
Ambient temperature:. . . 0–40°C
Power supply:. . . . . . . . . 12V , 110mA
Dimensions: . . . . . . . . . . Ø 65mm x 45mm
Weight:. . . . . . . . . . . . . . 160g
According to the manufacturer.
Subject to change.
®
TVCCD-320/SW Best.-Nr. 19.5760
TVCCD-320/WS Best.-Nr. 19.5770
Copyright©by INTER-MERCADOR GmbH & Co. KG, Bremen, Germany All rights reserved. MONACOR®International 08.00.01
12V
Video
a
rot • red
gelb • yellow
D A CH
GB
CCTV caméra à
encastrer
1 Possibilités d’utilisation
Cette caméra noir et blanc avec objectif de chas est
spécialement conçue pour une surveillance vidéo
discrète. Elle est construite pour l’installation dans un
revêtement de mur ou de plafond. Le réglage automa-
tique d’amplification (AGC), l’obturation électronique
automatique, la compensation contre-jour et la sensi-
bilité lumineuse permettent l’utilisation même dans
des conditions lumineuses critiques.
2 Conseils d’importants pour l’utilisation
La caméra répond à la norme européenne 89/336/
CEE portant sur la compatibilité électromagnétique.
●Utilisez la caméra uniquement à l’intérieur. Proté-
gez-la de l’humidité et de la chaleur (température
d’utilisation admissible 0–40°C).
●Protégez la lentille de l’objectif de la poussière ou
d’autres impuretés.
●Pour la nettoyage, utilisez un chiffon doux et sec, en
aucun cas de produits chimiques ou d’eau.
●Nous déclinons toute responsabilité en cas de dom-
mage si la caméra est utilisée dans un but autre que
celui pour lequel elle a été créée, si elle n’est pas
correctement branchée ou reparée d’une manière
appropriée.
●Lorsque la caméra est définitivement retirée du ser-
vice, vous devez la déposer dans une usine de recy-
clage adaptée.
3 Montage
Mettez la caméra en opération provisoirement (voir
chapitre 4) pour trouver la place de montage pour une
surveillance optimale.Acette place percez un trou avec
un diamètre de 47mm dans le mur ou plafond (profon-
deur de montage 40mm). Etablissez les connexions
définitivement, et vissez la caméra à encastrer.
4 Mise en opération
1) Branchez la fiche RCA jaune via un câble blindé
avec l’entrée vidéo d’un moniteur. Avec une lon-
gueur de câble de plus de 100m, un amplificateur
vidéo devrait être inséré entre la caméra et le câble
pour compenser les pertes de câble.
2) A la fiche basse tension rouge, branchez une ali-
mentation 12V stabilisée électroniquement avec une
capacité de charge permanente de 110 mAau moins
(p.ex. PS-362ST ou PS-128A de MONACOR). Une
fiche basse tension 5,5/2,1mm (Ø ext./int.) est
nécessaire. Placez le pôle positif au contact central
de la fiche.
3) Pour orienter la caméra exactement sur la zone de
surveillance, allumez le moniteur. Poussez la boule
de caméra (a) légèrement dans le support afin
qu’elle ne soit pas rayée, et tournez-la correspon-
damment.Attention, la zone pour tourner la caméra
est limitée à cause du câble de branchement à l’ar-
rière de la caméra.
5 Caractéristiques techniques
Système: . . . . . . . . . . . . puce 8,5mm (1/3") CCD
Synchronisation:. . . . . . . hor. 15625Hz, vert. 50Hz
Numéro de pixels: . . . . . hor. 500 x vert. 582
Résolution: . . . . . . . . . . . 380 lignes
Objectif: . . . . . . . . . . . . . 1:2,0/3,6mm (92°)
Luminosité minimale: . . . 0,1lux
Rapport signal/bruit: . . . > 46dB
Sortie vidéo: . . . . . . . . . . 1Vcc, 75Ω
Température ambiente: . 0–40°C
Alimentation:. . . . . . . . . . 12V , 110mA
Dimensions: . . . . . . . . . . Ø 65mm x 45mm
Poids: . . . . . . . . . . . . . . . 160g
D’après les données du constructeur.
Tout droit de modification réservé.
Telecamera CCTV
1 Possibilità d’impiego
Questa telecamera in bianco/nero con obiettivo a
cruna d’ago è stata realizzata specialmente per una
sorveglianza video che no si noti subito. È ideale per il
montaggio nei rivestimenti di soffitti o di pareti. La
regolazione automatica del guadagno (AGC), l’ottura-
tore elettronico automatico, la compensazione della
controluce e l’alta sensibilità alla luce permettono l’im-
piego anche in condizioni critiche.
2 Avvertenze
La telecamera corrisponde alla direttiva CE 89/336/
CEE sulla compatibilità elettromagnetica.
●Usare la telecamera solo all’interno di locali. Proteg-
gerla dall’umidità e dal calore (temperatura d’impie-
go ammessa fra 0°C e 40°C).
●Proteggere la lente dell’obiettivo dalla polvere e
dallo sporco in genere.
●Per la pulizia usare solo un panno morbido, asciut-
to; non impiegare in nessun caso prodotti chimici o
acqua.
●Nel caso di uso improprio, di collegamenti sbagliati
o di riparazione scorretta non si assume nessuna
responsabilità per eventuali danni.
●Se si desidera eliminare la telecamera definitiva-
mente, consegnarla per lo smaltimento ad un’istitu-
zione locale per il riciclaggio.
3 Montaggio
Far funzionare la telecamera provvisoriamente (vedi
capitolo 4) per trovare il posto di montaggio ideale.
Praticare in quel punto un foro con 47mm di diametro
e 40mm di profondità. Eseguire i collegamenti e fissa-
re la telecamera.
4 Messa in funzione
1) Collegare la presa gialla cinch con l’ingresso video
di un monitor servendosi di un cavo schermato. Se
la lunghezza del cavo supera i 100 metri conviene
inserire un amplificatore video fra telecamera e
cavo per compensare le perdite dovute al cavo.
2) Collegare un alimentatore 12V stabilizzato elettro-
nicamente con potenza permanente di 110mAmin.
(p.es. PS-362ST o PS-128Adella MONACOR) con
la presa rossa per piccole tensioni. È richiesto un
connettore per piccole tensioni 5,5/2,1mm (diame-
tro esterno/interno). Il positivo dev’essere sul con-
tatto centrale del connettore.
3) Per orientare bene la telecamera sulla zona da sor-
vegliare accendere il monitor. Spingere delicata-
mente la sfera (a) della telecamera nel suo suppor-
to senza provocare graffi e girarla secondo le
necessità. Da notare che il campo di rotazione è
limitato dal cavo di collegamento sul retro della
telecamera.
5 Dati tecnici
Sensore ottico: . . . . . . . . Chip CCD, 8,5mm (1/3")
Sincronizzazione:. . . . . . hor. 15625Hz, vert. 50Hz
Numero pixel:. . . . . . . . . hor. 500 x vert. 582
Risoluzione: . . . . . . . . . . 380 linee
Obiettivo: . . . . . . . . . . . . 1:2,0/3,6mm (92°)
Illuminazione minima:. . . 0,1lux
Rapporto S/R: . . . . . . . . > 46dB
Uscita video:. . . . . . . . . . 1Vpp, 75Ω
Temperatura d’impiego: . 0–40°C
Alimentazione: . . . . . . . . 12V , 110mA
Dimensioni:. . . . . . . . . . . Ø 65mm x 45mm
Peso: . . . . . . . . . . . . . . . 160g
Dati forniti dal produttore.
Con riserva di modifiche tecniche.
®
TVCCD-320/SW Best.-Nr. 19.5760
TVCCD-320/WS Best.-Nr. 19.5770
Copyright©by INTER-MERCADOR GmbH & Co. KG, Bremen, Germany All rights reserved. MONACOR®International 08.00.01
12V
Video
a
rouge • rosso
jaune • giallo
I
F B CH

This manual suits for next models

3

Other Monacor Security Camera manuals

Monacor TVCCD-34COL User manual

Monacor

Monacor TVCCD-34COL User manual

Monacor AV-3033CCD User manual

Monacor

Monacor AV-3033CCD User manual

Monacor INC-4036MDVP User manual

Monacor

Monacor INC-4036MDVP User manual

Monacor INC-2000BX User manual

Monacor

Monacor INC-2000BX User manual

Monacor TVCCD-130A User manual

Monacor

Monacor TVCCD-130A User manual

Monacor TVCCD-182HCOL User manual

Monacor

Monacor TVCCD-182HCOL User manual

Monacor TVCCD-180COL User manual

Monacor

Monacor TVCCD-180COL User manual

Monacor HDCAM-652AF User manual

Monacor

Monacor HDCAM-652AF User manual

Monacor INC-4036DF User manual

Monacor

Monacor INC-4036DF User manual

Monacor TVCCD-157SET User manual

Monacor

Monacor TVCCD-157SET User manual

Monacor INC-1500THERM User manual

Monacor

Monacor INC-1500THERM User manual

Monacor TVCCD-130S User manual

Monacor

Monacor TVCCD-130S User manual

Monacor TVCCD-32MCOL User manual

Monacor

Monacor TVCCD-32MCOL User manual

Monacor INC-4757PTZ User manual

Monacor

Monacor INC-4757PTZ User manual

Monacor TVCCD-257SET User manual

Monacor

Monacor TVCCD-257SET User manual

Monacor TVCCD-400 User manual

Monacor

Monacor TVCCD-400 User manual

Monacor security TVCCD-250SET User manual

Monacor

Monacor security TVCCD-250SET User manual

Monacor TVCCD-1702COL User manual

Monacor

Monacor TVCCD-1702COL User manual

Monacor IOC-2812BV User manual

Monacor

Monacor IOC-2812BV User manual

Monacor TVCCD-350VCOL User manual

Monacor

Monacor TVCCD-350VCOL User manual

Monacor security TVCCD-189HCOL User manual

Monacor

Monacor security TVCCD-189HCOL User manual

Monacor TVCCD-180 User manual

Monacor

Monacor TVCCD-180 User manual

Monacor TVCCD-160S User manual

Monacor

Monacor TVCCD-160S User manual

Monacor TVCCD-34COL User manual

Monacor

Monacor TVCCD-34COL User manual

Popular Security Camera manuals by other brands

Visionhitech VB21S3 Quick installation guide

Visionhitech

Visionhitech VB21S3 Quick installation guide

Hunt CCTV HTC-LP112DID instruction manual

Hunt CCTV

Hunt CCTV HTC-LP112DID instruction manual

InMotion in30S1P1L25 quick start guide

InMotion

InMotion in30S1P1L25 quick start guide

ICRealtime AVS Series quick start guide

ICRealtime

ICRealtime AVS Series quick start guide

Smart watch H20IPSD302 manual

Smart watch

Smart watch H20IPSD302 manual

HIK VISION DS-2CD2763G0-IZS quick start guide

HIK VISION

HIK VISION DS-2CD2763G0-IZS quick start guide

HIK VISION DS-2CD2346G1-l user manual

HIK VISION

HIK VISION DS-2CD2346G1-l user manual

i-PRO WV-X86531-Z2 installation guide

i-PRO

i-PRO WV-X86531-Z2 installation guide

Abus TVIP42562 manual

Abus

Abus TVIP42562 manual

HIK VISION DS-2CE11D0T-PIRL user manual

HIK VISION

HIK VISION DS-2CE11D0T-PIRL user manual

Abus HDCC72551 user manual

Abus

Abus HDCC72551 user manual

Delta OMEGA-PTZ-22P4-4P user manual

Delta

Delta OMEGA-PTZ-22P4-4P user manual

HIK VISION DS-2DF1-57XY Technical manual

HIK VISION

HIK VISION DS-2DF1-57XY Technical manual

i3 International Am52R user manual

i3 International

i3 International Am52R user manual

Alarmcom ADC-V724 installation guide

Alarmcom

Alarmcom ADC-V724 installation guide

i3 International i3-B731 quick start guide

i3 International

i3 International i3-B731 quick start guide

Cam Scan CS-PD6600 manual

Cam Scan

Cam Scan CS-PD6600 manual

Clear One UNITE 160 4K quick start guide

Clear One

Clear One UNITE 160 4K quick start guide

manuals.online logo
manuals.online logoBrands
  • About & Mission
  • Contact us
  • Privacy Policy
  • Terms and Conditions

Copyright 2025 Manuals.Online. All Rights Reserved.