manuals.online logo
Brands
  1. Home
  2. •
  3. Brands
  4. •
  5. Mosmatic
  6. •
  7. Cleaning Equipment
  8. •
  9. Mosmatic DR 520 User manual

Mosmatic DR 520 User manual

T
D
-
80
6
62
D
/E
©
M
O
S
M
A
T
A
A
I
C
A
G
15
.
11
.
2
0
11
Ä
n
d
e
r
u
n
g
e
n
v
o
r
be
h
a
l
t
e
n
/
S
ub
j
b
e
c
t
t
o
c
h
a
n
g
e
w
i
w
w
t
h
t
t
o
u
t
n
o
t
i
ce
DR 520
No. 80.662
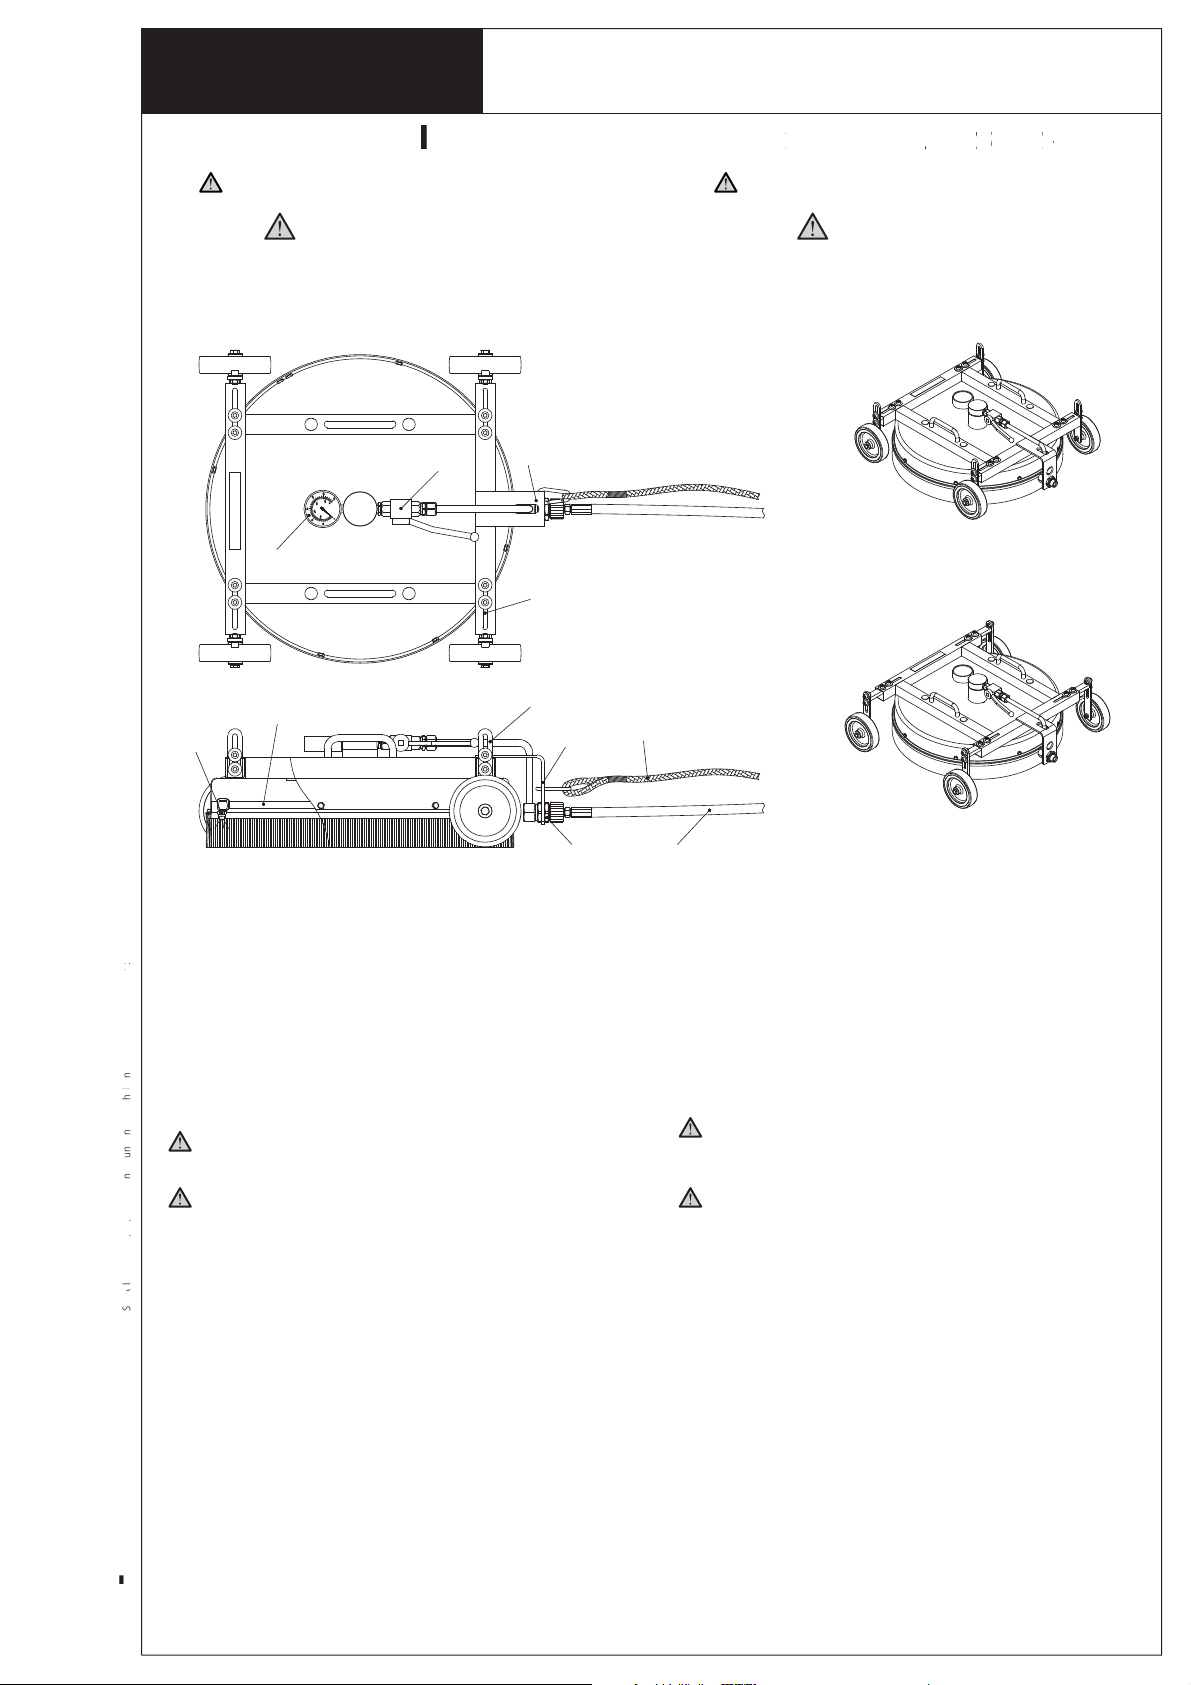
1. Screw the nozzles (a / not included) into the rotor arm (b).
2. Connect the safety rope with snap hook (c / not included) into the
safety eye (d).
3. Connect the HP hose (e) with the coupling (f) / (both not included).
4. Adjust the wheel track (g) of the Roof Cleaner depending on the
roof surface. Use the spacer (Included Accessory) to set the cleaning
distance between spray nozzle and roof surface.
5. Turn on the fluid flow by using the ball valve (h). Please check the
pressure on the roof again by using the pressure gage (i) mounted
on the roof cleaner. Warning: Use correct pressure and nozzle angle
according to roof surface.
Operator must be secured according to roof working standards.
For your own safety
- Read all instructions before the initial operation. Check their proper
condition and that they operate safely.
- Always use protection gear when using products connected to high
pressure.
- Before any maintenance or nozzle-change, turn off the high pressure
water supply, e.g.: turn off and secure the
power switch.
- After turning off the system, allow all self propelled equipment to
come to a complete stop before handling.
- Safety regulations and guidelines (Accident Prevention Rules) from
the manufacturer of your high pressure cleaner are applicable.
- Nozzle installation according to nozzle manufacturer.
- Do not move the unit over objects or uneven surfaces.
- Do not lift up the unit while operating.
- Do not run the unit if spray-arm is out of balance or bent, damage to
the swivel will result.
- No modifications to the unit are permitted.
- The equipment may be installed and used only by particularly trained
technical personnel.
1. Die Düsen (a / nicht inbegriffen) in den Kreiselarm (b) schrauben.
2. Das Sicherungsseil mit Karabinerhaken (c / nicht inbegriffen) in die
Sicherheits-Öse (d) einhängen. Dadurch wird das Gerät gesichert.
3. Den HD-Schlauch (e) an die Verschraubung (f) dicht anschliessen (beide
nicht inbegriffen).
4. Den Dachreiniger durch verstellen der Radaufhängungen (g) auf die
gewünschte Betriebsposition einstellen. Mit dem Distanzadapter (siehe
Zubehör) kann die Reinigungseinheit näher an die Oberfläche geführt
werden.
5.
Mit dem Kugelhahn (h) die Strömung des Durchflussmediums öffnen.
Der Druck sollte auf dem Dach nochmal mit Hilfe des Manometers (i)
überprüft werden, da es vom Boden zum Dach Druckunterschiede gibt.
Achtung: richtiger Druck für Dachbeschaffenheit wählen.
Es sollten alle notwendigen Sicherheitsvorkehrungen für die Dacharbei-
ten getroffen werden.
Für Ihre Sicherheit
- Alle Anleitungen sind vor erster Inbetriebnahme zu lesen.
Das Gerät ist auf ordnungsgemässen Zustand und Betriebssicherheit zu
prüfen.
- Alle Produkte die mit Hochdruck betrieben werden, dürfen nicht
ungeschützt verwendet werden.
- Bei Düsenwechsel sowie vor Wartungs- und Instandsetzungsarbeiten die
Wasserzufuhr absperren, das System abschalten und gegen unbeabsich-
tigtes Einschalten sichern
- Nach dem Abschalten des Systems läuft der Kreiselarm für kurze Zeit
nach. Beim Anfassen des Kreiselarmes besteht
Verletzungsgefahr.
- Es gelten die Sicherheitsrichtlinien (Unfallverhütungsvorschriften) des
Herstellers von Hochdruckgeräten.
- Die Düsenbefestigung erfolgt laut Angaben des Düsen-Herstellers.
- Das Gerät nicht über Gegenstände oder unebene Flächen führen.
- Das Gerät während der Benutzung nicht anheben.
- Bei einer Unwucht oder Krümmung des Kreiselarmes darf das Gerät
nicht benutzt werden, da dadurch das Drehgelenk beschädigt wird.
- An den Geräten dürfen keine Veränderungen vorgenommen werden.
- Das Gerät darf nur von speziell ausgebildetem Fachpersonal installiert
und bedient werden.
D
achreiniger
Roof
C
l
ea
n
er
max. eingefahrene Räder
max. ausgefahrene Räder
maximum retracted wheels
maximum extended wheels
a
bg
c
fe
i
h
g
d
d
A
ttention
:
H
ig
h
Pressure 500
b
ar
d
o not us
e
unprotected
!
M
o
n
t
ag
e
an
l
e
i
t
u
ng
A
s
s
s
s
e
m
b
l
y
l
i
n
i
i
s
t
r
t
t
u
rr
c
t
i
t
t
ons
i
i
(Diese Anleitung gilt für das Basismodel sowie für
daraus entstehende Versionen)
(This instruction is valid for the base model as well as for
the resulting versions)
A
chtung
:
Hochd
r
uck
500bar
nic
h
t un
g
esc
h
ütz
t
v
erwenden!
DR 520
No. 80.662
TD - 80662 D/E
© MOSMATIC AG 16.07.2013 Änderungen vorbehalten / Subject to change without notice
Dachreiniger
Roof Cleaner
Ersatzteilliste Spare parts List
2 3
4
5
1
7
8
6
Pos. Art. Nr. Bezeichnung
1 903.032 Manometer
2 59.916 Drehgelenk DYU
3 36.909 Hartmetall-Dichtsatz
4 90.066 Kugelhahn
5 900.933 Gummirad ø125
6 902.448 Höhenschieber
7 82.941 Turbo-Kreisel-Arm ø470
8 901.852 Bürstenring
Pos. Part No. Description
1 903.032 Pressure gage
2 59.916 Swivel DYU
3 36.909 Carbide seal-kit
4 90.066 Ball valve
5 900.933 Rubber wheels ø125
6 902.448 Height adjuster
7 82.941 Turbo-rotor-arm ø470
8 901.852 Brush ring
6
T
D
-
80662
D
/
E
©
M
O
S
M
A
T
A
A
I
C
A
G
15
.
11
.
2
0
11
Ä
n
d
e
r
u
n
g
e
n
v
o
r
b
e
h
a
l
t
e
n
/
S
ub
j
b
e
c
t
t
o
c
h
an
g
e
w
i
w
w
t
h
t
t
o
u
t
n
o
t
i
c
e
DR-Z
No. 38217
Z
ube
h
ör
A
c
cessor
i
es
V
erlängerung
f
ür DYT
E
x
te
n
s
i
o
n
fo
r DY
T
Drehgelenk DYU
Swivel DYU
Verlängerung 38217
Extension 38217
Gehäuse DR
Housing DR
Turbo Kreisel Arm TKA
Turbo Rotor Arm TKA
Dach
Roof
~60mm
~30mm
mit Verlängerung 38217
with Extension 38217
ohne Verlängerung 38217
without Extension 38217
The Extension adaptor may be installed only by particularly trained technical personell.
The proper installation and the safe an effective use rests with the user. Please contact Mosmatic for further
Assistance. Warranty, Terms and Conditions of Sales are not affected by these instructions.
Die Installation der Verlängerung darf nur von speziell ausgebildetem Fachpersonal durchgeführt werden.
Die Verantwortung für eine sichere und effiziente Anwendung liegt vollumfänglich beim Benutzer.
Weitere Auskünfte erhalten sie bei Mosmatic. Es gelten die allgemeinen Verkaufs- und Lieferbedingungen.

This manual suits for next models

1

Other Mosmatic Cleaning Equipment manuals

Mosmatic FL-CRY 520 User manual

Mosmatic

Mosmatic FL-CRY 520 User manual

Mosmatic FL-PH 520 User manual

Mosmatic

Mosmatic FL-PH 520 User manual

Mosmatic DR 520 User manual

Mosmatic

Mosmatic DR 520 User manual

Mosmatic TD-80611 A User manual

Mosmatic

Mosmatic TD-80611 A User manual

Mosmatic Ceiling Boom-Z User manual

Mosmatic

Mosmatic Ceiling Boom-Z User manual

Popular Cleaning Equipment manuals by other brands

Kärcher WATERCLEAN 1600 operating instructions

Kärcher

Kärcher WATERCLEAN 1600 operating instructions

ARIETE Vapori 2600 Instructions for use

ARIETE

ARIETE Vapori 2600 Instructions for use

Edic PTAC Owner's/operator's manual

Edic

Edic PTAC Owner's/operator's manual

Kärcher B 260 RI manual

Kärcher

Kärcher B 260 RI manual

Geotech SP 520E Use and maintenance manual

Geotech

Geotech SP 520E Use and maintenance manual

Sapphire Audio 370 SS manual

Sapphire Audio

Sapphire Audio 370 SS manual

Dynaset KPL 270-200-1250x8 Operation instructions

Dynaset

Dynaset KPL 270-200-1250x8 Operation instructions

SkyVac 78 Assembly & user's guide

SkyVac

SkyVac 78 Assembly & user's guide

Hizero F1 user manual

Hizero

Hizero F1 user manual

Kärcher ICC 1 S B/D manual

Kärcher

Kärcher ICC 1 S B/D manual

Pahlen Auto-UV 75/130 user manual

Pahlen

Pahlen Auto-UV 75/130 user manual

meccanocar Safe 4 You Use and maintenance manual

meccanocar

meccanocar Safe 4 You Use and maintenance manual

Butler's Choice BC6115BK manual

Butler's Choice

Butler's Choice BC6115BK manual

Kärcher K 2.68 manual

Kärcher

Kärcher K 2.68 manual

Meiko TopCut H operating instructions

Meiko

Meiko TopCut H operating instructions

3M Bair Hugger 675 Operator's manual

3M

3M Bair Hugger 675 Operator's manual

Kärcher HDR 777 manual

Kärcher

Kärcher HDR 777 manual

RIDGID K-1500B manual

RIDGID

RIDGID K-1500B manual

manuals.online logo
manuals.online logoBrands
  • About & Mission
  • Contact us
  • Privacy Policy
  • Terms and Conditions

Copyright 2025 Manuals.Online. All Rights Reserved.