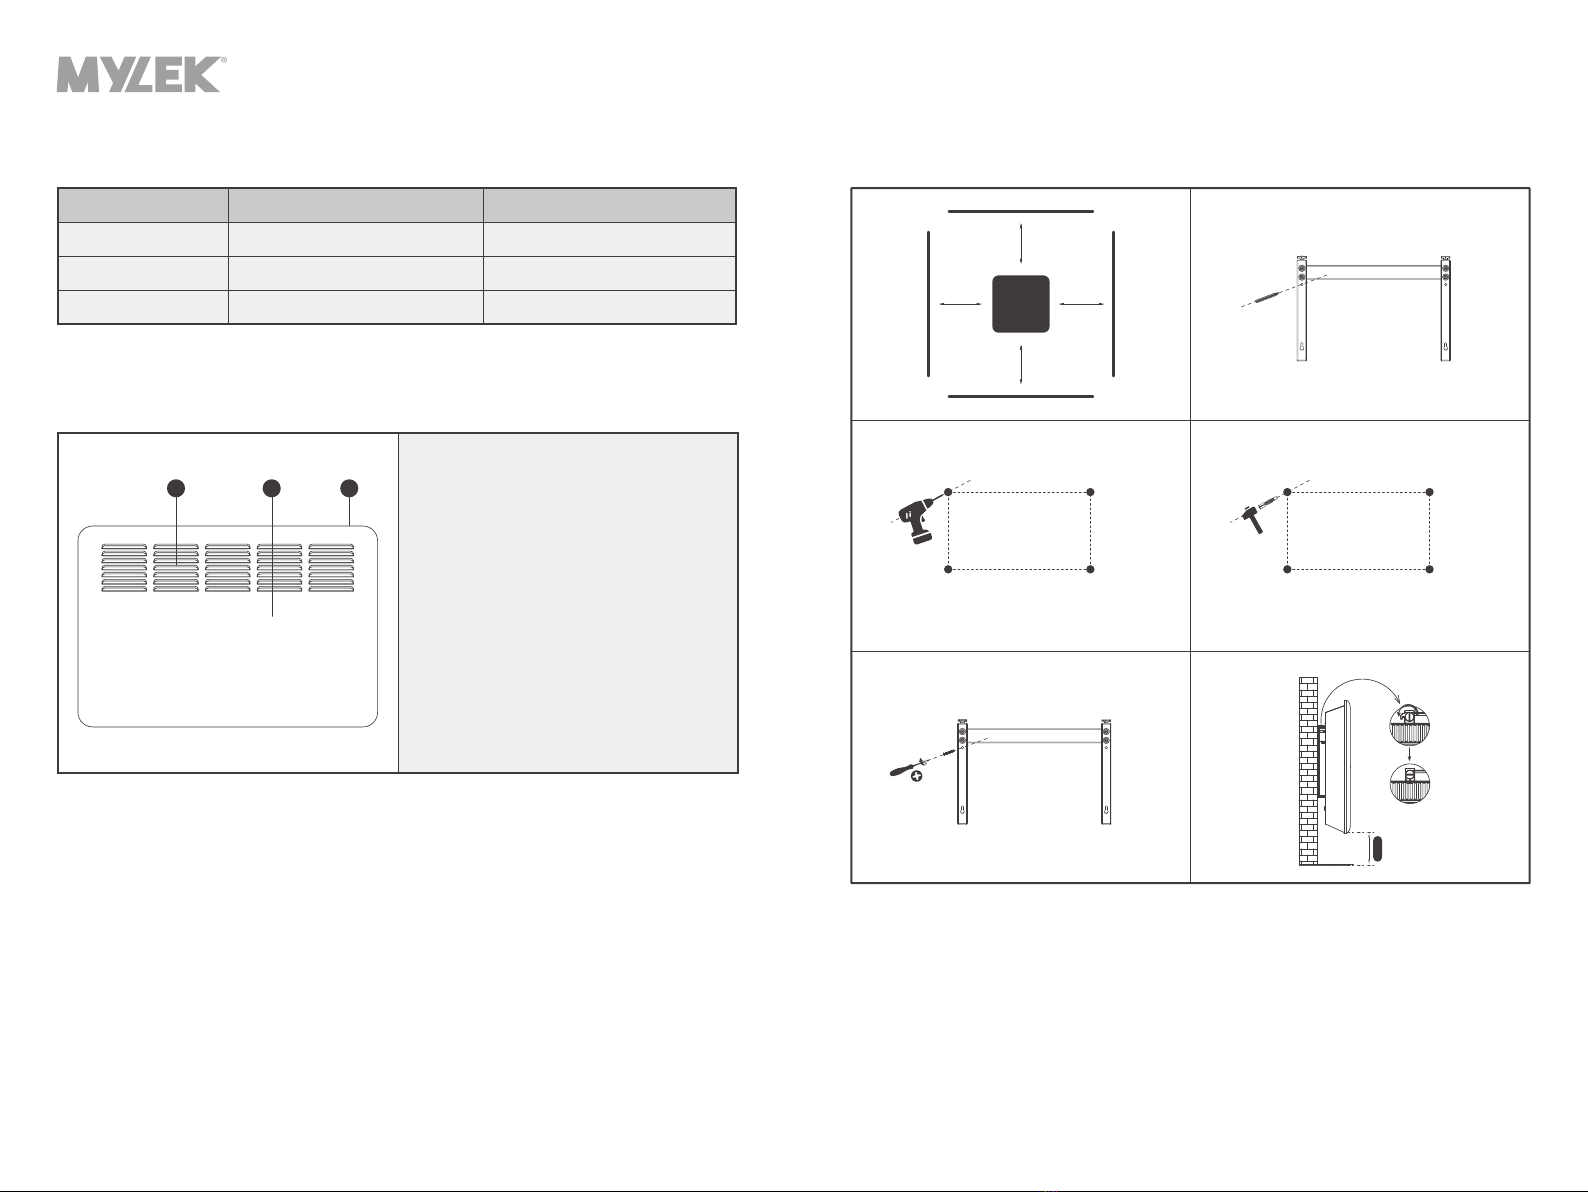
Mylek MHPH05-10E User manual

Please read the instructions carefully. You
must inspect the appliance including its
cable and plug for any signs of damage.
If the product is damaged, DO NOT USE
and contact your supplier immediately for
refund or replacement.
This product is only suitable for well
insulated spaces or occasional use.
BEFORE USE:
MHPH05-10E / MHPH05-15E / MHPH05-20E
WIFI PANEL HEATER
INSTRUCTION
MANUAL FOR MODELS
V 2021-12

2 | | 3
INSTRUCTION
MANUAL FOR MODELS
| GENERAL INFORMATION
Thank you for choosing the Mylek WiFi panel heater with
Open window function. Please take time to carefully read
and understand the entire instruction manual before using
the product and then save it for future reference. We reserve
the right for any errors in text or images and any necessary
changes made to technical data. If you have any questions
concerning operational or technical problems please contact
our Customer Services on 0800 091 3171.
| BEFORE USING THIS HEATER
When using electrical appliances, basic precautions should
always be followed to reduce the risk of fire, electric shock,
and injury to persons. This includes but is not limited to the
following.
CAUTION
This appliance is not intended for use by persons (including
children) with reduced physical, sensory or mental
capabilities, or lack of experience and knowledge of the
product. The appliance is to be operated by responsible adults
only after reading and understanding these instructions.
Children should be supervised at all times to ensure that
they do not play with the appliance. Children under 16 years
should not operate the unit or carry out maintenance and/
or clean the unit. Any infirmed persons in the vicinity of the
unit should be accompanied by a responsible and competent
able bodied adult. Remove the packing and make sure that
the appliance is intact. If there is any doubt concerning the
integrity of the unit do not use the appliance and contact our
recommended after-sales service.
Do not leave any packaging materials within easy reach of
children. Before switching on appliance check if the electrical
voltage and frequency of the circuit correspond to those
indicated on the appliance. Use the appliance only for the
stated purpose, namely as a heater for domestic use. Do not
use it for any other application as it could be dangerous.
| IMPORTANT SAFETY REQUIREMENTS
• This appliance can be used by children aged from 8
years and above and persons with reduced physical,
sensory or mental capabilities or lack of experience
and knowledge if they have been given supervision or
instruction concerning use of the appliance in a safe way
and understand the hazards involved. Children shall not
play with the appliance. Cleaning and user maintenance
shall not be made by children without supervision.
• Children of less than 3 years should be kept away unless
continuously supervised.
• Children aged from 3 years and less than 8 years shall
only switch on/off the appliance provided that it has
been placed or installed in its intended normal operating
position and they have been given supervision or
instruction concerning use of the appliance in a safe way
and understand the hazards involved. Children aged from
3 years and less than 8 years shall not plug in, regulate

4 | | 5
INSTRUCTION
MANUAL FOR MODELS
and clean the appliance or perform user maintenance.
• CAUTION - Some parts of this product can become very
hot and cause burns. Particular attention has to be given
where children and vulnerable people are present.
• If the supply cord is damaged, it must be replaced by
the manufacturer, its service agent or similarly qualified
persons in order to avoid a hazard.
• CAUTION: In order to avoid a hazard due to inadvertent
resetting of the thermal cutout, this appliance must not
be supplied through an external switching device, such
as a timer, or connected to a circuit that is regularly
switched on and off by the utility.
• The heater must not be located immediately below a
socket-outlet.
• Means for disconnection having a contact separation
in all poles must be incorporated in the fixed wiring in
accordance with the wiring rules.
• For correct installation on the wall, thanks to refer to
‘Installation on wall’ part.
• Fixed heaters are to be installed so that switches and
other controls cannot be touched by a person in the bath
or shower.
• WARNING: In order to avoid overheating, do
not cover the heater.
WARNING: this product should only be installed in Zone 2
and above only if fitted in a bathroom according the national
wiring rules.
Note: The drawing below is for reference only.
If this unit is fitted in a bathroom then it should be fitted by a
qualified electrician.
In the case as of buildings room, a room receiving a bath or a
shower and socket-outlets lower or equal to 32 A the circuit
corresponding must be protected by a device with differential
residual current (RCD) lower or equal to 30 mA.
225 cm
60 cm 240 cm
Zone 1
Area under bathtub
Zone 0
Zone 2 Zone 3 Out of zones
Floor
THIS PRODUCT IS FOR ROOM HEATING
FOR HOUSEHOLD USE ONLY

6 | | 7
INSTRUCTION
MANUAL FOR MODELS
| SPECIFICATIONS
Model No. RATED VOLTAGE RATED POWER
MHPH05-10E AC230-240V, 50-60Hz 1000W
MHPH05-15E AC230-240V, 50-60Hz 1500W
MHPH05-20E AC230-240V, 50-60Hz 2000W
| STRUCTURE AND PARTS
1 2 3
1 - Out-let
2 - Body
3 - Control panel
| INSTALLATION ON THE WALL
≥300mm
ø 8mm
Image 3 Image 4
Image 5 Image 6
Image 1 Image 2
≥300mm
≥300mm≥300mm
≥300mm
MHPH05-E
Figure 1
• For wall mounting, carefully remove the already constructed hanging bracket from
the rear of the heater by turning the two plastic securing grips located at the top of
the bracket. It is good practice to remove the bracket and replace a few times so you
are familiar on how it attaches before securing to the wall.
• Using the hanging bracket as a template, place the hanging bracket level against the
wall as a guide ruler (please make sure the holes are parallel level), use a marker
pen to mark the hole position. Image 2 on Figure 1 above.
• Drill holes on the wall with Ø8mm drill bit. Image 3 on Figure 1 above.

8 | | 9
INSTRUCTION
MANUAL FOR MODELS
• Insert the plastic wall plugs. Image 4 on Figure 1 above.
• Securely fasten the hanging bracket to the wall with the screws provided. Make sure
the hanging bracket is in the correct direction. Image 5 on Figure 1 above.
• Gently insert the bottom of the heater to the hanging bracket first and then push the
top of the heater body onto the hanging bracket. It is good practice to try attaching the
hanging bracket to the heater and taking off, so you are familiar with how it at-taches
and detaches.
• When the heater is attached to the hanging bracket, secure into place by turning the
two plastic securing grips. Image 6 on Figure 1 above.
Warning:
Be sure to keep a distance around the heater of at least 30cm (300mm) see image
above.
Warning! When drilling holes, always check to ensure there is no electrical wiring,
gas pipes, water pipes etc in the area to be drilled.
To fix the feet, pls see the picture as below:
If not use for wall-mounted, pls assembly the feet as above picture.
| CONTROL PANEL AND SCREEN
1 2
3 4 5 6
6 Button:
Standby
Mode selection
Wifi resetting
Increase function
Decrease function
Timer
1Standby: on/off
2Heating status
3WiFi function
4Comfort mode
ECO mode
Timer
| HOW TO USE
• Plug the appliance into a AC 230-240V 50-60Hz socket and press on/off switch, the
unit will “beep” once. The indicator light illuminates for standby mode.
• Press to turn on the heater. For the first use the heater is in factory default
settings as shown below: (If default settings are different, it will simply be because
the unit has been quality tested after production).
Heating mode: Comfort mode
Target temperature setting: 22ºC℃
Day: 1(Monday), Time: 00:00 (Off)
Window open function: Off
Timer: Off
• Press to turn off the heater and put into standby mode when not in use.
• Unplug the product from the power source when not in use.

10 | | 11
INSTRUCTION
MANUAL FOR MODELS
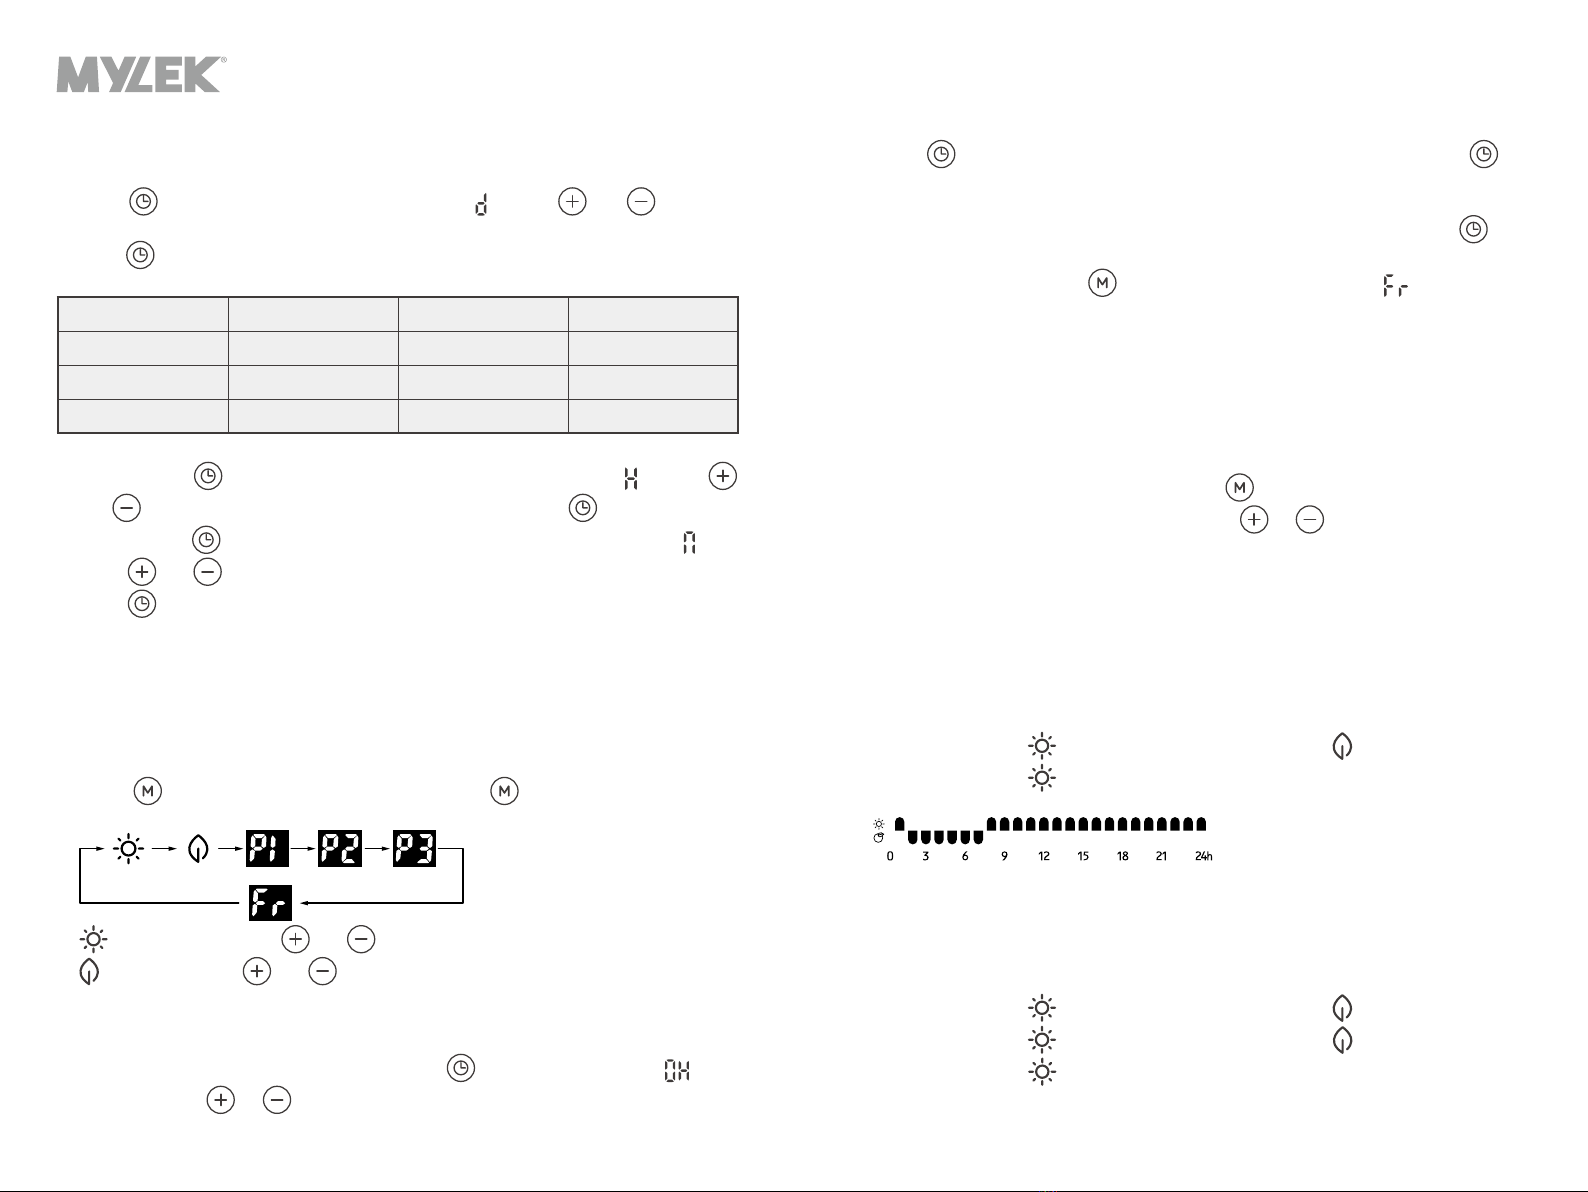
| TIME AND DAY SETTINGS
• Press for 3-4 seconds, the screen will flash “ ”, press and to choose
the current day, 1 for Monday, 2 for Tuesday etc. When the current day is reached
press to confirm the current day setting.
1Monday 2Tuesday
3Wednesday 4Thursday
5Friday 6Saturday
7Sunday
• After pressing to confirm the day setting the screen will display “ ”. Press
and to set the current hour. When current hour is set press to confirm.
• After pressing to confirm the current hour setting the screen will display “ ”.
• Press and to set the current minute.
• Press to confirm all settings.
Please note: If the unit is in standby mode the unit will keep the clock and day settings.
Depending how long the unit is switched off at the mains or unplugged, the clock and
day may need to be reset when powered back up.
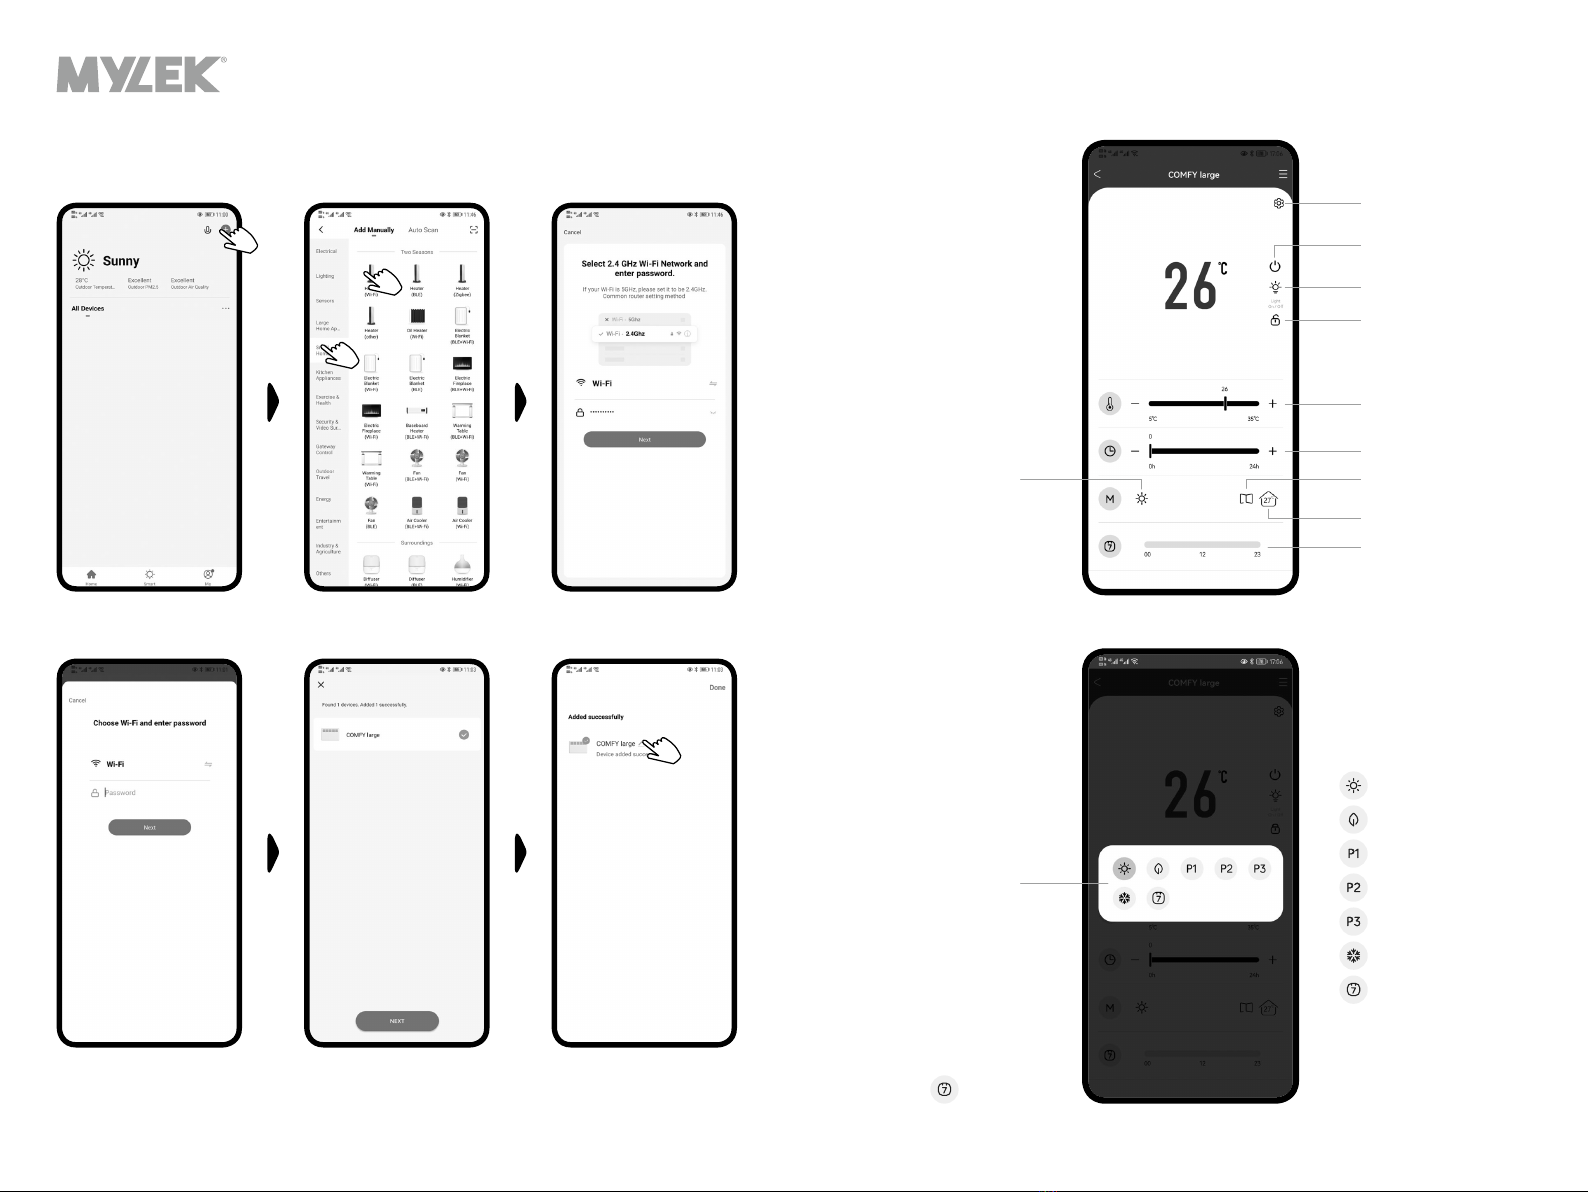
| HEATING MODE
• Press to enter mode selection. By pressing , heating mode runs in a
continuous cycle as below:
• Comfort mode: Press and to set the temperature from 5-35 ºC.
• ECO mode: Press and to set the temperature from 1-31 ºC.
Note: ECO mode=Comfort mode - 4 ºC.
• Use of countdown timer: In standard heating ECO or Comfort mode you can leave
the model on permanent or programme the countdown timer so the unit turns off
after your set hours have elapsed, press the button once and the “ ” will
flash, using the or key choose your set hour from 1-24 hours, once chosen
press the and the display will revert back to your set temperature, the will
illuminate to show you have set the countdown timer. The clock will countdown 1
hour at a time from your set hours and turn off when your set hours have counted
down. You can check the set countdown hours left by simply pressing the once
and once again to revert back to set temperature.
• Anti-frost mode: Press the button until the screen displays“ ”. In this mode
you cannot set the countdown timer or adjust the temperature or set the window
open function. The target temperature is 7ºC, if the room falls to 7ºC or below, the
unit will operate. This is a preferred mode for garages, caravans etc.
Using the Preset programmes 1 and 2:
Note: Clock and day setting must be set for correct usage of P1/P2 programs. It is
advised to set day and clock in advance for the programmes to work correctly.
Programmes P1 and P2 are not adjustable and are pre-set.
To choose programme P1 or P2 below press the button until P1 or P2 is chosen. Set
your preferred room temperature by pressing the or button. Once temperature
is chosen, the display will revert back to the chosen programme P1 or P2. The unit will
now operate in P1 or P2 programme.
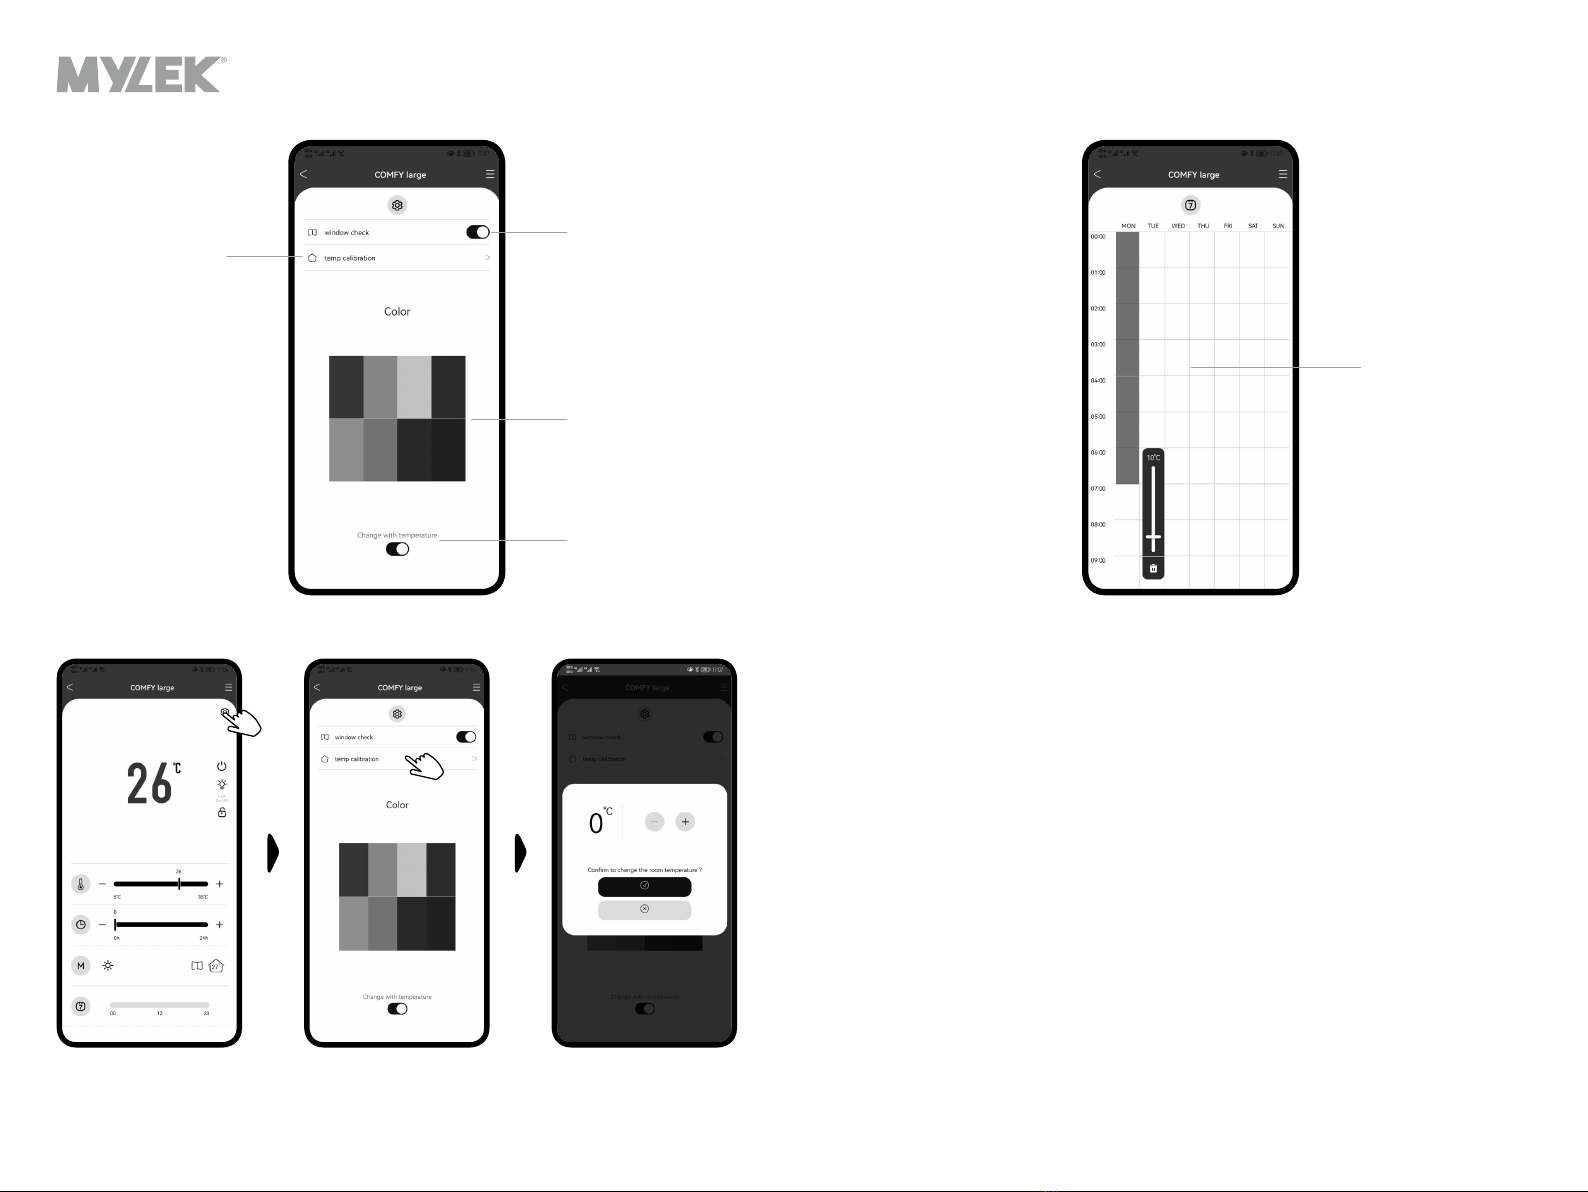
See below for pre-set settings over a 7 day period for programmes P1 and P2.
• P1 (Figure 1) is a preset programme Monday-Sunday. See image below for P1 preset
programme which shows the unit settings in a 24hr period which will repeat over a 7
day period. (The image below (Figure 1) is just for illustration purposes only and not
shown on the LED display.)
P1: (Monday-Sunday) preset program.
00:00am – 01:00am comfort mode, 01:00am – 07:00am ECO mode and
07:00am – 00:00am comfort mode.
Figure 1
• P2 (Figure 2) is a preset programme Monday-Friday and Saturday - Sunday. See
image below for P2 preset programme which shows the unit settings in a 24hr period
which will repeat over a 7 day period. (The images (Figure 2 and 3) below are just for
illustration purposes only and not shown on the LED display.)
P2:(Monday-Friday) preset program
00:00am – 01:00am comfort mode, 01:00am – 05:00am ECO mode,
05:00am – 09:00am comfort mode, 09:00am – 19:00pm ECO mode,
19:00pm – 00:00am comfort mode.

12 | | 13
INSTRUCTION
MANUAL FOR MODELS
displayed and flashing.
• Press and to choose the day you want to set from - (Monday-Sunday).
Press to confirm the Day.
• The screen displays for hour setting, press to choose either Comfort
mode or ECO mode or press so neither the Comfort or ECO lights show so the
heater will be in anti-frost mode. Press to move to the next hour to set or to
the previous hour to set, choosing Comfort mode, ECO mode or show no
lights for the unit to operate in anti-frost mode in this hour, repeat this process up to
hour 23, after setting hour 23, press to revert back to the current day and press
again to move to the next day to be set.
• Repeat the operation until you have completed the schedule of every hour and every
day.
• When the last day is programmed , press again to revert to .
• Your settings are then saved and can be adjusted at any time to suit your needs by
simply following these instructions again.
• The temperature can be set to your needs by simply pressing the or button at
any time whilst the unit is in operation.
| OPEN WINDOW FUNCTION
• When the product is in stand-by mode, press and hold until the screen displays
or , press or to set the open window function on or off.
• When the heater is working and the temperature of the room decreases 2 degrees
within 2 minutes, the open window function will be activated, the heater will stop
working. The screen will display .
• Press to set the unit back to normal operation.
Figure 2
P2:(Saturday-Sunday) preset program
00:00am – 01:00am comfort mode, 01:00am – 08:00am ECO mode,
08:00am – 11:00am comfort mode, 11:00am – 13:00pm ECO mode,
13:00pm – 16:00pm comfort mode, 16:00pm – 20:00pm ECO mode and
20:00pm – 00:00am comfort mode.
Figure 3
• P3: Can be adjusted to meet your requirements.
P3 is the only programme that can be set to your requirements, each day and hour
can be set individually by following the instructions below.
Below are examples of what you can adjust P3 programme to, although you can
adjust this programme to meet your own requirements. (Images (Figure 4 and 5)
below are just for illustration purposes only and not shown on the LED display.)
P3:(Monday-Friday) Adjustable program.
00:00am – 01:00am comfort mode, 01:00am – 05:00am ECO mode,
05:00am – 09:00am comfort mode, 09:00am – 12:00pm ECO mode,
12:00pm – 16:00pm comfort mode, 16:00pm – 18:00pm ECO mode and
18:00pm – 00:00am comfort mode.
Figure 4
P3:(Saturday-Sunday) Adjustable program
01:00am – 05:00am ECO mode 05:00am – 01:00am Comfort mode
Figure 5
How to adjust P3 program setting:
It is good practice to spend time carefully studying and practising the programming of
program 3 to fully understand the benefits which include time saving and cost savings.
If at any time you require assistance on how to programme the product please call out
dedicated customer service help line on Customer Services on 0800 091 3171.
• Press until P3 mode is chosen and displayed; press for 4 seconds until is

14 |
| WIFI CONNECTION
Use your phone to scan the QR code below or search for the “TUYA SMART” App to
download and generate a free account. You can also visit www.tuya.com for more
information. Please note Tuya are constantly developing and upgrading their Apps to
make them more user friendly and sometimes, displays may differ slightly to the display
shown in this manual due to upgrades. If you have any questions concerning technical
problems, please contact our Customer Services on 0800 091 3171 quoting the model
number found on the unit rating label.
Select your country code, enter your mobile number and select “Get” to receive a
message containing your verification code.
Enter your verification code and select “Login”.
When the first using to turn on the heater, the WiFi indicator light will flash, connect it in
the APP.
Reset the WiFi, press for 3 secs, the item will “beep”, the WiFi indicator light will
flash rapidly , you can now connect within the APP.
Press “+” in the right-top
position and go to next step Press “Go to add” Select 2.4 GHz WiFi Network
and enter the password, press
next
Wait it’s connected and press
“Next”, the APP will show as
below
You can press to modify the
name of the product
Quick connection:
Turn on your bluetooth in you mobile phone, then set as following steps.
A

16 | | 17
INSTRUCTION
MANUAL FOR MODELS
Other functions
Night mode
Children lock
Target temperature
setting
Timer off
Smart timer
Comfort mode
ECO mode
Weekly program P1
Weekly program P2
Weekly program P3
Anti-frost mode
Smart timer
Window open function
Room temperature
Working model selection
Please note when choosing P1/
P2/P3 in the APP, the unit will
operate to the settings shown in
the manual. If you set P3 manually
on the unit and you choose P3 in
the APP the unit will operate to
the settings you have set. You can
also choose to set to your own
requirements by selecting the
Smart Timer within the App.
Turn on/off the heater
Press “+” in the right-top
position and go to next step Choose small home appliance
and heater Select 2.4 GHz WiFi Network
and enter the password, press
next
Wait it’s connected and press
“Next”, the APP will show as
below
You can press to modify the
name of the product
Select 2.4 GHz WiFi Network
and enter the password, press
next
Normal connection
If the bluetooth is not on, pls follow the next step:
B

18 | | 19
INSTRUCTION
MANUAL FOR MODELS
Smart timer:
Set the working time and
working temperature for
every hour in everyday
Turn on/off windows open
function
App background color
selection
Turn on/off background
color changing
If on, the background
color will change
according to the
temperature
Room temperature
calibration
Use this function to set the Room Temperature Calibration to the correct room temperature if it is reading
incorrect. Select temp calibration and then adjust temperature to current room temperature and select the tick
box. The current room temperature is now set.

20 | | 21
INSTRUCTION
MANUAL FOR MODELS
Model identifier(s): MHPH05-10E
PManual heat charge control, with integrated
thermostat
Manual heat charge control with room
and/or outdoor temperature feedback
Electronic heat charge control with room
and/or outdoor temperature feedback
Fan assisted heat output
Two or more manual stages, no room
temperature control
With mechanic thermostat room temperature
control
With electronic room temperature control
Electronic room temperature control plus
day timer
Electronic room temperature control plus
week timer
Room temperature control, with presence
detection
Room temperature control, with open
window detection
With distance control option (WiFi Option)
Minimum heat output
(indicative)
Maximum continuous
heat output
At nominal heat
output
At minimum heat
output
In standby mode
Item Item UnitSymbol Value
Heat output Type of heat input, for electric storage local space
heaters only (select one)
Auxiliary electricity
consumption
Other control options (multiple selections
possible)
1.0
With adaptive start control
With working time limitation
Information requirements for electric local space heaters
nom kW
Pmin
Pmax,c
elmax
elmin
elsb
1.0
1.0
No
No
0.00061
[no]
[no]
[no]
[no]
Unit
Nominal heat output
kW
kW
kW
kW
kW
With black bulb sensor
[no]
[no]
[no]
[no]
[no]
[no]
[yes]
[yes]
[yes]
[no]
[no]
[no]
Contact details Hygiene Supplies Direct Limited, Ground floor,
Tayson House, Methley Road, Castleford WF10 1PA
Model identifier(s): MHPH05-15E
P
Minimum heat output
(indicative)
Maximum continuous
heat output
At nominal heat
output
At minimum heat
output
In standby mode
Item Symbol Value
Heat output
Auxiliary electricity
consumption
1.5
nom kW
Pmin
Pmax,c
elmax
elmin
elsb
1.5
1.5
No
No
0.00061
Unit
Nominal heat output
kW
kW
kW
kW
kW
Type of heat output/room temperature control
(select one)
Single stage heat output and no room
temperature control
| MAINTENANCE
1. Always disconnect the appliance and let it completely cool before any maintenance.
2. Use a vacuum cleaner to remove dust on grilles.
3. Clean the outside of the unit with a damp cloth and then dry it with a dry cloth. Never
immerse the unit in water, nor let water drip into the unit.
| STORING
1. Always disconnect the appliance, let it completely cool and clean it before storing.
2. If you do not use the device for a long period, put back the unit and the instruction
manual to the original carton and store in a dry and ventilated place
3. Do not place any heavy items on top of carton during storing as this may damage the
appliance.

22 | | 23
INSTRUCTION
MANUAL FOR MODELS
This marking indicates that this product should not be disposed with other household
wastes throughout the EU. To prevent possible harm to the environment or human
health from uncontrolled waste disposal, recycle it responsibly to promote the
sustainable reuse of material resources. To return your used device, please use the
return and collection systems or contact the retailer where the product was purchased.
They can take this product for environmental safe recycling.
The importer retains his right to make changes in appearance and completeness of the
item without preliminary notification to the customer.
The item is for indoor use only.
The manufacturer does not assume any liability for any damage caused directly or
indirectly by not following this instruction manual, general safety rules, or interference
in the construction of the product.
| SERVICE WARRANTY
Hygiene Supplies Direct guarantees the product free from defects in materials and
workmanship for a period of 1 year from date of purchase. Should this unit be operated
under conditions other than those recommended, at voltages other than the voltage
indicated on the unit, or any attempts made to service or modify the unit, then the
warranty will be rendered void. The product you buy may sometimes differ slightly from
illustrations. This warranty is in addition to, and does not affect, your statutory rights. If
you have any problems with this product, please call our Help Desk on 0800 091 3171 or
email: sales@hygienesuppliesdirect.com
Model identifier(s): MHPH05-20E
PManual heat charge control, with integrated
thermostat
Manual heat charge control with room
and/or outdoor temperature feedback
Electronic heat charge control with room
and/or outdoor temperature feedback
Fan assisted heat output
Two or more manual stages, no room
temperature control
With mechanic thermostat room temperature
control
With electronic room temperature control
Electronic room temperature control plus
day timer
Electronic room temperature control plus
week timer
Room temperature control, with presence
detection
Room temperature control, with open
window detection
With distance control option (WiFi Option)
Minimum heat output
(indicative)
Maximum continuous
heat output
At nominal heat
output
At minimum heat
output
In standby mode
Item Item UnitSymbol Value
Heat output Type of heat input, for electric storage local space
heaters only (select one)
Auxiliary electricity
consumption
Other control options (multiple selections
possible)
2.0
With adaptive start control
With working time limitation
Information requirements for electric local space heaters
nom kW
Pmin
Pmax,c
elmax
elmin
elsb
2.0
2.0
No
No
0.00061
[no]
[no]
[no]
[no]
Unit
Nominal heat output
kW
kW
kW
kW
kW
With black bulb sensor
[no]
[no]
[no]
[no]
[no]
[no]
[yes]
[yes]
[yes]
[no]
[no]
[no]
Contact details Hygiene Supplies Direct Limited, Ground floor,
Tayson House, Methley Road, Castleford WF10 1PA
Type of heat output/room temperature control
(select one)
Single stage heat output and no room
temperature control

YESSS Electrical, YESSS House, Normanton, WF6 1TN
declares that the Mylek Heaters are exclusively manufactured
and imported for Hygiene Supplies Direct Ltd.
This manual suits for next models
2
Table of contents
Other Mylek Heater manuals

Mylek
Mylek MY0210R User manual

Mylek
Mylek MYC01-10A User manual

Mylek
Mylek MYTH01C Instruction manual

Mylek
Mylek MYH03-05E User manual

Mylek
Mylek MYBH1000 User manual

Mylek
Mylek MYOD606WH User manual

Mylek
Mylek MYTH01D User manual

Mylek
Mylek MYRA600W User manual

Mylek
Mylek SPH05-05R User manual

Mylek
Mylek MYHH0406C User manual