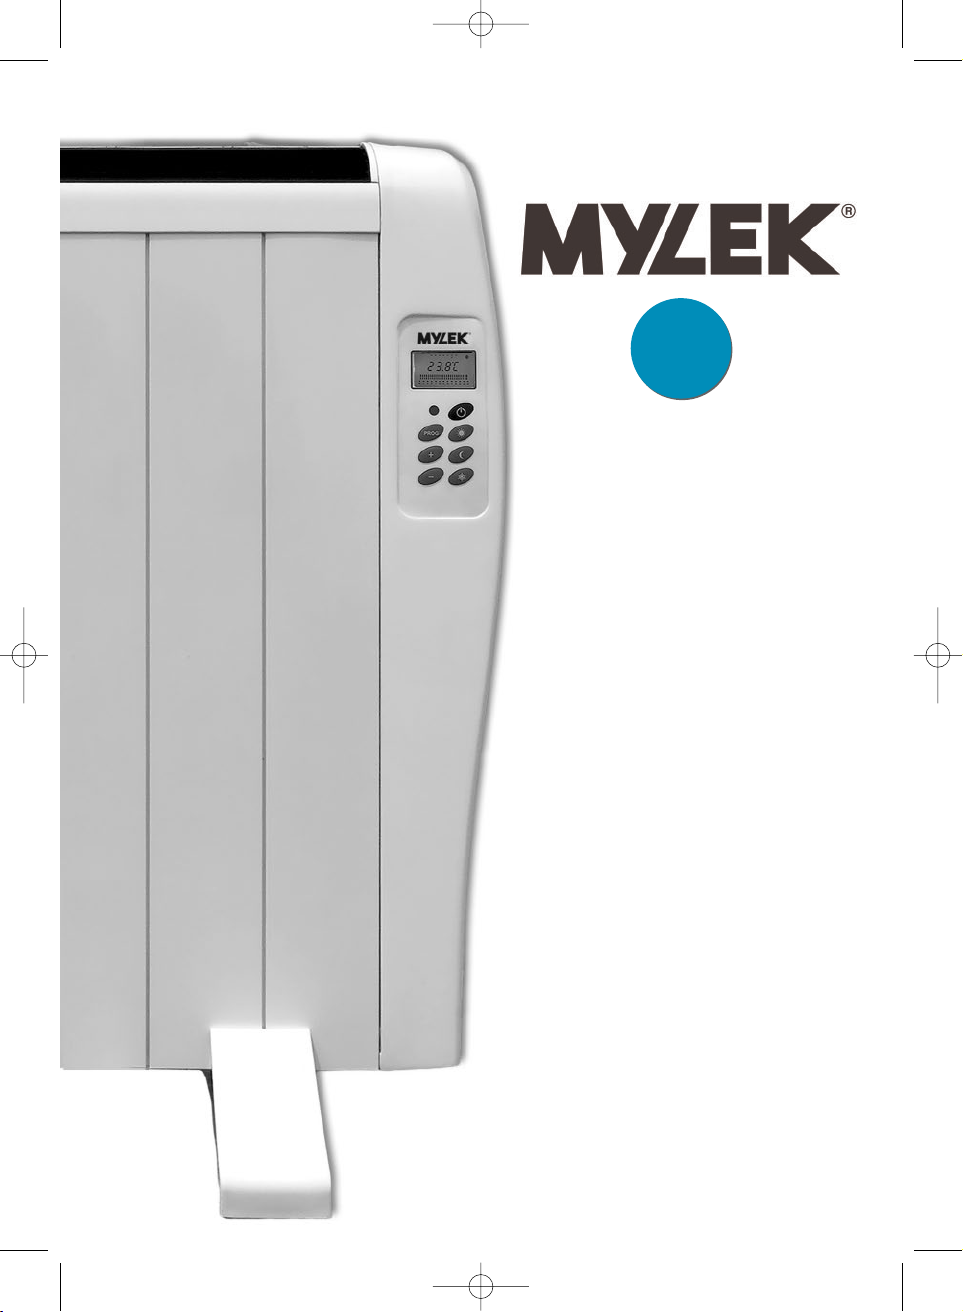
Mylek MYRA600W User manual

User Manual -
Please read and retain
for future reference
www.hsdonline.co.uk
MYRA600W
MYRA900W
MYRA1200W
MYRA1500W
PROGRAMMABLE TIMER
HEATER
WITH LCD SCREEN
&REMOTE CONTROL
DAY
DAY
7
7
MYLEK_heater_Manual_2018 6/6/18 16:42 Page 1

Contents
2. CONTENTS
3. INTRODUCTION
4. GENERAL SAFETY INSTRUCTIONS
6. INSTALLATION AND MOUNTING
10. CONTROL PANEL
10. LCD SCREEN
10. OPERATION
Operating instructions
Locking / Unlocking
Using the heater
Manual use
Changing the selected temperature
Switching off
Automatic use (programmed)
14. FAQ
15. POWER CUTS
15. SAFETY
15. RECOMMENDATIONS
15. MAINTENANCE
16. INFORMATION REQUIREMENT FOR THE ELECTRIC LOCAL
SPACE HEATERS
20. PAT TESTING
20. ENVIRONMENTAL RESPONSIBILITIES
20. SERVICE WARRANTY
www.hsdonline.co.uk
2
MYLEK_heater_Manual_2018 6/6/18 16:42 Page 2

Introduction
General Information
Please read the entire instruction manual before using the product and
then save it for future reference. We reserve the right for any errors in
text or images and any necessary changes made to technical data. If you
have any questions concerning technical problems please contact our
Customer Services on 0800 091 3171.
Safety Instructions
General safety instructions for heaters:
Warning: Read all the instructions. Failure to comply with
the following instructions can lead to electric shocks,
fires or serious injury.
SAVE THESE INSTRUCTIONS.
ERP Compliant
Good News your product is ErP Compliant, ErP stands for “Energy
Related Products”. ErP is supported by Mylek to makethe use of energy
and energy related products more efficient, by phasing out inefficient
products and making it easier for consumers to find energy information,
providing guidance to more energy efficient products.
Your heater is fitted with a ERP Compliant sensor that detects a sudden
drop in temperature, meaning there could be a open window or draft,
when the sudden drop in room temperature is detected your heater
quickly increases the display room temperature to your set temperature
to switch the heater off to save energy, once the heater senses a natural
rise in room temperature (meaning the window as been shut or draft
eliminated) it drops the display room temperature back down to normal
room temperature to switch the heater back on again. Making your Mylek
heater energy efficient and great for the environment.
www.hsdonline.co.uk 3
MYLEK_heater_Manual_2018 6/6/18 16:42 Page 3

www.hsdonline.co.uk
GENERAL SAFETY INSTRUCTIONS
•Remove the plug from the mains power socket to disconnect the heater. Do NOT
pull on the cable.
•Do not leave the mains cable in contact with the heater when it is switched on.
•During operation, ensure that the heater is kept well away from combustible
materials such as curtains, carpets and furniture, etc.
•DO NOT COVER THE HEATER. DO NOT USE THE HEATER TO DRY
CLOTHES.
If the heater is covered, there is serious risk of overheating.
•DANGER: If the mains cable is damaged, it must be replaced by the
manufacturer or by its after-sales service, by fully qualified personnel
in order to prevent any hazardous situations.
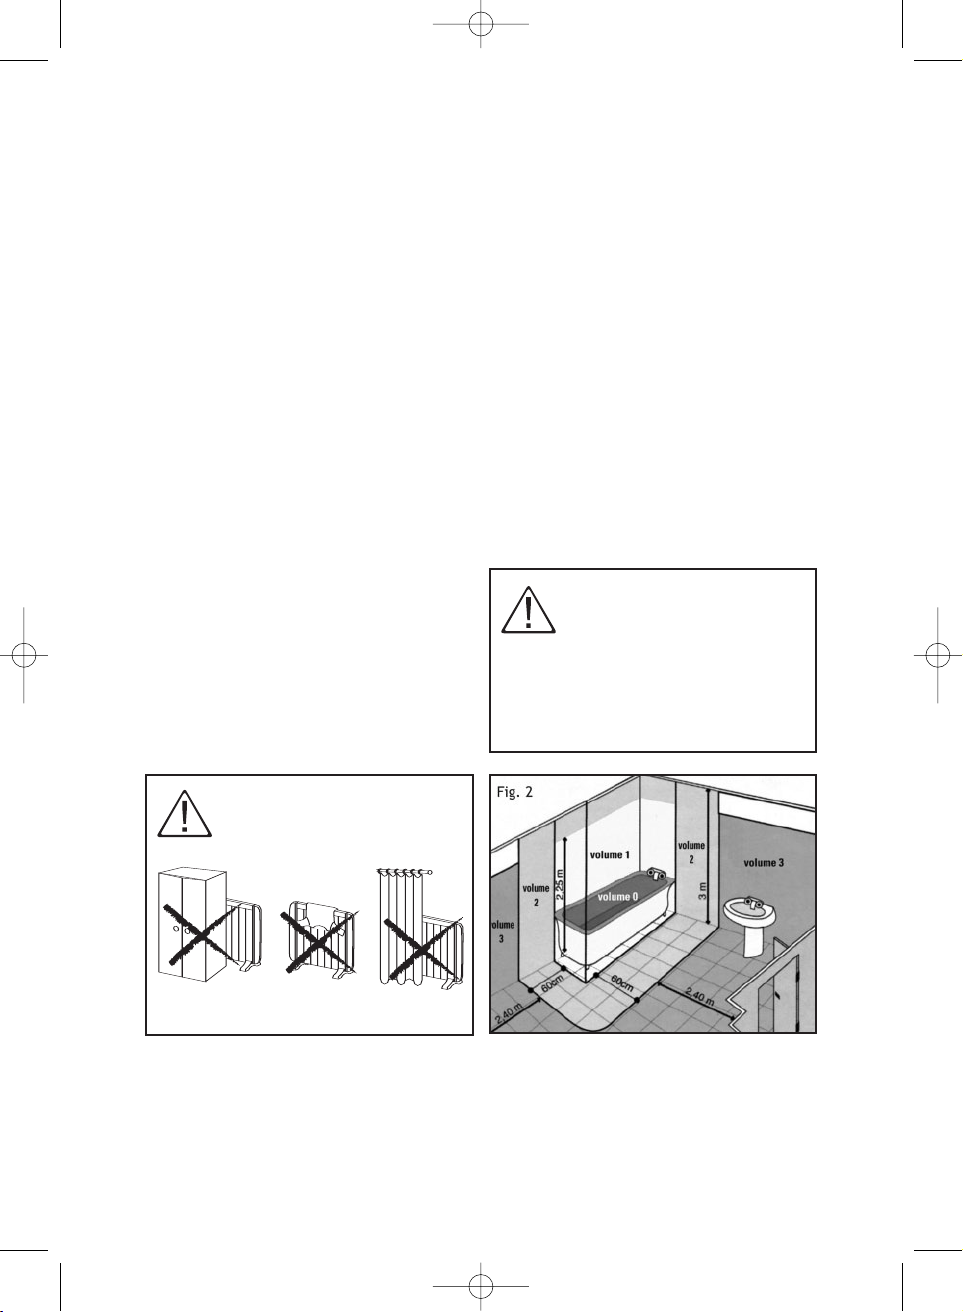
•If the heater is to be installed in a bathroom, it must be installed by a qualified
electrician in volume 3 (Figure 2, page 6).
•The heater must not be located under or in front of a mains socket.
•When disposing of the heater, all requirements established by current
legislation for waste processing and recycling must be followed.
•The installation must be carried out according to current electrical legislation.
•This heater must have an earth connection.
•The heater must be installed so that the mains plug is always accessible.
•This heater cannot be flush-mounted in a wall. Always respect the safety
distances (Figures 3 and 4).
*Alocking system is fitted to prevent children from playing with the heater
programming.
•This heater is not designed to be handled by children or physically, mentally or
sensory handicapped persons, with little experience or knowledge, unless
under the supervision of a person responsible for their safety and in
possession of the corresponding instructions on use. Children must be
supervised to ensure they do not play with the heater.
*Children under 3 years must be kept well away from the heater unless under
constant supervision.
*Children of less than 3 years should be kept away unless continuously
supervised. Children aged from 3 years and less than 8 years shall only switch
on/off the appliance provided that it has been placed or installed in its intended
normal operating position and thy have been given supervision or instruction
concerning use of the appliance in a safe way and understand the hazards
involved. Children aged from 3 years and less than 8 years shall not plug in,
regulate and clean the appliance or perform user maintenance.
4
MYLEK_heater_Manual_2018 6/6/18 16:42 Page 4

www.hsdonline.co.uk
*This appliance may be used by children age 8 and over and by persons with
physical, sensorial or mental disabilities or without experience or knowledge,
provided they have been duly trained and are supervised by somebody who
understands the hazards. The cleaning and maintenance to be carried out by
the user must not be done by children. Children should not play with the
appliance.
•PRECAUTION: Certain parts of this heater may become very hot
during operation and cause burns. Special care must be taken when
children and other vulnerable persons are present.
•PRECAUTION: Keep bags and other accessories well out of the reach
of children.
•Do not touch the outside of the heater during operation.
•It is quite normal to notice a smell of “something new” when the heater is
switched on for the first time”. Allow your heater to work in a well-ventilated area
for two or three hours.
•Before each cold season or if the heater has been switched off for several
days/months, it should be cleaned before switching it on again (follow the steps
in “section 10 Maintenance”). This cleaning will prevent the burning of
accumulated dust and other remains.
•This heater CANNOT be operated with external programmable units or any
other third party control device.
•Owing to the convection effect of this heater, together with other external
factors, discolouration of metal and other surfaces can be caused if in proximity
to the heater. This can cause discolouration of metal and plastic surfaces.
•Temperature fluctuations may cause crackling or heater noises. This is not an
indication of failure.
*The heater warranty does not cover any damage caused by failing to follow
these instructions.
5
MYLEK_heater_Manual_2018 6/6/18 16:42 Page 5

www.hsdonline.co.uk
INSTALLATION AND
MOUNTING
•This heater can be installed on feet
(provided) or wall mountable (fixings
provided).
•The heater must never be installed
underneath a mains wall socket.
•The heater must never be installed in
aposition where the switches and
other controls can be reached by
someone in the bath or shower.
•The heater works through natural air
convection. In order to achieve
correct performance and uniform
heat distribution, when it is installed
on a wall the lower part of the heater
must be at a minimum distance of
twenty centimetres from the floor and
aminimum distance of twenty
centimetres from the sides and fifty
centimetres from an upper shelf and
also a minimum distance of twenty
centimetres from any wall or object
(furniture and curtains etc).
6
Aqualified electrician can
install your heater in volume
3in the bathroom (Figure 2).
It must not be possible to
reach it from the bath or
shower.
IMPORTANT
Fig. 1
MYLEK_heater_Manual_2018 6/6/18 16:42 Page 6

www.hsdonline.co.uk
WALL INSTALLATION:
1. Select a suitable location on the wall,
which should be firm and level. Check
that there is a mains socket close by.
2. The distances marked, “a” and “e”
vary depending on the heater model.
Safety distances and installation
Models a(mm) b(mm) e(mm) f(mm)
MYRA600W 410 93 140 495
MYRA900W 550 93 280 495
MYRA1200W 690 93 420 495
MYRA1500W 830 93 560 495
3. Open the package box and check
that all fixing accessories are
present, it is a good idea to keep the
product box for out of season
storage.
7
AB
CD
EF
Feet
MYLEK_heater_Manual_2018 6/6/18 16:42 Page 7

www.hsdonline.co.uk
ASSEMBLY
1. While respecting the previously
indicated safety measurements, make
two marks on the wall according to
measurement “e” indicated in Table 1
and at a height of 695 mm from the
floor (not from the skirting board).
2. At the marked area drill two 10-mm
diameter holes, with a minimum depth
of 60 mm.
3. Push the two plugs (D) into the two
holes and secure the two hooks (C)
with the two screws (D). (Figure 6 & 7).
4. Screw the two support brackets (A) (or
one support bracket, depending on
the model) to the rear part of the
heater with the four screws (E) (or two
screws, depending on the model).
Note: The two brackets (A) are screwed
to the holes located on the lower rear
part of the heater, at both ends.
(Figure 8).
8
MYLEK_heater_Manual_2018 6/6/18 16:42 Page 8

www.hsdonline.co.uk
5. Hang the heater on the two hooks (C)
on the wall. Ensure that the heater is
correctly secured on both hooks.
(Figure 9).
6. When the heater is hung in place,
make two marks on the wall where the
two brackets (A) will be fixed to ensure
the heater is fixed to the wall.
(Figure 10).
7. Remove the heater and drill two 4-mm
diameter holes, with a minimum depth
of 25 mm at the two marks on the wall.
8. Insert the two plugs and secure
with the two screws (B) to completely
secure the heater to the wall.
(Figure 11).
INSTALLING THE FEET:
1. Screw the two feet to the lower rear
part of the heater with the four screws
provided (F), 2 screws per foot.
(Figure 12).
9
MYLEK_heater_Manual_2018 6/6/18 16:42 Page 9

www.hsdonline.co.uk
CONTROL PANEL
LCD SCREEN &
REMOTE CONTROL
The screen comes on for ten
seconds every time a button is
pressed and then dims as a
energy saving function.
The heater can be programmed by
either the LCD control section on
the heater or by the remote control.
(1) CONSUMPTION INDICATOR
This appears when the heater is
consuming power, in other words, in
operation.
(2) TEMPERATURE INDICATOR:
•Ambient room temperature reading:
that of the room, it is displayed on all
screens by default.
•Assigned temperature: programmed
by the user as the desired
temperature for COMFORT MODE,
ECONOMY MODE OR ANTI-FROST
MODE. To display this temperature
press the (-) or (+) button.
OPERATION
•Your heater is fitted with a digital,
daily-programmable timer-thermostat
that controls and adjusts the heating.
•The heater can be used in two ways,
either manually or automatically. It is
fitted with a daily timer for each day of
the week.
IMPORTANT:
The temperature indicated on the
screen may differ from that given by
another thermometer in the same room.
Different conditions such as air
currents, windows etc, could cause
these differences.
10
Standby
Comfort Mode
Economy Mode
Anti-frost Mode
LCD Screen
IR Sensor
“Prog” Button
Increase
Decrease
Remote Control
MYLEK_heater_Manual_2018 6/6/18 16:42 Page 10

www.hsdonline.co.uk
Operating Instructions
1. When the heater is installed and
connected to the mains power, press
the ON/ OFF switch, which is located
at the bottom right side of the unit.
2. The LCD screen will light up and all
the symbols will flash several times.
3. Then the operating mode just before
the last switch-off appears (stand-by
(Fig 15), manual (Fig 16) or automatic
(Fig 17), together with the approximate
room temperature.
4. When in “Standby” mode (Fig. 15),
press the “Standby” button to switch
the heater on (Figure 13). The heater
comes on and the last selected
operating mode symbol appears on
the screen. In addition, the
approximate room temperature is
displayed.
If the heater is switched on in manual
(Fig. 16) or automatic mode (Fig. 17) the
unit is in operation.
Locking / Unlocking
The heater controls will automatically
lock when no button has been pressed
for sixty seconds as a child safety
function. This operation will occur in
both manual and automatic modes. The
heater controls can be unlocked by
pressing the "+" and “-“ buttons
together on the control panel for three
seconds (Figure 13) or on the remote
control by pressing either singly the "+"
or "-" button.
Note: After unlocking the keypad, the
selected temperature will appear for
three seconds with °Cflashing.
Using the heater
The heater can operate in manual or
automatic mode (programmed).
Manual Use
To select manual mode, press the
“PROG” key until the time bars
disappear from the LCD screen
(Figure 18).
When in manual mode, the desired
heating mode can be selected (comfort,
economy or anti-freeze) by pressing the
corresponding button (Fig. 13) and the
heater will permanently operate in any
of these modes with the programmed
temperatures.
11
MYLEK_heater_Manual_2018 6/6/18 16:42 Page 11

www.hsdonline.co.uk
12
Changing the selected
temperature
The heater is supplied with a pre-
established temperature for each
operating mode, which can be modified
in the following manner:
•MANUAL - COMFORT MODE:
a) Press the Comfort mode button
(Figure 13).
b) Use the (-) or (+) buttons to select the
desired temperature. (Example, select
22°C)
c) The selected temperature is saved.
The existing room temperature will be
displayed again after a few seconds.
Note: The comfort mode is
recommended for a comfortable
temperature when remaining in the
room.
Recommended temperature: 21°C.
•MANUAL - ECONOMY MODE:
a) Press the Economy Mode button
(Figure 13).
b) Use the (-) or (+) buttons to select the
desired temperature. (Example,
Select 18°C)
c) The selected temperature is saved.
The existing room temperature will be
displayed again after a few seconds.
Note: This mode is recommended for
long absences from the room and is the
ideal temperature for night time.
Recommended temperature: 17°C.
•MANUAL - ANTI-FREEZING MODE:
a) Press the Anti-freezing Mode button
(Figure 13).
b) Use the (-) or (+) buttons to select the
desired temperature.
(Example, Select 7°C)
c) The selected temperature is saved.
The existing room temperature will be
displayed again after a few seconds.
Note: This mode is recommended for
unused dwellings in extremely cold
climates.
Recommended temperature: 5°C.
IMPORTANT: If the selected
temperature is higher than that of the
room the heater will start operating
(the flame symbol will be displayed ).
Note: If, no buttons are pressed after
approximately ten seconds the screen
will be switched off as a energy saving
mode. It will switch on again when any
button is pressed.
Switching off
The heater operation can be
disconnected by pressing the
“Standby” button (Fig. 13). The heater
can be permanently switched off by the
ON/OFF switch at the right bottom side
of the unit.
MYLEK_heater_Manual_2018 6/6/18 16:42 Page 12

www.hsdonline.co.uk 13
Automatic Use
(Programmed)
Taking into account your personal
needs, the heater provides the
possibility to create an individual
program. This program is established
according to the day, time and
operating modes: comfort, economy,
anti-icing or standby mode.
1. If the heater is in Standby (Fig.19),
press the “Standby” button (Fig 13)
to switch it on.
2. Press the “PROG” button for three
seconds. The four clock digits will be
displayed. First, the two “hour” digits
will flash. Use the (+) or (-) buttons to
enter the current hour. Then, press
“PROG” to program the minutes.
Enter the current minutes. Press the
“PROG” button.
3. Then, program the current day of the
week. The following digits will be
displayed, “1,-,-,-,-,-,-”, 1 standing for
Monday. Use the (+) or (-) buttons to
enter the day of the week you want
to program as follows (1 = Monday,
2 = Tuesday etc), once the day is
selected press the “PROG” button.
4. Programming each day of the week.
Begin by programming the first bar
for Monday
(1) For example 00:00 hours until 01:00
(the first double bar will flash), there
are 24 double bars, one double bar
for every hour.
An operating mode can be assigned to
each hour:
•To program comfort, press the
“Comfort” button:
(Comfort
Mode = one
double bar
and
“Comfort”
symbol).
•To program economy, press the
“Economy” button
(Economy
Mode = one
single upper
bar and
“Economy”
symbol).
•To program “Anti-icing”, press the
“Anti-icing” button.
(Anti-icing
Mode =
one single
bottom bar
and
“Anti-icing”
symbol).
•Toprogram “Standby – switch off”,
press the “Stand-by” button.
(Standby
Mode = no
bars”.)
Programming is performed hour by
hour. The selected hour will flash.
MYLEK_heater_Manual_2018 6/6/18 16:42 Page 13

www.hsdonline.co.uk
14
5. Press the "+" or "-" to select the time
bar hour you wish to set. The selected
time bar hour will flash, if you require
the heater to be off during the
selected time bar hour press the
"Standby Button" (Figure 13) and the
selected time bar will not show, the
unit is then set NOT to operate during
this hour. If you require the selected
time bar hour to operate during this
hour, simply press which mode you
require the time bar to operate in,
either Comfort (double bar), Economy
(single upper bar) or Ant-frost (single
bottom bar) and the relevant symbol
will show for this hour, the unit will
then operate in this mode during this
set hour. Repeat the process for
every time bar hour until you have
fully programmed your preferred
settings.
6. When all the time bars for Monday
have been programmed, press the
“PROG” button to move on to the
next day, Tuesday (2). Repeat all these
steps to program each day of the
week, until Sunday (7) is reached.
When Sunday is programmed, press
the “PROG” button to confirm
settings, press the "PROG" button
again to show the current day
displaying your settings, the current
hour will flash.
IMPORTANT: If you wish to modify the
previously assigned temperatures for
each operating mode then follow the
steps given on page 12 of these
instructions.
EXAMPLE PROGRAMME:
•The programmed actual day.
(1 for Monday).
•The approximate room temperature
(Example 21.6°C).
•The current time bar flashes
(18:00 – 19:00) for current, Hour.
•The mode programmed in each time
bar:
Comfort Mode (Sun symbol)
1800-2359hrs.
Economy Mode (Half Moon symbol)
1900 & 2359-0800.
Switched off between 1000-1600hrs.
•The heater element is switched on .
Note: If this symbol is not shown, the
heater is not consuming power.
IMPORTANT: Pressing the “PROG”
button will change between manual and
automatic modes (programmed).
Note: After working for two or three
months, the clock will usually require
adjustment.
MYLEK_heater_Manual_2018 6/6/18 16:42 Page 14

www.hsdonline.co.uk 15
POWER CUTS
If there is a power cut, the heater will
not work, but will be switched on again
in the same mode as before when the
power is re-established.
All previous adjustments will remain
unaltered (temperatures and
programmes), “EXCEPT THE CLOCK
AND THE CURRENT DAY OF THE
WEEK”.
If, during an absence from your
dwelling, you discover that the heaters
are not working:
When the mains power has been
restored, the clock and current time
must be reprogrammed.
AVERAGE ROOM HEAT
CALCULATOR
The required power of the heater
depends on size of room, its insulation,
outside temperature etc. (ie. whether
the room is south or north facing).
The following table gives estimated
average recommendations on what
wattage power is required depending
on the size and height of the room with
standard insulation. If the ceiling is
higher or insulation is poor, it is
recommended to choose a higher rated
wattage heater.
Wattage Size Room size, m2
(Based on
ceiling height 2.4m)
600W 7 - 9 m2
900W 9 - 12 m2
1200W 12 - 15 m2
1500W 15 - 20 m2
SAFETY
•Do NOT cover the heater. Do NOT use
it to dry clothes. If it is covered, there
will be a serious risk of overheating.
•The unit is fitted with a safety device
that will switch it off in case of
overheating. It will automatically
switch on again when the problem is
resolved. If this problem repeats itself
it could cause damage or faults that
are not covered by the warranty.
RECOMMENDATIONS
•Remember that the economy mode
should be used when there is nobody
in the room or at night. The comfort
mode provides the desired
temperature when the room is
occupied.
•The anti-frost mode should not be
used unless in an extremely cold
climate.
•Always remember to maintain
intermediate temperatures for best
performance.
MAINTENANCE
•This heater does not require any
special maintenance.
•It is recommended that when the
heater is put into use for the first time
each year, all dust and any other dirt
on the outer surfaces should be
cleaned off (ALWAYS COLD AND
SWITCHED OFF), together with any
accumulated dust inside.
•The dust should be cleaned off with a
soft dry cloth. ALWAYS WITH THE
HEATER SWITCHED OFF AND COLD.
•NEVER USE SOLVENTS, CLEANING
OR ABRASIVE PRODUCTS.
MYLEK_heater_Manual_2018 6/6/18 16:42 Page 15

www.hsdonline.co.uk
16
INFORMATION REQUIREMENT FOR THE
ELECTRIC LOCAL SPACE HEATERS
MODEL IDENTIFIER(S): MYRA600W
ITEM SYMBOL VALUE UNIT ITEM UNIT
Heat output Type of heat input, for electric storage
local space heaters only (select one)
Nominal Pnom 0.60 kW manual heat charge control, No
heat output with integrated thermostat
Minimum Pmin 0.60 kW manual heat charge control, with room No
heat output and/or outdoor temperature feedback
(indicative)
Maximum Pmax,c 0.60 kW electronic heat charge control with room No
continuous and/or outdoor temperature feedback
heat output
fan assisted heat output No
Auxiliary electricity Type of heat output/room temperature
consumption control (select one)
At nominal elmax N/A kW
heat output
At minimum elmin N/A kW single stage heat output and no room No
heat output temperature control
In standby elSB 0.00094 kW two or more manual stages, no room No
mode temperature control
with mechanic thermostat room No
temperature control
with electronic room temperature control No
electronic room temperature control No
plus day timer
electronic room temperature control Yes
plus week timer
Other control options
(multiple selections possible)
room temperature control No
with presence detection
room temperature control Yes
with open window detection
with distance control option No
with adaptive start control No
with working time limitation No
with black bulb sensor No
Contact details Refer to Applicant Name / Address
MYLEK_heater_Manual_2018 6/6/18 16:42 Page 16

www.hsdonline.co.uk 17
MODEL IDENTIFIER(S): MYRA900W
ITEM SYMBOL VALUE UNIT ITEM UNIT
Heat output Type of heat input, for electric storage
local space heaters only (select one)
Nominal Pnom 0.90 kW manual heat charge control, No
heat output with integrated thermostat
Minimum Pmin 0.90 kW manual heat charge control, with room No
heat output and/or outdoor temperature feedback
(indicative)
Maximum Pmax,c 0.90 kW electronic heat charge control with room No
continuous and/or outdoor temperature feedback
heat output
fan assisted heat output No
Auxiliary electricity Type of heat output/room temperature
consumption control (select one)
At nominal elmax N/A kW
heat output
At minimum elmin N/A kW single stage heat output and no room No
heat output temperature control
In standby elSB 0.00094 kW two or more manual stages, no room No
mode temperature control
with mechanic thermostat room No
temperature control
with electronic room temperature control No
electronic room temperature control No
plus day timer
electronic room temperature control Yes
plus week timer
Other control options
(multiple selections possible)
room temperature control No
with presence detection
room temperature control Yes
with open window detection
with distance control option No
with adaptive start control No
with working time limitation No
with black bulb sensor No
Contact details Refer to Applicant Name / Address
MYLEK_heater_Manual_2018 6/6/18 16:42 Page 17

www.hsdonline.co.uk
18
INFORMATION REQUIREMENT FOR THE
ELECTRIC LOCAL SPACE HEATERS
MODEL IDENTIFIER(S): MYRA1200W
ITEM SYMBOL VALUE UNIT ITEM UNIT
Heat output Type of heat input, for electric storage
local space heaters only (select one)
Nominal Pnom 1.20 kW manual heat charge control, No
heat output with integrated thermostat
Minimum Pmin 1.20 kW manual heat charge control, with room No
heat output and/or outdoor temperature feedback
(indicative)
Maximum Pmax,c 1.20 kW electronic heat charge control with room No
continuous and/or outdoor temperature feedback
heat output
fan assisted heat output No
Auxiliary electricity Type of heat output/room temperature
consumption control (select one)
At nominal elmax N/A kW
heat output
At minimum elmin N/A kW single stage heat output and no room No
heat output temperature control
In standby elSB 0.00094 kW two or more manual stages, no room No
mode temperature control
with mechanic thermostat room No
temperature control
with electronic room temperature control No
electronic room temperature control No
plus day timer
electronic room temperature control Yes
plus week timer
Other control options
(multiple selections possible)
room temperature control No
with presence detection
room temperature control Yes
with open window detection
with distance control option No
with adaptive start control No
with working time limitation No
with black bulb sensor No
Contact details Refer to Applicant Name / Address
MYLEK_heater_Manual_2018 6/6/18 16:42 Page 18

www.hsdonline.co.uk 19
MODEL IDENTIFIER(S): MYRA1500W
ITEM SYMBOL VALUE UNIT ITEM UNIT
Heat output Type of heat input, for electric storage
local space heaters only (select one)
Nominal Pnom 1.50 kW manual heat charge control, No
heat output with integrated thermostat
Minimum Pmin 1.50 kW manual heat charge control, with room No
heat output and/or outdoor temperature feedback
(indicative)
Maximum Pmax,c 1.50 kW electronic heat charge control with room No
continuous and/or outdoor temperature feedback
heat output
fan assisted heat output No
Auxiliary electricity Type of heat output/room temperature
consumption control (select one)
At nominal elmax N/A kW
heat output
At minimum elmin N/A kW single stage heat output and no room No
heat output temperature control
In standby elSB 0.00094 kW two or more manual stages, no room No
mode temperature control
with mechanic thermostat room No
temperature control
with electronic room temperature control No
electronic room temperature control No
plus day timer
electronic room temperature control Yes
plus week timer
Other control options
(multiple selections possible)
room temperature control No
with presence detection
room temperature control Yes
with open window detection
with distance control option No
with adaptive start control No
with working time limitation No
with black bulb sensor No
Contact details Refer to Applicant Name / Address
MYLEK_heater_Manual_2018 6/6/18 16:42 Page 19

YESSS Electrical, YESSS House, Normanton, WF6 1TN declares that the Mylek Heaters are exclusively
manufactured and imported for Hygiene Supplies Direct Ltd.
www.hsdonline.co.uk
FAQ
I. If the unit does not heat:
a. Verify that it is switched on.
b. Check that the power consumption indicator is on; otherwise, increase the
temperature assigned to each mode.
II. If the unit does not provide sufficient heat:
a. Check whether the flame symbol is displayed and if it appears intermittently,
increase the temperature assigned to each mode.
b. Check that the installed heater has adequate power for the room size.
Pat Testing
When used in a workplace, this product must be safety-tested yearly by a
qualified electrician (PAT Tested) in order to comply with the Electricity at Work
Regulations. We recommend that it is PAT tested regularly when used in a
domestic environment.
Environmental Responsibilities
Meaning of crossed-out wheeled dustbin:
Do not dispose of electrical appliances as unsorted municipal waste,
use separate collection facilities.
Contact your local council for information regarding the collection
systems available.
If electrical appliances are disposed of in landfills or dumps, hazardous
substances can leak into the groundwater and get into the food chain damaging
your health and well-being.
When replacing old appliances with new ones, the retailer is legally obligated to
takeback your old appliance for disposal free of charge.
SERVICE WARRANTY
Hygiene Supplies Direct guarantees the product free from defects in materials
and workmanship for a period of 1 year from date of purchase.
Should this unit be operated under conditions other than those recommended,
at voltages other than the voltage indicated on the unit, or any attempts made to
service or modify the unit, then the warranty will be rendered void. The product
you buy may sometimes differ slightly from illustrations. This warranty is in
addition to, and does not affect, your statutory rights.
If you have any problems with this product, please call our Help Desk
on 0800 091 3171 or email [email protected]
20
MYLEK_heater_Manual_2018 6/6/18 16:42 Page 20
This manual suits for next models
3
Table of contents
Other Mylek Heater manuals

Mylek
Mylek MHPH05-10E User manual

Mylek
Mylek MYOD606WH User manual

Mylek
Mylek MYC01-10A User manual

Mylek
Mylek MYTH01D User manual

Mylek
Mylek MYSH0406E User manual

Mylek
Mylek MYBH1000 User manual

Mylek
Mylek MY0210R User manual

Mylek
Mylek MYTH01C Instruction manual

Mylek
Mylek MYH03-05E User manual

Mylek
Mylek SPH05-05R User manual
Popular Heater manuals by other brands

Zibro
Zibro Kamin R 22C operating instructions

Holmes
Holmes HCH4062B owner's guide

MPM
MPM MUG-09 user manual

Propex
Propex Heatsource HS2800 Installation & operation instructions

Nordic Home Culture
Nordic Home Culture HTR-512 user manual

Everdure
Everdure HCT2075D Operation, maintenance and safety instructions