Nahita 503 Series User manual

Revisión 3 A osto 2014Pá . 1Manual de instrucciones 59000503
Este manual es parte inseparable del aparato por lo que debe estar dispo-
nible a todos los usuarios del equipo. Le recomendamos leer atentamente
el presente manual y se uir ri urosamente los procedimientos de uso para
obtener las máximas prestaciones y una mayor duración del mismo.
This manual should be available for all users of these equipments. To get the best
results and a higher duration of this equipment it is advisable to read carefully this
manual and follo the processes of use.
Ce manuel fait partie de l’appareil, c'est pourquoi il doit être disponible à tous les
utilisateurs. Nous vous recommandons de lire attentivement ce manuel et suivre
tous les procédures d’emploi, afin d’obtenir les meilleures prestations et une plus
grande durée de l’appareil.
EVAPORADOR ROTATIVO
ROTARY EVAPORATOR
EVAPORATEUR ROTATIF
Serie / Series / Séries 503

Version 3 Au ust 2014Pa . 14Instruction manual 59000503
5. MAINTENANCE AND CLEANING
To get the best results and a higher duration of the rotary evaporator it is essential to
follow the pro esses of use.
Note: A the processes of use mentioned be ow wi not have any va ue un ess you keep
a continued and carefu maintenance.
Please follow the processes of use of this manual.
This manual should be available for all users of this equipment.
Always use ori inal components and supplies. Other devices can be similar but they
can dama e the equipment.
The rotary evaporator is supplied with an adapter. It has to be plu ed to an earth con-
nection and the socket should be handy and ready to unplu the equipment in case of
emer ency.
Never try to repair the rotary evaporator by yourself, since you will lose the warranty
and may provoke dama es to the eneral operatin system or the electrical installation,
as well as injuries to the people that usually handle the rotary evaporator (burns, hurts…)
or dama es in nearby equipments.
In the event of breakdown please contact your distributor to overhaul throu h Nahita
Technical Assistance Department.
C eaning
Never use scourers or substances that can rate for cleanin metallic parts such as stain-
less steel, aluminium, coatin s, etc. as they dama e the rotary evaporator and produce an
early a ein of the equipment.
Use a fluff-free cloth dampened with soaped water that does not contain abrasives.
ATTENTION!! IF EQUIPMENTS ARE NOT PROPERLY CLEAN AND
DISINFECTED THEY WOULD NOT BE ALLOWED TO REPAIR BY OUR
TECHNICAL SERVICE.
INSTRUCTIONS ON ENVIRONMENT PROTECTION
At the end of its life cycle, please, do not dispose of this equipment by throwin
it in the usual arba e; hand it over a collection point for the recyclin of electrical
and electronic appliances. It does not contain dan erous or toxic products for
humans but a non adequate disposal would dama e the environment. The mate-
rials are recyclable as mentioned in its markin . By recyclin material or by other
forms of re-utilization of old appliances, you are makin an important contribution to protect our
environment. Please inquire at the community administration for the authorized disposal location.
Try not to spill any liquid on the control panel, thou h it is properly insulated. In case
you have any doubts do please immediately unplu the equipment (see Maintenance).
Made under the European re ulations for electrical security, electroma netic compati-
bility and security on machines.
ENGLISH

Version 4 Au ust 2014Pa . 13Instruction manual 59000503
Remember: grease or spread with vase ine the ground joints of a the g ass pieces to
avoid breakage when disassemb ing.
Fill the water bath.
Note: never connect the bath without water inside, the ressitance wi break down.
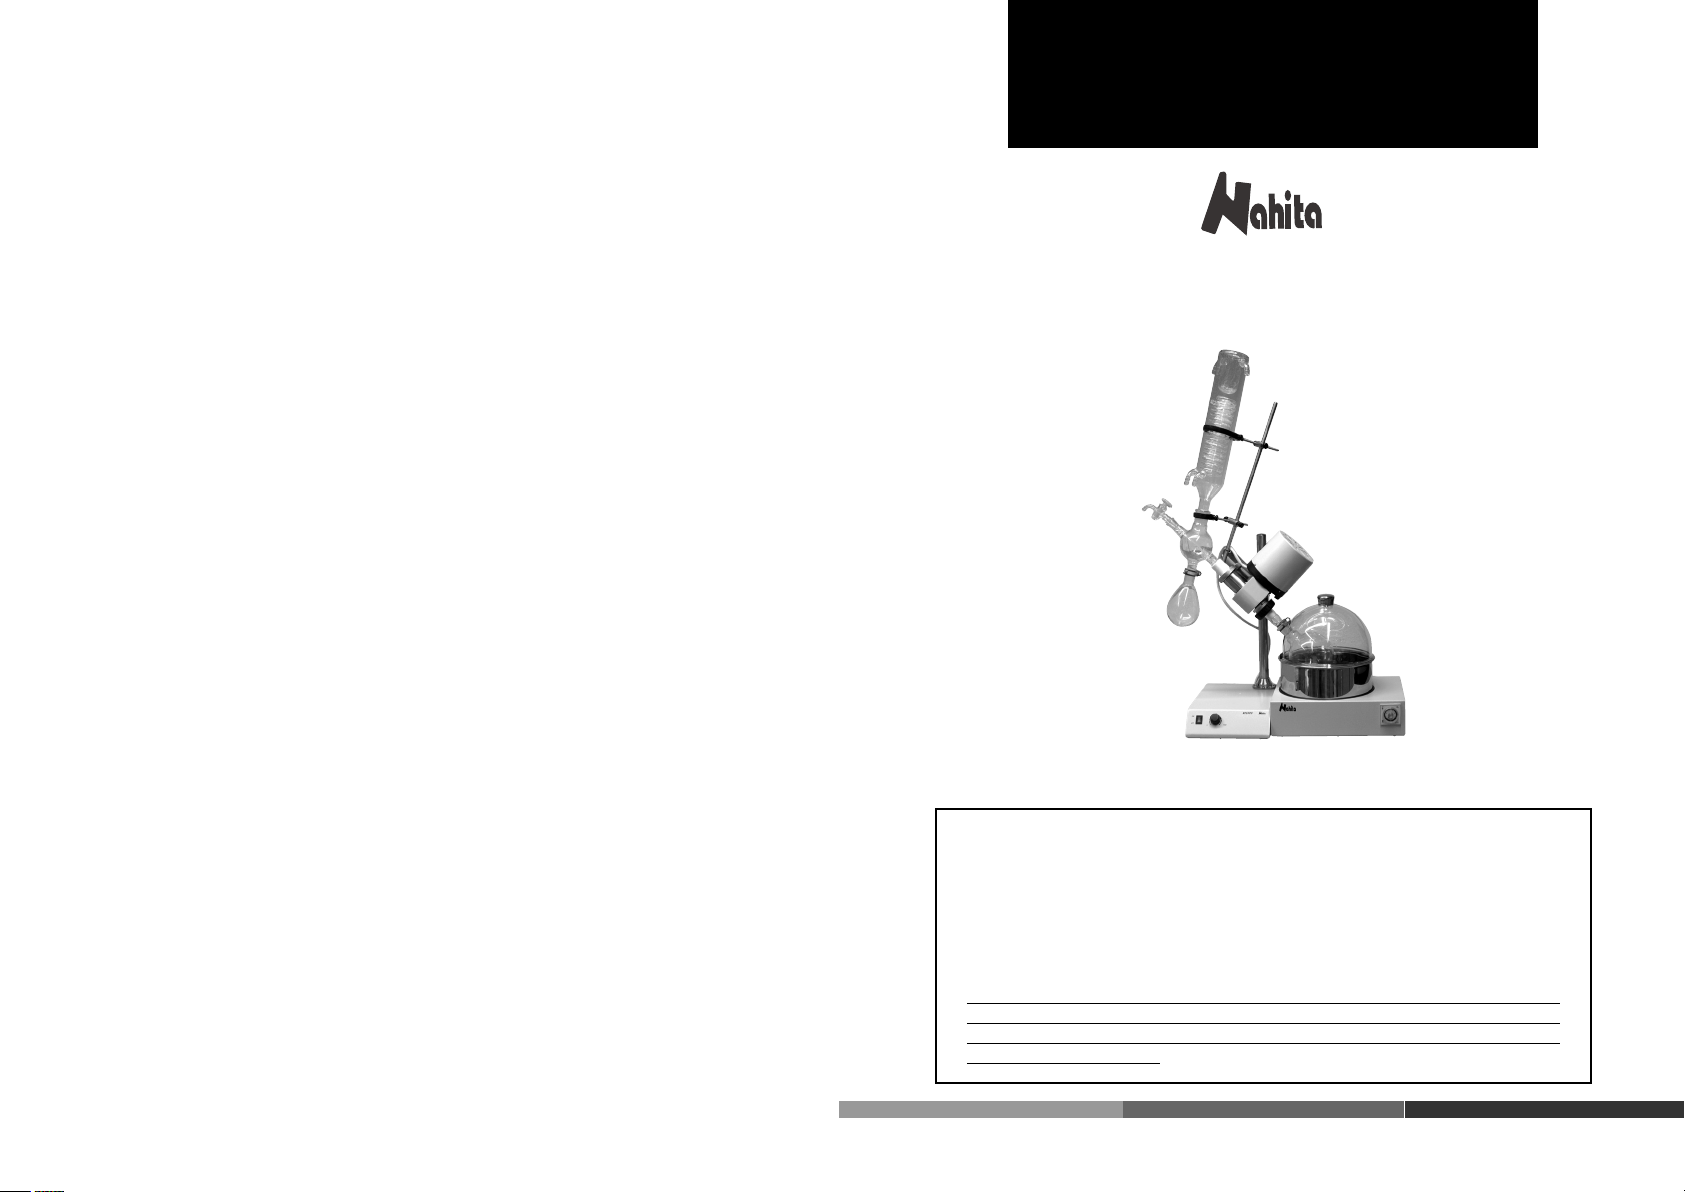
The Nahita rotary evaporator presents the possibility of turnin the lass assembly into
an an le of 0-45º by a screw that acts as a turnin device. Put the lass assembly into the
desired an le and fix such position with the screw.
Once the evaporatin system is ready, connect the equipment to the power supply.
The rotary evaporator is supplied to ether with a Schuko standard wire. Please insert
the wire that feeds the AC electric current in the base of current 220V 50Hz ±10% provi-
ded with earth wire and to the other end to the rotary evaporator connector.
Neither the manufacturer nor the distributor will assume any responsibility for the
dama es produced to the equipment durin its installation or dama es to people suffe-
red by the improper use of the electric connection. The tension should be 220V 50Hz ±
10%.
7. Select the desired temperature of the water bath by the analo ical adjustment knob.
8. Press the power ON.
9. Adjust the turnin speed of the evaporatin flask by the analo ical adjustment knob.
NOTE: When turning the equipment on, put the bath cover to avoid spi ing when wor-
king at high temperatures.
10. Connect the condenser to the water flux. The condenser presents two connections
that must be respectively connected to the water inlet and outlet hoses.
11. The vacuum connection of the system is situated at the upper part of the condenser;
it must be connected to a water jet pump or a vacuum pump.
NOTE: In case you have to send the equipment for its repair, DO NOT send the g ass
components since due to their fragi ity they can be damaged. We do not take responsibi-
ity for the broken pieces that arrive to our Technica Assistance Department.
Security
The rotary evaporator must be used by previously qualified staff that knows how the
equipment works thanks to the user manual.
Put the rotary evaporator on top of a horizontal, plane and stable table makin a free
space at least at 30 cm per side.
Do not put the rotary evaporator near any warm supply (burners, blowlamps…), nor
expose it directly to the sun, etc. Avoid vibrations, dust and dry environments.
Durante su funcionamiento el material peli roso como líquidos inflamables o material
patoló ico, deben estar fuera del área de trabajo.
When you are not usin the rotary evaporator for a lon period of time please make
sure it is unplu ed in order to avoid possible accidents.
It is essential to have the equipment switched off and unplu ed from the net before
cleanin , checkin components or replacin any piece (e. . replacement of a fuse).
Never try to repair the rotary evaporator by yourself, since you will lose the warranty
and may provoke dama es to the eneral operatin system or the electrical installation,
as well as injuries to the people that usually handle the equipment (burns, hurts…).
Revisión 3 A osto 2014Pá . 2Manual de instrucciones 59000503
Gracias por haber adquirido este equipo. Deseamos sinceramente que disfrute del eva-
porador rotativo Nahita 503. Le recomendamos que cuide el equipo conforme a lo expues-
to en este manual.
Nahita desarrolla sus productos se ún las directrices del marcado CE y haciendo hin-
capié en la er onomía y se uridad del usuario.
La calidad de los materiales empleados en la fabricación y el correcto proceder le per-
mitirán disfrutar del equipo por muchos años.
El uso incorrecto o indebido del equipo puede dar lu ar a accidentes, descar as eléctri-
cas, cortocircuitos, fue os, lesiones, etc. Lea el punto de Mantenimiento, donde se reco en
aspectos de se uridad.
LEA DETALLADAMENTE ESTE MANUAL DE INSTRUCCIONES ANTES DE
OPERAR CON ESTE EQUIPO CON EL FIN DE OBTENER LAS MÁXIMAS PRES-
TACIONES Y UNA MAYOR DURACIÓN DEL MISMO.
Ten a especialmente presente lo si uiente:
Este manual es parte inseparable del evaporador rotativo Nahita 503, por lo que debe
estar disponible para todos los usuarios del equipo.
Debe manipularse siempre con cuidado evitando los movimientos bruscos, olpes, caí-
das de objetos pesados o punzantes; evitar el derrame de líquidos en su interior
Nunca desmonte el equipo para repararlo usted mismo, además de perder la arantía
podría producir un funcionamiento deficiente de todo el equipo, así como daños a las per-
sonas que lo manipulan.
Para prevenir fue o o descar as eléctricas, evite los ambientes secos y polvorientos. Si
esto ocurre, desenchufe inmediatamente el equipo de la toma de corriente.
Cualquier duda puede ser aclarada por su distribuidor (instalación, puesta en marcha,
funcionamiento). Usted puede también mandarnos sus dudas o su erencias a la si uien-
Este equipo está amparado por la Ley de arantías y bienes de consumo (10/2003).
No se consideran en arantía las revisiones del equipo.
La manipulación del equipo por personal no autorizado provocará la pérdida total de
la arantía.
Los fusibles o accesorios, así como la pérdida de los mismos, no están cubiertos por
dicha arantía. Tampoco estarán cubiertos por el periodo de arantía las piezas en su des-
aste por uso natural.
Ase úrese de uardar la factura de compra para tener derecho de reclamación o pres-
tación de la arantía. En caso de enviar el equipo al Servicio Técnico adjunte factura o
copia de la misma como documento de arantía.
El fabricante se reserva los derechos a posibles modificaciones y mejoras sobre este
manual y equipo.
¡ATENCIÓN! NO SE ADMITIRÁ NINGÚN APARATO PARA REPARAR
QUE NO ESTÉ DEBIDAMENTE LIMPIO Y DESINFECTADO.
ENGLISH CASTELLANO

Revisión 3 A osto 2014Pá . 3Manual de instrucciones 59000503
ÍNDICE DE IDIOMAS
Castellano
In lés
2-9
10-14
ÍNDICE DE CONTENIDOS
1. APLICACIONES DEL INSTRUMENTO
2. DESCRIPCIÓN
3. ESPECIFICACIONES TÉCNICAS
4. INSTALACIÓN / PUESTA EN MARCHA
5. MANTENIMIENTO Y LIMPIEZA
3
3
4
4
8
1. APLICACIONES DEL INSTRUMENTO
Los evaporadores rotativos Nahita son unos aparatos indispensables en laboratorios de
Bioquímica, Química Or ánica, Farmacia, etc. para llevar a cabo aquellas tareas que
requieren una rápida destilación o la concentración de muestras.
El evaporador rotativo es uno de los instrumentos más importantes dentro de un labo-
ratorio ya que permite aumentar la velocidad de evaporación al doble de la conse uida
con los métodos tradicionales. Esto se lo ra mediante dos mecanismos:
- Aumento de la superficie de evaporación mediante el calentamiento y iro continuo
del matraz dentro de un baño de a ua.
- Aplicación de vacío dentro del sistema.
2. DESCRIPCIÓN
1.1 Matraz evaporación
1.2 Adaptador de unión esme-
rilado con pieza de sujeción del
matraz de evaporación y el
conector
1.3 Refri erante
1.4 Pipeta de entrada
1.5 Matraz receptor
1.6 Baño termostático
1.7 Selector de velocidad
1.8 Selector de temperatura
1.1
1.2
1.3
1.4
1.5
1.6
1.7 1.8
Version 3 Au ust 2014Pa . 12Instruction manual 59000503
PLEASE READ THOROUGHLY THE INSTRUCTIONS BEFORE CONNECTING
AND OPERATING WITH THIS EQUIPMENT WITH THE AIM OF ACHIEVING
THE HIGHEST FEATURES AND THE MAXIMUM DURABILITY OF THE INS-
TRUMENT.
Please put the rotary evaporator on top of a horizontal, plane and stable table makin a
free space at least at 30 cm per side. Do not put the equipment near any warm supply (bur-
ners, blowlamps…), nor expose it directly to the sun, etc.
Durin operation, dan erous material such as flammable or infectious liquids must be
out of the workin area.
When you are not usin the rotary evaporator for a lon period of time please make
sure it is unplu ed and protected from dust, in order to avoid possible accidents and
extend its life-span.
1. Assemble the evaporatin system (see drawin )
Previously, put the rod on the motor support with
the four supplied screws. Place the motor on its
correspondin bosshead; you have received a fixin
screw, insert it bearin in mind that it presents two
slots that must fit with the rod.
2. Put the connector (white Teflon piece) into the
fixed evaporatin system by introducin the narro-
wer part of the connector inside the system. Screw
the metal rin and the black piece of the piece to fix the evaporatin flask, in the round
joint adapter neck. Finally, join this set with the white Teflon piece previously inserted
into the system and use the black piece to fix all the components (see fi ure 2).
a
b
c
Figure 2
3. To assemble the left part of the rotary evaporator, place the rod with the four supplied
screws (fi ure 3a). Arran e the bossheads (fi ure 3b) and fixin rin s (fi ure 3c) that will
hold the condenser, placin the narrower rin at a lower position and the wider rin at an
upper position. Put the joinin lass piece in the position where the rest of the lass com-
ponents (condenser, receivin flask and inlet tube) conver e (fi ure 4).
bca
SPEED
ROTARYEVAPORATOR
MODEL503
OFF
ON
MOTOR
Figure 3
a
bc
Figure 4
CASTELLANO ENGLISH

Version 4 Au ust 2014Pa . 11Instruction manual 59000503
3. TECHNICAL SPECIFICATIONS
Manua raising mechanism Up to 150 mm
Turning ang e of the g ass assemb y 45º
Speed range 0-90 r.p.m
Speed adjustment Analo ical
Temperature range of the water bath RT - 100 ºC
Speed adjustment Analo ical
Precision +/- 1 ºC
Bath power 1100 W
Rotor power 40 W
Power supp y 220-240 V, 50-60 Hz +/- 10%
4. INSTALLATION / SETTING UP
Pre iminary inspection
Unwrap the rotary evaporator, take off the involvin plastic and take off the polispan
protection in which it comes fitted. Take off all protections and without connectin the
rotary evaporator to the power supply, make sure that the equipment does not present
any dama e because of the shipment. In case it presents any dama e, tell it immediately
to your transport a ent or dealer so that they can make the claims in the correct time limit.
Please keep the ori inal wrappin ; you will always need it for returns enclosed with all
the accessories supplied.
Please check that all the accessories are enclosed with the equipment:
- Rotary evaporator - 2 Rin s, 2 Bossheads
- Thermostatic water bath - 2 Plastic clips for round joints 29/32
- 1 Glass condenser ( round joint 29/32) - 1 Metal clamp
- 1 Glass joinin piece with three necks - 1 Metal piece to fix the evaporatin flask
- 1 Inlet tube - 1 Rod to hold the lass assembly
- 1 Ground joint adapter - 1 Rod to hold the motor
- 1 Round bottom flask, 500 mL - Warranty
- 1 Pear-shaped flask, 250 mL - Instructions manual
We will only a ept any equipment return within 15 days after delivery and provided
it omes in its original wrapping.
Insta ation
Before usin the rotary evaporator, it is convenient for you to familiarize with its com-
ponents and basic essentials, as well as with its control functions.
Revisión 3 A osto 2014Pá . 4Manual de instrucciones 59000503
3. ESPECIFICACIONES TÉCNICAS
Mecanismo e evador manua Con poder de elevación de 150 mm
Ángu o de giro para e juego de vidrio 45º
Rango de ve ocidad 0-90 r.p.m
Regu ación de ve ocidad Analó ica
Rango de temperatura de baño ca efactor Ambiente - 100 ºC
Regu ación de temperatura Analó ica
Precisión +/- 1 ºC
Consumo baño 1100 W
Consumo rotor 40 W
A imentación 220-240 V, 50-60 Hz +/- 10%
4. INSTALACIÓN Y PUESTA EN MARCHA
Inspección pre iminar
Desembale el evaporador rotativo, retire el plástico que lo envuelve y quite la protec-
ción de poliespán en que viene encajado. Retire todas las protecciones y, sin conectar el
evaporador rotativo a la red eléctrica, ase úrese de que no presenta nin ún daño debido
al transporte. De ser así, comuníquelo inmediatamente a su transportista o suministrador
para que pueda hacer las debidas reclamaciones en el plazo establecido.
Guarde el embalaje, ya que siempre se deben realizar las devoluciones en su embalaje
ori inal con todos los accesorios suministrados.
Compruebe los accesorios que usted debe recibir junto al equipo:
- Rotavapor
- Baño termostático
- 1 Refri erante de vidrio (esmerilado 29/32)
- 1 Pieza de unión de vidrio con tres salidas
- 1 Pipeta de entrada de vidrio
- 1 Adaptador de unión esmerilado
- 1 Matraz de fondo redondo de 500 mL
- 1 Matraz forma corazón de 250 mL
- 2 Aros de sujeción, 2 Nueces
- 2 clips de plástico para uniones esmeriladas 29/32
- 1 Pinza metálica de sujeción
- 1 Pieza metálica de sujeción del matraz de evaporación
- 1 Varilla de sujeción del jue o de vidrio
- 1 Varilla de sujeción del motor
- Garantía
- Manual de instrucciones
CASTELLANOENGLISH

Revisión 3 A osto 2014Pá . 5Manual de instrucciones 59000503
So o aceptamos devo uciones de equipos en os 15 días posteriores a envío y siempre
que vengan comp etos en su emba aje origina .
Insta ación
Antes de comenzar a utilizar el evaporador rotativo es conveniente familiarizarse con
sus componentes y fundamentos básicos, así como con las funciones de sus controles.
LEA DETALLADAMENTE ESTE MANUAL DE INSTRUCCIONES ANTES DE
OPERAR CON ESTE EQUIPO CON EL FIN DE OBTENER LAS MÁXIMAS PRES-
TACIONES Y UNA MAYOR DURACIÓN DEL MISMO.
Coloque el evaporador rotativo sobre una mesa horizontal, plana y estable, creando un
espacio libre de al menos 30 cm por cada lado. No coloque el equipo en zonas próximas a
fuentes de calor (mecheros, sopletes...), ni lo expon a directamente a la luz del sol, etc.
Evite en el lu ar de trabajo la presencia de productos inflamables o tóxicos.
Cuando no vaya a hacer uso del evaporador rotativo durante lar os períodos de tiem-
po, ase úrese de que esté desconectado de la red y protéjalo del polvo (evitando así posi-
bles accidentes y prolon ando la vida útil del equipo).
1. Realice el montaje del sistema de evaporación (se ún dibujo)
Previamente, coloque la varilla soporte del motor con los cuatro tornillos que se sumi-
nistran. Coloque el motor en la nuez preparada para ello; ha recibido un tornillo de suje-
ción, insértelo teniendo en cuenta que en su parte interior tiene dos muescas que deben
coincidir con la varilla.
2. Inserte el conector (pieza de teflón blanco) en el sistema fijo de evaporación introdu-
ciendo la parte más estrecha del conector en el interior del sistema. Enrosque el anillo
metálico y la pieza ne ra de la pieza de sujeción del matraz de evaporación en el cuello
del adaptador de unión esmerilado. Finalmente, una este conjunto a la pieza de teflón
blanco insertada en el sistema y fíjelo todo con la pieza ne ra (ver fi ura 2).
a
b
c
Figura 2
3. Para realizar el montaje de la parte izquierda, coloque la varilla de sujeción en el sis-
tema con los cuatro tornillos que incorpora (fi ura 3a). Dispon a las nueces (fi ura 3b) y
los aros de sujeción (fi ura 3c) que posteriormente sujetarán el refri erante, situando el
más estrecho abajo y el más ancho arriba. Coloque la pieza de unión de vidrio donde con-
fluyen el resto de componentes de vidrio a montar (refri erante, matraz receptor y pipe-
ta de entrada) (fi ura 4).
Version 3 Au ust 2014Pa . 10Instruction manual 59000503
ATTENTION!! IF EQUIPMENTS ARE NOT PROPERLY CLEAN AND
DISINFECTED THEY WOULD NOT BE ALLOWED TO REPAIR BY OUR
TECHNICAL SERVICE.
INDEX OF LANGUAGES
Spanish
En lish
2-9
10-16
1. USES OF THE INSTRUMENT
2. DESCRIPTION
3. TECHNICAL SPECIFICATIONS
4. INSTALLATION / SETTING UP
5. MAINTENANCE AND CLEANING
11
11
12
12
15
INDEX OF CONTENTS
1. USES OF THE INSTRUMENT
Nahita rotary evaporators are essential instruments in Biochemistry, Chemistry and
Pharmacy laboratories to carry out those operations in which rapid distillation or sample
concentration is required.
Rotary evaporator is one of the most important laboratory instruments due to its capa-
city of increase evaporation speed twice as much as that ot with traditional methods.
This is obtained by two different mechanisms:
- Increase in evaporatin surface by continuously heatin and turnin the flask into the
water bath.
- Application of vacuum inside the system.
2. DESCRIPTION
1.1 Evaporatin flask
1.2 Ground joint adapter with a piece
to fix the evaporatin flask and the con-
nector.
1.3 Condenser
1.4 Inlet tube
1.5 Receivin flask
1.6 Thermostatic water bath
1.7 Speed adjustment knob
1.8 Temperature adjustment knob
1.1
1.2
1.3
1.4
1.5
1.6
1.7 1.8
CASTELLANO ENGLISH

Version 4 Au ust 2014Pa . 9Instruction manual 59000503
Thank you for choosin this equipment. We sincerely wish that you enjoy your Nahita
rotary evaporator 503. We hi hly recommend lookin after this equipment accordin to
what is stated in this manual.
Nahita develops its products accordin to the CE markin re ulations as well as
emphasizin the er onomics and security for its user.
The correct usin of the equipment and its ood quality will permit you to enjoy this
equipment for years.
The improper use of the equipment can cause accidents and electric dischar es, circuit
breakers, fires, dama es, etc. Please read the point of Maintenance, where we expose the
security notes.
TO GET THE BEST RESULTS AND A HIGHER DURATION OF THE EQUIP-
MENT IT IS ADVISABLE TO READ THOROUGHLY THIS MANUAL BEFORE
OPERATING WITH THE EQUIPMENT.
Please bear in mind the followin :
This manual is inseparable from the Nahita rotary evaporator 503, so it should be avai-
lable for all the users of this equipment.
You should carefully handle the equipment avoidin sudden movements, knocks, free
fall of heavy / sharp objects on it. Avoid spillin liquids inside the equipment.
Never dismantle the different pieces of the equipment to repair it yourself, since it could
produce a defective use of the whole equipment and a loss of the product warranty, as
well as injuries on people that handle the rotary evaporator.
To prevent fire or electric dischar es avoid dry or dusty environments. In case it may
happen unplu the equipment immediately.
If you have any doubt about settin up, installation or functionin do not hesitate in
contactin your wholesaler. You can also tell us any doubts or su estions you have by
This equipment is protected under the Warranties and consumer oods re ulation
(10/2003).
Overhaul is not covered by the equipment warranty.
Operations made by non-qualified staff will automatically produce a loss of the
warranty.
Neither fuses nor accessories (includin their loss), are covered by the product's
warranty. The warranty neither covers piece's deterioration due to the course of time.
Please make sure you keep the invoice, either for havin the ri ht to claim or askin for
warranty covera e. In case you have to send the equipment to Nahita Technical Assistance
Department you should enclose the ori inal invoice or a copy as uarantee.
Please do not for et fillin the warranty certificate and send it before 15 days after the
date of purchase.
Manufacturer reserves the ri ht to modify or improve the manual or equipment.
Revisión 3 A osto 2014Pá . 6Manual de instrucciones 59000503
a
bc
Figura 4
Recuerde: Unte con grasa o vase ina as juntas esmeri adas de todas as piezas de
vidrio para evitar su rotura a ser desmontadas.
4. Llene el baño de a ua.
Nota: NUNCA CONECTE EL BAÑO SIN AGUA EN SU INTERIOR, LA RESISTENCIA
SE ROMPE
5. El evaporador rotativo Nahita presenta una posibilidad de iro del jue o de vidrio de
0 a 45º mediante un tornillo que actúa como dispositivo de iro. Coloque el jue o de
vidrio en el án ulo en el que desee trabajar y fije dicha posición mediante el tornillo.
6. Una vez que ya tiene preparado el sistema de evaporación, enchufe el equipo a la red
eléctrica.
El evaporador rotativo se suministra con un cable Schuko estándar. Inserte el cable de
alimentación de corriente alterna a la base de corriente 220 V, 50 Hz +/- 10% provista de
toma de tierra y por el otro extremo al conector del evaporador rotativo.
Ni el fabri ante ni el distribuidor asumirán responsabilidad alguna por los daños
o asionados al equipo, instala iones o lesiones sufridas a personas debido a la inob-
servan ia del orre to pro edimiento de onexión elé tri a. La tensión debe ser de 220
V, 50 Hz ± 10%.
7. Seleccione la temperatura deseada del baño de a ua mediante el re ulador analó i-
co.
bca
SPEED
ROTARYEVAPORATOR
MODEL503
OFF
ON
MOTOR
Figura 3
CASTELLANOENGLISH

Revisión 3 A osto 2014Pá . 7Manual de instrucciones 59000503
8. Lleve el interruptor de encendido a la posición ON.
9. Re ule la velocidad de iro del matraz de evaporación mediante el re ulador analó-
ico de velocidad.
Nota: Cuando ponga en funcionamiento e equipo, co oque a campana en e baño ya
que, a trabajar a a tas temperaturas, podría sufrir sa picaduras.
10. Conecte el refri erante a la salida de a ua. El refri erante presenta dos salidas que
deben ser conectadas a las omas de entrada y salida de a ua respectivamente.
11. La salida para hacer el vacío en el sistema se encuentra en la parte superior del refri-
erante; debe ser conectada bien a una trompa de a ua o a una bomba de vacío.
Nota: En caso de enviar su evaporador rotativo para reparar, NO envíe as piezas de
vidrio ya que, dada su fragi idad, pueden producirse roturas. No nos hacemos responsa-
b es de as piezas que puedan egar rotas a nuestro Servicio Técnico.
Seguridad
El evaporador rotativo debe ser utilizado por personal cualificado previamente, que
conozca el equipo y su manejo mediante el manual de uso.
Coloque el evaporador rotativo sobre una mesa horizontal, plana y estable, creando un
espacio libre de al menos 30 cm por cada lado.
No coloque el evaporador rotativo en zonas próximas a fuentes de calor (mecheros,
sopletes...), ni expon a el equipo directamente a la luz del sol. Evite las vibraciones, el
polvo y los ambientes muy secos.
Durante su funcionamiento el material peli roso como líquidos inflamables o material
patoló ico, deben estar fuera del área de trabajo.
Cuando no vaya a hacer uso del evaporador rotativo por lar os períodos de tiempo, ase-
úrese de que está desconectado de la red para evitar posibles accidentes.
Para cualquier manipulación de limpieza, verificación de los componentes o sustitución
de cualquier componente (ej: sustitución de fusible) es imprescindible apa ar el equipo y
desconectarlo de la toma de corriente.
No intente repararlo usted mismo; además de perder la arantía puede causar daños en
el funcionamiento eneral del equipo, así como lesiones a la persona (quemaduras, heri-
das...) y daños a la instalación eléctrica.
Procure que no entre a ua en el cuadro de controles, aunque éste se encuentre debida-
mente aislado. Si por cualquier causa sospecha que ha entrado a ua o cualquier líquido
desconecte el equipo inmediatamente (ver Mantenimiento).
Fabricado se ún las directivas europeas de se uridad eléctrica, compatibilidad electro-
ma nética y se uridad en máquinas.
Revisión 3 A osto 2014Pá . 8Manual de instrucciones 59000503
5. MANTENIMIENTO Y LIMPIEZA
Para un ade uado fun ionamiento del evaporador rotativo es ne esario seguir algu-
nas re omenda iones.
Nota: Todas as normas de uti ización citadas anteriormente carecerán de va or si no
se rea iza una continua abor de mantenimiento.
Si a las instrucciones y advertencias relativas a este manual.
Ten a este manual siempre a mano para que cualquier persona pueda consultarlo.
Utilice siempre componentes y repuestos ori inales. Puede ser que otros dispositivos
sean parecidos, pero su empleo puede dañar el equipo.
El evaporador rotativo dispone de un cable de red Schuko; éste debe conectarse a una
toma de corriente que esté conectada a tierra, debiendo quedar a mano para poder des-
conectarlo en caso de emer encia.
No intente repararlo usted mismo; además de perder la arantía puede causar daños en
el funcionamiento eneral del evaporador rotativo así como lesiones a personas (quema-
duras, heridas...) y daños a la instalación eléctrica o equipos eléctricos cercanos.
En caso de avería diríjase a su proveedor para la reparación través del Servicio Técnico
de Nahita.
Limpieza
Para la limpieza de las partes metálicas, acero inoxidable, aluminio, pinturas, etc. nunca
utilice estropajos o productos que puedan rayar, ya que deterioran el equipo, limitando su
vida útil.
Para la limpieza del equipo recomendamos se utilice un trapo libre de pelusa humede-
cido con a ua jabonosa que no conten a productos abrasivos.
¡ATENCIÓN! NO SE ADMITIRÁ NINGÚN APARATO PARA REPARAR
QUE NO ESTÉ DEBIDAMENTE LIMPIO Y DESINFECTADO.
INSTRUCCIONES SOBRE PROTECCIÓN DEL MEDIO AMBIENTE
No se desha a de esta centrífu a tirándola a la basura ordinaria cuando haya
terminado su ciclo de vida; llévela a un punto de reco ida para el reciclaje de
aparatos eléctricos y electrónicos. No contiene elementos peli rosos o tóxicos
para el ser humano pero una eliminación no adecuada, perjudicaría al medio
ambiente.
Los materiales son reciclables tal como se indica en la marcación. Al reciclar materiales u otras
formas de reutilización de aparatos anti uos, esta Ud. haciendo una contribución importante a la
protección del medio ambiente.
Por favor pón ase en contacto con la administración de su comunidad para que le asesoren sobre
los puntos de reco ida.
CASTELLANO CASTELLANO
Table of contents
Other Nahita Laboratory Equipment manuals

Nahita
Nahita GLC001 User manual

Nahita
Nahita 2624/2 User manual

Nahita
Nahita LNB003 User manual

Nahita
Nahita 2818 User manual

Nahita
Nahita 802 Series User manual

Nahita
Nahita 2615 User manual

Nahita
Nahita LGB004 User manual

Nahita
Nahita 601/3 User manual

Nahita
Nahita 631/3 Plus User manual

Nahita
Nahita 2640 Series User manual