Nasco LF01271 User manual

Multi-Venous IV
& Injection Arm
LF01271 - Light, LF01272 - Medium
INSTRUCTION MANUAL

About the Simulator
The Multi-Venous IV & Injection Arm duplicates the human
condition as closely as modern plastics technology allows.
This unit is the simulation of the entire human arm from the
shoulder to fingertips. Externally, the skin texture is realistic to
touch.
Although this arm will provide you with long trouble-free usage,
the skin and veins can be easily removed and replaced when
needed, providing literally, a brand new arm. The life of the
replaceable skin and veins will be prolonged by utilizing smaller
needle sizes (such as 20- to 25-gauge). However, if instruction
with larger needle sizes is required, this can be done; the skin
and veins will merely need to be replaced sooner. The Skin and
Vein Kits are available through Nasco Healthcare (see list of
supplies).
2

List of Components
A. Multi-Venous IV & Training Arm
(LF01271-LIGHT,
LF01272-MEDIUM)
B. 3 cc Syringe with Needle
C. 12 cc Syringe with Needle
D. Case
E. 2 Fluid Supply Bags
F. Infusion Butterfly
G. Pinch Clamp
H. 2 Small Towels
I. Infusion Needle
J. 2 Pint Bottles with Blood Powder
K. Skin Sealant
L. Arm Stand included but not pictured
D.
B.
C.
D.
E.
F.
G.
H. I.
J.
K.
J.
A.
3

Internal Structure
Internally the vascular structure (dry natural rubber tubing) includes
the basilic, median, accessory cephalic, and metacarpal veins. This
venous system is constructed of special self-healing dry natural
rubber tubing, with the lumen being the approximate size of a human
vein. The lumen changes diameter in the arm to simulate rolling or
disappearing veins. This vascular structure has inlet tubing and outlet
tubing at the shoulder, and it is via these tubes that the venous system
is filled. Thus, the techniques of blood drawing and starting intravenous
infusions may be practiced on the Multi-Venous & Injection Arm.
Venous Channels Beneath the Skin
8 Fluid Lines
Subcutaneous and
intramuscular
injection site Intradermal injection sites (3)
4
Realism

General Instructions For Use
A. Pressurizing the Veins with Synthetic Blood:
1. Add 1 pint of distilled water to the pint bottle with blood powder;
shake it to mix.
2. Be sure the clamp on the fluid supply bag A tubing is closed,
fill it with the blood and hang the bag no more than 18" above
the level of the arm. (See Figure 1 and inset.) (Fluid Supply Stand
shown sold separately.)
3. Attach the fitting end of the fluid supply bag A tubing to one
of the shoulder tubes. (Make sure the arm is palm down at this
point.) (See Figure 2.)
Note: Connecting the fluid supply bag to the shoulder tube may
require a small amount of water soluble lubricant, heating the
shoulder tube end in the palm of a warm hand, or dipping the
shoulder tube end into warm water.
A.
B.
Figure 1
Figure 2
5

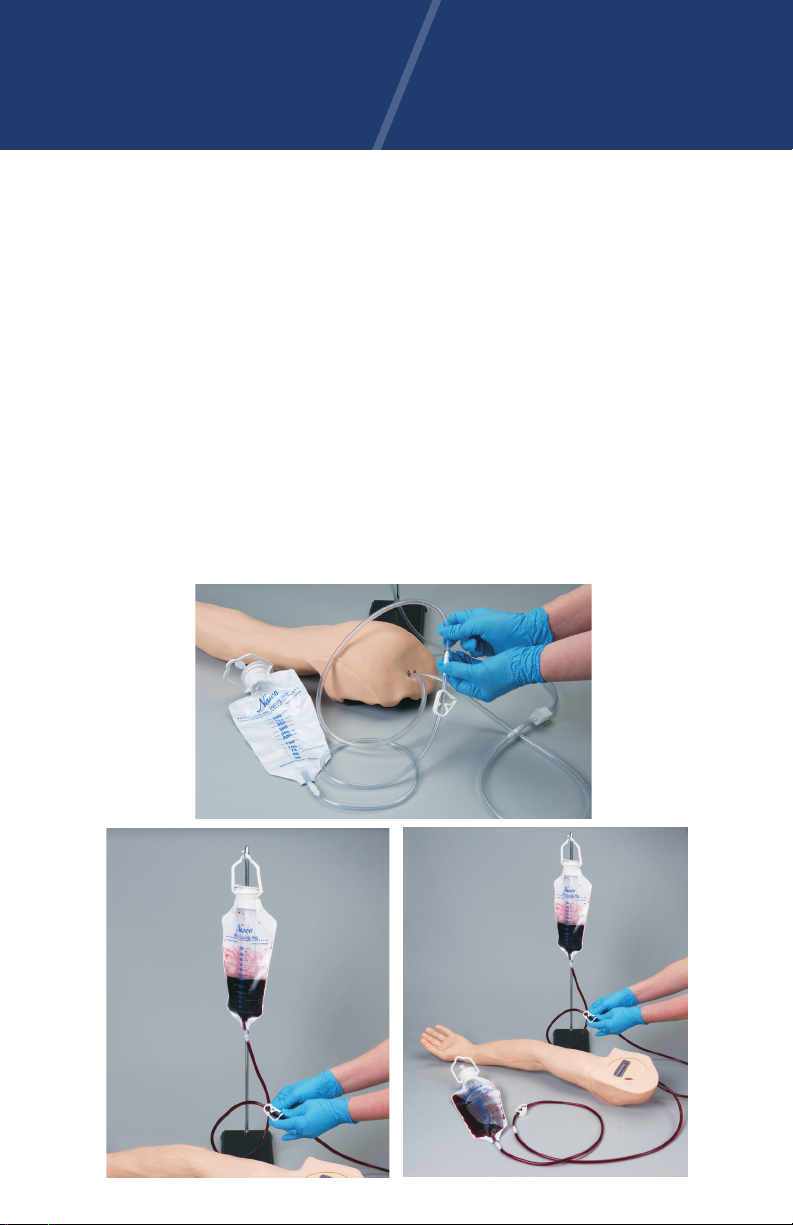
4. With the other shoulder tube attached to the second (empty)
fluid supply bag B, (see Figure 3) gradually “flush” the vascular
system with synthetic blood by slowly opening the clamp on
fluid supply bag A. (See Figure 4.) (The pinch clamp on fluid
supply bag B should be open.) Allow same “blood” to pass
through the system until the air bubbles have been eliminated.
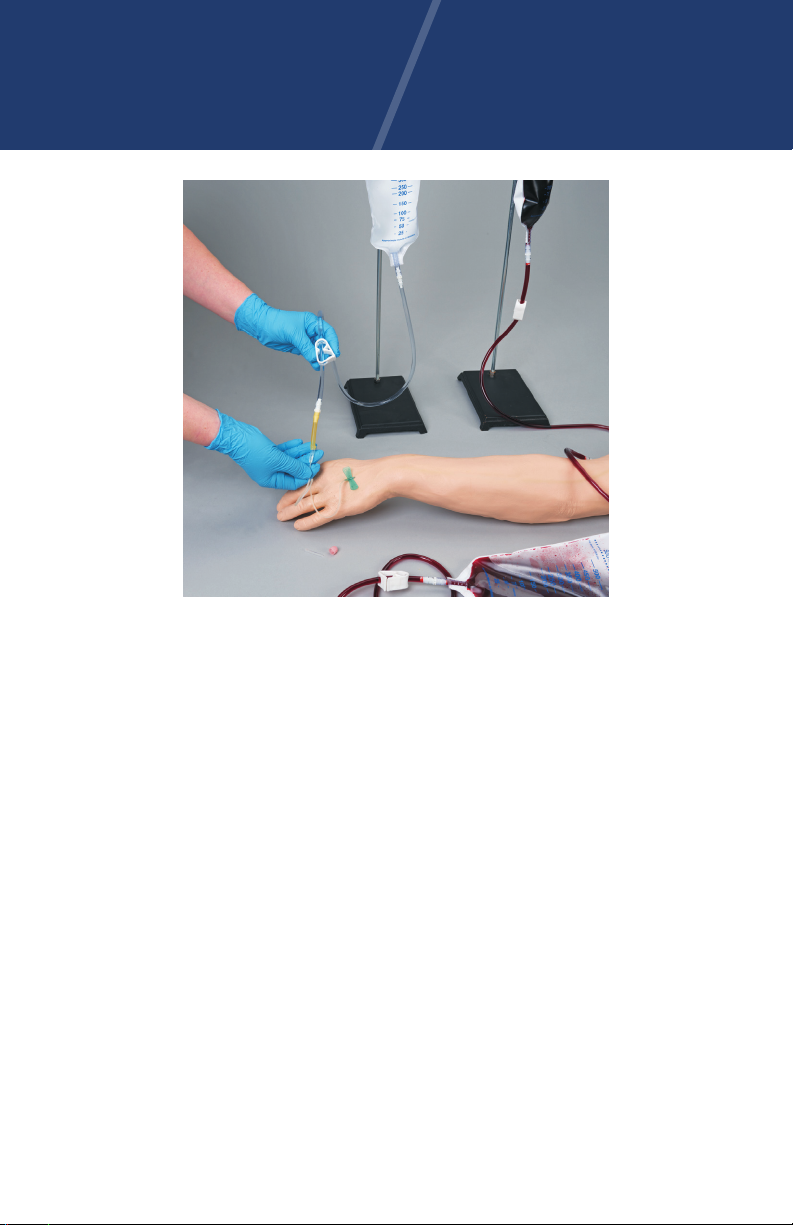
5. Close the clamp on bag A and then turn the arm over so it is
palm up. Slowly open the clamp on bag A to allow some blood to
pass through and to remove any remaining air that is trapped in
the system. (See Figure 5.)
Note: It may be necessary to swap the positions of the fluid
supply bags A and B during the filling process in order to
prevent bubbles in the tubing. If bag A runs out of blood before
the arm is fully prepped, simply remove it from its hanging
position and replace it with (full) bag B.
6. Once the system is filled, close the clamp on (resting) fluid
supply bag B and leave (hanging) fluid supply bag A clamp
open. The arm is now fully pressurized and can be used palm up
or down.
Figure 3
Figure 4 Figure 5
6

B. IV Injection and Withdrawal
1. Start with a fully pressurized arm. See procedure A under
General Instructions for Use.
2. Close the clamp on Fluid Supply Bag B.
3. Open the clamp on Fluid Supply Bag A.
The arm is now ready to perform injections or withdrawals along any
of the 8 fluid lines present in the arm. Nasco Healthcare recommends
the use of small diameter needles for these procedures; 20 to 25 gauge.
Use only distilled water to prep the injection sites and as an injection.
A realistic flashback will occur when the vein has been properly
punctured. (See Figure 6.)
Figure 6
7

Figure 7
A.
C. Intravenous Infusions
1. Begin with a fully pressurized arm. See procedure A under
General Instructions for Use.
2. Select the appropriate intravenous infusion needles or
butterfly included. Nasco Healthcare recommends small
gauge needles 20-25 gauge.
3. Make sure the arm is palm down and the clamps on Bags A
and B are closed.
4. Simulate cleansing the injection site with distilled water,
alcohol, or iodine solution.
5. Insert the IV needle or butterfly into a vein. Flashback will
indicate proper insertion.
6. Attach the needle or butterfly to the tubing from the infusion
solution (not supplied) or fluid supply bag C (sold separately)
with the latex adapter if needed. (See Figure 7 and inset.)
7. Open the clamps on fluid supply bag B.
C.
B.
8

8. Open the clamp on the infusion solution or fluid supply bag C.
Proof of proper procedure will be evidenced by the flow of fluid
from the infusion solution or fluid supply bag C. (See Figure 8.)
Note: This procedure may dilute your simulated blood solution.
Figure 8
A.
C.
B.
9

D. Intramuscular Injections
The procedure for administering intramuscular injections can be
practiced in the area of the deltoid. (See Figure 9.) Prep the site with
distilled water, alcohol, or iodine solution. Injections can be done
utilizing the appropriate needle and syringe. ⁄ cc of distilled water
may be injected, however, we recommend utilizing air as injectant
since the distilled water cannot be drained, but must evaporate
from the arm. Synthetic blood must NEVER be used for injections.
E. Intradermal/Intracuetaneous Injections
Use a 3 cc syringe with a 25-gauge needle for this procedure.
Internal Structure of the the arm features three locations.
All are located on the outer aspect of the upper arm.
(See Figure 10.) If fluid is properly injected, a characteristic skin welt
will form. The welt is removed by drawing the fluid after practice. We
recommend you use distilled water as an injection fluid.
Figure 9 Figure 10
10

The Multi-Venous IV & Injection Arm should be completely
drained of fluid and dry before storing. Simulated blood can be
reused.
A. Draining and Rinsing the Simulator
1. Disconnect the fluid supply bags and drain simulated blood
into the supplied pint bottles.
2. Fill one bag with water and reconnect to a shoulder tube.
3. Reconnect the other rinsed fluid supply bag to the open
shoulder tube.
4. Open both clamps and allow the system to flush.
5. Repeat with clean water until the water runs clear from the
arm.
6. Drain the fluid supply bags and leave the caps open to allow
the inside to air dry as much as possible.
7. Excess water may be removed from the arm by raising the
hand, lowering the shoulder, and draining it into a sink or
basin.
8. Remove the clamps from the fluid supply bag tubing as they
can cause permanent kinks and restrict fluid flow.
B. Cleaning the Simulator
1. Wash the outside of the arm with mild liquid detergent and
water.
C. Maintaining the Simulator
Nasco Vein Tubing Sealant Kit (LF01099U) will extend the
useful life of the tubing.
Note: Nasco Vein Tubing Sealant cannot be shipped outside
of the United States.
D. IV Arm Compatibility with Tapes and Bandages
The Multi-Venous IV & Injection Arm has skin
texture realistic to touch thanks to modern plastics
technology. Nasco Healthcare has tested and recommends
the following adhesives that will alleviate challenges in
adhesion: 3M Kind Removal Adhesive Tape, Safe N Simple
Silicone Adhesive Tape, Curad Silicone Band-Aid,
Safe N Simple Simpurity IV Derm Silicone (Tegaderm
equivalent)
Care and Maintenance
11

Cautions
1. This synthetic blood is specially formulated to be compatible
with the self-sealing veins and plastics used in manufacturing
the arm.
2. NEVER use synthetic blood for intramuscular injection.
3. DO NOT use dull or burred needles, as these will cause leaks in
the system. Burred
needles will cause permanent damage. Use smaller needles
(20- to 25-gauge).
4. DO NOT allow “blood” to dry on simulator — it may stain the
skin.
5. Use only 500 cc of infusion fluid, as a larger amount will also
increase the pressure of the venous system, resulting in leaks.
6. DO NOT clean the simulator with solvents or corrosive material
as they will damage it.
7. Newsprint, similar printed paper, or plastic will permanently
stain the simulator if prolonged contact occurs.
12

PROBLEM: Cannot get blood to flow or flashback.
If you are unable to get blood flow through your IV Arm, there is most
likely a restriction somewhere within the system. Restrictions can be
caused by air bubbles, kinks (either in the veins or supply and drain
tubing), or dried blood within the system.
1. Check for kinks in the tubing of the fluid supply bags: If a
clamp has been located in one spot of the tube for a long period
of time, the tube can become kinked, restricting flow even when
the clamp is open. Massage the tube where the clamps have
been to open the tubing again. Change positions of clamps often
to keep this from reoccurring.
2. Fluid supply bag height: Is the supply bag hung at the
appropriate height according to the instruction manual?
Hanging the supply bags slightly higher for the arms that are not
producing enough pressure can create just enough gravity on
the fluid to facilitate flow.
3. Vein connection: Are the veins/tubes connected to the manifold
correctly? Check correct positions in the instruction manual
for LF01274 Advanced IV Arm Skin and Vein Replacement Kit.
Contact Nasco for a FREE instructional video.
4. Check for air bubbles: Make sure you purge the arm of air
bubbles. Gradually “flush” the system with synthetic blood by
slowly opening the supply clamp. Allow some blood to pass
through the system until the air bubbles have been eliminated
in the drain bag. Close the clamp on the supply bag and then
turn the arm over so it is palm up. Slowly open the clamp to allow
some blood to pass through and to remove any remaining air
that is trapped in the system.
5. Dried blood left in veins from previous uses: If these are veins
that have been used before, you could try running a couple of
bags of clear warm water through them. There may be some
sediment from previous uses lodged within the veins/tubing.
6. Check vein tubing for kinks: Following a skin/vein replacement,
it is possible that a vein rolled out of the track or there may also
be a slight kink in the tubing. This is most likely in the underside
of the fingers. Flexing the fingers will sometimes work out the
kink. Try massaging the area of the arm (thumb and fingers)
to relocate the vein back within the track of the arm core. Also,
make sure you haven’t pulled the skin on too tight, causing a
restriction. Skins should be loose fitting, especially around the
thumb and finger areas. Apply lubrication to help move the veins
back into place.
Troubleshooting
13

Supplies and Replacement Parts
LF00845 Blood, 1 quart
LF00846 Blood, 1 gallon
LF00991 Shoulder Injection Pad Replacement
LF00993 Replacement Vein Manifold
LF01279 Skin Sealant
LF01022 Fluid Supply Stand
LF01099 Vein Tubing Sealant Kit*
LF01104 IV Arm Skin & Vein Replacement DVD — FREE
LF01105 IV Arm Set-Up & Troubleshooting DVD — FREE
LF01274 Replacement Skin, Light
LF01275 Replacement Skin, Medium
LF01276 Replacement Skin, Dark
LF01277 Vein Replacement Kit
LF01130 Fluid Supply Bag
LF01022 Fluid Supply Stand
*Not available outside the United States
14

LF01007U
LF01139U
Other Available Simulators
LF00698 Adult Venipuncture and
Injection Training Arm,
Light
LF00700 Portable IV Hand, Adult,
Light
LF00701 Portable IV Arm, Light
LF00952 Injection Training Model,
Light
LF00958 Pediatric IV Arm
LF00961 Intramuscular Injection
Simulator
LF00995 Arterial Puncture Arm
LF01007 IV Foot
LF01008 Intradermal Injection
Simulator
LF01139 Advanced IV Hand, Light
LF01162 Vebatech IV Trainer, Light
LF01184 Venatech IM & SubQ
Simulator, Light
LF03637 Infant IV Arm
LF03636 Infant IV Leg
15

Nasco Healthcare
16 Simulaids Drive
Saugerties, NY 12477
1-833-NASCOHC (627-2642)
info@nascohealthcare.com
www.nascohealthcare.com
NC30732 IM - 601003 - 03/21©2021 Nasco Healthcare
Table of contents
Other Nasco Educational Equipment manuals

Nasco
Nasco Life/form LF03840U User manual

Nasco
Nasco Life/form LF03633 User manual

Nasco
Nasco Lifeform LF01087U User manual

Nasco
Nasco CRiSis LF03957 User manual

Nasco
Nasco Life form LF03633U User manual

Nasco
Nasco Life form LF01006U User manual

Nasco
Nasco Life/form CRiSis ManikinAuscultation Kit User manual
Popular Educational Equipment manuals by other brands

ARRL
ARRL ETP Solder 101 Construction manual

Prestan
Prestan PP-AM-100M Use and Care Instructional Sheet

FCMP OUTDOOR
FCMP OUTDOOR Hotfrog Living Composter instructions

Pitsco Education
Pitsco Education R2K Rocket Kit user guide

Experia
Experia IRiS Balance Beam instruction manual

Enabling Devices
Enabling Devices Spinz-a-Round 7799 user guide