Nasco CRiSis LF03957 User manual

Complete CRiSisTM Torso
Manikin
LF03957
INSTRUCTION MANUAL
5 Year Warranty

About the Simulator
The complete Crisis Torso Manikin
is a complete resuscitation system
consisting of modular components
that allow you to create a manikin
to suit your changing needs. The
components may be purchased as
a complete package or separately
to update your existing manikin.
Update packages are compatible
with all versions of CPARLENE.
This manual will guide you in set-
ting up, using, and maintaining
each of the available components.
Also included is a list of replacement
parts, supplies, and auxiliary equip-
ment.
By reading and following all instruc-
tions carefully and completely, you
can be sure your Complete Crisis
Torso Manikin will provide years of
valuable service.
LIST OF COMPONENTS
1. Complete Crisis Torso Manikin
2. 8oz. Pump Spray Lubricant
(LF03644)
3. Short Sleeve Jacket
4. Red Caps (3)
FEATURES
1. Airway Management
• Anatomically correct nostrils, teeth,
tongue, oral and nasal pharynx,
larynx, cricoid ring, epiglottis, ary-
tenoid, false and true vocal cords,
trachea, and esophagus.
• Practice oral, digital, and nasal
intubation.
• Intubate with E.T., E.O.A., P.T.L.,
Combitube, and King System
• Practice suction and proper cuff
inflation
• Visible chest rise or stomach infla-
tion
2. CPR
• Adult compression depth
• Visible chest rise
• Mouth to Mouth or Bag-Valve-
Mask compatible
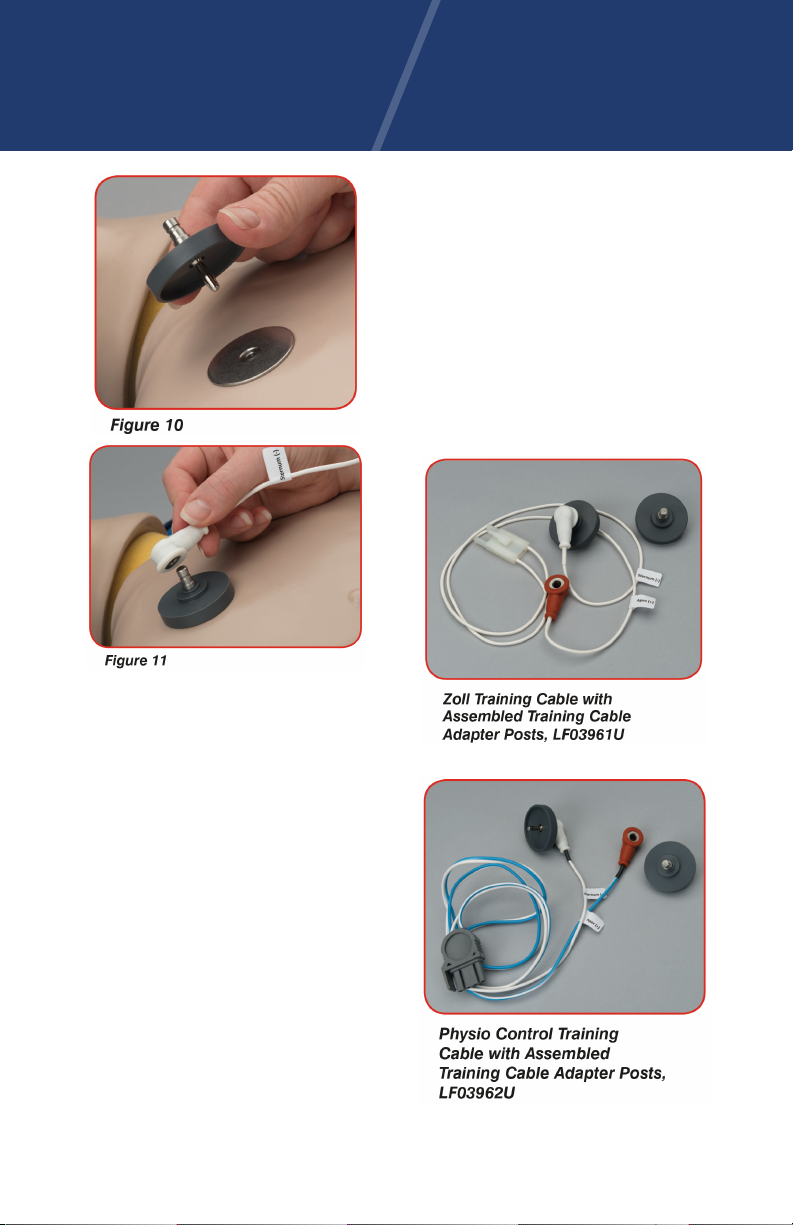
3. Defibrillation Chest Skin
4. Interactive ECG capabilities
SET UP
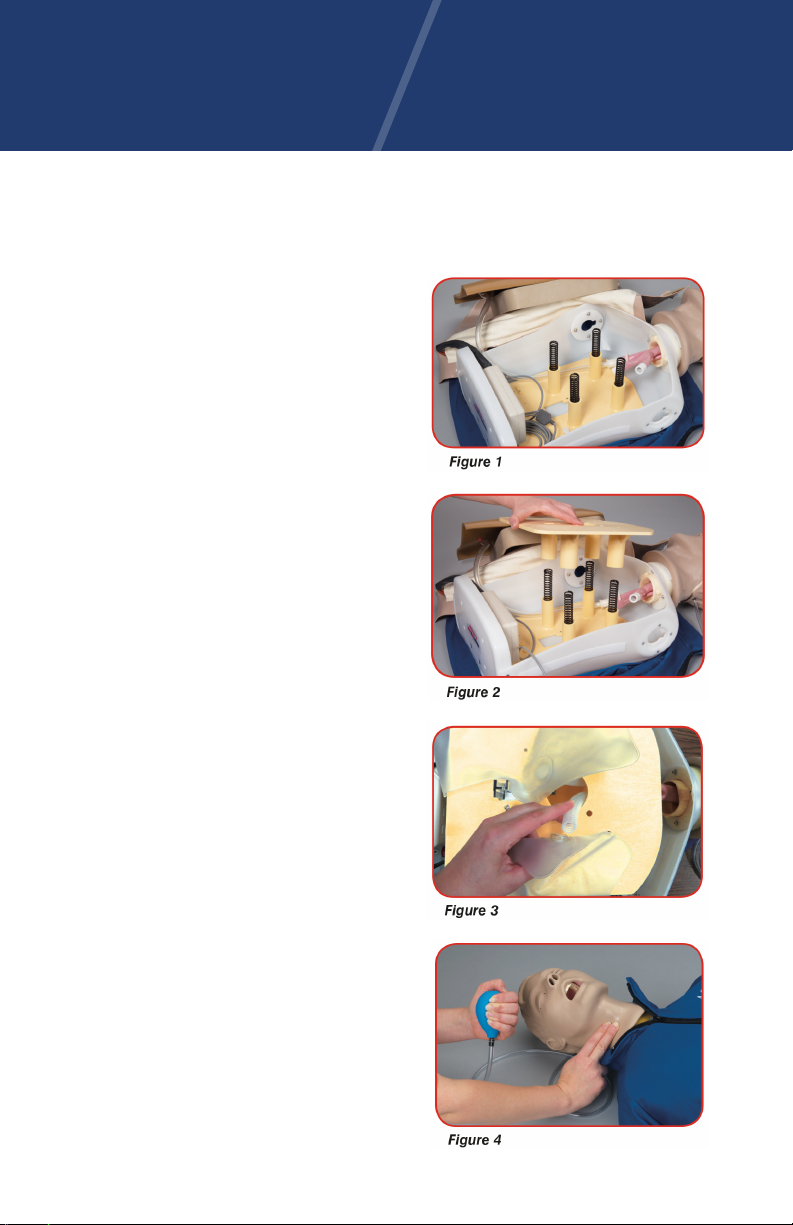
A. Installing the Chest
Compression Springs
1. Remove the chest skin, chest
plate, and upper compression plate.
Note: Caution must be taken not to
damage the defibrillation electron-
ics attached to the chest skin.
2. Remove the compression springs
from packaging. Insert the springs
into the four plastic cylinders
extending up from the lower com-
pression plate (See Figure 1).
3. Position the upper compression
plate over the springs so that each
of the springs fits up into a cylinder
on the bottom of the upper com-
pression plate (See Figure 2).
B. Connecting the Airway
1. The manikin’s airway has been
disconnected to prevent damage
during shipping.
2. With the chest skin and chest
plate still removed feed the corru-

gated bronchial tubes up through
the hole in the center of the upper
compression plate and connect
to the back of the lung bags (See
Figure 3).
3. Place the chest plate back over
the upper compression plate and
lungs.
4. Reattach the chest skin by
adjusting the hook-and-loop edges.
Again, be careful not to damage
the electronics attached to the
chest skin.
Note: The chest skin should not be
drawn too tightly over the torso as
it could restrict compression retrac-
tion or appropriate chest rise dur-
ing ventilation.
C. Pulse Feature
The Airway Management Trainer
Head is equipped with a squeeze
bulb for activating a manual carotid
pulse (See Figure 4).
D. Stomach Feature
Connected to the esophagus, the
Crisis Torso Manikin is equipped
with a stomach intended only as
an indicator of improper intubation
(stomach rise) (See Figure 5 and
inset.)
E. Lubricating the Airway Trainer
Head
Lubricate both the simulator and
supplies being used with the pump
spray lubricant provided (See
Figures 6 and 7). Endotracheal tube
sold separately.
Note: We recommend the use of
the provided lubricant or a similar
vegetable-based lubricant for the
Airway Management Trainer Head.
The use of a silicone-based lubri-
cant may cause damage to the
simulator, thus voiding warranty on
the trainer.
Set Up Continued

Set Up Continued
GENERAL
INSTRUCTIONS FOR USE
A. Intubating the Complete Crisis
Torso Manikin
We recommend the use of a 7.5-
8mm endotracheal tube for oral
intubation and 7.5cm or smaller
for nasal intubation. This simulator
allows for the Sellick Maneuver of
applying cricoid pressure during
intubation procedures. Ensuring
the cuff is properly deflated prior to
removal will prolong the useful life
of your simulator. Damage caused
by improper use of the simulator
will not be covered under the war-
ranty.
1. Determine the method of intuba-
tion.
2. Select the appropriate sized intu-
bation appliance.
3. Generously lubricate the airway
and appliance.
4. Intubate the manikin.
5. Visualize chest rise or stomach
inflation.
6. Ensure the cuff is properly deflat-
ed before removing the appliance.
Note: Remove all appliances prior to
storage.
B. Using a Combitube (Not
Included)
Thoroughly read and follow the
instructions that come with the
Combitube. The trainer will accept
either a full size or a small adult
tube. As with a real patient, it may
be necessary to back the tube out if
ventilation cannot be established.
Note: Depending on tube place-
ment, the large cuff may not accept
the recommended amount of air.
In this case, simply inflate the cuff
to its maximum volume (when
the plunger stops) and while hold-
ing the plunger down, detach the

syringe from the blue print balloon
and proceed.
C. Defibrillating the Manikin
with Paddles or Gel Pads
1. Defibrillate the manikin by plac-
ing paddles or gel pads on the
round, metal defibrillation sites on
the manikin’s chest (See Diagram 1).
As with a real patient extreme care
should be taken to make complete
contact with the sternum and apex
defibrillation site.
2. The equipment is now ready for
defibrillation practice. Follow all
normal safety precautions indicat-
ed for use and training.
Note: In an effort to help you save
money, we offer sets of defibrilla-
tion training cables and chest post
adapters, sold separately, to be
used in place of defibrillator pad-
dles or gel pads.
Defibrillating with Snap-On
Cables
Adapter posts, (sold separately), are
available to fit a variety of snap-on
cable heads. Be sure to identify
your brand of defibrillator before
selecting an adapter post set. (See
the Supplies and Replacement
Parts section of this manual for
more information.)
1. Feed the banana clip through
the protective disc and screw the
adapter post specific to your snap-
on cable head to the banana clip
(See Figures 8 & 9).
2. Insert the banana clip end into
the manikin’s chest skin defibrilla-
tion location and snap the cable to
the adapter post (See Figures 10 &
11).
Note: Cables must be placed in the
appropriate defibrillation location,
sternum or apex.
3. The equipment is now ready for
defibrillation practice. Follow all
normal safety precautions indicat-
ed for use and training.
General Instructions Continued

General Instructions Continued
Defibrillating with Training Cables
Training cables purchased from
Nasco Healthcare have snap-on
heads assembled with the standard
Training Cable Defib Adapter post
shown. Brand specific adapter posts
are only needed if you are using
your own snap-on defib cables with
unique heads. Our training cables
have unique plug-ins for use with
your own defibrillator’s specific
brand. Custom training cables can
be made for brands not seen below;
contact us for information.
Important: Training cables are not
recommended for use with battery
operated AED’s with non-recharge-
able lithium batteries.
1. Insert the cable plug into your
defibrillator.
2. Insert the banana clip end into
the manikin defibrillation location.
3. The equipment is now ready for
defibrillation practice. Follow all nor-
mal safety precautions indicated for
use and training.
Note: The simulator can accept a
maximum energy level of 360 joules.
We recommend administering the
lowest possible shock in order to
extend the life of your simulator.

D. Connecting Your Manikin
to an Arrhythmia Simulator,
or Interactive ECG Simulator
(LF03670U) and Defib/Monitor
(Sold Separately)
We have designed the CRiSisTM
line of manikins to be compat-
ible with a variety of arrhythmia
simulators and suggest the use
of the Interactive ECG Simulator -
LF03670U (sold separately).
1. Snap the colored ends of the four-
lead cable coming from the mani-
kin to the appropriate locations on
the ECG Simulator (See Figure 12).
2. Connect your defibrillator’s col-
ored limb-lead snaps to the appro-
priate locations on the manikin’s
chest skin (See Diagram 2).
3. You should now be able to select
rhythms on the ECG Simulator and
view them on your monitor.
4. Change rhythm selected from
waiting rhythm to running rhythm
automatically using the Convert
button and applying a shock to the
manikin.
Note: The running rhythm indica-
tor light is solid while the waiting
indicator blinks on and off. After
the shock is applied to the manikin,
the blinking rhythm indicator light
turns solid and the original solid
light turns off.
5. Apply paddles, gel pads, defibril-
lator cables with adapter posts, or
training cables to the appropriate
defibrillation location on the mani-
kin (See Diagram 3).
General Instructions Continued

General Instructions Continued
6. To change the age group select
the age group key, then the rhythm
you wish to select.
Note: At Power on the adult age
group is automatically selected.

A. General Cleaning
Normal surface soil can be removed
from the trainer with mild soapy
water. Do not allow water to
contact electrical components.
Stubborn stains may be removed
with (LF09919). Simply apply the
cleaner to the soiled area and wipe
clean with a soft cloth.
Note: Avoid using cleaner around
the mouth area if students will be
applying direct mouth-to-mouth
resuscitation techniques, as the
cleaner may be toxic if ingested.
B. Cleaning the Airway
Management Trainer Head
1. Remove the chest skin and chest
plate.
2. Disconnect the lungs from the
bronchi and esophagus from the
tubing to the stomach. Then, rotate
the head so that it is facing back-
wards. The large tab on the front
of the neck should be aligned with
the keyway in the torso. Tilt the
head upward until it snaps free.
Disengage the smaller rear tabs
from the neck opening and pull the
head from the body (See Figure 13).
Reverse these steps to reattach the
head.
3. Take the trainer to an area with a
sink and open counter space. Using
the red caps supplied, plug off
the right and left bronchi and the
esophagus.
4. Stabilize the head on the counter
face-up (towels work well for this)
with plugged tubes hanging over
the sink (See Figure 14).
5. Carefully pour warm soapy water
(a mild dish soap works best) into
the mouth until the water level
reaches halfway up the tongue.
6. Tilt the head back and bring the
neck up 3” off the countertop.
7. Continue filling until the water
level covers the tongue. Take a
small soft brush and gently scrub
the inside of the mouth (a small
tooth brush works well for this).
Cotton swabs can be used to scrub
inside the nostrils.
8. When done, pull the plug from
the esophagus and drain the water
into the sink.
9. Now pick the head up, hold it in a
vertical position, and pull the plugs
from the bronchi to completely
empty the system (See Figure 15).
10. Rinse the airway, following the
same procedure used to clean, with
warm tap water only. Repeat this
process until all the soap has been
flushed from the system.
Care and Maintenance

Care and Maintenance Continued
C. Disinfecting the Airway
To disinfect, repeat the standard
cleaning procedure, with a bleach
solution, as specified by the Centers
for Disease Control.
1. Fill the system with the solution
until it reaches the corners of the
mouth. Remember to start filling
with the head flat and finish with
the neck slightly elevated to ensure
that the solution completely fills all
airway passages.
2. Once completely filled with the
bleach solution, allow the head to sit
for at least 10 minutes.
3. Drain as previously described ear-
lier and repeat the rinsing process
to flush out all of the bleach solu-
tion. Set the head aside and allow
it to air dry completely prior to next
use or storage.
D. Storage
Retain the padded shipping con-
tainer to store your clean, dry simu-
lator between uses.
To Store for an Extended Period:
1. Remove any intubation appliance
used.
2. Remove the chest skin and chest
plate.
3. Disconnect the airway from the
lungs pushing the corrugated bron-
chial tubes through the hole in the
center of the upper compression
plate.
4. Remove the upper compression
plate.
5. Remove the compression springs
from the four plastic cylinders in the
lower compression plate.
6. Loosely wind the ECG cable and
place in the base of the torso, near
the load box.
7. Replace the upper compression
plate over the four plastic cylinders
in the lower compression plate.
8. Place the Chest Plate over the
upper compression plate.
9. Replace the chest skin and jacket.
10. Cover the simulator with a clear,
plastic trash liner.
11. Place the clean, dry simulator in
the retained padded shipping con-
tainer.
CAUTIONS
1. Do not place simulator in contact
with any printed paper or plastic.
The ink will transfer and cause an
indelible stain. Similar inks, such
as ball-point pen will also cause an
indelible stain.
2. Do not use cleaner (LF09919)
around the nose or mouth of the
simulator. The cleaner may be toxic
if ingested.
3. Properly lubricate the Airway
Management head and intubation
appliances.

4. Use only Pump Spray Lubricant
(LF03644) with this simulator.
Other lubricants such as silicone oil
may cause damage to the airway of
the simulator.
5. Ensure intubation appliances are
used accordingly. Improper use of
intubation appliances could dam-
age the airway of the simulator.
Damage to the airway will require
the product to be returned for
repair.
TROUBLESHOOTING
Problem:
ECG Wave is not being picked up
from the manikin.
Solution:
1. Check your connections on the
patient simulators; one or more
may be disconnected.
2. Check to make sure your patient
simulator is plugged in and work-
ing properly.
Problem:
ECG wave is inverted.
Solution:
Recheck the position of the red
and black lead snaps on the patient
simulator.
Note: If the defibrillation skin is
not functioning or wiring comes
undone, please contact us to repair
or replace the unit. Failure to do so,
or unauthorized repair, may void
the warranty or cause further harm
or damage to your equipment.
SUPPLIES/
REPLACEMENT PARTS
LF03285 Replacement Lung Set
LF03628 Replacement Stomach
LF03644 8oz. Pump Spray
Lubricant
LF03656 Physio Control Adapter
Posts for LifePak 10 and LifePak 20
LF03657 Marquette Adapters Posts
LF03658 SpaceLabs/Laerdal/
Heartstart/First Medic Adapter
Posts
LF03670 Lifeform Interactive ECG
Simulator
LF03670B Adapter Posts Set
(SpaceLabs/Laerdal/Heartstart/First
Medic Marquette, Physio Control,
and Training Cable Adapter Posts
with Banana Clips and Protective
Discs)
LF03961 Zoll Training Cables with
Adapter Posts and Protective Discs
SB32214 Physio Control - Training
Cable Only
SB32215 Zoll - Training Cable Only
SB46514 Phillips - Training Cable
Only
Note: If you need help selecting
the training cables or adapter posts
that correspond to your AED unit,
please feel free to call or email us
for assistance.
Caution Continued

Nasco Healthcare
16 Simulaids Drive
Saugerties, NY 12477
1-833-NASCOHC (627-2642)
info@nascohealthcare.com
www.nascohealthcare.com
07/2022
©2022 Nasco Healthcare
Table of contents
Other Nasco Educational Equipment manuals
Popular Educational Equipment manuals by other brands

Tobii Dynavox
Tobii Dynavox EM-12 Mounting instructions

ClassMate
ClassMate BOLTX501 user guide

Ambu
Ambu Man Advanced Instructions for use

Bresser
Bresser NATIONAL GEOGRAPHIC LAND AND WATER EXPLORATION... operating instructions

Makeblock
Makeblock Color Picker Building instructions

Rehan
Rehan ACUITY SPEECH user manual

PASCO
PASCO TD-8596A instruction manual

DIVERSIFIED WOODCRAFTS
DIVERSIFIED WOODCRAFTS ARS-4030 Assembly instructions

timio
timio TM01-01 user manual

SMART
SMART SBM600 quick start guide

Prestan
Prestan PP-AM-100M Use and Care Instructional Sheet

Nasco Healthcare
Nasco Healthcare Child CRiSis Starter Torso instruction manual