natus OLYMPIC CFM 6000 User manual

602053A
DCN: 08-0175
Operator’s Manual
OLYMPIC CFM 6000
Version 2
CAUTION
Read and be familiar with this manual before operating this device.
To ensure operator, technician, and patient safety, use only as
specified in this manual.
0086


Product Manufacturer:
Toll-free: 1-800-308-8684 (US/Canada)
Phone: +1-650-802-0400 (international)
Customer Service Fax: +1-650-802-6620
Technical Service Fax: +1-650-802-8680
Any product vigilance related communications per 93/42/EEC Article 10 should be referred to:
European Union Authorized Representative
Natus Europe GmbH
Bärmannstrasse 38
D-81245 München, Germany
The information in this manual is subject to change without notice.
No part of this manual may be photocopied, reproduced, translated, or reduced to any electronic medium without the express
written permission of Natus Medical Incorporated.
All tradenames and trademarks mentioned herein are property of their respective owners.
The CFM 6000 software described in this manual is ©2003–2008 Natus Medical Incorporated.
© 2008 Natus Medical Incorporated. All rights reserved.
Natus Medical Incorporated
5900 First Avenue South
Seattle, WA 98108 USA


OLYMPIC CFM 6000 Operator’s Manual i
Contents
Introduction . . . . . . . . . . . . . . . . . . . . . . . . . . . . . . . . . . . . . . . 1
Indications for Use. . . . . . . . . . . . . . . . . . . . . . . . . . . . . . . . 1
Warnings and Precautions . . . . . . . . . . . . . . . . . . . . . . . . . . 2
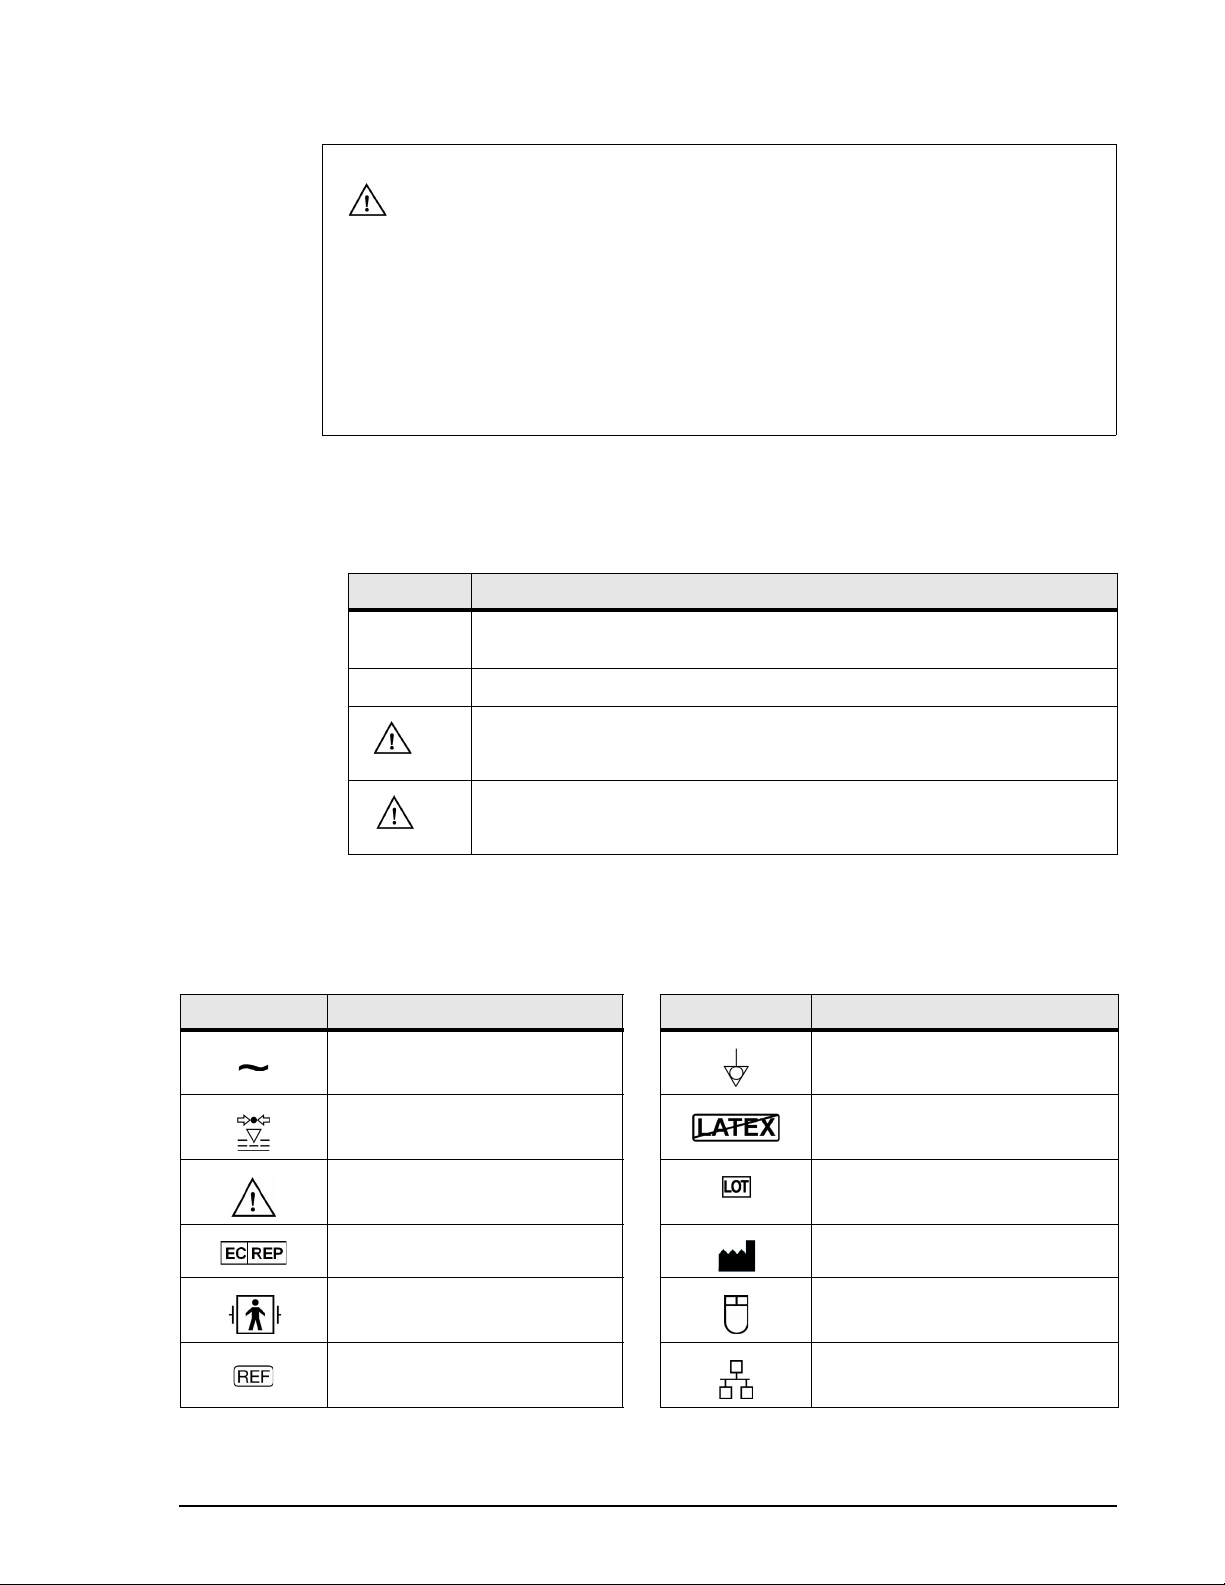
Conventions . . . . . . . . . . . . . . . . . . . . . . . . . . . . . . . . . . . . . 3
Symbols . . . . . . . . . . . . . . . . . . . . . . . . . . . . . . . . . . . . . . . . 3
CFM 6000 System . . . . . . . . . . . . . . . . . . . . . . . . . . . . . . . . . . 5
CFM 6000 Components. . . . . . . . . . . . . . . . . . . . . . . . . . . . 5
CFM Cart . . . . . . . . . . . . . . . . . . . . . . . . . . . . . . . . . . . . . . . . . 6
CFM Cart Components . . . . . . . . . . . . . . . . . . . . . . . . . . . . 6
Using the CFM Cart. . . . . . . . . . . . . . . . . . . . . . . . . . . . . . . 7
Olympic CFM 6000 Data Displays. . . . . . . . . . . . . . . . . . . . . 8
CFM Tracings . . . . . . . . . . . . . . . . . . . . . . . . . . . . . . . . . . . 8
EEG Tracings. . . . . . . . . . . . . . . . . . . . . . . . . . . . . . . . . . . . 9
Impedance Tracings. . . . . . . . . . . . . . . . . . . . . . . . . . . . . . . 9
Starting and Stopping the CFM 6000 . . . . . . . . . . . . . . . . . 10
Preparing the Patient — Applying Electrodes . . . . . . . . . . 10
Operating the CFM 6000 . . . . . . . . . . . . . . . . . . . . . . . . . . . 13
Understanding the CFM 6000 Screen . . . . . . . . . . . . . . . . 13
Buttons . . . . . . . . . . . . . . . . . . . . . . . . . . . . . . . . . . . . 14
Alerts . . . . . . . . . . . . . . . . . . . . . . . . . . . . . . . . . . . . . . 14
Customizing Settings . . . . . . . . . . . . . . . . . . . . . . . . . . . . . 15
Changing Predefined (Standard) Markers . . . . . . . . . . 15
Changing the CFM Tracing Display Style . . . . . . . . . 16
Adjusting the System Date/Time . . . . . . . . . . . . . . . . 16
Language . . . . . . . . . . . . . . . . . . . . . . . . . . . . . . . . . . . 16
Changing the Operation Mode . . . . . . . . . . . . . . . . . . 16
Changing Data Entry Capitalization . . . . . . . . . . . . . . 17
Changing Patient Information to Display . . . . . . . . . . 17
Recording a Session. . . . . . . . . . . . . . . . . . . . . . . . . . . . . . 17
Viewing an EEG Tracing. . . . . . . . . . . . . . . . . . . . . . . . . . 18
Navigating an EEG Tracing . . . . . . . . . . . . . . . . . . . . 19
Changing EEG Speed and Amplitude . . . . . . . . . . . . . 20
Entering Patient Information . . . . . . . . . . . . . . . . . . . . . . . 20
Using Markers . . . . . . . . . . . . . . . . . . . . . . . . . . . . . . . . . . 21
Placing Markers . . . . . . . . . . . . . . . . . . . . . . . . . . . . . 21
Editing a Placed Marker . . . . . . . . . . . . . . . . . . . . . . . 22
Finding Placed Markers . . . . . . . . . . . . . . . . . . . . . . . 22
Viewing Marker Details . . . . . . . . . . . . . . . . . . . . . . . 23
Opening a Session for Viewing . . . . . . . . . . . . . . . . . . . . . 23
Using the CFM 6000 Printer . . . . . . . . . . . . . . . . . . . . . . . 23
Printing a Tracing . . . . . . . . . . . . . . . . . . . . . . . . . . . . 23
Replacing Printer Paper . . . . . . . . . . . . . . . . . . . . . . . 25
Managing Files . . . . . . . . . . . . . . . . . . . . . . . . . . . . . . . . . 26
Archiving a Session to CD . . . . . . . . . . . . . . . . . . . . . 26
Restoring Sessions from CD . . . . . . . . . . . . . . . . . . . . 27
Deleting Files . . . . . . . . . . . . . . . . . . . . . . . . . . . . . . . 27
Checking Hard Disk Space . . . . . . . . . . . . . . . . . . . . . 28

ii OLYMPIC CFM 6000 Operator’s Manual
Cleaning and Maintenance . . . . . . . . . . . . . . . . . . . . . . . . . 28
Cleaning the CFM 6000 and the CFM Cart . . . . . . . . . . . 28
Tightening the Tilt Adjustment Hinge . . . . . . . . . . . . . . . 29
Updating Software . . . . . . . . . . . . . . . . . . . . . . . . . . . . . . 29
Disposing of Product . . . . . . . . . . . . . . . . . . . . . . . . . . . . 30
Assembling the CFM Cart . . . . . . . . . . . . . . . . . . . . . . . . . . 30
Troubleshooting . . . . . . . . . . . . . . . . . . . . . . . . . . . . . . . . . . 33
Service . . . . . . . . . . . . . . . . . . . . . . . . . . . . . . . . . . . . . . . . . . 34
Replacement Parts . . . . . . . . . . . . . . . . . . . . . . . . . . . . . . . . 34
Contact Information . . . . . . . . . . . . . . . . . . . . . . . . . . . . . 34
CFM 6000 Catalog Items . . . . . . . . . . . . . . . . . . . . . . . . . 35
Standards and Compliance . . . . . . . . . . . . . . . . . . . . . . . . . 35
Specifications. . . . . . . . . . . . . . . . . . . . . . . . . . . . . . . . . . . . . 36

OLYMPIC CFM 6000 Operator’s Manual 1
Introduction
This manual provides the necessary information for installing, maintaining, and operating
the Olympic CFM 6000 and the Olympic CFM cart. Olympic CFM 6000 is a cerebral
function monitor (CFM) that monitors the state of the brain by acquiring an EEG signal
and passing it through a special algorithm to display a continuous view of global
electrocortical activity. It is suited for use in the NICU, ICU, PICU, emergency room,
operating room, and clinical research laboratory.
The CFM 6000 should be used only under the direct supervision of a licensed medical
practitioner who is trained in its operation and safe use.
Indications for Use
The Olympic CFM 6000 is intended to be used by a variety of clinicians for the acquisition
of electroencephalography (EEG) signals that can be used in conjunction with other
clinical data to:
Monitor the state of the brain.
Determine and monitor long-term the neurological status of patients who may have
suffered an hypoxic-ischemic event.
Assist in the clinical management and treatment of a patient by monitoring
neurological status to indicate how the treatment affects the neurological status.
Assist in the prediction of neurological outcome.
Monitor and record frequency and intensity of seizures to assist in the management of
anticonvulsive therapy.
Assist in the prediction of the severity of hypoxic-ischemic encephalopathy (HIE) and
the long-term outcome in infants who have suffered an hypoxic-ischemic event.

2OLYMPIC CFM 6000 Operator’s Manual
Warnings and Precautions
WARNING
Electrical Grounding:
Always connect the system power cord directly to a hospital-grade
grounded power receptacle with a functional ground.
To avoid electrical shock hazard, never touch the open rear-panel
connectors and the patient at the same time. Always place connector
covers over their receptacles when not in use.
Internal Voltage:
To avoid electrical shock hazard, always turn off the CFM 6000 and unplug
its power cord before cleaning the outer surfaces of the device or
disassembling the device. For cleaning instructions, see Cleaning and
Maintenance on page 28.
Liquids & Gases:
Never use liquids on or near the CFM 6000. Fluid seepage into internal
components creates a potential shock hazard. Never operate the system if
internal components have been exposed to fluid.
Cables:
Use of cables that exceed the lengths or are of different types than noted
in the Specifications on page 36, may result in increased radio emissions
or decreased RF immunity.
CAUTION
Operation:
Only properly trained medical and service personnel should operate and
maintain the CFM 6000 and the CFM cart. As appropriate, maintain any records
that indicate training attendance and completion.
This device should only be used under the direct supervision of a licensed
medical practitioner.
Explosion hazard. Do not use in the presence of flammable anesthetics.
Service:
Only technically qualified personnel should perform service procedures. On
request, Natus Medical Incorporated will provide circuit diagrams, parts lists,
and instructions to assist qualified technical personnel to repair the CFM 6000
to the printed circuit board (PCB) level. To obtain service, see Service on
page 34.
Detachable Components:
Never autoclave the CFM 6000 or its components as doing so will cause
damage and void the warranty.
Electromagnetic Interference:
Operation of this device may affect or be affected by other nearby equipment
due to electromagnetic interference (EMI). If this occurs, place the devices
further apart, re-orient the device cabling, or plug the devices into separate
outlet circuit branches.
Medical electrical equipment needs special precautions regarding EMC and
needs to be installed and put into service according to the EMC information
provided in the accompanying documents.
Portable and mobile RF communications equipment can affect medical
electrical equipment.

OLYMPIC CFM 6000 Operator’s Manual 3
Conventions
The following conventions are used in this manual:
Table 1
Conventions
Convention Description
Provides additional information to clarify a point.
Indicates situations that could result in damage to the equipment.
Indicates situations that, if not avoided, could result in minor to moderate injury
to the patient or operator.
Indicates situations that, if not avoided, could result in serious injury or death
to the patient or operator.
Symbols
The following symbols are used on the CFM 6000, its accessories, or packaging.
CONT’D
CAUTION
USB Devices:
To meet electrical safety requirements, USB devices used with the CFM 6000
must meet the requirements of IEC 60601-1. Alternately, if line connected and
approved to an appropriate national standard other than 60601-1, a separation
device must be used (refer to IEC 60601-1-1).
To avoid electrical shock hazard, ensure that the cover is securely placed over
the USB port connector when not in use, and never touch the connector and
patient simultaneously.
Product Disposal:
The fluorescent lamp in the LCD display contains a small amount of Mercury.
Follow your local ordinances and regulations for disposal.
NOTE
#
NOTICE!
CAUTION
WARNING
Table 2
Symbols
Symbol Definition Symbol Definition
Alternating current (AC) Equipotential ground
Atmospheric pressure Latex free
Attention, consult accompanying
documents
Lot—the manufacturer’s production
identification number
Authorized representative Manufacturer
Defibrillation proof type-BF and
complies with IEC Publication 601
Mouse—this port is intended only
for use in Service mode
Catalog number Network/Ethernet port

4OLYMPIC CFM 6000 Operator’s Manual
Cart tilt Percent humidity
Cart raise/lower Mains power ON
CE mark Mains power OFF
Electrical shock hazard Serial number
Package of three electrodes,
Silver/Silver Chloride (Ag/AgCl)
Shipping specification
Bag of 20 electrode sets:
20 packages per bag
Single use only—discard after use,
do not sterilize
Box of 100 electrode sets: five
bags of electrodes per box
Storage specification
Foot activated Temperature
Fuse USB port—see the USB port
precautions on page 3
Ground Use by the expiration date
Input/output—RS-232 in/out serial
port
Use indoors at normal room
temperature and keep out of direct
sunlight
Keyboard—this port is intended
only for use in Service mode
Table 2
Symbols, Continued
Symbol Definition Symbol Definition

OLYMPIC CFM 6000 Operator’s Manual 5
CFM 6000 System
The CFM 6000 comes fully assembled with all the accessories (electrodes, NuPrepTM skin
prep gel, printer paper, clips, and power cord) required to get started. Just plug in the power
cord and the amplifier module, and the device is ready to operate.
CFM 6000 Components
Touch screen: see Understanding the CFM 6000 Screen
on page 13
Printer: see Replacing Printer Paper on page 25
CD-RW drive: for archiving patient files to compact disc
and for updating software
Amplifier module: connects electrodes to the CFM 6000
Handle: use to carry the CFM 6000
Power cord receptacle: connects the CFM 6000 to a
hospital-grade electrical outlet via power cord
Power on/off switch: use to turn the CFM 6000 power ON
or OFF (see Starting and Stopping the CFM 6000 on
page 10)
Fuses
Serial I/O port: for future use
Keyboard port: for service use only
Mouse port: for future use only
USB port: for future use; shown with cover in place (see
the USB port precautions on page 3)
Network/Ethernet port: for future use
Equipotential ground
Electrodes with touch-proof
connectors: connect to the
amplifier module (hydrogel
electrodes shown)
1
2
3
4
5
6
7
8
9
10
11
12
13
14
15
5
23
4
1
67 8
9
10 11 12 13 14
4
15

6OLYMPIC CFM 6000 Operator’s Manual
CFM Cart
The optional Olympic CFM cart is intended for use with the Olympic CFM 6000. The
cart makes it easy to use, move, and store the CFM 6000 and provides storage space for
related accessories. For ordering information, see CFM 6000 Catalog Items on page 35.
For information about assembling the CFM cart, see Assembling the CFM Cart
on page 30.
CFM Cart Components
The storage drawer provides space for the following CFM 6000 accessories:
Amplifier module
Several packages of electrodes
A tube of electrode cream or NuPrep™Skin Prep Gel
Several blank CD-R discs
A roll of thermal imaging paper
Storage drawer
Handle
Post
Foot pedal – for height adjustment
1
2
3
4
2
5
4
1
Footprint base with five caster wheels,
two locking
Power cord clamp and cleats
Thumbscrews with spacers
Drawer slides
5
6
7
8
6
7
8
3

OLYMPIC CFM 6000 Operator’s Manual 7
Using the CFM Cart
To lock/unlock the two locking caster wheels:
Press the wheel lock down to lock the wheel.
Pull the wheel lock up to unlock the wheel.
Figure 1
Locking/unlocking the caster wheels
To adjust the height:
Press the foot pedal while pulling the handle up to raise the device.
Press the foot pedal while pushing the handle down to lower the device.
To tilt the drawer assembly and the CFM 6000:
With one hand on top of the CFM 6000 and the other on the bottom of the drawer,
firmly tilt the drawer forward or backward.
The drawer tilts up to 15º in either direction (up/down), allowing you to easily
change the viewing angle and optimize touch-screen access from a seated or
standing position.
Figure 2
Adjusting the height and tilt
To maneuver the CFM cart:
Use the handle to move or maneuver the cart.
CAUTION
Keep the CFM cart caster wheels locked during use to prevent the CFM 6000 from pulling
on the electrode connections.
Periodically inspect the caster wheels to ensure that the locking mechanism works correctly.
press up
to unlock
press down
to lock

8OLYMPIC CFM 6000 Operator’s Manual
To use the cart to transport the CFM 6000:
1Unplug the power cord of the CFM 6000 from the power receptacle, and wrap the
excess cord around the cleats on the back of the drawer (see Figure 17 on page 33).
2Ensure that the two locking wheels are in the unlocked position (see Figure 1).
3Ensure that the CFM 6000 is not in a tilted position.
4Ensure that the drawer is fully closed and latched.
5Using the cart handle, push the cart forward.
Olympic CFM 6000 Data Displays
The Olympic CFM 6000 records and displays three types of tracings: CFM, EEG, and
impedance.
CFM Tracings
The CFM tracing indicates the overall electrocortical background activity of the brain by
recording amplitude-integrated electroencephalography (aEEG). The EEG signal is
filtered, rectified, and semi-logarithmically compressed. It is then displayed at a very slow
chart speed, 1 mm per minute. A high reading on the chart indicates a high level of activity;
a low value indicates low activity. The CFM 6000 screen shows three hours of a CFM
tracing.
The CFM 6000 may be applied at any time, or used continuously, to determine the
neurological status of a patient. A minimum of 20 minutes of trace should be observed to
make a determination of neurological status. However, when there is a question about the
presence of seizures, or potential changes in neurological status as a result of illness or
other clinical treatment, it is generally best to observe the record for a longer, continuous
period. The exact length of this period depends on the frequency of the seizures, or the
condition or treatment being monitored. The CFM may record continuously for up to 30
days.
A CFM tracing is created by the continuous up and down movement of a digital pen
responding to subtle variations in a brain's electrocortical activity. A tracing rises in
response to increased activity and drops in response to lowered activity according to a
fixed algorithm. With the pen moving at a very slow rate across the screen, 1 pixel width
of CFM tracing reflects about 15 seconds of data.
Previous versions of the Olympic CFM 6000 offered only one view, CFM Basic. The CFM
Basic view shows a series of vertical lines of different lengths, each of uniform density.
This view shows no variation in the color of the 'ink.' CFM 6000 version 2.0 introduces a
new and more sensitive view, CFM Insight. This view shows each vertical line with
variable density that reflects the relative amount of time the brain spends at different levels
of electrical activity, more closely approximating the trace generated by a CFM 5330
(Lectromed). Sometimes these two views are nearly identical; in other cases, Insight
provides a clear gray-scale effect where a dark central band of activity can be seen,
surrounded by lighter bands of activity above or below. This can be a valuable aid to
identification of artifacts and can help identify certain conditions more clearly. The
CFM 6000 now offers both views and the capability to toggle between them. The
following illustration shows a tracing with both views.

OLYMPIC CFM 6000 Operator’s Manual 9
Figure 3
Basic and Insight views
EEG Tracings
The EEG tracing shows the underlying EEG detail that relates to the cursor position on the
CFM tracing. The EEG cursor on the CFM tracing represents 15 seconds. The EEG
window shows between 3 and 14 seconds of the EEG tracing at a time, depending on the
EEG speed setting. The EEG can help confirm seizures and other brain activity. Display
the EEG at a lower amplitude setting to see more detail; display it at a higher amplitude
setting to show only major events. For information about changing speed and amplitude
settings, see Changing EEG Speed and Amplitude on page 20.
The following illustration shows a CFM tracing with underlying EEG data.
Figure 4
CFM tracing with EEG detail
Impedance Tracings
The impedance tracing indicates the connection quality (contact between the patient and
the electrodes) and distinguishes noise. Impedance greater than 20 kΩindicates that the
electrodes should be reapplied or replaced. Occasional random spikes might occur when
electrode conductivity changes for brief moments. The Lead-Off alert appears and sounds
if the impedance becomes greater than 20 kΩfor more than three seconds.
Tip: To maintain good impedance when recording over long periods of time, it might be
necessary to reattach or replace the electrodes periodically.
The following illustration shows a CFM tracing with the associated impedance tracing.
Figure 5
CFM tracing with impedance

10 OLYMPIC CFM 6000 Operator’s Manual
Starting and Stopping the CFM 6000
To start the CFM 6000:
1Attach the power cord to the rear panel of the device, and then connect it to a
hospital-grade electrical outlet. If the CFM 6000 is on a cart, lock the cart wheels.
2Connect the amplifier module cord to the CFM 6000.
3Press the power switch to the ON (|) position, and wait for the CFM 6000 main
screen to appear.
To shut down the CFM 6000:
1Press the CFM 6000 power switch to the OFF (O) position, and unplug the power
cord from the electrical outlet.
2Remove the electrodes from the patient and discard the electrodes.
3Unplug the amplifier module, and clean the device and module according to the
instructions in Cleaning and Maintenance on page 28.
Preparing the Patient — Applying Electrodes
Required items:
Electrodes — hydrogel or low-impedance needle
Skin prep gel, such as NuPrep™brand (if using hydrogel electrodes) (part no. 62060)
2x2 or 4x4 gauze pads (if using NuPrep skip prep gel)
NOTE
#
It is recommended that you connect the amplifier module to the CFM 6000 before placing
electrodes on the patient.
NOTE
#
If recording is in process, first touch 9
RECORD
to stop recording.
CAUTION
To avoid electrical shock hazard, ensure that the cover is placed over the USB port connector
when not in use, and never touch the connector and patient simultaneously. For additional USB
cautions, see page 3.
NOTE
#
Read the warnings and cautions on page 2 before operating this device.
To obtain assistance or reorder items, see Service on page 34 and Replacement Parts on
page 34.

OLYMPIC CFM 6000 Operator’s Manual 11
Adhesive tape, Coban™wrap, or Kling®wrap (if using low-impedance needle
electrodes)
1Verify that the amplifier module is connected to the CFM 6000 and that the
CFM 6000 is turned on.
2Determine whether to place electrodes biparietally or frontally and whether to use
hydrogel or low-impedance electrodes, and then locate the areas of contact on the
patient’s head according to one of the following placement methods:
Placement method 1 — Biparietal placement for hydrogel or low-impedance
needle electrodes:
Figure 6
Biparietal placement
aLocate the vertex and identify a point 25 mm anterior to it. The BLACK
electrode (1) is to be placed at this location.
bLocate a point approximately 50 mm posterior to the vertex. The RED electrode
(2) is to be placed approximately 37 mm to the patient’s left of this point (right
if facing the patient).
cThe YELLOW electrode (3) is to be placed approximately 75 mm to the
patient’s right of the red electrode (left if facing the patient).
CAUTION
Medications may affect the patient’s record. Anticonvulsants or sedatives may transiently
suppress the CFM record. Administration of drugs or other clinical events should be noted
to facilitate interpretation of the record.
Poor electrode contact may cause high impedance. To ensure good electrode contact,
always prepare the patient’s skin before attaching the electrodes.
NOTICE!
For instructions and warnings relating to cleaning agents and skin prep gel (for example,
alcohol wipes or NuPrep), consult the product instructions.
NOTE
#
Depending on the type of electrodes used, color coding indicated below may not be applicable.
The BLACK electrode is the ground; the YELLOW electrode is placed on the patient’s right (left
when facing the patient); and the RED electrode is placed on the patient’s left (right when facing
the patient).

12 OLYMPIC CFM 6000 Operator’s Manual
Placement method 2 — Frontal placement for hydrogel electrodes (use this
method if hair interferes with biparietal placement of hydrogel electrodes):
Figure 7
Frontal placement
aThe BLACK electrode (1) is to be placed at the center of the patient’s forehead
as close to the hairline as possible.
bThe YELLOW electrode (2) is to be placed approximately 37 mm to the
patient’s right of the center electrode (left if facing the patient).
cThe RED electrode (3) is to be placed approximately 37 mm to the patient’s left
of the center electrode (right if facing the patient).
3Visually examine the electrode package for damage before opening it. Remove the
electrode set from the package, and examine the electrodes and leads. If damage is
apparent, discard the set.
4Clean and dry the areas of the patient’s head where the electrodes are to be placed.
Do not use alcohol for cleaning: alcohol can increase impedance.
5If using hydrogel electrodes, prepare the areas of contact prior to placement, as
follows:
aApply a small dot of skin prep gel, such as NuPrep, to each area of contact. You
can use a 2x2 or 4x4 gauze pad to apply the NuPrep.
bVigorously rub the NuPrep over the skin for 20 to 30 seconds, removing the
surface layer of dead skin to improve conductivity. Ensure that the entire surface
area to be covered by the electrode is prepared.
cThoroughly remove the NuPrep with a new, clean gauze pad, and make sure the
area is completely dry.
6After the area is prepared, attach the electrodes, as follows:
For low-impedance electrodes, insert the needle subcutaneously up to the plastic
hub and secure as you would an IV.
For hydrogel electrodes, run a finger around the edges of the electrode for 20 to
30 seconds to ensure a secure seal.
NOTE
#
It is recommended that you prep and place one electrode at a time when possible.
NOTE
#
Where hair might present a barrier to good electrode contact, either shave the area or tamp
down the hair with water during cleaning, and then pat dry.
NOTE
#
Always apply the skin prep gel directly to the skin. Never apply it directly to an electrode
because it can increase impedance.

OLYMPIC CFM 6000 Operator’s Manual 13
7Form a strain relief to minimize motion artifact by collecting the three leads into a
bundle and tying the bundle into a small, loose loop near the electrodes. The strain
relief loop should be as close to the electrodes as possible, while remaining isolated
from them. Secure the loop to the patient’s head with Coban™or Kling®wrap. If
desired, create a second strain relief loop near the amplifier end of the leads.
8Connect the leads to the amplifier module, matching them to the corresponding
color-coded receptacles, and clip the amplifier module to the patient’s bedding.
Operating the CFM 6000
Understanding the CFM 6000 Screen
The following illustration shows the location of major types of information on the
CFM 6000 screen.
Figure 8
Main screen
NOTE
#
Read the warnings and cautions on page 2 before operating this device.
To obtain assistance or reorder items, see Service on page 34 and Replacement Parts on
page 34.
NAME or ID
DOB: 00/00/00 00:00
00/00/00
00:00:00
CFM
1005025105
IMPEDANCE
PLAYBACK RECORDING
0
100 50 25 10 5 0
00/00/00 00:00
DAY 0:00
00/00/00 00:00
DAY
9
RECORD MARKER EEG PATIENT TOOLS
20 10 0
20100
00/00/00 00:00
DAY 0:00
00/00/00 00:00
DAY
marker
00:00
Patient display Alert messages System date/time
Trace day/time
Marker label
Impedance
display
Recording pen
Marker cursor
EEG cursor
(when the EEG
is displayed)
Marker time
CFM display
µV
kΩ
LEAD OFF

14 OLYMPIC CFM 6000 Operator’s Manual
Buttons
The following table describes the functions of buttons on the CFM 6000 screen. For
information about buttons used to navigate EEG tracings, see Viewing an EEG Tracing on
page 18.
Button Function
Print. Touch to print the displayed tracing.
Help. Touch to open Help.
Previous/next marker. Touch to move the display to the previous or next
off-screen marker. Touch and hold to jump to the beginning or end of the
tracing.
If you scroll during recording and want to return to real-time display, touch
and hold the next marker button.
Auto-scroll. Touch to automatically scroll backward or forward through the
tracing. Touch again to stop scrolling. When recording, the display returns
from playback to real-time when the end of the trace is reached.
Scrollbar. Touch or drag the bar or touch the buttons to scroll backward or
forward through the tracing. Touch and hold to scroll quickly. When
recording, the display returns from playback to real-time when the end of the
trace is reached.
If you scroll during recording and want to return to real-time display, touch
and hold the forward button until the end of the trace is reached or drag the
scrollbar all the way to the right.
EEG cursor or marker position. Touch to scroll the EEG cursor or a marker
cursor backward or forward in 15-second increments.
Close. Touch to close the active window.
More. Touch to expand the active window, showing additional functions if
available.
Less. Touch to reduce the active window. Some functions might no longer
show.
Alerts
Alerts are status messages that appear in color-coded boxes at the top of the CFM 6000
screen: green for normal, yellow for caution, red for stop and take action. For red alerts, a
dialog box describes the action that is needed. For these alerts, take the appropriate action
and press OK to close the dialog box, stop the alarm, and resume recording.
The possible alerts are the following:
Alert Meaning
CALIBRATING The system is performing a calibration check. A calibration check
occurs each time recording is started. It is important to wait for
calibration to complete before attempting any other tasks.
CALIBRATION The calibration check failed. The amplifier module needs to be
replaced.
CHECK SUM The amplifier non-volatile RAM is corrupted. The amplifier module
needs to be replaced.
COMM ERROR A communication error occurred between the amplifier module
and the CFM 6000. Disconnect and reconnect the amplifier module.
Replace the module if the problem is not corrected.
Table of contents
Other natus Diagnostic Equipment manuals

natus
natus Madsen A450 User manual

natus
natus Bio-logic AuDX PRO FLEX User manual

natus
natus UltraPro S100 User manual

natus
natus Bio-logic NavPRO ONE User manual

natus
natus Bio-logic AuDX User manual

natus
natus Bio-logic AuDX PRO FLEX User manual

natus
natus Bio-logic AuDX PRO User manual

natus
natus Bio-logic AuDX PRO FLEX User manual

natus
natus Bio-logic AuDX PRO FLEX User manual

natus
natus Bio-logic AuDX User manual