manuals.online logo
Brands
  1. Home
  2. •
  3. Brands
  4. •
  5. natus
  6. •
  7. Medical Equipment
  8. •
  9. natus ICS Impulse User manual

natus ICS Impulse User manual

Goggles preparation
• Ensure goggles have a new, unused face cushion.
• Clean mirror using the cleaning cloth.
1. Choose a wall that allows you to position the patient at least one
meter in front of the wall.
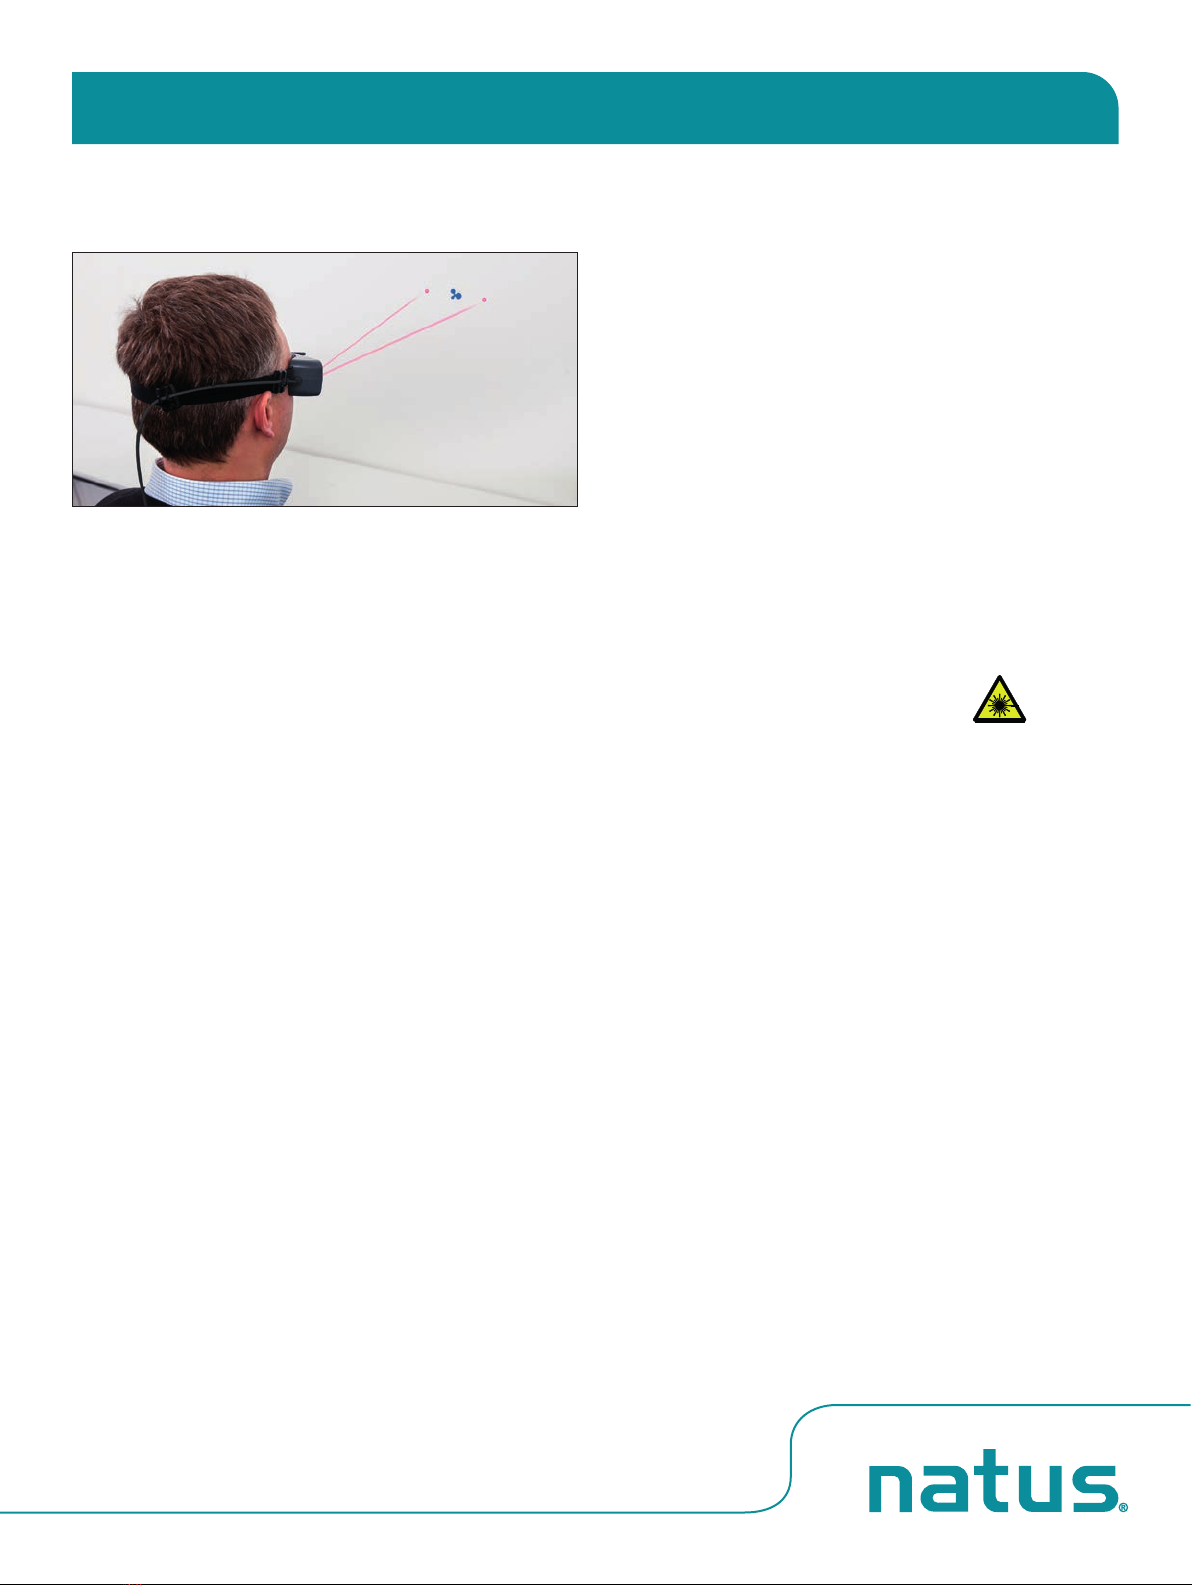
2. Apply one of the fixation dots supplied with the system to the
wall in a location that allows you to position the patient directly
in front of the fixation dot.
Goggles placement
Caution: Improper goggles placement may result in goggles
slippage. Slippage will result in inaccurate data collection.
1. Position the goggles on the patient’s face over the bridge of the
nose.
2. Bring the strap above the patient’s ears and around to the back
of head.
3. Tighten strap tight enough to ensure that goggles will not shift
horizontally during test.
4. Allowing some flexibility in the cables for head movement during
testing, clip the cable clip to the patient’s clothing at the top of
the right shoulder.
5. Ensure the eyes are wide open with eyelids positioned to not
interfere with data collection.
Test Setup
1. Choose the Test Type: Dynamic or Repositioning
2. Within the Test Type choose the test (e.g., Dynamic – choose Dix-
Hallpike, Hallpike-Stenger, Side-Lying or Roll)
3. Choose to perform with or without Vision Denied. Note that
calibration must be performed with vision.
4. Choose to collect torsional data. Note that in order to collect
torsional data your goggles must be licensed to perform this
functionality.
5. Choose the Test Direction (e.g., Dix-Hallpike – Rightward,
Leftward)
Pupil detection
1. Position the pupil in the ROI (region of interest): use the mouse to
center the ROI box on the pupil and click, or click on the pupil to
center the pupil inside the green box.
2. In the Video window, choose Grayscale Image or Pupil
Location.
3. Select Auto Threshold. The system centers the cross-hair on
the pupil.
4. Ask the patient to stare at the fixation dot. If the cross-hair fails
to track the pupil (jumps around and does not stay centered on
the pupil), move the threshold slider to adjust.
5. Click OK.
Note:When Image Display is set to Pupil Location, make additional
adjustments to remove any white dots outside the white circular
image of the pupil.
Caution: Do not look directly at the lasers.
6. Turn on both lasers.
7. Ask the patient to position the left and right dots equidistant on
each side of the fixation dot.
8. Without moving their head, ask the patient to look at the left
dot, then at the right dot. In the Video window, check that the
cross-hair continues to track the pupil.
Note:Use the Real Time Trace window to monitor the patient.
By observing the head trace (orange) and the eye trace (green), you
can tell if the patient is moving their head or eyes (instead of staring
at the fixation dot), blinking excessively, or not following instructions
being given (not cooperating).
9. If the cross-hair fails to track the pupil (jumps around and does
not stay centered on the pupil), move the threshold slider to
make further adjustments.
10. When pupil detection is set, start calibration.
Please review the Positional Training Video prior to testing patients
Positional Quick Guide
ICS®Impulse
Calibration
In the calibration procedure, the patient is asked to switch their gaze
between the two dots that appear when the lasers are on. If the
patient cannot be calibrated, click Default to use the calibration
default values.
Caution: During this procedure both lasers will turn on.
Do not look directly at the lasers.
1. Click Run
2. Ask the patient to face the fixation dot and hold their head still.
3. Ask the patient to look right at the laser beam dot.
The calibration values are automatically saved.
Caution: Once calibration has been performed, it is recommended
not to move the goggles.
Calibration Check
1. Ask the patient to stare at the fixation dot and move the head
side to side through a small angle (about 10 degrees).
2. Check that the eye and lateral head trace overlay.
3. If the eye and lateral head trace do not overlay, you need to
recalibrate or review the patient’s history.
4. Once the calibration has been checked and you are satisfied with
the result, click Accept.
The Collection window opens and you are ready to begin testing.
Head Position Feedback
Clinically, for dynamic positional testing and for repositioning
treatment, positioning the head properly is essential to acquiring
the proper diagnosis and successful treatment. Data from the head
sensor in the goggles tracks head movement. The head movement
seen in the software corresponds directly to the patient’s head
movement. This assists the tester to position the head in the various
positions unique for each dynamic positional test or repositioning
maneuver.
• The semicircular canal(s) being tested or treated is highlighted in
green.
• As the test or maneuver is performed, the blue dot moves with
the head.
• According to the test or treatment maneuver being performed,
each position is numbered and represented by a blue line. Move
the patient’s head aligning the blue dot with each successive
numbered blue line.
Positional Data Collection
1. Perform the dynamic positional test or a repositioning maneuver.
2. Ask the patient to keep their eyes wide open and perform the
test or treatment as described in the Dynamic Positional or
Repositioning Training video.
3. Click the Start button in the software or use a presentation
remote to start/stop the test and center the head for the head
position feedback.
A separately purchased presentation remote can be used with the
Otosuite®Vestibular application. An external monitor displays the
eye video, real time SPV, and elapsed time separately from the laptop
making viewing patient response from multiple positions in the room
possible.
Consult the Reference Manual in the software for more information.
©2021 Natus Medical Incorporated. All Rights Reserved. All product names appearing on this document
are trademarks or registered trademarks owned, licensed to, promoted or distributed by Natus Medical
Incorporated, its subsidiaries or affiliates. 06/2021. 7-50-1133-EN Rev04. 7-50-11303-EN
Healthcare solutions with one thing in mind. You.
natus.com
Natus Medical Incorporated
Positional Quick Guide
ICS®Impulse

Other natus Medical Equipment manuals

natus XLTEK EEG32 Troubleshooting guide

natus

natus XLTEK EEG32 Troubleshooting guide

natus neoBLUE User manual

natus

natus neoBLUE User manual

natus Madsen A450 User manual

natus

natus Madsen A450 User manual

natus ErgoJust User manual

natus

natus ErgoJust User manual

natus ALGO 3i User manual

natus

natus ALGO 3i User manual

natus neoBLUEmini User manual

natus

natus neoBLUEmini User manual

natus Madsen AccuScreen User manual

natus

natus Madsen AccuScreen User manual

natus Otometrics Bio-logic AuDX PRO User manual

natus

natus Otometrics Bio-logic AuDX PRO User manual

natus Photic Stimulator Troubleshooting guide

natus

natus Photic Stimulator Troubleshooting guide

natus Aurical Otocam 300 User manual

natus

natus Aurical Otocam 300 User manual

natus MADSEN Alpha OAE+ User manual

natus

natus MADSEN Alpha OAE+ User manual

natus ICS Aircal User manual

natus

natus ICS Aircal User manual

natus Xltek Trex HD Troubleshooting guide

natus

natus Xltek Trex HD Troubleshooting guide

natus Dantec Keypoint G4 Manual

natus

natus Dantec Keypoint G4 Manual

natus Aurical Aud User manual

natus

natus Aurical Aud User manual

natus Dantec Keypoint Focus User manual

natus

natus Dantec Keypoint Focus User manual

natus OLYMPIC SMART SCALE 50 User manual

natus

natus OLYMPIC SMART SCALE 50 User manual

natus Xltek EMU40EX Troubleshooting guide

natus

natus Xltek EMU40EX Troubleshooting guide

natus neoBLUE mini User manual

natus

natus neoBLUE mini User manual

natus neoBLUE User manual

natus

natus neoBLUE User manual

natus Nicolet Viking EDX User manual

natus

natus Nicolet Viking EDX User manual

natus Xltek User manual

natus

natus Xltek User manual

natus Nicolet User manual

natus

natus Nicolet User manual

natus Madsen AccuScreen User manual

natus

natus Madsen AccuScreen User manual

Popular Medical Equipment manuals by other brands

Dräger 2M85674 Instructions for use

Dräger

Dräger 2M85674 Instructions for use

Clinical Health Services TENS 3N1R Instructions for use

Clinical Health Services

Clinical Health Services TENS 3N1R Instructions for use

IACER I-TECH OSTEOMAT user manual

IACER

IACER I-TECH OSTEOMAT user manual

KYRA MEDICAL k-tek KTEK2305 Instructions for use

KYRA MEDICAL

KYRA MEDICAL k-tek KTEK2305 Instructions for use

Otto Bock 4R84 D Instructions for use

Otto Bock

Otto Bock 4R84 D Instructions for use

Welch Allyn 53 Service manual

Welch Allyn

Welch Allyn 53 Service manual

Henry Schein COLPOSCOPE I user manual

Henry Schein

Henry Schein COLPOSCOPE I user manual

Promeba PC-678 user guide

Promeba

Promeba PC-678 user guide

Organis TestChest V3 Operator's manual

Organis

Organis TestChest V3 Operator's manual

Alere Triage Quick reference guide

Alere

Alere Triage Quick reference guide

Moretti MOPEDIA RP180S instruction manual

Moretti

Moretti MOPEDIA RP180S instruction manual

Tandem TruSteel Instructions for use

Tandem

Tandem TruSteel Instructions for use

bon E-20 SE instruction manual

bon

bon E-20 SE instruction manual

OSCILLA TSM-300 Instructions for use

OSCILLA

OSCILLA TSM-300 Instructions for use

Gima OXY-200 user manual

Gima

Gima OXY-200 user manual

Inogen One G3 Technical manual

Inogen

Inogen One G3 Technical manual

Iron Bow MEDVIEW-V-10X-A01 Installation and user guide

Iron Bow

Iron Bow MEDVIEW-V-10X-A01 Installation and user guide

ResMed Ultra Mirage Clinical Guide

ResMed

ResMed Ultra Mirage Clinical Guide

manuals.online logo
manuals.online logoBrands
  • About & Mission
  • Contact us
  • Privacy Policy
  • Terms and Conditions

Copyright 2025 Manuals.Online. All Rights Reserved.