Nektar Impact iX49 User manual

www.nektartech.com Nektar Impact iX49 & iX61 User Guide
User Guide
www.nektartech.com

2Nektar Impact iX49 & iX61 User Guide www.nektartech.com
Index
Page
Bitwig Studio Setup & Configuration 3
Bitwig Studio and Impact iX Working Together
Cubase/Nuendo Setup & Configuration 5
Cubase/Nuendo and Impact iX Working Together
Digital Performer Setup & Configuration 7
Digital Performer and Impact iX Working Together
GarageBand Setup & Configuration 9
GarageBand and Impact iX Working Together
Logic Setup & Configuration 11
Logic and Impact iX Working Together
Reaper Setup & Configuration 13
Reaper and Impact iX Working Together
Reason Setup & Configuration 15
Reason and Impact iX Working Together
Sonar Setup & Configuration 17
Sonar and Impact iX Working Together
Transport Control without Nektar DAW Integration 19
USB Port Setup & Factory Restore 20

www.nektartech.com Nektar Impact iX49 & iX61 User Guide 3
Bitwig Studio Setup and Configuration
The Impact iX Bitwig Studio Integration has been verified to work with Windows Vista, 7 and 8 as well as OS X 10.6 or higher.
Neither Windows XP or Linux compatibility has been tested. If you are running Impact iX on a Windows XP or Linux system,
please contact Nektar support for manual installation instructions.
Setup
Here are the steps you need to go through to get Bitwig Studio up and running with your Impact iX:
Make sure Bitwig Studio is already installed on your computer. If not,
please install Bitwig Studio first and open Bitwig Studio at least once,
before running the installer for Nektar DAW integration software.
With Bitwig Studio installed, locate the “Impact_Bitwig_Support” file
in the folder that you downloaded from “My Downloads” on
www.nektartech.com after registering your product
Run the installer and follow the on-screen instructions. See note for
OSX.
Plug-in your Impact iX and make sure it’s switched on (if you didn’t
do so already)
Launch Bitwig Studio and go to Options/Preferences/Controllers
Click “Detect available controllers”. Your Impact iX should now
appear in the list.
Click “Ok” and exit Device Setup.
That’s it, setup is now complete.
OSX Note:
If you get a message that the installer “can’t
be opened because it’s from an unindentified
developer”, do the following:
Go to System Preferences/Security & Sys-
tems/General and switch “Allow apps down-
loaded from” to “Anywhere”.

4Nektar Impact iX49 & iX61 User Guide www.nektartech.com
Bitwig Studio and Impact iX49 Working Together
With installation complete, it’s time to take a look at how the Impact iX49 integrates with Bitwig Studio.
Launch Bitwig Studio.
Create a few audio tracks
Move the fader all the way up and down. The Bitwig Studio mixer volume for the currently selected track is now
controlled by the fader on your Impact iX49. To avoid parameter jumping we also implemented soft-takeover. Read the
section at the bottom of this page for more information about how that works.
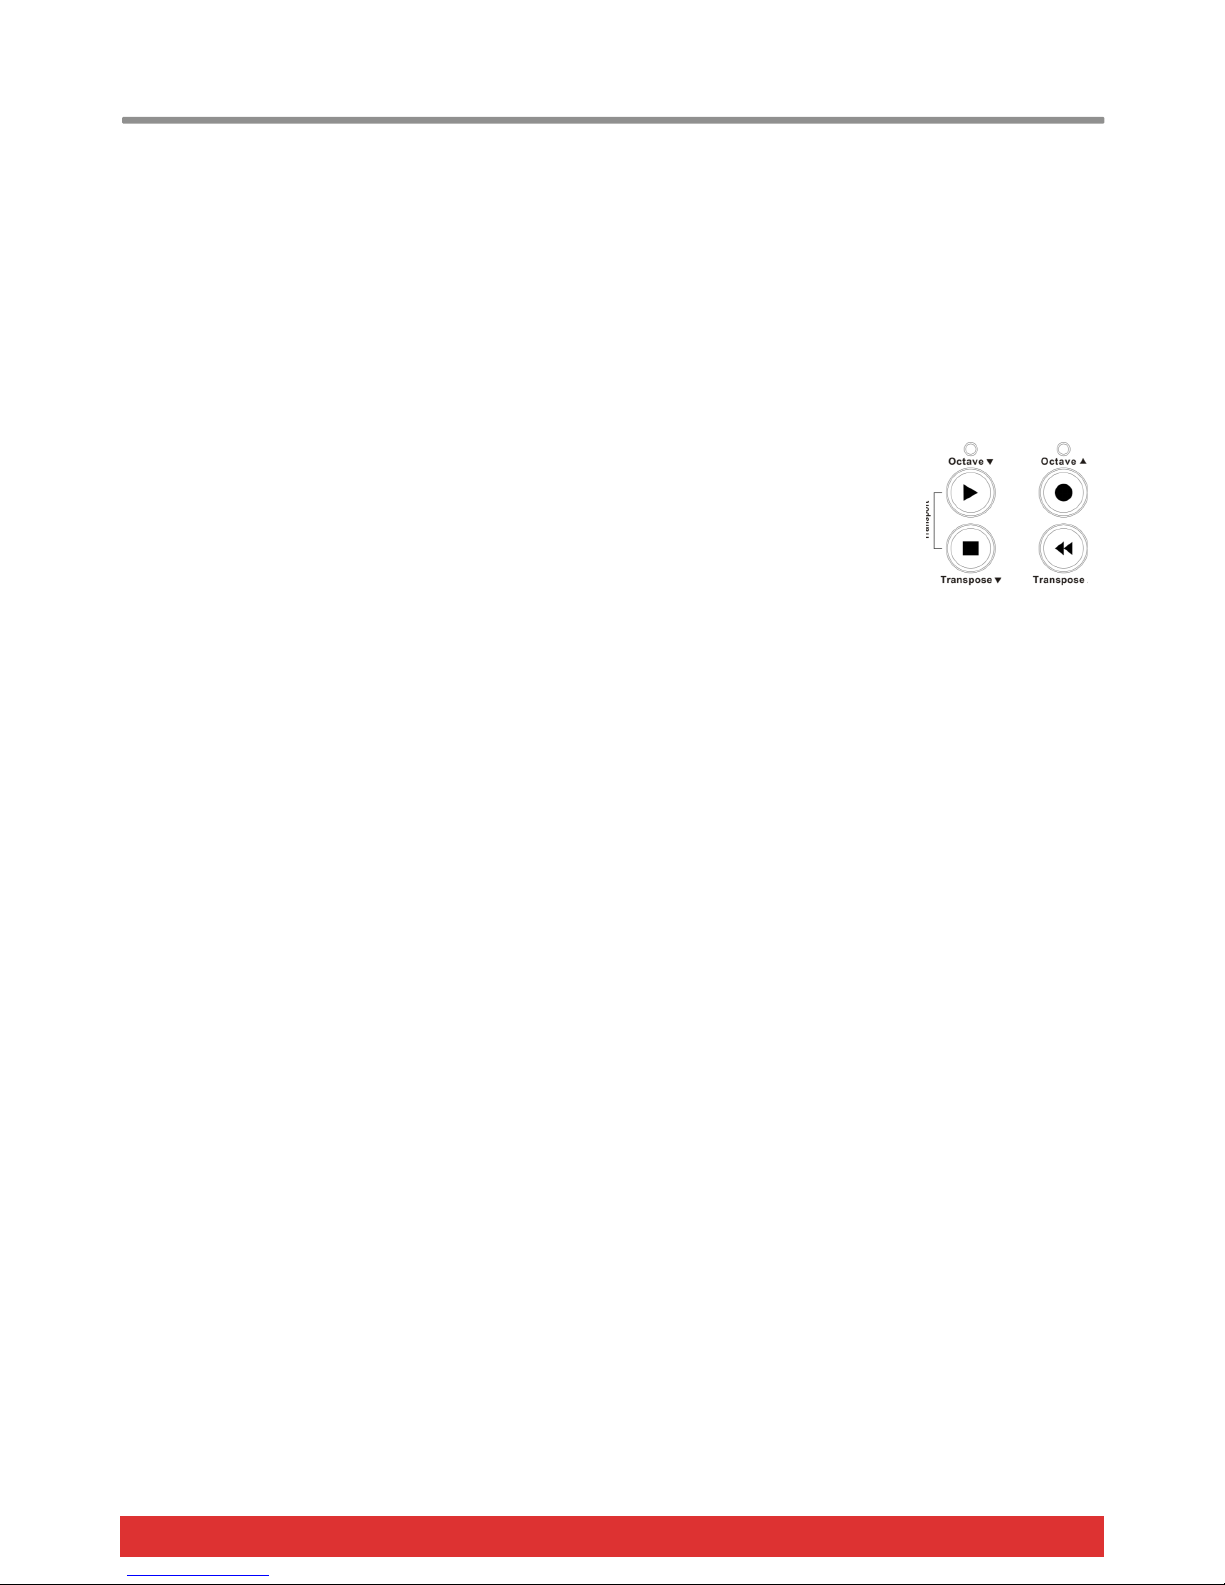
Next, press the [Octave Down] + [Transpose Down] buttons at the same time. This assigns the 4 round buttons to
control transport functions in Bitwig Studio.
Now press the [Octave Down] button. It activates Play. [Octave Up] activates Record and press
[play] again to stop. The two Transpose buttons are assigned to Rewind and Forward.
Press the [Octave Down] + [Transpose Down] buttons at the same time to return to controlling
Octave and transpose with the buttons.
You can also assign the Transpose buttons to control track or patch change in your DAW.
Here’s how you assign the two buttons to change the track in Bitwig Studio:
Press the [Setup] button. The LED above the button will blink and the color is orange to indicate setup is active.
Press the key D#2 (labeled “Track”) on your iX keyboard to assign the Track Select function.
Press Enter (C5). This will accept the change and exit Setup.
Pressing the Transpose up/down buttons will now allow you to step through tracks in your DAW.
The process for assigning the buttons to change the patch in your virtual instrument is the same, only press E2 instead of
D#2.
If you are not getting the results described, please check your installation one more time as well as the Nektar support tab on
our website www.nektartech.com
Soft Take-Over
When changing tracks and adjusting Bitwig Studio’s mixer volume with a control, you would normally experience parameter
jumping. This happens when a control’s physical position is not the same as the position of the parameter you are controlling.
When you move the control, the parameter therefore jumps to the value the control is sending out.
To avoid parameter jumping when using the fader, your Impact iX is equipped with Soft Take-Over. This means that if the
fader is not in sync with current channel volume, moving the fader will not cause a change, until it’s position matches the
value of the parameter.
Try changing tracks in Bitwig Studio and move the iX49 fader on each track to get a feel for how this works.

www.nektartech.com Nektar Impact iX49 & iX61 User Guide 5
Cubase/Nuendo Installation and Setup
The Impact iX Cubase Integration is compatible with Cubase 6, 6.5 and 7, Elements, Artist, AI, LE as well as Nuendo 5 or
later. Earlier version may be compatible but check the Nektar support website for additional information:
www.nektartech.om/support
These instructions assumes you have a compatible Cubase or Nuendo program installed running on either Windows (Vista, 7,
8 or higher) or Mac OS X 10.6 or higher. Throughout we talk about Cubase but the same instructions apply to Nuendo.
Installation
Locate the “Impact iX DAW Integration” folder on the included DVD
or download it from “My Downloads” on www.nektartech.com after
registering your product
Run the “Impact_Steinberg_Support” installer and follow the
on-screen instructions
Plug-in your Impact iX and make sure it’s switched on (if you didn’t
do so already)
Launch Cubase and go to Devices/Device Setup/MIDI Port Setup
Un-tick the second Impact iX port in the “In ‘All MIDI’” column. The
second port is named “MIDIIN2 (IMPACT iX)” (image 1) in Windows
and “Impact iX Port 2” in OS X (image 2)
Next check that Impact iX appears in the Device Setup list (image 3)
Click “Ok” and exit Device Setup.
That’s it, setup is now complete and you can move on to the fun part,
learning how it all works.
Image 1
Image 2
Image 3

6Nektar Impact iX49 & iX61 User Guide www.nektartech.com
Cubase/Nuendo and Impact iX49 Working Together
With installation complete, it’s time to take a look at how the Impact iX49 integrates with Cubase and Nuendo. In the below,
we refer only to Cubase but Impact iX49 works the same way with Nuendo.
Launch Cubase.
Create a few audio tracks
Move the fader all the way up and down. The Cubase mixer volume for the currently selected track is now controlled by
the fader on your Impact iX49. To avoid parameter jumping we also implemented soft-takeover. Read the section at the
bottom of this page for more information about how that works.
Next, press the [Octave Down] + [Transpose Down] buttons at the same time. This assigns the 4 round buttons to
control transport functions in Cubase.
Now press the [Octave Down] button. It activates Play. [Octave Up] activates Record and press
[play] again to stop. The two Transpose buttons are assigned to Rewind and Forward.
Press the [Octave Down] + [Transpose Down] buttons at the same time to return to controlling
Octave and transpose with the buttons.
You can also assign the Transpose buttons to control track or patch change in your DAW.
Let’s assign the two buttons to change the track in Cubase:
Press the [Setup] button. The LED above the button will blink and the color is orange to indicate setup is active.
Press the key D#2 (labeled “Track”) on your iX keyboard to assign the Track Select function.
Press Enter (C5). This will accept the change and exit Setup.
Pressing the Transpose up/down buttons will now allow you to step through tracks in your DAW.
The process for assigning the buttons to change the patch in your virtual instrument is the same, only press E2 instead of
D#2.
If you are not getting the results described, please check your installation one more time as well as the Nektar support tab on
our website www.nektartech.com
Soft Take-Over
When changing tracks and adjusting Cubase mixer volume with a control, you would normally experience parameter jumping.
This happens when a control’s physical position is not the same as the position of the parameter you are controlling. When
you move the control, the parameter therefore jumps to the value the control is sending out.
To avoid parameter jumping when using the fader, your Impact iX is equipped with Soft Take-Over. This means that if the
fader is not in sync with current channel volume, moving the fader will not cause a change, until it’s position matches the
value of the parameter.
Try changing tracks in Cubase and move the iX49 fader on each track to get a feel for how this works.
Notice that the setup button’s LED is used to indicate whether you should move the fader up or down to pick up the value of
the mixer channel volume. Orange means up and red means down. If the LED is green, it means the fader is in sync with the
Cubase channel volume.

www.nektartech.com Nektar Impact iX49 & iX61 User Guide 7
Digital Performer Setup and Configuration
The Impact iX integration for MOTU's Digital Performer is compatible with Digital Performer 8. These instructions assume
Digital Performer 8 is installed running on either Windows (Vista, 7, 8 or higher) or Mac OS X 10.6 or higher.
Setup
Here are the steps you need to go through to get your Impact iX up and running with Digital Performer:
Locate the “Impact iX DAW Integration” folder on the included DVD
or download it from “My Downloads” on www.nektartech.com after
registering your product
Run the “Impact_MOTU_Support” installer and follow the on-screen
instructions
Plug-in your Impact iX and make sure it’s switched on (if you didn’t
do so already)
Launch Digital Performer 8 and create a Project or open an existing one
Go to Setup/Control Surface Setup...
Click the '+'
For 'Driver' select Nektar Impact iX
For 'Unit' select Multi MIDI
For 'MIDI Input', select MIDIIN2 (Impact iX) in Windows or Impact LX Port 2-16
in OS X
For 'MIDI Output', select Impact iX49 in Windows or Impact iX49 Port 1 in OS
X
Click 'OK' to close the Control Surface Setup window.
That’s it, Digital Performer is now configured to work with you Impact iX.
Windows
OS X

8Nektar Impact iX49 & iX61 User Guide www.nektartech.com
Digital Performer and Impact iX49 Working Together
With installation complete, it’s time to take a look at how the Impact iX49 integrates with Digital Performer.
Launch Digital Performer.
Create a few audio tracks.
Move the fader. The currently selected mixer channel in Digital Performer is now controlled by the fader. Selecting a new
track will assign the fader to the corresponding mixer channel in Digital Performer.
Next, press the [Octave Down] + [Transpose Down] buttons at the same time. This assigns the 4 round buttons to
control transport functions in Digital Performer.
Now press the [Octave Down] button. It activates Play. [Octave Up] activates Record and press [play] again to stop. The
two Transpose buttons are assigned to Rewind and Forward.
Press the [Octave Down] + [Transpose Down] buttons at the same time to return to controlling
Octave and transpose with the buttons.
You can also assign the Transpose buttons to control track or patch change in your DAW.
Let’s assign the two buttons to change the track in Digital Performer:
Press the [Setup] button. The LED above the button will blink and the color is orange to indicate setup is active.
Press the key D#2 (labeled “Track”) on your iX keyboard to assign the Track Select function.
Press Enter (C5). This will accept the change and exit Setup.
Pressing the Transpose up/down buttons will now allow you to step through tracks in your DAW.
The process for assigning the buttons to change the patch in your virtual instrument is the same, only press E2 instead of
D#2.
If you are not getting the results described, please check your installation one more time as well as the Nektar support tab on
our website www.nektartech.com

www.nektartech.com Nektar Impact iX49 & iX61 User Guide 9
GarageBand Setup and Configuration
The Impact iX GarageBand Integration has been verified with versions 9 and 10. The following instructions assumes you have
one of these programs installed running OS X 10.6 or higher.
Setup
Here are the steps you need to go through to get GarageBand up and running with your Impact iX:
Locate the “Impact iX DAW Integration” folder on the included DVD or download it from “My Downloads” on
www.nektartech.com after registering your product
Run the “Impact_Apple_Support” installer and follow the on-screen instructions
Plug-in your Impact iX and make sure it’s switched on (if you didn’t do so already)
Press the [Setup] button on your Impact LX and press the A2 key on the keyboard (from the E key with screen printing
“Patch” above, count 5 keys up).
On the numerical keys on the keyboard, press “1”
Press [Enter] (top C) to accept. This will set the USB ports for use with GarageBand *
Launch GarageBand
Create a new Project
Create an Audio or Instrument track
That’s it, setup is now complete.
*You may have to complete this step again if you are using Nektar supported DAWs other than Logic with your Impact iX.

10 Nektar Impact iX49 & iX61 User Guide www.nektartech.com
GarageBand and Impact iX49 Working Together
With installation complete, it’s time to take a look at how the Impact iX49 integrates with GarageBand.
Launch GarageBand.
Create a few audio tracks.
Move the fader. The currently selected mixer channel in GarageBand is now controlled by the fader. Selecting a new
track will assign the fader to the corresponding mixer channel in GarageBand.
Next, press the [Octave Down] + [Transpose Down] buttons at the same time. This assigns the 4 round buttons to
control transport functions in Digital Performer.
Now press the [Octave Down] button. It activates Play. [Octave Up] activates Record and press [play] again to stop. The
two Transpose buttons are assigned to Rewind and Forward.
Press the [Octave Down] + [Transpose Down] buttons at the same time to return to controlling
Octave and transpose with the buttons.
You can also assign the Transpose buttons to control track or patch change in your DAW.
Let’s assign the two buttons to change the track in GarageBand:
Press the [Setup] button. The LED above the button will blink and the color is orange to indicate setup is active.
Press the key D#2 (labeled “Track”) on your iX keyboard to assign the Track Select function.
Press Enter (C5). This will accept the change and exit Setup.
Pressing the Transpose up/down buttons will now allow you to step through tracks in your DAW.
The process for assigning the buttons to change the patch in your virtual instrument is the same, only press E2 instead of
D#2.
If you are not getting the results described, please check your installation one more time as well as the Nektar support tab on
our website www.nektartech.com

www.nektartech.com Nektar Impact iX49 & iX61 User Guide 11
Logic Setup and Configuration
The Impact LX Logic Integration has been verified with Logic 8, 9 and X. The following instructions assumes you have one of
these programs installed running OS X 10.6 or higher.
Setup
Here are the steps you need to go through to get Logic up and running with your Impact LX:
Locate the “Impact iX DAW Integration” folder on the included DVD.
Alternatively, download the Apple zip file from “My Downloads” on
www.nektartech.com after registering your product
Run the “Impact_Apple_Support” installer and follow the on-screen
instructions
Plug-in your Impact iX and make sure it’s switched on (if you didn’t
do so already)
Press the [Setup] button on your Impact LX and press the A2 key on
the keyboard (from the E key with screen printing “Patch” above,
count 5 keys up).
On the numerical keys on the keyboard, press “1”
Press [Enter] (top C) to accept. This will set the USB ports for use
with Logic*
Launch Logic
Create a new Project
Create an Audio or Instrument track
In Logic the Control Surface Setup window will appear to indicate
that Logic has detected a new control surface. You can close this
window
That’s it, setup is now complete.
*You may have to complete this step again if you are using Nektar
supported DAWs other than GarageBand with your Impact iX.

12 Nektar Impact iX49 & iX61 User Guide www.nektartech.com
Logic and Impact iX49 Working Together
With installation complete, it’s time to take a look at how the Impact iX49 integrates with Apple Logic.
Launch Launch Logic.
Create a few audio tracks.
Move the fader. The currently selected mixer channel in Logic is now controlled by the fader. Selecting a new track will
assign the fader to the corresponding mixer channel in Logic.
Next, press the [Octave Down] + [Transpose Down] buttons at the same time. This assigns the 4 round buttons to
control transport functions in Digital Performer.
Now press the [Octave Down] button. It activates Play. [Octave Up] activates Record and press [play] again to stop. The
two Transpose buttons are assigned to Rewind and Forward.
Press the [Octave Down] + [Transpose Down] buttons at the same time to return to controlling
Octave and transpose with the buttons.
You can also assign the Transpose buttons to control track or patch change in your DAW.
Let’s assign the two buttons to change the track in Logic:
Press the [Setup] button. The LED above the button will blink and the color is orange to indicate setup is active.
Press the key D#2 (labeled “Track”) on your iX keyboard to assign the Track Select function.
Press Enter (C5). This will accept the change and exit Setup.
Pressing the Transpose up/down buttons will now allow you to step through tracks in your DAW.
The process for assigning the buttons to change the patch in your virtual instrument is the same, only press E2 instead of
D#2.
If you are not getting the results described, please check your installation one more time as well as the Nektar support tab on
our website www.nektartech.com

www.nektartech.com Nektar Impact iX49 & iX61 User Guide 13
Reaper Installation and Setup
The Impact iX Reaper Integration is compatible with Reaper 4.59 or later. We recommend that you upgrade to the latest
version if you have not already done so.
These instructions assumes you have a compatible Reaper program installed running on either Windows (Vista, 7, 8 or
higher) or Mac OS X 10.6 or higher.
Installation
If you have just completed a fresh install of Reaper, make sure to
first open Reaper once and quit again, before installing the Impact
Reaper support files.
Locate the “Impact iX DAW Integration” folder on the included DVD.
Alternatively, download the Reaper zip file from “My Downloads” on
www.nektartech.com after registering your product
Run the “Impact_Reaper_Support” installer and follow the on-screen
instructions
Plug-in your Impact iX and make sure it’s switched on (if you didn’t
do so already)
Launch Reaper and go to Options/Preferences/Control Surfaces
Click “Add”, then in the pop-up window, select your Impact iX model
in the “Control surface mode” list. As long as your Impact iX is
connected and switched on, Reaper should automatically detect the
correct ports. (See Image 1 for Windows setup and Image 2 for OS
X). Click “Ok”
Go to Preferences/Audio/MIDI Devices next and enable Port 1 for
your Impact iX. The mode should be “Enable+Control”. The other 2
Impact iX ports should remain disabled.
Click “Apply” and OK
That’s it, setup is now complete and you can move on to the fun part,
learning how it all works.
Image 1 - Windows
Image 2 - OS X
14 Nektar Impact iX49 & iX61 User Guide www.nektartech.com
Reaper and Impact iX49 Working Together
With installation complete, it’s time to take a look at how the Impact iX49 integrates with Reaper.
Launch Reaper.
Create a few audio tracks
Move the fader all the way up and down. The Reaper mixer volume for the currently selected track is now controlled by
the fader on your Impact iX49. To avoid parameter jumping we also implemented soft-takeover. Read the section at the
bottom of this page for more information about how that works.
Next, press the [Octave Down] + [Transpose Down] buttons at the same time. This assigns the 4 round buttons to
control transport functions in Reaper.
Now press the [Octave Down] button. It activates Play. [Octave Up] activates Record and press
[play] again to stop. The two Transpose buttons are assigned to Rewind and Forward.
Press the [Octave Down] + [Transpose Down] buttons at the same time to return to controlling
Octave and transpose with the buttons.
You can also assign the Transpose buttons to control track or patch change in your DAW.
Let’s assign the two buttons to change the track in Reaper:
Press the [Setup] button. The LED above the button will blink and the color is orange to indicate setup is active.
Press the key D#2 (labeled “Track”) on your iX keyboard to assign the Track Select function.
Press Enter (C5). This will accept the change and exit Setup.
Pressing the Transpose up/down buttons will now allow you to step through tracks in your DAW.
The process for assigning the buttons to change the patch in your virtual instrument is the same, only press E2 instead of
D#2.
If you are not getting the results described, please check your installation one more time as well as the Nektar support tab on
our website www.nektartech.com
Soft Take-Over
When changing tracks and adjusting Reaper mixer volume with a control, you would normally experience parameter jumping.
This happens when a control’s physical position is not the same as the position of the parameter you are controlling. When
you move the control, the parameter therefore jumps to the value the control is sending out.
To avoid parameter jumping when using the fader, your Impact iX is equipped with Soft Take-Over. This means that if the
fader is not in sync with current channel volume, moving the fader will not cause a change, until it’s position matches the
value of the parameter.
Try changing tracks in Reaper and move the iX49 fader on each track to get a feel for how this works.
Notice that the setup button’s LED is used to indicate whether you should move the fader up or down to pick up the value of
the mixer channel volume. Orange means up and red means down. If the LED is green, it means the fader is in sync with the
Reaper channel volume.

www.nektartech.com Nektar Impact iX49 & iX61 User Guide 15
Reason Setup and Configuration
The Impact iX Reason Integration is compatible with Reason 5, 6, 6.5 and 7 as well as Reason Essentials. These instructions
assume you have one of these programs installed running on either Windows (Vista, 7, 8 or higher) or Mac OS X 10.6 or
higher.
Installation
Here are the steps you need to go through to get Reason up and running with your Impact iX:
Locate the “Impact iX DAW Integration” folder on the included DVD.
Alternatively, download the Reason zip file from “My Downloads” on
www.nektartech.com after registering your product
Run the “Impact_Reason_Support” installer and follow the on-screen
instructions
Plug-in your Impact iX and make sure it’s switched on (if you didn’t
do so already)
Launch Reason and go to Edit/Preferences/Control Surfaces
Click “Auto-detect surfaces”
You should now see Impact iX appear as a control surface In Reason.
Close the Reason Preferences window
That’s it, setup is now complete.
Image 1
Windows OS X
Manufacturer Nektar Nektar
Model Impact iX Impact iX
Controls In Port MIDIIN2 (IMPACT iX) Impact iX Port 2
Keyboard Port IMPACT iX Impact iX Port 1
Out Port IMPACT iX Impact iX Port 1
Adding the Impact iX ports manually
If the Impact iX control surfaces did not appear in Reason after auto-detection, you can add it manually.
Click the 'Add' button (bottom left corner of image 1)
Set up each of the two ports as per the below chart and click ok when done

16 Nektar Impact iX49 & iX61 User Guide www.nektartech.com
Reason and Impact iX49 Working Together
With installation complete, it’s time to take a look at how the Impact iX49 integrates with Reason.
Launch Reason.
Create a few instrument tracks.
Move the fader all the way up and down. The Impact iX49 fader now controls the volume of the device associated with
the currently selected track. To avoid parameter jumping we also implemented soft-takeover. Read the section at the
bottom of this page for more information about how that works. Note: The fader does not control volume on audio
tracks.
Next, press the [Octave Down] + [Transpose Down] buttons at the same time. This assigns the 4 round buttons to
control transport functions in Reason.
Now press the [Octave Down] button. It activates Play. [Octave Up] activates Record and press
[play] again to stop. The two Transpose buttons are assigned to Rewind and Forward.
Press the [Octave Down] + [Transpose Down] buttons at the same time to return to controlling
Octave and transpose with the buttons.
You can also assign the Transpose buttons to control track or patch change in your DAW.
Let’s assign the two buttons to change the track in Reason:
Press the [Setup] button. The LED above the button will blink and the color is orange to indicate setup is active.
Press the key D#2 (labeled “Track”) on your iX keyboard to assign the Track Select function.
Press Enter (C5). This will accept the change and exit Setup.
Pressing the Transpose up/down buttons will now allow you to step through tracks in your DAW.
The process for assigning the buttons to change the patch in your virtual instrument is the same, only press E2 instead of
D#2.
If you are not getting the results described, please check your installation one more time as well as the Nektar support tab on
our website www.nektartech.com
Soft Take-Over
When changing tracks and adjusting device volume with a control, you would normally experience parameter jumping.
This happens when a control’s physical position is not the same as the position of the parameter you are controlling. When
you move the control, the parameter therefore jumps to the value the control is sending out.
To avoid parameter jumping when using the fader, your Impact iX is equipped with Soft Take-Over. This means that if the
fader is not in sync with current device volume, moving the fader will not cause a change, until it’s position matches the value
of the parameter.
Try changing instrument tracks in Reason and move the iX49 fader on each track to get a feel for how this works.
Notice that the setup button’s LED is used to indicate whether you should move the fader up or down to pick up the value of
the device volume. Orange means up and red means down. If the LED is green, it means the fader is in sync with the Reason
device volume.

www.nektartech.com Nektar Impact iX49 & iX61 User Guide 17
Sonar Setup and Configuration
The Impact iX Cakewalk Integration has been verified with Sonar 8.5, X1, X2 and X3. The following instructions assumes you
have one of these programs installed running on either Windows Vista, 7, 8 or higher.
Setup
Here are the steps you need to go through to get Cakewalk Sonar up and running with your Impact iX:
Locate the “Impact iX DAW Integration” folder on the included DVD.
Alternatively, download the Cakewalk Sonar zip file from “My Down-
loads” on www.nektartech.com after registering your product
Run the “Impact_Cakewalk_Support” installer and follow the on-
screen instructions
Plug-in your Impact iX and make sure it’s switched on (if you didn’t
do so already)
Launch Sonar and go to Edit/Preferences/MIDI/Devices (Image 1)
Make sure both Impact iX and MIDIIN2 (IMPACT iX) are ticked.
(Image 1)
In Sonar Preferences, now go to MIDI/Control Surfaces
Click on the yellow star icon. You can see what it looks like on image
3, top right corner
The Controller/Surface Settings dialogue box now appears.
Make the following selections as per Image 2:
Controller/Surface: Impact iX
Input Port: MIDIIN2 (IMPACT iX)
Output Port: IMPACT iX
Click OK
Image 3 shows how the Control surface window should now look.
Click Apply and Close.
That’s it, setup is now complete.
Image 1
Image 2
Image 3

18 Nektar Impact iX49 & iX61 User Guide www.nektartech.com
Sonar and Impact iX49 Working Together
With installation complete, it’s time to take a look at how the Impact iX49 integrates with Sonar.
Launch Sonar.
Create a few audio tracks
Move the fader all the way up and down. The Sonar mixer volume for the currently selected track is now controlled by
the fader on your Impact iX49. To avoid parameter jumping we also implemented soft-takeover. Read the section at the
bottom of this page for more information about how that works.
Next, press the [Octave Down] + [Transpose Down] buttons at the same time. This assigns the 4 round buttons to
control transport functions in Sonar.
Now press the [Octave Down] button. It activates Play. [Octave Up] activates Record and press
[play] again to stop. The two Transpose buttons are assigned to Rewind and Forward.
Press the [Octave Down] + [Transpose Down] buttons at the same time to return to controlling
Octave and transpose with the buttons.
You can also assign the Transpose buttons to control track or patch change in your DAW.
Let’s assign the two buttons to change the track in Sonar:
Press the [Setup] button. The LED above the button will blink and the color is orange to indicate setup is active.
Press the key D#2 (labeled “Track”) on your iX keyboard to assign the Track Select function.
Press Enter (C5). This will accept the change and exit Setup.
Pressing the Transpose up/down buttons will now allow you to step through tracks in your DAW.
The process for assigning the buttons to change the patch in your virtual instrument is the same, only press E2 instead of
D#2.
If you are not getting the results described, please check your installation one more time as well as the Nektar support tab on
our website www.nektartech.com
Soft Take-Over
When changing tracks and adjusting Sonar mixer volume with a control, you would normally experience parameter jumping.
This happens when a control’s physical position is not the same as the position of the parameter you are controlling. When
you move the control, the parameter therefore jumps to the value the control is sending out.
To avoid parameter jumping when using the fader, your Impact iX is equipped with Soft Take-Over. This means that if the
fader is not in sync with current channel volume, moving the fader will not cause a change, until it’s position matches the
value of the parameter.
Try changing tracks in Sonar and move the iX49 fader on each track to get a feel for how this works.
Notice that the setup button’s LED is used to indicate whether you should move the fader up or down to pick up the value of
the mixer channel volume. Orange means up and red means down. If the LED is green, it means the fader is in sync with the
Sonar channel volume.

www.nektartech.com Nektar Impact iX49 & iX61 User Guide 19
Transport Control without Nektar DAW Integration
The Nektar DAW Integration files automatically map the Octave and Transpose buttons so they can be used to control
transport. If your DAW is not supported directly , you may still be able to control your DAWs transport controls using MIDI
Machine Control.
Here is how you set up the Impact iX keyboard to send MIDI Machine Control messages
Press the [Setup] button. The LED above the button will blink and the color is orange to indicate setup is active.
Press the A2 key on your iX keyboard.
Press the numeric key to enter 3
Press Enter (C5). This will accept the change and exit Setup.
Provided your DAW is set up to receive MMC, you can now control transport functions by first pressing [Octave Down]+
[Transpose Down] at the same time. The 4 buttons now are assigned to control the following:
To revert the 4 buttons to their main functions, press button combination [Octave Down]+[Transpose Down] again.
MMC is supported by DAWs such as Pro Tools, FL Studio and many more.
Button Function
Octave Down Play
Octave Up Record
Transpose Down Rewind
Transpose Up Stop

20 Nektar Impact iX49 & iX61 User Guide www.nektartech.com
USB Port Setup & Factory Restore
USB Port Setup
Impact iX49 has one physical USB port however there are 2 virtual ports as you may have discovered during the MIDI setup
of your music software. The additional port is used by the Impact DAW software to handle communication with your DAW.
You only need to change the USB Port Setup setting if the Impact iX49 setup instructions for your DAW specifically advises
that this should be done.
Factory Restore
If you need to restore factory settings for example if you by mistake managed to change the assignments needed for DAW
integration files, here is how you do that.
Make sure your Impact iX49 is switched off
Press the [Octave up]+[Octave down] buttons and hold them
Switch your Impact iX49 on
Other manuals for Impact iX49
1
This manual suits for next models
1
Table of contents
Other Nektar Recording Equipment manuals

Nektar
Nektar Pacer User manual

Nektar
Nektar Panorama P1 User manual

Nektar
Nektar Impact LX Mini User manual

Nektar
Nektar Impact LX49+ User manual

Nektar
Nektar Reason T4 User manual

Nektar
Nektar Impact iX49 User manual

Nektar
Nektar Impact LX49+ Manual

Nektar
Nektar Panorama P1 User manual

Nektar
Nektar Aura Safety guide

Nektar
Nektar SE49 User manual


