Phonocar 05963 User manual

FR
DE
EN
IT
ES
INTERFACCIA VIDEO HDMI
HDMI VIDEO INTERFACE
PLUG&PLAY
Istruzioni di montaggio
Installation instructions
Instructions de montage
Montageanleitung
Instrucciones para el montaje
05963
03/2019
BMW
NBT System
with 6.5”/8.4”/10.25” display
1 (F20) 2012>, 1 (F21) 2012>,
3 (F30) 2012>, 4 (F32) 2013>,
5 (F10) 2010>, X3 (F25) 2010>

2
IT-EN
DIP SWITCH settings • Impostazioni DIP SWITCH
Utilizzo • Use
AV HDMI
PLUG&PLAY
FRONT
REAR
CAMERA
The interface 05963 allows HDMI & Camera input to the
OEM screen.
This plug and play Mini interface adds HDMI to connect
your Apple or Android device, allowing you to mirror
your smartphone display on the vehicle’s original scre-
en. lnputs for front and rear aftermarket cameras also
come as standard with the Mini.
APPLICATION
For BMW vehicles with NBT 6.5”/*8.8”/l 0.25” control
display. Vehicles with OEM AUX input only. For LVDS
HSD+2 pin connector only. *Not compatible with 8.8”Alpine units
KIT INCLUDES
Phonocar 05963 lnterface, vehicle Harness.
PRIOR TO INSTALLATION
Read the manual prior to installation .
Technical knowledge is necessary for installation.
The place of installation must be free of moisture and
away from heat sources. Phonocar Spa cannot be held
responsible for the installation of this product.
TECHNICAL SUPPORT
Phonocar Spa want to provide a fast and suitable
resolution should you encounter any technical issues.
With this in mind, when contacting Phonocar Spa, try to
provide as much lnformation as possible. This will speed
up the process and help usto help you.
For more information go to: phonocar.com
EN
EN
ATTENZIONE: Effettuare le impostazioni DIP SWITCH con l’interfaccia scollegata.
ATTENTION: Make the DIP SWITCH settings with the interface disconnected.
IT
L’interfaccia Phonocar 05963 consente l’ ingresso HDMI
e telecamera sullo schermo OEM. Grazie a questa mini
interfaccia plug&play è possibile utilizzare il tuo dispo-
sitivo Apple o Android sfruttando la funzione mirror del
display del tuo smartphone direttamente sullo schermo
originale. Ingressi per telecamera anteriore e posteriore
aftermarket di serie.
APPLICAZIONE
Per veicoli BMW con controllo display NBT 6,5”/*8,8”/
10,25”. Solo veicoli con ingresso AUX OEM. Solo per con-
nettore LVDS HSD+2 pin. *Non compatibile con le Alpine da 8,8”.
INCLUSI NEL KIT :
Interfaccia Phonocar 05963, cablaggio auto.
PRIMA DELL’INSTALLAZIONE
Leggere con attenzione il manuale prima dell’installa-
zione. E’necessario essere in possesso di conoscenze
tecniche per procedere all’installazione.Il luogo di instal-
lazione deve essere privo di umidità e al riparo da fonti
di calore,.Il produttore è sollevato da ogni responsabilità
circa l’installazione del prodotto.
SUPPORTO
Nell’intento di fornire al cliente soluzioni rapide e
adeguate in caso di problemi tecnici, si prega di fornire
il maggior numero di informazioni possibili, in caso di
richiesta di supporto.
Per maggiori informazioni: phonocar.com
IT
Con retrocamera OEM
(ON: YES OFF:NO)
With OEM reverse camera
(ON: YES OFF:NO)
EN
DIPON 1 2 3 12
DIP 1
IT
DIP 1 Schermo 6.5” - ON
DIP 1 Schermo 8.8”,10.2” - OFF
DIP 2 Schermo 6.5” - OFF
DIP 2 Schermo 8.8”,10.2” - OFF
DIP 1 Screen 6.5” - ON
DIP 1 Screen 8.8”,10.2” - OFF
DIP 2 Screen 6.5” - OFF
DIP 2 Screen 8.8”,10.2” - OFF
EN
DIPON 1 2 3 12
IT
Con camera frontale
AFTERMARKET (ON: YES OFF:NO)
With aftermarket
front camera (ON: YES OFF:NO)
EN
DIPON 1 2 3 12
DIP 2
IT
Con retrocamera
aftermarket (ON: YES OFF:NO)
With aftermarket
reverse camera (ON: YES OFF:NO)
EN
DIPON 1 2 3 12
DIP 3
IT

FR-DEIT-ENConnessioni • Connections
JACK 3.5”
AUX-IN
CONNETTORE
ORIGINALE
ORIGINAL
CONNECTOR
LVDS OUT LVDS IN AV IN POWER
DIP SWITCHES USB IN HDMI IN
USB PER
AGGIORNAMENTI
UPDATE USB PORT
DISPLAY
CONNETTORE 4+2 POLI
4+2 POLES CONNECTOR
UNIT CONTROL

4
IT-EN
BUTTON CONFIGURATION
MENU Button - BACK Button
HDMI ACCESS
Select AUX In from the OEM Source Menu.
Hold MENU for 2 seconds to switch between
OEM screen and
Phonocar Multimedia
HDMI
screen. Hold MENU for 2 seconds to exit HDMI.
Video In Motion Warning -
16 km/h
Hold BACK for 2 seconds to disable the video in motion
warning message.
REAR AND FRONT CAMERA ACCESS
From either HDMI mode or OEM mode
1. Select reverse gear for reverse camera
2. Deselect reverse gear - will goto after market front
camera ( if DIP 2 ON )
Hold BACK for 2 seconds to cancel front camera or drive
over
16 km/h.
While reversing and PDC on, long press the MENU but-
ton to switch below three modes.
1. Full display
2. 3/4 display
3. The PDC screen moves to the right
Front Camera Access
Press and hold BACK to enter the front camera screen ( if
DIP 2 is ON). Hold BACK
for 2 seconds to exit front camera.
View Version Number
Hold MENU Button for 8 seconds to enter rmware
information screen.
PULSANTE DI CONFIGURAZIONE
Pulsante MENU - Pulsante BACK
ACCESSO HDMI
Selezionare AUX IN dal menu delle sorgenti
OEM. Premere MENU per 2 secondi per
passare dalla schermata OEM alla
Phonocar
Multimedia
HDMI. Premere MENU per 2
secondi per uscire da HDMI.
Avviso video in movimento - 16 km/h
Premere 2 volte BACK per disattivare l’avviso video in
movimento.
ACCESSO TELECAMERA POSTERIORE E ANTERIORE
Da entrambe le modalità HDMI o OEM
1. Selezionare la retromarcia per attivare la retrocamera
2. Deselezionare la retromarcia per passare alla telecame-
ra anteriore after market (se il DIP 2 è su ON).
Premere
BACK
per 2 secondi per disattivare la telecame-
ra anteriore o guidare sopra i 16 km/h.
Durante la retromarcia e con PDC su on, tenere premuto
il pulsante MENU per passare alle 3 modalità seguenti :
1. Full display
2. 3/4 display
3. PDC a destra
Accesso camera frontale
Tenere premuto
BACK
per accedere alla telecamera
anteriore (se DIP 2 è su ON). Tenere premuto
BACK
per 2
secondi per uscire.
Visualizza il numero di versione
Premere BACK per 8 secondi per accedere alle Informa-
zioni sul firmware.
Funzioni • Functions
ENIT

5
FR-DEUtilisation • Nutzung
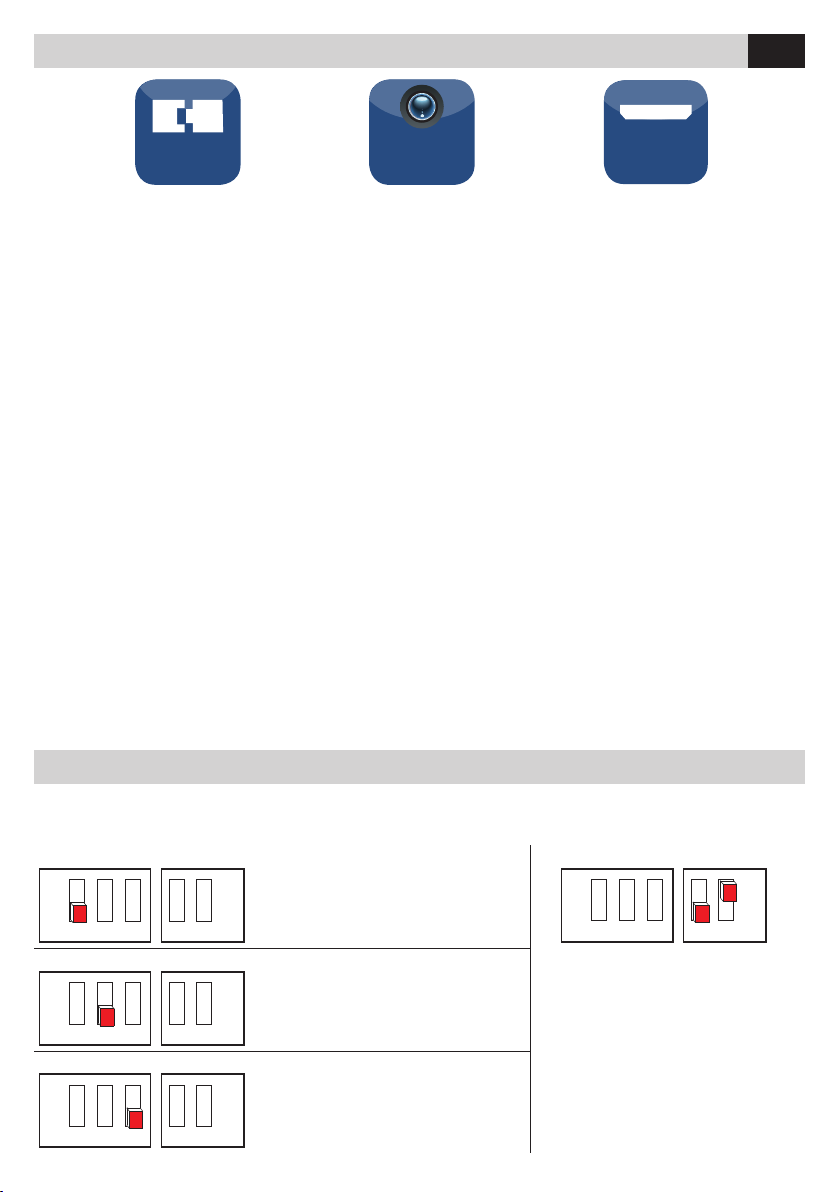
AV HDMI
PLUG&PLAY
FRONT
REAR
CAMERA
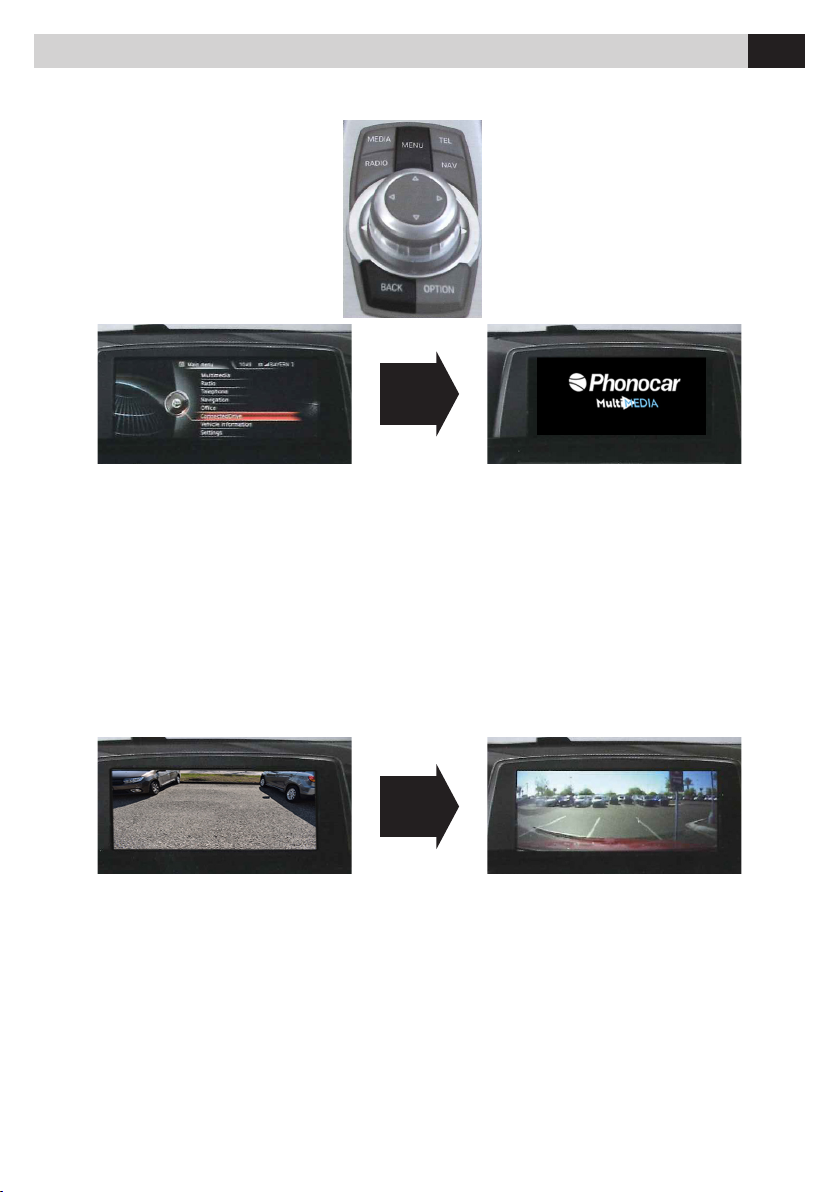
Das Phonocar Interface 05963 ermöglicht den HDMI-
und Kamera-Eingang auf dem OEM-Bildschirm.
Dank diesem Mini-Plug&Play-Interface können Sie Ihr
Apple- oder Android-Gerät über die Spiegelfunktion des
Displays Ihres Smartphones direkt auf dem Original-
bildschirm bedienen. Kamera-Eingänge für aftermarket
Frontal- und Rückfahrkameras sind serienmäßig.
ANWENDUNG
Für BMW Fahrzeuge mit NBT Display-Steuerung
6,5”/*8,8”/10,25”. Nur Fahrzeuge mit OEM AUX-Eingang.
Nur für HSD+2-poligen LVDS-Anschluss. *Nicht kompatibel
mit 8,8”Alpine.
IM LIEFERUMFANG ENTHALTEN:
Phonocar Interface 05963 Fahrzeugverkabelung.
VOR DER INSTALLATION
Lesen Sie diese Anleitung vor der Installation sorgfältig
durch. Der Aufstellungsort muss frei von Feuchtigkeit
und vor Wärmequellen geschützt sein, und der Herstel-
ler ist von jeglicher Verantwortung für die Installation
des Produkts befreit.
TECHNISCHE UNTERSTÜTZUNG
Um bei technischen Problemen schnelle und angemes-
sene Lösungen zu nden, bitten wir Sie, bei Suppor-
tanfragen so viele Informationen wie möglich zur
Verfügung zu stellen.
Für weitere Informationen: phonocar.com
DE
L’interface 05963 permet de rajouter une entrée
HDMI et une entrée caméra sur l’écran OEM
Grace au HDMI, vous pouvez utiliser votre dispositif
Apple ou Android directement sur l’écran d’origine,
ceci en exploitant la fonction miroir de l’afficheur du
smartphone. Entrées d’origine pour caméras avant et de
recul deuxième monte.
APPLICATION
Pour les véhicules BMW avec commande d’achage
NBT 6,5“/ * 8,8” / 10,25 “. Seuls les véhicules avec entrée
AUX OEM. Uniquement pour connecteur HSD + LVDS à 2
broches. * Non compatible avec 8.8“Alpine.
INCLUS DANS LE KIT
Interface Phonocar 05963, câblage pour le véhicule
AVANT L’INSTALLATION
Lire attentivement cette notice avant toute installation.
L’installation doit être faite par du personnel spécialisé.
Le lieu d’installation doit être sec et à l’abri des sources
de chaleur. Le producteur n’a aucune responsabilité
concernant l’installation du produit.
ASSISTANCE TECHNIQUE
Dans le but de fournir des solutions rapides et appro-
priées en cas de problèmes techniques, nous vous
invitons à nous donner autant d’informations possibles,
lors de la demande d’assistance.
Pour plus d’informations: phonocar.com
FR
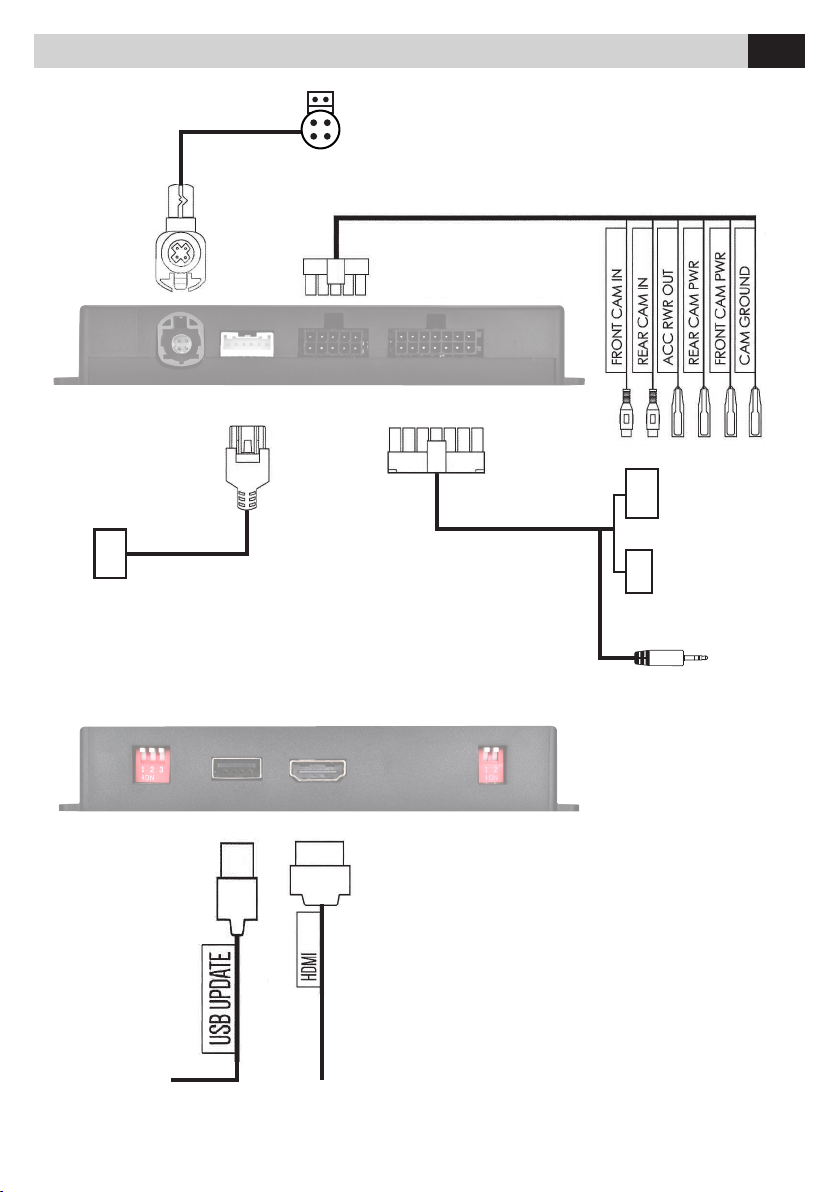
Réglages DIP SWITCH • DIP SWITCH einstellungen
DE
ATTENTION: Effectuer les réglages DIP SWITCH avec l’interface déconnectée
WARNUNG : Nehmen Sie die Einstellungen des DIP-SWITCH vor, wenn das Interface getrennt ist.
FR
Avec camera de recul OEM
(ON: YES OFF:NO)
Mit OEM Rückfahrkamera
(ON: YES OFF:NO)
DE
DIPON 1 2 3 12
DIP 1
FR
DIP 1 ECRAN 6.5” - ON
DIP 1 ECRAN 8.8”,10.2” - OFF
DIP 2 ECRAN 6.5” - OFF
DIP 2 ECRAN 8.8”,10.2” - OFF
DIP 1 Screen 6.5” - ON
DIP 1 Screen 8.8”,10.2” - OFF
DIP 2 Screen 6.5” - OFF
DIP 2 Screen 8.8”,10.2” - OFF
EN
DIPON 1 2 3 12
IT
Avec camera avant deuxième monte
(ON: YES OFF:NO)
Mit AFTERMARKET Front-Kamera
(ON: YES OFF:NO)
DE
DIPON 1 2 3 12
DIP 2
FR
Avec camera de recul deuxième monte
(ON: YES OFF:NO)
Mit aftermarket Rückfahrkamera
(ON: YES OFF:NO)
DE
DIPON 1 2 3 12
DIP 3
FR

6
FR-DEBranchements • Verbindungen
JACK 3.5”
AUX-IN
ORIGINAL
CONNECTOR
LVDS OUT LVDS IN AV IN POWER
DIP SWITCHES USB IN HDMI IN
UPDATE USB PORT
DISPLAY
4+2 POLES CONNECTOR
UNIT CONTROL

7
FR-DEFonctions • Funktionen
KONFIGURATIONSTASTE
MENÜ
-Taste – BACK-Taste
HDMI-ZUGANG
Wählen Sie AUX IN aus dem OEM-Quellmenü.
Drücken Sie auf
MENU
2 Sekunden lang, um
zwischen dem OEM-Bildschirm und dem HDMI
Multimedia Phonocar zu wechseln. Drücken
Sie
MENU
2 Sekunden lang, um HDMI zu
verlassen.
Video in Motion Warnung - 16 km/h
Drücken Sie zweimal ZURÜCK, um den Warnhinweis zu
deaktivieren
ZUGANG ZUR RÜCKFAHRKAMERA UND ZUR
FRONTKAMERA
Entweder vom HDMI- oder OEM-Modus aus
1.Wählen Sie den Rückwärtsgang, um die Rückfahrka-
mera zu aktivieren.
2.Deaktivieren Sie den Rückwärtsgang, um zur after-
market Frontkamera zu wechseln ( beim eingeschalte-
tem DIP 2 ). Drücken Sie 2 Sekunden lang auf
BACK
um
die Frontkamera zu deaktivieren oder fahren Sie über
16 km/h.
Beim Rückwärtsgang und beim PDC auf ON halten
Sie die
MENU
-Taste gedrückt, um unter drei Modi zu
wechseln.
1.Vollanzeige
2.3/4 Anzeige
3.Der PDC-Bildschirm bewegt sich nach rechts.
Zugang zur Frontkamera
Halten Sie
BACK
gedrückt, um in den Bildschirm der
Frontkamera zu gelangen (beim eingeschalteten DIP
2). Halten Sie
BACK
für 2 Sekunden gedrückt, um die
Frontkamera zu verlassen.
Versionsnummer anzeigen
Halten Sie die MENÜ-Taste 8 Sekunden lang gedrückt,
um Firmware-Informationen anzuzeigen.
TOUCHE DE CONFIGURATION
Touche
MENU
– Touche BACK
ACCÈS HDMI
Sélectionner AUX IN à partir du menu des
sources OEM. Appuyer
MENU
pendant 2 se-
condes pour passer de la visualisation OEM à
la visualisation Phonocar Multimédia HDMI.
Appuyer sur
MENU
pendant 2 secondes
pour quitter le HDMI.
Message vidéo en mouvement - 16 km/h
Appuyez 2 fois sur BACK pour désactiver le message
d’avertissement vidéo en mouvement.
ACCÈS CAMÉRAS AVANT ET DE RECUL
A partir du mode HDMI ou du mode OEM
1. Sélectionnez la marche arrière pour la caméra de
recul.
2. Désélectionnez la marche arrière pour passer à la
caméra avant deuxième monte (si le DIP 2 est sur ON).
Appuyer sur BACK pendant 2 secondes pour désactiver
la caméra avant ou conduire à une vitesse supérieure à
16 km/h.
Lorsque vous enclenchez la marche arrière, le contrôleur
PDC s’active :
Appuyez longuement sur le bouton MENU pour passer
comme indiqué ci-dessous sur les trois modes :
1. Plein écran
2. Mode 4/3
3. Achage sur la droite de l’écran
Accès camera avant
Appuyez
la touche BACK pour accéder à la caméra avant
(si le DIP 2 est activé). Appuyez sur BACK pendant 2
secondes pour quitter.
Afficher le nr. de version
Faire pression sur MENU pendant 8 secondes pour
accéder à la page des informations du logiciel.
DEFR

8
ESUtilizoUtilizo
AV HDMI
PLUG&PLAY
FRONT
REAR
CAMERA
El interface Phonocar 05958 consiente la entrada HDMI y
cámaras en la pantalla original (OEM). Gracias a esta mini
interface plug&play es posible utilizar tu dispositivo
Apple o Android y disfrutar de la función mirror (duplica-
ción de imágenes) del display de tu Smartphone directa-
mente en la pantalla de origen del coche. Entradas para
cámara delantera y trasera aftermarket o de origen
APLICACIÓN
Para vehiculos BMW con control NBT 6.5”/*8.8”/l 0.25”.
Solo vehículos con entrada Aux OEM . Solo para conec-
tor LVDS HSD+2 pin. *No compatible con monitor Alpine de 8.8”
INCLUIDOS EN EL KIT
Interface Phonocar 05963, cableado completo.
ANTES DE LA INSTALACIÓN
Leer atentamente el manual antes de la instalación.
Es imprescindible tener un alto conocimiento técnico
para proceder a la instalación. El lugar de instalación
del interface tiene que estar ausente de humedad y
protegido de fuentes de calor, el productor no se hace
responsable de la instalación del dispositivo .
SOPORTE
En el intento de ofrecer al cliente rápidas y adecuadas
soluciones, en caso de necesitar soportes técnicos,
rogamos de informar adecuadamente en los mínimos
detalles.
Para más información: www.phonocar.com
ES
Ajustes DIP SWITCH
ATENCIÓN: Efectuar los ajustes de DIP SWITCH con el interface desconectado.
ES
Con
cámara delantera
OEM
(ON: YES OFF:NO)
DIPON 1 2 3 12
DIP 1
ES
DIP 1 PANTALLA 6.5” - ON
DIP 1 PANTALLA 8.8”,10.2” - OFF
DIP 2 PANTALLA 6.5” - OFF
DIP 2 PANTALLA 8.8”,10.2” - OFF
DIPON 1 2 3 12
ES
Con
cámara
frontal
AFTERMARKET (ON: YES OFF:NO)
DIPON 1 2 3 12
DIP 2
ES
Con
cámara delantera
aftermarket (ON: YES OFF:NO)
DIPON 1 2 3 12
DIP 3
ES

9
ESConexiones
JACK 3.5”
AUX-IN
ORIGINAL
CONNECTOR
LVDS OUT LVDS IN AV IN POWER
DIP SWITCHES USB IN HDMI IN
UPDATE USB PORT
DISPLAY
4+2 POLES CONNECTOR
UNIT CONTROL

10
ES
CONFIGURACION TECLADO
Tecla MENU - Tecla BACK
ACCESO HDMI
Seleccionar AUX IN en el Menú de las fuentes
OEM . Pulsar MENU durante 2 segundos
para pasar de la pantalla OEM a la pantalla
Phonocar Multimedia HDMI. Pulsar MENU
durante 2 segundos para salir de HDMI.
Aviso Video en Movimiento - 16 km/h
Pulsar 2 veces BACK para desactivar el mensaje de
video en movimiento.
ACCESO CAMARA TRASERA Y FRONTAL
Desde ambos modo, HDMI o bien OEM
1.Seleccionar la marcha atrás para activar la retro
cámara.
2.Deseleccionar la marcha atrás para pasar a la cámara
frontal aftermarket (si DIP 2 es ON). Pulsar BACK duran-
te 2 segundos para desactivar la cámara delantera o
superar la velocidad de 16 km/h.
Durante la marcha atrás con PDC en ON, tener pulsado
la tecla MENU para pasar a los 3 siguientes modos.
1.Display completo
2.Display 3/4
3.PDC a la derecha del display
Acceso a la cámara frontal
Pulsar la tecla BACK para acceder a la visualización de
la cámara frontal (Si DIP 2 es ON) Tener pulsado BACK
durante s 2 segundos para salir
Visualizar versión
Pulsar la BACK durante 8 segundos para visualizar la
información sobre el rmware.
Funciónes
ES


PHONOCAR S.p.a. Via F.lli Cervi, 167/C • 42124 Reggio Emilia (Italy) • Tel. +39 0522 941621 • www.phonocar.com • e-mail: info@phonocar.it
DICHIARAZIONE DI CONFORMITÀ alla direttiva 2014/30/EU
DECLARATION OF CONFORMITY directive 2014/30/EU
IT Phonocar dichiara che il VM117 è conforme ai requisiti essenziali e a tutte le altre disposizioni pertinenti stabilite dalla direttiva 2014/53/EU.
EN Phonocar declares that this unit VM117 is in compliance with the essential requirements and other revelant provisions of Directive 2014/53/EU.
FR Phonocar dèclare que l’appareil VM117 est conforme aux exigences essentielles et aux autres dispositions pertinentes de la Directive 2014/53/EU.
DPhonocar erklärt, dass dieser VM117 in Übereinstimmung ist mit den grundlegenden Anforderungen und den anderen relevanten
Vorschriften der Richtlinie 2014/53/EU.
EPhonocar declara que el VM117 cumple con los requisitos esenciales y cualesquiera otras disposiciones aplicables o exigibles de la Directiva
2014/53/EU.
Il prodotto non deve essere smaltito con i riuti domestici. Si ricorda che le pile/accumulatori devono essere rimosse dall’apparecchiatura
prima che questa sia conferita come riuto. Per rimuovere le pile/ accumulatori fare riferimento alle speciche indicazioni del costruttore.
L’utente dovrà, pertanto, conferire gratuitamente l’apparecchiatura e la pila giunta a ne vita agli idonei centri comunali di raccolta
dierenziata dei riuti elettrici ed elettronici, oppure riconsegnarle al rivenditore. L’adeguata raccolta dierenziata contribuisce ad
evitare possibili eetti negativi sull’ambiente e sulla salute e favorisce il reimpiego e/o riciclo dei materiali di cui essi sono composti. Per ulteriori
informazioni consultare il sito www.phonocar.it
This product must NOT be treated as a domestic waste. Please remember that batteries/chargers must be extracted from the appliance before throwing the
appliance away. How to extract batteries/chargers: please follow the manufacturer’s specic instructions.
The end-user is requested to carry the appliance and its related battery, with no cost, to the municipal waste-recycling-spots for electrical and electronic
parts, or take them to the related Retailer shop. Recycling-spots help to avoid negative eects on the environment & health and promote the re-use and/
or recycling of the various materials. For further information, please read homepage www.phonocar.it
E24
10R05/01 2615 00
Table of contents
Other Phonocar Recording Equipment manuals

Phonocar
Phonocar 4/063 User manual

Phonocar
Phonocar 5/841 Simple manual

Phonocar
Phonocar 5/143 Simple manual

Phonocar
Phonocar 05958 User manual

Phonocar
Phonocar 5/871 Simple manual

Phonocar
Phonocar 05960 User manual

Phonocar
Phonocar 04059 User manual

Phonocar
Phonocar 05941 User manual

Phonocar
Phonocar RESISTIVE 04065 User manual

Phonocar
Phonocar 05961 User manual
Popular Recording Equipment manuals by other brands

Behringer
Behringer B-Control Fader BCF2000 quick start guide

Sony
Sony HXR-IFR5 operating guide

SyxthSense
SyxthSense ITPF Product sheet

Niles
Niles SSVC-2 Specification sheet

Trilithic
Trilithic Visionary HD/SD Overlay System Hardware installation and configuration manual

Alesis
Alesis MICROVERB 4 Reference manual