Nektar Panorama P1 User manual
24 Nektar Panorama P1: User Guide www.nektartech.com
www.nektartech.com
www.nektartech.com Nektar Panorama P1: User Guide
User Guide

2Nektar Panorama P1: User Guide www.nektartech.com
INDEX
INDEX 2
PANORAMA PHILOSOPHY 3
WHAT'S IN THE BOX 4
WHAT'S ONLINE 4
PANORAMA OVERVIEW 5
POWER & SETUP 7
Connecting to a computer 8
Foot Switch 8
INTERNAL MODE 8
Getting around 8
Preset, Maps & Buttons 9
Global Settings 10
Assigning Controls 11
CUBASE & REASON 12
Driver & download 12
Reason Setup 13
Getting around 14
Mixer mode 16
Instrument mode 17
Transport mode 18
Remote override 19
CLEANING & MAINTENANCE 20
FACTORY RESET 20
ABOUT 20
www.nektartech.com Nektar Panorama P1: User Guide 23

22 Nektar Panorama P1: User Guide www.nektartech.com
www.nektartech.com Nektar Panorama P1: User Guide 3
PANORAMA PHILOSOPHY
Thank you for buying our Panorama controller. Panorama is a very powerful controller that, combined
with your DAW, will make you experience musical creativity in a new way.
What makes Panorama different is our intense attention to workflow and insistence that a controller
should be as easy to use as integrated hardware systems. Our commitment to simplicity and efficiency
makes Panorama highly transparent to use regardless of whether you operate it as a traditional MIDI
controller, programming MIDI messages, or use our dedicated communication protocols to control
supported software such as Reason by Propellerhead Software or Cubase by Steinberg.
And while controller hardware can never be as flexible as the software it controls, we provide a well
thought-out set of controls and buttons in a logical layout that makes it easy to find exactly what you
need. Our ultimate goal with Panorama is to make your experience in the studio and in live performance
as intuitive and expressive as possible.
In addition, Panorama is field-updatable via USB. This means we can adapt it as software is updated or
changed. Future versions of our firmware and drivers will be available to registered users. So remember
to register your product!
We hope you will enjoy playing, using and being creative with Panorama as much as we have enjoyed
creating it.
The Nektar Team

4Nektar Panorama P1: User Guide www.nektartech.com
WHAT’S IN THE BOX
Please take a moment to check the items we supplied in the box, just to make sure it’s all there. Here is
what you should have found:
Panorama Controller x 1
Printed version of this User Guide x 1
USB cable (standard) x 1
WHAT’S ONLINE
Additional documentation, drivers, and support software are available online, which is also where you
will find any future firmware updates. If you plan to operate Panorama with a computer, make sure to
register Panorama to get access to the extra material. If you plan to use Panorama without a computer,
we still recommend you register Panorama so you can be kept up to date with new firmware releases.
Here is the internet address to our product registration page:
http://www.nektartech.com/registration
www.nektartech.com Nektar Panorama P1: User Guide 21
Note: This equipment has been tested and found to comply with the limits for a Class B digital device, pursuant to part 15 of
the FCC Rules. These limits are designed to provide reasonable protection against harmful interference in a residential instal-
lation. This equipment generates, uses and can radiate radio frequency energy and, if not installed and used in accordance
with the instructions, may cause harmful interference to radio communications. However, there is no guarantee that interfer-
ence will not occur in a particular installation. If this equipment does cause harmful interference to radio or television recep-
tion, which can be determined by turning the equipment off and on, the user is encouraged to try to correct the interference
by one or more of the following measures:
—Reorient or relocate the receiving antenna.
—Increase the separation between the equipment and receiver.
—Connect the equipment into an outlet on a circuit different from that to which the receiver is connected.
—Consult the dealer or an experienced radio/TV technician for help.
WARNING: Dispose of product securely, avoiding exposure to food sources and ground water. Only use
the product in accordance with the instructions.
Prop 65 Notice
The state of California wants you to know the following:
"WARNING: This product contains a chemical known to the State of California to cause cancer, birth
defects or other reproductive harm."
Dispose of the product in an environmentally safe way to avoid exposure to drinking water or food
sources. The product is safe in regular use but take precautions during service.
Panorama firmware, software and documentation are the property of Nektar Technology, Inc and subject to a License
Agreement.
© 2012 Nektar Technology, Inc. All specifications subject to change without notice. Nektar is a trademark of Nektar
Technology, Inc. Reason is a trademark of Propellerhead Software AB.
20 Nektar Panorama P1: User Guide www.nektartech.com
CLEANING & MAINTENANCE
If you want to keep Panorama pristine, you’ll need to clean it occasionally. We recommend you use a
moisture-free air duster or electronics spray to clear away any surface dust. Then use electronics dry
cloth or the included lint-free cloth to polish the surface and remove any finger marks.
Note: Do not use any abrasive materials to clean the surface as this may leave scratch marks.
Performing a complete factory reset will erase all presets and maps and return the unit to its default
factory state. Make sure to back up your presets and maps first! For details on backup, make sure to
register your product to gain access to our online documentation.
Here is how you perform a factory reset:
Un-plug the USB cable that connects to Panorama
Press and hold the Patch–and Patch+ buttons (N) and plug the USB cable in to power the unit.
The About page tells you what firmware and hardware versions are currently in your unit.
To activate, select Internal mode and press the two display buttons D1 and D2 simultaneously.
To exit, press D5.
FACTORY RESET
ABOUT
www.nektartech.com Nektar Panorama P1: User Guide 5
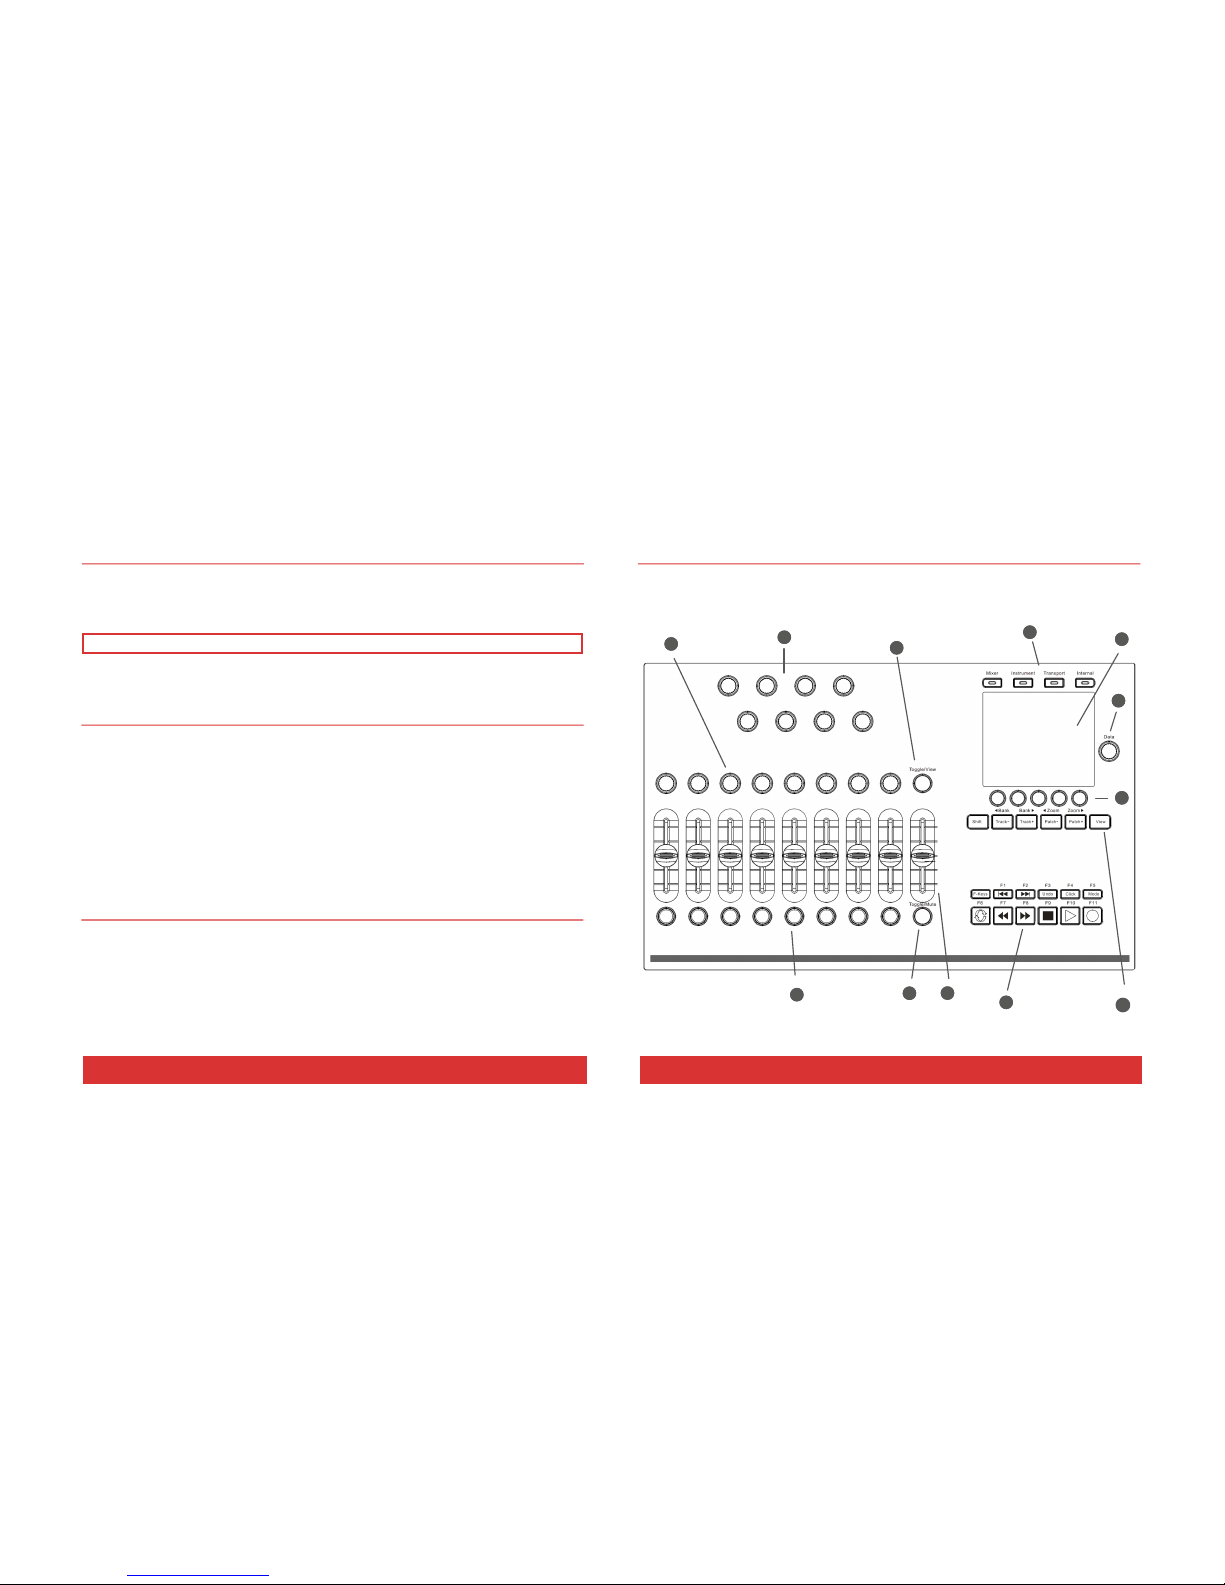
PANORAMA OVERVIEW
Here is a brief overview of all the parts of Panorama to which we will refer in the guide. Before you
jump in and start using Panorama, we recommend you get acquainted by identifying each called out part
on your unit.
A B
C
D
E
F
G H
K
L
I
J

6Nektar Panorama P1: User Guide www.nektartech.com
Four Mode buttons. Used to switch between Mixer, Instrument, Transport and Internal modes but
also double as each mode’s “home” or “back” button.
High-resolution TFT display
Data encoder for changing values for parameters and navigation. Also used as an extra MIDI
encoder in some menus.
Five menu buttons. Their functions always correspond to the menu label at the bottom of the TFT
display.
6 MIDI- and ASCII-assignable buttons. When used with our dedicated communication protocols they
act as navigation buttons for selecting the DAW track, the patch on instruments, bank switch, etc.
Eleven MIDI- and ASCII-assignable buttons, plus a SHIFT button (labeled F-Keys) which gives access
to a total of 22 assignments. When used with our dedicated communication protocols the buttons are
assigned automatically to 11 transport buttons, and the F-KEYS button gives access to 11 user-
configurable MIDI or ASCII commands.
Eight MIDI and ASCII-assignable LED buttons
TOGGLE/MUTE button: Mutes MIDI output in Internal Mode. Toggles between assignments of all eight
LED buttons when used with dedicated communication protocols.
Nine MIDI-assignable 45mm faders
Eight MIDI-assignable encoders
TOGGLE/VIEW button: Used to view MIDI assignments in Internal mode. Toggles between
assignments of all eight encoders when used with dedicated communication protocols.
Eight MIDI-assignable encoders
Back:
Kensington lock
Foot switch jack. MIDI-assignable, but by default controls sustain (pedal optional). Polarity is
automatically detected on power up.
USB Standard-B connector. Main USB port for power and data to and from your computer. The port
powers the entire unit
A
B
C
D
E
F
G
H
I
J
K
L
www.nektartech.com Nektar Panorama P1: User Guide 19
REASON: REMOTE OVERRIDE
Transport mode does not use the faders, encoders or buttons to the left of the display, so they are
conveniently available for you to assign any parameter you want using Reason’s Edit Remote Override
Mapping function. This is great if you want parameters for different devices accessible as one group of
controls, at any time. And it’s easy to set up, too:
1. Enter Transport mode
2. Right-click on the parameter on the Reason device you want to control
3. Select “Edit Remote Override Mapping”
4. In the popup menu, make sure “Learn from control surface input” is ticked
5. Move a control, such as encoder 1 (J1)
6. Click OK in the dialogue box.
The use of Remote Override Mapping does not affect the assignments in Panorama and can be different
from song to song.
Note: We recommend that you don’t use Remote Override Mapping in Mixer or Instrument mode.
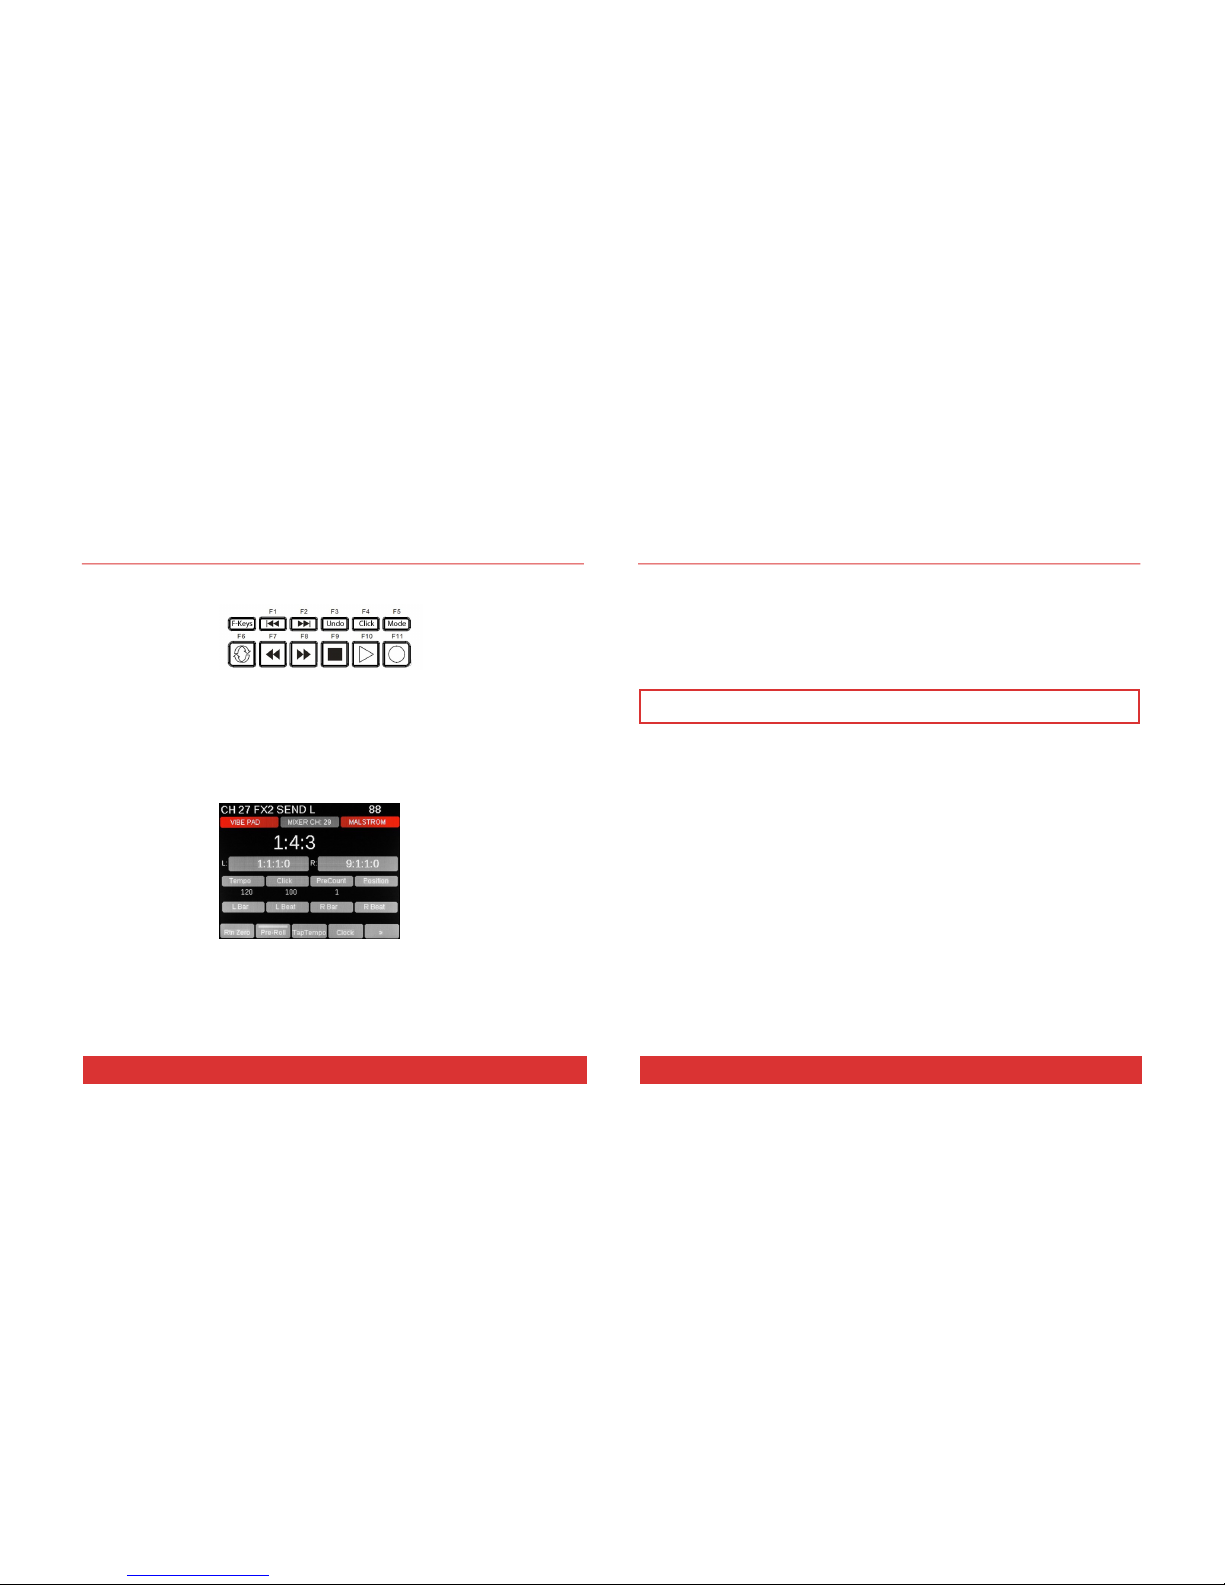
18 Nektar Panorama P1: User Guide www.nektartech.com
CUBASE & REASON: TRANSPORT MODE
The transport buttons (F) are always available in all three Cubase or Reason modes so you can control
the main transport functions at any time.
Activating Transport mode expands your navigational options considerably, with control over locators,
tempo, click level, pre-count, song position and more. In addition, the real-time clock tells you the
current playback position in your arrangement so you always know where you are.
The layout of the Transport home page is similar to that of Instrument mode, with the clock readout in
large characters and the grid indicating the assignments of each of the controls in the encoder group (L).
The Menu buttons (D1-5) offer eight essential Transport features on two pages. For example, on the first
page the Clock button (D4) toggles the clock readout between real time and bars and beats.
If you are into loop-based recording, try the display buttons labeled Loop> and <Loop on the second
page of the Transport menu. Pressing one of these buttons automatically moves your L/R location points
by the number of bars between the two points, creating a new loop location with one button push.
www.nektartech.com Nektar Panorama P1: User Guide 7
POWER & SETUP
With Panorama unpacked and securely seated on a solid surface, it’s now time to connect the unit and
get going.
Connecting to a Computer
Panorama is USB bus-powered which means you can power it from a connected computer. Here is how:
Plug in the USB cable (standard) to the USB jack on the back of Panorama and plug the other end
into a USB port on your computer.
Note: You can power Panorama via a battery powered laptop but we recommend the use of your
laptop’s AC power supply during extended work sessions with Panorama.
Your computer’s operating system will install the USB class driver, which will show up as three sets of
MIDI ports inside most MIDI applications. If you plan to use Panorama as a regular USB MIDI controller,
you will need to select the inputs and outputs labeled PANORAMA P1 in your application. For now, you
can ignore the other two sets of MIDI ports.
Foot Switch
You can also connect a foot switch to the foot switch socket on the back. The foot switch can be used to
control record on/off, sustain or changing Panorama’s Presets. Your foot switch polarity is automatically
detected on power up. If a foot switch is plugged in after the unit has been switched on, you may
experience it working in reverse. If that’s the case, simply power cycle your unit.

8Nektar Panorama P1: User Guide www.nektartech.com
INTERNAL MODE: GETTING AROUND
Panorama has four modes, which is like having four different control surfaces (A): Mixer, Instrument,
Transport and Internal modes. The first three modes are available when you operate Panorama with our
dedicated communication protocols, such as the one for Reason (see pages 17-25). But let’s start with
Internal mode, which is the default mode if you are using Panorama as a traditional USB MIDI controller.
The LED button for Internal mode is illuminated when the unit is in this mode and the display will look
similar to the illustration below:
Move the faders and their values will update in the display as they move. Where controls are assigned to
send a standard MIDI Controller message, pressing the TOGGLE/VIEW button (K) will display the
Controller number assignments. Pressing the TOGGLE/MUTE button (H) will mute the MIDI output of the
faders, so you can position them where you want them. Press again to unmute.
The buttons under the display (D) are used to navigate and activate functions within a menu. In this
case, pressing the Encoders button (D2) will display the encoders’ status. Ctrl Edit (D3) takes you to the
Control Edit menu where you can assign controls to buttons, faders and encoders. Global (D4) activates
the Global menu where you can change MIDI channels, send program message changes, select encoder
curves and change display color settings. Finally the Setup menu (D5) gives you access to Load and
Save menus to and from any of Panorama’s 20 Preset locations or 10 F-keys maps. Setup also contains
access to the menus on the main display screen so you quickly can navigate to any menu from Save or
Load.
www.nektartech.com Nektar Panorama P1: User Guide 17
CUBASE & REASON: INSTRUMENT MODE
Instrument mode controls the device assigned to the currently selected sequencer track. Changing
tracks will therefore immediately update the assignments of all controls.
The Instrument home page is designed to provide the information and experience of a hardware
workstation. The large character field shows the current patch name of the device, and the grid below
that shows the parameters and values assigned to the encoder group (L). And if the current device has
envelopes, the fader group will be assigned to Amp and Filter envelopes by default.
The first parameters you encounter are the ones we considered most useful, and they’ve been selected
from different menus. But you can edit any of the device’s parameters by pressing the Menu button
(D5), which will activate the scroll menu. From here you can access every menu in the selected device.
Reason: To control devices in the Effects and Other Category, you will need to create a track for that
device. This can be done by right-clicking on the device in the rack and selecting “Create track for
(device name)”.

16 Nektar Panorama P1: User Guide www.nektartech.com
CUBASE & REASON: MIXER MODE
In Mixer mode, the first eight faders (I) control eight mixer channels at a time, while the corresponding
encoders (J) control the Pan position and the LED buttons (G) act as Channel Select buttons.
You can change the assignment of the encoders by pressing the TOGGLE/VIEW button (H) to step
through Pan, Width and Sends 1-8.
By pressing the TOGGLE/MUTE button (H) to the right of the LED buttons, you also change their assigned
function by stepping through Select, Mute and Solo.
The Encoder group (L) is assigned by default to control EQ for the currently selected channel. Using the
LED buttons (G) as Select buttons, you can select a new mixer channel without changing your current
sequencer track. This is useful, say, if you want to tweak the EQ on a kick drum track while still playing
a bass sound from the keyboard.
To view the EQ parameters, press the display navigation button labeled EQ (D1), or select any of the
other display buttons for other menus. The Menu button (D5) gives you quick access to all mixer menus,
including the Master section.
Reason note: We recommend you only rename sequencer tracks and not mixer channels. By only
naming sequencer tracks, mixer channels will display the same name as the track name. If you name
mixer channels independently, you may experience inaccurate track information in the info bar.
www.nektartech.com Nektar Panorama P1: User Guide 9
INTERNAL: PRESETS, MAPS & BUTTONS
Panorama P1’s memory structure has three parts.
Presets: 20 locations in total that store the 9 Faders (I), 16 Encoders (J+L) and 8 LED buttons (G).
F-Key Maps: 10 locations in total store the 11 F-keys buttons assignments.
Navigation (E) and Transport (F) buttons assignments are not stored as part of a preset or map
but assignments are retained over power cycling. This means you do not need to worry that your
navigation or transport settings may change if you load a preset.
Loading Presets
To load a preset or map you simply select the Load menu in Setup. However you can also assign any
button to load a specific preset or map, or assign it to load the previous or next map to the one currently
loaded. The Patch —and Patch + buttons are assigned in this manner so pressing these buttons will
allow you to scroll through the presets in your Panorama. If you want to assign these buttons in a
different way, check the section about Control Edit on page 11.
Loading F-keys Maps
The transport buttons (F) double up as 11 F-keys accessible when you press the F-keys button. To
activate the assignment, press the F-keys button followed by any of the Transport buttons labeled F1-
F11. The F-keys are particularly useful for QWERTY macro’s because they are the only buttons available
in all 4 modes.
As mentioned you can load maps in the Load menu located in the Setup page, either with a preset or on
it’s own. You can also assign any assignable button to load maps, as you can with Presets.
However there is another quick way you can change the current F-keys map.
Press the F-keys button (F) brings the current F-keys assignments in to view and the info-bar tells you
which map is currently loaded. To change the current F-keys map, move the data control while the F-
keys button is pressed. The change is instant so make sure you have saved any F-keys assignments you
want to keep before selecting a new map.

10 Nektar Panorama P1: User Guide www.nektartech.com
INTERNAL: GLOBAL SETTINGS
Enter the Global menu by pressing the display button labeled Global (D3) in Internal mode. Here you
have access to the following parameter options:
Global Channel, Program & Bank LSB/MSB
Sets the global MIDI channel for Panorama. If controls have been assigned to send on the global MIDI
channel, changing this channel will affect all those assignments.
Changing the value for Program or Bank LSB/MSB will send out a program or bank change message on
the global MIDI channel.
Encoder Curve
Next select the menu Encoder Curve. This setting determines how quickly Panorama’s encoders scroll
through parameter values; the options are Slow, Standard and Fast. You may like Fast if you want to be
able to go from 0-127 in less than 1 rotation. Standard allows you to do it in about 1 rotation and Slow
requires more than one rotation. Select the curve you think might work best for you.
LCD Color
This setting changes the brightness of the gray colors in the display. If you find these colors are not clear
from your viewing angle, changing this setting may help.
Display Pedal/Mod: On/Off
This determines if you will see data in the info-line when you use an Expression pedal or the modulation
wheel. Off is default and means you will not see this data displayed.
www.nektartech.com Nektar Panorama P1: User Guide 15
CUBASE & REASON: GETTING AROUND
Info-Bar (Red/Gray/Red)
The display Info-Bar (Red/Gray/Red) provides the following important current status information for the
mode home pages:
Sequencer Track Name / Mixer Channel Number / Device Name
Deeper in the menu structure, the Info-Bar changes to:
Mixer mode: Sequencer Track Name / Mixer Channel Number / Current Menu
Instrument mode: Current Patch Name / Device Name / Current Menu
Changing Track, Patch and Mixer Bank
The navigation buttons allow you to make the following navigational changes:
Track -/+: Changes the current sequencer track
Patch -/+: Changes the patch (or preset) of the instrument device assigned to the current sequencer
track
View: Changes the display view on your computer to show Mixer in Mixer mode, Rack in Instrument
mode and Sequencer in Transport mode
Bank <>: Shifts the current selection of eight mixer channels in Mixer mode so the fader group
assignments are changed, for example, from channels 1-8 to channels 9-16
Zoom <>: controls the magnification of sequencer tracks when the sequencer is in view.
14 Nektar Panorama P1: User Guide www.nektartech.com
REASON: GETTING AROUND
About Panorama’s Reason Implementation
Panorama’s dedicated communication protocol for Cubase & Reason is extremely comprehensive. And if
you know you DAW, it’s easy to understand how it all works...because you already know how your DAW
works! In the following we’ll give you a starting point for exploring Panorama, which may be all you
need.
Modes and Navigation
By pressing the Mode navigation buttons (A) you change the assignments of Panorama’s controls at the
push of a button. It’s like having four control surfaces in one:
Mixer —Assigns all controls to the DAW’s mixer.
Instrument —Assigns controls to the device on your sequencer track. In most cases, this will be an
instrument, but it’s also how you control any of Reason’s effects.
Transport —Controls functions in your DAW’s transport menu including current song position and
locator points.
Internal —Uses Panorama’s internal MIDI controller functions so you can jump out of our dedicated
protocol and use Panorama as a traditional MIDI controller.
Regardless of where you are in Panorama’s menu structure, you can always press a mode button (A) to
jump out of the current menu to a new mode. The last menu of a mode is remembered, so pressing the
mode button once from any other mode will take you back to the remembered menu; pressing it twice
will take you to the mode home page.
www.nektartech.com Nektar Panorama P1: User Guide 11
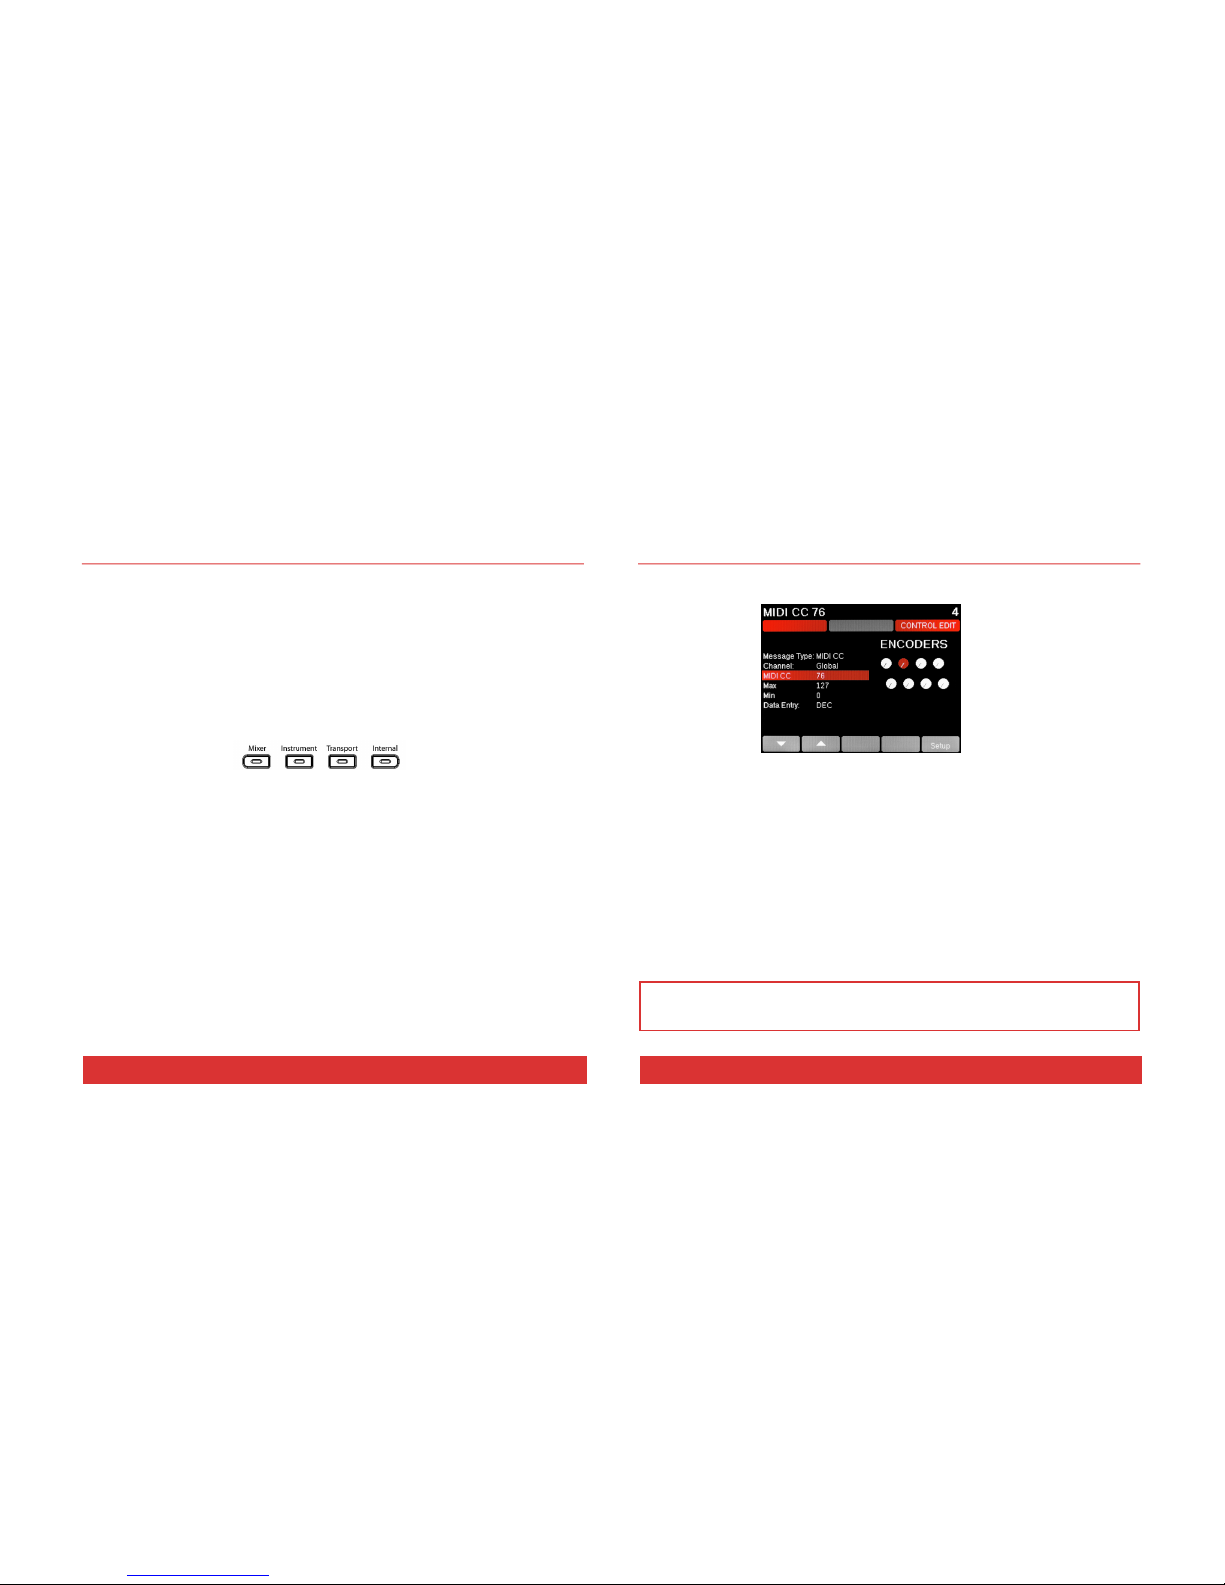
INTERNAL: ASSIGNING CONTROLS
Internal : Control Edit
Pressing Ctrl Edit (Control Edit) from the Internal mode home page will activate the Control Edit menu
with the display looking similar to what is shown above. Moving or pressing any of the controls (faders,
encoders, pads, buttons) while on this page will update the display to show their current settings. The
default parameter selection is MIDI CC, so right away you can change the Controller number assignment
for the most recently used control using the Data encoder (C). The change takes effect immediately, so
you can check your receiving device or software to see that it responds correctly as you make changes.
Using the arrow display menu buttons (D1 or D2), select Message Type. Use the Data encoder (C) to
review the options. Options vary depending on the type of control you have selected so for example you
can’t assign loading presets to an encoder, only a button.
We have included a very flexible set of options for each selection. In the above screen you have the
ability to assign the selected fader to send a particular MIDI CC# within a definable range on any MIDI
channel, and then assign completely different values to the faders on either side if you like.
Note: QWERTY or ASCII messages can be assigned to any of the assignable buttons, but only with the
Panorama driver installed. You can download it from our website once you have registered your product
here: www.nektartech.com/registration

12 Nektar Panorama P1: User Guide www.nektartech.com
DRIVER & DOWNLOAD
About the Panorama Driver
The Panorama driver is required to use our dedicated communication protocol DAW’s such as Cubase
and Reason. If the program you want to use is not already installed on your computer, we recommend
you install the program first and our driver second.
If you don’t own Reason, you can try a demo of the full version by visiting Propellerhead Software’s
website: http://www.propellerheads.se/download/
Once installed, you can run the program in demo mode and see for yourself how well Reason and
Panorama interact.
Note: Panorama’s dedicated communication protocol is compatible with Record 1.5, Reason 5, Reason 6,
6.5 and up. Older versions are not supported.
Downloading the Reason Driver
The Reason driver for Panorama can be downloaded from http://www.nektartech.com/registration
Follow the online instructions to register, download and install the Panorama driver and update the
firmware of your unit.
www.nektartech.com Nektar Panorama P1: User Guide 13
REASON: SETUP
With Reason and the Panorama driver installed, connect the Panorama keyboard to your computer via
USB and set its power switch to On. Wait until the OS has recognized Panorama, then follow these steps:
Launch Reason
Select the Preference menu in Reason and click on the Control Surfaces tab
Click the button labeled “Auto-detect surfaces”
Once complete Reason should have found two control surfaces: Nektar Panorama and Nektar Panorama
Mixer Mode.
Note: If you are installing Reason for the first time, Reason will request permission to search
automatically for a Master Keyboard. If you do this, Reason will find only Nektar Panorama because our
Mixer Mode control surface does not contain a keyboard. You must follow the steps above to ensure
both control surfaces are found.
Reason and Panorama are now connected. You will see the following message on Panorama’s display:
“To use Mixer Mode, please lock Panorama Mixer Control Surface to a Mixer device.
Locking to the Master Section is most useful. You can also lock to any Mixer device in the rack and the
ReGroove Mixer. Alternatively, select Instrument, Transport or Internal mode.”
To lock to the Reason 6 mixer, navigate to the Options menu and select “Surface Locking…”. For the
Surface select “Nektar Panorama Mixer”, and for “Lock to Device” select “Master Section”.
If you are using Reason 5, you can lock Mixer mode to the 14:2 mixer and control it the same way as
the larger mixer in Reason 6. The rest of this guide assumes you are using Reason 6.
That’s it; you are now ready to experience Panorama communicating with the power of Reason.
Note: The “Lock Nektar Panorama Mixer Mode to this device” setting is stored with your song so you
don’t have to set this up every time if you save the setting you prefer in your default song.
Other manuals for Panorama P1
2
Table of contents
Other Nektar Recording Equipment manuals

Nektar
Nektar Impact LX49+ Manual

Nektar
Nektar Impact LX49+ User manual

Nektar
Nektar Aura User manual

Nektar
Nektar SE49 User manual

Nektar
Nektar Aura Safety guide

Nektar
Nektar Panorama P1 User manual

Nektar
Nektar Pacer User manual

Nektar
Nektar Impact iX49 User manual

Nektar
Nektar SE49 User manual

Nektar
Nektar Impact iX49 User manual


Popular Recording Equipment manuals by other brands

HHB
HHB DualBurn CDR-882 Technical specifications

Safety Basement
Safety Basement INFIDEL QX7777 instruction manual

FONESTAR
FONESTAR SR-1590 instruction manual

Sony
Sony RCD-W222ES - Cd/cdr Recorder Specifications

Electro-Harmonix
Electro-Harmonix 16 Second Digital Delay instructions

Sonosax
Sonosax SX-ST quick start guide


