NeuroTek Elite Deluxe EyeScan Series User manual

©NeuroTek 2020 Version 1.0
Liability Disclaimer
This product is a tool designed to assist the clinician in the administration of
(EMDR). The purchaser/clinician agrees to accept full responsibility for any
harmful results and/or undesirable consequences obtained from the use of
this machine.
The manufacturer of this machine shall not be held liable for adverse aects
caused to clients resulting from the administration of EMDR or any other
form of therapy using this machine.
Any unexpected reactions, results, or behavior noted as a result of the
administration of EMDR, either using this product or by other methods,
should be immediately reported to the EMDR Institute.
Limited Warranty
The manufacturer warrants this equipment to the original purchaser against
defective material or workmanship during the warranty period from the date
of purchase. The manufacturer’s responsibility under this warranty is limited
to the repair or replacement of defective parts.
The warranty period:
One (1) year on all parts and components. The manufacturer reserves the
right to determine whether the part or parts failed because of defective
material, workmanship or other causes. Failure caused by accident, normal
wear, alteration, misuse, tampering, negligence or improper packaging of
returned units is not covered by this warranty. Please be advised that if a
product is returned for warranty service and no defects are found or the
problem is due to a weak/dead battery or operator error a shop charge and
return shipping costs may be charged. All warranty repairs must be done by
NeuroTek or a representative designated by NeuroTek. Any repair to the
equipment other than by these authorized facilities voids this warranty. The
rights under this warranty are limited to the original purchaser and may not
be transferred to subsequent owners. To receive warranty service, you must
rst contact NeuroTek for a return authorization number. This number will
be used for tracking your return. Send the complete unit, postage paid, to
NeuroTek. Include a description of the problem you are having and a daytime
phone number.
www.neurotekcorp.com
Phone: 727-372-0104
p
WARNING: This instrument should not be used
with any person who has a history of seizures.
©NeuroTek 2020 Version 1.0
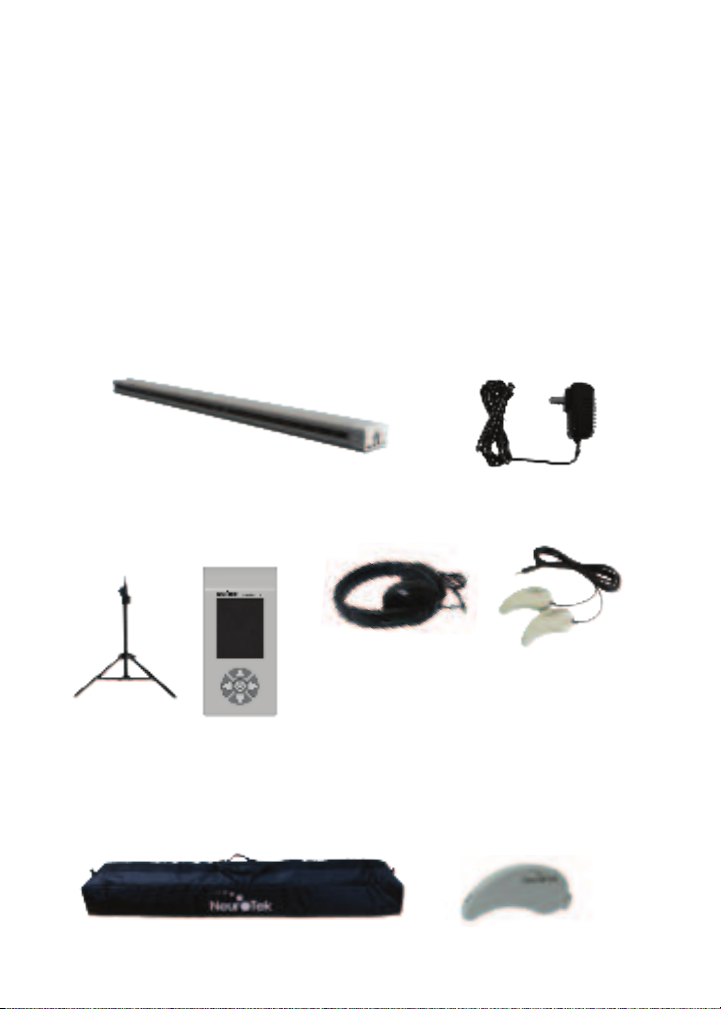
Package Contents
Available Accessories
Deluxe EyeScan Adapter
Tripod Tac Pulsers
Accessory Bag
Headsets
LED Pulsers
Product Features
22 LED lights in 4 color options and two modes:
Colors -Blue, Green, Teal, & Purple
Scan Mode – the lights go completely back and forth along the entire lightbar
Ends Mode – the lights alternate illumination at each end of the lightbar only
Easily able to adjust LED brightness, audio volume, pulser intensity, and over-
all speed settings from controller (options from 1-10)
Standard Tac doubles as wireless remote control for the EyeScan
One available tone for audio stimulation with headset
Standard Pulsers and Wired Headset included
Backed by our Limited one-year Warranty!
©NeuroTek 2020 Version 1.0
Deluxe EyeScan Getting Started
➊Charging the Deluxe Wireless EyeScan
Plug adapter into
the EyeScan and
then plug into
power supply
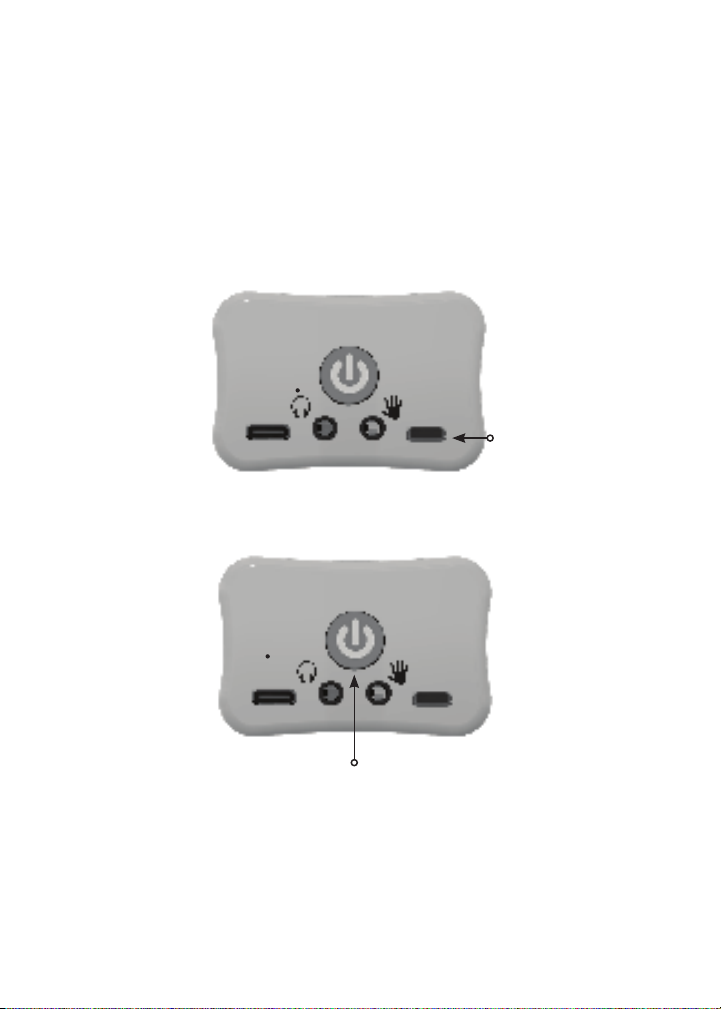
➋Turning on the EyeScan and Battery Level
Press and hold the power
button until the green LED
on the right lights and stays
solid, if the battery level
is low, the green light will
blink 5 times, pause for 30
seconds, and repeat.
Thank you for purchasing the NeuroTek Elite Series Deluxe
EyeScan. Your Eyescan can be controlled with any NeuroTek
Tac. The Standard Tac has and adjustment range of 1–10.
Advanced and Deluxe Tacs have an adjustment range of 1-20.
If using with wired devices, plug the Pulsers and/or Headset
into the Tac.
©NeuroTek 2020 Version 1.0
Troubleshooting Guide
If your EyeScan does not respond to inputs and you cannot end a
session or make adjustments, there is a reset feature that will allow
you to reboot the device. Your settings and proles are not eected.
For further assistance please email us at:
Our normal oce hours are 7:30 a.m. - 4:30 p.m. EST
Monday through Friday.
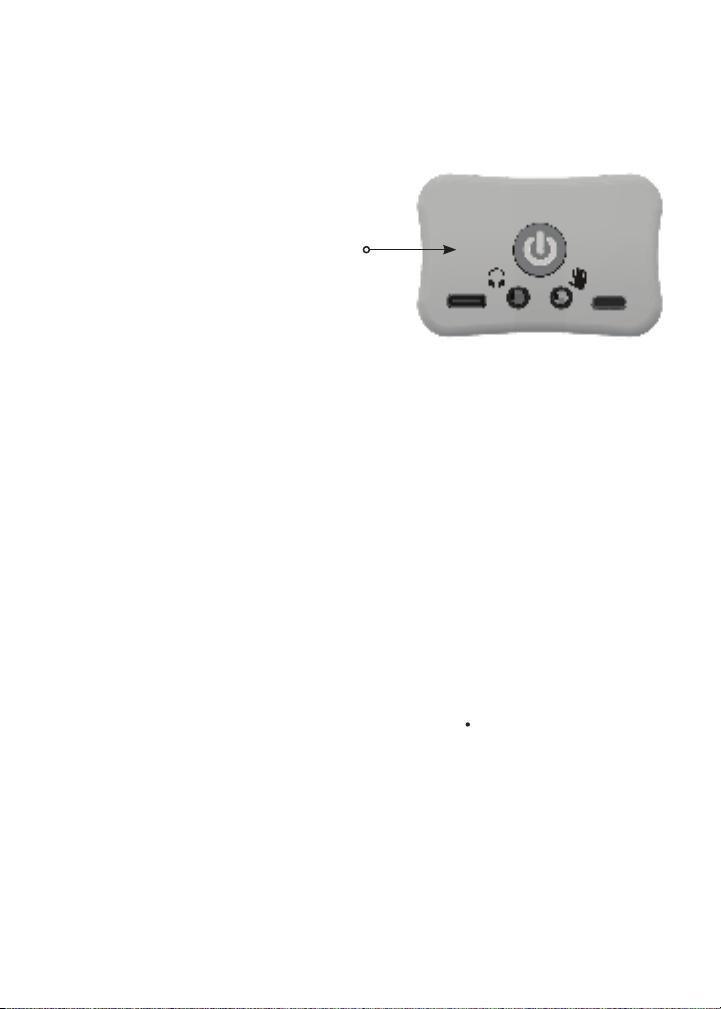
The reset button is just above the
headset icon and can be activated
using a paper clip. You will feel the
button click. Release the button and
the EyeScan will restart.
Maintenance
To clean the device, we recommend using a microber cloth to dust
the device. Do not use harsh chemicals on the LCD screen on the
remote as it can damage the screen over time. We do recommend
using the premoistened screen wipes occasionally, if you need to
clean the screen, and the cloth isn’t enough.
In order to extend the life of your pulsers it is important to know
that the life of the wires is directly related to how much exing,
pulling and bending your pulser wires receive. Although we work
very hard to make the pulsers and wires as durable as possible,
there is no way to predict how long they will last. Any wire that is
handled on a regular basis, especially by people who are stressed,
will eventually wear out. Pulsers are considered consumable items
and having spares on hand is highly recommended.
If your Tac cannot nd your EyeScan and there are two lights on
your lightbar, your device has been switched to wired mode. To
change it back to wireless mode and one light, press and hold the
power button until the device turns o and on again and then you
should see one green light and you can release the button.
Table of contents
Other NeuroTek Medical Equipment manuals

NeuroTek
NeuroTek EyeScan Deluxe User manual

NeuroTek
NeuroTek Elite Series User manual

NeuroTek
NeuroTek Elite Series User manual

NeuroTek
NeuroTek Advanced LapScan 4000 User manual

NeuroTek
NeuroTek Advanced Tac/AudioScan User manual

NeuroTek
NeuroTek Tac/AudioScan User manual

NeuroTek
NeuroTek Deluxe Tac/AudioScan User manual
Popular Medical Equipment manuals by other brands


Getinge
Getinge Arjohuntleigh Nimbus 3 Professional Instructions for use

Mettler Electronics
Mettler Electronics Sonicator 730 Maintenance manual

Pressalit Care
Pressalit Care R1100 Mounting instruction

Denas MS
Denas MS DENAS-T operating manual

bort medical
bort medical ActiveColor quick guide

AccuVein
AccuVein AV400 user manual


