Nibe GV-HR110 User manual

O
R
I
G
I
N
A
L
w
w
w
.
N
I
B
E
.
d
k
NIBE A/S Sverigesvej 6 DK-6100 Haderslev Tlf.: +45 7353 2700 www.NIBE.dk
NIBE AB Sweden · Box 14 · Hannabadsvägen 5 · SE-285 21 Markaryd · www.NIBE.eu
INSTALLATIONS MANUAL
Passive ventilation / Heat recovery
G V- H R110
Version 31.10.2014

2
Table of Contents
GV-HR110 - assembly ....................................................................4
Assembly........................................................................................ 5
Condensation drain ........................................................................ 6
Duct system....................................................................................7
Insulating ducts in cold attics.......................................................... 7
Insulating ducts in warm rooms...................................................... 8
Reheating of the supply air............................................................. 8
Electric installations........................................................................ 9
Control and settings of the facility...................................................9
Optimal adjustment of the facility....................................................9
Facility maintenance.....................................................................10
Troubleshooting............................................................................ 12
Electric wiring diagram .................................................................13
CE-conformity marking................................................................. 15
Subject to Technical Modications of GV-HR110

3
To assemble GV-HR110 follow the instructions below:
1) Remember to switch off the electricity before
opening the aggregate.
2) An airtight waterseal must be mounted in a frost-free
place to compensate for the pressure from the
ventilation unit.
3) The height of the waterseal must be at least 50 mm.
4) The pipe drain must fall freely to the sewer drain.
5) Pour 1 litre water into the condensation container of
the machine to check that the water flows without
stoppage. The waterseal must be checked for water
every year before the cold season begins.
6) If the waterseal is mounted where the temperature can
fall below 0 C°, then the waterseal must be protected
against frost with a thermostat and an electric heating
element that switches on when the temperature falls
below +2 °C.
.IMPORTANT .IMPORTANT .IMPORTANT .IMPORTANT .
7) Set the amount of incoming 1 - and outgoing air
before using the facility. It is very important that the
air balance in the house is correct.
8) It is recommended to close the air valves etc. until
the machine has been started up and the settings
made.
9) The supplied electric preheater has to be installed
in fresh air duct and connected to the AHU. It is
important to set the settings regarding the heater in the
control panel. See “ User manual, 4.5 User Menu,
2-Reheater “.
Follow the instruction in this manual. If the drain is not
set up in accordance with the manual, NIBE will not
be liable for any consequential damages pertaining to
the NIBE facility.
.IMPORTANT .IMPORTANT .IMPORTANT .IMPORTANT .
Subject to Technical Modications of GV-HR110

1: Frisk luft
2: Udsugning
3: Afkast
4: Indblæsning
5: Modstrømsvarmeveksler
6: Indblæsningsventilator
7: Udsugningsventilator
8: Friskluftlter
9. Udsugningslter
10: El-kasse
11: Kondensvandsbakke
12: Kondensvandsaøb
13: 230V/50Hz
14: By-pass
9
11
10
14
12
1
2
3
4
13
7
5
6
8
72,7
60,7
550
421014
24
32
1088
1056
550
135 280
128,6265
1: Frisk luft
2: Udsugning
3: Afkast
4: Indblæsning
5: Modstrømsvarmeveksler
6: Indblæsningsventilator
7: Udsugningsventilator
8: Friskluftlter
9. Udsugningslter
10: El-kasse
11: Kondensvandsbakke
12: Kondensvandsaøb
13: 230V/50Hz
14: By-pass
11
12
1
2
3
4
13
7
5
8
72,7
60,7
550
421014
24
32
1088
1056
550
135 280
128,6265
4Subject to Technical Modications of GV-HR110
GV-HR110 - Assembly
GV-HR110 is delivered upright or as horisontal.
The aggregate must be assembled on a vibrationfree,
firm substrate (cement, brick, etc.) or onto a solid wall.
Since the aggregate can produce up to 6 litres of water
per day during the winter months it must be placed
where the necessary waterseal and its condensation
drain-off can be lead off to in a satisfactory way to the
indoor drain.
In order to be able to service and maintain the
aggregate there must be at least 600 mm of space in
front of the aggregate and it must stand on a firm
substrate.
Weight: 32 kg
1: Fresh air
2: Extract air
3: Exhaust air
4: Supply air
5: Counter-ow heat exchanger
6: Supply air fan
7: Extract air fan
8: Supply air lter
9: Extract air lter
10: Electric control box
11: Condensation container
12: Condensation drain
13: 230V/50Hz
14: Bypass

5
Subject to Technical Modications of GV-HR110
Assembly
GV-HR110 is delivered with universal wall
mountings consisting of 2 rails.
Wall assembly
GV-HR110 can also be mounted directly on the
wall with visible or concealed wall mountings.
Cabinet assembly
GV-HR110 is made for mounting in
a normal 60 x 60 cm cabinet, as shown in the
drawing. When assembling a cabinet the aggregate
can be placed on the wall mounting delivered with
the aggregate (as shown in the picture).
A
A
Visible wall mountings
Concealed wall mountings
Cabinet assembly
gummifødder, som leveret
ved vandret montage af
maskinen skal de leverede
gummifødder flyttes til
positioner som anvist her
bunden af maskinen i tilfælde
at maskinen monteres vandret
D
E
F
C
1
2
3
4
B
A
3
2
1
5
C
D
4
6
7
8
A
B
14-08-2009
1
Oprettet Dato:
Revision:
Kg
Vægt:
Betegnelse:
Tegn. Nr.:
Blad 1 af 1
A3
010324-1
GES Energy liggende u. bypass
General tolerance hvor intet andet er angivet: ISO 2768-m
Skala:1:5
Revisions Dato:
02-01-2007
Lokation:
Horizontal mounting
When mounted
horisontally, place
feet as shown
Bottom of unit
when placed horisontally
Feet as
delivered

6Subject to Technical Modications of GV-HR110
Duct connection
All duct connections have yellow markings that
indicate which ventilation ducts are connected to the
different connections.
Incoming air connection:
The duct system from the aggregate to the residence.
Outgoing air connection:
The duct system from the residence to the aggregate.
Outside air connection:
The duct system from the outside air hood/outside air grid
or from the ground heat exchanger to the aggregate.
Exhaust air connection:
The duct systems from the aggregate to the exhaust
air hood/exhaust air grid outdoors.
Optimal operation of the GV-HR110 is achieved by
mounting a connector piece Ø160 mm in each of the
four outlets as the first stepp of the duct system. The
connectors are tightened with the supplied collar bands.
Condensation drain
The aggregate produces up to 6 litres condensation
per day. It is therefore important that the condensation
drain is set up correctly and that the aggregate declines
toward the condensation drain side.
The waterseal must be airtight e.g. by bending a 15 mm
copper pipe as a waterseal (see the drawing on the left).
A reinforced water hose is attached between the drain
connection and the waterseal using a hose clip on both
connections.
A necessary decline of 1 % is installed from the waterseal
to the inside drain. If the aggregate is mounted in a
cold air room then the condensation drain pipe must be
insulated so that the condensation inside the pipe does
not freeze. We also recommend that the waterseal is
mounted in an underlying warm room to guarantee that
the water in the waterseal does not freeze.
If protection of the condensation drain pipe against frost
cannot be guaranteed when installing then a thermostat-
controlled heating strip must be assembled around the
condensation drain pipe. When hanging on wood walls
we recommend using a vibration-dampener to avoid
transferring vibrations.
No water in the waterseal = water damages During operation there is negative pressure in the
aggregate, which makes it necessary to guarantee
a height difference of at least 50 mm down to the
water in the waterseal.
Supply air
Extract air
Fresh air
Exhaust air
GV-HR110

3 m
1 m
3 m
7
Subject to Technical Modications of GV-HR110
Isolering af kanaler, alt. A
Isolering af kanaler, alt. B
Forkert isolering af kanaler
Insulating ducts in cold rooms
If you want to make use of the aggregate‘s high recycling
rate (efficacy), the ducts must be insulated correctly.
Incoming and outgoing air ducts:
To reduce heat loss from the duct system in cold attics the
ingoing and outgoing air ducts must be insulated with
at least 100 mm insulation. If the insulation alternative A is
used, we recommend the insulating be done with 2 times
50 mm plate covers with paper or aluminium foil on the
outside and overlaying joints between the 2 insulation
layers. If the ducts are laid out on the roof rafters, then
alternative B can be used. The insulation must always be
packed tightly around the pipes.
Outside air and exhaust air ducts in cold rooms:
Outside air and exhaust air ducts must be insulated with
PE30-insulation. The outside air ducts can be insulated
with even thicker insulation to avoid warm air in the attic
from heating the incoming air during the summer.
Make sure that the closures are tight where the exhaust
air duct comes through the roof or through the gable so
that damage from condensation is avoided.
Duct system
We recommend that the duct system be made of
spiralflanged pipes and couplings made with rubber
ring seals to assure a sealed, durable duct system.
To assure a satisfactory low aggregate noise level, always
mount an exhaust silencer on the ingoing and outgoing
duct system between the aggregate and the first ingoing
and outgoing units.
We recommend dimensioning the air speeds in the ducts
sufficiently low so that no noise occurs from the ingoing
and outgoing air units.
When placing the outgoing air and exhaust hood/grid
make sure that the two air flows are not short-circuited
thereby avoiding the outgoing air being sucked in again.
We recommend placing a grid on the north or east side of
the house for optimal comfort in the residences/flats.
Minimum distance: 3 metres between the outside air intake
and exhaust air.
Insulation of ducts alt. A
Incorrect insulation of ducts Insulation of ducts, alt. B

8Subject to Technical Modications of GV-HR110
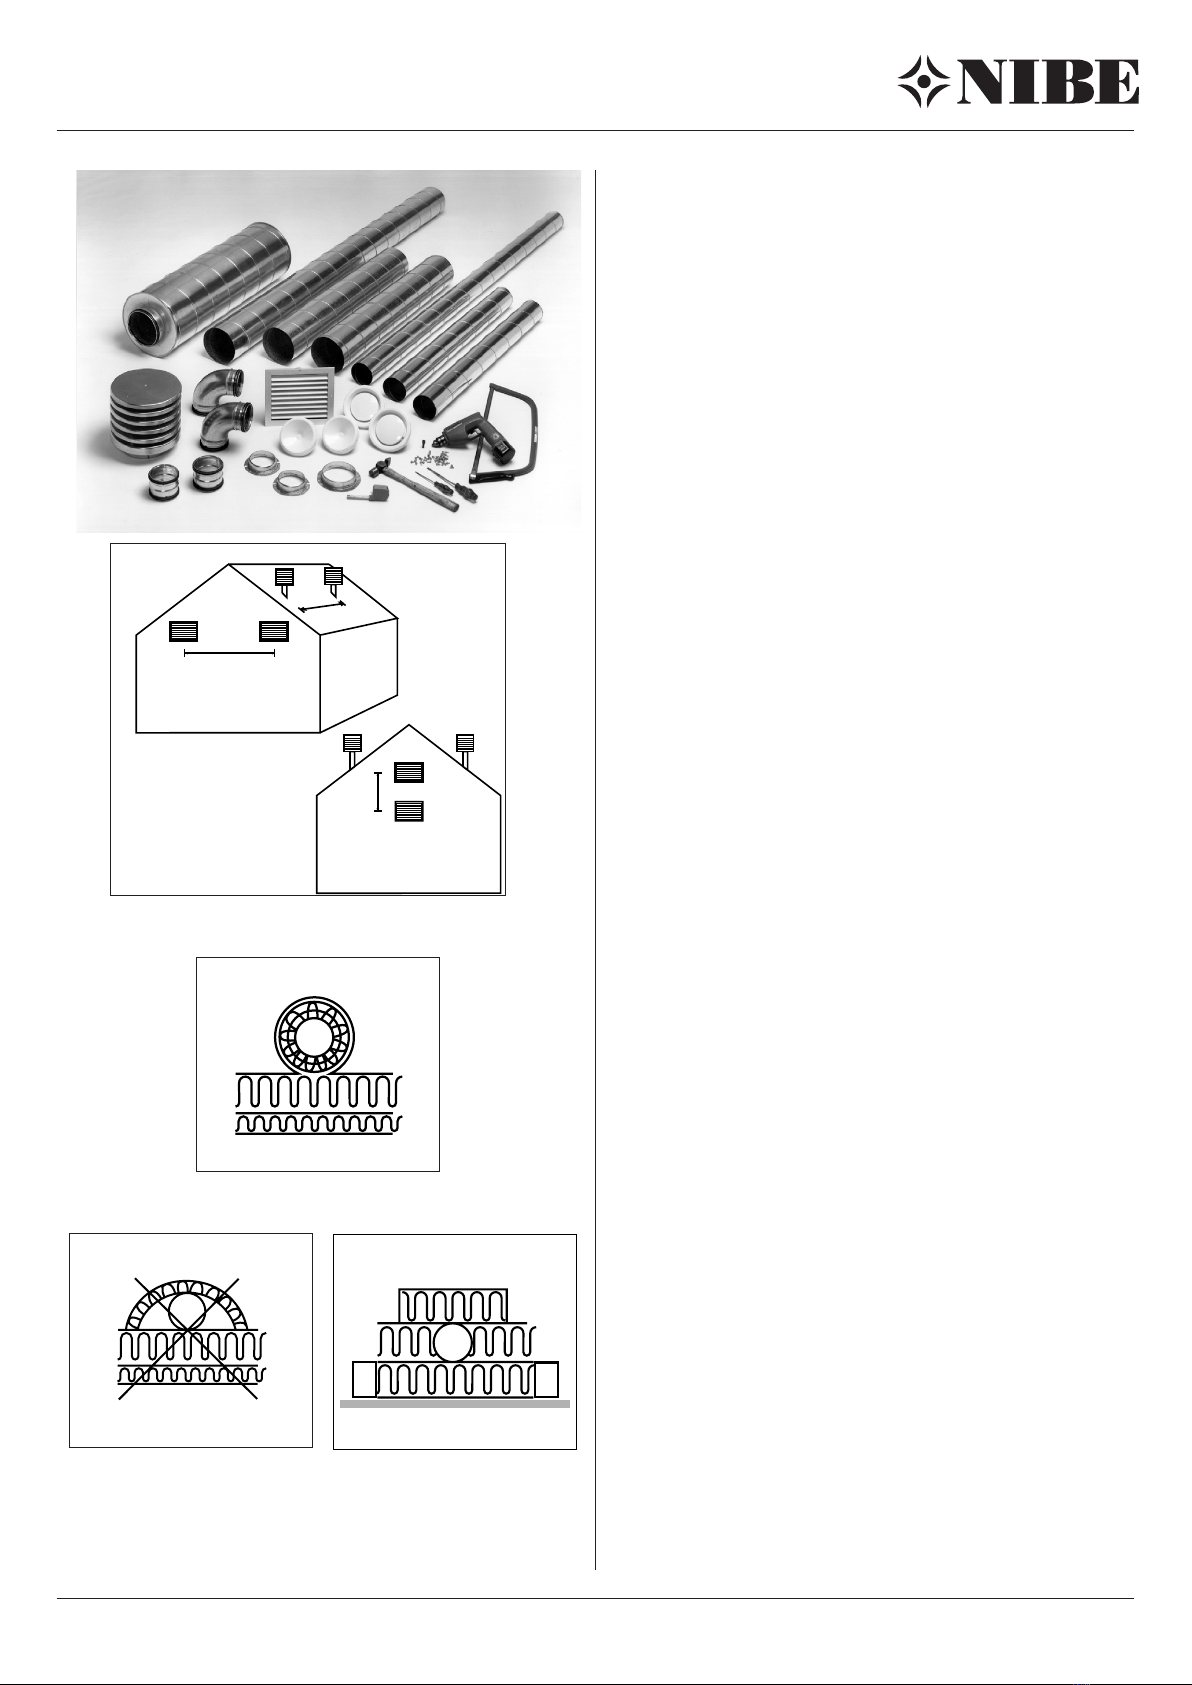
Insulation of ducts in warm rooms
Supply air and extract air ducts:
Supply air and extract air ducts installed in heated rooms
of the residence do not need to be insulated unless
they are used for cooling, bypass or ground source
heat exchanger. In this case, the supply air duct is to be
insulated.
Fresh air and exhaust air ducts:
If the fresh air and exhaust air ducts are installed in a
heated space they must be insulated equivalent to at
least PE30 insulation.
When using ground source heat exchangers we
recommend 100 mm insulation on the fresh air duct.
Preheating of the fresh air
The supplied electric preheater is to be installed on
the fresh air duct and connected to the terminal block
H3. The AHU‘s built-in fresh air sensor (T3) is to be
disconnected from terminal L3, pos. 3 and 4, and
replaced with the supplied fresh air sensor. This fresh air
sensor is to be installed approx. 500 mm in front of the
electric preheater to avoid the impact of radiant heat.
It is important that the preheater is activated in menu 4.5
User menu and that the setpoint temperature is set in
menu 4.8 Service Menu. Recommended setpoint is -3 °C.
Reheating of the supply air
Since the counterflow heat exchanger cannot recycle
all heat from the exhaust air to the incoming air, the
supply air will be approx. 1-4 °C lower than the room
temperature of the residence during the winter season.
If you want to use the facility for heating, you can mount
a water-based or electric reheater that can heat the
incoming air to room temperature.
Water based reheater:
To protect the water based reheater from frost damages,
it must be equipped with a frost sensor and it must be
insulated. The frost sensor is mounted behind the plates
of the water-based reheater. The sensor that controls the
motor valve is mounted in the supply air duct approx. 500
mm behind the water-based reheater so that it will not
be affected by the radiant heat from the heating element.
The water connection to the water based reheater must
be performed by an authorised sanitary and heating
installer.
Electric reheater:
The control sensor for the electric reheater is mounted
in the supply air duct approx. 500 mm behind the electric
reheater so that it will not be affected by the radiant heat
from the heating element.

9
Subject to Technical Modications of GV-HR110
Electric installations
The electric installations must be performed by an
authorised electrician. See the electric wiring diagram
included. The cable between the aggregate and control
panel is a 4-lead cable, max. 50m.
Control and settings of the facility
For optimal operation of the facility it must be set using
technical ventilation measurement instruments.
To use the facility before installing, do the following:
Before using the facility:
1: Check that the NIBE-aggregate is correctly mounted
and that all the ducts are insulated according to
instructions.
2: Check that the lid can be opened so that service and
maintenance of the aggregate can be performed.
3: Check that the filter is clean
(may be dirty after assembly)
4: Check that the condensation drain is correctly
mounted with a waterseal and that it is protected
from frost. Pour 1 litre of water into the condensation
container and check that it flows unimpeded through
the condensation drain pipe.
5: Set all incoming air units so that the unit
closest to the aggregate will open 3 turns from the
locked position while the outermost will open 8 turns
from the locked position. The unit in-between will
open between 4-7 turns, depending on how close to
the aggregate they are.
6: If a postheater is assembled (not sold by NIBE) on the
facility set the incoming air temperature to 0-3 °C
below the room temperature of the residence.
The facility can now be used and run until the facility
is adjusted using technical ventilation measurement
instruments.
Optimal adjustment of the facility
Calibrated technical ventilation equipment must be used
to adjust a NIBE-ventilation facility for residences.
Before adjusting, check that the 6 items in the section
on control and settings have been performed. The
facility can then be used.

10 Subject to Technical Modications of GV-HR110
Facility maintenance
Remember to switch off the power
supply before opening the aggregate.
Filter:
When the red light ashes on the control panel
the lter must be changed/cleaned.
The facility is turned off with the facility switch or with
the switch by the fuse cabinet. It is not necessary to
remove the lid to exchange the lter. The lter unit can
only be opened by turning both knobs one quarter turn
counter-clockwise (to the left). The lter unit is pushed
into place by reversing the procedure; both knobs must
be turned one quarter turn clockwise (to the right).
When the lter has been exchanged or cleaned by
shaking them to remove most of the dirt, the lter timer
is set by pressing ”Enter” for 10 to 15 seconds until the
NIBE-logotype ashes once again and the facility is
back to normal operation.
If you want to clean the lter at another time interval, this
can be adjusted in item 14 of the Operations menu,
The incoming air lter (F7) on the left side is higher up
than the outgoing lter (G4).
Do not use a vacuum cleaner or air pressure
on the lter as this deteriorates the ltration
effect.
G4 = Standard lter (Coarse lter class
G4) F7 = Pollen lter (Fine lter class F7)
Closed filter unit
Open filter unit

11
Subject to Technical Modications of GV-HR110
Condensation drain:
When it is time to exchange the filter in the fall, check the
condensation drain for fouling by dirt and make sure there
is water in the waterseal. The waterseal must not dry out
since the negative pressure of the aggregate will suck air
into the aggregate causing the condensation to remain in
the aggregate. Pour 1 litre of water into the condensation
container and check that the flow is undeterred. If the
condensation drain does not work correctly water damages
may occur in the residence.
Counter-flow heat exchanger
The counter-flow heat exchanger must be overseen
every year. Remove it if it is dirty and vacuum it without
touching the plates. Open the front of the condensation
container before removing the counter-flow heat
exchanger. This is done by opening the spring latch on
the right corner of the condensation container. Push
lightly from behind when removing the counter-flow heat
exchanger.
Do not damage the plates. The effect will no
longer be optimal if the plates are damaged.
Fans:
Remember to switch of the power supply!!
Check the fans in the fan wheel for dirt every third year.
The four outermost screws that hold the fans in place
must be removed in order to remove the fans. Remove
the front lid of the unit. Clean the fans using a brush, fan
brush or paintbrush.
The filter units must be removed
before disassembling the front lid.
Incoming and outgoing units:
The ventilation unit must be cleaned regularly with a small
brush in order to maintain correct ventilation. Do not
change the setting. N.B. Do not mix the units up when
many are cleaned at the same time.
12: Kondensvandsaøb
11: Kondensvandsbakke
9. Udsugningslter
7: Udsugningsventilator
6: Indblæsningsventilator
5: Modstrømsvarmeveksler
14: By-pass
13: 230V/50Hz
10: El-kasse
8: Friskluftlter
4: Indblæsning
3: Udsugning
2: Afkast
1: Frisk luft
3
1
4
2
13
265
128.6
550
280135
550
24 32
60.7
1014
42
1056
1088
The four outermost screws that hold the fans in
place must be removed in order to remove the
fans.
12: Kondensvandsaøb
11: Kondensvandsbakke
9. Udsugningslter
7: Udsugningsventilator
6: Indblæsningsventilator
5: Modstrømsvarmeveksler
14: By-pass
13: 230V/50Hz
10: El-kasse
8: Friskluftlter
4: Indblæsning
3: Udsugning
2: Afkast
1: Frisk luft
3
1
4
2
13
265
128.6
550
280135
550
24 32
60.7
1014
42
1056
1088
Condensation drain
Counter-flow
heat exchanger
Spring latch,
condensation container

12 Subject to Technical Modications of GV-HR110
Turn off the facility
No lamps are lit on the service panel, even when you press on
both buttons.
Error:
- A fuse has blown in the fuse box, no power supply to the facility.
- One of the fuses on the circuit board has shorted.
- Loose contact, no voltage to the aggregate.
- Loose contact between the aggregate and control panel.
Red light constantly lit on the control panel:
Error for control:
- Frost thermostat switched off. (Facilities with water heaters.)
- Faulty sensor in aggregate
- Faulty sensor in control panel
- If no sensor is attached for incoming air it has been replaced
by a resistor that is faulty
- Loose sensor wire or loose bridge in coupling list on the circuit
board.
Condensation flowing from the aggregate:
Error:
- Condensation drain fouled with dirt
- No water in the waterseal
- Condensation drain fouled due to frost.
- Drain is not sufficiently protected from frost
No incoming air to the residence:
Error:
- Faulty fan
- Fouled incoming air filter
- Fouled outside air grid
- A fuse has blown on the circuit board
- No power supply to the facility
No exhaust air from the residence:
Error:
- Faulty fan
- Fouled filter
- A fuse has blown on the circuit board
Cold incoming air
Error:
- Counter-flow heat exchanger is fouled with dirt or ice.
- Faulty exhaust fan
- Fouled exhaust air filter
- An electric postheater is disconnected due to overheating
protection (Only facilities with electric postheaters mounted).
- No circulation of hot water to the waterborne postheater.
(Only facilities with mounted waterborne postheaters).
- Fouled circulation pump, air in the hot water pipe, faulty
thermostat/motor valve, faulty setting of control panel.
Display message:
Computer error:
- no connection with circuit board
- lead too long between display and circuit card
Version error:
- Program displayed and circuit card not compatible
Exchange filter:
- Filter must be changed
Stop ON-OFF:
- Filter has not been exchanged/cleaned within 14 days
from the filter alarm being triggered.
The facility is turned off.
Troubleshooting

13
Electric wiring diagram GV-HR110
08-04-2014
L1 =Humidistat
L2 =Display
L3 =Sensors T1,T3,T4,T7
L4 =Humidity sensor P1
L6 =Sensors T8, T9
L8 =External stop
L11=0-10V Water valve and
0-10V Belimo bypass
L17=0-10V extract air fan and
0-10V supply air fan
Q=Fuse
H1 =Mains connection 230 VAC
H2 = (R2) Electric Reheater 230VAC
H3 = (R3) Electric Preheater 230VAC
H2,H3 =Max. load total 1800W COSФ1
H6 = (R10) Water valve, Belimo Bypass 230VAC
H7 = (R10) Fan, extract air 230VAC
H8 = (R12) ON/OFF Bypass 2x230VAC
H9 = (R10) Fan, supply air 230VAC/bypass
H16= (R8) AUX relay 230VAC max. 20W
H17= (R9) AUX relay 230VAC max. 20W
1
1
1
1
11
1
1
1
1
1
1
1
1
1
1
1
2
2
2
2
22
2
2
2
2
2
2
2
2
2
2
2
3
3
3
3
3
3
34
4
4
4
4
4
5
56
6
7
78
8
L1 L2
L3
L6
L8
L11
H2 H3
H7H6
H8 H9
H17H16
ES960C
PEPE
L17
AB
Q1=1.6A
Q2=2.5A
H1
L4
Q3=0.5A
Q4=0.5A
Q1= H8,H16,H17
Q2= H6,H7,H9
Q3= L1-L17
Q4= L1-L17
1
1
1
1
11
1
1
1
1
1
1
1
1
1
1
1
2
2
2
2
22
2
2
2
2
2
2
2
2
2
2
2
3
3
3
3
3
3
34
4
4
4
4
4
5
56
6
7
78
8
Subject to Technical Modications of GV-HR110

14
Electric wiring diagram GV-HR110
-
-
+
+
M1
M2
N
N
N
L
L
0-10V
0-10V
0-10V
0-10V
L
L
L
L
N
N
N
N
N
L
+5V
0V
Signal
08-04-2014
0V
+10V
-
-
+
+
Mains connection
1x230VAC, L-N-PE
Max: 13A
H2 and H3 Max.
load total
1800W
Aux. relay R9
1x230V 50Hz
ONLY control current
Genvex
Humidistat Potential-free
contact
must be used
Sensor Frost
Sensor, extract air
Sensor, exhaust air
Sensor, fresh air
Sensor, supply air
Sensor Option
External stop
EC fan
Extract air
Blue
Yellow
EC fan
Supply air
Blue
Yellow
Water valve
EC fan
Extract air
ON/OFF
Bypass
Brown
Brown
Blue
Blue
Yellow/green
Yellow/green
Water valve
Belimo
Bypass
Humidity sensor White
Red
Blue
EC fan
Supply air
Aux. relay R8
1x230V 50Hz
ONLY control current
Red - Brown
Blue - Green
Yellow - White
Belimo
Bypass
Electric Reheater
Electric Preheater
Black
Black
White
White
123
Hy≥Set
123
12 12
H1
12 12
H2
12 12
H3
12 12
H6
12 12
H7
123 123
H8
12 12
H9
12 12
H16
12 12
H17
L
12 12
L1
1234 1234
L2
12345678 12345678
L3
1234 1234
L4
12345678 12345678
L6
12 12
L8
1234 1234
L11
1234 1234
L17
M1
M1
M2
M2
M3
M3
M5
N
P1
PE
PE
PE
T1
T3
T4
T7
T8
T9
21
22
23
24
21
22
23
24
OPTIMA DESIGN
M4
M4
Subject to Technical Modications of GV-HR110

EF - Försäkran om Överenstemmelse
EC - Declaration of Conformity
EG - Konformitätserklärung
Intygar härmed att följande produkt / hereby certifies that the following product / bestätigt, da das nachfol-
gend bezeichnete Gerät:
B. Beteckning :
Type :
Typ: :
C. Huvednr :
S/N :
Nibe TM GV-HR110-250
Nibe TM GV-HR110-250H
Nibe TM GV-HR110-400
Nibe TM GV-HR110-400H
066033, 066039, 066046, 066047, 912001, 912002
Under forutsättning att Nibe Energy Systems monteringsanvisningar har följts / on the assumption that the
mounting instructions from Nibe energy Systems have been followed / bei Voraussetzung dass die Montagean-
weisungen von Nibe Energy Systems gefolgt wurden
Har tillverkats i överensstämmelse med / is made according to /
über Einstimmung von nachfolgend bezeichnete EG-Sicherheitsstandards hergestellt:
Directive:
a) Machinery 2006/42/EC 15. March 2006
b) Low Voltage 2006/95/EU 12. December 2006
c) Electromagnetic Compatibility 2004/108/EC 15. December 2004
d) Radio/Telecommunication 99/5/EC 9. March 1999
e) RoHS 2011/65/EU 8. June 2011
Departmental Order.
a) No. 797 17. August 2009
b) LBK nr. 823 af 3. July 2007
c) No. 743 af 23. September 1999
d) AT No. 612 af 25. June 2008.
DS/EN
a) 60335-1-A13-A14 General requirements
b) 60335-2-40 Particular requirements for electrical heat pumps, air-conditioners and dehumidifiers
c) 55014-1 Electromagnetic compatibility Part 1: Emission
d) 55014-2 Electromagnetic compatibility Part 2: Immunity
Företag:
Company:
Firma:
Ort och datum:
Place and date:
Ort und Datum:
Underskrift:
Signature:
Unterschrift:
Nibe Energy Systems
Hannabadsvägen 5
SE-28521 Markaryd
Markaryd,
22. November 2013
Peter Jocic Kenneth Magnusson
(PM Director) (Quality Manager)
15
CE-Manufacturing Assurance GV-HR110
Subject to Technical Modications of GV-HR110

PL
NL
FI
DK
DE
CZ
NIBE Energy Systems OY, Juurakkotie 3, 01510 Vantaa
3C Broom Business Park, Bridge Way, Chesterfield S41 9QG
FR AIT France, 10 rue des Moines, 67500 Haguenau
NIBE-BIAWAR Sp. z o. o. Aleja Jana Pawła II 57, 15-703 BIAŁYSTOK
Tel: 085 662 84 90 Fax: 085 662 84 14 E-mail: sekretariat@biawar.com.pl www.biawar.com.pl
RU © "EVAN" 17, per. Boynovskiy, Nizhny Novgorod
NIBE Energietechniek B.V., Postbus 634, NL 4900 AP Oosterhout
Vølund Varmeteknik A/S, Member of the Nibe Group, Brogårdsvej 7, 6920 Videbæk
NIBE Systemtechnik GmbH, Am Reiherpfahl 3, 29223 Celle
CH NIBE Wärmetechnik AG, Winterthurerstrasse 710, CH-8247 Flurlingen
AT KNV Energietechnik GmbH, Gahberggasse 11, 4861 Schörfling
NIBE AB Sweden, Box 14, Hannabadsvägen 5, SE-285 21 Markaryd
GB NIBE Energy Systems Ltd,
NO ABK AS , Brobekkveien 80, 0582 Oslo, Postadresse: Postboks 64 Vollebekk, 0516 Oslo
Druzstevni zavody Drazice s.r.o, Drazice 69, CZ - 294 71 Benatky nad Jizerou
Table of contents
Other Nibe Heating System manuals
Popular Heating System manuals by other brands

Armcor
Armcor REM900 Installation and operation manual

Daikin
Daikin ALTHERMA Installer's reference guide

Vortice
Vortice VORT NRG 500 ECR Operating and Commissioning Instructions

frenzelit
frenzelit hicoTHERM 60 Installation and operating instructions

Legalett
Legalett 4000W-24 manual

Pentair
Pentair Raychem GM-2CW installation manual

HDG
HDG Compact 99 user manual

Viessmann
Viessmann Vitotronic 200 KW2 operating instructions

Danfoss
Danfoss SET2E Installation & user's instructions

Valeo
Valeo THERMO DC 200 Installation and operation instructions

Vaillant
Vaillant VIHSGB210 operating instructions

UTEK
UTEK FLAT GUIDE FOR INSTALLATION, USE AND MAINTENANCE