NIEUWKOOP GT1050 User manual

USER MANUAL
GT1050 –GT1060
CO2/TEMP/RH-METER

CGT1050 –GT1060
CO2/TEMP/RH METER
_____________________________________________________________________________________________
INTRODUCTION
Thank you for purchasing this portable CO2meter. The meter measures CO2 level, air temp.,
dew point, wet bulb temp. and humidity(DP, WB, RH are for model GT1060-RH) and is an ideal
instrument for indoor air quality (IAQ) diagnosis.
Poor indoor air quality is considered unhealthy because it causes tiredness, loss of ability to
concentrate, and even illness(ex. Sick Building Syndrome). IAQ monitoring and survey,
especially on CO2 level and air ventilation become widely applied in public areas such as
offices, classrooms, factories, hospitals and hotels. It is also suggested in regulations of
industrial hygiene in some countries. (Appendix).
The portable CO2 meter uses NDIR (non-dispersive infrared) technology to ensure the
reliability and long term stability. It’s useful in verifying HVAC system performance and air
ventilation control.
Features:
•Triple displays of CO2level, temp. and humidity (GT1060 RH).
•Stable NDIR sensor for CO2detection
•Statistics of weighted averages
TWA (8 hours weighted average)
STEL (15 minutes weighted average)
•Backlight for working in dark area
•Audile CO2warning alarm
•Battery and adaptor power supply
•Easy manual calibration on CO2 and humidity (RH for GT1060 RH only)
MATERIAL SUPPLIED
✓Instrument
✓4pcs AA batteries
✓Operation manual
✓Hard carrying case
POWER SUPPLY
The meter is powered by either 4 AA batteries or a DC adaptor(9V/1A output).
Install the batteries into the battery compartment on the rear and make sure they are in
correct polarity and good contact. When an adaptor is used, it will cut off the power supply
from batteries. The adaptor can’t be used as a battery charger.
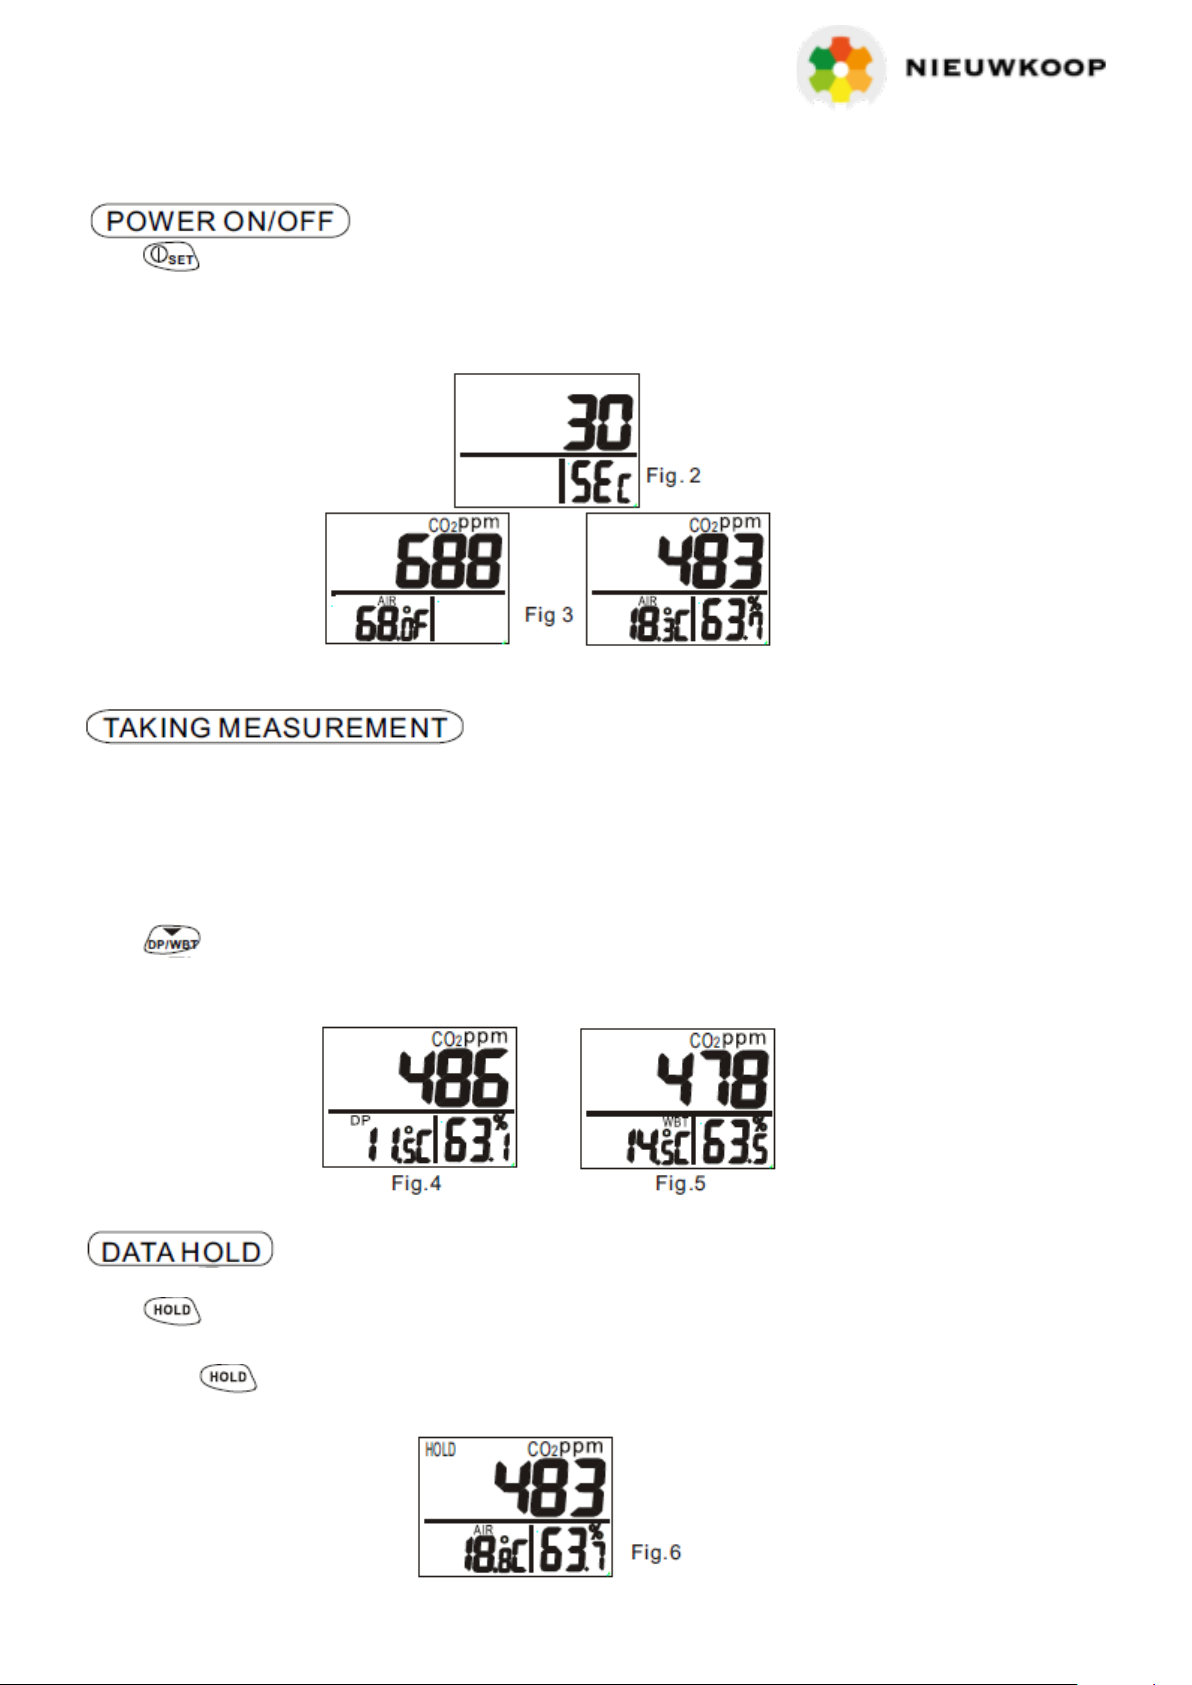
When battery voltage gets low, and “Lob” will appear on the LCD (Fig.1). And beeper sounds.
The CO2sensor can’t work under low voltage, so it beeps to indicate failed CO2measurement
(press any key but to stop the beeps) and the readings won’t be displayed. Please
replace with fresh batteries or connect with an adaptor.
GT1050 GT1060

CGT1050 –GT1060
CO2/TEMP/RH METER
_____________________________________________________________________________________________
LCD DISPLAY
Symbols:
TWA Time weighted average( 8 hours)
STEL Short-term exposure limit (15 minutes weighted average)
HOLD Readings are freezed unchanged
MIN/MAX Minimum/Maximum readings
Low battery indicator
DP Dew point temperature(GT1060 RH)
AIR Air temperature
WBT Wet bulb temperature(GT1060 RH)
% Unit of relative humidity
oE (C/F) Celsius/Fahrenheit
KEYPAD
Turns on and off the meter. Enters setup mode. Sets as non-sleep mode with
Exits setup page/mode.
Enters CO2 calibration with
Enters RH calibration with
Freezes the current readings. Cancels data hold function.
Activates or cancels the backlight. Selects unit or increases value in setup.
Selects AIR, DP, WBT temps display. (GT1060 RH only)
Selects unit or decreases value in setup.
Activates MIN,MAX,STEL,TWA function. Saves and finishes settings.

CGT1050 –GT1060
CO2/TEMP/RH METER
_____________________________________________________________________________________________
OPERATION
Press to turn the instrument on and off. At power up, it emits a short beep and performs
30 seconds countdown (Fig.2) for instrument warm up, then enters normal mode with current
CO2, temperatures, and humidity(GT1060 RH) readings displayed (Fig.3).
Model GT1050 Model GT1060 RH
The meter starts measurement when power on and update readings every second. In the
condition of operating environment change (ex. from high to low temp.), it takes 30 sec to
respond for CO2sensor and 30 minutes for RH.
NOTE: Do not hold the meter close to faces in case exhalation affects CO2levels.
AIR (all models), DP, WBT (GT1060 RH)
Press to switch temperatures display. The lower left display will cycle from air
temperature, dew point. (Fig.4), and wet bulb temp. (Fig.5)
Press to freeze the readings, "HOLD” icon is displayed on the left top of LCD (Fig.6). All
current readings are kept unchanged, except STEL and
TWA. Press again to cancel the hold function.

CGT1050 –GT1060
CO2/TEMP/RH METER
_____________________________________________________________________________________________
Hold down for more than 1 second to activate and cancel backlight function.
Under normal mode press to see the minimum, maximum, and weighted average
readings. Each press of it displays MIN, MAX, STEL, TWA in sequence and returns to
normal mode.
In MIN and MAX modes, it shows the minimum and maximum readings of CO2on main display
and of AIR or Dp or WB temperatures and humidity (GT1060 RH) on the lower displays. (Fig. 7)
In STEL and TWA modes, the main display shows the weighted average of CO2readings for the
past 15 minutes (STEL) and 8 hours(TWA). The lower displays are the current AIR, DP/WB
temperatures and humidity (GT1060 RH). (Fig.8)
NOTE:
1. If the meter is turned on for shorter than 15 minutes, the STEL value will be the weighted
average of readings taken since power on. Same for TWA values appear before 8
hours.
2. It takes at least 5 minutes to calculate STEL and TWA. The display shows “----” (Fig.9)
during the first 5 minutes from power on.
3. While all readings are held unchanged, STEL and TWA will keep updating every 5
minutes.

CGT1050 –GT1060
CO2/TEMP/RH METER
_____________________________________________________________________________________________
The meter features audible alarm to give warnings when CO2concentration exceeds the limit.
(See P1.0 in setup for setting alarm threshold). It emits beeps(Abt.80dB)when CO2level goes
over the set value and stops when any key (but ) was pressed or readings fall below the
set value. It beeps again when value goes over the limit. Restart the meter if beeper can't be
stopped.
AUTO POWER OFF
The meter turns off automatically after 20 minutes of inactivity. To override the function, hold
down and for 2 seconds to turn on the meter until “n” appears.
NOTE: Auto sleep function will be disabled during calibration mode.
SETUP
Hold down under normal mode for more than 1 sec to enter setup mode. To exit setup,
press in P1.0 or P3.0 and it returns to normal mode.
Note: P2.0 is not applicable in these models but for future model with
CO and CO2measurement.
When entering setup mode, P1.0 and “AL” (Fig.10) are displayed on the LCD.
Press to go into P1.1 for setting CO2alarm threshold. The current set value will be blinking
on LCD (Fig11).
Press to increase the value or to decrease. Each press tunes
100 ppm and the alarm range is from100 to 9900ppm. When the preferred alarm value is set,
press to save the setting or without saving and return to P1.0.
Press or in P1.0to access P3.0for setting up temperature scale (Fig.12).
Press and it goes into P3.1 with blinking oC or oF current set (Fig.13) on the lower left
display. To switch oC or oF, press and . Then press to save the setting or with

CGT1050 –GT1060
CO2/TEMP/RH METER
_____________________________________________________________________________________________
CO2CALIBRATION
The meter defaults to be calibrated manually in the ambient air where CO2
concentration is around 400ppm.
CAUTION:
Do not calibrate the meter in the air with unknown CO2concentration. Otherwise, it will be
calibrated as 400ppm by default and leads to inaccurate measurements.
It is suggested to calibrate the CO2sensor in fresh outdoor air that is well ventilated and better
in sunny weather. Do not calibrate the meter in places crowded with people or close to where
with high CO2concentration such as ventilating outlets or fireplaces.
Place the meter in the calibration site. Turn on the meter and hold down and simultaneously
to enter CO2calibration mode (Fig.14). 400ppm and “CAL” are blinking on the LCD while
performing calibration.
Wait about 10 minutes until the blinking stops and the calibration is completed automatically
and back to normal mode. To abort the calibration, turn off the meter at any time.
NOTE:
Ensure the batteries are with full voltage during the calibration to prevent from interruption or
failed calibration.
RH CALIBRATION (GT1060 RH)
The meter defaults to be calibrated the humidity with 33% and 75% salt solution. The ambient
condition is recommended to be at 25 C and stable humidity (better to be close to the
calibrating value). To abort calibration, just turn off the meter.
CAUTION:
Do not calibrate the humidity without the default calibration salt. Otherwise, it will cause
permanent damage. Contact the dealer for calibration salt or services.

CGT1050 –GT1060
CO2/TEMP/RH METER
_____________________________________________________________________________________________
Plug the sensor probe into 33% salt
bottle. Hold down and under normal mode to enter 33% calibration (Fig.15).
“CAL” and calibrating value (32.7% if at 25 C) are blinking on the LCD with current temperature
at the left.
Instrument is now calibrating, and will finish in about 60 minutes when “CAL” and humidity
stop blinking. (Fig.16)
After 33% calibration, plug the sensor probe into 75% salt bottle, then press to enter 75%
calibration (Fig.17).
“CAL” and calibrating value (75.2% if at 25 °C) are blinking on the LCD with current temperature
at the left. Instrument is now calibrating. Wait about 60 minutes until blinking stops, then
calibration is completed and it returns to normal mode.
NOTE:
Users can also calibrate either point. To calibrate 33% only, press and exit when 33%
calibration is completed.
To calibrate 75% only, press or within the 5 minutes while initializing 33%
calibration.

CGT1050 –GT1060
CO2/TEMP/RH METER
_____________________________________________________________________________________________
TROUBLESHOOTING
Cannot power on
Press for more than 0.3 seconds and try again. Check whether batteries are in good
contact and correct polarity, or the adaptor is well plugged.
Fixed readings
Check whether data hold function was activated. (HOLD icon at the left top)
Slow response
Check whether the air flow channels on the rear were blocked.
Error messages
E01: CO2sensor damaged.
E02: The value is under range.
E03: The value is over range.
E04: The original data error results in this error (DP, WB)
E07: Too low voltage to measure CO2. Replace batteries or use an adaptor.
E11: Retry humidity calibration.
E17: Retry CO2calibration.
E31: Temperature sensor damaged.
E34: Humidity sensor damaged.
PC CONNECTION
The meter can do PC link for on-line logging and data analysis via RS232 interface and
software.
The protocol is as follows.
A. 9600 bps, 8 data bits, no parity.
B. B.Format (ASCII)
Model GT1050
Cxxxxppm:Txxx.xC(F) LRC CRLF Description: $CO2:Air LRC CRLF
Model GT1060
Cxxxxppm:Txxx.xC(F):Hxx.x%: dxxx.xC(F):wxxx.xC(F) LRC CRLF
Description: $CO2:Air:RH:DP:WBT LRC
CRLF

CGT1050 –GT1060
CO2/TEMP/RH METER
_____________________________________________________________________________________________
SPECIFICATION
Model GT1050 Model GT1060

CGT1050 –GT1060
CO2/TEMP/RH METER
_____________________________________________________________________________________________
CO2 LEVELS AND GUIDELINES
The following are excerpts from ANSI/ASHRAE addendum standard 62.1-2004:
Enforceable and/or regulatory levels:
OSHA -5000ppm
The Occupational Safety and Health Administration
MAK -5000ppm or 10000ppm(1h) German institution
Non-Enforced Guidelines and Reference levels: Canadian - 3500ppm (Long-term)
NIOSH-5000ppm or 30000ppm(15 min) The U.S. National Institutes of Health
ACGIH-5000ppm or 30000ppm(15min) The American Conference of Govern¬mental Industrial
Hygienists (ACGIH)
NOTES :
TWA(Time Weighted Average) value stands for the average carbon dioxide level exposure
during 8 hours(working day) is 5000ppm/5 days.
STEL(Short-Term Exposure Limit) value shows the last 15 minutes CO2concentration is
30,000ppm.
ASHARE Standard 62–1989,Sec.6.1.3 :Comfort (odor) criteria are likely to be satisfied if the
ventilation rate is set so that 1,000 ppm of CO2is not exceeded.
WARRANTY
The instrument is warranted to be free from defects in material and workmanship for a period
of one year from the date of purchase. This warranty covers normal operation and does not
cover misuse, abuse, alteration, neglect, improper maintenance, or damage resulting from
leaking batteries. Proof of purchase is required for warranty repairs. Warranty is void if the
instrument has been opened.
RETURN AUTHORIZATION
Authorization must be obtained from the supplier before returning items for any reason. When
requiring a RA (Return Authorization), please include data regarding the defective reason, the
meters are to be returned along with good packing to prevent any damage in delivery and
insured against possible damage or loss.
Nieuwkoop BV
Aalsmeerderweg 249-s
1432 CM Aalsmeer-Holland
Tel. +31 297 325836
E-mail: info@nieuwkoopbv.nl
Website: www.nieuwkoopbv.nl

This manual suits for next models
1
Table of contents
Other NIEUWKOOP Measuring Instrument manuals

NIEUWKOOP
NIEUWKOOP TP1200 User manual

NIEUWKOOP
NIEUWKOOP EC1210 User manual

NIEUWKOOP
NIEUWKOOP LX1100 User manual

NIEUWKOOP
NIEUWKOOP EC-95 User manual

NIEUWKOOP
NIEUWKOOP LX1010 User manual

NIEUWKOOP
NIEUWKOOP PH-95 User manual

NIEUWKOOP
NIEUWKOOP RE1500 User manual

NIEUWKOOP
NIEUWKOOP RV2050 User manual

NIEUWKOOP
NIEUWKOOP CB1000 Installation guide

NIEUWKOOP
NIEUWKOOP CB1000 User manual