©1993 Nikon Corporation
English
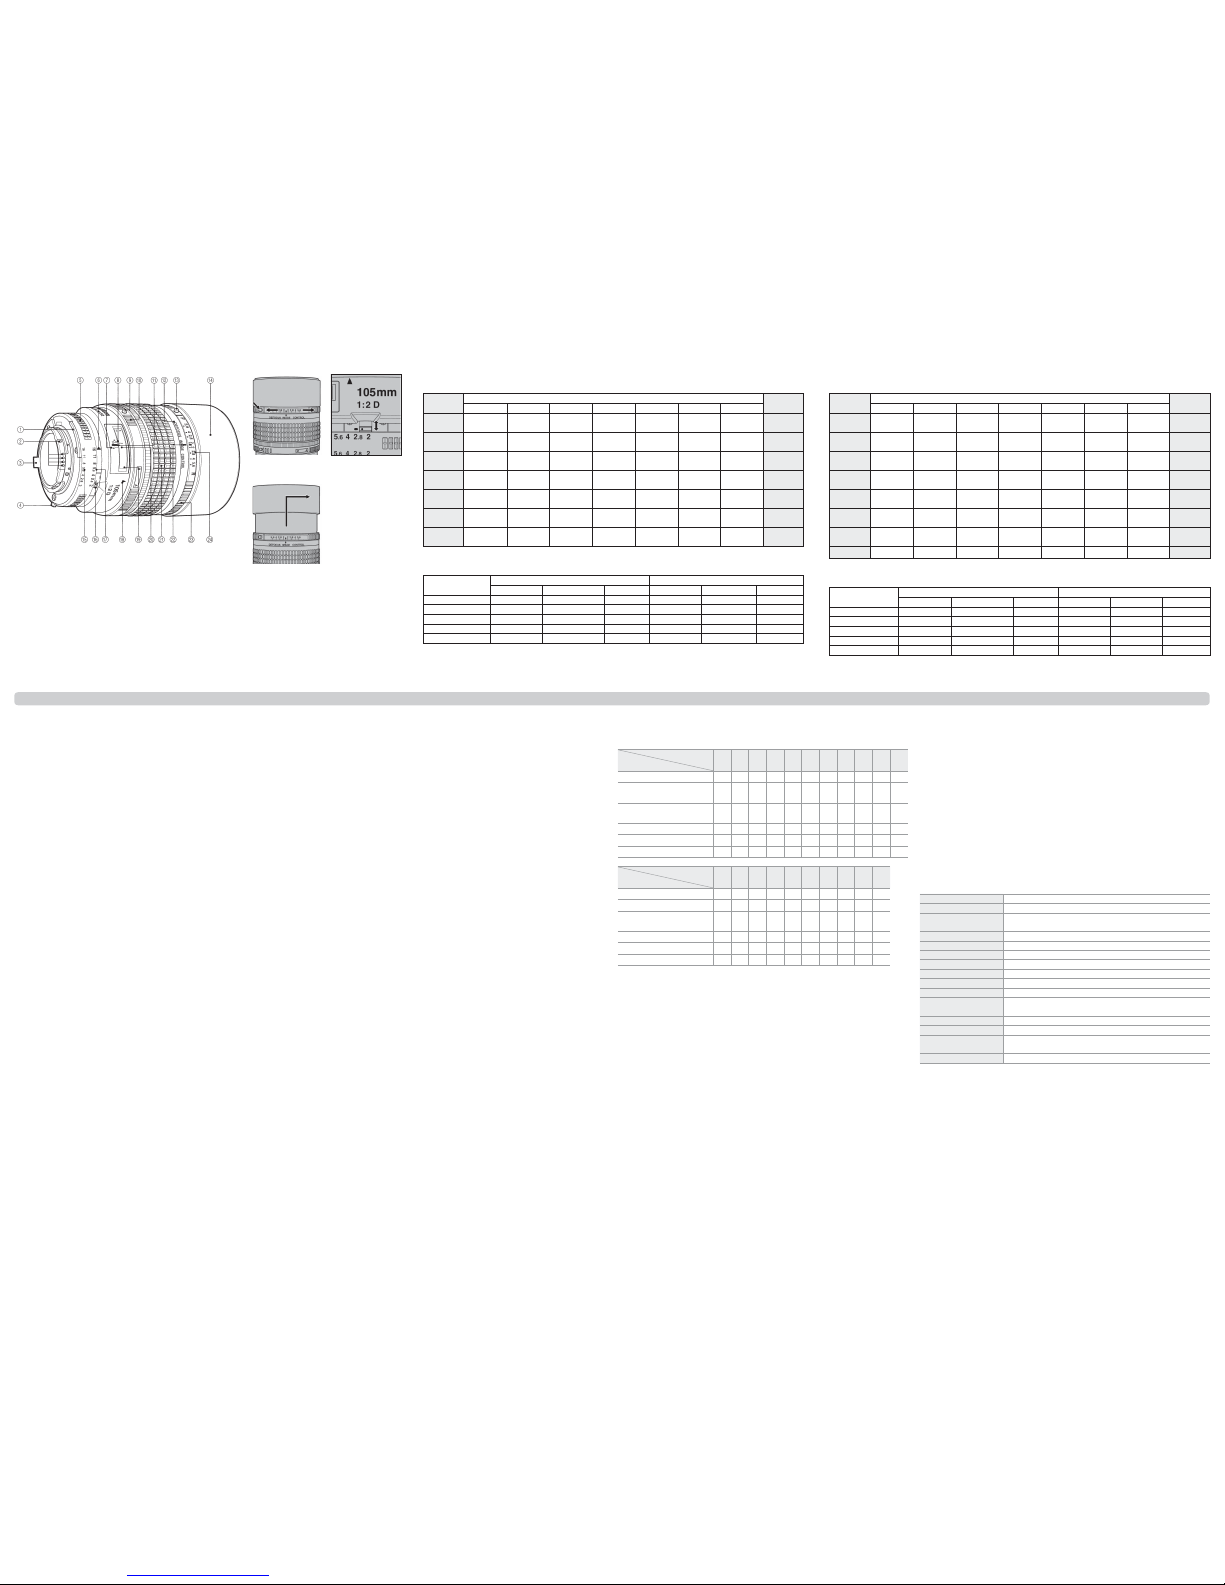
Figure A Figure B
Figure C
Depth of Field (Metric)
(m)
0.9 0.90 – 0.90 0.91 – 0.90 0.91 – 0.90 0.91 – 0.89 0.92 – 0.89 0.92 – 0.88 0.93 – 0.87
1.2 1.21 – 1.19 1.21 – 1.19 1.21 – 1.19 1.22 – 1.18 1.23 – 1.17 1.24 – 1.16 1.26 – 1.15
1.5 1.51 – 1.49 1.52 – 1.48 1.52 – 1.48 1.53 – 1.47 1.55 – 1.45 1.57 – 1.44 1.60 – 1.41
2.0 2.02 – 1.98 2.03 – 1.97 2.04 – 1.96 2.06 – 1.94 2.09 – 1.92 2.13 – 1.88 2.19 – 1.84
3.0 3.05 – 2.95 3.07 – 2.93 3.11 – 2.90 3.15 – 2.86 3.22 – 2.81 3.32 – 2.74 3.48 – 2.64
5.0 5.15 – 4.86 5.22 – 4.80 5.31 – 4.73 5.45 – 4.62 5.66 – 4.48 5.99 – 4.30 6.54 – 4.06
∞165 – ∞ 117 – ∞ 83 – ∞ 59 – ∞ 41 – ∞ 29 – ∞ 21 – ∞
Close – up Photography (Metric)
Close – up Photography (Metric)
(cm)
Close-up photography (lens reversed)
Close-up photography (lens reversed)
21/13.1 – 1/1.5 31.5 × 47.2 – 3.6 × 5.5 154 – 37.4 –––
Ring PN 1/2.0 – 1/1.4 4.8 × 7.2 – 3.5 × 5.2 42.0 – 37.1 –––
Bellows PB-4, PB-5 1/2.4 – 1/8 5.9 × 8.8 – 1.4 × 2.0 45.7 – 40.2 –––
Bellows PB-6 1/2.2– 2.0 5.2 × 7.9 – 1.2 × 1.8 43.5 – 41.9 –––
Extension Bellows PB-6E 1/2.2 – 4.2 5.2 × 7.9 – 0.57 × 0.86 43.5 – 62.1 –––
1.Can not be used when lens is reversed.
2.First figure is for PK-11A when used alone, remaining figures for rings PK-11A through PK-13, PK-11 through PK-13, or PK-1 through PK-3
used together. Note the PK-11 and PK-1 can not be attached directly to the lens.
Thank you for purchasing a Nikon product. This AF DC-Nikkor 105mm f/2D lens combines Nikon
defocus image control (DC) with a rounded diaphragm, allowing you to defocus objects in the
foreground or background while making the out-of-focus elements appear more natural. It also
features a rear focusing (RF) system to improve durability and autofocus response; the rear lens
elements slide inside the barrel so that the overall length of the lens does not change during
focusing. A built-in lens hood minimizes are in bright sunlight.The lens also supplies distance in-
formation to the camera body for instantaneous 3D matrix metering or 3D multi-sensor balanced
ll-ash ash control. Before using this product, please carefully read both these instructions and
the camera manual so you get the maximum value from your lens now and for years to come.
CAUTIONS
• Do not disassemble. Touching the internal parts of the camera or lens could result in injury. In the event of
malfunction, the product should be repaired only by a qualified technician. Should the product break
open as the result of a fall or other accident, remove the camera battery and/or disconnect the AC adapter
and then take the product to a Nikon-authorized service center for inspection.
• Turn the camera o immediately in the event of malfunction. Should you notice smoke or an unusual smell com-
ing from the equipment, immediately unplug the AC adapter and remove the camera battery, taking care
to avoid burns. Continued operation could result in fire or injury. After removing or disconnecting the
power source, take the equipment to a Nikon-authorized service center for inspection.
• Do not use in the presence of ammable gas. Operating electronic equipment in the presence of flammable gas
could result in explosion or fire.
• Do not look at the sun through the lens or the camera viewnder. Viewing the sun or other bright light source
through the lens or viewfinder could cause permanent visual impairment.
• Keep out of reach of children. Particular care should be taken to prevent infants from putting the batteries or
other small parts into their mouths.
• Observe the following precautions when handling the lens and camera:
-Keep the lens and camera dry. Failure to observe this precaution could result in fire or electric shock.
-Do not handle the lens or camera with wet hands. Failure to observe this precaution could result in
electric shock.
-Keep the sun well out of the frame when shooting backlit subjects. Sunlight focused into the camera
when the sun is in or close to the frame could cause a fire.
-If the lens will not be used for an extended period, attach the front and rear lens caps and store the lens
out of direct sunlight. If left in direct sunlight, the lens could focus the sun’s rays onto flammable objects,
causing fire.
Parts of the Lens
qMeter coupling ridge
wCPU contacts
eAperture indexing post
rEE servo coupling post
tAperture ring
yAperture/mounting index
uDepth-of-eld indicators (show depth of eld at f/16)
iInfrared compensation index (white)
oA-M mode ring release button
!0 A-M mode ring
!1 Focus distance mark
!2 Lens barrel
!3 DC ring lock button (unlocks DC ring while pressed)
!4 Built-in lens hood
!5 Aperture-direct-readout scale
!6 Minimum aperture lock lever
!7 Aperture scale
!8 A-M mode index
!9 Focus distance indicator window
@0 Focus distance indicator
@1 Focus ring
@2 DC ring index
@3 DC ring (turn toward“R” to blur background, toward“F”to
blur foreground)
@4 Aperture scale for image blur control
Notices
• Keep the CPU lens contacts clean and be careful not damage the CPU contacts.
• Do not attach the following accessories directly to the lens: PK-1 or PK-11 auto extension rings, K1 or K2
rings, BR-4 auto rings, or BR-2 macro adapter rings (the PK-11A, BR-6, and BR-2A can be used in place of
the PK-11, BR-4, and BR-2, respectively). Failure to observe this precaution will result in damage to the CPU
contacts or other parts of the lens. Other lens accessories may not be compatible with the camera; be sure
to consult the camera manual before use.
• The lens can not be used with the DX-1 viewfinder for Nikon F3AF cameras.
Defocus Image Control: Using the DC Ring (Figure A)
Defocus Image Control: Using the DC Ring (Figure A)
To use defocus image control, keep the DC ring lock release button pressed while rotating the
DC ring. To blur background objects, rotate the ring toward “R” (rear). To blur foreground objects,
rotate the ring toward “F”. Rotating the ring so that the DC ring index aligns with the f-number
currently selected for aperture throws your subject into sharp relief while artfully blurring objects
in the background or foreground; for a soft-focus eect, rotate the ring to a higher number. Always
position the ring before focusing; rotating the DC ring after focusing or while focus is locked will
throw your subject out of focus.
Note that the highest resolution is achieved when the ring index is aligned with the dot between
the two f/2 positions, and that the distance shown by focus distance indicator may dier from the
actual focus distance when the ring is other positions. When defocus image control is in eect,
the focus ring can be rotated past innity and the minimum focus distance may, depending on
the position of the DC ring, be greater than 0.9 m (3 ft.).
The eects of defocus image control vary with shooting conditions, including the distance be-
tween the subject and the background or foreground. If the eects are dicult to discern in the
viewnder, take a test shot and adjust the ring as necessary.
Focus
This lens supports A-M mode selection. To choose the A-M mode, rotate the A-M mode ring while
pressing the A-M mode ring release button. Select Afor autofocus and Mfor manual focus. Choos-
ing an A-M mode that does not match the camera focus mode may damage the camera.
Focusing Screens
The cameras below support a variety of focusing screens for use with dierent lenses or in dier-
ent situations. The following screens are suited for use with this lens (when using B2/B3, E2/E3, or
K2/K3 screens with cameras not listed here, refer respectively to columns B, E, or K):
H1
F6
F5+ DP-30 {
(+0.5)
F5+ DA-30
(+0.5)
{
(+1.0)
F4+ DP-20 {
F4+ DA-20 {
F3
U
F6
F5+ DP-30
F5+ DA-30
(+0.5)
F4+ DP-20
F4+ DA-20
F3 { U{
: Recommended.
{: Vignetting visible in viewfinder (photographs are not affected).
U: Split-screen display does not improve focus accuracy.
( ): Figures in parentheses give the exposure compensation for center-weighted metering. Select
“Other screen” for Custom Setting b6 (“Screen comp.”) when adjusting exposure compensation
for the F6; note that with screens other than B or E,“Other screen”must be selected even when the
value for exposure compensation is 0. Users of the F5 and F4 can adjust exposure compensation
using Custom Setting 18 or the focusing screen exposure compensation dial, respectively; see the
camera manual for details.
Empty cell: Not suited to use with this lens. Note that type M screens can however be used for photomicrog-
raphy and macro photography at magnifications of 1 : 1 or higher.
The Minimum Aperture Lock Lever (Figure B)
The Minimum Aperture Lock Lever (Figure B)
Lock aperture at f/16 when shooting in programmed auto or shutter-priority auto mode.
1Rotate the aperture ring to the minimum aperture setting (f/16).
2Slide the lock lever toward the aperture ring so that the white dot on the lock lever aligns
with the orange dot.
To release the lock, slide the lever in the opposite direction.
Using the Built-in Lens Hood (Figure C)
Using the Built-in Lens Hood (Figure C)
To extend the hood, pull it out and rotate it counterclockwise until it stops. To retract the hood,
turn it clockwise and press it back.
Lens Care
• Use a blower to remove dust and lint from the lens surfaces. To remove smudges and fingerprints, apply
a small amount of ethanol or lens cleaner to a soft, clean cotton cloth or lens-cleaning tissue and clean
from the center outwards using a circular motion, taking care not to leave smears or touch the glass with
your fingers.
• Never use organic solvents such as paint thinner or benzene to clean the lens.
• The lens hood or an NC filter can be used to protect the front lens element.
• Attach the front and rear caps when the lens is not in use.
• Keep the lens dry. Rusting of the internal mechanism can cause irreparable damage.
• If the lens will not be used for an extended period, store it in a cool, dry location to prevent mold and rust.
Do not store in direct sunlight or with naphtha or camphor moth balls.
• Leaving the lens in extremely hot locations could damage or warp parts made from reinforced plastic.
Compatible Accessories
• 72 mm screw-in filters
• Hard Lens Case CL-38
Lens construction • 6 elements in 6 groups
• Protective glass lens covering
Focus distance indicator Graduated in meters and feet from 0.9 m (3 ft.) to infinity (∞)
Distance information Output into camera
Aperture scale f/2 to f/16 on both standard and aperture-direct-readout scales
Minimum aperture lock Provided
Diaphragm Fully automatic
Focusing Nikon Rear Focusing (RF) system
Metering • CPU/AI cameras: Full aperture
• Other cameras: Minimum aperture
Filter-attachment size 72 mm (P =0.75 mm)
Dimensions Approx. 79 mm (maximum diameter) × 111 mm (distance from camera
lens mount flange); overall length is approx. 119 mm
Weight Approx. 620 g (1 lb. 5.9 oz.)
Nikon reserves the right to change the specifications of the hardware described in this manual at any time and
without prior notice.
Depth of Field (Imperial)
Depth of Field (Imperial)
(ft)
3 ft 3 ft ⁄ in. –
2 ft 11 ⁄ in.
3 ft ⁄ in. –
2 ft 11 ⁄ in.
3 ft ⁄ in. –
2 ft 11 ⁄ in.
3 ft ⁄ in. –
2 ft 11 ⁄ in.
3 ft ⁄ in. –
2 ft 11 ⁄ in.
3 ft ⁄ in. –
2 ft 11 ⁄ in.
3 ft 1 ⁄ in. –
2 ft 10 ⁄ in.
4 ft 4 ft ⁄ in. –
3 ft 11 ⁄ in.
4 ft ⁄ in. –
3 ft 11 ⁄ in.
4 ft ⁄ in. –
3 ft 11 ⁄ in.
4 ft ⁄ in. –
3 ft 11 ⁄ in.
4 ft 1 ⁄ in. –
3 ft 10 ⁄ in.
4 ft 1 ⁄ in. –
3 ft 10 ⁄ in.
4 ft 2 ⁄ in. –
3 ft 9 ⁄ in.
5 ft 5 ft ⁄ in. –
4 ft 11 ⁄ in.
5 ft ⁄ in. –
4 ft 11 ⁄ in.
5 ft ⁄ in. –
4 ft 11 in.
5 ft 1 ⁄ in. –
4 ft 10 ⁄ in.
5 ft 1 ⁄ in. –
4 ft 10 ⁄ in.
5 ft 2 ⁄ in. –
4 ft 9 ⁄ in.
5 ft 4 ⁄ in. –
4 ft 8 ⁄ in.
6 ft 6 ft ⁄ in. –
5 ft 11 ⁄ in.
6 ft 1 in. –
5 ft 11 in.
6 ft 1 ⁄ in. –
5 ft 10 ⁄ in.
6 ft 2 ⁄ in. –
5 ft 10 in.
6 ft 2 ⁄ in. –
5 ft 9 ⁄ in.
6 ft 4 ⁄ in. –
5 ft 8 ⁄ in.
6 ft 6 ⁄ in. –
5 ft 6 ⁄ in.
8 ft 8 ft 1 ⁄ in. –
7 ft 10 ⁄ in.
8 ft 1 ⁄ in. –
7 ft 10 ⁄ in.
8 ft 2 ⁄ in. –
7 ft 9 ⁄ in.
8 ft 3 ⁄ in. –
7 ft 8 ⁄ in.
8 ft 5 ⁄ in. –
7 ft 7 ⁄ in.
8 ft 8 in. –
7 ft 5 ⁄ in.
8 ft 11 ⁄ in. –
7 ft 2 ⁄ in.
10 ft 10 ft 2 in. –
9 ft 9 ⁄ in.
10 ft 3 in. –
9 ft 9 ⁄ in.
10 ft 4 in. –
9 ft 7 ⁄ in.
10 ft 6 in. –
9 ft 6 ⁄ in.
10 ft 8 in. –
9 ft 4 ⁄ in.
11 ft 1 in. –
9 ft 1 ⁄ in.
11 ft 7 in. –
8 ft 9 ⁄ in.
20 ft 20 ft 8 in. –
19 ft 3 in.
21 ft –
19 ft
21 ft 6 in. –
18 ft 7 in.
23 ft 3 in. –
18 ft 1 in.
23 ft 4 in. –
17 ft 6 in.
25 ft 1 in. –
16 ft 7 in.
28 ft 1 in. –
15 ft 6 in.
∞542 ft – ∞ 383 ft – ∞ 271 ft – ∞ 192 ft – ∞ 135 ft – ∞ 96 ft – ∞ 69 ft – ∞
Close – up Photography (Imperial)
Close – up Photography (Imperial)
(in.)
Close-up photography (lens reversed)
Close-up photography (lens reversed)
21/13.1 – 1/1.5 12.4 × 18.6 – 1.4 × 2.2 60.7 – 14.7 –––
Ring PN 1/2.0 – 1/1.4 1.9 × 2.8 – 1.4 × 2.1 16.5 – 14.6 –––
Bellows PB-4, PB-5 1/2.4 – 1/8 2.3 × 3.5 – 0.54 × 0.80 18.0 – 15.8 –––
Bellows PB-6 1/2.2 – 2.0 2.1 × 3.1 – 0.48 × 0.71 17.1 – 16.5 –––
Extension Bellows PB-6E 1/2.2 – 4.2 2.1 × 3.1 – 0.23 × 0.34 17.1 – 24.4 –––
1.Can not be used when lens is reversed.
2.First figure is for PK-11A when used alone, remaining figures for rings PK-11A through PK-13, PK-11 through PK-13, or PK-1 through PK-3
used together. Note the PK-11 and PK-1 can not be attached directly to the lens.


