Noaw NS220 Specification sheet
GRAVITY SLICERS
NS220 –NS250 –
NS250HD –NS300 –
NS300HD –NS350HD
Instructions for use and
maintenance
Edition March 2016

Installation, use and maintenance
1
LIST OF CONTENTS
Page
1. INTRODUCTION............................................................................................................................................................2
2. GENERAL INFORMATION ............................................................................................................................................ 2
2.1 SAFETY REGULATION ................................................................................................................................................. 2
2.2 GUARANTEE AND MANUFACTURER’S RESPONSIBILITY ...................................................................................... 3
2.3 THE USER’S OBLIGATIONS ........................................................................................................................................ 3
3. TECHNICAL CHARACTERISTICS.................................................................................................................................. 3
3.1 OVERAL SIZE................................................................................................................................................................ 3
3.2 PRODUCT THAT CAN BE SLICED............................................................................................................................... 4
3.3 PRODUCT THAT CANNOT BE SLICED ....................................................................................................................... 4
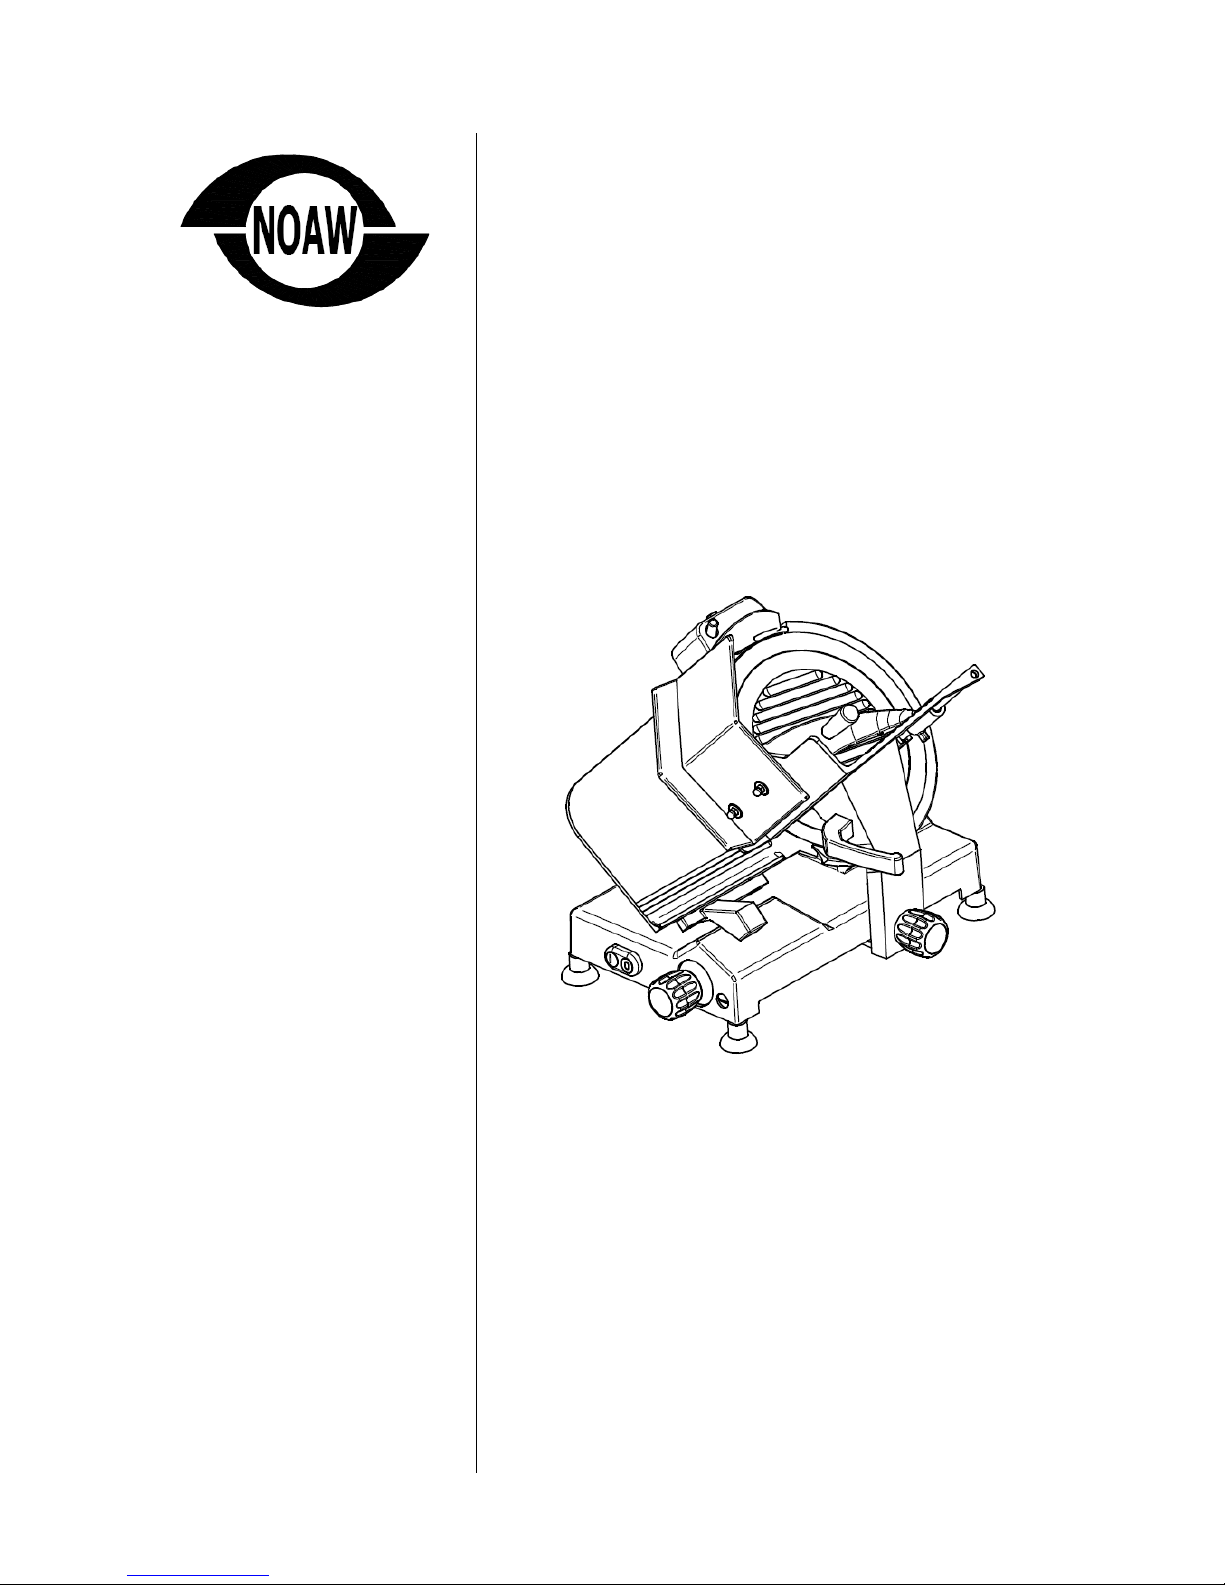
4. MAIN COMPONENTS ................................................................................................................................................... 4
5. INSTALLATION .............................................................................................................................................................5
5.1 UNPACKING AND ASSEMBLY.................................................................................................................................... 5
5.2 TESTING PRIOR TO OPERATION ............................................................................................................................... 5
6. CLEANING AND LUBRICATING ...................................................................................................................................5
6.1 PRODUCT TO BE USED ............................................................................................................................................... 5
6.2 CLEANING SHARPENING STONES............................................................................................................................ 5
6.3 LUBRICATION............................................................................................................................................................... 5
7. SHARPENING INSTRUCTION....................................................................................................................................... 6
8. TROUBLESHOOTING....................................................................................................................................................6
The manual is made up of 6 progressively numbered pages.
The contents are divided into progressively numbered paragraphs, if in any doubt about the contents and for any
further explanation contact the manufacturer or the authorised technical assistance, stating the paragraph
number of the pertinent subject
Installation, use and maintenance
2
1. INTRODUCTION
The purpose of this manual is to allow the user,
above all the direct user, to take every precaution
and arrange all human and material means
necessary for a safe and lengthy use of these
machines.
This manual must be given to the person who will
use and maintain the machines and this person will
keep the manual in a safe and dry place, ready to
be used.
The use and configurations of the machine are the
only ones allowed by the manufacturer; do not try to
use the machine differently from the indications.
The machines are to be used for cutting only food
products of the type and size indicated in the
following paragraphs.
The manufacturer declines all responsibility derived
from an improper use or use by personnel who has
not read and fully understood the contents of this
manual; changes and/or repairs carried out on
one’s own; the use of spare parts that are not
original or not specific for the type of machine.
For any explanation or doubts on the contents of
this manual, please contact immediately the
manufacturer or an authorised technical assistance
service.
2. GENERAL INFORMATION
The operating environment must have the following
characteristics:
-Temperature.............................. …..da -5°C a +40 °C
-Relative humidity......................................... max. 95%
The machine cannot be used in open areas and/or
exposed to atmospheric agents and in places with
fumes, smoke or corrosive and/or abrasive dust,
with the risk of fire or explosion and in any case
where the use of antideflagrating components are
prescribed.
The slicing machine must be used only by personnel
who has carefully read the contents of this manual.
The operators must be over 18 years of age, in
perfect mental and physical conditions, have the
right attitude and capacity (with the necessary
knowledge for manoeuvring and normal
maintenance of simple mechanical and electrical
components).
2.1 SAFETY REGULATION
SHARP KNIFE BLADE
To avoid serious personal injury
follow all the instructions in this
manual
Install the machine according to the
instructions in the paragraph “Installation”;
Install the machine so that it is far from
people who must not use it, especially
children;
Do not touch food while slicing. The user
should only touch the carriage handle or
carriage locking knob during slicing;
Do not be distracted while using the machine;
Do not wear loose clothing or open sleeves, if
necessary use headgear to keep hair out of
the way;
Do not let anyone come close to the machine
while in use;
Do not remove, cover or change the plates
that are on the machine and, if they are
damaged, replace them immediately;
Do not remove the protective devices and do
not change or exclude the mechanical
protective devices;
If the slicer jams, switch off and unplug
before removing obstruction;
Only slice permitted products; do not try to
slice any products that are not allowed;
The area around the machine, where the food
is laid and the floor where the operator works
must always be kept clean and dry;
Do not use the machine as a support surface
and do not place any object on it that does
not pertain to normal cutting operations;
Do not use the machine with electrical
connections of a “temporary” nature, with
temporary or non-insulated wires;
Periodically check the state of the mains
cable and the cable gland on the machine
body, when necessary have it replaced
without delay by qualified personnel;
Immediately stop the machine and call the
technical assistance service in the case of
anomalous function, suspicion of breakages,
incorrect movements, unusual noises, etc.;
Installation, use and maintenance
3
Before cleaning or carrying out any
maintenance, disconnect the machine from
the electric mains supply;
Always use gloves that are resistant to
cutting and tearing for the cleaning and
maintenance operations;
The goods to be cut must be placed on and
removed from the sliding plate with the
carriage in a retracted position and the
thickness regulating knob in the “O” position;
The use of accessories for cutting is not
allowed unless supplied by the maker
specifically for the machine;
For any exceptional maintenance (replacing
grindstones, blade, etc.) please contact the
manufacturer or qualified and authorized
personnel.
2.2 GUARANTEE AND MANUFACTURER’S
RESPONSIBILITY
The manufacturer declines all direct and indirect
responsibility deriving from:
-Not following the instructions in the manual;
-Persons using the machine who have not read
and understood the contents of this manual;
-Using the machine so that it does not conform
to specific regulations in force in the country of
installation;
-Unauthorised changes and/or repairs to the
machine;
-The use of accessories that are not supplied by
the manufacturer and spare parts that are not
original;
-The machine is not cleaned correctly with the
right product;
-Outstanding events.
2.3 THE USER’S OBLIGATIONS
The user must scrupulously observe the instructions
in this manual for the manufacturer’s guarantee to
be valid and particularly:
-Always respect the limits of the machine;
-Always carry out a constant and diligent
maintenance;
-Make sure the persons using the machine are
qualified and able to do so, including the fact
that they must have read this manual.
3. TECHNICAL CHARACTERISTICS
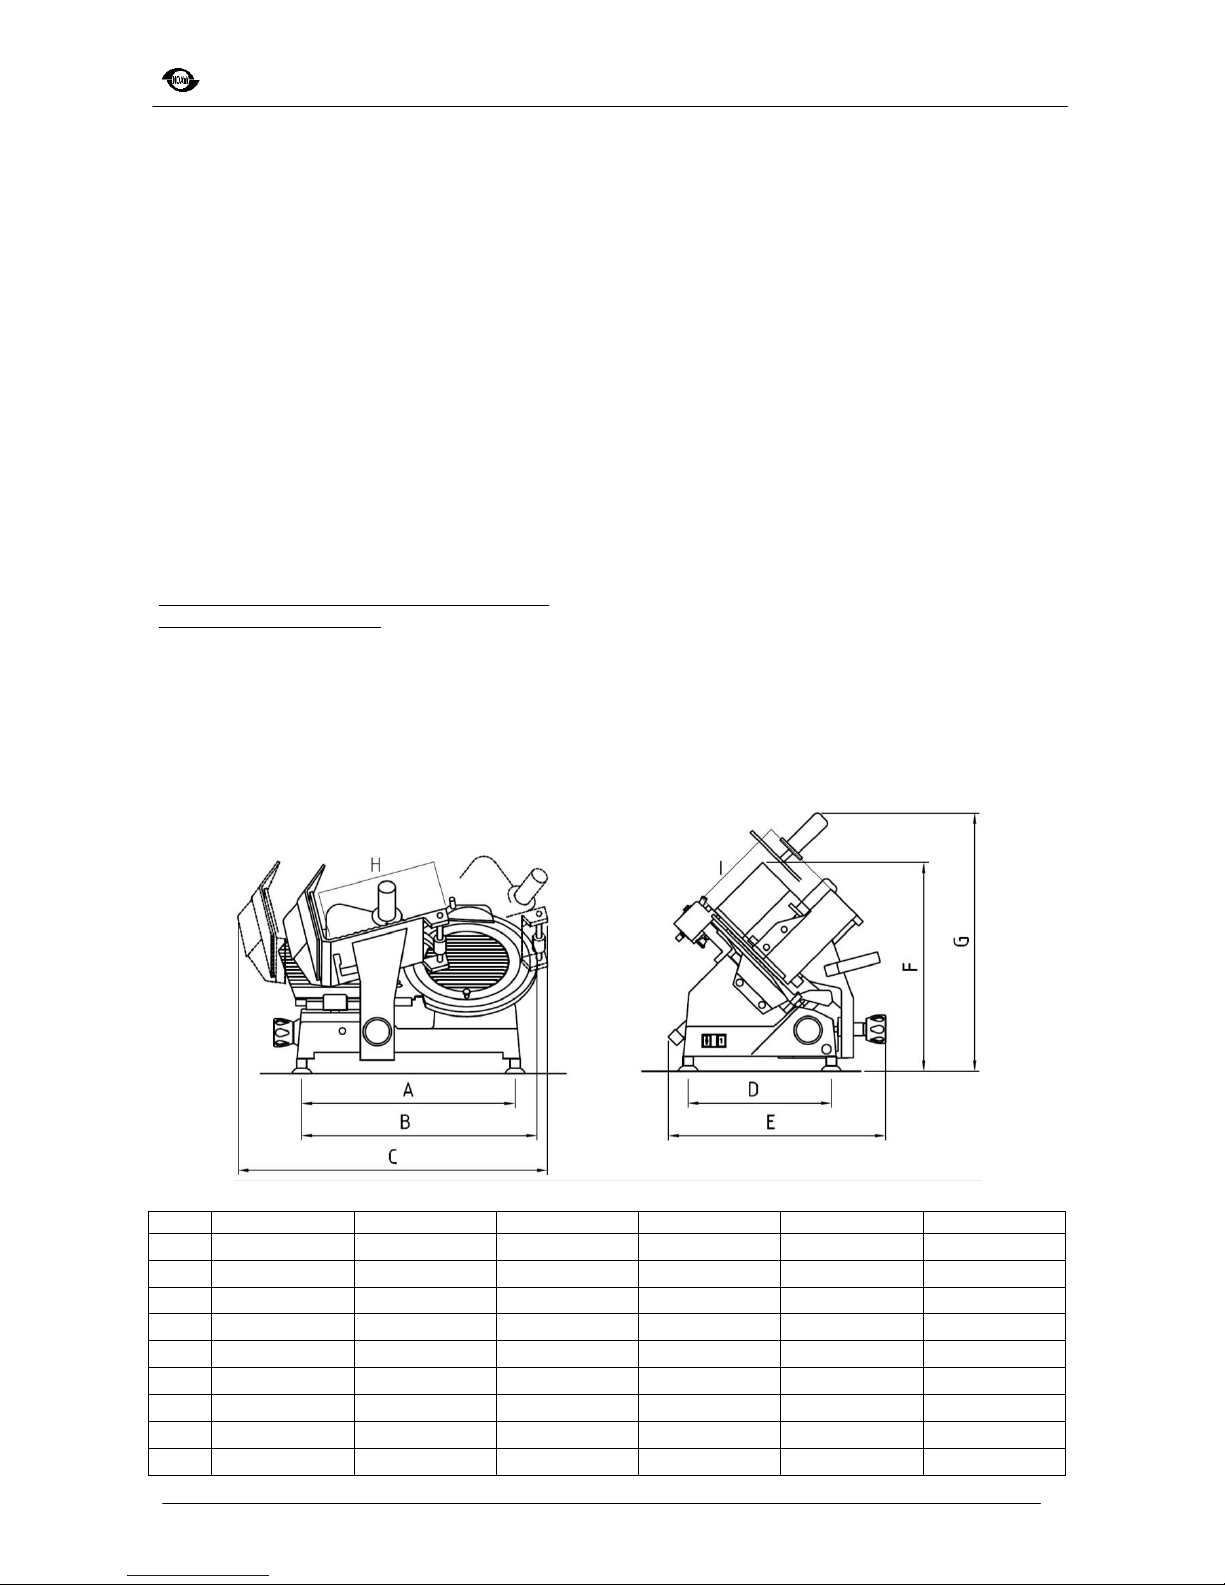
3.1 OVERAL SIZE
Rif.
NS220
NS250
NS250HD
NS300
NS300HD
NS350HD
A
410
410
480
480
540
540
B
480
480
530
530
600
620
C
590
590
630
630
680
760
D
320
320
320
320
370
370
E
430
430
440
440
560
560
F
370
400
450
450
520
530
G
370
410
460
460
570
600
H
195
230
230
230
250
310
I
190
230
230
230
290
330

Installation, use and maintenance
4
NS220
NS250
NS250HD
NS300
NS300HD
NS350HD
Blade diameter
mm
220
250
250
300
300
350
Height of cut
mm
155
170
170
220
220
250
Length of cut
mm
220
220
260
260
290
290
Slice thickness
mm
0-13
0-13
0-13
0-13
0-14
0-14
Blade speed
RPM
290
290
310
310
300
300
Motor power
Watt
180
180
250
250
370
370
Current
Amp
<2
<2
<2
<2
<2
<2
Voltage (AC)
Volt
230
230
230
230
230
230
Net weight
kg
14.5
16
19
20
29
36
3.2 PRODUCT THAT CAN BE SLICED
The following are products that can be sliced:
-All types of cold cuts (cooked, raw, smoked);
-Boneless meat (cooked or raw at a temperature
of no lower than +3 °C);
-Bread and cheeses (those that can be sliced,
such as Gruyere, Fontina, etc.).
3.3 PRODUCT THAT CANNOT BE SLICED
The following are products that cannot be sliced
because they could cause damage to people and
equipment:
-Frozen foods;
-Deep-frozen foods;
-Food with bones (meat and fish);
-Vegetables;
-Any other product that could be sliced but not
meant for consumption.
ATTENTION: Do not try to slice products that are not
allowed.
4. MAIN COMPONENTS
1. Feed cable
2. Identification plate, technical data and EC
marking
3. ON/OFF push button
4. Regulating knob for slice thickness
5. Food table
6. Food press handle
7. Food press
8. Rod
9. Slice deflector
10. Foot
11. Knob for table pushing
12. Table support
13. Table locking handle
14. Base
15. Blade cover
16. Blade guard ring
17. Sharpener cover
18. Blade
19. Safety guard
20. Gauge plate
21. Tie rod

Installation, use and maintenance
5
5. INSTALLATION
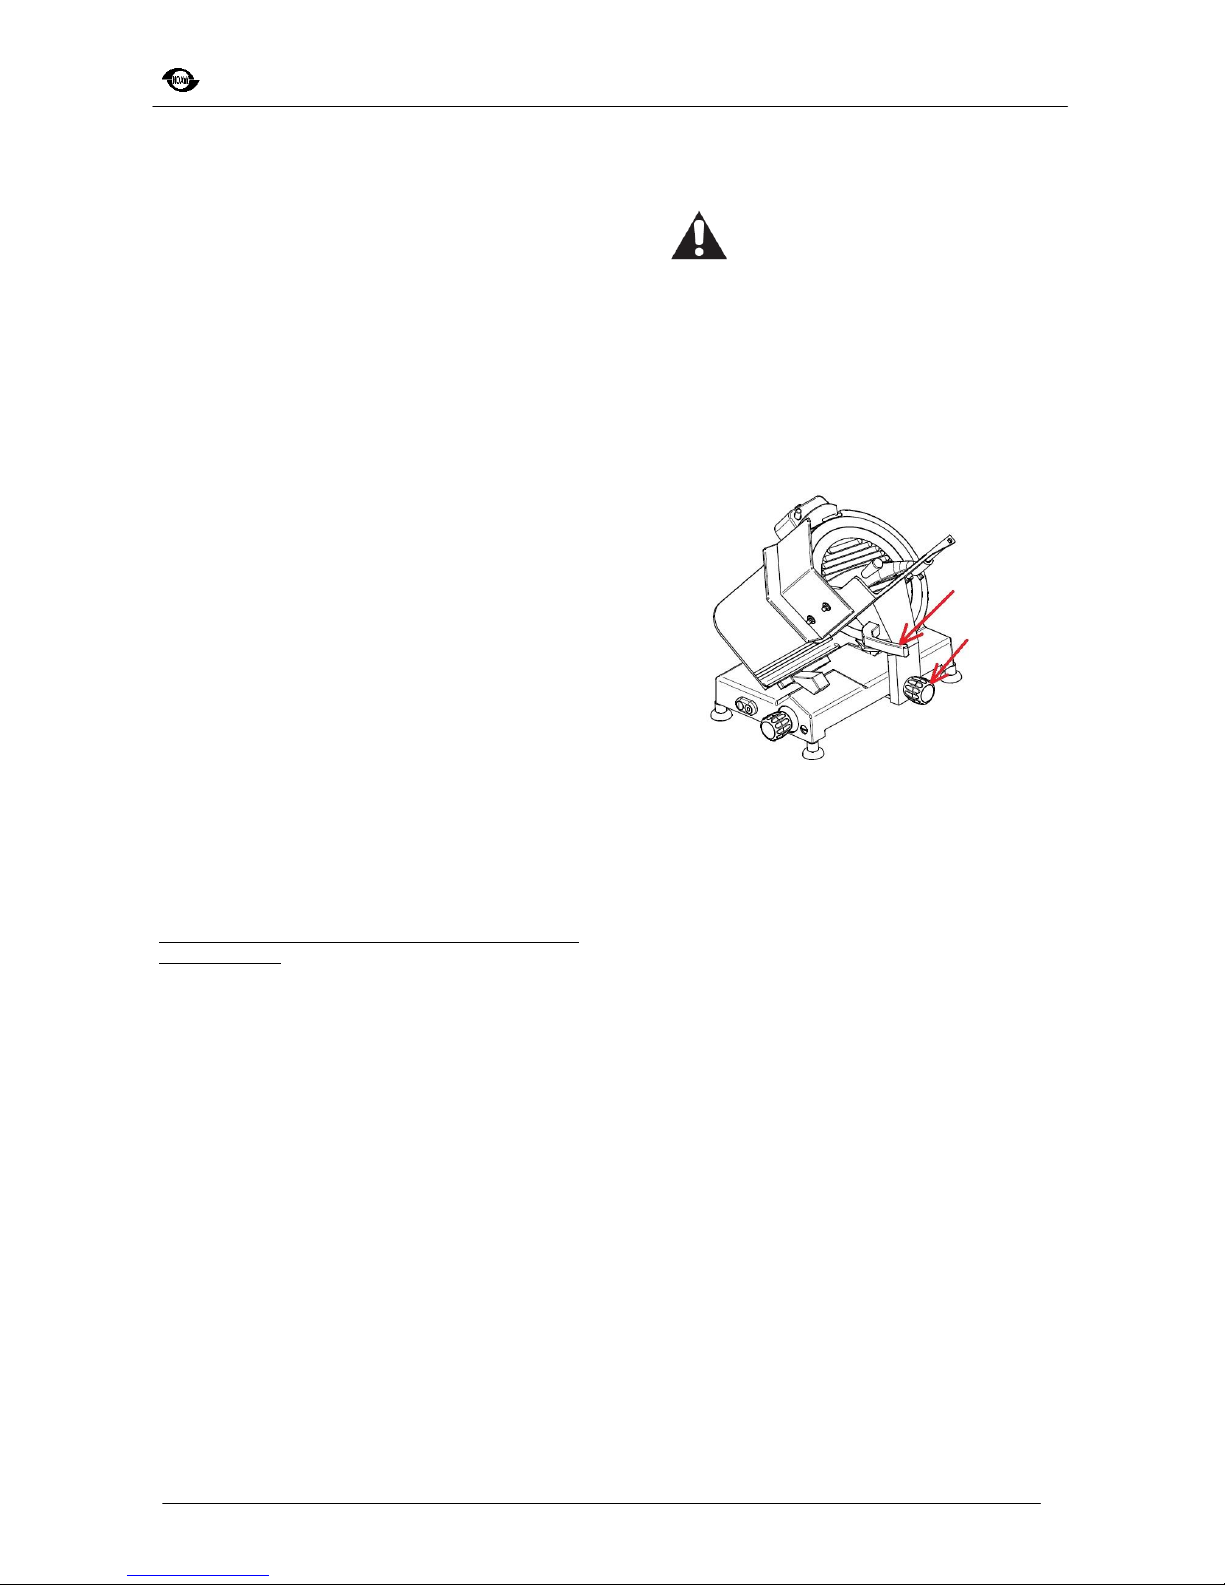
5.1 UNPACKING AND ASSEMBLY
1. When the slicer has been unpacked and removed from its shipping carton, it should be checked carefully for
any damage that may have occurred during shipment. Do not plug in the power cord or attempt to operate the
slicer prior to this examination. Any damage during shipment must be reported to the freight company and sales
agent within 3 days of receiving goods. No claims accepted after this period.
2. Carefully check all slicer components such as the product table, pusher, sharpener, thickness control knob,
etc., to make certain they move freely and that there are no obstructions. Turn the thickness control knob as far
right as possible. Lubricate the pusher slide bar (on the product table) and the square and round table support
rails (underside of slicer) with Food Grade Machine Oil / Grease. Vegetable oil should never be used. Vaseline
may be used if no suitable grease can be obtained.
3. Install the Slicer on a firm, level surface. The feet can be adjusted to prevent rocking on a slightly uneven
surface.
4. National Standards exist which outline position, spacing and ventilation requirements for appliance
installation. Please consult the relevant Standard for requirements on installation space. We recommend a
minimum, well ventilated air gap of 100mm. Please ensure a gap of at least 100mm is given or more as
specified in the local Standard.
5.2 TESTING PRIOR TO OPERATION
1. Make sure that the ON/OFF switch is in the OFF position, and the thickness control knob is turned as far to the
right as possible. In this way the gauge plate is in a position that the knife is not exposed during testing.
2. Plug power cord into correct electrical outlet, and ensure the mains cable does not cause a tripping hazard.
3. Turn the slicer ON and check for smooth knife rotation. Turn the slicer OFF.
4. Slide Product Table back and forth holding on to the Product Table Handle. If there is any rough operation or
obstruction, shut off, unplug power cord and call service for assistance.
6. CLEANING AND LUBRICATING
The machines must be properly cleaned at least once a day; if necessary even more.
If the machines have not been used for a while they must be cleaned before use as well.
6.1 PRODUCT TO BE USED
Only use hot water and a biodegradable detergent for dishes with a 7-8 PH, at a temperature of no lower than
30°C using a soft, spongy cloth and a semi-rigid nylon brush for the plate and the sharp food press.
WARNING: For cleaning the sharp areas of the plates, the food press and the blade, we recommend using
protective gloves.Rinse well with a lot of hot clean water and dry with a soft cloth or a spongy material.
Do not clean slicer with running water from a tap or hose, etcs.
6.2 CLEANING SHARPENING STONES
Each time the sharpener is used, the sharpening stones should be examined for cleanliness. Turn off slicer, close
the gauge plate, unplug power cord and remove sharpener. If there is evidence of fatty or metallic build-up in the
stones, they must be cleaned. Otherwise, they will not have the abrasive quality necessary to sharpen.
Clean stones with a semi-rigid nylon brush. Now replace the sharpener and lock in position.
Dirty Stones Cannot Sharpen!
IF THE SHARPENING STONES HAVE BECOME COATED WITH FOOD FATS OR METALLIC BUILD-UP,
THEY WILL NOT SHARPEN EFFECTIVELY.
REMOVING THE SHARPENER EXPOSES THE KNIFE. DO NOT LEAVE UN-ATTENDED.
6.3 LUBRICATION
Before lubricating, disconnect the machine from the power supply and turn the slice thickness regulator to zero.
Every week put a small amount of oil (a few drops) on the transversal sliding bar of the handgrip and on the
longitudinal sliding bar of the plate support inside the base of the machine.
Manually slide the groups and clean as necessary removing any excess oil.
ATTENTION: Use only Food Grade Machine Oil / Grease or Vaseline.
DON'T USE VEGETABLE OILS!

Installation, use and maintenance
6
7. SHARPENING INSTRUCTION
1. Switch OFF the power.
2. Unplug the slicer.
3. Turn the thickness control knob to the clockwise to place the gauge plate in the fully closed position.
4. Clean the knife completely. Always clean from the centre towards the outside edge of the knife. Never move
your hand towards the edge of the knife. Replace the centre plate knife guard.
5. Loosen the sharpener locking knob, raise and rotate the sharpener until the stones sit with one on each side
of the knife. Re-tighten the knob to hold the sharpener in its sharpening position.
6. Switch ON the power.
7. Press the sharpening stone push-button to bring the stone against the knife and hold it for five to 10
seconds and release.
8. Press the deburring stone pushbutton to bring the stone against the knife and hold it for two or three
seconds and release.
9. Switch OFF the power.
10. Return the sharpener to its stored position and lock in place.
11. Clean slicer before slicing product.
Your slicer is now sharpened, cleaned and sanitized-ready to use.
KNIFE SHOULD BE SHARPENED AT A MINIMUM ON A WEEKLY BASIS.
DO NOT SHARPEN A KNIFE THAT IS NOT CLEAN. YOU WILL DAMAGE THE SHARPENING STONES
AND BE UNABLE TO SHARPEN THE KNIFE.
8. TROUBLESHOOTING
Should your slicer fail to function properly, here are a few things you can check before calling FOR ASSISTANCE.
Product not slicing properly; thick and thin or irregular slices.
1. Is the knife sharp? If not, sharpen according to instructions. Remember, only sharpen a clean knife.
2. Does the product size exceed the capacity of the slicer? Too large a product may rub against the sharpener
assembly causing interference to normal slicing.
3. Is the product positioned correctly and held securely on product table? If not, product may move or rotate
during slicing operation resulting in partial or thick and thin slices.
4. Are all components held securely in place? A loose product table or pusher can cause inconsistent slices.
Knife not sharpening
1. Are sharpening procedures being followed exactly as explained in this manual?
2. Are sharpening stones clean? If not, clean according to instructions.
3. Is the knife clean? If coated with food fats, sharpener stones cannot sharpen. Clean per instructions.
4. Are sharpening stones making solid contact with the knife? If not, have a service engineer adjust them to the
proper height.
5. Are sharpening stones severely worn and not making contact with the knife? Are the sharpening stones
cracker or chipped? If so, have a service engineer replace and adjust the new stones to the proper position for
best sharpening results.
Electrical failure
1. Is slicer fully plugged into a properly grounded outlet? If properly connected, the red or white warning light
should be on when switch is in the ON position.
2. Inspect power cord. Has it been damaged, cutting off electrical flow? If so, call for service assistance to
replace the power cord.
3. Is ON/OFF switch in the ON position?
4. Are you getting electricity from the wall outlet? Check by plugging in another piece of equipment with the
same electrical requirements. Also, check circuit breaker or fuse.
5. If you are getting electrical power and your slicer is still not operating, contact service for assistance.
Thickness control knob not operating gauge plate
1. If the thickness control knob is not opening and closing the gauge plate properly, it is a sign that the internal
mechanism has suffered some loss of adjustment. Do not try to adjust the mechanism yourself. Call service for
assistance.
If correction of any of the above conditions does not result in a functional slicer, call service for assistance.

Other manuals for NS220
1
This manual suits for next models
5
Table of contents
Other Noaw Kitchen Appliance manuals

Noaw
Noaw 30E Specification sheet

Noaw
Noaw 250/14 Troubleshooting guide

Noaw
Noaw NS300M Troubleshooting guide

Noaw
Noaw 300/10H Troubleshooting guide

Noaw
Noaw NS220 User manual

Noaw
Noaw TWS Service manual

Noaw
Noaw 330/83 Troubleshooting guide

Noaw
Noaw LEADER 350G/LI Specification sheet

Noaw
Noaw A300 Specification sheet

Noaw
Noaw A300 Specification sheet


