Noaw NS220 User manual

PROUDLY DISTRIBUTED BY
ROBAND AUSTRALIA PTY LTD
OPERATING INSTRUCTIONS
NOAW SLICERS
MODELS: NS220, NS250, NS300,Version 4
NS300HD & NS350HDVersion 3
Special Features:
Unique Safe Guard Safety System
Solid One-Piece Cast Aluminium Body
Motor-Saving Belt Drive System
Gravity Feed
These instructions cover the models of NOAW®Slicers listed above. Although
there are slight variances between models, the installation, operation, care and
maintenance procedure is the same for all.

Page
2
Roband Australia is a wholly Australian owned company, which has
been manufacturing quality commercial catering equipment for the
food service industry for more than 45 years. Roband products are
engineered and manufactured to the highest standards to provide
functionality, reliability and durability, and our quality products are
exported world-wide.
Included in the comprehensive Roband ranges are Grill Stations,
Toasters, Fryers, Milkshake Mixers, Rotisseries, Food Display
Cabinets and much more.
Roband Australia also acts as the Australian agents for Vitamix®
Blenders, NOAW®Meat Slicers, Ceado®Juicers and RYNO®Soup
Warmers and Rice Cookers.
In addition to a vast range of machines, Roband Australia has its own
line of commercial cookware and cutlery under the Robinox®brand
name.
For a complete set of brochures please contact your nearest
authorised dealer or contact Roband directly at our head office.
Roband Australia Pty Ltd
24 Middleton Road
CROMER
NSW 2099
Australia
Telephone: 61 – 2 – 9971 1788
Facsimile: 61 – 2 – 9971 1336
E-mail: [email protected]
Website: www.roband.com.au
© Copyright 2000 – Roband Australia Pty Ltd
All rights reserved. No part of this work may be reproduced or copied in any form or by any means,
electronic or mechanical, including photocopying or posting to a website, without the written permission of
the publisher. The material contained within this document is intended entirely for instructional purposes.

Page
3
CONTENTS
INTRODUCTION......................................................................................... 4
GENERAL PRECAUTIONS........................................................................ 4
PACKAGING .............................................................................................. 5
COMPLIANCE............................................................................................ 5
INSTALLATION.......................................................................................... 5
OPERATION............................................................................................... 6
SHARPENER USAGE.................................................................................................7
GENERAL SAFETY.................................................................................... 8
CLEANING, CARE & MAINTENANCE ...................................................... 9
Safety Blade Ring Guard: ............................................................................................9
Important Cleaning Notes: .........................................................................................10
TROUBLESHOOTING.............................................................................. 11
SPECIFICATIONS .................................................................................... 11
SAFE GUARD SAFETY SYSTEM............................................................ 12
NOTES...................................................................................................... 13
Warranty................................................................................................... 14

Page
4
INTRODUCTION
Congratulations on your purchase of this quality NOAW®product. With
proper care and management your new purchase will give you years of
trouble free service.
By reading these instructions carefully you can ensure that this machine is
used and maintained properly, helping your new investment to perform well
for you now, and to continue performing in the many years to come.
GENERAL PRECAUTIONS
This machine must only be operated by qualified person(s) who are fully
versed in the operating and safety instructions described in this manual.
Servicepersons should be instructed to familiarise themselves with any and
all safety instructions described in this manual prior to commencement of any
maintenance or service.
In the case of new personnel, training is to be provided in advance. These
machines should not be operated by persons (including children) with
reduced physical, sensory or mental capabilities, or lack of experience or
knowledge, unless they have been given supervision or instruction
concerning the safe use of the appliance by a person responsible for their
safety.
These machines are slicing units, and as with any commercial slicing unit
extra care is required. Always be careful when near an operating slicer, and
ensure that any risk to unwary customers or staff is minimised with additional
signage if necessary. Due to the obvious safety hazard it is recommended
that these units be kept out of reach of children.
The performance of this unit cannot be guaranteed for operational use
outside its design parameters
The machine should be disconnected from all power and the blade allowed
to stop before cleaning.
Roband will accept no liability if;
♦ Non-authorised personnel have tampered with the machine.
♦ The instructions in this manual have not been followed correctly.
♦ Non-original spare parts are used.
♦ The machine is not cleaned correctly, with the right product.
♦ There is any damage to the unit.

Page
5
PACKAGING
All care is taken when packing and Roband ensures that every unit is
functional and undamaged at the time of packaging.
The Package of this Slicer should include:
1) One Slicer (appropriate model)
2) This Manual
3) Packaging Materials
Any damage to the machine as a result of freight must be reported to the
Freight Company and to the agent responsible for the despatch of said unit
within three (3) days of receipt. No claims will be accepted or entertained
after this period.
COMPLIANCE
NOAW® products have been designed and manufactured to comply with
any and all specifications set out by the Australian Communications
Authority (ACA) in regards to Electromagnetic Compatibility. As testament
to such compliance these units bear the C-Tick symbol.
For further information contact the Australian Communications Authority, PO
Box 13112, Law Courts, Melbourne VIC 8010.
INSTALLATION
Remove all the packaging materials and tape, as well as any protective
plastic from the machine. Clean off any glue residue left over from the
protective plastic or tape.
Place the slicer on a firm, level surface in the required position. The feet can
be adjusted to prevent rocking on slightly uneven surfaces.
National Standards exist outlining the positioning, spacing and ventilation
requirements when installing new appliances. These Standards should be
consulted and new equipment should be installed accordingly. In any
situation where specifications allow a distance of less than 100mm we
would still recommend that a well-ventilated air gap of not less than 100mm
be maintained.
Ensure all guards are in place before connecting the power cord to a
standard 10 Amp power outlet. Observe all the safety warnings listed in
the section on safety on page 9.
Page
6
OPERATION
Place the product to be sliced on the sliding carriage. Position the meat
grip/product pusher on the outer end of the product. If the item is too long, place
the meat grip on top of product to hold it firmly in place. These slicers are of the
gravity feed type and do not require the operator to push the product towards the
blade. The product will progress towards the blade after each slice is taken.
Never push the product towards the blade with your hand.
Except where fitted with a carriage handle, the carriage securing knob is used to
move the sliding carriage during operation. Do not touch any other part of the
slicer or the product during operation.
Never try to operate the machine by pushing or pulling the handle on the Meat
Grip, use only the Carriage Knob and/or Carriage Handle.
The thickness adjustment allows you to vary the thickness of the slices from
“paper thin” to 16mm thick. To make thinner slices, turn the graduated thickness
adjusting knob to the right (clockwise). For thicker slices, turn the knob to the left
(anti-clockwise). The numbers on the knob will help you recall your desired
thickness for different products.
Once the product to be sliced is in position, and the thickness has been set,
switch the slicer "ON" and grasp the carriage handle or carriage securing knob.
Slide the carriage back and forth, letting the slices drop from the blade. The
shape of the blade will cause the slices to fall away behind it.
EXTREME CAUTION: the slicing of tomatoes (or other high water content
products) is not recommended. However, if the slicer is used to slice such
products, it is important to clean the back of the blade immediately after the
machine has stopped and been turned off and unplugged. Using a dry cloth or
sponge, carefully clean the back of the blade as you gently spin the blade with
the dry cloth or sponge. Never reach over the machine to clean the back of the
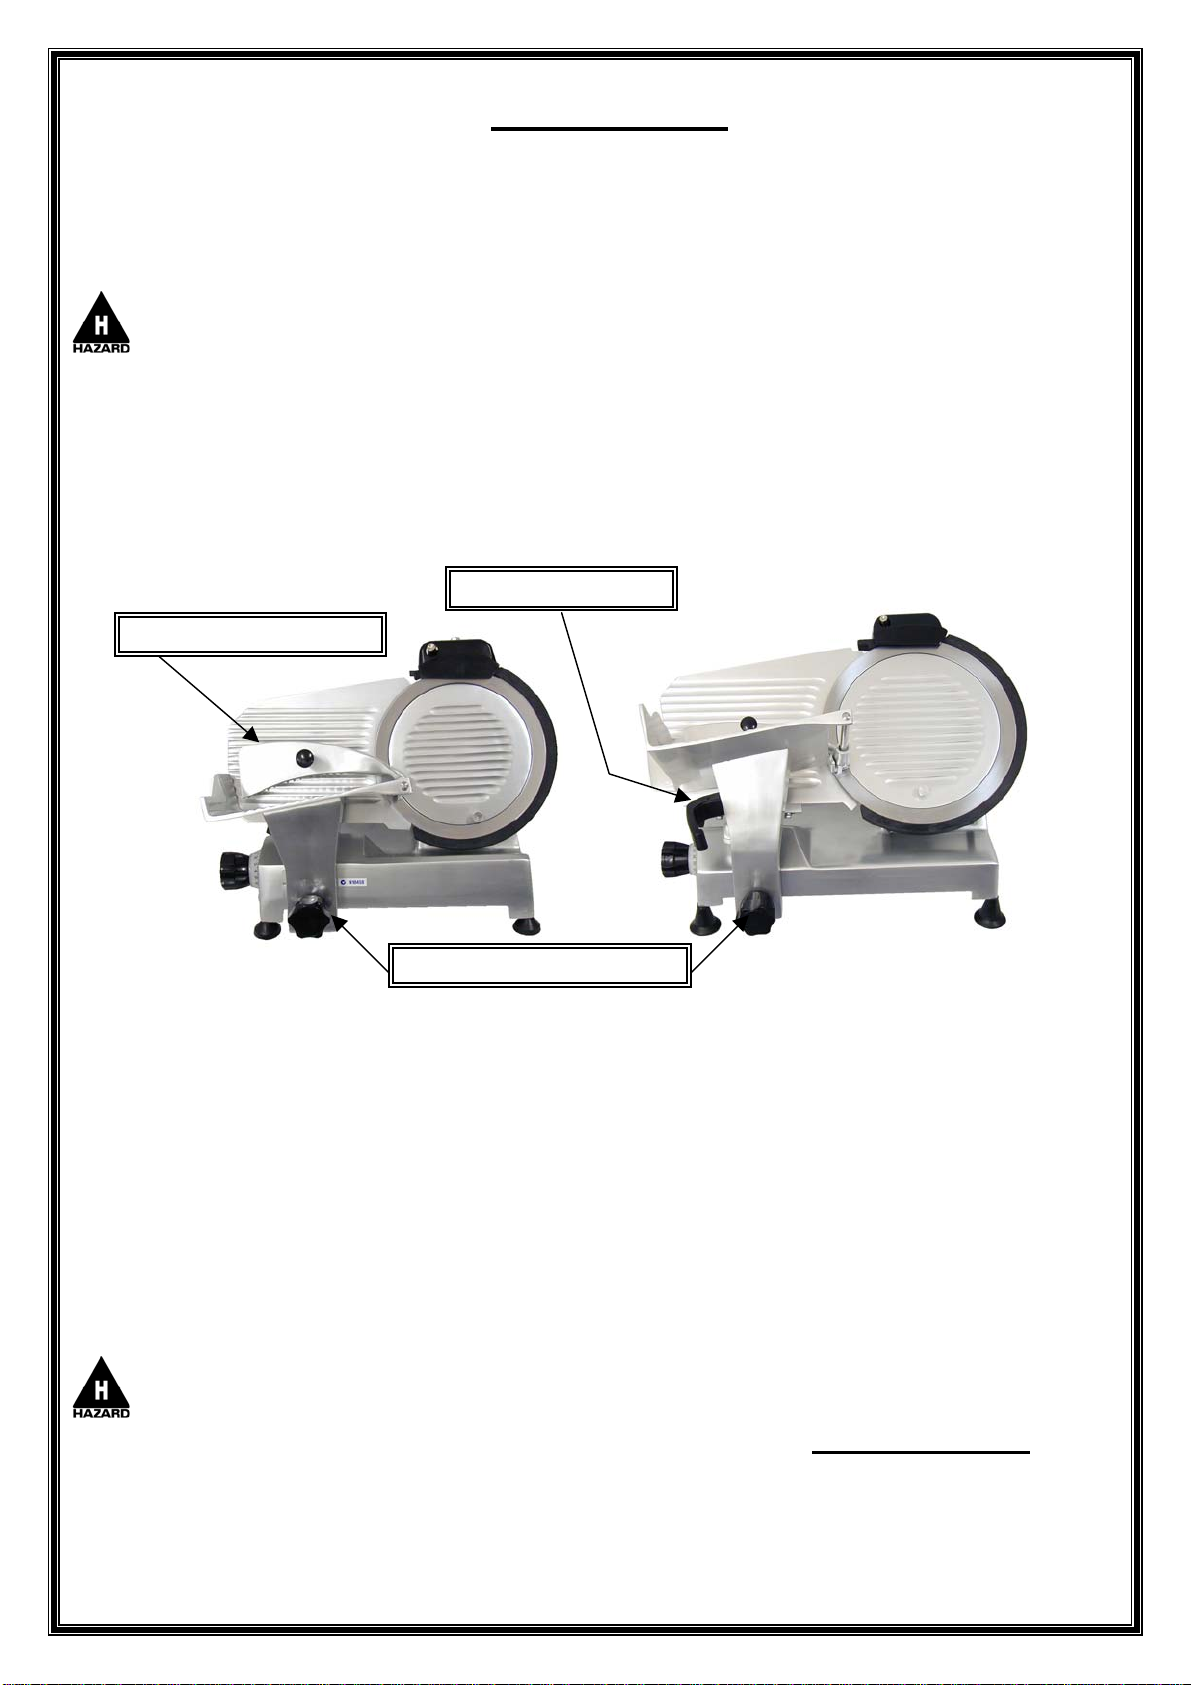
blade. Moisture in the motor as a result of slicing tomatoes and not wiping the
Carria
g
e Securin
g
Knob
Carria
g
e Handle
Hand
g
ri
p
/Meat Gri
p

Page
7
blade may cause the motor to fail. Motor failure caused by such moisture ingress
is not covered by warranty.
SHARPENER USAGE
To use the sharpening device, switch the machine off and rotate the thickness
adjusting knob fully to the “0” thickness position (clockwise). Unscrew the knob
just below the sharpening device. Lift the device up and over the blade so that
the sharpening stones straddle the blade. Use the knob to tighten the device in
place.
Switch the machine on and carefully push the stone that contacts the back of the
blade towards the blade using the pushing button, making contact with the blade
for about 5-10 seconds, depending on how blunt the blade is. This can be done
several times if required, but remember that the more often you sharpen the
blades the shorter the sharpening time required. Repeat the process for the
stone that contacts the front of the blade but only make contact for about 4 - 5
seconds. DO NOT TOUCH THE BLADE. Switch the machine off and replace
the sharpening device to its original position by reversing the procedure above.

Page
8
aSAFETY a
GENERAL SAFETY
This machine contains no user-serviceable parts. Roband Australia, one of
our agents, or a similarly qualified person(s) should carry out any and all
repairs. Any repair person(s) should be instructed to read the Safety
warnings within this manual before commencing work on these units.
Do not remove any covers that may be on the machine.
Always use the standard 10Amp power cord and plug provided. Ensure
that any damaged power cord is replaced before further use.
Never touch this machine without training and authorisation from your
supervisor.
The machine must be on a solid level support.
All guards must be in place before connecting to the power and switching
the machine on.
Always use the food pusher NOT YOUR HAND.
Never touch the rotating blade.
Always keep hands, arms, hair and loose clothing clear of all moving
parts.
Should the machine jam, switch off and unplug before removing the
obstruction.
Switch off and unplug the machine from the power source before cleaning,
sanitising or servicing.
Use only the attachments provided by the manufacturer.
Always set the thickness adjustment to the minimum thickness (zero on the
thickness adjusting knob) when the machine is not in use.

Page
9
CLEANING, CARE & MAINTENANCE
Attention to regular care and maintenance will ensure long and trouble free
operation of your slicer. Although scheduled servicing is not required we do
recommend you adopt a program of regular maintenance to ensure that the
slicer is clean and functional and to avoid inadvertently damaging the unit.
Daily cleaning should be considered mandatory for all equipment used in
the preparation of food. When dealing with Meat Slicers and the possibility
of cross contamination, these units should be cleaned before slicing each
new product. In order to ensure the slicer is cleaned properly and to avoid
damage, the instructions below should be followed.
Before cleaning ensure that the machine is switched off and unplugged,
and that the thickness adjustment is set to zero to prevent exposure of the
blade.
Use hot soapy water or denatured alcohol and a soft cloth/sponge for
cleaning, taking special care with the sharp blade.
It is important that the slicer is wiped down with a damp cloth or sponge,
NOT WET, to prevent any water (or denatured alcohol) ingress behind the
blade and into the motor. The blade guard may be removed to assist with
cleaning by undoing the knob at the rear of the machine opposite the
blade. Beware of the sharp blade and always replace the blade guard after
cleaning and re-tighten the knob.
Safety Blade Ring Guard:
In models containing a Safety Blade Ring Guard the black Safety Blade
Ring is a non-detachable part designed to prevent lacerations from an
unprotected blade during cleaning. Do not attempt to remove this essential
protective device.
Using a wire brush and then a damp sanitising cloth or sponge, clean the
small gap between the blade and the Ring Guard. The sponge/cloth can
be held over the Ring Guard and forced into the gap by pinching with your
thumb and forefinger (index finger). The cloth can then be run along the
length of the Ring Guard. Ensure that any sponge fibres are removed by
wiping them from the blade. A small “lick” from the sharpening stones will
also achieve this aim whilst also ensuring a sharp blade.

Page
10
Important Cleaning Notes:
• Do not use steel wool or steel wool soap pads on the slicer.
• Do not use other metal objects to scrape stubborn deposits of sliced
product from the slicer.
• Do not allow any food particles to remain on the slicer - clean at least
once a day.
• Do not clean this unit with the use of a water jet.
• Do not clean this unit, or any parts of this unit in a dishwasher.
• Never place the cord over the unit.

Page
11
TROUBLESHOOTING
If the slicer does not function check the following points before calling for
service.
The machine is plugged in correctly and the power switched on.
The power cord is whole and undamaged.
The power point is not faulty.
The switch is not broken.
The blade is sharp.
The tie rod is in securely.
SPECIFICATIONS
Model NS220 NS250 NS300 NS300HD NS350HD
Blade
diameter 220mm 250mm 300mm 300mm 350mm
Height of
cut 150mm 170mm 220mm 240mm 240mm
Carriage
movement 220mm 235mm 250mm 310mm 310mm
Slice
thickness 16mm 16mm 16mm 16mm 16mm
Power
source 220-240 Volts AC, 50 Hertz
Electrical
rating* 220W,
0.9A 220W,
0.9A 220W,
0.9A 370W,
1.6A 370W,
1.6A
* Motor Wattages quoted here are indicative of power under load and
will vary with heavier/lighter loads.
Constant Research & Development may necessitate machine
changes at any time.

Page
12
SAFE GUARD SAFETY SYSTEM
Exclusive to NOAW, the unique Safe Guard Safety System reduces the
potential for injury to the user, particularly during the cleaning of the unit,
and increases the longevity of the machines.
Workplace Safety has become a major issue with Slicers in recent years,
particularly given the potential for serious injury both in use and during
cleaning. The Safe Guard safety system has been developed by NOAW
with these issues in mind, and extensive research and development has
gone into producing a range of Slicers capable of meeting both the
productivity and OH&S demands of the commercial kitchen or workplace.
The non-removable glass-filled Nylon Safety Blade Ring Guard ensures
that cleaning is both simple and, more importantly, safe.
Additionally NOAW slicers have a safety cutout switch, which will prevent
the unit from operating when the cover on the front of the blade is removed
from the unit. Combine with this the shielding box around the electrical
switches to prevent minor splash ingress and you can see that NOAW
Slicers are built to last. In addition all NOAW Slicers are built with double
sealed bearings on the motor shaft AND an additional Blade Seal at the
rear of the blade to reduce the likelihood of liquid penetrating inside the
electrical segments of the motor
NOAW slicers also use a belt drive system to minimise any future repair
costs while maximising motor protection. Where gears will strip or burn out
the motor if the Slicer gets jammed, a belt will slip. The slipping action
allows the motor to continue turning somewhat, even when the blade has
jammed, reducing the potential for the motor to fail.
No other Slicer offers the NOAW Safe Guard (© 2002) safety system.
Models Containing the Safe Guard Safety System
NS220
NS250
NS300
NS300HD
NSA350

Page
13
NOTES
Record any preferred settings etc. here to act as a quick reference for other users.

Page
14
Warranty
Every care is taken to ensure that no defective equipment leaves our factory and all
goods manufactured by us are guaranteed against faulty workmanship and materials for
a period of 24 months from the date of purchase. Generally, all goods claimed under
this warranty must be returned to the factory or an authorised service agent, freight
prepaid, for inspection. Any part deemed to be defective will be replaced, however, no
claims will be entertained for parts damaged in transport, misused or modified in any
way without our approval. For machines that are not considered to be portable (e.g.
food bars, rotisseries, large hotplates and some bain maries), on site warranty service
will be provided in capital city metropolitan areas only. In all other locations, the
customer is responsible for all travelling time/service call costs and payment for this will
be required prior to the commencement of the repair. The labour costs to actually repair
the fault will be met by this company.
This company reserves the right to reject a claim for warranty if it is not completely
satisfied with the circumstances under which it occurred and any costs incurred for false
claims or faults due to incorrect usage etc. are the responsibility of the claimant. Under
no circumstances shall Roband Australia Pty Ltd or any subsidiary company or Agent
be liable for loss of profit or damage to other equipment and property.
Generally, authorised service agents are located in all areas, which have authorised
distribution dealers. For the name of your nearest Australian authorised service agent
please contact: ROBAND AUSTRALIA PTY LTD, Phone: (02) 9971 1788 Fax: (02)
9971 1336. All other countries please contact your selling agent.
WARRANTY REGISTRATION
Your new product is an important investment, and completion of the warranty
registration form is a vital first step in protecting your asset. We also encourage you to
register your product for the following reasons:
1. Registering your product will activate your free 2nd year warranty, making a total of
two years (24 months) full warranty, covering all parts and labour.
2. Completing the registration helps us provide more efficient warranty service in case
there is a problem with your appliance.
2. In the unlikely event of a product safety recall, or an important change to Australian
standards, we will be able to contact you immediately.
3. We like to know who buys our products as it helps us in better understanding and
servicing the needs of our customers.
To register your Warranty go to www.roband.com.au. Alternatively, please complete the
form and then detach and mail to: Roband Australia Pty Ltd, PO Box 500, Dee Why
NSW 2099.
To make a warranty claim you will be required to provide proof of purchase. Please ensure you retain your
recei
p
t for this
p
ur
p
ose.

Business Name…………………………………………………………………………………...
Contact Person……………………………………………………………………………………
Email address………………………………………………. Tel No……………………………
Address…………………………………………………………………………………………….
Model No…………………………………………..Serial No……………………………………
Name of Dealer where purchased……………………………… Purchase Date…………...
Type of Business (eg Café, Restaurant, Hotel, Takeaway, Institution such as hospital
nursing home, TAFE)…………………………………………………………………………….
What other equipment do you currently use?
!Water Boiling !Hot Water Urn !Meat Slicer !Grill
!Conveyor Toaster !Milkshake Mixer !Deep Fryer !Food Display Bar
!Griddle/Hotplate !Rice Cooker !Toaster - Refrigerated or Hot
!Pie Warmer !Soup Kettle !Blender
What factors MOST influenced your decision to purchase this product? (Tick up to 5)
!Ease of Use/Speed/Convenience !Specific Product Features !Brand Reputation
!Past Experience with the Brand !Quality/Reliability of unit !Warranty Terms
!Salesperson’s recommendation !Style Appearance !Price
!Advertisement (Print/In-Store Display)
!Other …………………………………………………………………….…..(please specify)
$ If you do not wish to receive any cashback offers, marketing or promotional material from us,
please tick this box.
******************************************************** cut along here **********************************************************************
Once the form is completed, cut along where indicated and mail to:
Roband Australia Pty Ltd
P.O. Box 500,
Dee Why,
NSW 2099
Thank you for completing this form. The information that you provide will be treated as confidential. If you
have any questions about how Roband handles your personal information, please contact us on (02) 9971-
1788 or by email: warra[email protected]. Alternatively, go to www.roband.com.au and follow the Privacy
Policy Statement link at the bottom of the page. Failure to submit this card will not diminish your warranty
rights.
ROBAND AUSTRALIA PTY LTD
If you would like information on any of our products, please call our Head Office on (02) 9971-1788
or go to www.roband.com.au.
Page
15
W
ARRANTY ACTIVATION CARD

Page
16
ROBAND AUSTRALIA PTY LTD
Authorised Distributor/Agent
Other manuals for NS220
1
This manual suits for next models
4
Table of contents
Other Noaw Kitchen Appliance manuals

Noaw
Noaw NS300M Troubleshooting guide

Noaw
Noaw A300 Specification sheet

Noaw
Noaw LEADER 350G/LI Specification sheet

Noaw
Noaw 250/14 Troubleshooting guide

Noaw
Noaw TWS Service manual

Noaw
Noaw 30E Specification sheet

Noaw
Noaw 330/83 Troubleshooting guide

Noaw
Noaw 300/10H Troubleshooting guide

Noaw
Noaw A300 Specification sheet

Noaw
Noaw A370G/L Specification sheet


