Noaw LEADER 350G/LI Specification sheet

21048 SOLBIATE ARNO (VA)
Via Colombera, 27
Tel. 0 1.219.72
Fax 0 1.216.197
E-mail: noaw@noaw.it
http://www.noaw.it -
www.noawsrl.com
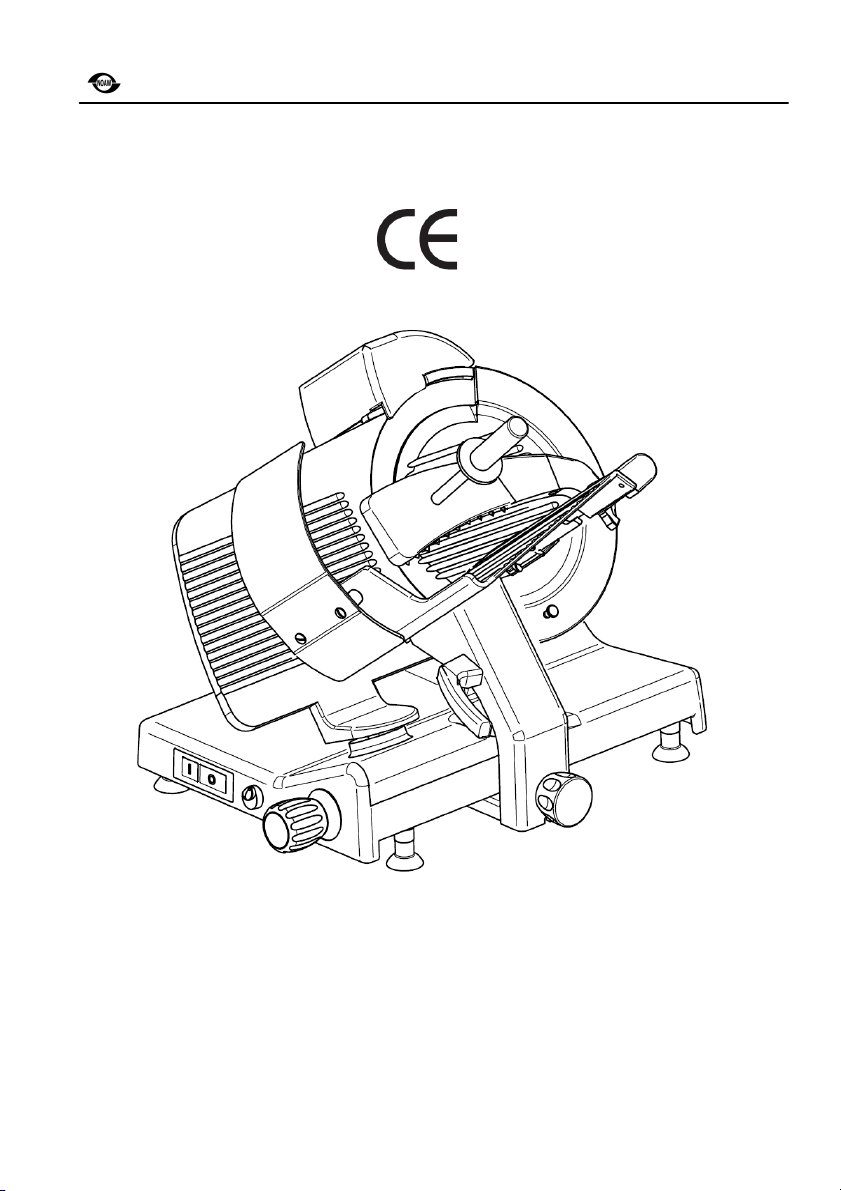
Slicers LEADER
50- 70G/LI
GRAVITY FEED
TRANSMISSION GEAR
Instructions for use and
maintenance
Use and maintenance
1
Slicers LEADER
Ø 50/ Ø 70
GRAVITY FEED
GEAR TRANSMISSION
INSTRUCTION HANDBOOK
Edition November 2010

Use and maintenance
2
LIST OF CONTENTS
Page
1. INTRODUCTION..................................................................................................
1.1 Purpose of the manual...............................................................................................
1.2 Keeping the manual ...................................................................................................
1. Use of the machine.....................................................................................................
2. GENERAL INFORMATION..................................................................................4
2.1 Machine limits, safety regulations.............................................................................4
2.2 Guarantee and manufacturer’s responsibility...........................................................5
2. The user’s obligations................................................................................................5
2.4 Markings - Plates........................................................................................................5
. TECHNICAL CHARACTERISTICS......................................................................6
.1 Data sheets.................................................................................................................6
.2 Furnished items and accessories..............................................................................7
. Products that can be sliced .......................................................................................7
.4 Products that cannot be sliced..................................................................................7
4. DESCRIPTION.....................................................................................................8
4.1 Unpacking...................................................................................................................8
4.2 Main components.....................................................................................................10
4. General description..................................................................................................11
5. INSTALLATION..................................................................................................12
5.1. Installing the machine.............................................................................................12
5.2. Command description.............................................................................................12
5. Electrical connection................................................................................................12
5.4 Checking direction of blade rotation (only for machine with three phase motors)
.........................................................................................................................................1
6. USING THE SLICING MACHINE ......................................................................1
6.1 Loading the goods on the plate and cutting ...........................................................1
6.2 Cleaning the slicing machine ..................................................................................15
7. MAINTENANCE AND REPAIRS........................................................................19
7.1 General information .................................................................................................19
7.2 Sharpening the blade...............................................................................................19
7. . Lubricating the guide bars of the carriage with arm and food table support
(weekly)...........................................................................................................................21
7.4 Lubricating the transversal guide rods of the table and food press (weekly) ......21
8. LOCATING AND ELIMINATING FAILURES .....................................................22
9. CIRCUIT DIAGRAM...........................................................................................2
10. DISMANTLING THE SLICING MACHINE.......................................................25

Use and maintenance
3
1. INTRODUCTION
1.1 Purpose of the manual
This publication contains all the information necessary for the use and maintenance of
“LEADER” slicing machines ith gear transmission to be used for food, ith circular blade,
models Ø 350 mm and Ø 370 mm.
The purpose of this manual is to allo the user, above all the direct user, to take every
precaution and arrange all human and material means necessary for a safe and lengthy use
of these machines.
1.2 Keeping the manual
This manual must be given to the person ho ill use and maintain the machines and this
person ill keep the manual in a safe and dry place, ready to be used. We recommend that a
copy be kept on file.
For any correspondence ith the maker or authorized personnel, please refer to the
information on the plate and the machine serial number.
The manual must be kept for the entire life of the machine and in case of need (ex. any
damage to even a part of the manual that makes consulting it difficult) the user must acquire
a ne copy exclusively from the maker.
The user must let the manufacturer kno the address of any ne o ner of the machine.
Note: The terms Front, Back, Right and Left used in this manual refer to the machine as seen
from the operator’s side in normal orking conditions.
1. Use of the machine
The use and configurations of the machine are the only ones allo ed by the manufacturer; do
not try to use the machine differently from the indications. The indicated use of the machine is
only valid for machines ith a complete structural, mechanical and system efficiency.
The machines are to be used for cutting only food products of the type and size indicated in
this manual.
The maker declines all responsibility derived from an improper use or use by untrained
personnel, changes and/or repairs carried out on one’s o n or by unauthorized personnel,
the use of spare parts that are not original or not specific for the type of machine.
For any explanation or doubts on the contents of this manual, please contact
immediately the manufacturer or an authorized technical assistance service and quote
the paragraph number of the required subject.

Use and maintenance
4
2. GENERAL INFORMATION
2.1 Machine limits, safety regulations
The machine has been designed and made to slice food products, ith a continuous service,
of the type and size as indicated in paragraphs 3.2, 3.3 e 3.4.
2.1.1 Environmental conditions for using the machine
- Temperature from -5°C to +40°C
- Humidity max. 95%
The slicer cannot be used in opened places and/or atmospheric agents. It cannot be used in
rooms ith steams, fumes or corrosive and/or abrasive dusts ith fire or explosion risk and
every here they are used anti-deflagration components.
2.1.2 General safety regulations
The slicing machine must be used only by an adequately trained person ho has carefully
read the contents of this manual. The operators must be over 18 years of age, in perfect
mental-physical conditions, have the right attitude and capacity and necessary kno ledge for
manouevering and normal maintenance of simple mechanical and electrical components.
For a better use of the machine follo the instructions belo :
•Install the machine according to the instructions in the paragraph “Installation”;
•Install the machine so that it is far from people ho must not use it, especially children;
•Do not become distracted hile using the machine;
•Do not use loose clothing or open sleeves;
•Do not let anyone come close to the machine hile in use;
•Do not remove, cover or change the plates that are on the machine and, if they are
damaged, contact qualified and authorised personnel;
•Do not remove the transparent protection and do not change or exclude the mechanical
and electrical protections;
•Only slice permitted products; do not try slicing any products that are not allo ed;
•The area around the machine, here the food is laid and the floor here the operator
orks must al ays be kept clean and dry;
•Do not use the machine as a support surface and do not place any object on it that does
not pertain to normal cutting operations;
•Do not use the slicing machine hen, after a normal use, the distance bet een the
cutting edge of the blade and the blade protection ring is over 6 mm. (see paragraph
7.2);
•Do not use the machine ith electrical connections of a “temporary” nature, ith
temporary or not insulated ires;
•Periodically check the state of the mains cable and the cable gland on the machine
body, hen necessary have it replaced ithout delay by qualified personnel;
•Immediately stop the machine in the case of a defect, anomalous function, suspected
breakage, incorrect movements, unusual noise;
•Before cleaning or carrying out any maintenance, disconnect the machine from the
electric mains supply;
•Use protective gloves for cleaning and maintenance;
•The goods to be cut must be placed on and removed from the sliding plate ith the
carriage in a retracted position and the thickness regulating knob in the “O” position;

Use and maintenance
5
•Only use the moving handle placed on the arm or the handle on the food press for
moving the food plate during slicing;
•The use of accessories for cutting is not allo ed unless supplied by the maker
specifically for the machine;
•For any exceptional maintenance (replacing grindstones, blade, etc.) please contact the
manufacturer or qualified and authorized personnel.
2.2 Guarantee and manufacturer’s responsibility
The guarantee of a good function and a complete conformity of the machines, that are to be
used accordingly, depends on the correct application of the instructions contained in this
manual.
The manufacturer declines all direct and indirect responsibility deriving from:
-Not follo ing the instructions in the manual;
-Untrained personnel using the machine;
-Using the machine so that it does not conform to specific regulations in force in the
country of installation;
-Unauthorized changes and/or repairs to the machine;
-The use of accessories and spare parts that are not original;
-Outstanding events.
If the machine is sold or given a ay, this automatically means that the manufacturer is no
longer responsible for the machine in question except for anything regarding the EEC
directive 85/374 (responsibility for any construction faults of the product).
2. The user’s obligations
The user must scrupulously observe the instructions in this manual for the manufacturer’s
guarantee to be valid and particularly:
- al ays respect the limits of the machine;
- al ays carry out a constant and diligent maintenance;
- make sure the persons using the machine are qualified and able.
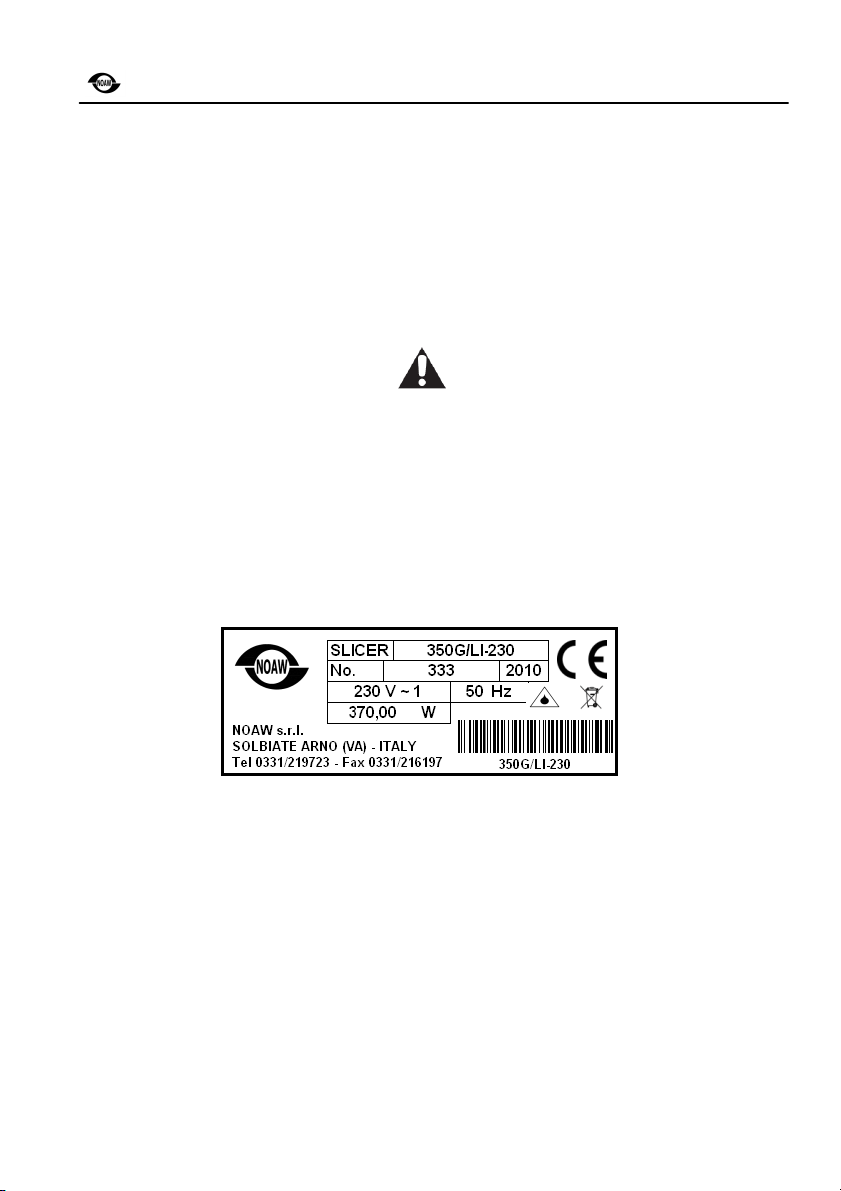
2.4 Markings - Plates
The follo ing plate is installed on the machine:
- manufacturer’s identification plate, machine plate, technical data plate and EC marking;
placed on the base, left- hand side.
Use and maintenance
6
. TECHNICAL CHARACTERISTICS
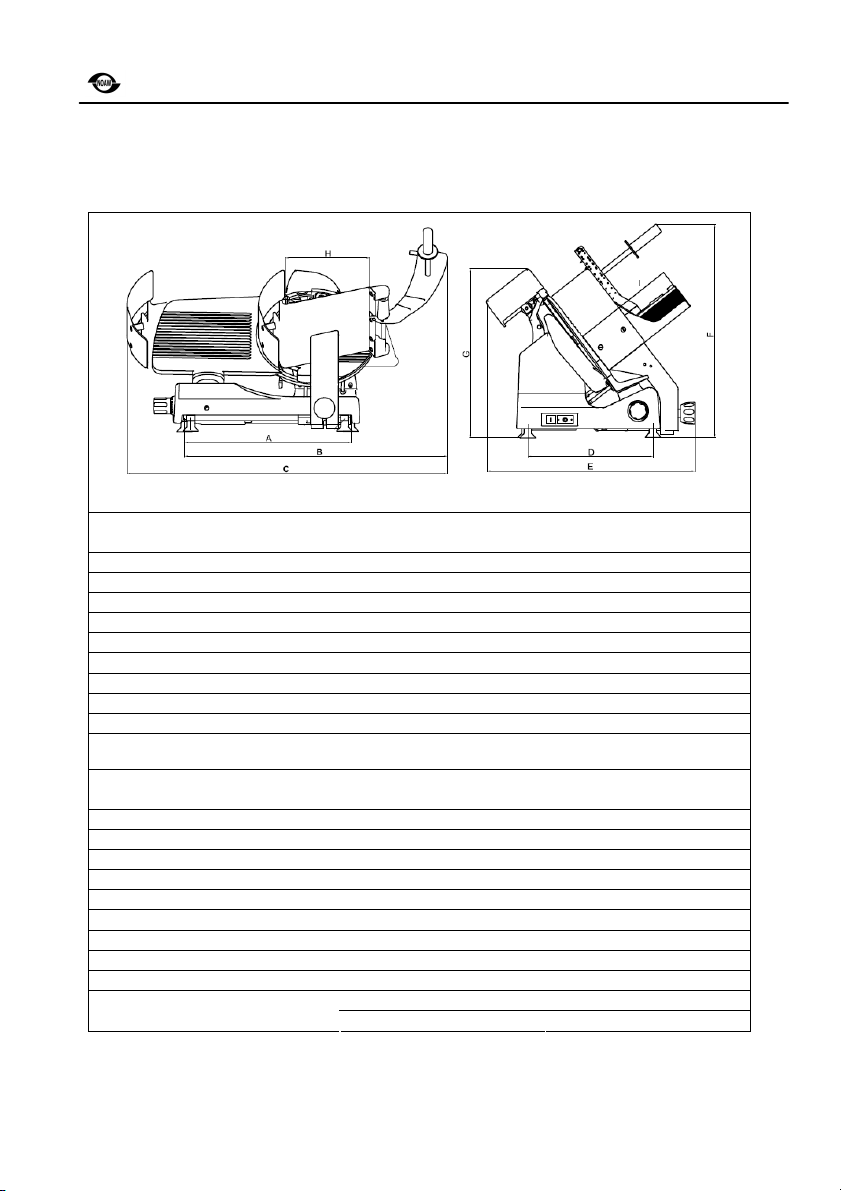
.1 Data sheets
DIMENSIONS
Blade diameters 50 70
A 540 mm 540 mm
B 830 mm 830 mm
C 955 mm 955 mm
D 395 mm 395 mm
E 660 mm 660 mm
F 525 mm 525 mm
G 670 mm 670 mm
H 300 mm 300 mm
I 350 mm 350 mm
TECHNICAL DATA
Blade diameters 50 70
Blade turns/1’ 210 rpm 210 rpm
Carriage movement 365 mm 365 mm
Cut’s capacity Ø 260 mm 270 mm
Cut’s capacity 290 X 220h. mm 290 X 230h. mm
Thickness adjuster 0 ÷ 22 mm 0 ÷ 22 mm
Blade diameters 350 mm 370 mm
Base dimensions 600 x 450 mm 600 x 450 mm
Net eight 45 Kg 47 Kg
Motor po er 0.37 kW 0.37 kW
230V 50Hz single phase 230V 50Hz single phase Electrical characteristics
400V 50 Hz three-phase 400V 50 three-phase
Use and maintenance
7
.2 Furnished items and accessories
The follo ing documents and accessories are supplied ith the machine, unless other ise
requested;
- instruction manual for use and maintenance;
- EC conformity declaration;
- accessories: lubricating oil for carriage guide bars and food press.
. Products that can be sliced
The following are produtcs that can be sliced:
- all types of cold cuts (cooked, ra smoked);
- boneless meat (cooked or ra at a temperature of no lo er than +3°C);
- bread and cheeses (those that can be sliced, such as Gruyere, Fontina, etc.).
.4 Products that cannot be sliced
The following are products that cannot be sliced because they could cause damage to
people and equipment:
- frozen food;
- deep-frozen food;
- food ith bones (meat and fish);
- vegetables;
- any other product not meant for consumption.
IDENTIFICATION PLATES OF THE MANUFACTURER, MACHINE, TECHNICAL DATA
AND EC MARKING.
Use and maintenance
8
4. DESCRIPTION
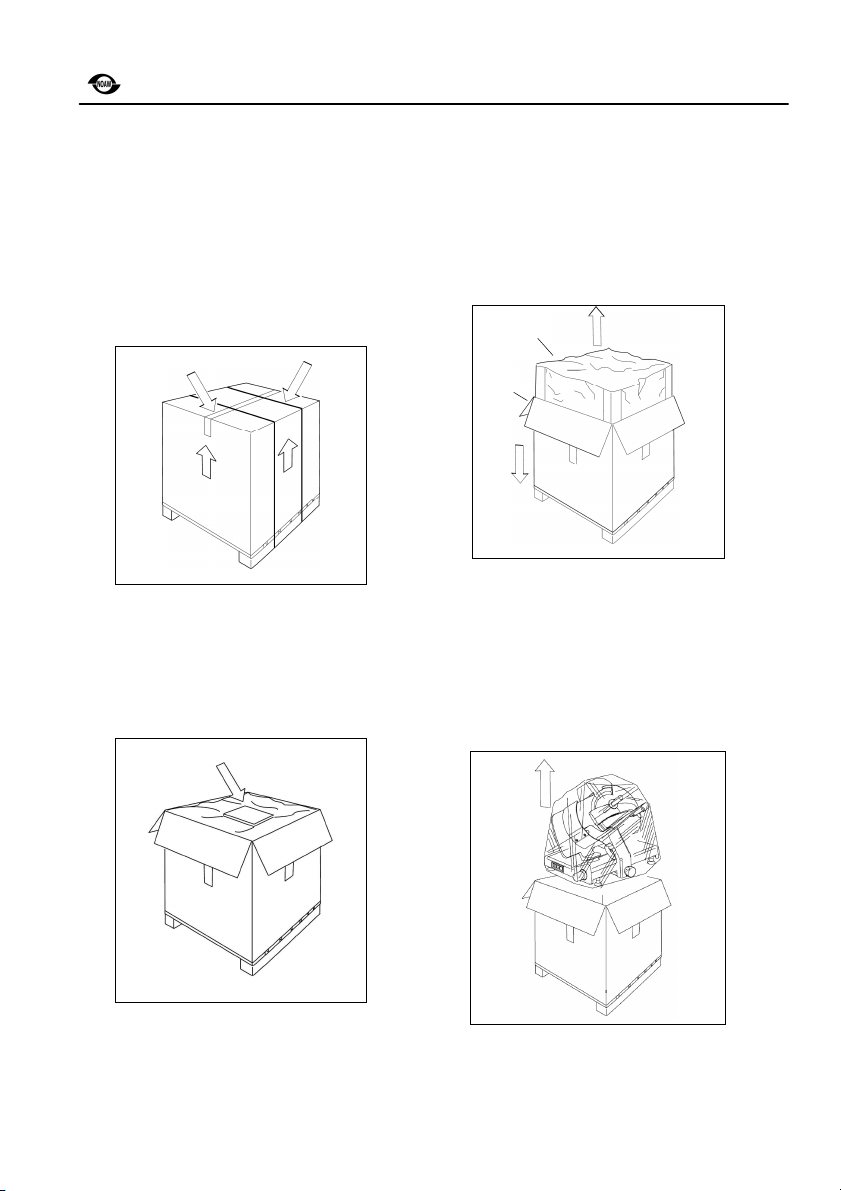
4.1 Unpacking
Check that the packaging is unopened and
undamaged; other ise immediately inform
the for arding agent or the area agent.
To take the machine out of the packaging
proceed as follo s:
1. Cut and remove the plastic straps;
2. Remove the staples from the top
of the box;
3. Open the box and take out the
copy of the instruction manual
hich is on top of the
polyurethane protection;
4. Continue as indicated in the
manual;
5. Push the upper cardboard box
do n (1) using the flaps so that
the next step is easier, that is,
removing the polyurethane
protection and the corner
reinforcements (2);
6. Remove the above mentioned
protection and the corner
reinforcements;
7. Lift and take out the machine
hich is rapped in a sheet of
transparent polyethylene;
ATTENTION: The machine must be lifted
by t o people, taking into account that it
eighs more on the side here the blade
is.
1
2

Use and maintenance
9
8. Once this operation is over, check the contents of the box and make sure it
corresponds to the label on the outside.
WARNING: The packaging components (plastic straps, cardboard, polyurethane foam) can
be thro n a ay ith normal solid astes and therefore there is no difficulty in disposing of
them.
Ho ever it is advisable to dispose of products separately (differential collecting) in conformity
ith theregulations in force for adequate recycling.
DO NOT DISCARD THE PACKAGING PRODUCTS IN THE ENVIRONMENT!
Use and maintenance
10
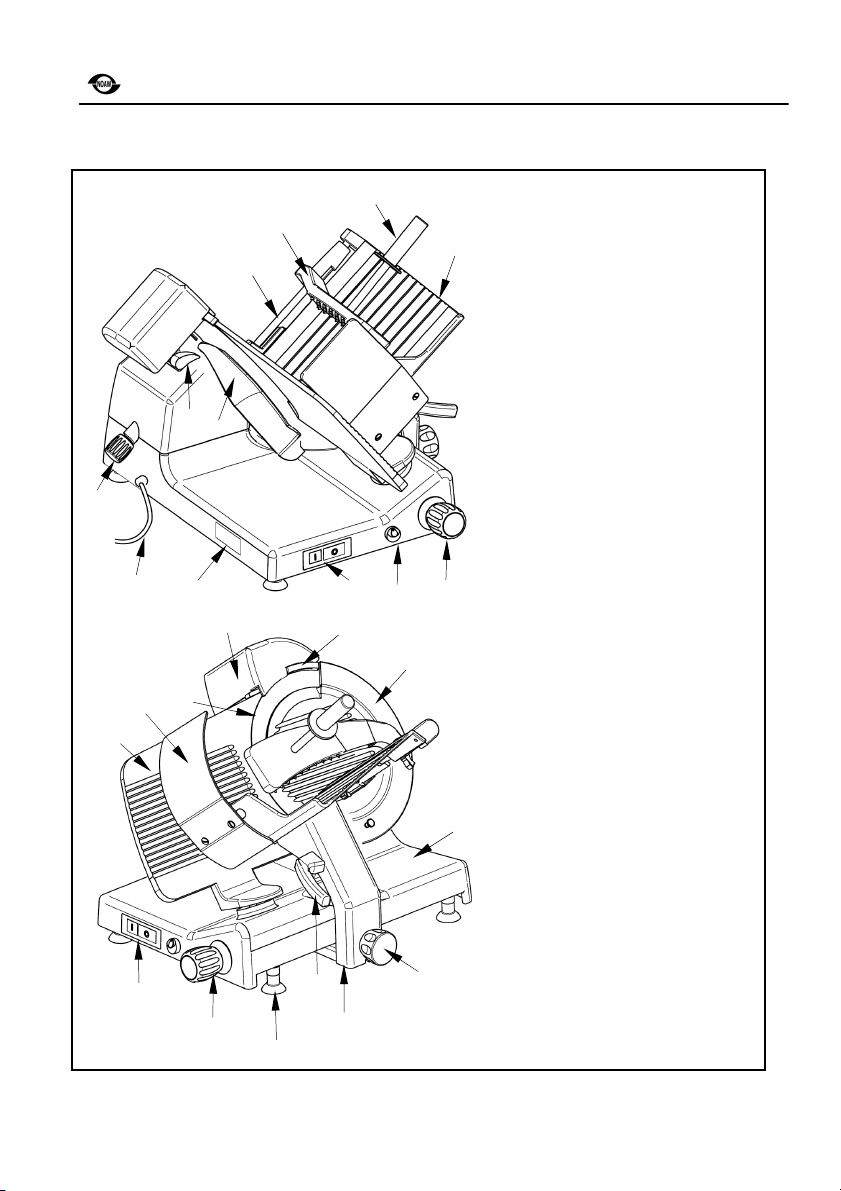
4.2 Main components
1. Feed cable
2. Identification plate, technical
data and EC marking
3. ON/OFF push button
4. Regulating knob for slice
thickness
5. Food table
6. Food press handle
7. Food press
8. Rod
9. Sharpener knob
10. Slice deflector
11. Foot
12. Knob for table pushing
13. Table support
14. Table locking handle
15. Base
16. Blade cover
17. Balde guard ring
18. Sharpener cover
19. Blade
20. Safety guard
21. Gauge plate
22. Tie rod
23. Lubricating point
1
2
3
4
5
6
7
8
9
3
4
10
11
12
14
15
16
17
18
19
20
2
1
13
23
22

Use and maintenance
11
4. General description
The slicing machine has been designed and made according to the EEC Directive 2006/42.
The machine offers the user:
-maximum safety hen in use, during cleaning and ordinary maintenance;
-maximum hygiene from the use of inoxidizable materials or adequately protected
against oxidization together ith an careful design of all the parts in food zone;
-maximum cutting precision and capacity together ith strength and reliability;
-the chance to ork continuously.
The machine is essentially made up of a base that holds a circular blade that is inclined,
operated by an electric motor, hich slices the food and a sliding carriage on bars, placed
under the above mentioned base, hich in turn supports the food plate, parallel to the cutting
edge of the blade.
The food table is made up of a plate and a sliding upper table, also has an appropriate self-
stopping device to keep the product in its proper place during cutting operations (food
press).
The thickness of the slice is regulated by a thickness plate behind the blade; this plate, on
hich the food is placed, can be moved transversally to the blade at the thickness of the
desired slice.
All the components of the machine are made of a light aluminium alloy and magnesium
Peraluman 3, polished and anodized, in stainless steel and plastic for food products as
according to the sanitary regulations in force so the structure is sturdy, reliable, easy to clean
and does not alter in time.
The cutting blade is operated by a self-ventilated motor, under the base; the motor
transmission is obtained ith gears, guaranteeing a quiet running. The transmission gear is
the top in terms of reliability, strong efforts, and it is able to cut the product even harder.
Starting and stopping is carried out by using the t o buttons at the front of the machine
hich are easily identifiable by their position; there is a light hich indicates the machine is
running. This command system prevents accidental starting of the machine after a possible
electric circuit interruption; this means the slicing machine can only be re-started intentionally.
The machine has a sharpener hich is extremely easy and safe to use.
The food plate, slice deflector and blade cover can be removed for cleaning.
4. .1 Safety
The mechanical safety devices are the follo ing:
•Irremovable safety ring around the blade (blade protection);
•Food plate hich can only be removed if the regulating knob of the thickness plate is in
the ‘zero’ position and the carriage is at the end of its position on the operator’s side.
Once the arm complete ith food plate has been removed the thickness plate is locked
in the above mentioned position;
•A set of aluminium and transparent protections on the food plate.
The electric safety devices are the follo ing:
•Start-up ith start and stop buttons ith a lo tension control circuit that also requires a
voluntary re-start of the machine in the case of an electric circuit interruption.
4. .2 Residual risks
WARNING: The safety ring around the blade is made according to the European regulation
(EN 1974:1998+A1) but this protection doesn’t completely eliminate risks in sharpening area.
When cleaning and sharpening the blade, be very careful and always concentrate on the
job at hand. We recommend the use of protective gloves.

Use and maintenance
12
5. INSTALLATION
5.1. Installing the machine
Install the machine on a surface hich is level,
smooth, dry and suitable for the eight of the
machine plus the food to be sliced; refer to
paragraph3.1.
WARNING: Check that there is nothing that
can get in the ay of the plate and the food
that is to be cut on the plate.
5.2. Command description
5.2.1 Start and stop buttons
- Press the button I (1) to start the blade;
- Press the button 0 (2) to stop the blade
moving.
5.2.2 Regulating knob for slice thickness
The thickness of the slice is regulated by
turning the graduated scale knob (3)
counterclock ise.
Regulating field: see paragraph 3.1.
5. Electrical connection
The machine must be installed close to an EEC
regulation socket in a system hich conforms
to the regulations in force ith:
- magnetothermal protection;
- automatic differential s itch;
- grounding system.
Before connecting, verify that the electric
supply mains is suitable for the machine by
checking the technical data plate on the
machine.
Max height
0.9 mt.
1
2
3
Use and maintenance
13
The slicer is fitted ith a po er supply cord of
about 2 metres length, complete ith a plug to
allo a simple disconnection from the electric
mains supply.
ALWAYS indicate the presence of the po er
supply cord if the slicer cannot be installed
near a socket and if in the installation zone
there is a transit of people.
If the po er supply cord is not long enough
you ill require the technical assistance service
and do not proceed ith a temporary electrical
connection.
5.4 Checking direction of blade rotation
(only for machine with three phase motors)
1. Start the machine;
2. Check the orking light is on;
3. Check the blade rotates in the direction
indicated by the arro (counterclock ise
looking at the machine from the side of the
blade cover);
4. If the blade goes round in the opposite
direction (clock ise) stop the machine
immediately and call a qualified person to
invert the feed wires of the plug.
5. Check the food plate and food press move
smoothly.
6. Check the orking and regulation of the
thickness plate.
6. USING THE SLICING MACHINE
6.1 Loading the goods on the plate and
cutting
1. Check that the regulating knob for slice
thickness is on ‘0’;
2. Pull back the carriage completely (to ards
the operator) to the loading position.
Use and maintenance
14
3. Lift up the food press and put it in the rest
position;
4. Place the food to be sliced on the plate
against the operator’s side. The food ill press
against the thickness plate because of its
eight.
Block it ith the food press by pressing do n
slightly;
5. Regulate the thickness of the slice.
Start the blade by pressing the start button I.
Grip the handle attached to the plate holder
arm and begin an alternate cutting movement;
6. When the eight or size of the goods do not
allo a proper cutting for reasons of eight,
use the food press hand-grip;
7. At the end of the cutting operations turn the
thickness regulating knob back to ‘0’ and pull
back the carriage.
Stop the blade movement by pushing the stop
button 0.
Use and maintenance
15
6.2 Cleaning the slicing machine
6.2.1 General information
The machines must be properly cleaned at
least once a day; if necessary even more.
If the machines have not been used for a hile
they must be cleaned before use as ell.
6.2.2 Disassembling machine for cleaning
1. Disconnect the plug from the electric mains
supply;
2. Turn the regulating knob of the thickness
plate to ‘0’;
3. Remove the various components as
described in the follo ing paragraphs.
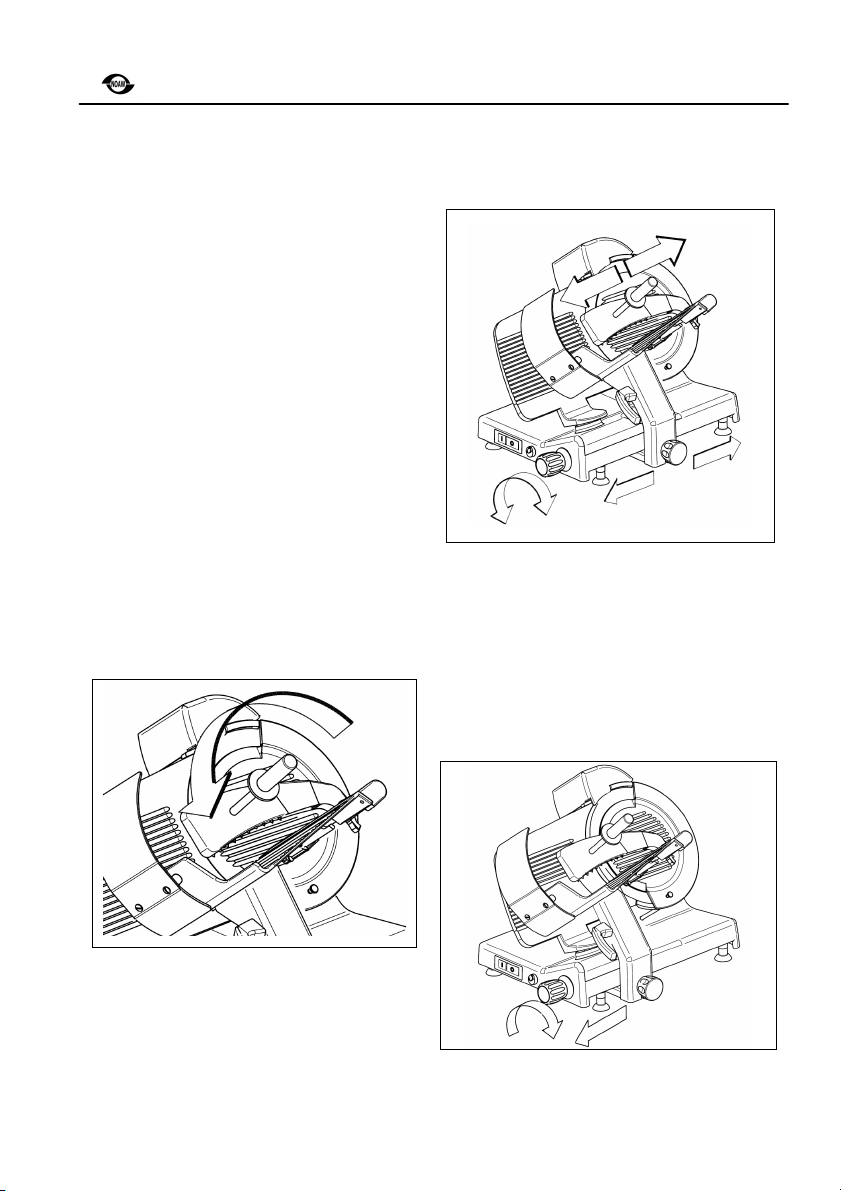
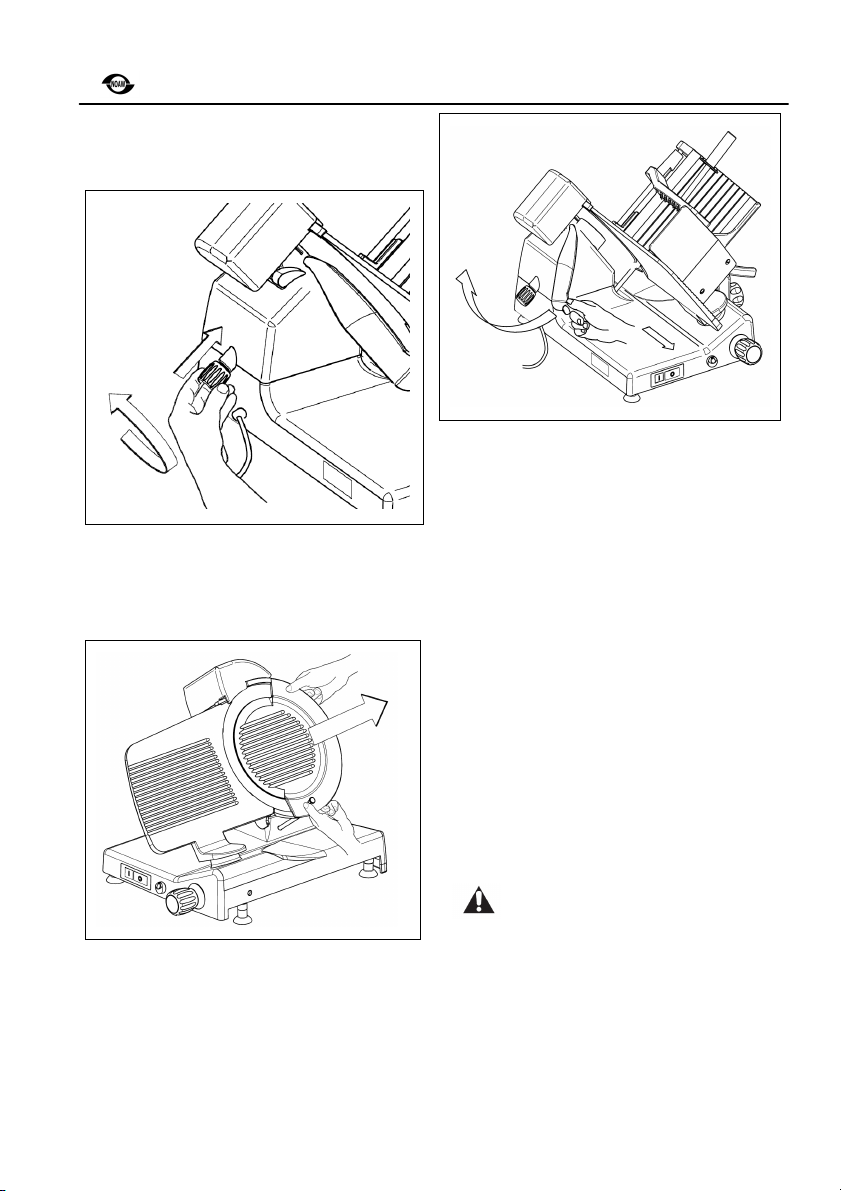
Disassembling the food table
1. With the regulating knob of the thickness
plate on ‘0’ pull back the plate holder support
all the ay to ards the operator;
2. Turn the locking knob counterclock ise all
the ay hile keeping the support at the end
until the safety device of the thickness plate
can be heard.
WARNING: To correctly carry out this
operation it could be necessary to move the
thickness regulating knob at the same time
taking it 1-2 mm over the ‘0’ position.
3. Take out the hole group by pulling it
up ards.
Use and maintenance
16
Disassembling the blade cover
1. Completely unscre (counterclock ise) the
tension rod knob of the blade cover block;
2. If the blade cover is tight, loosen it ith
pressure on the tension rod knob.
Take out the tension rod and remove the blade
cover using the special knob.
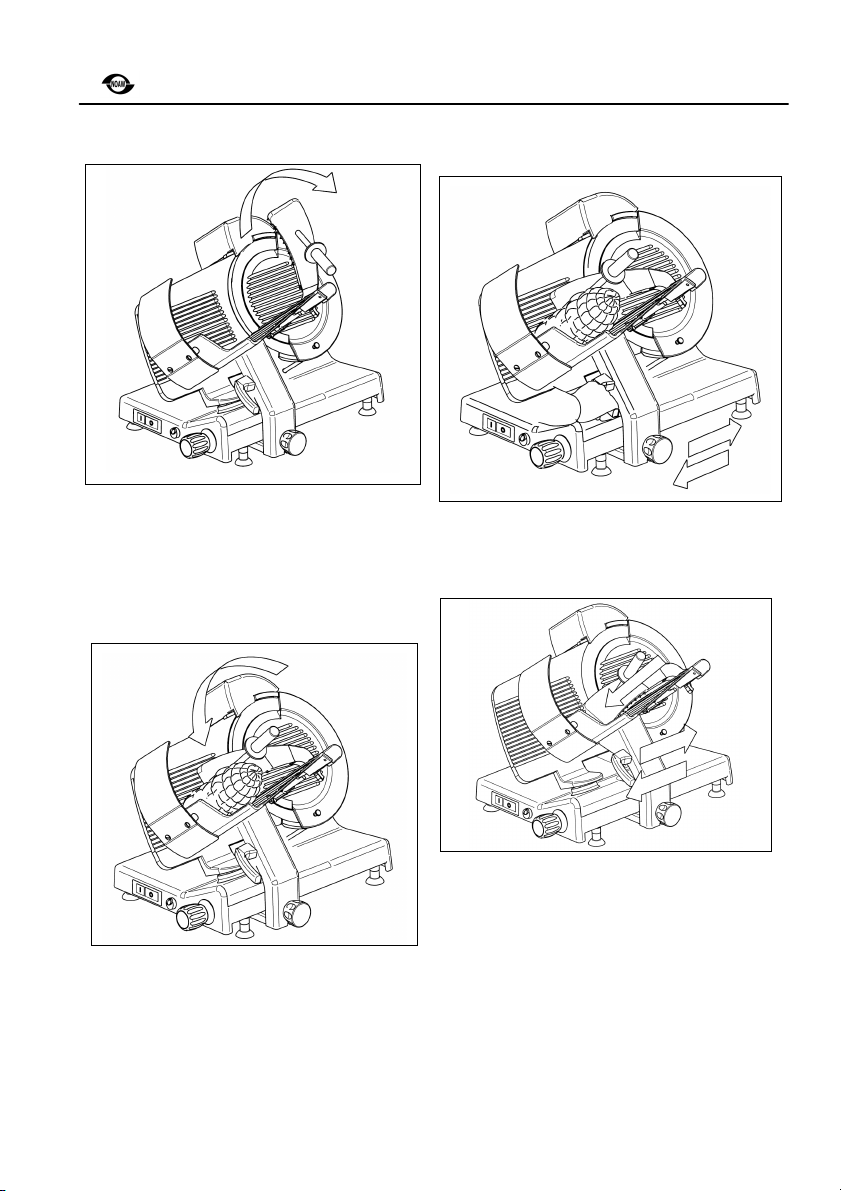
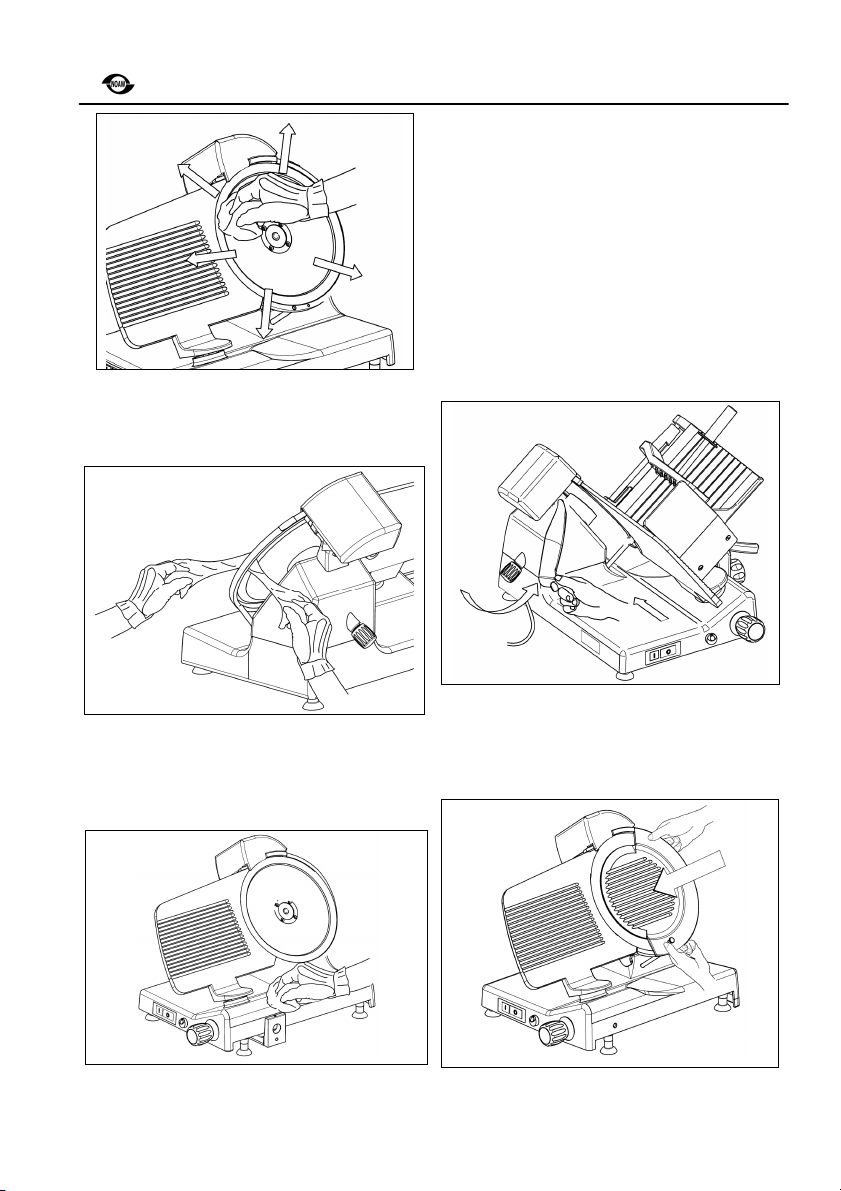
Disassembling the slice deflector
1. Rotate and lift the slice deflector as in the
figure, it’s not necessary to remove it, but it is
possible to extract it pulling the slice deflector
to yourself;
6.2. Cleaning the machine and the parts
that have been removed
PRODUCT TO BE USED
Only use hot ater and a biodegradable
detergent for dishes ith a 7-8 PH, at a
temperature of no lo er than 30°C using a soft,
spongy cloth and a semi-rigid nylon brush for
the plate and the sharp food press.
WARNING: For cleaning the sharp areas of the
plates, the food press and the blade, e
recommend using protective gloves.
Rinse ell ith a lot of hot clean ater and dry
ith a soft cloth or a spongy material.
Do not clean the slicer ith ater or stream jets
or similar methods.
Cleaning the blade
WARNING: Use protective gloves
and concentrate on the job at
hand.
DANGER!
1. Press a damp cloth on the surface of the
blade and move it slo ly from the centre to the
edge, as sho n in the picture, on the side of
the blade cover and on the other side;
2. Dry in the same ay using a dry cloth.
Use and maintenance
17
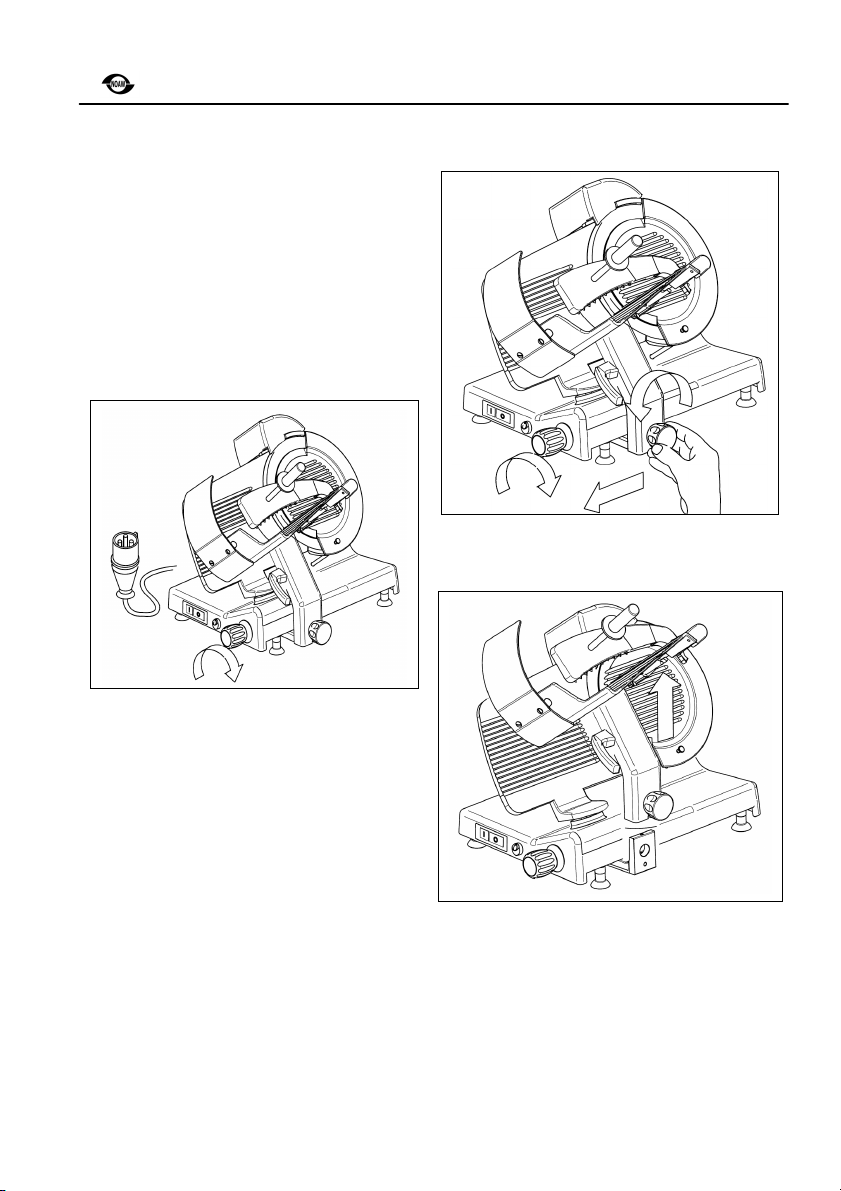
Cleaning the safety ring
1. Pass a damp cloth bet een the blade and
the safety ring as sho n in the picture;
Cleaning the machine body
Clean the machine body ith a damp cloth or a
sponge rinsing frequently ith hot ater.
Dry carefully.
Cleaning the components in the base
The components contained in the base do not
need any special cleaning; occasionally
remove the dust that can accumulate in the
end area of the carriage and of the thickness
plate regulation.
6.2.4 Reassembling the slicing machine
Reassembling the slice de
1. Insert the pin of the slice deflector in the
centre and rotate carefully bringing the slice
deflector in the original position, as sho n in
the figure.
Reassembling the blade cover
1. Replace the blade cover as sho n in the
picture making sure the square section joint is
in its proper place;

Use and maintenance
18
2. Insert the tie rod for locking and scre
completely.
Reassembling the food table
1. Insert the entire group on the carriage as
sho n in the picture;;
2. Tighten the locking knob;
3. Check that the carriage moves freely;
4. Check that the slice thickness regulator
orks correctly.
Use and maintenance
19
7. MAINTENANCE AND REPAIRS
7.1 General information
The operator is allo ed to carry out the follo ing maintenance:
- Blade sharpening, periodically;
The interval and length of the sharpening obviously depend on the use of the machine ( ork
times and type of product used)
- Lubrication of the carriage guide bars, eekly;
- Lubrication of guide rod/s of the plate and the food press, eekly;
- Check the conditions of the electric cable and the cable gland on the base of the machine,
periodically.
Maintenance to be carried out exclusively by personnel authorized by the manufacturer is as
follo s:
- Replacing the blade;
- Replacing the sharpener grindstones;
- Replacing the components of the electric system under the base;
- Repairing the structural parts, repairing and/or replacing components under the base.
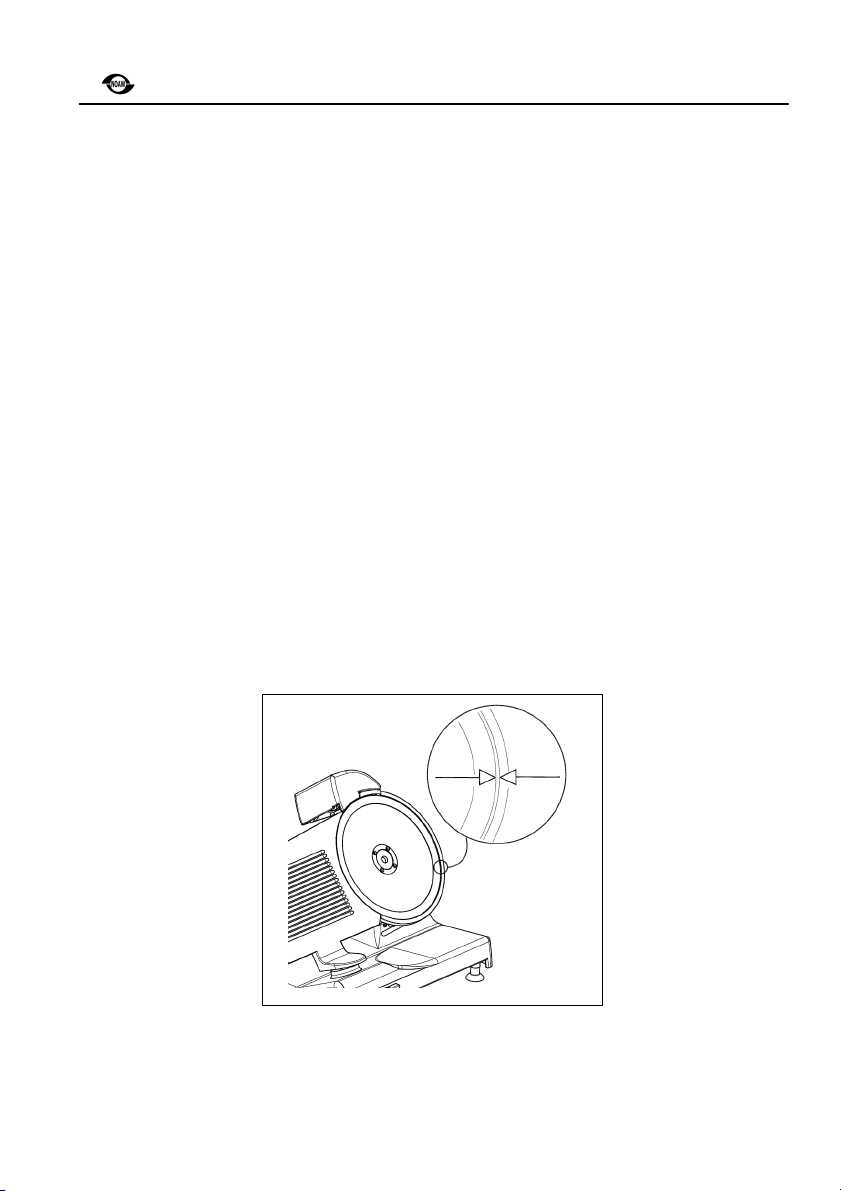
7.2 Sharpening the blade
NOTE: The sharpening operation is to be carried out only hen the machine has been carefully
cleaned as described in the previous paragraphs..
WARNING: The blade can be sharpened up until the distance between the cutting edge of
the blade and the inside border of the protection is no more than 6 mm., corresponding to a
decrease of about 10 mm. of the size of the original diameter. Once this value has been
reached, it is NECESSARY TO REPLACE THE BLADE and this operation must be carried
out EXCLUSIVELY by personnel authorized to by the manufacturer.
6mm
This manual suits for next models
1
Table of contents
Other Noaw Kitchen Appliance manuals

Noaw
Noaw NS300M Troubleshooting guide

Noaw
Noaw 330/83 Troubleshooting guide

Noaw
Noaw 30E Specification sheet

Noaw
Noaw NS220 Specification sheet

Noaw
Noaw NS220 User manual

Noaw
Noaw 300/10H Troubleshooting guide

Noaw
Noaw TWS Service manual

Noaw
Noaw A300 Specification sheet

Noaw
Noaw NS350HDA Specification sheet

Noaw
Noaw A370G/L Specification sheet


